If, for example, you plug it in and there is silence in response, neither the light indicators work nor there is any heat. It feels like I'm dead.
What are the causes of failure of oil heaters?
Can I fix it myself?
At one time, I had the opportunity to work in a workshop for the production of oil radiators, namely, testing finished radiators to determine their performance.
You can repair the radiator yourself if you do not need to replace the thermostat itself. In order to repair a radiator, you must first determine the cause of the failure. And for this you need at least minimal knowledge in electrical engineering and the presence of an ohmmeter and a screwdriver.
First of all, you need to make sure that the socket and plug of the heater are working properly using an ohmmeter or indicator. If everything is in order in this part, you need to check the control unit by removing the panel covering it. Using an ohmmeter, we check that there is no short circuit between the current-carrying parts of the radiator. The control unit may have loose or burnt contacts. In this case, we tighten the loose contacts using a screwdriver, clean and secure the burnt contacts, not forgetting to first insulate them. Once again we check that there is no short circuit and close the panel. Only after this we try to connect the electric radiator to the network.
Unfortunately, you did not indicate what brand of oil cooler. But in any case, if the cause of the breakdown is the failure of the thermostat, it is more difficult to repair it yourself.
It is also difficult to repair a Chinese-made oil radiator. It is better to dispose of this one than to repair it. If the thermal relay has failed (very fragile and unreliable), then it must be replaced if you find a suitable one on sale.
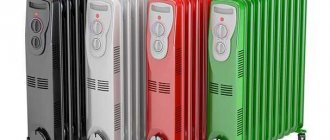
Oil heaters are considered the most reliable, durable and long-lasting devices, but they may also require repairs.
When it comes to additional heating of a room, oil heaters are considered the most reliable, durable and durable devices for this. However, they can also fail over time. Then the question arises: is it worth repairing oil heaters yourself, or is it better to turn to professionals for help? There is another option - simply get rid of the faulty unit. Let's find out how realistic it is to repair the device, and whether it is worth spending energy, time and material resources on it.
How to repair an oil heater
- Why doesn't the heater work?
- Internal structure of the structure
- Heater repair from A to Z
- Restoring the integrity of the hull
Why doesn't the heater work?
If you compare a non-working heater with a sick person, then first of all it is important to make the correct diagnosis. Only after finding out the cause of the breakdown, you will understand how to repair the device, restoring its functionality.
The most common causes of breakdowns can be divided into several categories:
- After turning on the device makes a cracking noise. This sound does not mean that the appliance is faulty. Most likely, the oil inside the device is gradually warming up. In addition, the cracking noise may be caused by a recent fall of the heating device. To solve this problem, you need to place the heater on a horizontal surface without a slope;
- the heater does not turn on. First of all, pay attention to the outlet and, if it is working, focus on the wiring of the heater itself. Most likely, the contact has come loose somewhere: either inside the cord or in the plug;
- The heater turns on, but does not heat. That is, visually, the radiator seems to be working properly - its lights are on and the noise of the fan is heard - but it does not produce heat. This indicates that the thermal relay has broken. A home craftsman can easily handle such repairs on his own;
- The heater does not heat up. Another probable cause of the malfunction may be failure of the heating element (heater).
Internal structure of the structure
Once you've gained some insight into the likely causes of oil-filled heater failure, it's time to take a closer look at its design.
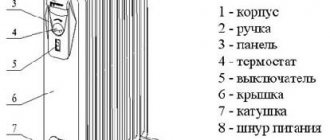
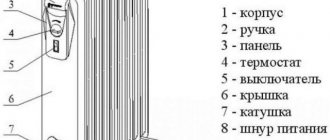
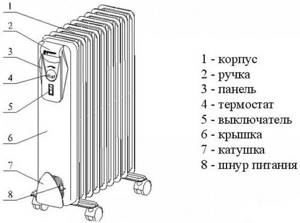
A standard modern oil cooler consists of the following elements:
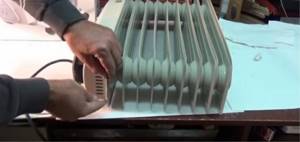
- sealed housing. It is made in the form of an accordion, which consists of two panels welded to each other. Mineral (technical) oil is pumped inside. In almost every heater model, there is some air inside the oil tank - this is a necessary condition, since when heated, the oil expands, increasing in volume. Note that this circumstance cannot harm the device by causing corrosion;
- heating element. This device is responsible for heating the oil, and therefore the device itself;
- safety and control unit. Its main element is a thermostat equipped with a fuse. The first is responsible for setting and maintaining the set temperature, and the second ensures the safe operation of the heating device. If suddenly, for some reason, oil begins to ooze from the housing, the fuse will fulfill its “mission” by stopping the supply of current to the heating element.
How the device works
If the heater is broken, before you start repairing it, you should become more familiar with its structure and operating principle.
The main parts of an oil heater are as follows:
- Metal body.
- Heating element – heating element.
- Control block.
- Connecting wires.
The device works according to this principle:
- The housing is filled with special oil.
- When the radiator is turned on, the temperature of the heating element begins to rise.
- Accordingly, the oil also heats up.
- Gradually, heat is transferred to the walls of the housing, and from them the room is heated.
- When the temperature in the room reaches the optimal value, the control unit is activated and the heating element is turned off.
- The process is repeated throughout the entire period of connecting the heater to the power supply. Thanks to this, a comfortable environment is created in the room.
What kind of oil is poured into the oil heater, the efficiency of the oil heater
Many people are interested in what kind of oil is poured into a floor-mounted oil heater. Transformer oil is poured into the sections. It is heated by a heating element and circulates. The oil temperature can reach one hundred degrees Celsius.
The heat output of the heater is very high. To increase efficiency, fans are installed on radiators, and special water evaporators are installed to prevent the air in the room from drying out.
The efficiency factor (COP) of the oil heater is 80%. With proper operation, the service life of a floor oil heater is more than twenty years.
The oil heater contains transformer oil
Reasons for heater failure
An oil heater stops working for various reasons, but all damage can be electrical or mechanical.
In the first case, electrical equipment fails, this can be a heating element and elements of the control unit, including thermal fuses, a thermal relay and a switch. In rare cases, malfunction occurs due to faulty electrical wiring.
Mechanical damage involves deformation of the housing, including the formation of cavities through which oil leakage may occur. This problem is the result of metal corrosion. It is very easy to determine such a malfunction; in this case, an oil stain forms under the heating device.
Preparing for heater repair
Before repairing the oil radiator, certain conditions must be created. This step will be the key to quality repairs. First of all, it is necessary to prepare the place where the equipment will be dismantled. The main condition for this is space and good lighting. Heater repairs can easily be carried out in a garage or a separate room.
Next, you need to prepare a set of tools for work and various devices. You will need the most ordinary tools, since the heater has a fairly simple structure. When performing repair work, you should have screwdrivers, pliers, wire cutters, a hammer and an awl on hand. In addition, you may need a soldering iron, a tester, lubricant and a clean rag. If the cause of the radiator failure is already known, then it is better to purchase a spare part in advance.
Recommendations
Speaking about recommendations for repairing heaters of this type, we should give some useful advice from professionals.
- Under no circumstances should you pour new oil into old oil if a leak in the heater has previously been detected. A number of users often neglect this point, which is why the heater not only fails, but can also cause injury to the people who operate it.
- You should also not carry out repairs while the device is plugged into an outlet. Doing so may result in electric shock or burns due to the device becoming too hot.
- Do not use low-quality components when replacing any parts. It’s better not to save money and buy a part from a well-known brand that will actually last a long time.
- Do not neglect the services of a specialist if you are not sure that you can repair such a device yourself.
To learn how to troubleshoot an oil heater, see the following video.
Repair process
Every owner, when an additional heating device fails, asks the question of how to get the broken equipment back to work. The solution to the issue is quite simple and consists of several points:
- Regardless of the type of work performed, before disassembling the oil cooler, you must disconnect it from the power supply.
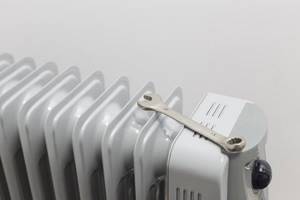
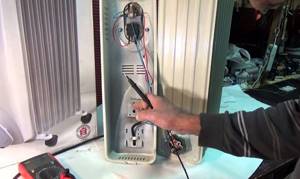
- Then you need to disassemble the device and examine the oil radiator circuit to understand why it does not work. For this purpose, the control panel is disconnected from the main body. In this case, latches, screws and staples may be used as fasteners, so it is important to conduct a thorough visual inspection. After determining the type of fastening, remove the control panel. At the same time, it is very important not to make special efforts so as not to break the plastic elements.
- Restoring the operation of an oil heater begins with checking the power cord and switch. Sometimes an oil heater does not work due to broken power cord wires. You can check the reliability of this using a tester. As for the switch, the reason here is a broken contact, which is the result of burning of the wires at the connection points. To solve the problem, the wires are disconnected and stripped, and the connection point is also cleaned. Next, the switch is assembled and the restored contact is checked using a tester.
- At the next stage, all contact connections of the control unit are inspected. At each contact, oxidized or burnt areas are identified, as well as places of weakened fastening. Repairs are carried out using screwdrivers and sandpaper. In some cases, they use a soldering iron to solder the torn wires.
- If the thermal relay or temperature controller turns out to be faulty, you need to carefully remove these elements and disassemble them. The bimetallic plate located inside is pulled out and replaced with a new element. There cannot be any other faults in these parts. A new plate restores the functionality of the relay or thermostat.
- Thermal fuses are checked for operability using a tester; in case of malfunction, they are replaced with new elements. Each of the existing thermostats should be checked.
- If the oil heater does not heat up, the cause may be a faulty heating element. A tester is also used to check the condition of heating elements. It is used to measure resistance, the normal value of which should be equal to 1 KOM. A deviation from this value indicates a malfunction of the heating element and the time for its replacement.
Device structure
The components of an oil heater are:
- A sealed accordion-shaped housing consisting of two panels welded to each other. Technical oil is pumped inside, and in almost all models air remains in small quantities. But this does not harm the device, because oil in contact with air does not create conditions for corrosion. If there was water instead, the probability of rupture of metal structures would be very high.
- A heating element is inserted into the device in the lower part on the side. It is with its help that the oil and the radiator itself are heated.
- A control and safety unit is installed next to the heating element. Its main and important element is a thermostat with a fuse. The first is responsible for setting the required temperature conditions, and the second is for operational safety. If for any reason oil begins to leak out of the housing, the fuse will trip and stop the supply of electricity to the heating element.
Today, manufacturers use disposable wire-type fuses or reusable bimetallic fuses in the form of tablets. As for the control relays, in oil heaters they are similar to an electric kettle, and not to irons. In the design, the relay hangs in the air without contacting the device body.
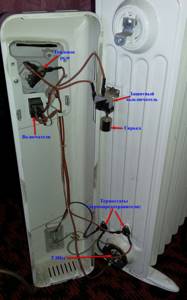
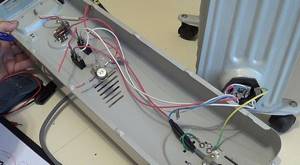
- Each device has two switches. Each has three wires - phase, neutral from the heating element and a wire from the thermal relay. Three wires are needed for the switch illumination to work.
The electrical circuit of an oil heater is almost the same as in irons, electric kettles and other heating devices. It is simple and yet reliable. Typically, all these heaters have two heating elements installed, and when both are turned on at once, electricity consumption increases greatly. But at the same time, the time to reach the operating temperature increases. If the temperature in the rooms is low, then even with two heating elements turned on, the device can operate without turning off.
The metal case, which covers the power and safety unit of the device, has ventilation slots at the top and bottom. If you close them, the device will not suffer from this, but it will work with difficulty. It will turn off faster, but turn on less quickly. Therefore, it is recommended not to hang things on the radiator to dry. If this happens, try not to close the ventilation gaps.
Major failures of oil radiators
Any repair begins with diagnostics. It is important to correctly determine the cause of failure and calculate the faulty part.
- Do not be alarmed if the heat source begins to make a cracking noise immediately after being turned on. As a rule, this happens when the mineral oil inside is heated. Crackling is considered normal and does not affect the operation of the electrical appliance. Sometimes moving the radiator to a perfectly level place helps reduce noise.
- If the heater stops turning on, the first thing you should do is rule out a breakdown in the outlet and plug the device into another power source. The most common failure in this case is a loose contact, in second place is a malfunction of the plug, and in third place is damage and breaks in the cord.
- If the heater shows signs of operation (indicators light up, fans turn on), but does not heat up, the cause should be sought in the thermostat. This spare part is easy to buy and replace with your own hands.
- A cold case may also indicate that the heating element is out of working order - this is a rather serious reason and it is not recommended to fix it yourself.
- If the device does not turn off after heating to the set temperature, this may indicate a malfunction of the thermostat - such work becomes not only uncomfortable and dangerous, but also uneconomical in terms of energy consumption.
Oil heater does not work. Causes and troubleshooting
In some cases, you can repair the oil cooler yourself. Let's consider the main breakdowns of such devices and the algorithm for subsequent actions.
Important! When repairing an oil heater, observe all safety precautions and follow the operating rules of the device and the manufacturer's instructions. Violation of any of the points may result in injury.
Extraneous noise
Often, after a heater has been dropped or left tilted for a long time, it begins to make crackling or hissing noises during operation. This is one of the cases when there is no need to disassemble the device. Due to improper positioning or impact, air and oil have moved inside the device.
Troubleshooting - It is necessary to place the device in an upright position for several days. After this, the problem should resolve itself.
Electrics
If the device does not respond to being plugged in, does not heat up, and the indicator light does not even light up, then first try connecting the power cord to a different outlet. The cause may be a faulty socket. If it is the radiator that is broken, then using a multimeter you should check the serviceability of the electrical part of the device.
Important! If you smell a burning smell while the heater is operating, immediately unplug the device from the outlet. You should start looking for the causes of malfunctions only after the device has completely cooled down.
Troubleshooting:
- Check sockets and plugs. Check to see if there is a short circuit between the heater elements, because often the cause of such a problem is burnout at the wire connections.
- The de-energized radiator needs to be checked to ensure that all switch keys are working. This can be done using a multimeter or tester. In the on position there will be a short circuit at the ends, and in the off position there will be nothing.
- You also need to check the thermostat using a multimeter. There should be no short circuit and low resistance.
Other breakdowns associated with this problem can only be detected by disassembling the case:
- Inspect all contacts in the control unit - they may oxidize, burn out or become loose. In this case, repairing the oil heater comes down to treating the contacts with alcohol. Loose contacts should be tightened using a screwdriver, oxidized contacts should be rubbed with sandpaper and insulated.
Important! The most heat-resistant insulation is fiberglass tape, which can withstand temperatures up to 200 degrees.
- Finally, check again for short circuits. Perhaps this is where the repairs will end. If after the described actions the device does not work, then you should look for a breakdown in another place.
DIY troubleshooting
The oil radiator is a non-separable structure, so you must not break the sealed housing of the device when trying to replace a faulty heating element. Self-repair of an oil heater is only possible at the level of the cord, plug and control unit. To the delight of home craftsmen, the most frequent breakdowns occur in these places. In order not to get confused in spare parts, it is recommended to group all fasteners and parts and take step-by-step photos while working - this will make it easier to assemble the device in reverse order.
The heater does not turn on: procedure
First of all, the cord is inspected and carefully palpated, trying to detect any kinks. If the cord has been in a bent state for a long time, most likely a defect has formed in this area. The plug, if its design allows, is disassembled and the integrity of the contacts is checked. Most often, the problem is hidden at the point where the pins of the plug meet the ends of the current-carrying wires of the cord.
If there are no visible signs of failure on the cord and plug, you should use a special device - an ohmmeter and “ring” the cable. It is also necessary to inspect the connection of the electrical wire with the power supply terminals and check the condition of the unit by first removing the decorative cover of the front panel. Detected carbon deposits are removed by thoroughly cleaning the elements. Loose fasteners are carefully tightened, restoring contacts. If you have a new power cord with a socket in stock, you may notice an aged cable with it.
Basic problems and troubleshooting
Now we will try to understand the main problems with an oil heater, and also consider various situations when and how to repair an oil heater with your own hands. The most common problem that often prevents such a heater from working is an oil leak. If it has been identified, you must first determine the location of the suspected leak, then restore the integrity of the device body. To do this, you should brew it by soldering. Moreover, you cannot use tin, but only silver. Before you start soldering, you need to drain the oil, and only then do it using a torch. Then you need to check how hermetically sealed the place is. You should fill the device with water. If the liquid does not flow out in the area of interest to us, then everything should be drained and the heater dried by heating it.
The design of a simple oil heater
It is good to cover an oil heater with clothes to dry. The only type of device where the owner will avoid fatal consequences. The only thing is that on the side of the accordion container there is an extension equipped with electronic filling; avoid covering the compartment. The oil heater device includes the following elements:
Emergency shutdown sensor (thermal fuse, relay)
- A container filled with oil. Appearance - like an accordion, heating up to a decent temperature; wait a moment to touch it with your hand. When it comes to drying items, don't be afraid to place heat-resistant items. The container is sealed, but there is 15% air inside. Try placing the oil heater upside down, tilt it on its side, and return the load to the wheels. Hearing dull blows frighten mice: air bubbles burst inside. Water is not used by the heater, it will quickly evaporate, corrosion of the housing will become significant, the manufacturing technology would require the complete exclusion of air from the working fluid (water + oxygen = the most powerful oxidizer of living nature). The coefficient of thermal expansion of the most common liquid on the planet is ten times higher than that of steel. It's not good if the tank ruptures.
- The lower part of the end of the accordion contains a heating element, to which the electronics compartment clings. The oil heater does not have a pump and works by natural oil recirculation. The current starts from the heating element upward, then at the opposite end of the battery the liquid descends. While working, it emits audible spiral vibrations under the influence of alternating voltage. The effect is irreversible and is caused by the influence of the Earth's magnetic field. The boiling point is above 100 ºС (150-200), avoid touching the container, the liquid is not brought to a change in phase state due to the prohibition of using water: the container will burst. A double heating element (two spirals) will allow you to more flexibly regulate heating.
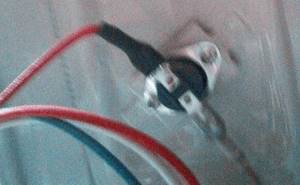
- There is a thermal fuse located not far from the heating element. The device will prevent a fire from happening if the oil suddenly leaks out and the temperature relay breaks. An oil heater would work hard when the copper heating element began to melt. The oil will leak out - the high temperature through the housing will cause the stuck thermal fuse to trip. The structure is divided into bimetallic (reusable) or wire (disposable). The photo shows the presence of a clearly blackened tablet above the heating element: a thermal fuse (see the first photo of the review), or a thermal relay (determined by the design).
Tank repair
Although it is not recommended to repair the tank yourself, some DIYers still try to fix it. What do you need to know so that the result does not disappoint you?
- First the oil is drained. Pay attention to its variety. The fact is that when repairing the body of an oil heater, some of the oil will spill out, and it will have to be replenished. However, you cannot mix mineral oil with synthetic oil. Its volume should be such that an air cushion remains inside the housing. It is necessary for the expansion of the oil.
- Typically, the metal body of the radiator is welded or soldered. The first option is preferable. But not every home craftsman has this opportunity, so many choose soldering. Please note that when soldering the oil cooler, you must use silver, brass or copper-phosphorus solder. Tin cannot be used. A burner is required. During the soldering process, water is poured into the tank. After completion of work, the body must be dried.
- Oil in the usual form is not poured into a repaired tank. It must be evaporated at a temperature of +90C. It is not recommended to raise the temperature higher, as the oil will begin to oxidize.
Read also Making a greenhouse from a profile pipe video
Sometimes small holes in the housing are sealed with a threaded connection. The repair method is not very reliable, but it is acceptable as a temporary option. It is important to seal the joint well here. During the repeated cycle - heating and cooling - any sealant will begin to crack, so smudges cannot be avoided.
As for replacing the heating element with your own hands, this heating element is selected based on power. And if you decide to change it yourself, you will have to work hard. Flaring it will not be so difficult, but doing the flaring again is a big problem. Some models of oil heaters are equipped with removable heating elements, which makes them easier to repair. But even in this case, it is necessary to devote a lot of time and attention to the junction of the housing and the heating element. Any gaskets and sealants will not last long, and the likelihood that you will return to repair work again is very high.
To repair a tank hole, it is better to use electric welding. To do this you will need an inverter for thin sheets. Before starting welding work, it is necessary to remove rust from the edges of the crack or hole. Repairing the tank in this way is the best option and increases your chances of success.
Disassemble the oil heater
Photos of the oil heater show: the electronic unit is rolled into one piece with an accordion. This is wrong. The inscription “Do not cover” hides a pair of screws; the mounting bracket is held in place by a spring located in the bottom. Clearly visible to the naked eye, no explanation needed:
- the spring comes unfastened;
- the bolts are unscrewed.
Inside the oil heater housing, most electrical connections are made using plug-in terminals. If necessary, remove the switches and bimetallic relay by unscrewing the screws from the inside and disconnecting the wires. Please note: the heating element is tightly rolled. It shows the desire of the producers not to allow anyone inside.

A cunning technician knows how to make acquaintances
We repair the heater
The appearance of the heater creates the feeling that it is a single whole, that is, the electrical unit and the body are connected using rolling. But this is only an appearance. Pay attention to the inscription “do not cover” - under it there are several screws with which the lid is held on the body. They need to be unscrewed, but the lid will not come off because there is a spring installed in its lower part that holds it. Simply remove it and remove the lid.
Now pay attention to the heating element. It is tightly and hermetically sealed. Manufacturers did this on purpose to prevent curious people from prying into it. These tubular heating elements last for decades, so there is no point in touching them. If one of them fails, then it is better to purchase a new oil heater. No one can repair such a breakdown with their own hands. To do this, you will have to replace the elements, but at home and even in some workshops it is impossible to roll the heating element back into the housing with 100% tightness. The result is constantly leaking oil, which can lead to big troubles.
But anyone can wipe the connection elements with alcohol. All of them are made in the form of terminals, so disconnecting, cleaning and connecting them back will not be a big problem. It is important here not to confuse anything when installing the wire to a specific terminal.
The same goes for replacing power supply and safety parts. It will be difficult to repair any of them with your own hands. And if you are not an expert in this matter, then you are unlikely to succeed. Therefore, there is only one way out - to replace the failed elements with new ones. They are all held on by screws or brackets, so removing them won't be too difficult. Again, we remind you that your main task is not to confuse the connection wires. After all, the electrical circuit of a radiator is the basis for its correct and efficient operation.