What height should be for installing batteries?
A high-quality heating system is a mandatory factor to ensure a comfortable life for people in an apartment building. In order for energy efficiency to be at a high level, it is necessary to comply with the requirements for the installation and placement of radiators. There are established standards for the location of heating devices, following which you can ensure optimal temperature in the house and reduce heating costs. Before starting installation, you need to know how far the window sill should protrude above the battery, at what distance from the battery to the wall and floor to install the heating circuit, and which circuit is best to choose.
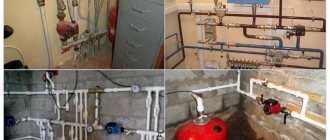
Connection diagrams
There are several radiator connection diagrams that comply with the requirements and standards of GOST and SNiP. They are represented by the following varieties:
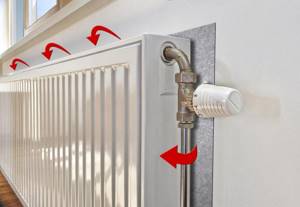
- Lateral connection. Characterized by maximum heat transfer. With this connection, the input is made from the top of the battery, and the output is from the bottom on the same side. This is the most popular connection diagram.
- Diagonal connection. Produced with significant system dimensions. Water enters the radiator through the top and is discharged from the bottom on the opposite side.
- Lower connection or “Leningradka”. It is produced in small one- and two-story houses, as well as when installing pipes hidden under the floor. The efficiency of such a system is 5-15% lower than with a lateral connection.
How to take measurements and determine the size of a window sill

The width of the window sill is determined based on the thickness of the load-bearing wall. To do this, appropriate measurements of the walls are first taken.
To the result obtained, add 10-15 cm - the distance by which the window sill will protrude into the interior of the room and another 2 cm, which are necessary to deepen the structure under the double-glazed window.
The length of the plastic window sill is equal to the length of the window opening, plus an additional 5 cm. This is necessary so that the side parts of the plank extend into the slopes, and the cutting parts are not visible.
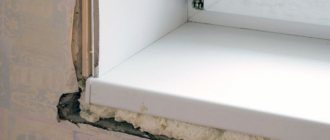
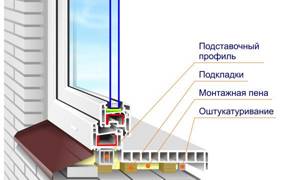
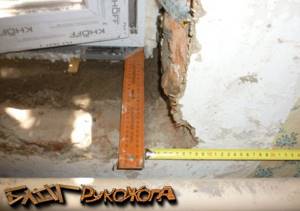
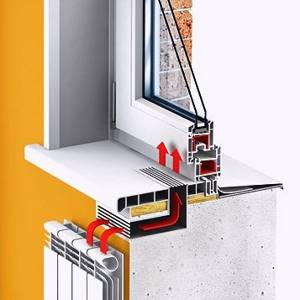
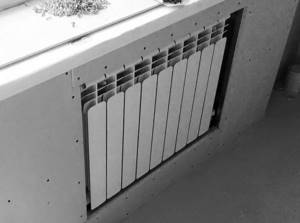
Attention! The protrusion of the window sill above the heating radiator should not exceed 7 cm, otherwise a niche for insulating warm convection air will form in the window opening.
Advice from professionals
If all the windows on the facade are to be replaced, then everything must be measured at once. Their height may be almost the same, but their width may differ. For manufacturing, you need to take the smallest value of the measured window.
To determine the location for installing the window unit, the thickness of the wall must be known. From the inside, the structure should be mounted to a depth equal to 2/3 of the width of the wall, while you can take into account the width of the external insulation and install it further.
If you add 5 cm to the width of the opening for the bend and 4 cm for the protrusion, then the required value of the drainage width will be known. If the wall is sheathed, then this thickness must also be taken into account. The width of the slopes is measured only after installing the window unit.
Preparatory work before installation
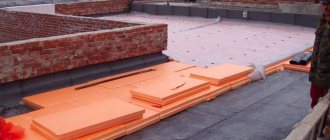
At the preparatory stage, you need to decide on the size and design of the window sill. To do this, measure the width of the window opening. 10-20 cm is added to the resulting value, this is the size of the side protrusions. The overhang over the battery is up to 7 cm, otherwise the plastic will interfere with heat transfer and overheat. If the opening has the shape of a trapezoid, then for accuracy it is measured in several places. After taking measurements, you can buy the product.
The second stage of preparation is clearing the area where we will install the window sill from debris and dust. The surface for installation using polyurethane foam must be clean and damp. For installation you will need the following tool:
- electric jigsaw;
- chisel;
- hammer;
- level;
- construction knife.

General list of recommendations for installing a window sill
- The window sill is attached inside the room and at the bottom of the window opening;
- At the bottom of the window sill, a maximum of 60 mm from its edge, there is a gutter - a teardrop up to 20 mm deep, necessary for draining water;
- The final stage of installation begins only after preparing the lower plugs;
- The lower part of the solution of the side slopes is cut down to the wall. Then the wall is cleaned of debris, dust, dirt, etc.:
The window sill is placed like this:
- So that the board is in a strictly horizontal position (measured using a level), and the transverse slope of the window sill inward from the window frame is approximately 3 0;
- The wedges that form the basis for installation should not extend beyond the wall. Therefore, if they are installed correctly, they will require additional fixation with plaster.
- After this, they proceed to removing the window sill, wetting the wall with water and covering it with lime-gypsum mortar, so that the level of the mortar exceeds the level of the wedges by 15 mm;
- The window sill is placed in the solution and pressed forcefully onto the wedges until it stops;
- At the last stage, the excess mortar is leveled and pressed flush with the wall plaster, followed by rubbing. In this case, the window sill itself fits into a groove made on the block at the bottom of the box. In relation to the side slopes located in the lower part, the same actions are performed - covering with mortar and subsequent rubbing.
The window sill can be installed correctly, so as to prevent its subsequent bending and breaking, by placing metal strips under it and inserting the ends of the latter into the lower plug. However, most often you have to deal with plastic and wooden window sills, during the installation of which strength and reliability can be achieved in your own way for each option.
Applying primer and adhesives to the window opening
Typically, builders recommend moistening the surface before applying construction foam or cement. But some advise using a primer for the same purposes. Which one? The one for concrete plaster is quite suitable. The point is to create a layer of microscopic thickness on the surface, reminiscent of rough sandpaper under a microscope. Both foam and cement will grab onto this. It is recommended to seal the seams with gypsum plaster, but there is another option.
Let's look in order at how and with what to attach a window sill to a window opening:
- The simplest thing is to fill all the corners and cracks with polyurethane foam, then place the window sill on top, press it firmly and leave it until everything is dry. Polyurethane foam has the ability to slowly expand greatly. Due to this, it fills all the pores, so there is no need to try to blow on the entire surface. Many people install a window sill first, then press it down, and pump foam inside through the remaining gap. We will not tell you exactly how to do it; rather, it depends on the working conditions. For example, before installation you need to see if there are any gaps left in the seams and fill these sinks with foam. Strictly speaking, you still need to check the correct installation of the vapor barrier membrane, and if necessary, do everything as it should be. It is clear that here it will no longer be possible to simply lay a window sill and blow out the foam from below. You need to go slowly into the cracks; polyurethane does not expand so quickly, and therefore you should do the job efficiently once and for all. After this, the window sill is laid, and the remaining part is blown out. After hardening, all excess is cut off just beyond the edge of the wall and sealed with gypsum plaster.
- The second option of laying a plastic window sill on foam looks more rational. In this case, only the outer part of the window opening is foamed; cement is immediately placed on the outside, which is suitable for any plaster. That is, to plant a window, two types of substances are used at once. At the same time, it would be a good idea to attach several metal brackets on the back side of a fairly dense window sill (not a profile) to increase adhesion. At the same time, any plaster can be applied to cement, and this is good. On the other hand, there will always be a crack under any plastic window sill. This is caused by the high coefficient of thermal expansion of this material.
How to choose a plastic window sill
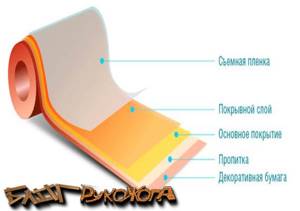
1. Window sill covered with PVC film
The cheapest option. It tolerates temperature changes very poorly and quickly loses its appearance, as it quickly absorbs dirt and dust. The only advantage is its low cost.
2. CPL coated laminate
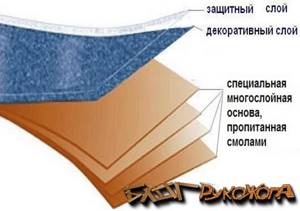
Such window sills are obtained by pressing paper sheets impregnated with melamine resins. Very resistant to temperatures and chemical influences.
3. Plastic with EPL coating
Window sills with EPL coating are premium class. Excellent technical characteristics, special antistatic coating, a huge range of design solutions, etc. and so on.
Necessary tool
- The window sill itself is the required width
- Plastic plugs for it
- Plastic wedges or bars, in the absence of such
- Metal saw or jigsaw
- Polyurethane foam
- Building level
- Roulette
- Well, preferably a primer
Preparing for installation
We have decided which window sill to choose for plastic windows and we can proceed directly to preparation. If, after dismantling the old window sill, there are side grooves left, then this is good, but if there are none, then you will have to cut them out. We use a hammer drill or chisel for this. The depth of the groove should be about 6 cm on each side.

The next stage is garbage collection. Using a brush, clean the work surface as much as possible.
Then we prime. Primer is necessary to increase the adhesion of the polyurethane foam, and we will also exclude fine dust from the work.
Friends, if you stain a window while priming, you should immediately remove the remaining primer, because traces may remain in the future.
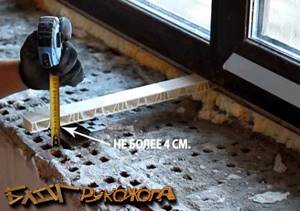
The final stage of preparation is to control the gap between the window sill canvas and the base. The distance should not exceed 4 cm, as this is the optimal thickness for polymerization of polyurethane foam. Exceeding the permissible limits will lead to the appearance of “sinks” and voids in the frozen foam, which is not good: (If your distance is greater, then you need to build up the base using plaster or other methods - it all depends on the thickness:)
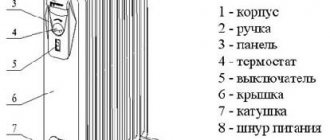
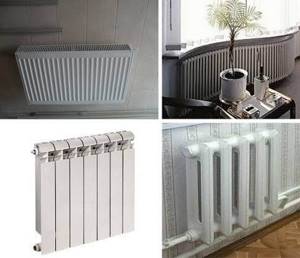
Types of heating radiators
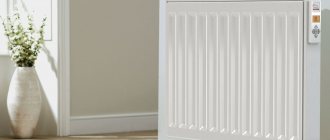
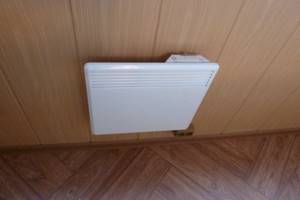
To equip your home, you can choose different models of heating devices - you can have an aluminum radiator, an electric wall heater or a cast iron radiator made of several sections. The question is whether such a battery can effectively heat a room that has large windows.
Building codes regulate at what distance the battery must be placed under the window. But at the same time, these standards do not indicate which batteries should be hung under stained glass windows or under panoramic structures. The fact is that modern technologies offer several options for organizing heating in an apartment. Including in such a non-standard situation as installing a heating radiator under a panoramic window, to the entire height of the room.
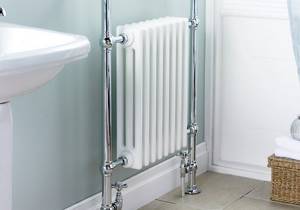
Depending on the material of manufacture, the following can be selected for installation in a central or autonomous heating system:
- cast iron sectional batteries;
- aluminum radiators;
- bimetallic radiators;
- steel models;
- radiators made of copper.
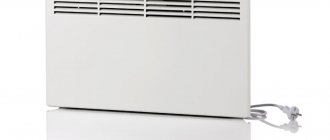
In this place you can also place convectors for connecting to the electrical network in a wall position or install them in the floor under a decorative cover.
Heating devices can be:
- in the form of full-size radiators;
- low radiators for panoramic windows;
- floor batteries;
- copper batteries for installation in the baseboard;
- convectors for panoramic windows for placement in the floor.
Live in your own home
How to properly install a window sill over a radiator
What types of window sills are there for plastic windows?
Even before installation, you need to know that even plastic window sills are different from each other. If you need a hard coating that is not afraid of fire and scratches, then you need to choose acrylic ones. At this price it will be much more expensive, but the strength will be high. It should be noted here that most window sills are sold in such a form that they are sufficient for installation. And it’s customary to trim off everything unnecessary.
How to install a window sill yourself
When installing a window sill, you must rely on GOST. According to the standard, the width of the window sill should be chosen so that it covers a maximum of half of the heating radiator. An exception is the case when the radiator is located at a distance of more than 15 cm from the opening. But in this case, the owner must check that the warm currents rise from the battery without obstacles.
The window sill board is installed so that it goes under the window frame and the plastered layer on the slopes. Otherwise, moisture will get into the remaining cracks.
Installing a window sill involves performing several related actions. If the owner decides to install a plastic window sill, he needs to do the following.
- First of all, measurements are taken. First, the length of the window sill is determined. To do this, measure the width of the window opening, and add another 10 cm to the resulting figure. To find out the width of the window sill, measure the distance between the edge of the wall and the installed window, and then increase the number by 5-12 cm, depending on the projection above the radiator. You also need to add 1 cm to place the window sill under the frame. When narrowing the opening to the window, measurements are taken in two places - the widest and narrowest. To simplify the work, it is better to knock down the plaster layer at the bottom of the slopes. Then the window sill will be pressed tightly against the grooves.
- The window sill is being prepared. To cut the piece to the desired size, you can use an electric jigsaw, a hand saw with fine teeth, or a PVC saw. You can also cut a window sill using a circular saw, but then the disk is installed in the opposite direction.
- The space for installing the window sill is cleared. Before installing the plank, dust and dirt must be removed from the work area.
- Window sill pads are placed near the frame. You can use scraps of boards of suitable thickness as them. At the edge of the window opening, linings of thinner thickness (about 2-3 mm) are placed so that the window sill rests with a slight slope.
- The workplace is once again cleaned of dust and moistened with water. The free area under the frame is filled with mounting foam, after which the window sill strip is immediately inserted. A load is placed on it or bars are placed opposite the top side of the window opening. The space under the bar is foamed.
- After the foam has dried, the excess part is cut off and plaster is applied on top. It is leveled flush with the wall to create a smooth plane.
We recommend that you study the information on how to remove a window sill unit for replacement to understand how it works.
| To determine the need to treat walls with a water-repellent liquid, use a special device - a Carlsten tube. Over the course of several hours, the water level in the tube drops, which means it is absorbed by the facade. |
Wall cladding methods
Finishing the wall behind the battery can be expensive or cheap, but in both cases it is not done quickly.
Battery repair steps:
- We remove the battery, otherwise it is impossible to fully seal the surface. When removing it yourself, first turn off the water supply valve and return valve.
- There is water in the radiator; when unscrewing it from the taps, place a low bucket or, better yet, a wide basin. The battery is removed from the mount when the water has completely drained. It’s safer to call a technician, because if the heating is on and the ball valve on the jumper is old, it’s dangerous.
- In order not to spoil the clean floor and carpets, you should stock up on large pieces of film and cover the entire path from the front door to the radiator.
- Next, we inspect the wall for defects and prepare it. We remove the bumps of old plaster and paint with a hammer and chisel, paying attention to the place where the baseboard is, it should be as even as possible.
- We remove debris and fill small cracks with putty. Once they have dried, we completely level the niche with plaster.
- The dried plaster is primed 2 times, the layers dry for 2 hours.
The radiator has been removed, the wall has been prepared, now you can choose the finishing method, and there are many of them. By the way, there are “dry” finishing options behind the battery, for which the surface does not need to be leveled, you just need to remove the protrusions and prime it.
We putty and glue wallpaper
Let's continue the topic of plaster. The method is expensive and time-consuming: you need to buy a lot of materials, and the plaster takes up to a week to dry. Beacons are not placed in the starting layer; this is a small surface; it is quite possible to level it without beacons.
After drying (up to approximately 5 days), we prime the wall, let it dry and apply the finishing coat. To save time, it is better to buy a bucket of ready-made putty. The dried surface is sanded with a sharp spatula, this way there is less dust in the room. Cut out the required pieces of wallpaper, take special glue and paste over it. They start gluing from two opposite sides, so that the joint of the pieces is in the middle, behind the battery. Next, measure out the pieces of plinth, drill holes in the hay for the fastening and install it.
Installing drywall
Finishing the wall behind the battery also means finishing the wall with plasterboard. The method is well suited in a house with plasterboard walls, it’s less hassle: at the same time you make the sheathing under the gypsum board for the battery. This is also possible with brick walls. They make a metal frame on which the sheets will be attached. GCR withstands exposure to warm temperatures very well, does not crack over time and has low heat transfer.
In this regard, it is perfect for finishing the space behind and around the battery. If you install insulating material between the wall and the gypsum board, then 10-30% of the heat will remain in the room. You just need to remember to drill holes in the drywall so that warm air from the radiator can enter the room. The joints between the sheets are pasted over with a thin mesh and puttied. A thin layer of finishing mixture is used to level everything flush with the wall. When everything was dry, all that was left was to paint the wall.
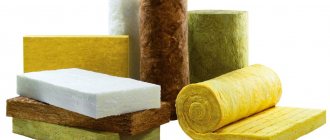
To increase operating efficiency, a heat-reflecting film is glued behind the rear wall of the radiator
There are also special heat reflectors that direct warm air into the room, but not everyone has proven the effectiveness of such a device.
We glue plastic panels or ceiling tiles
This option is the most budget-friendly, but it allows you to give the area under the battery a well-groomed look and even well insulate the thin wall where the niche is located. We are talking about the use of modern material - foiled polyethylene foam. It is mainly used for thermal insulation. It comes with double-sided aluminum coating and single-sided, with denser polyethylene inside and regular, self-adhesive and not. The simplest one is also suitable for finishing a niche.
Rarely does anyone glue ceiling tiles anymore, but they do exist as a finishing option.
Before pasting, the wall is also prepared, but not as thoroughly as in the case of plaster. We knock down the unevenness, remove the dust with a rag, seal small cracks with a solution of alabaster and sand, it dries quickly and you can continue working. You need to carefully measure the size of each wall with a tape measure so as not to spoil the penofol. Next we glue the insulation. We use universal acrylic-based mounting adhesive and a mounting gun. It sticks perfectly, and temperature does not affect it in any way.
They start gluing from the widest wall behind the radiator, then seal the top wall and the sides. The insulation can be covered with white or wood-like plastic panels using the same glue. The panels must be chosen the same width as the window sill protruding above the niche, so as not to cut it in this place. If necessary, the side parts are trimmed along the plank. External and internal corners are trimmed with special plastic strips to match the panels. Instead of a plinth, you can use a special strip with two sides into which panels are inserted.
The battery, like the wall behind it, can be designed as a design element, but then the wall behind it must be perfect
The second cladding option will be polystyrene foam ceiling tiles. It is easy to cut out pieces of the desired size from them, they are sold in a variety of colors, smooth and embossed. They begin gluing from the bottom up, so that whole pieces of tile are visible in a visible place. It is better to decorate the window sill with a ceiling plinth at the first stage, and then “pull” the tiles to it. Here you can also use corner strips. The tiles near the floor can be glued at the joint to the baseboard, or you can remove it, veneer it and attach the baseboard back. In addition to decoration, ceiling tiles have good thermal insulation characteristics.