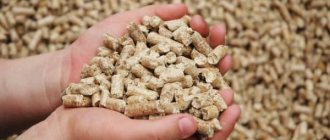
The furnace units used for mining have a simple design and are heated using inexpensive fuel. A special supply of previously used oil will help to achieve stable and safe operation of the equipment. You can assemble a drip stove for mining with your own hands from scrap metal and leftover materials.
Features of the design of dropper furnaces
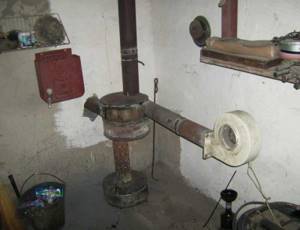
Such units consist of a rectangular or cylindrical body. Inside there is a combustion chamber, in the lower part of which there is a container intended for waste oil and holes that provide air flow.
After heating, the fuel evaporates, and then the vapors combine with the air in the chamber. The resulting mixture as a result of convection is directed upward through the firebox, where, when burned, it releases a significant amount of heat.
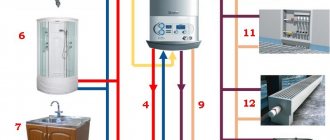
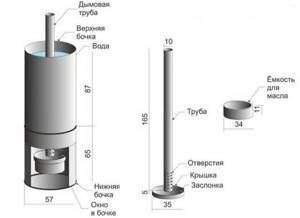
If desired, a water or air heat exchanger is built into the upper part of the drip furnace during processing, as a result of which it becomes possible to heat the room more evenly and better or to arrange a circuit for supplying hot water.
Drip supply occurs through a metal tube, which is connected to an oil evaporator. Its second end is brought out and connected to the tank with a flexible hose. In the upper compartment of the drip-type furnace during exhaust there is a smoke pipe, which is connected to the chimney.
The temperature in the upper part of the unit, even with a heat exchanger, is not low, so the chimney system must be installed in accordance with fire safety regulations. Experts do not recommend making such a design in an open version, since the oil can ignite.
How to make a burner for mining yourself
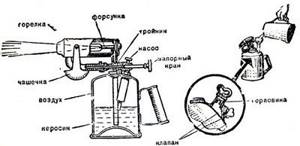
For successful combustion of oil, you must either preheat it to the evaporation temperature - approximately 300 degrees Celsius, or finely spray and enrich the oil vapors with air. You can heat the oil to such temperatures using powerful heating elements, but this will increase energy costs. An oil aerosol can be created by applying a stream of compressed air through a layer of oil. This effect is realized in the Babington burner - a device, an analogue of which you can assemble with your own hands from available components.
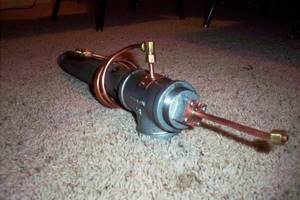
Babington burner - an alternative to a blowtorch
The Babington burner was originally patented to run on diesel fuel. Later, having made minor changes to the design, the craftsmen changed the design with their own hands and adapted the burner for burning waste machine and food oils. The degree of oil contamination does not matter much, since the fuel channels of the unit are free of bottlenecks prone to blockages.
Unlike a blowtorch, where the fuel-air mixture is sprayed under pressure through nozzles, in a Babington burner oil is pumped from a reservoir using a low-power pump and flows in a thin film along an inclined or spherical surface, and the oil-air mixture is formed by blowing a thin jet of compressed air air through this film.
The spraying effect is clearly presented in the video:
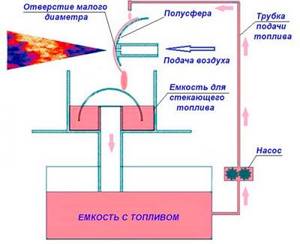
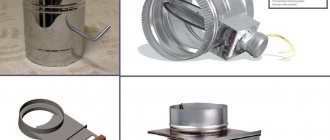
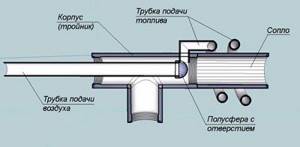
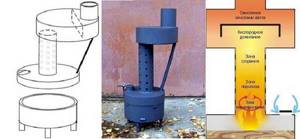
- The Babington burner consists of several functional blocks:
- Fuel - reservoir, pump and pipes for supplying fuel.
- Air, it consists of a compressor and an air tube.
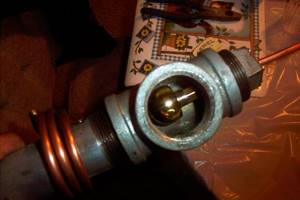
- A hemisphere with a small diameter hole where the air stream mixes with oil.
- A nozzle that directs the flame in the desired direction.
The standard design can be modified with your own hands, increasing its efficiency.
To do this, the fuel tank is equipped with a heater that heats the oil before the burner starts operating, which makes it possible to increase its fluidity. In addition, a fuel channel made of a metal tube can be wrapped around the nozzle - this way the oil will heat up while the burner is operating. The burner nozzle is directed into the boiler, where the fuel chamber and water jacket are heated. You can also use the device to melt and heat metals.
Advantages of a DIY Babington burner:
- wide choice of fuel - used machine oils, lubricants of any viscosity, diesel fuel, fuel oil, any vegetable oils, including food waste;
- the presence of impurities in the fuel;
- simplicity of design - you can do it yourself.
Flaws:
- difficulty setting up the burner, especially often when changing the type of fuel;
- smell and dirt - the burner cannot be installed in residential premises, a boiler room is required;
- The use of the burner involves an open flame, so fire safety precautions must be observed.
There must be a powder or salt chemical fire extinguisher in the boiler room!
DIY Babington burner
You can assemble the burner yourself from simple components; for this you will need:
- A hollow ball or hemisphere with such a wall thickness that you can drill a hole with a diameter of no more than 0.3 mm. You can use any metal objects of a similar configuration, for example, a spherical brass door handle, nuts with plugs. The main condition is the possibility of reliable fastening of the air duct.
- Metal tube for supplying compressed air from a compressor, diameter - 10-15 mm.
- A compressor, for example, from a refrigerator, with an operating pressure of 2 atm, a maximum pressure of 4 atm.
- Fuel tank with a built-in heating element of 0.5-1 kW made of non-corrosion metal.
- Fuel sump and pipe to drain excess oil back into the tank.
- Copper tube, diameter - 10 mm, wall thickness - 1-1.5 mm for the fuel channel.
- Oil pump from a car or motorcycle with an electric motor to drive the pump. It is advisable to equip the pump with a filter with a large mesh at the inlet.
- The nozzle is a 200-400 mm long nozzle with an external thread of 2 inches.
- Crosspiece for two-inch metal pipe with internal threads.
- A 1" threaded drain and a 2/1" adapter to drain excess fuel into the sump.
- Adapters and fittings for connecting the fuel line, air duct and nozzle.
Preparing burner components for assembly
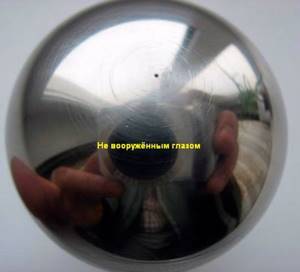
- The main and most important task is to make a hole of a given diameter in the spherical nozzle. The power of the burner depends on its size. For example, a boiler with a thermal power of 10-15 kW requires a burning torch obtained by operating a burner with one hole with a diameter of 0.2-0.25 mm. To obtain more power, there is no need to expand the hole - this will lead to larger droplets. It is better to make 2-4 holes with a diameter of 0.1-0.3 mm with a distance between them of 8-10 mm, otherwise the torches will be mutually extinguished. Fuel consumption can be calculated as follows: through one hole of 0.25 mm, 2 liters of waste are sprayed per hour.
Video about how you can make small diameter holes in a metal hemisphere:
- The tank is made of corrosion-resistant metal. A heating element is built into it with a thermostat set to turn off the heating element at a temperature of 70 degrees Celsius.
- It is necessary to make a fuel sump from the same material, equipped with a pipe with an overflow. Through this pipe, oil from the sump will flow back into the tank. To drain dirt from the sump, you can provide a plug in its bottom.
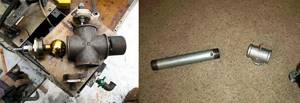
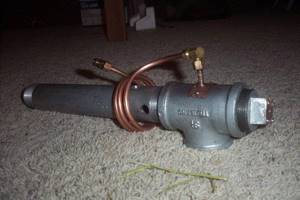
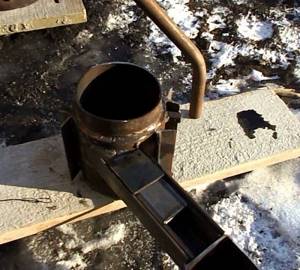
- Assemble the burner body: connect the nozzle from the squeegee to the 2-inch cross in the front part, then adapters: from the top for oil supply, from the back side for air. From below, a 2/1-inch adapter and a squeegee are connected to the crosspiece, through which excess oil will drain into the sump. The adapters are made of plugs with drilled holes into which the fuel and air channel tubes are inserted.
The housing can also be made from a tee, in which the air duct is inserted into the upper part, having previously drilled a hole of the required diameter.
- The fuel path is made of a copper tube, one end of which is wound around the nozzle three times, and then led through a plug adapter into the housing at the top. The fuel pipe is connected to the pump, a coarse strainer is installed and the other end of the pipe is inserted into the tank. The fuel path can be equipped with a valve. The pump is connected to an electric motor operating from a 220 V network.
- An air duct made of a metal tube is attached at one end to a hemisphere with a hole, having previously installed a plug adapter at the required distance. The hemisphere should be positioned so that the oil from the fuel tube evenly flows onto the rounded part of the nozzle, and then into the lower part of the housing and into the sump. The other part of the air duct is connected to a compressor, which is also connected to a 220 V network.
- Since the installation will have as many as three consumers of electricity, which are not turned on simultaneously, it is advisable to equip the burner with a control panel: install a separate toggle switch or button to turn on the heating element and a separate toggle switch to turn on the compressor and pump. If desired, you can equip the remote control with a light signaling system made of diode lamps.
- You can equip the burner with a controller that automatically turns on the units in accordance with the selected mode. Electric ignition is realized using spark plugs, and to extinguish the burner it is enough to turn off the oil supply.
Video - burner assembly diagram:
Preparing fuel for the burner
Almost any waste oil can be used in a Babington burner. Automotive waste with a large number of foreign inclusions is filtered before being poured into the tank through a mesh and mixed with cleaner oil. Oils with a small amount of impurities can be poured without preparation.
When using edible vegetable oils, such as deep frying, it is recommended to let it sit for several hours and carefully drain off the residue. These oils are sufficiently fluid at normal temperatures, so they can be heated in the tank only when the burner is started. When using fuel oil and other thick materials, they must be heated to a temperature of 70 to 90 degrees, otherwise the pump will work with overload.
In this article we consider in detail the entire process of making a long-burning potbelly stove: from arranging the foundation to making a chimney.
You can see the technology for safely disassembling a gas cylinder and then making a wood-burning potbelly stove from it.
Here
Read about the pros and cons of a long-burning wood-burning stove made by yourself:
https://gidpopechkam.ru/pechki/dlitelnogo-goreniya-na-drovax.html
What are dropper stoves made of?
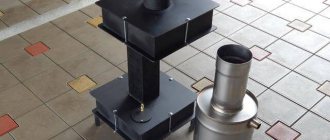
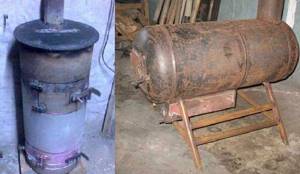
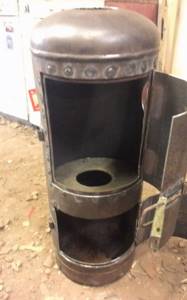
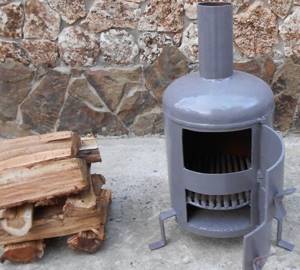
Due to the fact that this type of unit has a simple structure, you can assemble a drip-type stove with your own hands from a sheet of iron, a gas cylinder and a used barrel. The only requirement for them is the presence of a wall with a thickness of at least 4 millimeters, otherwise the body will move during operation. A proven drawing of a furnace using a gas cylinder will help you assemble the furnace correctly and quickly.
The simplest and at the same time reliable way is to assemble a stove from a gas cylinder, since it has a durable body and can withstand high pressure and heat to high temperatures.
In addition, its dimensions are suitable for a unit capable of heating a garage, workshop or small country house. If you carefully weld such a stove, it will turn out to be safe, it can be easily cleaned and heated.
Why work off
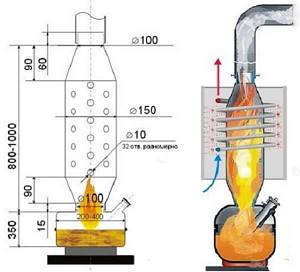
Drip fuel supply is widely used in heating engineering when a heat output of approx. up to 15 kW. The principle of operation of a drip furnace is simple: liquid fuel drips into a heated evaporator, into which primary air is supplied. Each drop evaporates and partially burns immediately, maintaining the temperature of the evaporator. The remaining fuel vapors enter the combustion chamber with the influx of secondary air, where they burn completely. Thus, in drip furnaces, 2-stage fuel combustion is carried out. Unlike stoves with non-pressure burners, where the fuel heats only itself until it evaporates, in drip stoves part of the heat from the combustion of each drop is spent on heating a rather massive evaporator, which determines their lower efficiency. But there are ways to minimize this disadvantage, see below.
The maximum power of a drip furnace is largely determined by the properties of the fuel: if, in order to obtain a given amount of heat, the fuel must be released in a trickle, the furnace becomes fire and explosive. Mining in this regard is good because its viscosity and surface tension are high, i.e. It is possible to obtain frequent and large drops of waste. Diesel fuel is significantly worse in these parameters, although it is still possible to make a stove using waste fuel and diesel, see below. Drip stoves are not made with light liquid fuel - it is dangerous. Fuel oil and oil sludge are too valuable as fuel, and industrial-scale sources of heavy fuels are too stable to be burned haphazardly.
Materials
To assemble a drip furnace with your own hands, you need to prepare:
- used 50-liter gas cylinder with a whole body;
- a two-meter metal pipe with a diameter of 100 millimeters with a wall thickness of at least 3.5 millimeters;
- for the heat exchanger and other small parts - the remains of an equal-flange metal corner with a thickness of 40–50 millimeters;
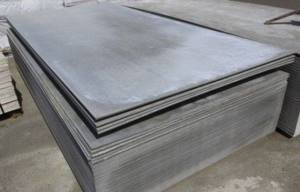
- a sheet of 4 mm steel or its trim of the required size;
- cast iron brake disc from a car, can be used;
- a regular-sized freon bottle with a needle valve;
- half-meter half-inch metal pipe;
- a hose of the required size, which is suitable for attaching to a ½-inch pipe and clamps;
- half-inch ball valve;
- door hinges and fire door latch.
In addition, pipes of a certain cross-section and a duct fan are needed to assemble an air heat exchanger. You can use a corrugated pipe or components for the chimney. To ensure a high-quality result, you should use drawings of a stove from a gas cylinder during testing.
What will you need?
The simplest burner was created and patented in 1979 by Englishman Robert Babington. The design of our burner involves the use of the following materials:
- iron sheet;
- galvanized steel bucket;
- oil pump from a car;
- electric motor for oil pump with speed controller;
- bolt M10;
- sets of heat and light sensors;
- copper tube;
- air solenoid valve.
We will also need tools such as an electric drill, soldering iron, hacksaw, grinder, wrenches of various sizes, pliers and a welding machine.
That's all the materials you need to create a burner with your own hands. This has a big advantage: the device you make will cost much less than industrial analogs, will meet your needs and, in comparison with industrial models, will cost mere pennies.
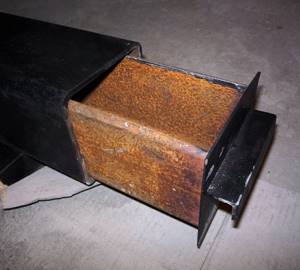
Work on preparing the cylinder
Even after prolonged ventilation, condensation remains in the gas cylinder. To remove it, you need to remove the valve and gearbox and leave it in fresh air for several days.
Then a hole is drilled in the bottom of the cylinder. To prevent sparking, the drill is moistened with oil. Since it is not easy to make a hole in thick metal, it is better to start the work with a small diameter drill, and then it can be increased to 10–16 millimeters.
Next, the balloon is filled with water and drained after 24 hours. Since condensate has an unpleasant, pungent odor, it should be carefully poured away from your home. The procedure is repeated if necessary.
Stove body
A drawing will help you create a furnace using a gas cylinder.
The work is performed in a certain sequence:
- The balloon is visually divided into two parts, the upper one should be 2/3 of the height, and the lower one should be 1/3. Openings are cut out in each, the width of which is approximately equal to 1/4 of the circle.
- To make holes, use a grinder. You need to make the cut as even as possible. Subsequently, pieces of metal are used to make doors.
- To remove any remaining condensation, the cylinder is additionally washed from a hose with water under pressure.
- The dropper furnace compartments are separated during processing using a metal insert. It is cut to the size of the cylinder from sheet steel.
- The resulting circle will serve as the bottom for the exhaust vapor combustion chamber. It will be large in volume, which will allow you to use firewood or briquettes to fire the unit and, if necessary, burn household waste in it. The bottom is tried on and adjusted to the desired size.
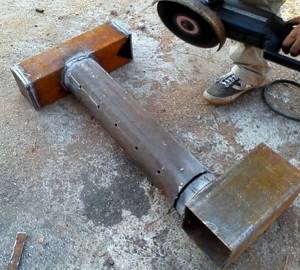
- To make the burner, a 20-centimeter piece of pipe with a cross-section of 100 millimeters is used. Holes with a diameter of 10 millimeters are made in it using a drill and a metal drill. They need to be staggered around the entire circumference to the middle of the burner. The inside of the pipe is polished without leaving burrs.
- The burner is placed in the bottom of the upper part, having welded the joint with a welding machine.
- The completed part is mounted in the unit body between the chambers with the perforated part downwards. The holes are needed for air suction.
- To make a working tray that serves as the bottom of the lower chamber, use a brake disc of the required size. A plug cut from a 4-mm sheet of metal is welded to its bottom to close the hole.
- The top cover with an opening is made from the same sheet. Its shape should allow the counterpart of the burner to be welded, providing air access.
- When assembling a drip-type furnace with your own hands, the bottom of the burner from a piece of 100 mm pipe 10 centimeters long is connected to the lid by welding.
- To connect the parts of the burner, use a coupling, which you can make yourself from a 100 mm pipe, cut lengthwise and slightly bent. The coupling allows you to make the burner detachable. It will be possible to lift it, remove the pan, clean it of oil and remove soot from the top of the chamber and burner.
Sprayer for polyurethane foam from a spray gun
One of the most budget-friendly and effective means of insulating and sealing premises from the effects of the external environment is polyurethane foam with a closed structural cell (impervious to moisture and air). To apply this product, a disposable plastic tube or a special gun with a comfortable handle and trigger can be used. Such devices allow for spot application of material in a fairly thick layer. To increase the coverage area, speed up the process and save a little money, you can spray polyurethane foam through the spray gun, slightly modifying it. The following components will be required:
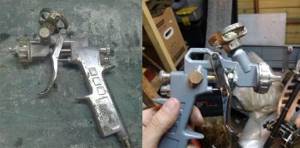
- Cheap spray gun with a nozzle of 1.4 mm and an upper tank.
- Gun for applying polyurethane foam (for removing the adapter for the cylinder).
- Adapter sleeve/fitting (if the thread of the inlet hole into the spray gun differs from the adapter).
- Fum tape for a reliable connection.
If you purchase all the elements in a store, the maximum cost of a homemade pneumatic sprayer for polyurethane foam will be no more than 1,600 rubles. The most expensive and basic element here is the spray gun, which can be bought for 800 rubles. The second most expensive item is a foam gun for 400 rubles, followed by an adapter and foam tape. Compared to a ready-made pneumatic foam sprayer for 8,500 rubles, this option is very profitable (especially if you already have the required components on your farm).
The essence of the assembly is to screw the adapter from the gun onto the spray gun, instead of the paint tank. When connecting, there will most likely be a problem with differences in the size of the elements (threads or tube diameters). Since a tight fit is necessary in this case, you should use an adapter or wind fum tape (if the diameter of the adapter is smaller than the hole for the tank). You can completely make the structure non-dismountable and put everything on epoxy glue.
When making a sprayer for mounting foam with your own hands, you should go through the internal channels of the gun with a special lubricant without silicone. Particular attention should be paid to the o-ring (oil seal) of the needle. If you plan to use the sprayer in future work, it must be cleaned immediately after completion of use, using a special cleaner or dimexide. This procedure should also be carried out during long breaks during work.
The process of assembling and operating a foam sprayer from a spray gun is clearly demonstrated in the following videos.
Heat exchanger
For a drip-type furnace, this element is not mandatory. When the room is small and without partitions, then the heat coming from its walls is sufficient for heating. If it is necessary to achieve greater efficiency of the unit, an air or water type heat exchanger is made. It is placed in the upper chamber.
A heat exchanger is made from a section of 100 mm pipe. Its length should be such that the ends protrude beyond the walls of the housing by 10–20 centimeters on both sides. Two holes are created at opposite ends of the cylinder, a pipe is passed through them and fixed by welding.
A flame divider made of a sheet of iron must be welded above the heat exchanger so that it divides the flame into tongues, increasing heat transfer.
A swirler is placed inside the air heat exchanger, accelerating the air flow. It is made from a strip of steel or a corner divided into bent blades.
Then air ducts made from an uninsulated chimney pipe and corners are connected to the heat exchanger pipe. A duct fan is installed on one side of the air duct. It is connected to the network directly or through the contacts of a thermal relay installed on the fan housing, or by adjusting the temperature mode.
Heating oil
As we have already said, any type of fuel can be used as fuel for waste furnaces. The easiest option is to purchase used machine oil. Its cost is from 25 rubles per liter. If you try hard, you can find oil at more affordable prices. In this regard, car oil change shops are lucky - they can get it from customer cars (usually no one takes it).
In addition to processing, you can use any types of oils:
Vegetable oil ignites quickly if heated thoroughly. It even causes fires.
- Vegetable - the most common sunflower oil burns well, releasing a large amount of thermal energy ;
- Gear oil - if you are lucky enough to get a barrel of this oil, you can use it to run your stove;
- Synthetic oils are excellent liquid fuels for waste furnaces.
In addition to oil, you may need kerosene to light the stove - it is used in pyrolysis stoves.
Ignition and operation
It is not easy to light a cold drip stove during testing. The fact is that oil vapors can only burn when heated, so the unit is ignited using other flammable substances - alcohol or gasoline. They need to be poured into a pan in a thin layer on top of the oil and then set on fire.
When burning, the substance heats up the top layer of waste, and it evaporates. After this, the oven begins to function. Then open the valve on the waste supply hose and adjust its flow into the furnace. To stop the unit, close the valve.
To clean the structure from soot and soot, use metal brushes or fine gravel, which is thrown into the chimney. He, touching the walls of the chimney, knocks off the soot and it settles inside the firebox. After opening the door, sweep it out with a brush. The pan is removed and dirt is cleaned from it.
How to properly make such a hearth can be seen in the drawing of a drip furnace during development, which must be prepared before starting work.
Employees of automobile workshops or motor transport enterprises, where vehicles are constantly serviced, including changing the oil in the engine or gearbox, are well aware of the problem of waste disposal. A lot of oil products accumulate, and to get rid of it, you need to contact specialized organizations that have the appropriate license.
However, there are ways not only not to pay for the disposal of technical oil that has served its useful life, but also to save a lot of money by using it correctly.
One of the most effective uses of mining is to use it for heating rooms. First of all, we are talking about industrial buildings, workshops, etc. By using such fuel for heating, you can significantly reduce the cost of more conventional energy sources. In fact, waste oil furnaces can completely replace traditional heating systems. In addition, they can be used in conjunction with existing boilers, reducing gas or solid fuel consumption. The advantage of these stoves is that they are able to quickly heat a room.
These types of heating devices have different designs, but drip-type furnaces are considered the most effective. This name is explained by the fact that oil enters the combustion chamber in strictly small doses (droplets).
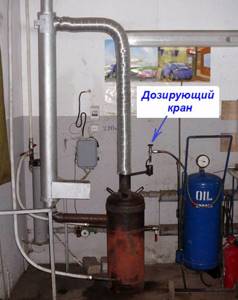
Operating principle of the Babington burner
A few words about the history of the invention. The considered method of burning heavy fractions of liquid fuel appeared relatively recently - in the middle of the last century. More precisely, inventor Robert S. Babington (RS Babington) patented his diesel burner in 1969. However, the patent has long expired and now its device is available to everyone interested.
Babington’s invention is fundamentally different in operating principle from traditional oil burners, where a mixture of air and fuel is injected by a nozzle under pressure:
- Exhaust or diesel is supplied from the tank by a low-capacity pump.
- Fuel drips onto the working surface - spherical or inclined. The fuel flows down along it, forming a thin film.
- In the center of this surface there is a hole of small diameter (no more than 0.3 mm), through which the compressor pumps compressed air.
- A Babington waste oil burner operates on the following principle: a stream of compressed air exiting through a small orifice under pressure tears off part of the oil film from the surface.
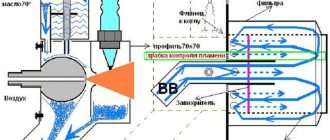
- As a result, we obtain a jet of air-fuel mixture, which, after ignition, forms a stable flame. It is sent to the firebox of a furnace or boiler, heating the walls of the chamber or the water jacket. The figure below shows the operation diagram of the burner device:

Since some of the fuel flows past the hole, it flows back into the tank
Here you can clearly see that the unburned waste oil residues flow from the hemisphere into a special container, and from there back into the main tank. From it, the fuel is supplied for combustion under low pressure, and is preheated to liquefy it. As you can see, the design does not provide any filter elements.
Preheating waste oil or diesel fuel before burning it with a Babington burner is very important and here's why:
- The heated waste liquefies and forms a thinner film on the working surface, which is well atomized by the air flow. This promotes more efficient combustion.
- The smaller the droplets of liquid fuel suspended in the stream, the easier it is to ignite a boiler or Babington stove in manual/automatic mode.
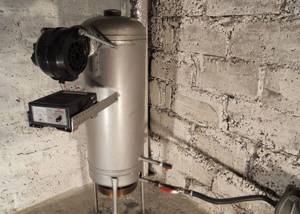
Reference. Finding and buying a ready-made Babington burner in a factory version is unrealistic. Well-known manufacturers of oil and diesel units, for example, KROLL or EURONORD, do not produce them. There is only one way out - order a burner from a good craftsman or make it yourself.
Design features
The design of such drip-type waste oil furnaces is quite complex. Therefore, these devices are usually produced industrially. However, they are in good demand among consumers. The popularity of this type of stove is easily explained by their safety and cost-effectiveness. The last characteristic is due to the operating principle: oil is supplied in small doses, so its consumption is insignificant. In addition, such furnaces are quite inexpensive units.
The advantage of such heating devices for testing is also that they can be made independently. Both engine and transmission oil are used as fuel. A special fuel supply regulator allows you to change the temperature of the furnace. The fuel tank is located at a distance from the unit itself, which avoids heating the fuel.
An undoubted advantage of stoves is the fact that the oil in them burns out completely. This is achieved due to the instant heating, evaporation and combustion of fuel trapped in a hot pan. The process of cleaning the furnace from soot is simple. The unit ignites quite easily and stops its operation just as quickly. All operations are absolutely safe.
In the process of making a homemade stove, the following materials will be required:
- used 50L propane tank;
- a 2-meter steel pipe with a diameter of 100 mm, which will be used for the production of the burner, heat exchanger body and chimney;
- a metal corner 50 mm long, slightly more than 1 m, from which the stove stand, internal parts of the heat exchanger and door handles will be made;
- 4 mm steel sheet measuring approximately 0.5 square meters. m, from which the bottom of the upper chamber and the plugs for the pallet will be made;
- a cast iron brake disc from a passenger car, which should fit into the cylinder in diameter;
- fuel supply hose;
- a used freon container with a working needle valve for making a fuel storage tank;
- two good clamps;
- a half-inch water pipe for supplying fuel inside the heating device;
- a half-inch plumbing valve, which will additionally shut off the fuel supply;
- door hinges.
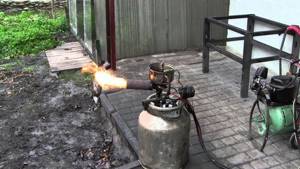
Is it possible to make a blowtorch work during mining?
The principle of operation of a conventional blowtorch is to ignite gasoline vapors, which are pushed out under the action of compressed air.
This effect is achieved by forcing air into the burner fuel tank. What happens if you pour used oil into a blowtorch?
Oil itself, even under pressure, does not evaporate well - it needs to be heated. Due to poor atomization, the flame will be uneven and it will be difficult to ignite the burner. The oil burns with the formation of a large amount of soot and soot, so the jet will quickly coke, its cross-section will decrease, and the lamp will fail. Increasing the cross-section of the nozzle will also not give the expected effect - the oil will be sprayed in large drops, which will not allow obtaining a uniform flame of the torch.
In addition, used oil often contains impurities: diesel fuel, gasoline, antifreeze and even water, which can lead to flashes inside the lamp. To use waste as fuel for a blowtorch, you will have to install a filtration system, which will further complicate the task.
Considering all the difficulties, using a gasoline blowtorch as a burner during mining is difficult and unsafe. Therefore, it is necessary to modify or completely change its design.
Making a furnace
Next, we will consider in detail how to make a heating device with your own hands.
Frame
You need to start by preparing the balloon. First of all, it is necessary to release the remaining gas by placing the container outside overnight with the valve open. Then you need to slowly make a hole in the bottom using a drill. This tool must be moistened with oil, otherwise sparks may occur. Next, the balloon is filled with water, which is then drained. Everything needs to be done outside, otherwise gas condensate along with water may spill, and its smell is very unpleasant, and it will not be easy to remove it later. Subsequently, the drilled hole will be useful for draining condensate.
The next step is to cut two holes in the cylinder: in the upper part for the combustion chamber with a heat exchanger, and in the lower part for the burner and pan. The volume of the top must be made such that the stove can be heated with wood, pellets and other solid fuels. The cut openings should have a 1:2 ratio in height. It is important that the distance between them is approximately 50 mm. At this stage, it is necessary to provide a small side at the top of the furnace, which will prevent slag from falling out when the door is opened. The openings must be made so that they are 30 mm away from the annular protrusions of the cylinder.
After opening the container, you need to rinse it again to get rid of the smell of condensation.
Burner and combustion chamber bottom
The lower part of the combustion cavity will be made of 4 mm thick steel sheet.
Before installing this structural element, you need to drill two holes with a diameter of 3-4 mm in it. They need to be made on the same line opposite each other and as close to the edges as possible. The bottom should be installed so that the holes are at an equal distance from the door. The purpose of these holes is also to drain condensate from the furnace, which will avoid corrosion.
A 200 mm long pipe serves as a burner. In this product, it is necessary to drill many holes in random order, which will provide free access of air. We clean the remaining burrs so that soot does not settle on them later.
The burner is welded to the bottom of the upper chamber, and the finished structure is installed inside the cylinder.
Oil pan
A cast iron brake disc from a passenger car works well as a tray for a drip furnace. Its important characteristic is high heat resistance. The purpose of such a stand is to ensure that the oil, entering the oven, quickly heats up and evaporates. And this will allow all the fuel to burn without any residue.
It is required to use a non-ventilated disk that is sized to fit the internal diameter of the case. A good option would be the rear metal part of the wheel of a Japanese car. This product is quite deep and can work for a long time without cleaning.
The bottom is welded to the lower chamber. A cover is installed on top, in which an opening is made for air intake, and the burner mating part is also mounted. The hole must be made large enough so that the oil gets directly into the stand under the bottom.
Then you need to make a coupling that will connect the burner to the pan. This is necessary to make it easier in the future to clean the device that ensures fuel combustion, remove the pan and get to the bottom of the furnace. For the coupling, a piece of 100 mm rolled metal product, cut lengthwise, is suitable.
Fuel will enter the stove through a water pipe, which should be welded into the body. It needs to be cut so that the oil falls exactly into the pan. A valve for emergency shut-off of the fuel supply and a hose are installed outside.
Chimney
The same 100mm pipe is used for this design detail. It must be welded strictly in the center of the top of the cylinder.
Heat exchanger
If you plan to use such a stove to heat a residential building with traditional water radiators, it is recommended to place several coils in the heat exchanger. You need to connect a circulation pump to them, purchased at a price approximately corresponding to the fan. A separate utility room must be allocated for the stove.
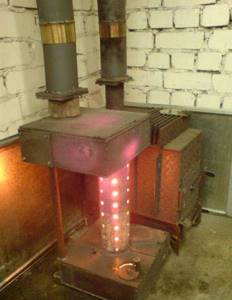
When installing an air heat exchanger, it must be placed between the burner and the chimney, where it will heat up well. To ensure stable combustion, complete combustion of the oil, as well as uniform distribution of the flame inside the stove, a metal plate must be welded to the heat exchanger. This device should also have an air swirler. This design allows the furnace to successfully cope with its tasks. If it operates at full capacity, then the middle part of the body becomes red-hot.
Waste oil tank
The fuel storage tank must be made from an empty freon cylinder. It can be easily found at scrap metal collection points or in workshops where car air conditioners are repaired. The most useful part of such a cylinder is the needle valve, with which you can regulate the fuel supply with great precision.
Doors
It is important that there is a hole in the bottom flap that allows air to flow freely to the burner and pan. The other door must provide a good seal, so stop plates must be provided in the opening.
A lock must be installed on the top door to ensure secure closure. This is important, because when it gets very hot, the body will certainly “lead,” and therefore, without such an element, the sash will not be able to ensure proper tightness.
At the bottom of the stove you need to install a metal stand, which will simplify maintenance of the unit and reduce heat loss to the floor.
Blitz tips
- If the fuel supply is properly adjusted, the Babington burner is very economical and consumes only 0.5–1 liters of waste per hour. And air consumption will be only a few liters per hour.
- If you additionally add a chimney and a combustion chamber with a water jacket to the circuit, then such a burner can be used as a full-fledged boiler for heating a private house.
- You can use a compressor from an old refrigerator as an air pump.
- Such a system works stably even on a mixture of various used oils containing gasoline, diesel fuel, various additives and even antifreeze, which undoubtedly gives it an advantage over its factory counterparts.
- The heat from such a burner is very strong, and the power, depending on the configuration, is more than 10 kW.
How to light a stove
When starting the device, you need to pour a small amount of fuel into the pan. Then take a piece of foam rubber, well moistened with gasoline, solvent or white spirit, and place it directly in the oil in the pan. The foam rubber is set on fire. When the stand is already warm enough, you can turn on the fuel supply from the cylinder. The valve must be opened slowly so that the fuel gradually flows into the stove. Gradually the unit warms up to operating temperature. It is necessary to ensure that no unburned oil remains in the pan: the supply must be adjusted so that the fuel burns out completely.
To stop the furnace, you must first close the valve on the oil cylinder, then the emergency valve. It will take a few more minutes for the fuel to burn out in the stove, after which the operation of the device will stop completely.
Security measures
- A burner using oils and other GSPs can be dangerous if installed and operated incorrectly. To avoid a fire, a number of measures must be observed:
- floors and walls made of flammable materials are sheathed with metal or asbestos sheets;
- fuel reserves are stored at a safe distance;
- oil leaks must be removed in a timely manner;
- electrical elements of the installation must be carefully insulated to avoid sparking in the oil spray area;
- The burner must be placed out of reach of air currents and drafts.
A burner with an open nozzle must not be left running unattended!
The Babington burner, unlike a blowtorch converted for working in mining, is a reliable and durable unit that does not require complex maintenance. It is enough to periodically clean the fuel system, tank and sump, blow out the air duct in idle mode, and also monitor the serviceability of the compressor and oil pump. A working burner is a reliable and economical unit with a long service life.
Cleaning
Combustion products are deposited on the burner, chimney and tray. Before you start cleaning the unit, you need to wait for it to cool completely. The cleaning process includes the following operations:
- From the outside, you need to throw 2-3 handfuls of small crushed stone or sand into the chimney.
- Natural building material removes soot from the canal. It is then removed from the top of the oven.
- The walls of the burner are cleaned with a metal rod (you can wear a glove and clean it with your hand). The carbon deposits are poured into the pan.
- You should take out the stand and shake out all the garbage into the trash bin.
Operating a furnace using waste oil
During the operation of the furnace during mining, it is important to always remember the need to comply with safety regulations when working with flammable substances. In this case, the fuel burns open, which is fraught with unpredictable consequences. Compliance with safety regulations comes down to the following points:
- During operation, the unit is placed on high stands supported on a surface made of non-combustible materials.
- If there are other objects or walls nearby, they should be covered or lined with heat-resistant material.
When the furnace is ignited, the working container is filled with waste to at least two-thirds of its full volume. A few milliliters of solvent or gasoline are added on top, which will increase evaporation and cause the mixture to ignite.
To ignite the stove, a special wick or lit paper rolled into a tube is used and placed into the hole for pouring fuel.
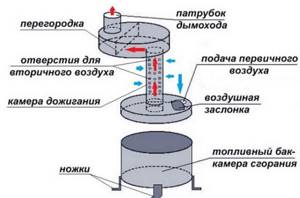
Design and installation
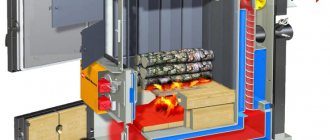
Such a stove has two chambers in its design, which ensure double combustion of fuel. In the first chamber, waste oil burns. In this case, a large amount of flammable gas is released, which then enters the second compartment. It mixes with oxygen, and the resulting mixture continues to burn in the second chamber. This process is accompanied by high temperature and the release of a significant amount of heat. This allows you to efficiently heat the garage, even if there is severe frost outside.
If you intend to use a drip furnace to heat your garage, you should carefully choose the location for its installation. After all, the heating of the room occurs due to the combustion of fuel, and this can cause a fire. The surface of the walls and floor near the stove must be made of non-combustible materials. You should also ensure there is good and stable ventilation. It will be extremely necessary. Otherwise, combustion products will accumulate in the room.
Attention: For the furnace to function properly, both compartments must receive the required amount of oxygen. To regulate it, there must be a special damper in the first compartment. It also has many small holes in the pipe, which is located at the junction of the two compartments. The holes are necessary so that the required volume of oxygen enters the second chamber. The diameter of each hole should be approximately 1 centimeter.
Advantages and disadvantages of a liquid fuel burner
The Babbington design burner has a number of advantages:
- Simplicity of design, no moving parts.
- Availability for making at home.
- Availability of well-calculated and accurate drawings on the Internet.
- Exceptional cheapness of fuel. Enterprises that own a large fleet of automobile and tractor equipment will be able to significantly save on heating and at the same time on the disposal of used oil.
- High energy efficiency. Other burners during processing consume significantly more fuel per kilowatt of thermal energy.
- Small dimensions allow the burner to be built into existing heating systems without significant modifications.
- High degree of fire safety.
In addition to these advantages, the burner also has a number of disadvantages.
- Sensitivity of the fuel path to contamination. The work will definitely have to be filtered.
- Requires power to operate the fuel pump and air compressor.
- Unpleasant odor during work. It is better not to use the burner in premises where people or farm animals are permanently occupied, or it will be necessary to ensure reliable removal of combustion products.
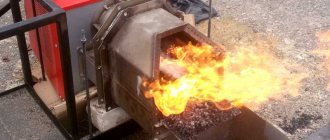
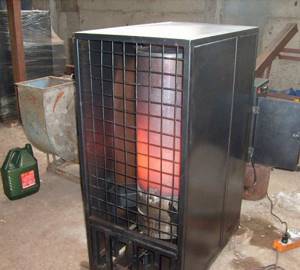
Burner being tested at home
In general, the advantages significantly outweigh the disadvantages, and the Babbington burner is becoming increasingly popular.
Optional equipment
To achieve better heating of the garage, a drip-type furnace will need to be equipped with additional equipment. First of all, connect it to the heating system. To do this, you must first install the water heating tank. After this, connect it to the heating system. Thanks to this, the stove can be used not only for heating, but also for heating water, and, if necessary, for cooking. One of the key advantages of this oven is its compactness. It allows you to quickly dismantle it and then install it in the right place. It is also easy to transport.
Manufacturing options
Attention: Before manufacturing a drip-type furnace for mining, you should decide in advance on its design. Quite often its basis is a gas cylinder.
During manufacturing, it should be taken into account that its burner is characterized by poor sensitivity to all impurities that are part of used oil. At the same time, the sensitivity of the drip mechanism is very high and should be reduced to the required level. To achieve this, you need to put a filter on the hose, for example, a car filter.
A pump will also be required. A high-pressure fuel pump or a car pump is suitable for this purpose. It will be necessary to make a return flow, since otherwise more oil will flow into the tank than required. This is where a dropper, for example a medical one, comes in handy. Since it has a clamp, it will be possible to regulate the intensity of the fuel supply.
Requirements for homemade burners
For proper operation of a homemade waste oil burner, a number of requirements must be met. For better heat transfer, the waste must be heated and in a sprayed state. Other requirements for homemade products:
- low energy consumption;
- ease of assembly and use;
- highly efficient operation of a homemade device;
- The burner should work perfectly even with fuel that is of low quality or contaminated with a large number of additives.
Homemade burners are used for a variety of purposes, often being inserted into stoves that use liquid fuel or universal boilers.
The main thing is to make a nozzle that will be capable of producing a powerful jet of flame.
Preparation and production
Having decided to make a similar structure in your garage, you need to draw up a careful drawing of it and prepare the necessary materials and tools:
- IV;
- steel sheet;
- grinder;
- oil container;
- chimney pipe;
- pump;
- gas cylinder;
- welding machine.
It is best to use a gas cylinder with thick metal walls to make such a stove. Of course, you can use sheet steel, but you must first find one that will have the required thickness, and then give it the required shape. And this will require welding work, which will make the manufacturing process more labor-intensive.
When making this design, you should also remember about the presence of a damper to regulate the oxygen supply in the first chamber. Only if it is present will the camera function properly. You need to draw up in advance or find a drawing on the Internet according to which you will make the stove.
Attention: It must be completely vertical and have no horizontal sections, as this complicates its cleaning and impairs traction. The pipe must be made of high-quality material, which will increase its service life.
Climate
Very often, in household buildings or houses where people live periodically, it is necessary to install an economical stove. An affordable and budget option is a potbelly stove using waste fuel. The real owners quickly figured out how to put oil to work and came up with a heating system that runs on energy-intensive fuel. This raw material burns, releasing a lot of heat and releasing a minimum of soot or soot into the room. The stove and heating method are the most convenient option for heating many outbuildings, such as garages, sheds, greenhouses or animal pens.
Table of contents:
- Do-it-yourself furnace
- Pros and cons of using spent fuel
- Do-it-yourself furnace, drawings
- Do-it-yourself stove made from a gas cylinder
- Do-it-yourself garage oven
- Do-it-yourself drip furnace
- Do-it-yourself wood-burning stove
Do-it-yourself furnace
The design of this stove is simple and, if you have the tools and materials, you can make it in a few hours. As for raw materials, recycling waste diesel fuel, recycled oil and other flammable materials is a big problem for motorists. The decision to use recycling waste from a car to heat the same garage or other buildings is an excellent solution that will bring double benefits. Free material, which is also practically safe for the environment, is an ideal solution. All that remains is to make a stove and use the fuel twice, for its intended purpose and as recycled material. You can get used raw materials in large quantities at service stations and car factories. Sometimes they even pay for the disposal of recycled materials.
Pros and cons of using spent fuel
The most important advantage of using a do-it-yourself stove is its high efficiency. Mining is practically free fuel, which can be purchased for a purely symbolic amount. The efficiency of the boiler installation is at least seventy-five percent. These are not the highest figures, but not small ones either. Among the advantages of heating using economical waste furnaces, the following parameters can be highlighted:
- The heat output of this type of heating is comparable to an electric heater with a power of fifteen kilowatts. Average fuel consumption is one liter per hour;
- in fifteen minutes the high temperature rises and warms up a medium-sized room;
- Any oil will be used, it can be transmission, shock-absorbing or motor oil;
- the design can be used at any temperature conditions, low temperature will not affect the quality of the stove;
- to make such a heating system you do not need special skills, it is enough to have welding and plumbing skills;
- the flat top of the oven allows you to cook food on it;
- the structure is quite mobile and can be moved to any convenient place;
- burning waste fuel can be called conditionally environmentally friendly, but the harm to the environment is minimal;
- The stove can be integrated into the heating system.
As for the disadvantages of this option, we can highlight the following:
- to prevent carbon monoxide and smoke from entering the room, it is necessary to make a sufficiently long chimney and insulate it well;
- you should clean the boiler installation and chimney at least every ten days;
- the issue of storing oil in winter requires advance decision, so that the waste does not freeze, it must be stored in a warm place or buried in the ground below the freezing line;
- heat does not accumulate, the room temperature is comfortable while the stove is burning;
- To comply with safety precautions, you must purchase a fire extinguisher and store it close to the stove you built yourself.
Do-it-yourself furnace, drawings
When deciding to build a heating device for testing yourself, you need to think about what type of structure it will be. There are three known options for a heating system using used oil:
- Pyrolysis burner - made from sheets of metal or ready-made tubes, cylinders; such a system consists of two closed reservoirs connected to each other using a pipe. Used oil is poured into the lower reservoir, which releases vapors, which in turn burn, spreading heat. The temperature can be adjusted by increasing or decreasing the oxygen supply.
- Design with built-in ventilation - a specially adapted fan supplies air to the second compartment, this allows the combustion process to be carried out more efficiently, and heat is distributed throughout the room.
- Design with drip feed of waste - this model is identical to the principle of operation of a diesel engine and is the most economical, but at the same time the most difficult to manufacture. Factory-made devices are available for sale and it is better to purchase a ready-made design. This type of stove is quite demanding on the quality of the fuel and its temperature.
There are many options for making a stove, but with any variation, the necessary parts of the heating system are as follows:
- fuel tank or combustion chamber;
- afterburner;
- air damper;
- chimney pipe;
- primary air supply;
- secondary air hole;
- legs.
The stove has its positive and negative sides. The advantages include the following:
- efficiency - low fuel consumption;
- ease of manufacture - such a design can be made in a day;
- energy independence - you can heat the stove at any time as needed, without being tied to gas or electricity;
- multifunctionality - the stove heats the room, using the stove you can heat water or cook food.

The disadvantages of such structures are that:
- chimney pipes must be installed only strictly horizontally with a pipe height of at least four meters;
- The chimney must be cleaned regularly.
But we should not forget about precautions when using homemade heating structures:
- No water should get into the boiling oil;
- During operation of the heating system, it is necessary to carefully refuel;
- do not use this heating option in rooms with difficult access to fresh air;
- Do not leave the device unsupervised for a long period of time.
Do-it-yourself stove made from a gas cylinder
If the farm has a gas cylinder, it can be used to make a homemade furnace for mining. Thanks to the thick walls of the cylinder, the stove can function for a long time without burning out. The shape of the cylinder is ideal for the design of the boiler installation. To make a stove, you will need:
- To do this, you need to take any cylinder with a volume of fifty liters. The thickness of the material should not exceed one and a half centimeters, otherwise the walls cannot fully warm up and the oven will not work properly.
- You will need a sheet of metal of the same thickness - up to one and a half centimeters.
- The chimney pipe must be no shorter than four meters, with a diameter of ten centimeters.
- The best pipe for the burner is ten centimeters in diameter and up to thirty-five centimeters long.
- For the legs you will need a metal corner or tube.
- The tools you will need are a tape measure, a drill, a grinder, a welding machine, and electrodes.
Before starting work, the cylinder must be emptied of gas residues and thoroughly rinsed outside. Even if the cylinder appears empty and has not been used for a long time, safety precautions should be observed.
The cylinder is fixed for convenience and work on making the stove begins.
The bottom of the cylinder is the lower combustion chamber, the height of this part of the structure is about twenty centimeters, the upper chamber will be about the same size. Legs made from available materials are welded to the bottom part: corners, tubes.
A partition is welded to the opening of the upper chamber hatch; it is welded as close as possible to the location of the chimney; its task is to trap heated smoke in the tank.
After this, you need to cut out two circles; for this, metal sheets are used. Circles will be used for the lid of the lower chamber and for the bottom of the upper chamber. Holes ten centimeters in diameter are made in each of the lids. For the lower chamber, the hole is located in the center, for the upper chamber - closer to the edge along the diameter of the combustion tube. A hole about six centimeters in diameter must be made in the bottom cover; it is necessary for refueling. The hole should have a flap like a peephole, with the ability to move back and be installed in place.
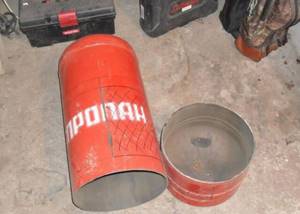
Preparing the balloon
If you decide to use a gas cylinder to make an exhaust furnace, you will need to properly prepare it and cut off the lower and upper parts from it. To achieve the necessary stability, you need to weld metal legs to it, which can be made from previously cut parts. After this, you can begin constructing the camera, which, as mentioned above, should be collapsible. A hole should be made in it into which a tube will be mounted to regulate the supply of oxygen and fuel to the chamber.
A hole of the required diameter should be made in the center of the cylinder and a pipe connecting both chambers should be welded to it. The second compartment can be made either from the middle part of the cylinder or from a steel sheet. Having made the camera, it must be secured by welding. Having done this, you can install the chimney.
After the device is ready, you need to check its functionality. Please note that you should not completely fill the compartment with oil, as it will splash out of the combustion chamber. Fill in oil approximately 2/3 full. The same should be done during subsequent operation of the furnace.
Making a boiler with your own hands
You can find out complete information on the selection, operation and maintenance of gas boilers from all manufacturers if you go.
It will be necessary to make a burner during testing, because the device works by burning oil supplied to the heated combustion bowl.
To work you will need:
Tools
By the way! Did you know that a heating boiler from any manufacturer can explode at any minute?
To make your own boiler from an oxygen (or gas) cylinder, it is optimal to choose a cylinder with a capacity of 50 liters.
Tools you will need:
- Welding machine
- Angle grinder (grinder)
- Cutting torch
First, you should cut off the balloon at the top, from which you can later make a lid. Then you need to make a hole at the top of the cylinder, to which the chimney will then be connected.
According to the diagram, we cut out a door on the side for loading fuel. The chimney can be of different sizes, the main thing is that it provides the best draft. Then you can get a stable pyrolysis process throughout the day. This is convenient because you only have to heat it once a day, which is essential during the heating season.
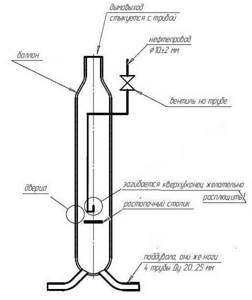
Diagram of a boiler made from an oxygen cylinder
Such a homemade boiler in testing, having small dimensions and weighing only about 10 kg, produces 5-6 kW of heat, with an oil consumption of about 0.5 liters per hour. You can melt it even more, but don't, because it might explode.
You can improve this design and weld the cone as shown in the figure. To make them, you should take structural steel thicker than 4 mm. The fuel-air mixture will be mixed in the pipe, which will increase operating efficiency. You can install an oil burner, further improving the device.
The length of the chimney should not be more than 3.5 meters, since due to the significantly increased draft, the fuel will go into the pipe. As a result, heat transfer will decrease and fuel consumption will increase.
Optimal dimensions and operating principle
The right picture shows a water heating version of the device made from a cylinder. Its essence is that several turns are made from a steel tube, placing them in the upper part of the zone where the boiler afterburner device is located. In detail, you can experiment on the spot, based on your wishes.
To maintain temperature, it is better to cover the outside of the coil with a protective casing. Cold water is supplied into it from below, which heats up as it passes along the spiral, and goes into the water heating system.
The proposed boiler design for exhaust from an oxygen cylinder is so good that it has long been used in industrial production; for example, a boiler called “Rizza” is produced, which completely repeats the drawings according to which such boilers are made independently.
Diagram of a Rizza type boiler
Recommendations for safe work with the cylinder
If you are heating your garage with a do-it-yourself stove using a gas cylinder, you should follow some recommendations. This will allow you not only to speed up its production, but also to make this process safer. First of all, remember that even in a cylinder that has not been used for a long time, there may be residual gas that can explode. To avoid this, unscrew the valve and allow any gas that may be contained in it to escape. After this, fill the bottle with water. Only then can you cut it with a grinder.
Attention: Do not under any circumstances start cutting the balloon if you have not completed the steps mentioned above.
Making a drip-type oven yourself can be done quite simply and quickly. With its help, you can effectively heat your garage even in the coldest weather. In addition, thanks to its availability, you can save a lot of money. After all, the fuel for this furnace is any used type of oil, which any motorist can always find in the required volume. All this makes a drip furnace ideal for heating a garage.
Kinds
These devices may differ from one another in several ways. First of all, if possible, regulate the power. There are three varieties:
Single stage
These are the simplest burners, the thermal output of which, also known as power, is always constant.
The amount of incoming heat is regulated by periodically turning on/off the burner.
The advantage of this device is its low cost.
The disadvantage is that all elements of the boiler, and especially the heat exchanger, operate with maximum thermal load and under conditions of sudden temperature changes. And this negatively affects the durability of the heat generator.
Two-stage
Such devices can operate in two modes: with maximum performance and half. Half mode is used as an intermediate mode for smoothly reaching maximum power, or as the main mode in relatively warm weather.
A two-stage burner is more expensive than a single-stage burner, but the boiler equipped with it operates in a gentle mode, and therefore lasts longer.
Modulated
The most expensive type of diesel burner, which is characterized by the ability to smoothly regulate power over a wide range - from 10% to maximum. Such burners do not turn off, but operate constantly - with the productivity that is required at the moment. This not only reduces the thermal load on the heat exchanger and furnace, but also eliminates temperature changes.
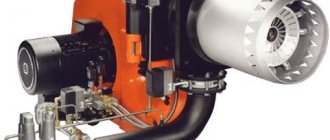
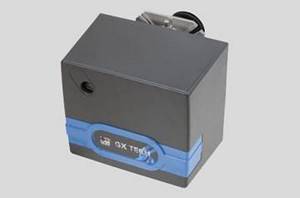
Diesel burner M 302
In addition, fuel consumption is reduced. After all, the operating scheme of one- and two-stage burners assumes some overheating of the coolant, as a result of which the amount of heat loss increases (it is proportional to the difference in temperature inside the room and outside).
If the boiler is equipped with a modulating burner, no overheating occurs (the temperature is maintained at the set point all the time), so heat loss, and therefore fuel consumption, becomes minimal.
Other types
Diesel burners also differ in the method of supplying primary air, which is used to prepare the fuel-air mixture. On this basis they are divided into two types:
- Diffusion (atmospheric): the simplest burners in which air is sucked in due to the pressure drop in a moving liquid stream. But with this method it is not always possible to ensure the supply of a sufficient amount of oxygen, so the fuel may not burn completely. The consequences are a drop in the efficiency of the installation and the formation of a large amount of soot.
- Pressurized or blown burners: Equipped with a fan that provides forced air supply in any volume. They cost a little more, but the fuel burns completely under any conditions.
Particularly powerful heat generators are equipped only with forced-air burners.