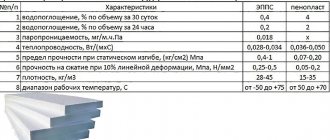
What is oil waste?
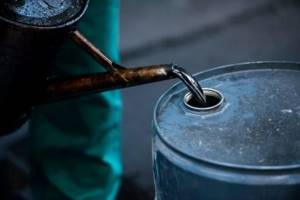
Waste oil or used oil is the product that remains as a result of the operation of a car engine. Motor, transmission or other industrial oil accumulates in large quantities at service stations, in automobile workshops, as well as among ordinary car owners.
During use, the oil loses its beneficial qualities, accumulates salts, slags, resins, and tiny particles of metal, but people have found use for such an illiquid product.
It is forbidden to dump the waste into the ground, since the most dangerous product for nature completely destroys all living things. An alternative is to deliver waste material to special collection points for further processing.
In small quantities it is used for household needs:
- lubricate working tools (for example, chainsaws);
- impregnate wood (sleepers for railway lines);
- lubricate rubbing parts of light vehicles (scooters, bicycles);
- used as a fire starter;
- cover surfaces filled with bitumen.
As at the end of the last century, waste is used as fuel for furnaces installed in semi-residential premises - garages, utility rooms, workshops. If you build a stove yourself, then with constantly replenished supplies of used oil, heating the room will be practically free.
Other effective ways to organize economical garage heating are presented in an article entirely devoted to this issue.
Conclusion
The most common reasons for stoves smoking in the house are poor draft and soot-covered structure inside. Moreover, if the system begins to become overgrown with “fluffy” soot, then it needs to be cleaned urgently, as it can catch fire, which is a fire hazard.
If you promptly check the chimney for soot fouling and clean it when blockages are detected, then smoke in the room will rarely occur or will not occur at all. It is also necessary to constantly check the entire structure to identify various damages, cracks, breaks, and so on - they are also a common cause of smoke.
Why are waste oil furnaces popular?
The main reason for people's love for homemade stoves is the low (or zero) cost of the unit itself and the fuel for it. Some home-grown craftsmen make such heating devices as an experiment and at the same time a useful device.
With the advent of a homemade waste oil stove, the issue of “attaching” recyclable materials no longer exists.
For especially advanced craftsmen, the production of garage furnaces for working out has become another business option. They build custom models and sell them to interested but less skilled garage owners.
How does the unit operate during testing? The process consists of splitting heavy fuel with impurities, which has a rather complex composition. In another way, the process in which there is a lack of oxygen and the combustion of not the fuel itself, but its vapor, is called pyrolysis. The operating principle of pyrolysis equipment is described in our recommended article.
To start the process, it is necessary to evaporate the fuel, then heat the resulting vapor to a temperature of about +300-400 ºС, after which combustion will occur spontaneously. All you have to do is wait for the fuel to burn completely.
There are 2 schemes that are used when making stoves independently:
- filling the tank with oil and setting it on fire, as a result of which the vapors evaporate and begin to burn;
- the use of a burner in which three zones (pyrolysis, ignition and afterburning) are combined and make the combustion process more efficient, controllable and safe.
The second scheme is more complex, requiring serious modification of the fuel and manufacturing precision, so we will consider simpler models from the first group.
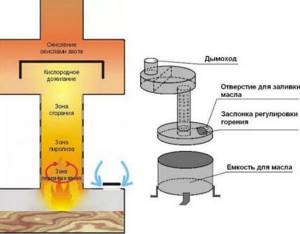
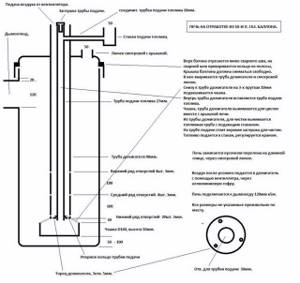
Diagram of the design of a simple model of a furnace in production. The air necessary to support the combustion process enters through the neck with a damper. The same damper can partially regulate the combustion force
Advantages of using an oil-based garage stove:
- ease of design and maintenance of the device;
- fuel economy - about 1.5-2 liters per hour;
- absence of soot and soot;
- safety of storage of mining reserves;
- it is possible to connect an air or water heating circuit;
The compactness of the unit is also extremely important for small spaces.
There are also disadvantages:
- the need for regular cleaning of the stove and chimney;
- a mandatory element is a vertical chimney with a height of at least 4 m;
- for furnaces with nozzles, only purified oil should be used (the approximate cost of a filtered product is 8-12 rubles/l);
- One of the conditions for storing mining is above-zero temperature, that is, you need either a room heated in winter or a tank buried in the ground.
Before manufacturing/purchasing a finished furnace or boiler for testing, it is necessary to consider all the pros and cons of home-made devices, and then make a final decision.
The stove smokes when lighting: what to do first
If, when igniting, clouds of black smoke pour into the room, then this is not only fraught with damage to property, which will affect the interior, but is also dangerous to health.
First of all, it is necessary to open the front door slightly; if no visible changes have occurred, use non-flammable containers to remove the stash and stop further smoldering of the solid fuel. As soon as this process is completed, it is necessary to move on to finding the reason why the stove smokes and such an unpleasant effect appears.
In such a situation, you cannot hesitate, especially when the problem arose during the heating season. There are two algorithms of action, guided by which, you can identify the cause of smoke in the structure.
To implement your plans, you won’t need a lot of time and effort, you don’t need to have any special skills, just follow the instructions that I will provide for each method separately.
Checking the draft quality in the chimney
At the first manifestations of excess, it is necessary to check this particular indicator; there are several methods, each owner can choose one of them at his own discretion.

Experts advise choosing the most understandable algorithm of actions, for which you have everything you need, the principle is as follows:
- Using an anemometer. This device is often used by professionals; it is designed to identify draft indicators in a chimney.
- Highly flammable material is also actively used. It must be brought to the door of a potbelly stove, fireplace or stove, and if the pipe has good patency, the fire will rush upward.
- Visual inspection. When fuel burns, you can observe a dark red color, which will indicate poor draft of the room heating device. If everything is in order, the flame will be light, almost white.
- Strong odors. Using your sense of smell, you can identify problems; if sharp unpleasant odors appear when you open the firebox, this indicates mechanical blockages in the chimney.
To carry out checks, you will need to purchase a device, but often excesses can be identified using available materials or based on personal inspection.
Check chimney deformations
Before inspecting the structure, it is important to determine the nature of the problem; whether it is temporary or permanent. If the problem recurs often, then it would not be superfluous to carry out an inspection to identify damage.
You need to visit the attic space and climb onto the roof; if you couldn’t find anything suspicious, you should use a weight on a cable and check the passage of the channel, you need to lower the device until they appear in the firebox, trying to tap the inner walls as much as possible.
Where to use a homemade furnace for mining
Since during the combustion process engine oil, especially used one, does not emit the most pleasant odor, and from a health point of view it is not very useful, it is better not to use stoves of this kind in residential premises. If there is no other way out, high-quality removal of combustion products is mandatory.
Typically, stoves are installed in non-residential premises - utility rooms, garages, sheds, workshops, and so on - where constant heating is not required, but only warming up the air for a relatively short time.
Due to the fact that even the simplest designs of such a “ garage potbelly stove ” make it possible to regulate the intensity of fuel combustion, it is possible to ensure either an economical mode of its use and gradual heating of the premises, or increased consumption with very fast heating of the air volume.
Reason 6 - combustion does not occur in the oven
Sometimes you can observe a phenomenon when portions of smoke and sparks fly out of the furnace in whole bursts. This is due to the fact that combustion in the furnace does not occur in the firebox itself, but in the smoke channels, and is of a pulsed nature.
Eliminating this cause depends on the specific oven. There is no universal solution. In some cases, simple traction control will help. However, many stoves will “shoot” intensely at any draft. To cope with the problem, you can try simply laying less firewood. This is better than waiting until the stove “fires” and the room is filled with smoke.
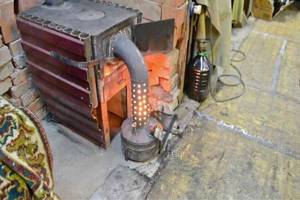
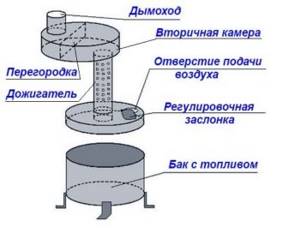
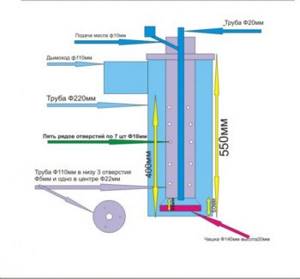
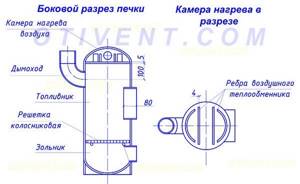
General principles of operation of a furnace for a garage or summer cottage
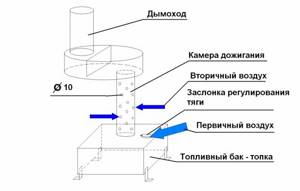
The essence of the process is simple: since the oil itself does not burn so much as it smokes, it must be heated to boiling point and the released vapors must be ignited. Accordingly, you need a container for heating the oil, air supply points and an afterburner chamber. And, of course, the chimney.
The diagram below shows the principle of the simplest stove with a square fuel tank.
So:
- approximately ½…2/3 of the volume is filled with waste into the fuel tank, also known as the firebox. This is no longer possible - either during the boiling process the oil will splash out, or simply not enough flammable vapors are formed;
- after the fuel has settled a little in the tank and gives off a certain amount of evaporation, the contents are set on fire. This is done with the help of a “torch” - a burning splinter, a rag (preferably also oiled), paper. Next, the filling hole is closed and not opened again until the fuel burns out;
- when heated, the oil begins to produce more and more vapors; they rise to the afterburning zone, mixing along the way with secondary air. Since the heated vapors are much higher in temperature than the air surrounding the pipe, oxygen is drawn into the holes very actively, contributing to an increase in the combustion temperature. The draft can be adjusted using dampers, thereby increasing or decreasing the intensity of vapor combustion;
- heating of the surrounding room occurs due to heat exchange between the hot combustion chamber, pipes, afterburning chamber and air. To ensure that the device releases heat longer, a damper is placed between the afterburning chamber and the chimney, reducing the rate of removal of heated and burning vapors.
To ensure uniformity of the process, the afterburning chamber and the firebox are made of approximately the same size (volume).
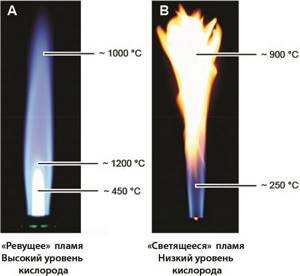
If the stove is made correctly, the flame has a white-blue color. Accordingly, the combustion temperature is 1000 degrees Celsius and higher. If the flame has golden-orange, reddish tones, the combustion temperature is clearly insufficient - weak draft, low heating of the exhaust, design problems in general. With a blue-white flame, the soot formed during the combustion process partially burns out before reaching the chimney, which significantly reduces the necessary frequency of cleaning the smoke ducts.
Regardless of how correctly the structure is designed and executed, soot and soot will certainly form in it, and non-combustible sediment will accumulate at the bottom of the fuel container. Therefore, it is necessary to make the oven as collapsible as possible - this will make cleaning it much easier.
We recommend: Insulating walls from the outside: types of external insulation for a brick or concrete building, density of slabs and rating of materials
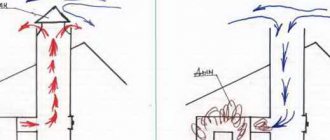
Features of the chimney device
The length of the chimney in these stoves is assumed to be at least 4 m. This is necessary both to create proper draft and to ensure high-quality removal of combustion waste. It is also important to provide high-quality ventilation in a heated room, since some of the combustion products somehow end up not in the chimney, but inside the room.
The diameter of the chimney is assumed to be at least 100 mm, and the presence of elbows, turns, and complex shapes is extremely undesirable - cleaning the chimney is necessary much more often than with conventional stoves, since the fuel produces a large amount of soot.
The best option for installing a potbelly stove is strictly under the hole in the roof through which the chimney will be led out. In this case, the vertical position of the chimney will ensure stable draft and easy cleaning. The outer part of the pipe must be insulated. If this is not done, condensation mixed with unburnt soot will settle on the inner walls, quickly narrowing the passage for smoke.
Operating principle of a potbelly stove
The operation of a potbelly stove is based on the phenomenon of pyrolysis. Such a furnace, where the fuel is waste oil, has 2 main compartments: a tank and a combustion chamber, located at different levels. The first is intended for pouring waste and burning it.
In another compartment, located above, combustion products of waste mixed with air are burned. At the first stage, the temperature is relatively moderate, and at the second stage it is much higher - up to 800⁰.
When making such a stove, the main task is to ensure that air flows into both compartments. It enters the first chamber through an opening designed for loading liquid fuel. The hole is equipped with a special damper, through which the volume of air supply is regulated.
Air access to the second tank is provided by holes with a diameter of about 9 mm. The efficiency of a properly assembled potbelly stove reaches 90%. Visually, different potbelly stoves may differ from each other in both shape and size, but the principle of operation is the same.
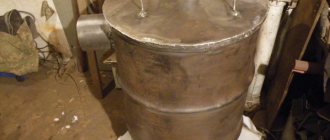
The power of a potbelly stove is proportional to the volume of the lower tank. The larger it is, the less often you will have to add mining. Sometimes this container is made very massive, holding about 30 liters of used oil.
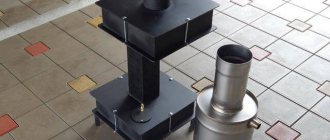
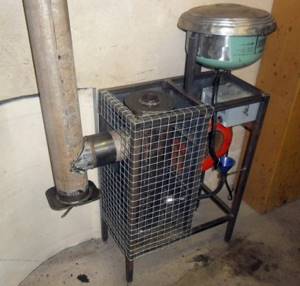
Improving the simple design of the stove during development made it possible to invent a unit for arranging a garage, in which it would be pleasant to wash your hands with hot water, or a small private bathhouse:
Pros and cons of a garage furnace using waste oil
Among the main advantages of mining furnaces, it is worth highlighting:
- ensuring efficient heating of a garage or household building in a short period of time;
- independence of the device from the presence of gas or electricity;
- ease of operation;
- unique design features of the unit, which allow not only to heat the room, but also to cook food;
- no open flame;
- reliability of the design due to the use of metal products connected by welding in the manufacturing process of the furnace;
- absence of a large amount of burning and soot when the stove is used correctly;
- light weight, allowing the heating device to be easily transported;
- the possibility of using scrap metal in the furnace manufacturing process;
- During operation of the device, oil and its vapors are burned;
- By installing the tank at the top of the stove, you can combine the device with a water heating system.
In addition to the advantages, the exhaust stove has some disadvantages, namely:
- high probability of clogging of the supply tube with spent fuel;
- the need to install a chimney whose length exceeds 4 m;
- hotness of exposed surfaces;
- the need for weekly cleaning of the chimney and oil container from waste accumulation;
- a high percentage of the likelihood of clothing becoming contaminated during contact with fuel;
- unpleasant aroma that comes from used oil;
- the need to place the container with fuel in a well-heated room;
- improper operation increases the risk of fire;
- extinguishing the flame in the device is possible only after the fuel has completely burned out;
- the presence of a humming noise that occurs during the operation of the heating device;
- the occurrence of fuel combustion if it is heated to its flash point.
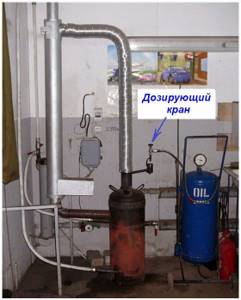
Important! A working furnace allows you to quickly heat a garage space. Before adding fuel to the system, it must be filtered.
A homemade stove can be equipped with a drip fuel supply
How to light and stop the stove?
After many experiments, I found the simplest and most effective way to ignite such a stove. First I pour oil into the pan. There shouldn't be too much of it. It is enough for the oil to cover the bottom of the pan.
Then I take a piece of foam rubber and thoroughly moisten it with gasoline or solvent. I place the soaked foam rubber in a tray so that the lower part of the piece is immersed in oil.
Then I set the foam on fire. It burns steadily even when the draft gets too strong. As a result, the surface of the pan is heated to the required temperature.
Then I carefully open the valve of the fuel tank until it begins to flow in a very thin stream. Adjust the feed rate as carefully and slowly as possible.
The stove will gradually enter operating mode. Periodically monitor the waste level in the pan.
To stop such a stove, it is enough to simply close the valve on the oil tank, and then, when the oil stops flowing, close the emergency valve. The oven will go out completely within 3-5 minutes and the housing will begin to cool.
Types of homemade stoves in development for the garage
According to the type of design, there are several options for homemade furnaces for mining:
- a unit that is made of metal sheets or a gas cylinder;
- supercharged device;
- drip type stove being used in a garage.
The first type is the simplest device that any garage owner who knows how to use a welding machine can make. For this purpose you will need to prepare:
- metal sheets;
- metal pipes.
To reduce the manufacturing time of the structure, you can use a gas cylinder. When cutting off its upper part, you should be careful, because a small part of the gas may remain in the metal vessel. An explosion is possible, which can be prevented by filling the cylinder with water. Now you can start dismantling.
During the manufacturing process of a supercharged stove, a fan is installed. In this case, it is important to ensure that the main air flow is directed to the second chamber, which will ensure high-quality combustion of the fuel. The resulting heat will spread quickly and evenly throughout the garage.
Depending on what type of structure will be manufactured, you can give preference to installing conventional convection, an air heat exchanger, or heating water in a boiler.
A stove using a gas cylinder can keep the garage warm even in severe frosts. Important! Industrial furnaces are compact in size, safe, and affordable. However, self-made devices are no less effective at heating a garage space.
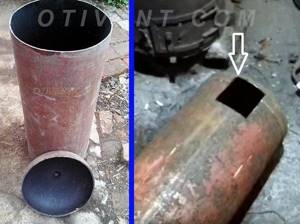
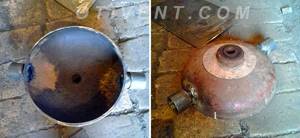
Oil tank
Oil tank
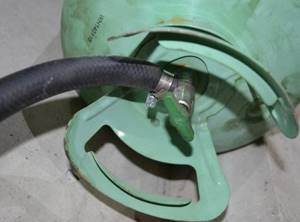
To make the tank, I took a freon cylinder. You can buy it for pennies at any service station or metal collection point. The main thing is that the needle valve of this cylinder is in good condition. With its help, in the future you will be able to accurately control the amount of fuel supplied.
Oil tank
The tank was connected to the stove using a hose. The hose was connected to the valve. The tank itself was secured in an inverted position.
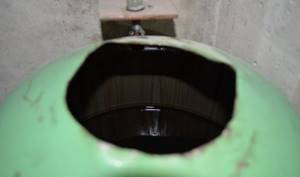
To fill the waste, I cut a hole in the tank.
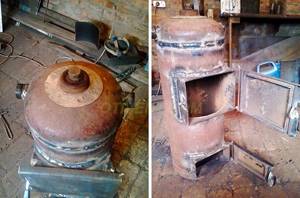
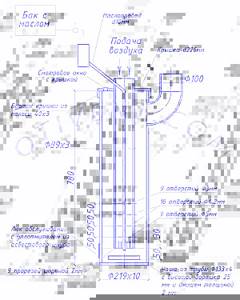
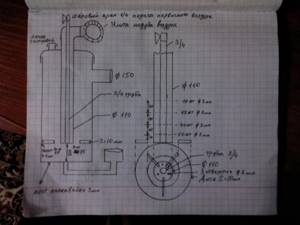
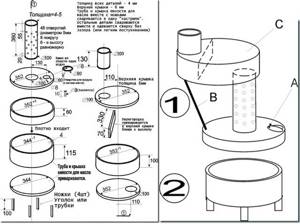
Furnace under development: drawings and stages of creation from a gas cylinder
A gas cylinder exhaust furnace is very popular due to its simple assembly scheme.
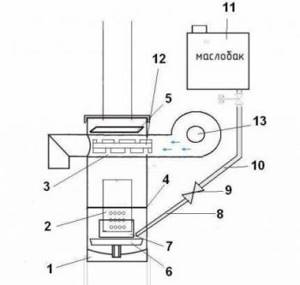
Drawing of a furnace being tested.
Scheme of a gas cylinder stove
Construction details: 1 – base of the body; 2 – perforated pipe; 3 – heat exchanger pipe; 4 – partition; 5 – visor; 6 – evaporator for oil; 7 – coupling; 8 and 10 – tube for feeding waste; 9 – ball valve; 11 – mining tank; 12 – swirler; 13 – fan.
The mechanism itself is aimed at more efficient heating of the room. Heated air will circulate throughout the room after installing the heat exchanger. This is a steel pipe with a diameter of 100 mm. The most suitable place for its installation is inside the housing, between the burner and the chimney.
To hold the flame, a metal platform cut from a 4 mm sheet is welded to the top of the heat exchanger. The air supply is organized using a duct fan. It can be made automatic by using a thermal relay.
To better retain heat, a swirler is placed inside the pipe - a structure of two welded metal corners, the sides of which are cut and deployed in the form of blades. A gap is made at the bottom of the second door to allow air to freely enter the housing and maintain oil combustion.
Chamber separation
In a waste oil furnace, the combustion process occurs twice, i.e., you will need to equip two combustion chambers.
In the first chamber, the used oil burns slowly, producing flammable vapors. They enter the second chamber, where they are mixed with air. This combustible gas mixture burns in the second chamber, and releases a significant amount of heat, heating up to very high temperatures.
For proper operation of a homemade waste oil stove to work correctly, it is necessary to ensure air supply to both the first and second chambers. Where the waste burns, a control damper is needed, since the amount of incoming air must be moderate.
The second chamber can be provided with air by making a series of holes with a diameter of about 10 mm in the pipe connecting these two sections.
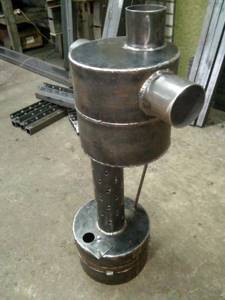
Burner device
An exhaust furnace consists of two containers connected to each other by a pipe. Thanks to the holes, the air necessary for combustion enters the unit. The lower reservoir is used for oil. It has an opening with a damper to increase or decrease the air flow into the chamber.
Drawing of a furnace being tested.
When waste is burned, vapors and gases are formed and enter the connecting pipe. Here the products of oil combustion are mixed with a large amount of oxygen. The gaseous waste from this process is discharged through the chimney.
Heater operation algorithm:
- Used oil is poured into the lower tank and ignited using any flammable liquid.
- After heating, the waste evaporates and begins to burn.
- The released pyrolysis gases are mixed in the afterburner with secondary air and burned in the upper tank, which has a partition.
- Combustion products exit through the chimney.
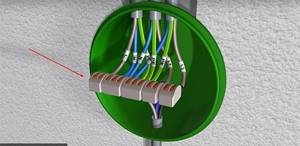
Bowl evaporator
Waste oil is a highly contaminated fuel that burns poorly. Therefore, for complete combustion, its heavy components must be separated from the light ones. For this, the flame splitting method (pyrolysis) is used.
There are two ways to initiate the pyrolysis process:
- The first method is to set fire to the oil in the fuel tank. Its temperature rises and evaporation begins. Next, the oil vapor mixes with the air entering through the neck of the tank. The splitting of waste and combustion of its light fractions is carried out in a pyrolysis combustion chamber, where excess oxygen is burned.
- The second method - instead of a tank with burning oil, a flame bowl and a special burner are used, which allows you to combine the pyrolysis, combustion and afterburning zones in the flame torch. A drop of oil falls on the hot surface of the bowl, evaporates, flares up and burns.
Homemade furnaces with drip oil supply are extremely rare, since their manufacture requires fundamental knowledge in the field of physics. In addition, experience in the manufacture of high-precision parts and the availability of special materials are required.
Recommend: Heat Resistant Oven Sealant, High Temperature Chimney Sealant
Fuel supply system
The drip supply of oil should be organized according to a 2-stage scheme, since a single-stage system can lead to unstable combustion or even an explosion. The two-stage scheme assumes the presence of a main oil tank, a valve, a supply dropper, a supply tank and a free drain.
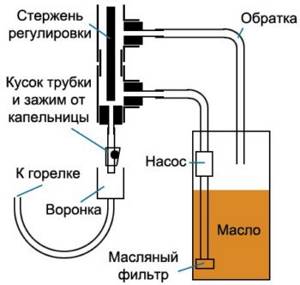
Furnace fuel supply system.
A working dripper is located from the drain no lower than 60 mm from the bottom.
The fuel supply is opened when the kindling in the bowl (see below) is lit. While the oil drips into the tank to the level of the drain, you can adjust its flow, and then it drips into the bowl.
Drip furnace safe power supply diagram
But if you open the valve too much, the consumable will immediately fill, fuel will flow into the stove, and it will emit burning spray. It would be more correct to build a system for dropping oil into the stove with a safety valve and a metering capillary.
Since different metals are wetted by waste in different ways, and its properties change significantly, the length of the capillary will need to be selected: the oil is supplied under a gravitational pressure of 120-150 mm at room temperature, and the capillary is selected so that it drips more often, but with clearly visible drops.
Heat exchanger device
A heat exchanger is a device that transfers heat from one medium to another. The heat exchanger itself is not an independent device; it begins to work only when installed in any device.
To increase the efficiency of heat transfer, a specific type of heat exchanger with an optimal set of characteristics is selected for each device. Its efficiency depends on the design of the device itself and the material from which it is made.
Materials that are resistant to corrosion and have high thermal conductivity are used for heat exchangers. These include: aluminum, stainless steel, copper and its alloys, brass, cupronickel, titanium.
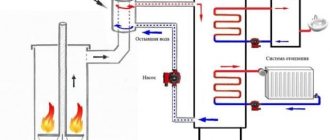
Exhaust furnace with water circuit
Waste oil furnaces with a water circuit heat water well. Thus, the room is heated by the furnace body and pipes in which the heated liquid circulates.
The advantages of such a unit:
- simplicity of design;
- does not smoke during operation;
- fire safety;
- economical in operation;
- independence from gas and electricity;
- easy to regulate room temperature;
- ease of ignition.
Installation of an exhaust furnace for a garage.
Flaws:
- chimney installation required;
- the chimney must be strictly vertical, without inclined sections;
- Every week you need to clean the stove and chimney; used oil must be purified.
The design of the furnace for mining with a water circuit consists of two chambers. They are connected by a pipe through which air is supplied. When heated in the lower tank, the fuel forms oil vapor. In the pipe it mixes with air, causing the combustion to become more intense. It burns in the upper chamber, and combustion products are discharged through a pipe.
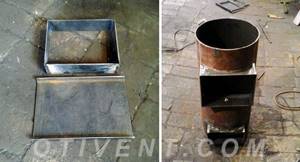
Making a stove from steel sheets - a guide for home craftsmen
Instead of a cylinder, steel sheets can be used.
The heating design made from them is very popular among owners of workshops and garages. A stove made from sheets not only heats the room, but is also used for cooking. At the same time, it has compact dimensions. We make a miracle oven from steel sheets like this:
- We find a suitable design drawing.
- We make the lid of the future heating unit and the bottom of the firebox from a 6 mm thick sheet, and the tank itself from a 4 mm sheet. It is easy to obtain the required blanks from sheet steel using a grinder.
- We cut a strip of steel 11.5 cm wide from a 4-mm sheet, fold it into a ring with a cross-section of about 34 cm (this operation should be performed on a sheet bending unit), and weld the strip to the last one. You have received a fuel tank pipe.
- Make a circle from the same sheet (its diameter will be 34 cm). It will serve as a lid for the tank. Metal corners need to be welded to it (on four sides).
- From a 6 mm sheet, cut out a strip (6 cm in width) and make a ring out of it, as well as another circle. The cross-section of the circle and ring should be slightly more than 35 cm.
- In the center of the circle, cut a hole for a chimney pipe with a cross-section of 10 cm. Next to this hole, make another one. Its diameter is 5.5 cm. Fuel will be supplied into this hole. All that remains is to weld a circle and a ring into one structure to obtain a reservoir for filling the waste.
Now you need to make the lower part of the tank. Cut a circle from a 6 mm sheet, step back 2 cm from its edge and make a hole (a pipe for the chimney is placed in it). The pipe itself is obtained by cutting a piece (about 13 cm) of a pipe with a cross section of 10 cm. Then you make a partition - cut a rectangular blank from a 6 mm sheet. Its length is 33 cm, and its width is 7. The partition is installed in a circle 35 cm in diameter and welded. After this, you can install the pipe.
Steel furnace using waste oil
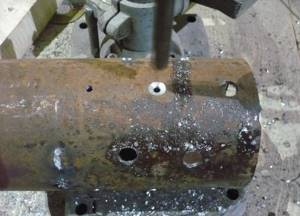
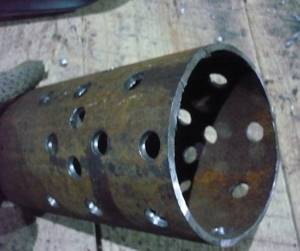
The first pipe made should be slightly modified. From below it will be necessary to drill 48 nine-millimeter holes in a circle (8 per circle, the total number of circles is 6, the distance between them is 6 cm). A pipe treated in this way can be installed in the lid of a fuel tank. The procedure is performed so that it stands absolutely level. If there are deviations, you need to process the pipe with a grinder and a file.
Important! The pipe and cover are not welded together. At the same time, they must fit into each other as tightly as possible.
Then everything is simple:
- Connect the two parts of the container. They are also not weldable. The tightness of their joint is ensured by a sealing ring.
- Weld a container for filling oil to a pipe with 48 holes, and on the opposite side - two parts connected by rings.
- Mount a peephole - a plate in the form of a circle - on the hole for feeding the waste. It should close and open easily.
The last step is installation of the chimney. Its length, as was said, is taken to be at least 400 cm. Outdoors, it should be located vertically (strictly, without the slightest deviation - check with a level). In the very room where the stove is located, the chimney can be installed at a slight angle.
Solid fuel heat gun
Any stove that burns wood or coal suffers from one significant drawback. Located in a corner of the garage, which is usually not insulated, the heater warms only part of the room. The opposite corner (usually right at the gate) remains cold and uncomfortable to work there. The problem is partially solved if the chimney is laid at an angle through the entire room, which is practiced by many owners of garage buildings.
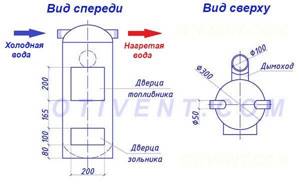
The design proposed by one of our experts in the manufacture of solid fuel boilers and stoves, Vitaly Dashko, can boast of a more thorough heating of the garage. The unit is an old gas cylinder installed vertically and equipped with a separate chamber for heating air, which is forced into it. The design of this garage stove with dimensions is shown in the drawings:
The stove operates on the principle of a heat gun. The work algorithm looks like this:
- A portion of firewood is loaded into the firebox and ignited.
- After warming up, the fan is turned on, connected by a corrugation to one of the heating chamber pipes.
- Since the horizontal partition between the firebox and the chamber takes the greatest heat load, the air passing over it quickly heats up.
- Hot air, coming out of the second pipe, is supplied via a corrugated pipe to any point in the garage. The corner where the unit itself is installed is heated by the side walls.
Intense heat exchange inside the chamber is carried out thanks to steel ribs, increasing the heat transfer area. The drawing below shows a longitudinal and transverse section of a wood-burning stove, where the location of these ribs is clearly visible.
The advantage of a potbelly stove is that it does not need a high chimney, although it cannot do without natural draft. Any suitable low-performance fan will serve as an air blower. In a small room, a cooler from a computer power supply may be enough. For medium and large garages, household duct fans with a capacity of 50 m³/h are suitable; they are placed on the hoods from the bathrooms. A supercharger from a car heater, for example, a “snail” from a VAZ 2108, is also suitable.
A propane cylinder with a capacity of 50 liters is well suited for the manufacture of the heater body.
How to make a garage stove from a cylinder
To make a wood stove for the garage, you need to complete a number of preparatory work. To begin with, the upper part of the cylinder is cut off along the welding seam. You should first unscrew the valve and fill it with water so that the remaining propane does not explode when using the grinder. Then you need to cut a circle with a diameter of 300 mm (for the partition) and a strip 80 mm wide (for the door frame) from sheet metal 4 mm thick. From the leftovers, strips can be cut into heat transfer fins.
Advice. If you want to increase the heat output of the stove, you can cut off the top part below the seam, thereby increasing the volume of the air chamber. But remember that then you reduce the capacity of the firebox and the duration of combustion with one stack of firewood.
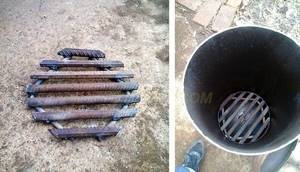
We carry out further work in this order:
- The next step is cutting the reinforcement and making a grate. There are no strict requirements here, follow the example in the photo, trying to adjust the length of the rods to the size of the seam protruding inside the balloon. After this, install the grill at the bottom of the container.
- In the cut off lid, you need to make 2 holes for installing threaded fittings DN50. This size is optimal, but it is not necessary to maintain it, as is the selection of threaded fittings. You can take pieces of pipe of suitable diameter, but do not make it smaller than 40 mm. Then weld the pipes in place, as shown in the photo:
- Next, in the cylinder body, in accordance with the drawing, it is necessary to cut openings for the loading door, vent and chimney hole. It is necessary to insert door frames welded from the prepared strip into the openings and weld them in a circle. Before installing the frame, you need to make blanks for the doors themselves, welding hinges and purchased handles to them.
- The next stage is the formation of the air chamber. A prepared circle with a diameter of 30 cm is placed in place of the cut-off cylinder cap and welded tightly. After this, heat exchange fins are attached to it by welding. Their number and placement can be arbitrary, but do not overdo it, otherwise you will have to select a more powerful fan that can overcome the aerodynamic resistance of the camera.
- The last step is to weld the cover with the pipes into place and install the doors with locking devices. At the very end, a chimney pipe of the required length is installed. Instead of a pipe, a ready-made 90° elbow will also work.
Note. The same wood-burning stove for a garage is made from a large-diameter pipe - 300 or 400 mm with a wall thickness of 4 mm. It will just be a little more work; the lid and bottom will have to be made separately.
Connection to water heating
The previous design of the garage furnace is quite capable of heating water or antifreeze instead of air, circulating through the water heating circuit. All that is needed is that instead of DN50 pipes, cut DN25 pipes into the chamber cover and purchase a low-capacity circulation pump (marked 25-40). A pump is required because the volume of the furnace water circuit is too small and without forced circulation the coolant will quickly boil.
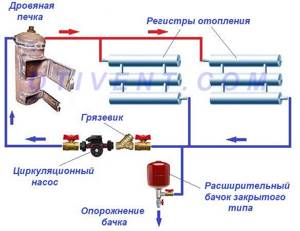
For normal operation of a heating system with a potbelly stove, you will need an expansion tank and a pump.
Then everything is simple: the stove pipes are connected to heating radiators or homemade registers, whose total heat output does not exceed 3-3.5 kW. It is recommended to make the connection using metal pipes, or, in extreme cases, metal-plastic ones. The pump is installed in front of the furnace on the return pipeline, and a closed expansion tank must be installed in front of it. Mayevsky valves must be installed in the registers to remove air from the system.
Advice. Since garage heating is periodic, the system should be filled with non-freezing liquid.
Making a simple potbelly stove with your own hands
The basic design of a homemade potbelly stove consists of 4 parts:
- A fuel tank of any shape with a hole in the center, the diameter of which is equal to the corresponding size of the attached pipe. This is where the combustion of the waste begins. The metal for the manufacture of this structural element must have a thickness of at least 3 mm.
- A combustion chamber or injector, which is a vertical cylindrical container with a number of holes, connected through an opening to the tank. As a result of air feeding through the perforated walls of the injector, the fuel entering the chamber burns completely.
- A heat exchanger in the form of a tank located above the combustion chamber. A heated gas mixture enters it. The design can have any size and shape. Ideally, this is a tank with a hollow platform on which food can be heated.
- Pipes for smoke removal , providing effective draft.
To make a potbelly stove yourself, you need to have good welding skills. Welded seams must ensure tightness.
Making a waste tank
An alternative to a welded tank can be an unusable gas cylinder or a canister with thick walls, but in any case, 3 basic requirements are mandatory:
- The design must be at least partially collapsible to allow for periodic cleaning.
- The hole for connecting the injector must be located in the center.
- The hatch for pouring waste should be equipped with an adjusting valve on a bolted connection. With its help, the intensity of combustion is controlled.
The easiest way to make a tank is from large diameter pipes. The bottom and legs are welded to one piece of pipe with a diameter of about 35 cm. In order to close the tank, take a small piece of pipe with a slightly larger diameter, weld a lid to it, then make 2 holes in it - one control hole with a diameter of approximately 60 mm, and the other for the injector.
The height of the side of the 2nd part should be 1/3 of the height of the lower container. The total height of the tank, measured from its bottom to the central hole on the lid, is 10 - 15 cm.
Light the fuel in the tank using paper or cloth soaked in kerosene. They are set on fire and lowered into the container through the control hole. The waste will have to be constantly added to maintain the level of 2/3 of the tank height.
How to make an injector?
The optimal pipe diameter for making an injector is 10 cm, the minimum wall thickness is 0.8 cm. To calculate its height, take the length of the chimney pipe, divide it by 10. Subtract five percent from the result and get the required value. It should be between 36 and 38 cm. This is a condition for normal traction.
The holes made in the walls of the pipe in a checkerboard pattern or simply evenly distributed over the surface have a diameter of 0.9 - 0.95 cm. Indentations of 2 - 2.5 cm and 5.5 - 6 cm are made at the bottom and top of the pipe, respectively.
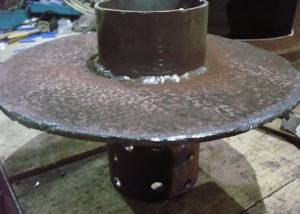
Basic heat exchanger option
The minimum thickness of the walls of the heat exchange tank is 0.3 cm. It is manufactured using the same technology as the fuel tank. It is better to make the top flat, and the hole for the chimney needs to be moved, then it will be possible, if necessary, to place a frying pan or kettle on the stove.
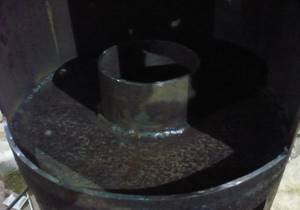
A partition is made inside the hollow vessel, creating a labyrinth for better heat transfer. Moreover, the thicker this part is, the hotter the surface of the potbelly stove will be. In order to clean the heat exchanger from carbon deposits, a special hatch is made on the side and closed with a lid.
A channel is welded onto the hole intended for the chimney - a pipe with a height of 5 to 10 cm and a diameter of 10 cm.
What is a chimney made of?
In order for the combustion products exiting through the pipe to have the lowest possible temperature, the part of the pipe that is located in the room must be made of steel. Due to this, the smoke transfers its temperature to the walls of the chimney and cools, increasing the residual heat transfer.
An ordinary tin pipe can serve as a continuation of the chimney from the outside, but it will have to be insulated to prevent the accumulation of soot during the cold period. Thermally insulated pipe is the best option, but more expensive. It is not necessary to seal the joints of pipe sections.
The pipes themselves can be of different diameters, but the one with the smaller diameter is connected directly to the furnace. Read on to learn how to make a chimney for a potbelly stove yourself.
Dropper at work
The operating principle of this safer and more efficient stove is to dose oil into the combustion zone located above a special bowl. The bowl is installed inside a pipe with a welded bottom, and a steel fuel pipe is connected to it from above or from the side. Dripping into a heated bowl, liquid fuel immediately evaporates and burns, releasing heat and pyrolysis gas. The latter is burned by supplying secondary air through a vertical pipe with holes or slits (afterburner) located above the bowl.
We recommend: What is a gas tank and why is it needed in a country house?
Sectional drawing of a drip furnace
Most waste oil heating gourmets prefer to provide a forced supply of combustion air using a fan. But if you have a chimney with good draft, this is not necessary, although adjusting the combustion process in this case can be difficult. Dosing is carried out by a simple valve installed in the fuel stream gap outside the stove, as shown in the photo:
Note. The fuel supply can be arranged by gravity by mounting the oil tank higher on the wall, or by means of a special pump.
It is better to insert the afterburner pipe into the furnace from the side, through the wall. The oil line runs inside the afterburner and reaches the bowl, due to which the waste heats up along the way. Since the flame is concentrated in one place - opposite the afterburner holes, the body of the potbelly stove becomes red-hot. Therefore, many home craftsmen prefer to make a boiler out of a dropper, enclosing its body in a water jacket.
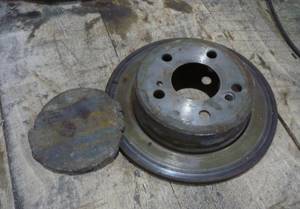
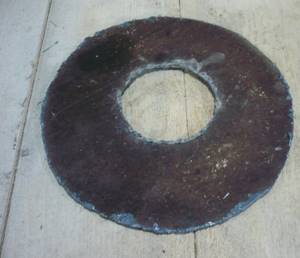
Making a pallet for mining
The tray was made from a cast iron automobile brake disc. Cast iron has good heat resistance, so I decided to use it.
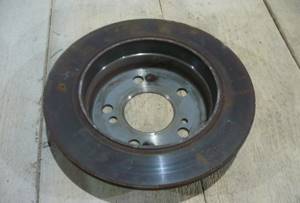
I will make a pallet from this disk
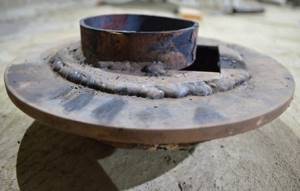
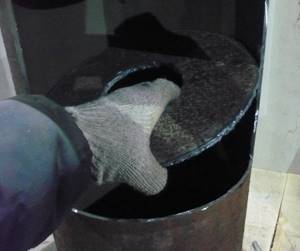
I welded the bottom underneath.
The steel circle is the bottom

Welded the bottom
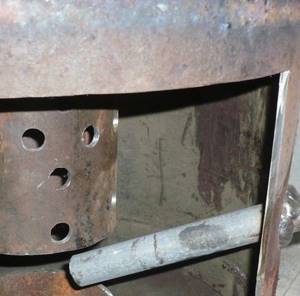
I welded the lid on top. In it you can see the counterpart of the burner and the opening. Air enters the stove through the opening. I made it wide - it's better that way. With a narrow opening, the air draft may not be strong enough, which is why the oil will not be able to get into the pan.
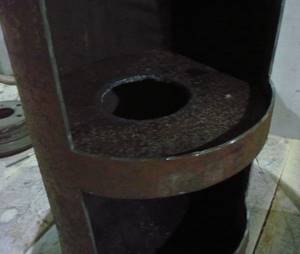
Next I made a coupling. In my stove it connects the pan and the burner. With a coupling it will be much easier to maintain the stove. If necessary, I can take out the tray and clean the burner from below.
Next I made a coupling
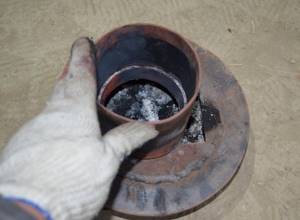
coupling

I put the clutch in place
I put the clutch in place
The coupling was made from a 10-centimeter pipe, simply cutting it along the longitudinal edge. I did not weld the opening in the coupling - there is no need for this.
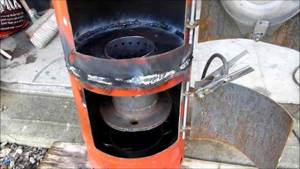
Pressurized furnace in operation
This design is also assembled on the basis of a 50-liter cylinder.
The air supply here comes from a fan (for example, from the stove of a VAZ 2108 car), which allows you to increase the draft in the afterburner and at the same time actually make the entire surface of the cylinder a heat exchanger.
The operation process and ignition are shown in the video.
Reason 8 - presence of cracks
Smoke in furnaces can be observed through small cracks that have formed in
places where masonry meets different elements of the stove structure. However, the stove does not smoke because of the presence of cracks. Smoke in this case is explained by the reason discussed under number 4. Nevertheless, cracks must be dealt with. To seal them, a stove solution is used.
The procedure is as follows:
- The solution is prepared from sand and clay, which are mixed in equal parts. Add a small amount of water to the mixture so that the consistency is thick enough. The solution must be kneaded well with your hands.
- You need to open the door and remove the mugs. Each crack should be moistened with water immediately before sealing.
- You need to put your left hand inside the firebox. You will need to close the cracks from the inside with your palm. You can also use a piece of metal for this. The slots are closed to prevent the solution from falling out into the oven.
- When the gap (or part of it) is sealed, you can move on to the next one. Again it starts with wetting, etc.
- If cracks appear in dried fresh mortar, do not worry: this is a natural phenomenon. They need to be sealed with oven mortar. The procedure may need to be repeated a couple of times.
- If there is lime whitewash in places where cracks have formed, it must first be removed. The oven solution will not last long on such a coating. It only applies to a clean, pre-moistened surface.
- It is strictly not recommended to try to strengthen seams using strips of metal. It quickly heats up and expands, therefore, being inside the dried solution, it will simply lead to the entire seam falling out of the crack.
Open and closed type furnace
What is the difference between the two models. A homemade open-type mining furnace consists of two chambers connected to each other by a perforated pipe. The latter has an open appearance, it is not protected by anything, and air is taken directly through the holes into the afterburner chamber. In this case, the pipe can be round or rectangular.
Potbelly stove using waste oil with an afterburner made of a round pipe
Stove with afterburner made of profiled pipe
The closed type design is a full-fledged unit, hermetically sealed on all sides. An afterburner made of the same perforated pipe is installed inside it. Only air is supplied into it from above using a fan. Essentially, this is a forced-air oven. True, small devices are not equipped with fans. The natural laws of physics apply in them, when air with a lower temperature flows by gravity into an area where the temperature is much higher.
Closed stove made from a gas cylinder
Conclusions and useful video on the topic
The author of this material talks about his experience in making potbelly stoves that work in mining. Perhaps some of his statements are controversial, but in general there is a lot of useful information:
This video author shares his invention:
The potbelly stove has a simple design, but to make it yourself, you need drawings with exact dimensions. A design made by eye will not only not provide heat, but will also become a source of various troubles in the form of soot, splashed oil and numerous alterations. It makes sense to start manufacturing such a unit only when it is possible to provide it with fuel. Otherwise, its operation will be economically unprofitable.
Perhaps you already have experience in making a potbelly stove yourself? Please share valuable tips with our readers. Leave comments in the block below. Here you can ask a question about the topic of the article, and we will try to answer it promptly.
A potbelly stove is a traditional wood-burning stove that was used to heat rooms 200 years ago. As a rule, in its standard form it is a metal cylinder mounted on legs, and it contains a door, a pipe and a chimney pipe.
With your own hands, such a design is created quite simply , and in modern versions of stoves it can have a variety of sizes. It consists of a large number of different materials. You can watch a huge number of videos that are available on the Internet, they explain how to create certain versions of this product .
The main disadvantage of a potbelly stove is that heating is carried out only when the equipment is running , so it is necessary to constantly add firewood and ensure that the stove does not cool down.
Compact models of waste oil furnaces
There are simpler models that you can assemble with your own hands. A potbelly stove made from sheet iron is more compact and completely autonomous.
Potbelly stove made of sheet iron - Photo 28
The operating principle is somewhat different from the previous model. Oil is poured into container (2) and set on fire. During combustion, the temperature rises and only after 3-5 minutes the pyrolysis process begins. The main disadvantage of such a stove is the need to constantly monitor the combustion process. It is necessary to constantly add waste, in addition, this is a very fire-hazardous process. Despite the fact that there is no need to filter the oil, as is the case with furnaces with drip fuel supply systems, the quality of the oil must be approached with all responsibility. If waste containing foreign fractions or water is added to a burning furnace, boiling and burning oil can splash out of the hopper and severely burn.
Ensuring oil supply
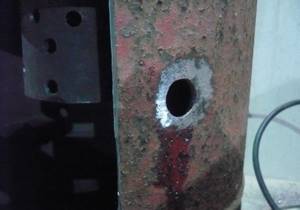
I'll insert a tube into the hole
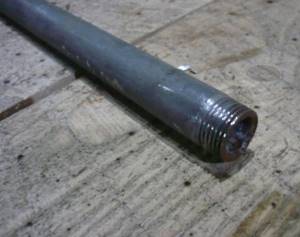
Waste will drip through the tube
The tube was caught by welding
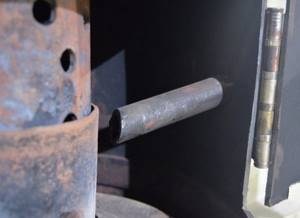
I cut the pipe
Next I worked on the oil supply system. To do this, I took a piece of pipe and welded it to the pallet through a previously prepared hole. I cut the pipe in advance so that the waste stream could pass normally through the opening in the pan.
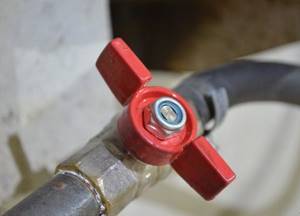
This is an emergency valve and a tube that leads to the tank
I ran the tube to the tank and installed the valve.
How to install and light a stove at work
To install a waste oil furnace, it is necessary to prepare a level area. It can be made of concrete or lined with brick.
The distance from flammable materials to walls must be at least one meter. The site is leveled plumb and level to avoid distortions.
Tip: When installing the stove, it is necessary to position the oil filling hole so that it is convenient to approach it, load fuel and adjust the air flow.
- The chimney should be installed as vertically as possible, and its length should be more than four meters, which will ensure good draft. The outer part of the chimney should be insulated to avoid the accumulation of condensate - acids that destroy the structure.
- The dismountable design of the stove is convenient for cleaning: you need to remove the chimney from the smoke exhaust pipe and the top with a high-temperature chamber, then you can remove carbon deposits and soot from the stove.
- Such a furnace can operate on any used oil:
- synthetic;
- mineral
It is necessary to fill fuel to a level that does not exceed half the tank, and oil vapor will form in the remaining volume. After filling the oil, you should wait for some time with the damper fully open to saturate the oil vapors with oxygen before igniting.
You can light the stove with fireplace matches or torches lowered into the tank through a hole.
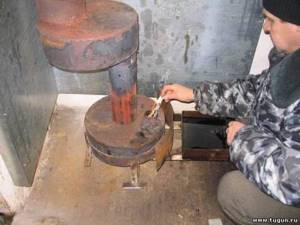
Lighting up the stove during testing
After the stove has flared up, the hole is half covered, and after it is heated, the air flow into the tank is adjusted to ensure even combustion of gases in the perforated pipe
Advice: It is strictly forbidden to pour gasoline, kerosene, any solvents or flammable substances into the stove. This could cause an explosion.
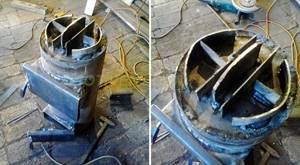
Bottom of the firebox chamber and burner
Then I made the bottom for the top compartment of the stove. For this, I used a sheet of steel 4 mm thick.
The bottom was cut out of steel
I'm trying on the bottom. Everything is cut neatly and fits together with almost no gaps.
Dontse is in place
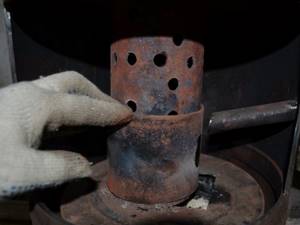
I decided to make the burner 20 cm long - that would be enough.

This will be the burner
Drilling holes
Sanded
I made many holes around the circumference so that air could easily get to the fuel. Once all the holes were done, I sanded down the inside of the burner. You should definitely do this too, because... soot will begin to actively accumulate on the protrusions and other defects.
First, I welded the burner into the bottom of the upper chamber, and then installed them in their proper place. You can safely lay wood on such a shelf of the stove. Relevant for cases when it is not possible to replenish mining reserves.
First I welded the burner into the bottom of the upper chamber
Installed the burner
Safety precautions
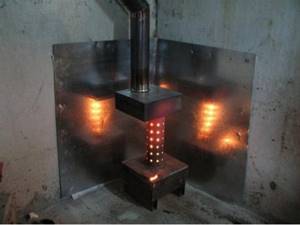
Furnace in operation with an open combustion chamber - Photo 29
A mining furnace with an open combustion chamber is a source of increased fire hazard. During the combustion process, it needs constant monitoring. There are a number of rules regulating the place where such a stove can be installed:
- the base on which the stove is installed must be non-flammable: concrete, ceramic tiles, metal;
- Do not install the device in a draft, as fire may escape from an open mixer;
- Do not place flammable objects near an intensively operating heating device.
Fuel consumption and economic feasibility
According to experienced stove makers, such a firebox remains operational when filled with 1 liter of waste. The actual data looks like this: the nominal value is 0.5 liters, the maximum is 2 liters per hour. Comments are unnecessary - the stove has no competitors in terms of efficiency and low cost of maintenance.
The costs of manufacturing or purchasing a finished installation will pay off quickly. And the benefit is obvious: the fuel is given for free, the efficiency of such a “ridiculous” stove is disproportionately serious - 0.75.