Option number 4. Construction of several tin cans
First you need to prepare three canning jars (two smaller and one larger). After that, take these tools:
- metal scissors;
- asbestos;
- marker.
Follow these steps:
Step 1. Make blanks. Take a large jar, step back about 20 centimeters from the bottom, place a smaller jar there and circle it with a marker. An even circle should form.
Step 2. Cut a hole in this circle, make sure that the jar fits into it, but with difficulty.
Step 3. Make a similar hole in a smaller jar. Place the smaller one in the larger one.
Step 4. Make parallel cuts of approximately 2-3 centimeters on one side of the jar.
Step 5. Take the lid from a large jar and make a hole in it for a small one. Sand the cuts.
Step 6. On the wall of the jar, make vertical slits of approximately 1.5-2 centimeters.
Step 7. Fill the voids between the cans with asbestos, then close the lid and bend the metal.
Step 8. Take a piece of tin and make a shelf for firewood from it, secure it.
Step 9. Now just attach a handle to make it convenient to carry the structure. That’s it, your DIY camp stove is ready! You can paint it.
Construction from old pots - minimum work and excellent results
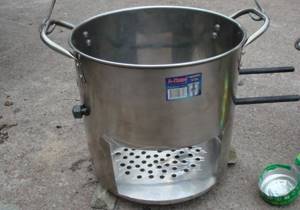
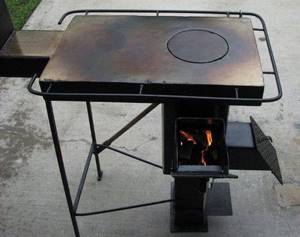
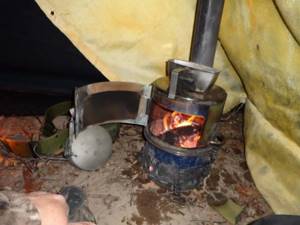
If tourists go out of town on vacation in a large group, a set of cans will not allow them to prepare enough food for all participants in the trip. In this case, it is recommended to make a wood-burning stove with your own hands from two stainless pans that are not used on the farm.
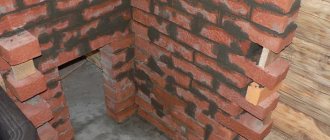
Holes or slits are made in the bottom of a larger outer container strictly parallel to each other, and an opening is cut on the side of the tank. It is used to store wood fuel.
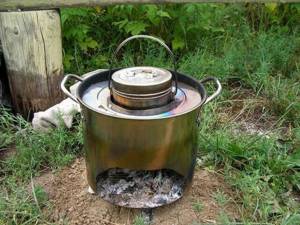
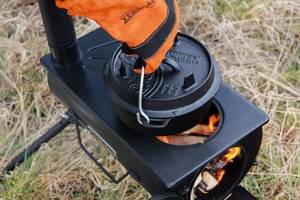
The cracks at the bottom are covered with a metal stand. It performs the function of a grate. Firewood is placed on it. The second pan is placed on top of the first. The fuel is ignited and the cooking process begins.
It is advisable to equip the second saucepan, which is used as a kettle, with a removable iron handle. It will significantly simplify the operation of removing the container from the oven.
The unit of two pans is compact and lightweight. It can be transported in a car without any problems. It is allowed to move the structure from one place to another even during cooking. Such a mini-stove can be used as a heating device in any room in the country house or in a tourist tent.
Design features and its advantages
As we found out, a camp stove is an extremely useful device, which is difficult to do without when fishing or just relaxing outside the city. If we talk about standard stoves with grates, they require large volumes of firewood due to good draft. In short, the fuel burns out quickly.
But in structures without a bottom, where firewood lies directly on the ground, combustion slows down, the coals smolder for a long time, and after loading a new portion, flare-up occurs instantly. But the draft in this case is poor, and heat is practically not accumulated.
In hiking designs with stands, traction is maximum. If the dish you plan to cook should be cooked over low heat, then the stove should simply be placed on the ground, thereby blocking the grate. In this case, the supply of oxygen deteriorates, combustion slows down, and the time, accordingly, is extended. But regardless of the design, all stoves of this type have significant advantages, including:
- efficiency;
- versatility and independence from weather conditions;
- efficiency;
- compactness;
- long burning without smoke formation;
- ease of use and transportation;
- power adjustment;
- safety;
- performance.
We also add that due to the fact that the wood burns from the inside, the stove body does not heat up much. You can even hold it in your hands for a while, since wood effectively insulates heat
But, of course, you always need to be careful when working with open fire!
Description of pyrolysis and gas furnaces
Pyrolysis and gas stoves are very convenient for use on hikes and vacations outside the city. They are characterized by an excellent combustion process, so they are quite suitable for quick cooking in the fresh air. But you cannot make such stoves yourself; they are purchased in specialized stores.
The pyrolysis stove is highly efficient, so the models presented from the retail chain have a fairly high price. Compared to wood stoves, this option is characterized by greater productivity. Those who decide to make such a device with their own hands must have special knowledge and materials. In addition, it should be borne in mind that a homemade stove in nature does not give the desired effect.
Among the advantages of a pyrolysis oven are safety and environmental friendliness. In such a device you can burn excess garbage and cook food; the fire in them burns constantly without failure. The pyrolysis furnace is made from steel that is resistant to high heat.
A camping gas stove is also suitable for traveling out of town or camping with a tent. In the retail chain, such devices are presented in a wide range; you can choose a stove of any color and cost. The gas oven runs on a special cartridge that requires regular replacement. However, you can cook food on such a device without difficulty.
Before going on vacation outside the city or camping with a tent, you should take care of all the necessary things, including a camp stove. For regular use, it is better to purchase a good stove for tourism in a specialized store. And for occasional and very rare trips to relax in the fresh air, you can use self-made devices that do not require spending money, effort and time.
How the design works and choice depending on the place of use
A store-bought or homemade tent stove actually has the same operating principle. When fuel burns, heat rays are emitted from the heating device. Their volume depends on the material of the stove, the degree of heating, the direction of warm air flows and the shape of the stove. The only difference is in the fuel - wood, gas, gasoline, kerosene.
The place of operation determines the feasibility of using different types of devices. For expeditions in the forests, it is easier to heat with firewood, logs, brushwood and other delights of the forest - wood-burning models are chosen. And for fishing on lakes and rivers, it’s easier to take a gas cylinder so as not to be distracted by running into the neighboring forest for logs.
Don't miss: Features of the design and operation of the Buleryan stove
Furnace manufacturing options
The design of the stove can be complicated by turning it into a convector. To do this, it is equipped with vertical pipes with a diameter of 60 to 100 mm, 2/3 of the diameter of which must be located inside the firebox. To increase the contact area of the pipes with the high-temperature zone of the furnace, they are made curved.
Note! The diameter of the pipes is selected taking into account the viscosity, heat capacity and thermal conductivity of air. The use of thinner air ducts, even with an increased number of them, will lead to a deterioration in the performance of the convector.
The outside of the heat generator can be covered with a protective casing. Then its temperature when the furnace is operating in gas generation mode will not exceed 50–55 degrees. The air coming out of the pipes will have a temperature of 60–70 degrees.
A homemade pyrolysis furnace can be equipped with a catalyst, also made independently. A good material for it is nichrome. You can also make a ceramic catalyst using a brick or a tube of baked clay as a basis. A transition metal oxide, for example manganese, or an element from the platinum group is applied to it as follows:
- The metal salt (it should not be resistant to high temperatures) is dissolved in water, after which the ceramic base is impregnated with this solution.
- Next, the future catalyst is dried at a temperature of 160–200 degrees.
- Now the part needs to be calcined in the open air, heated to a temperature of 600–800 degrees.
The most accessible platinum salt is ammonium hexachloroplatinate; manganese nitrate can be used to make a manganese catalyst, and vanadium can be easily obtained from ammonium vanadate.
Heating the rocket
The rocket stove is not one of those stoves that are completely self-adjusting to fuel quality and external conditions. At the beginning of fuel combustion, the hopper lid in a small stove should be opened completely. At the moment the stove begins to hum, cover it until the sound is reduced to the maximum. Next, you need to gradually cover the access of air, you need to navigate by the sound from the oven.
If the damper slams shut for a couple of minutes, it’s okay; if you open it, the stove will light up again. For the first time, the rocket stove must be flooded with paper and fuel must be constantly supplied through the blower. In subsequent uses, it can be heated with recycled materials, including wood.
Hiking tips
The process of preparing for work is simple. Key points to consider:
- it is prohibited to lay out or store wood fuel directly in front of the firebox opening to avoid a fire;
- Coals from the combustion chamber must be removed carefully (not in a tent), they should not burn or smolder.
The oven in working condition must be:
- away from flammable materials, the recommended distance is at least 0.5 meters;
- There should be free space above the stove.
If large models are used, then it must be taken into account that there should be a distance of 1.5 meters in front of the door. Some models have special hooks. They will be needed when you need to open the lid/door.
Are used:
- dry/natural moisture firewood (chopped/small logs);
- branches;
- cones (dry);
- compressed wood waste;
- wood chips
Some heating systems are designed to use small buds.
Attention! In the event of a sudden fire in the stove, the space next to it can be used to extinguish not only water, but also sand and earth. The ideal option is a fire extinguisher (available if traveling by car)
Alternative design
Let's talk about how else you can make a stove for a tent with your own hands? Our next design is larger and suitable for those who have a car to transport such a stove. But such a stove can heat even a large tent designed for several people. Plus, it is quite economical in fuel consumption. The fuel for the stove is logs and sticks.
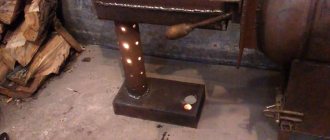
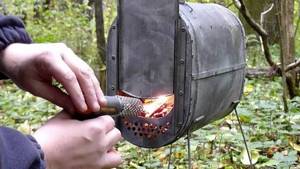
What to make a stove for a tent from? Let’s say right away that we don’t need any expensive materials; usually, everyone has everything they need at hand. The body will be a piece of steel pipe with a diameter of 150 mm and a length of 600 mm. Of course, it is not necessary to take strictly these sizes, choose what suits you, just make sure to maintain the proportions.
The pipe must be in a vertical position, it is the “body” and the rod of our furnace. A rectangular hole must be cut at the bottom of the pipe, its height should be about 300 mm, and its width should be a quarter of the circumference. You need to cut the pipe with something with a thin blade, since the width of the cut should be minimal. The cut piece will later become the door of our stove. Therefore, the cut out part must be cut into two unequal parts: one – 100 mm, the other – 200 mm. The larger part is the combustion door, and the smaller part is the door for the ash pan.
Let's return to our base; a pipe with a diameter of 60 mm and a length of 150 mm must be welded to the top of the stove; fuel combustion products will exit through it. It is necessary to weld a piece of the chimney pipe to the pipe, necessarily through a coupling.
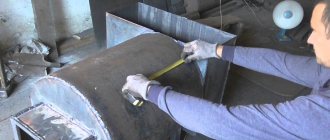
We will cover the ends of the stove with square sheets of steel with a thickness of at least 3 mm and a size exceeding the diameter of the stove by 100 mm. It is best to attach the sheets using electric welding, but if you are not comfortable with welding, you can use corners. Just below the top edge of our door for the ash pan, we need to install a grate and the stove is ready for use.
In principle, the described design is already a workable thing, but for greater efficiency it can be slightly modernized, namely:
- Install a steel casing made of 2 mm thick steel sheets. These steel sheets are attached to the ends of our plates either by welding, or tightened using aluminum wire, or the old fashioned way, with angles. Choose the method that is most convenient for you, although in terms of efficiency, welding is best.
Make rectangular holes in the installed casing so that you can safely use the firebox or ash pan.
Fill the remaining space between the stove and the casing with clay. After all, clay is an ideal heat accumulator.
Here, a more massive but efficient design is ready for use, don’t worry, it won’t eat up a lot of wood. A couple of logs will last for many, many hours. But just think in advance about a stand for such a stove and do not place it close to the tent awning, especially if the fabric is flammable. Remember, safety comes first.
Naturally, the described designs are in many ways inferior to their store-bought counterparts, including in terms of attractive appearance, but they are able to fully perform their function. Therefore, the decision: to buy or do everything yourself is yours.
Tent stoves - main types and features
Like any other equipment, a stove for a tent is selected according to two main criteria - the purpose of the tent and its volume. In the first case, it is recommended to consider heating devices according to the following criteria: tents for all-season hikes, summer tents, fishing tents. Separately, it is worth mentioning such tents as mountaineering ones. All these houses have their own heating and equipment requirements. Thus, an ordinary tourist tent, designed for outdoor activities only in the spring and summer, most likely does not have a special valve for installing a heating stove. Winter tents are characterized not only by the presence of such a window, but also by the presence of a special insert made of non-flammable fabric with a hole for the chimney. But a mountaineering tent is characterized by a low silhouette, so only equipment with a minimal risk of carbon monoxide emissions is applicable here.
As for the volume of the tent, here, first of all, it means the capacity of the tent, the presence of several rooms, and of course how many people it is designed for.
Depending on this, the stove for the tent is selected according to its power and the type of fuel used:
- Wood-burning camping stove;
- Kerosene stove;
- Automotive fuel stove;
- Gas-burner;
- Electric heating option;
- Heating option from an external heat source.
And although all these devices are designed to heat the volume of the tent in the natural environment, very stringent safety requirements apply to them.
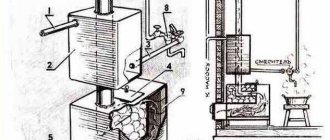
Operating principle
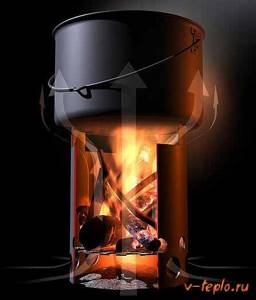
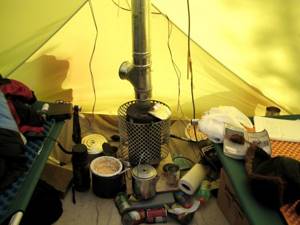
This device is made on the basis of a heating rocket stove. The mechanism of its operation is as follows. There is a bunker, which is a fuel compartment in which solid fuel burns. Combustion products enter the horizontal section of the pipe, and then into the vertical section. At the initial stage of the furnace operation, intense heating of the chimney is observed. Robinson's device is a somewhat simplified rocket stove. This is explained by the different purposes of the units. The first model does not require space heating, but only water heating and cooking. But the principle is the same. Firewood smolders in the bunker, which heats the chimney, where the gases then burn out. In this case, the chimney must be quite long so that no combustion products remain.
In order for the reactive furnace to operate efficiently, the following rules must be observed when installing the structure:
- The chimney must be at least twice as long as the horizontal or inclined section.
- The length of the fuel compartment must coincide with the horizontal section. Typically the firebox is installed at an angle of 45°, although there are designs with an angle of 90°. But they are less convenient in terms of fuel loading.
- The cross-section of the chimney should not be smaller than the fuel compartment itself.
Homemade stoves are a smart alternative to a fire
Mobile units designed for heating canned food, preparing rich fish soup or fragrant tea in the countryside can be monolithic or collapsible, multi-use or disposable. Regardless of the design, any homemade camping stove has the following advantages:
- Minimum financial costs for production.
- Versatility of use (suitable for a tourist outing in the forest, on the shore of a lake or sea, or relaxing in the country).
- Compact dimensions and at the same time high power and efficiency.
- Duration of combustion of fuel, which is used as dry grass, leaves, cones, tree branches, pre-prepared firewood.
- Minimum smoke during unit operation.
Lovers of wild outdoor recreation and exciting hiking trips build stoves from a wide variety of materials. The most popular are designs that operate on wood and other wood fuels. They are made from tin cans, sheets and scraps of iron, and old pans.
Rocket furnaces and pyrolysis units are less common. They are constructed using bricks, concrete, clay, and sheet metal.
Not every person can assemble such a structure. But, if everything works out, the rocket can be used not only for cooking, but also for heating a tent or cottage.
Option #3. DIY folding camp stove
A very effective design, the manufacture of which, however, requires more time and effort, as well as preliminary preparation. First you need to acquire the following consumables and equipment:
- roulette;
- Bulgarian;
- electric drill, as well as a set of drills for it;
- file;
- pliers;
- bicycle spokes;
- piano hinges;
- sheet of metal 1 millimeter thick.
We also note that in order to make a folding stove, you can use:
- iron sheets from the body of an old gas stove or refrigerator;
- side walls from an old computer system unit (these options can replace sheet steel).
Note! When starting to create a folding camp stove, be sure to familiarize yourself with its sketch, and also create templates for the planned structural elements based on it. During the work you will need to perform the following algorithm of actions
During the work, you will need to perform the following algorithm of actions.
Step 1. First, mark all structural elements on sheet metal using prepared templates, then cut out these elements using a grinder.
Step 2. Make holes in the piece that will be used to arrange the bottom.
Step 3: Next, file the edges of the holes to remove any burrs.
Step 4. Connect the side walls of the structure together using piano hinges with rivets. As a result, you should get a kind of box.
Step 5. Along the entire perimeter of the bottom, as well as on the lower edges of the side walls, special “ears” bent in one direction must be provided in advance.
Step 6. An element is placed under the formed box, which will serve as the bottom, while the “ears” of the two elements will align on each side and form a tube. Pins made from knitting needles must be inserted into this tube. This little trick allows you to make the stove more stable in its operating state. In addition, if necessary, the structure can be easily disassembled for transportation or storage.
Step 7. On the grate, make additional protrusions installed in the holes that are cut on the sides.
Step 8. There will also be another hole in the sidewall through which fuel will be loaded.
Step 9. The cutouts made in the top of the box not only increase traction, but they can also be used to place skewers.
Positive qualities of camp stoves made by yourself
One of the main advantages of such structures is the minimum financial costs. Anything you have will do: sheets of iron, pots, tin cans, clay, bricks, logs and much more. They can be collected both in advance and on the spot. According to circumstances. You can prepare disposable and reusable products. Collapsible and monolithic.
Advantages of a camping stove:
- minimum or no costs (can even be made from soil);
- burning duration;
- high efficiency, increased power;
- any fuel collected from nature is suitable;
- versatility of use;
- little or no smoke.
Ideally, the camp stove you make should be compact and heat the pan, but not the air. You can also make do with a minimum of firewood and keep the heat inside for a long time. Having assembled the structure yourself, you will experience satisfaction from your own invention, and those around you will note its benefits. What will help you improve the product? Of course, this is the previous experience of travelers. Study diagrams/drawings, educational videos. Only through trial and error can you get something truly worthwhile.
How to build a stove on a camping trip using improvised materials
Let's look at three options for homemade stoves that you can easily make with your own hands.
Option 1. Tin can as an oven
The most affordable and easiest way to build a mini-stove is to use a tin can. You can even use an iron mug. In this case, the main thing is that the parameters of the future camping stove coincide with the dimensions of the tall glass.
How to create a simple but functional device in a matter of minutes is described step by step in the instructions:
- First of all, holes are made in the bottom of the body (mugs or jars) to provide traction: one large one or several small ones so that the coals do not fall out.
- Then the camp stove is filled with small wood logs according to the “Indian candle” principle, that is, they are placed in a vertical position, without protruding beyond the edges of the jar. The thickness of the wood should approximately correspond to the thickness of your finger.
- The next step is to remove the block of wood located in the center of the structure from the oven. The resulting space will become a channel for the passage of air masses. By the way, they should coincide with the holes made in the bottom earlier.
- Let's start lighting the stove. To do this, you need to place a small piece of paper or a bunch of dry grass into the resulting air channel and set it on fire.
- The volume of the finished device is about 500 ml. Such a container can burn for about 25 minutes, and this is quite enough for preparing a simple dish or boiling water. The main thing is that the surrounding area will not be exposed to smoke.
Using the same principle, you can create more powerful camping stoves, for example, if the company consists of several people. To do this, you need to take a container of 1-2 liters and, accordingly, increase the amount of firewood.
Option 3. Folding camp stove
To create such a design you need to spend a little more effort and time than in the two previous cases. But the effectiveness of such a device fully justifies the effort.
First you need to do the preparatory work and stock up on the necessary materials and tools. You will need a tape measure, a grinder, a drill, a file, pliers, bicycle spokes, piano hinges and 1 mm thick sheet steel.
Working on a folding stove is not difficult. Just follow these steps:
- On the prepared steel sheets, it is necessary to use a stencil to outline the contours of future structural parts, which are cut out with a grinder.
- Of the resulting elements, set aside one, which will be used as the bottom of the stove. Then you need to make holes in it for the grate.
- The edges of the resulting holes must be carefully sanded with a file to remove all irregularities and nicks.
- Now it's time to make the body of the main structure. To do this, you need to connect the side parts using piano hinges with rivets.
- For future fastenings, it is necessary to construct special grooves along the entire perimeter of the bottom and along the underside of the side walls.
- Now you can connect the main body, which consists of side walls and bottom. This is done in such a way that the ears prepared at the previous stage coincide, forming a tube into which pins made from knitting needles are inserted. This small nuance adds stability to the oven during operation. The whole design is so well thought out that, if desired, it can always be disassembled for movement and convenient storage.
- One of the important stages in the manufacture of a prefabricated furnace is the creation of a combustion chamber. To do this, a window is made in the side of the body for storing firewood.
- The grate needs to be provided with additional protrusions that are inserted into the holes on the sides.
- For optimal operation of the furnace, it is necessary to take care of the air supply. If you make holes in the upper part of the box, then in the future they may be useful for laying skewers instead of a barbecue.
No trip to nature is complete without barbecue or any other dish cooked over a fire. It is better to foresee in advance which particular source of fire will be at the center of all events. A fire is not always a convenient solution, but a camp stove is useful in any weather. Despite the availability and abundance of models presented in travel stores, you can always build a camp stove yourself. The main thing is that this will require a minimum of time and materials.
When relaxing in nature, sooner or later you will need a fire - to heat canned food, cook porridge or boil tea. Of course, you can light an open fire, but sometimes the lack of forest or rain does not allow this. A camp stove, made with your own hands and delivered with the same hands, comes to the rescue! We will talk about how to make such a structure in today’s article.
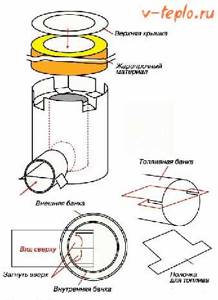
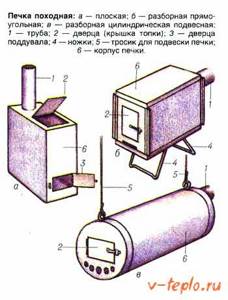
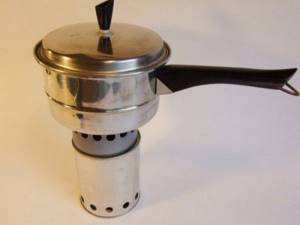
Camping mini-stove - manufacturing diagram
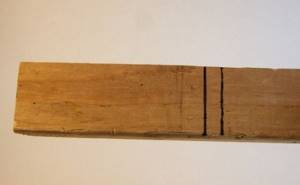
First, the block is inserted into the largest container. A straight line is drawn on a piece of wood at the level of the jar lid with a marker. Another line is drawn above it with an indentation of 8 mm (parallel to the first).
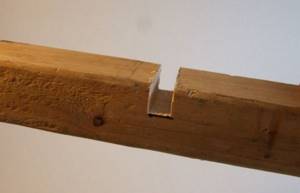
The part of the block between the two lines is cut out. There should be a small recess into which the edge (top) of the tin can easily fits.
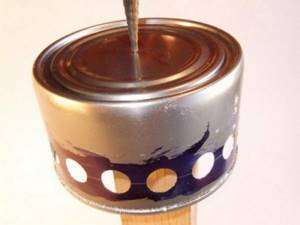
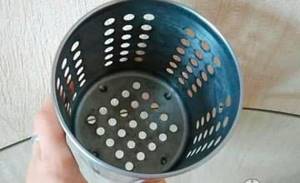
Several ventilation holes are made in the lower part of the large container. The same openings are drilled in the upper half of the second can. And its bottom is turned into a sieve (many holes are punched).

After this, the smaller can is inserted into the larger one. The result is a structure with a gap that ensures air movement during operation of the homemade unit.

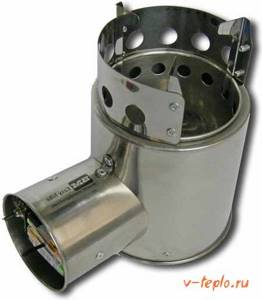
All that remains is to make a burner from the third (smallest in size) jar. Its bottom is removed with metal scissors. Sharp edges are smoothed using a hammer and then smoothed with a file.
Round holes are made on the sides of the container.
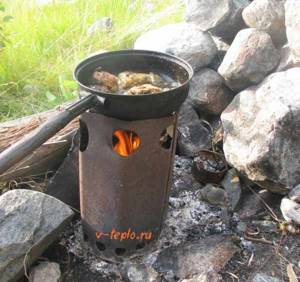
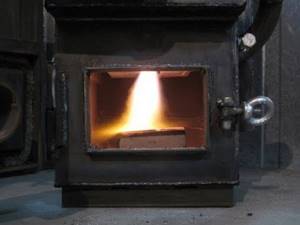
Small firewood, dry cones, small branches are loaded into a medium jar and set on fire. When the stove lights up well, it is covered with a homemade burner, on which a ladle or kettle is placed.
Improved rocket furnace with water circuit
A long-burning boiler can be obtained by equipping the stove with a water jacket. Water heating may not be efficient enough. The fact is that the bulk of the warm air enters the room and containers on the cooking surfaces. To create a rocket boiler, you need to give up the possibility of cooking on the stove.
Materials required for equipping a stove with a water circuit:
- Fireclay bricks and mortar for masonry;
- Steel pipe (diameter 7 cm);
- Barrel or cylinder;
- Insulation;
- Sheet steel and a barrel of smaller diameter than for the body to create a water jacket;
- Chimney (diameter 10 cm);
- Parts for the heat accumulator (tank, pipes, connecting pipe).
A characteristic feature of rocket furnaces with a water circuit is that the vertical part is insulated to ensure combustion of pyrolysis gases. In this case, warm air is directed into a coil with a water circuit and transfers heat to the stove. Even when all the fuel has burned out, warm air will still be supplied to the heating circuit.
Types of long-burning stoves
Options for furnaces of this type are classified depending on the material, method of operation and method of heat transfer. The designs differ in the type of traction and the relative position of the internal chambers. Thus, stoves are made of metal or brick.
Table: classification of pyrolysis furnaces
Photo gallery: variety of heating units
Based on the method of heat transfer, the units are divided into models:
- with a water heating circuit;
- variability in the placement of heat exchangers (combustion and smoldering chambers are located in different orders). If the firebox is located at the top and the afterburning chamber is at the bottom, then forced draft is required using smoke exhausters and fans. If, on the contrary, the firebox is located below, then natural draft is triggered.
How to choose a stove option
First decide:
- for what purposes is the stove needed;
- where will she stand;
- what fuel to run on?
When choosing the type of structure to DIY, consider the area and type of space. Depending on the parameters of the heated room, the size and power of the furnace are selected. It is worth considering that brick models are placed in a permanent place for future use, while metal ones are almost all mobile.
A homemade stove must meet the necessary characteristics and be safe to use
When making any furnace model, it is worth calculating the balance between the ratio of oxygen and gas. Therefore, the selection and assembly of any furnace option requires careful calculation of the parameters, power and dimensions of the product.
Structural elements
High-quality steel sheets are used to create rectangular metal structures. In this case, the stove is made with double walls. The space between them is filled with sand or water (water circuit). Metal barrels with thick walls can serve as the basis for making a small oven.
The metal structure can be covered with bricks from the outside (lining) or from the inside of the furnace (lining)
The pyrolysis furnace has two combustion chambers. In one compartment, solid fuel is processed, and in the other, pyrolysis products are mixed with air. When the firebox is located at the top for solid fuel, a grate is placed between the compartments. In metal furnaces, the partitions are hollow plates inside.
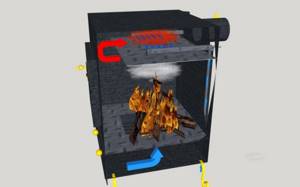
A visual representation of air flows during operation of a pyrolysis stove with a firebox in the lower compartment
Charge fans are necessary elements in structures where the gas chamber is located below. With the help of forced draft, gaseous substances move downwards, where the afterburning process begins. Such products also contain smoke exhausters on the exhaust channels.
Forced draft directs the gases to the second part of the furnace, where they are burned (releasing a large amount of heat)
All structural elements are interconnected, ensuring efficient operation of the pyrolysis furnace.
Material selection
For the manufacture of wood chip stoves, acid-resistant and heat-resistant steel grades are used, because they not only tolerate high temperatures well, but are also resistant to condensation that forms during ignition.
This metal is used for the internal lining of furnaces and boilers, as well as for the manufacture of drums and internal casings of washing machines.
It is also necessary to choose the thickness of the metal correctly. After all, the thinner the part, the less rigid and durable it will be (even if it weighs less), but at the same time it is noticeably easier to process. And the thicker it is, the stronger the structure will be, but the greater its weight, and the processing will be noticeably more difficult.
Therefore, most often for home-made stoves, stainless steel with a thickness of 1–1.5 mm is used, although both thinner and thicker metal can be used.
As a basis for the manufacture of round heating devices, you can use spoon dryers of various diameters, made of food grade stainless steel.
Such dryers can be bought on AliExpress and other sites for a low price. Metal thermoses are well suited for creating pyrolysis stoves, because they are also made of stainless steel.
However, they are quite difficult to drill due to their round shape and the inability to use a drilling machine, and for complete pyrolysis, the air flow in the combustion zone should be minimal, and in the afterburning zone located above the combustion zone, maximum.
Often, various steel containers are used to make wood chips, such as:
- saucepans;
- mugs;
- pots;
- banks.
The main selection conditions are:
- heat resistance;
- acid resistance;
- compliance with the size and shape of the water container that will be installed on top.
Advantages and disadvantages of a pyrolysis oven
Let's start with the good, with the advantages of pyrolysis boilers:
- Fantastic efficiency, often reaching more than 85%.
- The ability to simply maintain the long-burning stove device
- When using high-quality materials in the production of the stove, durability and reliability.
- Meets strict environmental safety requirements.
- Availability of fuel. It is at every step. Wood, chips, other wood waste.
- Due to its small size, it is possible to install the unit in any room.
- There are no difficulties in servicing the oven.
- Baking a bubafonya with your own hands is simple and, most importantly, quick.
Unfortunately, this type of boiler has some disadvantages. One of the main disadvantages is weak traction. Without draft, a pyrolysis stove will be of little use, since there will be no good heat transfer. Let's look at the following disadvantages:
- Complex chimney design.
- There is no model range of pyrolysis systems that can be fired using mixed fuel. For example, fuel oil, diesel.
- It is difficult and unfamiliar for beginners to make the initial setup.
- Not everyone can assemble a pyrolysis boiler with their own hands.
However, the flawless performance of the bubafonya stove and the low price of fuel cover all the existing shortcomings.
Manufacturing recommendations
The easiest way is to make a small portable stove with your own hands - the Robinson rocket, whose drawing is presented below. You will need cutting profile pipes, metal for legs and stands, as well as welding skills. Moreover, compliance with the exact dimensions indicated in the drawing is not necessary. You can take pipes of a different section, but you just need to reduce or increase them proportionally so that the parts fit together.
Drawing of an improved “Robinson” camping stove with nozzles made of a profile pipe, cut lengthwise into 2 parts
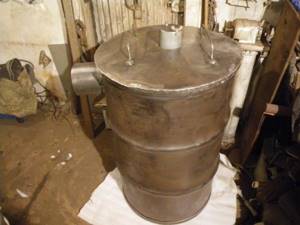
The most common versions of large rocket stoves are made from a gas cylinder or a two-hundred-liter metal barrel. You must understand that these ready-made elements are used as an outer hood, and the internal parts of the stove must be made from pipes of smaller diameter or laid out from fireclay bricks. Moreover, from a cylinder you can make both a stationary heater with a small bench, and a unit that can be moved.
Please note that calculating the thermal power of a rocket-type furnace is quite difficult; there is no single calculation method. It’s easier to rely on ready-made drawings of already working samples and assemble according to them. You just need to compare the dimensions of the future stove with the dimensions of the heated room. For example, to heat a small room, the size of a cylinder is enough; in other cases, it is better to take a large barrel. The selection of internal parts for them is shown in the diagram:
2 options for potbelly stoves - from a gas cylinder and a standard iron barrel
Stove rocket from a cylinder
In addition to the gas cylinder itself, to assemble the stove you will need:
- profile pipe 150 x 150 mm for the firebox and loading hopper;
- steel pipes with a diameter of 70 and 150 mm will go to the internal vertical channel;
- the same with a diameter of 100 mm for the chimney;
- insulation (basalt fiber with a density of at least 100 kg/m³);
- sheet metal 3 mm thick.
For a master skilled in welding, this work will not be particularly difficult. The top of the cylinder should be cut off along the seam, after first unscrewing the valve and filling it to the top with water. Openings are cut on both sides for installing a firebox and inserting a chimney. A profile pipe is inserted and connected to a vertical channel, which is discharged through the bottom of the cylinder. Further work on the manufacture of the rocket furnace is carried out in accordance with the drawing:
At the end, the upper part must be welded into place, then carefully check all seams for permeability so that air does not flow uncontrollably into the oven. After this, you can attach a chimney with a water jacket (if available) and begin testing.
Masonry of a rocket-type heater made of bricks
This stove option will require the purchase of fireclay bricks; ordinary ceramic bricks will not work for a rocket stove. The masonry is done using fireclay clay mortar; it is also sold as a ready-made building mixture. How to make a stationary rocket stove:
- First you need to dig a hole, compact the bottom and pour a foundation measuring 1200 x 400 mm and 100 mm high, as shown in the photo.
- After hardening, the foundation is covered with a sheet of basalt cardboard and the combustion chamber, a bunker for loading firewood and a vertical channel are laid. A door is installed at the end of the combustion chamber to clean the ash pan.
- After the clay has dried, the pit is filled up, and a pre-selected pipe or small barrel with a diameter of 450 mm is placed on the vertical channel. The gap between the brickwork and the pipe walls is filled with fire-resistant insulation, for example, basalt wool, expanded clay, vermiculite.
- At the last stage, a cap made of a large metal barrel with a diameter of 600 mm is put on the structure. First, a cutout is made in its upper part and a pipe is installed to connect the chimney. When the barrel turns over, he will be at the bottom.
The simplest version of a rocket stove
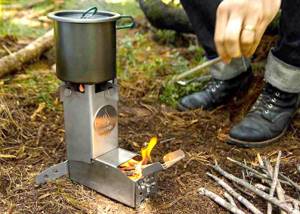
A simple rocket-type camping stove is easy to make, saves time and resources during use, and is compact in size and dimensions. All work will require you to spend 2-3 hours with the preparation of tools and materials, which is very convenient when camping or in a summer cottage.
A design feature that needs to be taken into account is that the lower part of the unit, which acts as the bottom of the fuel chamber (grid), must be made movable. This is done to facilitate the process of laying firewood and loading it into the combustion bunker.
If wood chips are used, the retractable structural element serves as a convenient stand during the process of adding fuel to the stove. Additionally, the moving part greatly facilitates the process of cleaning the unit from ash.
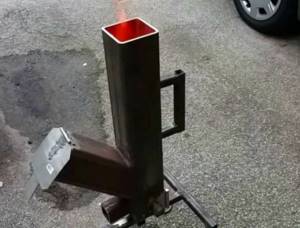
A simple rocket stove made from a pipe
Preparation of materials
To make a rocket stove you will need to purchase:
- Pipe with a square cross-section (15 cm×15cm×3, 40.5 cm) – 1 pc.
- The pipe is also square in shape (it is optimal to choose 15 cm × 15 cm × 3, 30 cm) – 1 pc.
- Steel strip (recommended dimensions 30 cm × 5 cm × 3 mm) – you need to buy 4 pieces of such elements.
- Another option for steel strips (with parameters ideal for work: 14 cm × 5 cm × 3 mm) – 2 pcs.
- A grille, also made of good metal (steel) (choose dimensions 30cm×14cm) – 1 piece.
Additionally, you will need to buy a steel rod (3:5 mm) - 2.5 meters in order to make the grate yourself if desired. A high-quality Robinson oven with your own hands means minimal financial investment, a little attention and time.
Tools
To carry out all the necessary work you will need:
- Bulgarian.
- Welding.
- Metal scissors.
You should also have safety glasses and gloves.
Work is carried out according to the diagram and drawing indicated below:
Drawing of the simplest rocket furnace made from a profile pipe
Manufacturing instructions
All work on creating a heating device must be carried out in stages. The guide to action consists of several steps that must be followed sequentially:
- Square pipes must be cut into pieces of the size required according to the drawing.
- Make markings on them, taking into account that one of their edges will need to be cut (the cut angle is 45 degrees). The work is carried out using a grinder.
- The resulting pipes will need to be carefully welded - the result should be a structure shaped like a boot.
When making a Robinson oven with your own hands and using drawings, it is important to follow the recommendations for the size of the parts contained there. The next steps will be:
- Cuts are made (on top of the pipe or on its sides) - the dimensions are 20 mm deep and 3.5 mm wide (a stand for installing containers will be installed in them).
- Steel strip (which has parameters 30cm×5cm×3mm), 1 piece purchased, must be cut exactly in half.
- Mark the second remaining strip of steel (also with parameters 30cm×5cm×3mm) exactly in the middle.
- To ensure high-quality completion of all stages of work, weld elements on both sides of the cut strip to it (you should get a cross-shaped shape).
- Steel strips (dimensions to be chosen are 30cm × 5cm × 3 mm) - the remaining 2 pieces and the remaining 14 cm long sections are welded into a frame that will be retractable.
- The elements are welded not side by side, but overlapping.
Next, the following work is carried out, which are final.
On top of the finished frame, using a spot welding machine, a finished grille (purchased additionally/specially) or parts of a good steel rod cut to the required length are attached. The distance at which the parts are attached is 1 cm. Then, a stand is installed on top of the pipe, and the grate is pushed into the combustion hopper. The main work on the production of the furnace can be considered completed.
The stage of verification and test behavior begins. You need to put some solid fuel in the firebox and light the stove; if no problems are identified in its operation, you need to wait for all structural elements to cool completely. Finally, you can paint the stove to protect the parts from corrosion. For this, heat-resistant paint is used. You can increase the operating comfort by welding a handle to the combustion chamber door.
Principle of operation
It doesn’t matter whether the stove was made independently according to its original drawing or purchased at a specialized retail outlet, you need to know the basic laws of heat engineering according to which any heating structure works.
The combustion process consists of heating the fuel, when moisture evaporates and some flammable substances are released, direct ignition and burning of the fuel. The efficiency of a heating device implies the level of its heat exchange with the surrounding space, that is, radiated heat and the intensity of convection.
The first factor depends on the degree of heating of the furnace, the area of the heat exchanger and the material used to make the device. The second depends on the shape of the furnace and the direction of hot air flows.
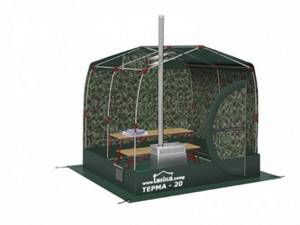
Characteristics of heated tents
Before purchasing winter housing for hiking, you need to familiarize yourself with the advantages and disadvantages of tents with a stove. Many fans of traveling in the winter season believe that the main advantage of heating in a tent is a comfortable time with friends on a long winter night. The second advantage is that you don’t need to take extra heavy tent insulation materials or bulky sleeping bags with you.
However, an experienced traveler is always practical, so from his point of view, heated temporary shelters also have disadvantages:
- If you intend to use a solid fuel “Economy”, you must take coal with you or agree in advance on a route adjacent to the forest area. Although in the forest there may be problems with dry firewood. Then the best option would be to use a gas appliance.
- Although heating a tent with solid fuel provides comfortable field housing, it requires a considerable investment of time and labor. It is necessary to constantly be on duty near the stove, even at night, and also to collect a sufficient amount of firewood for heating.
And in this case, a gas appliance comes to the rescue. Many models run on diesel fuel, which lasts all night.