How to install a stove in a bathhouse
Correct installation of the stove affects comfort and, as well as safety.
To heat the steam room more efficiently, it is necessary to correctly install the stove, position it correctly, make a base, prepare the walls and remove the chimney. Proper purchase and installation of a stove will give you many years of enjoying pleasant steam in the bathhouse without worrying about the safety of yourself and your loved ones. How to install a stove in a bathhouse with your own hands? There are two types of sauna stoves - brick stoves (heaters) and metal ones.
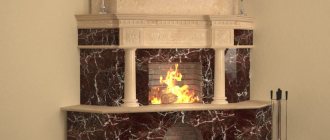
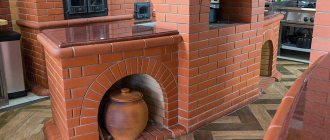
Brick stove (heater)
If you build a bathhouse yourself, a stone stove will be a very long and expensive option. It is necessary to have professional knowledge, namely, to be able to make high-quality bricklaying, pour a foundation, and understand how a stone oven works. The reliability and durability of a stone stove is several orders of magnitude superior to stoves made of metal.
To produce a heater, a special refractory brick is used, which is also called fireclay. Ceramic bricks are used for cladding.
The advantages of a stone stove include:
- fire safety;
- longer heat retention;
- the ability to heat a large area of the bath room;
- ease of use;
- more even heating of the room;
- soft steam;
- Contact between stones and open flames is kept to a minimum.
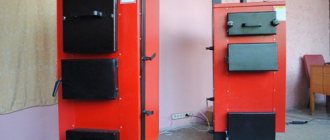
Metal oven
For the production of metal furnaces, alloys of different types of metal are used. The most widespread is the iron stove, because... iron heats up faster, less fuel is required for the furnace. The weight of such stoves ranges from 100 to 400 kg. How to properly install an iron stove in a bathhouse - the answer to this question will be revealed further.
Advantages of metal stoves:
- quick installation in a bathhouse;
- small size of the stove and its weight;
- closed sealed housing reduces carbon monoxide leaks.
The disadvantages of such ovens include:
- faster cooling of metal, unlike brick;
- uneven heating of the steam room;
- strong heating of the furnace body, which can lead to accidental burns;
Furnaces are divided into types depending on the place through which the fuel is loaded.
Video:
Stoves with a firebox located in the steam room. When installing such a stove in a steam room, it is necessary to provide additional ventilation, because With this arrangement of the stove in the steam room, oxygen burns out faster. The advantage of this arrangement of the firebox is constant control of the combustion of the stove and the ability to quickly regulate temperatures in the bath.
Firebox in the waiting rooms. With this arrangement of the firebox, it is necessary to install a frame wall between the dressing room and the steam room. Such a stove is usually heated with wood; this is optimal for maintaining a good temperature in the stove and keeping the room clean.
A stove with a firebox placed outside. This stove is well suited for small baths, as well as baths heated with coal. With this type of firebox arrangement, fuel is poured into the stove from the street. The disadvantage of this stove is that it is very inconvenient to control the loading of the stove and maintain the desired temperature in the bath.
The note! Before purchasing or building a heater, immediately pay attention to which direction the firebox door should open, so as not to create inconvenience when loading fuel into the stove.
How to choose the right place to install a stove in a bathhouse
In order for the installation of a metal stove in a bathhouse to be successful, you need to know how the rooms are heated. When the stove heats up, heat moves along with the air throughout the room, uniformly heating the entire space of the room. In this regard, for normal heating, you should not put obstacles in the way of warm masses, be they walls, decorations or other piles.
How to place a stove in a bathhouse with a water tank? The stove is installed so that at least two rooms in the bathhouse are warm. This is the steam room itself and the dressing room. This is achieved by placing the stove in the wall between the steam room and the dressing room.
How to install a boiler in a bathhouse? In general, choosing the correct installation point for the boiler is the main step in planning a bathhouse. The selection of this point is influenced by the following criteria:
- oven power. This affects the size of the firebox and the number of stones laid. A simple rule for calculation is that for each square meter of steam room you need 1 kW/hour;
- firebox design and smoke pipe outlet. According to the rules, the horizontal part of the pipe for removing smoke and gas from the furnace should not be more than 1 meter long;
- walls, ceilings and floors. The minimum distance for installing the stove from surfaces subject to rapid heating and ignition will depend on the material from which the walls, floors and ceilings in the bathhouse are made;
The note! Installing a metal stove in a bathhouse in a deep niche is not recommended. This arrangement greatly affects the service life of the heating unit.
Accessories for Teplodar stoves
When buying stoves, you don’t have to worry about the breakdown of any part of the unit. All components for a bath are always available at least in warehouses.
The manufacturer provides a guarantee for the product, and during the warranty period, replacement of components and spare parts in case of breakdown is free of charge. In other cases, you can always find and select spare parts for any of the stove models both on the company’s website and in specialized stores.
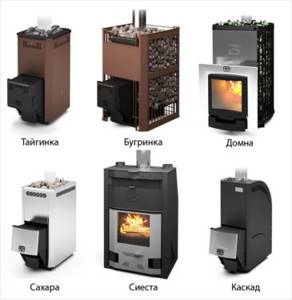
Conclusion
Over a long period of time, Teplodar stoves have proven themselves to be excellent on the sales market and have won the hearts of bathhouse lovers. Excellent technical characteristics, bright and beautiful design, constant modernization - all this contributes to the fact that when choosing and purchasing stoves for a bath, the buyer gives preference to the product.
How to make a foundation for a stove
The choice of the required foundation must be made at the planning stage. You can’t just put the stove on the wooden floor of the steam room. The stove is a very heavy thing and over time it will simply push through the floor. This will affect the horizontal position of the furnace, which can lead to the metal splitting when heated.
If the mass of the stove is less than 700 kg, then there is no need to make a separate foundation for the stove. A sufficient condition would be to lay the brick in several rows and connect the structure with load-bearing joists. This applies more to metal stoves, because... they are relatively light in weight. It must be remembered that if you cash the stove with bricks, plus the weight of the water in the tank, the number of stones laid - all this will increase the total weight of the stove. And if the total weight is more than 700 kg, then you definitely cannot do without a separate concrete foundation for the stove.
Is it necessary to connect the foundations of a bathhouse and a stove? In accordance with the recommendations of SNiP, the following types of foundation are used when constructing baths:
- the foundation is reinforced, monolithic, poured below the soil freezing level and is not connected to the foundation of the bathhouse;
- when arranging a bathhouse on highly heaving lands, a foundation on a pile foundation, not connected to the bathhouse, is used for the stove;
- a shallow foundation for the stove is erected in conjunction with the foundation of the bathhouse.
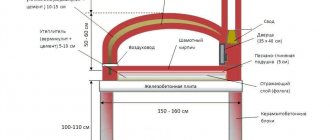
Pouring a monolithic furnace foundation
A pit 120-150 cm deep is prepared for a monolithic foundation. Sand is placed at the bottom of the pit, leveled, and compacted. A layer of waterproofing is laid. The formwork is installed and a reinforcement frame is constructed inside the box. Pour the concrete mixture to the top. After the solution has completely dried, the formwork is removed and the entire space between the foundation and the ground is covered with sand, carefully compacting each layer.
Pile-grillage foundation
A pile-grillage foundation takes less time than a monolithic foundation and costs less.
To make a foundation on piles, you need to remove the top layer of soil and use a rope to mark the dimensions of the future foundation for the stove. At the corners of the resulting square, holes are dug, 15 cm deep, and piles with a diameter of 108 mm are screwed into them. The piles should be as long as the depth of the main foundation of the bathhouse. The piles must be installed to such a depth that they are 10 cm below the level of the future clean floor of the bathhouse.
Next, the heads are welded to the piles. All parts of the metal that are above the soil must be painted with metal paint to protect against rust. The next step is to install 10 channels at the heads. A sheet of steel is welded to the channel, which must be laid inside the resulting square base for the furnace. Cement is poured into the prepared metal pit.
Shallow base
This foundation can only be done on solid, stable ground. The installation of such a foundation is similar to a monolithic foundation, the only difference is that the layer of finely buried foundation is 30-40 cm. This foundation is made without reinforcement.
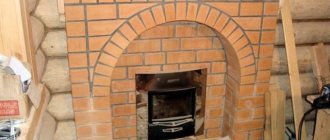
Preparation of the base and walls
Preparing the base
To install the stove, it is necessary to prepare the base. The passport of your stove must indicate the minimum dimensions of the base. If you do not have exact dimensions, then use the following rules: the protrusion of the steel sheet on the side of the firebox must be at least 50 cm, on the other sides - 10 cm.
To prepare the base, a marking is applied to the desired location. If the stove faces the street with its firebox, the base is made close to the wall. When the firebox is located in the dressing room, the base for the stove is made in the opening between the wall of the dressing room and the steam room.
Installation of the base with photo. What will you need?
- fireproof plate;
- refractory brick;
- fire-resistant mixture for laying stoves;
- steel sheet of the required size or heat-resistant tiles;
- heat-resistant glue for ovens;
The fireproof board is cut to the required size and laid on the floor. The brick must be soaked in water before laying. Dilute the mixture according to instructions. Lay the bricks in one row on top of the laid sheet widthwise on the mortar. The second row of outer bricks is laid with their end facing the first row, the remaining bricks are laid with the long side facing the first row.
In the next row, the outermost brick on the left side lies with its end facing the second brick on top, and with its side facing the protrusion of the first brick on top. This type of masonry will reduce the seams and will avoid breaking the bricks into halves. For the same reason, the second layer of brick is laid out.
After the brickwork has dried, apply heat-resistant adhesive to the steel sheet and glue it to the brickwork
Preparing the walls
The main task in preparing the walls next to the stove is to protect them from heat. There are several options for such protection:
- plastering the walls with a layer of 2-3 cm;
- installation of a heat-resistant screen;
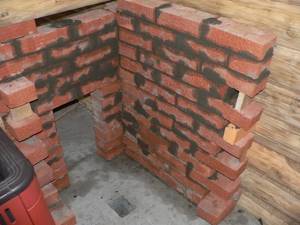
- brick protection.
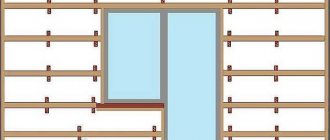
The note! The brick protection is installed at a distance of several centimeters from the main wall of the bathhouse. To ensure ventilation, special holes are left in the brickwork for air convection. This can be seen in the diagram.
If the stove is mounted at a distance of more than 50 cm from the walls or the walls of your bathhouse are made of non-combustible material, then wall protection will not be required.
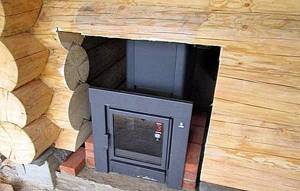
Before installing the stove in a bathhouse with an external firebox, you will need to make a hole in the wall.
The note! Despite all the precautions, if your bathhouse is made of timber, then the wood must be treated with a fire-retardant layer.
Step-by-step instructions for installing protective screens on walls and heaters.
Let's look at the option of installing a stove with a remote firebox:
1. On the surface of the wall, mark the passage of the combustion compartment extension. The groove should be 200-300 mm larger than the natural dimensions of the part. Holes are drilled in the corners with a large drill and a cavity is cut out along the marking line.
2. At the place where the chimney passes through the roof structure, a groove is made for installing a coupling through passage. You can lead the pipe directly through the wall to the street, but this is not always possible or convenient.
3. Separate parts of the stove are placed in the marked places and the holes in the wall and roof are adjusted. Then they mark the attachment points of the firebox and the chimney coupling, and drill them with a thin drill to insert the screws.
4. The stove is set according to the level, and the receiving part of the remote firebox with the door is secured in the rest room with self-tapping screws. The individual parts are fastened together. The hole in the partition is lined with ceramic or simple bricks and the remaining space up to the metal is filled with a layer of thermal insulation. It is not recommended to use asbestos boards - when heated and high humidity, the material releases harmful substances to human health.
5. Using wood screws, fix the sheathing on the surface of the walls and partitions, fill the free spaces with basalt wool and attach protective screens with a mirrored outer surface or lay simple ceramic tiles. The mirror surface will reflect heat and promote rapid heating of the steam room. But you can simply line the walls with bricks, tiles, fiber boards and other materials - the main thing is that they are not afraid of dampness.
Important! When building a brick heater, work is carried out according to the scheme - order, but a minimum distance from the walls of 40 mm is required. This helps to ventilate surfaces and does not cause deformation of wooden parts.
Pre-firing of the furnace
Before installing the stove in the bathhouse, it must be heated in the open air. This is done in order to remove any remaining grease from the oven, and also to allow the heat-resistant paint to completely dry and harden. Otherwise, if this is not done, at the first fire in the steam room, the new stove will produce a lot of acrid smoke.
Before the first heating, it is necessary to conduct a thorough inspection of the stove to identify minor defects, chips, etc. Carefully inspect the stove body, firebox door, glass, if any, and heat exchanger. Pay attention to how tightly or loosely the door closes
To fire the stove, place it on a flat surface, away from flammable objects. If the stove has a heat exchanger, then provide a temporary container to heat the water. Install a chimney with a height of at least 2 meters. Place the wood in the firebox, half the volume of the stove, and light the fire. The fire in the oven must be kept for about an hour.
You must wait until the fire goes out completely. Don't put it out. Wait until the oven cools down completely. This is necessary for the heat-resistant coating to completely cure.
Installation work
In order for the sauna to breathe dry steam, it is important to correctly install its source. A wood-burning metal stove can be a good choice if the owner thinks about how to use all its advantages and eliminate the disadvantages:
- The oven is heated outside to burn out the production anti-corrosion coating and check for serviceability and tightness.
- Prepare holes for pipes. At this stage, it is important to think carefully about fire safety. Most often, fires occur due to poor pipe insulation. If the pipe exits through the ceiling, provide the exit point with a protective ring made of non-combustible materials in accordance with SNiP standards.
- Install heat insulators on all walls closest to the stove. If necessary, use protective metal screens. If the stove has a firebox exit to another room or to the street, a protective passage is constructed according to the rules of SNiP.
- Place the stove in place and fix it in a stationary state.
- If it is planned to cover a metal furnace with bricks, then at this stage a brick casing is made. Sometimes it is done earlier, and then the stove is inserted from above or from the side, depending on the chosen technology.
- Install the chimney and other auxiliary blocks. Check their reliability.
- Do a test run. Control heating in dangerous places and smoke.
Having built a steam room and equipped it with a stove, the owner can fully enjoy the work of his hands.
The main thing is to follow the instructions so that the design is safe and lasts for many years. The work is not easy, but the result is worth it!
Installation of stove, tank and chimney
Furnace installation
The stove in the bathhouse is installed on a pre-prepared base, observing all indentations and minimum permissible distances from the walls. Detailed installation drawings. The distance from the stove to the ceiling, which is not protected by heat-resistant materials, must be at least 120 cm. The distance between the stove and the walls of the steam room must be at least 32 cm.
Tank installation
Bath stove with water tank. When choosing a tank, you can use a simple rule - 10 liters of hot water are needed per person. Based on this rule, everyone can calculate for themselves how large a tank they need.
The tank is installed on a special nozzle of the furnace air duct. This installation will allow you to heat the water to a temperature of 95 degrees Celsius, while heating the air in the steam room to 100 degrees Celsius. To securely mount the tank and reduce pressure on the foundation, it is advisable to mount the tank on the ceiling of the steam room or dressing room.
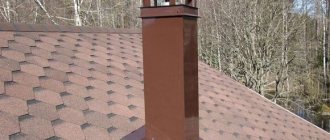
Chimney installation
Installing a chimney is a very important job, because... Many fires in bathhouses are associated precisely with improper or poor-quality installation of chimneys.
When installing a chimney, you need to remember that you will need approximately 90 cm of empty space along the line of the pipe. Therefore, if the bathhouse was not designed from scratch, according to a specific project, then there may be a ceiling beam above the stove, which will need to be cut out under the chimney, and connecting jumpers with the adjacent beam must be installed.
The material for the chimney can be brick, metal or ceramics. But ceramics require skillful handling, and it is unlikely that you will be able to install it yourself. You will have to look for a highly qualified specialist in this profile.
The simplest option for organizing a chimney is sandwich pipes. Almost anyone who knows how to use a tool can install such pipes.
Chimney installation, step-by-step instructions:
- a hole is made for the pipe in the ceiling, wall or ceiling;
- the wood is coated with a bio-fire retardant compound;
- a piece of pipe with thick walls is mounted on the furnace pipe, welded or installed with a heat-resistant sealant-adhesive;
- a smoke valve is installed on the pipe;
- sandwich chimney pipes are assembled;
- A spark catcher and rain protection are placed on top of the chimney.
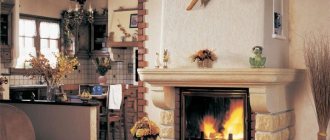
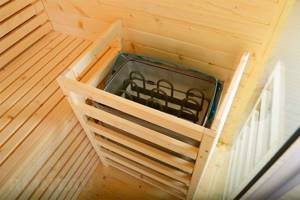
The fight for aesthetics and safety
In the steam room, the stove must be properly decorated. We are also talking about stoves located far from the walls without a protective lining; the whole point of the subsequent work is to correctly fit the metal body into the surroundings of the steam room and at the same time prevent accidental contact with heated surfaces.
The first option is the simplest and best suited for ovens with convection chambers. The arrangement consists of installing a parapet 15–20 cm high above the heater. The fence is installed 20 cm from the body with a standard heat shield and 35 cm without it. The parapet itself consists of 20x80 mm pickets exposed with drying oil, possibly with milling of the edges and shaped trimming of the heads. The planks are nailed with an indentation of 25–30 mm for sufficient ventilation. The basis of the fence is a frame assembled from 40x40 mm timber: pillars at the corners and two horizontal crossbars in each span.
If the heater does not have convection, it is very common practice to completely cover it with bricks. To do this, a reflective screen or a thin chrome-plated body is dismantled; these parts can be used in cutting the ceiling for a chimney. All that remains - the firebox and frame with a container for stones - is covered first with half of fireclay bricks on pure fireclay clay, and then with a quarter of red clay bricks with cement mortar. The top outer row is laid out in half a brick with a fold inward. With such a device, the heating inertia increases: the steam room will heat up a little longer, but the temperature at different combustion intensities will become approximately the same.

Safety rules for the construction of a bathhouse
It has already been written above how important it is when planning and constructing a bathhouse to strictly adhere to all standards and recommendations to ensure fire safety.
Brick is the best material for fire protection, but despite this, it is necessary to maintain a minimum distance from the stove to the walls - no closer than 25 cm. A special base for the stove is laid on wooden floors to avoid fire. The ash compartment is located at a height of at least 14 cm from the floor. When installing any metal stove, you must strictly comply with all the standards and regulations of the manufacturer. When installing a potbelly stove, you must follow the rules of SNiP. When building a stone stove, you first need to calculate the final weight of the entire stove and arrange an appropriate foundation for it.
Following the simple rules described in the article will help you install the stove in the bathhouse correctly and protect yourself from unforeseen situations.
We install a chimney
To remove combustion products, it is recommended to use sandwich-type chimney pipes. In this case, it is better to arrange a section of 1–1.5 meters from the stove with a non-insulated steel pipe: it is easier for it to make turns, and the possibility of installing a tank or coil remains possible.
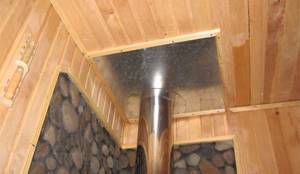
For the passage, two cuttings are performed: in the ceiling and roof; in the absence of an attic, they are combined. An opening in the ceiling is cut 25 cm from the chimney insulation casing, the space is filled with basalt wool.
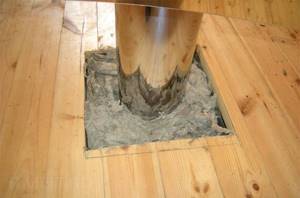
The passage through the roof is made with a standard roof cut with a tin flange. In this case, you will need to cut out the wooden parts of the sheathing 30 cm from the pipe and strengthen the rafter system. When assembling chimney elements, it is not recommended to seal the sockets; they are already compressed when heated.
Installing a stove in a bathhouse and possible errors
Finally, I would like to draw your attention to the most common mistakes when installing stoves. These include:
- incorrect installation of the stove, failure to follow the manufacturer’s rules, failure to comply with the minimum distances from the stove to flammable surfaces;
- non-installation or incorrect installation of heat-resistant screens;
- neglect of fire protection measures, lack of a fire extinguisher in the bathhouse;
- savings when buying stones for the stove, low-quality cheap stones - risk of fire, use of low-quality essential oils when vaping;
- installation of a casing for the chimney without gaps for ventilation;
- failure to install or incorrectly install the base for a metal stove on a wooden floor;
- saving on materials, buying cheap equipment.
Following simple rules and recommendations will help you understand how to install a stove in a bathhouse with your own hands.