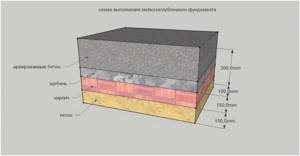
About the Pompeii oven, part II. Some explanations and operating principles.
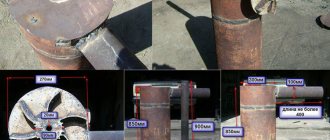
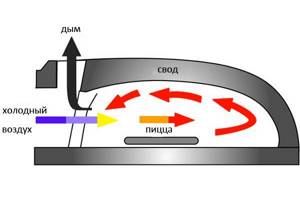
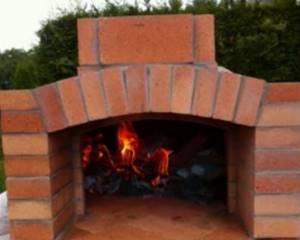
So, yesterday a man contacted me who was conducting (unsuccessful, as it turned out) experiments with pizza in a structure that can be called an outdoor stove-fireplace. The design is quite standard - a large firebox open at the front + chimney. Why was the result negative in such a furnace and why is the Pompeii furnace convenient? As a result, I decided to write this unscheduled chapter. The pizza oven is built on a slightly different principle from the fireplace, because... the chimney is separated from the combustion chamber and is located on the entrance side. The height of the entrance to the furnace is about 60% of the height of the dome, and cold air entering from below, along the hearth, enters the fire - when baking pizza, usually in the side at the back - and then comes out hot and humid, going around the “ceiling”, going down when exit and only then goes up into the chimney. Pay attention to this 60%. The width of the furnace entrance is approximately equal to the height of the furnace dome (radius) or slightly less. For example, my stove with a diameter of about 110 cm has an entrance about 50 cm high and about 50 cm wide. This is important, the correct further operation of the stove depends on it (good draft, smoke outflow, reasonable heat loss).
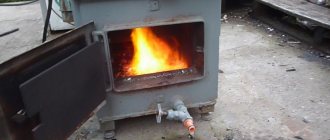
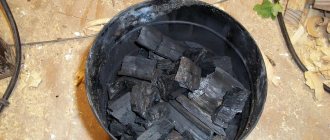
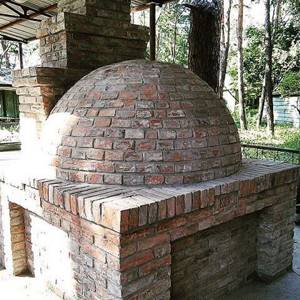
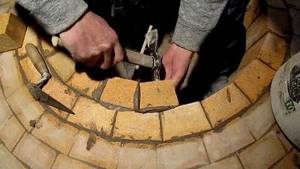
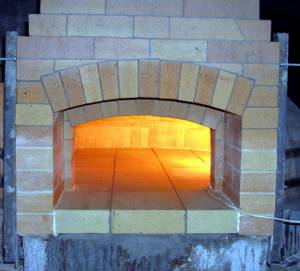
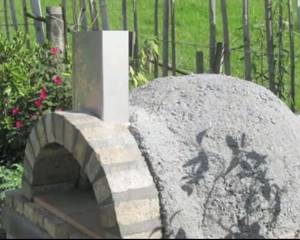
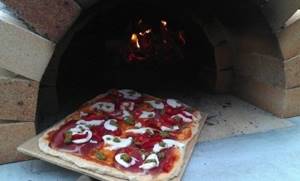
You can especially clearly see how the fire behaves in the stove in this photo - it literally licks the dome - from bottom to top and then, from the center, down again to the exit:
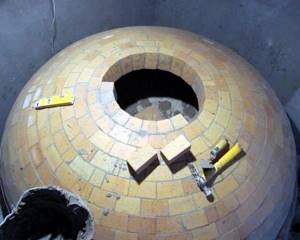
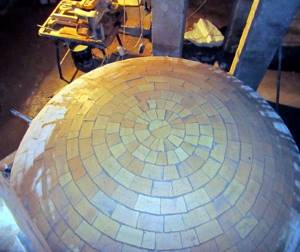
Thus, pizza (or something else, if we cook with a live fire in an oven) is cooked not only due to the hot hearth, but also due to the powerful infrared flow from the hot dome and the flame itself. In a fireplace stove, the distribution of flows is somewhat different - the flame, in general, immediately goes up, and the depth of the firebox is not enough to ensure uniform exposure to heat from above. Let me remind you that in a Pompeian - round - stove, the depth of the firebox is actually equal to its diameter - i.e. in my case - 43″ - i.e. 110 cm. They also practice more moderate cooking conditions, with lower temperatures - with burning, smoldering coals, or even with residual heat, when there is no wood or coals in the oven. The convenience and versatility of the Pompeian oven is manifested in several factors that distinguish it from a Russian or specialized bread oven. The thermal mass, that is, the mass of the stone that is heated by fire to the required T, and then releases this heat, is less in the Pompeii furnace, because usually it is placed in half a brick (about 12 cm). Until we warm up the entire thickness of the stone to the required temperature, heat from the hotter layers goes deeper into the colder parts of the stone - the heat “leaks away”. The main problem from this point of view with a Russian or bread oven is the laying of one whole, or even two bricks (i.e. 25 cm or more), which means a significant amount of time and amount of firewood spent on heating. The advantage of a large thermal mass is the long time during which the furnace maintains the achieved temperature - i.e. In a bread oven it is possible to bake significantly larger quantities of bread using the residual heat. If we do not set ourselves the task of baking 75 or more loaves of bread from one firebox, then the Pompeii oven, with its capacity of 20-30 loaves, will satisfy us through the roof. The pizza oven's not-too-high thermal mass is compensated for by good thermal insulation on top of the dome and bottom of the hearth (it's not on top in the top photo - this is one of the original fireboxes for drying out the oven). Those. You can use a Pompeian oven about an hour after the start of heating, but a bread oven will not provide temperature stability until everything is warmed up (2-3 hours or more).
Temperature distribution, °C, in a Pompeian oven (thickness of the roof and hearth - 8 cm).
| in 30 minutes | in 45 minutes | in 60 minutes | in 90 minutes | |
| outer part of the vault | 150 | 260 | 370 | 370 |
| inner part of the vault | 315 | 370 | 370 | 370 |
| fire | fire and pizza | fire and pizza | fire and pizza | fire and pizza |
| hearth top | 315 | 370 | 370 | 370 |
| bottom of the hearth | 150 | 260 | 370 | 370 |
Temperature distribution, °C, in a bread oven (cooper vault) - the thickness of the vault and hearth is 25 cm.
| in 30 minutes | in 45 minutes | in 60 minutes | in 90 minutes | |
| outer part of the vault | 37 | 37 | 65 | 120 |
| middle part of the arch | 93 | 120 | 150 | 205 |
| inner part of the vault | 260 | 290 | 315 | 260 |
| fire | fire | fire | fire | fire and pizza |
| hearth top | 260 | 290 | 315 | 260 |
| hearth middle | 93 | 120 | 150 | 205 |
| bottom of the hearth | 37 | 37 | 65 | 120 |
data for the tables is taken from the stove construction manual from the Forno Bravo website
Those. The balance of thermal mass and thermal insulation of the Pompeii oven allows for relatively quick heating to operating temperatures without any noticeable compromises for home use when baking pizza, bread and almost any dish.
The second point is that a bread oven, built on the principle of half a cylinder or barrel (barrel vault, barrel vault) has corners, which, in the case of an oven of the type 32x36″ (80x90 cm) that is adequate for a household, complicate the organization of the internal space of the hearth - “wood with fire” — pizza,” and uniform movement of hot air. In fact, they say that a 32x36″ oven is for one pizza (hearth area 7200 cm2), and a 43″ round oven is for three (under 9500 cm2). However, due to the large thermal mass, such an oven takes a long time to heat up, but is more effective when baking large quantities of bread. There are still points that I will not dwell on, for example, the apparent complexity of the domed vault vs the simplicity of the barrel vault. This is not to say that a Russian oven or a bread oven is bad - no, it’s just that such an oven is more versatile, due to the abandonment of some unnecessary features in everyday life (such as 80 loaves). Let me note, once again, that in a Pomeya oven you can not only bake the right pizza (60-90 seconds), but also fry and bake a wide variety of foods at a very wide range of temperatures, from 300°C to 70-80°C (relatively speaking). Those. ranging from roasts to desserts, including the so-called. low-temperature long-term cooking, in the manner of newfangled molecular culinary, when a piece of meat is brought to 60-70°C for several hours, or a regular grill, when the coal is shoveled out to the oven outlet, and a grate with legs is placed on top (the so-called Tuscan grill) .
Device and elements
Externally, the “Italian stove” resembles a “Russian stove”, but unlike the second one, it is not capable of heating the room. The design ensures a stable and high temperature inside the stove. Usually a classic Pompeian oven is built from brick or clay, but sometimes other materials are used, most often concrete cinder block.
The design of this system consists of four components:
- Foundation;
- Tabletop;
- Pedestal;
- Bake.
The Pompeian furnace was built in order of four main components:
- Floor;
- Entrance arch;
- Dome;
- Chimney;
Construction of the Pompeian furnace
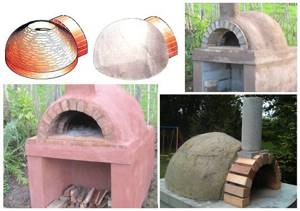
Since the history of this kitchen system is very long, it developed along two different paths, which subsequently led to the appearance of two types of Pompeii stoves: Tuscan and Neapolitan.
Photo of a Pompeian oven of two types:
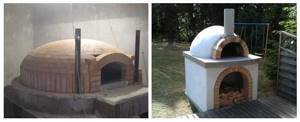
Pompeian ovens of different types
Tuscan designs have a high dome and a round vault, while Neapolitan designs are made exclusively with a low vault - due to the fact that they are intended exclusively for preparing large-sized pizzas and high-quality frying.
We build it ourselves
We will divide all construction work on the construction of a wood-burning pizza oven into a number of successive stages.
Stage 1: preparatory
First you need to stock up on everything you need, namely materials and tools.
We will use fireproof material to lay the stove. To do this, we take fireclay bricks and a special mortar for stoves. You can use a ready-made mixture or make the composition yourself using clay with the addition of fireclay (read about its features at this link ). It is better to refuse cement mortar, even if it contains various additives. Its characteristics are much worse than those of clay. In addition, the cement leaves hard-to-clean marks on the surface of the bricks, which is unacceptable for the inside of the kiln.
Another solution option is a special “Mertel” mixture for stove masonry. The composition of the ShA-28 brand is optimally suited for the Pompeii building. Its excess and traces can be easily cleaned from the surface of the brick.
To lay the sphere, the same square bars are used, so the formation of wide seams on the outside is inevitable. These gaps must be filled with a special fireproof mortar used for the construction of devices that is resistant to high temperatures. This will avoid cracking.
To carry out masonry inside the furnace, you should purchase fireclay bricks. You should not buy facing material, since its additional characteristics suitable for external work will not be required here, since all the bricks will be placed in the interior of the structure.
The cladding material can be used to make the entrance arch, since the temperature here is low. But this is done at will or if provided for in the design project. For such an element, fireclay bricks, which are used for interior work, are quite suitable.
Necessary materials
So, to build an oven structure for cooking pizza, you need to stock up on the following materials:
- Fireclay brick. Required for arranging the surface of the hearth, as well as the arch.
- “Mertel” is a special mixture for masonry.
- Mineral wool, with which it is necessary to insulate the arched ceiling.
- Reinforcement and reinforcing mesh for reinforcing works of the vault, table top and foundation.
- Perlite is an insulation material for the arc-shaped ceiling of the oven and for thermal insulation between the hearth and the countertop.
- Metal profiles: beams, angles, pipes (if provided for by the design).
- Boards for formwork.
- Chimney.
- Cement required for pouring the foundation and countertop.
- Polyethylene film.
- Bricks or concrete blocks on the podium.
- Boards and bars for supports.
- Sand for concrete pouring.
Tools
For construction work we will need:
- grinder and discs for cutting stone;
- hammer;
- chisel;
- saw;
- mallet;
- concrete mixer or drill with a mixing attachment.
You are also required to stock up on the following personal protective equipment:
- special glasses;
- respirator;
- gloves.
Step 2: Process of creating a stove stand
To perform such work you need to perform the following operations:
- Build the foundation. On the selected site, we dig a hole measuring 150x150 cm and a depth of 35 cm. In this case, the recess should be wider than the pedestal, 15 cm on each edge. Place crushed stone at the bottom of the hole and compact it well. We make a cushion of sand 20 cm thick on top. We take suitable boards and build formwork. Polyethylene film laid on sand simplifies the process of pouring concrete mortar. A reinforcing mesh is placed on top of it, for which rods with a thickness of at least 8 mm were used. Before pouring the solution, we place small supports under the mesh, creating a space of 5 cm for the concrete mixture. Pour the solution and level the surface of the slab. We check its evenness using a building level. After this, we wet the concrete with water, cover it with film and leave it to harden and set. The last process takes about a week.
- Set up a pedestal. We wait for the concrete to dry completely and proceed to the construction of a stand for the stove, using cinder blocks for this. The pedestal can be made in the shape of the letter H, where the sides are 120 cm, that is, three 40-centimeter blocks are placed. Some people prefer to make a stand in the shape of the letter P. But the first option has its own advantage: the transverse wall forms an additional support for the furnace structure, which allows you to evenly distribute the loads throughout the entire structure. We will use the dry method of installing blocks. It is as follows. We lay the prefabricated elements in rows, and insert reinforcement into the existing holes, which will help protect the blocks from moving while pouring concrete. We check the masonry for evenness, both horizontal and vertical. Next, passing through one, we fill the holes with solution. We leave the structure to dry for two days, allowing time for the composition to set.
- Create a tabletop in the form of a monolithic reinforced concrete slab. We start by making the formwork. The surface dimensions should be 140x120 cm. To meet these parameters, we extend the front part of the wooden form by 20 cm, while its height is 10 cm. Moisture-resistant plywood or boards covered with a polyethylene film are suitable as the bottom for the formwork. We place a mesh of reinforcing rods inside and make supports that provide gaps of 5 cm. In areas of the tabletop that extend beyond the boundaries of the stand, it is necessary to install an additional reinforcing layer. We fill the formwork with concrete mortar, level the surface, and check for horizontal evenness. After this, we spray the countertop with water, cover it with polyethylene and leave it for a week so that the concrete hardens.
Principle of operation
The heating principle inside the Pompeian system is based on two hot air flows - convective from the hearth and reflected from the ceiling.
Expert opinion
Nikolay Davydov
Stove maker with 15 years of experience
Inside the oven, the temperature is regulated without human intervention. This is done due to the physical properties of the combustion products: if the firewood flares up strongly, the gas released by the fire when exiting the system presses the incoming air flow so that the intensity of firewood combustion decreases, and therefore the temperature in this unique design is normalized.
Principle of operation
An important role in the design is played by the dome, which emits heat flows, thereby heating the surface of the food, and consequently preparing its upper layers. That is why in these systems the pizza becomes perfectly cooked.
How much will it cost?
A DIY Pompeian stove is a fairly expensive design, even if you decide to carry out all the work yourself. This is due to the high cost of the materials from which it is made. Since the design of a tandoor consists of several components, it is easiest to calculate the cost of each of them.
The price consists of purchased materials, and does not include construction waste and materials that can be found near the house (clay and sand):
- A bag of cement – 250 rubles;
- Cinder blocks will cost about 300 rubles;
- Fireclay bricks in the amount of 350 pieces will cost 17,000 rubles;
- Thermal insulation will cost 500 rubles;
- A cutting disc for stone costs about 250 rubles;
- Polyethylene for waterproofing will cost about 200 rubles.
In total, the construction of the entire structure, provided that fireclay bricks are used to lay the dome, will cost approximately 18,500 rubles .
Basic requirements for construction
There are no specific difficulties in building a Pompeian stove with your own hands; you only need to know a few basic rules for arrangement so that the structure can serve for a long time and be operated without problems:
- The inner walls of the stove must be made of refractory materials;
- It is imperative to provide the system with high-quality hydro and thermal insulation;
- The cladding must correspond to the location of the structure; if it is under a canopy, then plaster will do, but a stove located in the open air requires cladding with tiles or mosaics;
- The countertop must be able to withstand the stove, so its construction will require strong and stable materials;
- The dome of the structure must be exclusively spherical in shape;
- A chimney is required.
Materials and their quantity
A wood-burning pizza oven is built with your own hands using the following list of materials:
- 1 bag of cement
- 18 cinder blocks
- 1 pack of fireclay bricks
- Specialized fire-resistant mortar – 1 package;
- Boards if necessary;
- Insulation for thermal insulation;
- Polyethylene for waterproofing;
- Sand;
Required Tools
Each master can use his own set of tools, but usually the following list is needed to carry out all the work quickly and without much difficulty:
- Master OK;
- Kiyalo;
- Container for mixing and transferring cement mortar;
- Measuring instruments;
- Grinder and stone disc;
- Shovel for mixing the solution;
- Spatula, chisel, protractor - if necessary
What is a Pompeii wood stove?
This is an unusual outdoor device in shape and design, different from standard products laid out by a stove maker. It has a dome-shaped appearance, most likely reminiscent of the house of fairy-tale characters, and not a device for preparing a gourmet dish.
Refractory bricks are used to lay the inner surface of the furnace. A chimney is installed on the entrance side, which is separated from the combustion chamber. Burnt solid bricks are used to construct the canal. In this case, the pipe should be 1.5-2 meters long.
A wood-burning Pompeii stove is characterized by certain proportions. The height of the entrance is small and comparable to 1/2 of the height of the dome. As for the width, it is the same for both the entrance and the convex covering. The choice of this ratio is not random, since it allows you to optimize the working process of the furnace device, namely:
- reduce thermal energy losses;
- ensure normal smoke removal;
- create good traction.
The arc-shaped overlap of oven equipment for making pizza comes in two types:
- Tuscan. It is characterized by the same value for the height of the dome and the radius of the furnace.
- Neapolitan. In this case, the height of the convex roof is 80% of the total diameter.
Properly performed thermal insulation allows you to increase the period of maintaining operating temperature.
Expanded clay, basalt wool, and perlite are considered good materials for thermal insulation. You can also use others that meet the requirements of resistance to high temperatures, temperature changes, and thermal energy conservation. A wood-burning pizza oven has a body, the outer layer of which performs two functions: it is the outer wall of the heat insulator and a decorative element of the surrounding interior and landscape. Various types of finishing materials are used for cladding, for example, plaster or fireclay tiles.
Stages of work
How to make a Pompeii oven with your own hands from brick? Designing an Italian stove is quite simple - the main thing is desire and the availability of all the necessary materials. The work is carried out in 4 stages:
- Arrangement of a hearth and pedestal for a dome with an arch
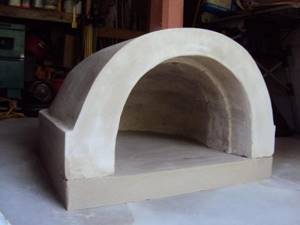
- Forming a model from clay or earth
- Construction of the dome
- Dome lock installation
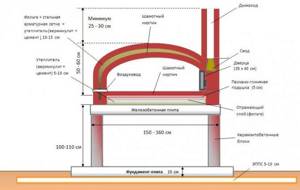
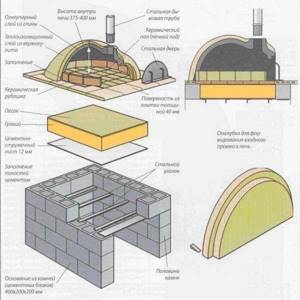
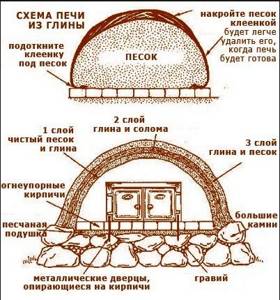
The whole order is clearly depicted in the diagram below:
Stages of work
Scheme and drawing
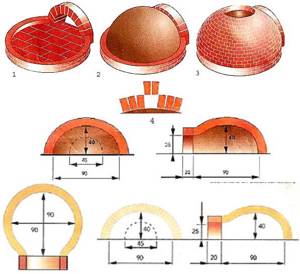
Scheme and dimensions
This figure shows the main stages of the construction of a pompeii, and also indicates all the dimensions of the parts of the Italian stove. The pizza oven, the drawing of which is shown above, does not require many skills to build - the main thing is to select the right materials.
Foundation
The structure definitely needs a high-quality foundation; a reinforced concrete slab with a thickness of 15-20 centimeters is ideal for this role. For proper waterproofing, you can use a two-layer roofing felt. The foundation plays a fairly important role - it ensures the stable condition of the entire structure and allows you to install very heavy structures on it, in this case it is a Pompeian brick oven, which has enormous weight.
The foundation can be made according to this scheme
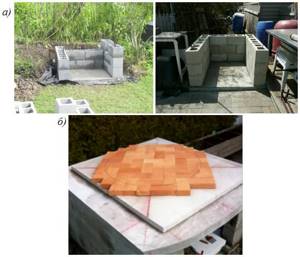
Cinder block pedestal
You need to install a pedestal on the base, on which the stove itself will be installed. A pedestal for a pompeii is also called a table. You can lay it out of brick, but it is easier and faster to build it from ordinary concrete cinder blocks - they are cheaper than other materials and have good stability compared to other materials.
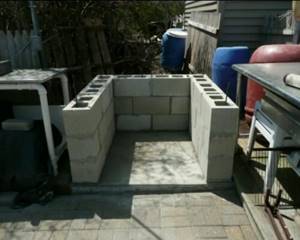
You need to build the base using regular masonry, as in the photo below:
Construction of the foundation
Three walls will allow the tabletop to remain stable, and inside the resulting opening you can stack dishes or firewood; this part of the pompeii will serve as a mini-warehouse. After the three walls are folded, the tabletop is installed on them.
Tabletop
As a countertop, you can use a concrete or calcium silicate slab. Some people purchase marble slabs, and the pedestal is made of natural stone. Residents of the Krasnodar region used slabs from dismantled dolmens for Pompeii ovens whenever possible.
Example of making a countertop
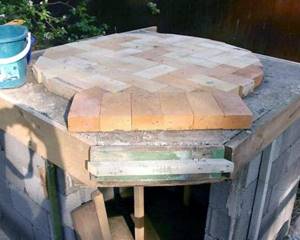
Furnace laying
The construction of the Pompeii furnace itself is the most important part of the work. It begins with laying a hearth made of fireclay refractory bricks. The bottom is the name given to the lower part of the stove, which is the bottom where the wood will burn while the pompeii is running, so it should be laid out beautifully and as compactly as possible. The most suitable herringbone styling:
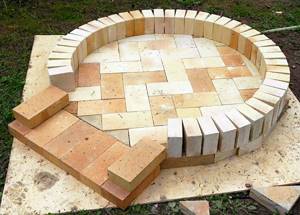
This option is most preferable
As you can see in the photo above, in addition to the hearth itself, you need to lay out the side of the entire structure and the pedestal for constructing the arch from fireclay bricks.
After this, you need to decide how the dome model will be made, on top of which the masonry will be made. The model can be a hemisphere made of earth or clay soil, formwork made of cardboard or wood, or a radial model made of wooden plates. The easiest way to make a model is from clay or earth:
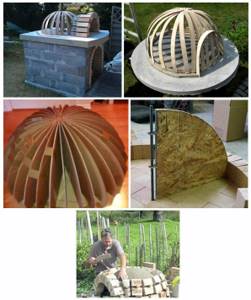
Layouts on which you can make masonry
After the dome model is made, masonry can begin. Since it will be the inner layer of the entire structure, you should use only refractory fireclay bricks that can withstand extreme temperatures. Some owners decide to use a hinged support instead of a model; this simplifies the laying process, but increases the duration of all work:
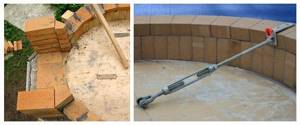
Another masonry method
Continuation of masonry
When laying a brick dome, it is necessary to maintain its spherical shape, since it is the basis for good heating inside the Pompeian oven. For convenience, you can use refractory brick halves, which should be prepared in advance by cutting with a grinder and a stone disc. Follow safety precautions when cutting bricks:
- Use a mask, it can be purchased at a pharmacy;
- Be sure to wear safety glasses and gloves;
- Brick should only be cut with a stone disc;
- The cutting process takes place in the “pull” mode so that the brick does not jump out from under the disk.
Make sure the dome is made correctly
In order to correctly install the Pompeii stove with your own hands, keep the drawings and dimensions close to you during the work. Lay alternate rows of domes around the sphere, finishing each row of masonry before starting the next. In each subsequent row there will be 1.5 fewer bricks, so before you make a Pompeian stove with your own hands, be sure to keep blanks of 0.3-0.7 bricks on hand.
Completion of the dome masonry
Front view
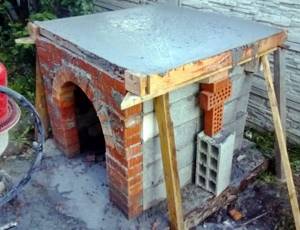
Construction of a chimney
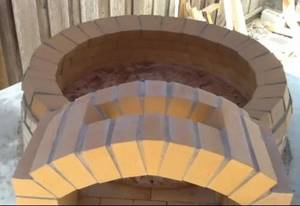
The chimney is laid out over the hole that was prepared during the construction of the structure. So the temperature inside it will be low; it can be made from ordinary brick masonry. The beginning of the work should be the installation of the arch:
Place for chimney
When building a Pompeian stove, some install a chimney made of galvanized steel. It doesn’t look so beautiful, but there is no need for work on its construction and you can save a lot on bricks.
Metal chimney
Thermal insulation of the furnace
On top of the masonry made of refractory bricks, a clay coating is made, on which thermal insulation 5-10 centimeters thick is laid on top. Mineral or basalt wool will serve best in this role.

Thermal insulation of the furnace
Next comes a layer of cement-sand or cement-lime plaster. After the thermal insulation has been completed, facing work can be carried out.
Furnace lining
When all the work on constructing the dome, installing thermal insulation and plastering has been completed, it is possible to carry out facing work that will make the stove visually attractive and consistent with the design conditions of the backyard.
Expert opinion
Nikolay Davydov
Stove maker with 15 years of experience
The type of cladding is largely determined by the location of the structure. If the system is installed outdoors, it is best to cladding it with mosaic or clay, or a high-quality cement-sand mixture.
Drying
After constructing the structure, it needs to be allowed to dry; the solution usually dries within 3-4 days, after which the first kindling can be done, which becomes the final stage of the work.
First kindling
After the entire structure has been erected, the first firing of the Pompeii furnace is necessary, which will serve as a strengthening process for it. Experts recommend heating the structure daily for a week to strengthen all layers. This is done in the following order:
- In the first fire, you need to fuse 2 kilograms of paper or 3 kilograms of straw inside the combustion chamber;
- In the second firebox, 3 kilograms of straw and 1 kilogram of wooden chips and sticks are burned;
- In the third firebox you can burn 4 kilograms of wood chips;
- The fourth fire allows you to burn one dry log;
- In each subsequent fire, the number of logs burned increases by one;
If the first kindling is carried out incorrectly, the entire structure may dry out and crumble, which will lead to the destruction of the structure.
Recommendations for performing construction work
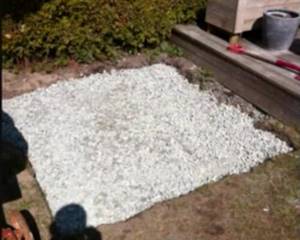
- First, you need to draw a circle with a diameter of about 100 cm. Its outer edge is trimmed with pieces of brick, and inside this ring, heat-insulating material is poured, namely expanded clay, penoizol or broken glass. Then the surface of the table is carefully extended using concrete. Stone tiles are used as finishing.
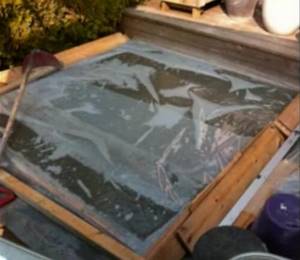
- To lay out the hearth, fireclay bricks, cut at the edges, are used. All cracks are carefully filled with solution , after which the circle is leveled.
- Next, the construction of the dome begins. First you need to determine the entrance and install a frame made of foam, metal or wood here. After this, rows of bricks are laid out in a checkerboard pattern. At this stage, you need to make sure that the tilt towards the center of the combustion chamber is noticeable. For this purpose, wedges made of wood or brick are used. When the masonry is ready, foreign objects must be removed.
- Simultaneously with the creation of the dome, the formation of the chimney of the Pompeii oven takes place. This element is installed externally. For its construction, brick or metal sandwich pipe is used. The height of such a part should be 2 m, and the diameter should be about 170 mm. After proper drying, the furnace roof is covered with heat-insulating material.
In order for a finished Pompeii stove to last a long time, all safety regulations must be followed. So, during the construction process you need to use a respirator and goggles. In addition, you should select high-quality materials, prepare an appropriate solution and adhere to the procedure.
Option made from clay (without brick)
Making a Pompeii oven from clay, without using bricks, is a simple process. The foundation and tabletop are made in the same way as in the case of the classical design, but the model is made from coarse sand (screenings). A clay dome is laid on top of it.
Pompeii made of clay
Device
It is best to use special clay; you can purchase it at a construction warehouse. How to properly make an Italian design from clay is well shown in this video:
A Pompeii clay oven is installed with your own hands in the same order as when constructed from other materials. After the dome is installed, a chimney is made - any materials can be used for its construction, including ordinary brick.
Expert opinion
Nikolay Davydov
Stove maker with 15 years of experience
As in the case of a brick Pompeian stove, waterproofing and thermal insulation are required, which will ensure a long service life, as well as cladding, which will protect the structure from irritating factors (rain, hail, snow).
The Pompeii clay pizza oven is a simple design to construct - anyone can make one like this.
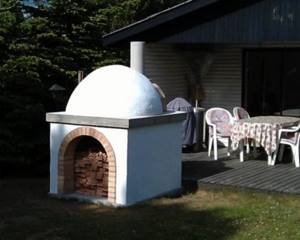
Pompeian oven and its place in our life
The most common place for its placement is in the garden, outdoors. Such a stove can be placed separately or be part of a garden barbecue complex. In combination with a gazebo, the stove becomes a wonderful element of the landscape and a favorite vacation spot for family and friends. By using various types of stove decoration, you can get a stylish decoration for your garden plot.
Despite the fact that a pizza oven is mainly considered as an option for placement on the site of a country house or cottage, it can also be installed indoors by making an appropriate foundation and a proper chimney for it. But now we will consider the classic version of the Pompeian oven in the open air. The construction of such a furnace is quite possible in our conditions, because all materials are sold in construction stores.
It should be said right away that building such a furnace is not a quick task, it is labor-intensive, and even expensive. But those who love fresh homemade baked goods, cooked in an authentic home oven, are willing to work hard to have such an oven. And there are more and more such enthusiasts, and they are very pleased with the results of their work. After all, they receive delicious homemade bread, real pizza and a real home, around which it is always pleasant to spend time in friendly company. And if you carefully study the instructions, then building a Pompeian stove turns out to be not such a difficult task. In addition, this process is creative and will bring a lot of pleasure, both in the process of the work itself and in the process of “reaping” its fruits.
Technical and financial side of the issue
The fairly high cost of installing such a furnace is due to several factors. The first is that it is made of refractory brick and this brick is more expensive. But the point is not only the cost of the refractory materials themselves, but the fact that the brick structure has a lot of weight. In order for it to be convenient to use the stove, it should be at a height of 80-100 cm. And for this it is necessary to make a stand on which the stove will be installed. At the same time, the design of this stand turns out to be quite massive, because it must support the weight of the stove. And to top it all off, such a massive structure requires an appropriate foundation.
But the stand and foundation can be made of any materials. Usually, during construction and renovation, there is always a large amount of unclaimed materials and leftovers (blocks, bricks, fittings, rolled metal, boards, the same cement), perhaps friends and neighbors have them and they don’t know where to put them. Thus, by using leftover materials to build the foundation and stand, you can reduce costs.
Another negative factor is the duration of the furnace construction process. The entire structure of the stove consists of the following components: foundation, pedestal, countertop, and the stove itself. The foundation and countertop will be made in the form of a monolithic reinforced concrete slab. In order for the concrete to set and harden, you will have to take technological breaks for at least 5-7 days, and preferably even longer. But, on the other hand, those who come to the site for the weekend may even find a certain advantage in this and engage in construction in stages. You can even prepare the foundation or foundation with a pedestal and table top in one season, and continue building the stove itself the next summer. Thus, it is possible to divide financial investments into different periods. In addition, a foundation that has stood over the winter will show whether it was done correctly, and any defects that appear can be corrected before laying the stove. This applies to areas with unfavorable soil conditions and groundwater levels.
It is important to choose the right time for laying the stove itself. It is advisable to do this in the dry season so that the brick does not retain excess moisture, and it is easier to prepare the oven for thermal operation in the future. During work, it is better to build a canopy over the site, or at least remember to cover the stove with film after work.
What can you cook?
Despite the fact that in these Pompeian buildings they cook mainly only pizza, which is truly tasty, because it will be prepared according to traditional technologies, many other dishes can be cooked in the Pompeian oven:
- Baked fish - usually served with baked potatoes or lemon, thanks to double-sided baking, the fish turns out tender, rich in flavor, melting in your mouth;
- Baked meats - many meat dishes are cooked to perfection in the Pompeian wood-burning oven, including kebabs and grilling, and lamb is cooked nowhere better than in the Pompeian system;
- Baked apples are a very tasty national dish, which is especially tasty in the tandoor; you can also prepare other hot desserts;
- Homemade bread and various buns - Italian wood-burning ovens allow you to prepare very tasty bakery products of various categories: Tuscan bread,
- Dishes baked in clay pots are a different story, because the temperature inside this oven is ideal for preparing various dishes baked in clay pots: beans, potatoes, fondue, vegetables, cabbage soup, mushrooms;
- Cantucci, buns, cookies, pies - baked goods for tea are excellent in Pompeika;
But every owner knows why he builds this unique structure - to prepare pizza and lasagna with an amazing range of flavors. These Italian dishes have long been prepared in Italian wood-fired ovens, so in order to get the highest quality pizza, no matter what ingredients it is made with, it should be cooked in a Pompeian oven.
Functions of the Pompeii oven
The Pompeian (otherwise called Neapolitan or Tuscan) oven is classified as a bell-type oven. The tradition of using this product in preparing family dinners, as well as in restaurant establishments, has a centuries-old history. This device is widely used by many peoples of the Mediterranean. Its closest relative is Russian.
Please note: in Italian pizzerias, the fire in such a device is not completely extinguished for many months. Even when there is no pizza in the oven, it maintains a high temperature. To prepare pizza, the temperature is raised to 350 - 400°C. Pizza is cooked directly on the oven floor, which should never be done on trays. In addition, the combustion is carried out by types of wood that do not smoke or emit resin during combustion - alder, cherry, olive wood. This is the secret of the wonderful smell emanating from a burning stove.
What temperature is maintained in the oven in the firebox during cooking? In the oven you can cook a huge number of different dishes at a very wide range of temperatures from 400 degrees to 70 - with low-temperature cooking. In such an oven, a Tuscan grill is also excellent, when the coals are raked out to the mouth of the oven and a grate is installed on legs. (See also: Sitemap)
Conclusion
In order to delight your household and your guests with delicious pizza, as well as pleasant gatherings near a warm fire, every enterprising owner can build a Pompeii pizza oven in his own garden with his own hands. This structure can be made of brick, and if you want to save money, it can be built from clay material. The main thing is that the entire system is manufactured in accordance with technology and basic rules.
What kind of Pompeian stove will you make?
From brick From clay