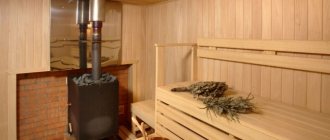
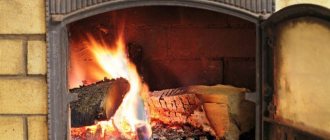
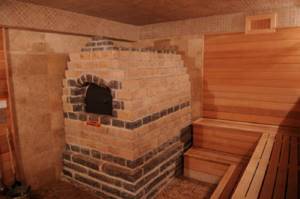
No matter how profitable and simplified the modern option of heating a bathhouse using a metal stove may seem, experienced experts unanimously advise: it is better to use traditional brick. Gentle heat, aesthetic appearance, rich but not scalding steam - only a brick oven can provide these advantages. And if you want the device to heat not only the steam room, but also the adjacent room, there is an even more profitable option - a stove with a firebox from the dressing room, equipped with a water tank. It will not be easy to build such a structure with your own hands, but with step-by-step instructions, drawings and photos of installation, anyone with basic construction skills will be able to complete the task.
Material selection: types and sizes of kiln bricks
The first step is to purchase the main building material - brick. If your budget is limited, you can choose ordinary ceramic bricks. Its dimensions are standard - 25 x 12 x 65 mm. But here you need to take into account one nuance: in order for the material to withstand difficult operating conditions caused by high temperatures and humidity without negative consequences, you will need to treat it with special protective compounds. An excellent option is heat-resistant varnish for a brick stove.
Brick for the stove
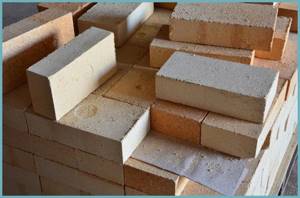
A more suitable raw material for a bathhouse is yellow-straw-colored fireclay bricks. They are made at high temperatures by pressing and firing, so they are extremely reliable. As a rule, products are sold in three size variations:
- standard – 230 x 125 x 65 mm;
- narrowed – 230 x 114 x 65 mm;
- narrowed with reduced thickness - 230 x 114 x 40 mm.
Bricks must be free of voids, that is, solid.
Advice. It is not recommended to use silicate and unfired adobe bricks: the former are not heat-resistant, and the latter are so hygroscopic that they simply turn limp from the steam and heat of the oven.
Preparation of the drawing
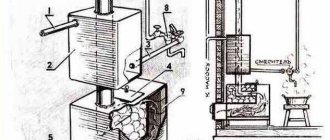
The most important stage for the construction of a high-quality stove in a bathhouse is the preparation of a plan diagram, which should display:
- Design dimensions.
- Type of selected model.
- The location of the firebox and the exit for storing firewood.
- Location and dimensions of the chimney.
- Details of the compartment for stones.
All parameters must be thought out in advance and then transferred to paper. During work, it is worth periodically reviewing the drawings, coordinating your actions.
If you wish, you can always use the services of a professional builder who will draw up the optimal drawing. Before starting work, it is also better to watch several video lessons on how to correctly draw up a high-quality drawing.
Preparation of tools and consumables
To lay the stove you will need not only bricks, but also many auxiliary materials and tools. The most important ones that will need to be purchased in advance:
- grate bars – 6 pieces of standard size 300 x 220 mm;
- firebox door – 250 x 280 mm;
- door for the blower - 200 x 250 mm;
- quartz or river sand;
- fireclay clay;
- door for compartment with stones;
- steel corners – 4 pcs;
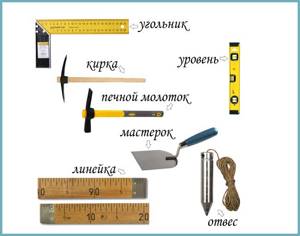
Required Tools
- steel sheet for firebox;
- steel corners for the ceiling - 10 pcs;
- fireclay elements for the ceiling - 6 pcs;
- heat-resistant varnish for a brick stove;
- construction mixer;
- level.
Now you need to prepare a clay mortar that will serve as a binding material for the bricks. First, soak the clay for 2 days - dry material is difficult to process. Then mash it with a special spatula, add water and mix with a construction mixer until you get a composition that resembles sour cream. Then add sand to the mixture. The ratio of clay and sand should be 1:1. Then knead the mixture again until a homogeneous solution is obtained.
Advice. If the clay is too oily, add a little fireclay mortar to it along with sand.
Tips for work
Before you begin, determine the dimensions of the sauna stove with a water tank. The width and height of the structure directly depends on the room. Naturally, the stove should not occupy the entire space. The distance to wooden walls and shelves should be at least 0.3 m. Linear dimensions can vary from 80 cm to one and a half meters.
A do-it-yourself brick stove for a bathhouse with a water tank, like any other, starts with the foundation. The weight of the future stove will be significant (500-900 kg), so the platform must be thoroughly prepared. For heavy structures, you will have to dig a pit more than a meter deep. More accurately, the depth is determined depending on the region and soil structure.
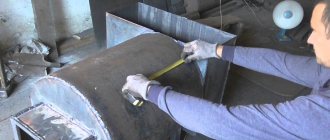
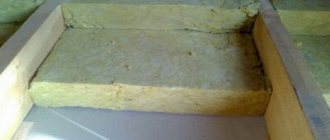
To protect wooden surfaces from fire, it is recommended to cover them with a sandwich of thermal insulation and a sheet of metal. This applies to those places that are located close to the structure. Among metals, preference is given to stainless steel, which does not corrode. Thickness plays an insignificant role here; the main task of such protection is to reflect thermal radiation. It is advisable to place the sheets away from the main routes of human traffic to avoid burns. Read more in the article: protecting the walls of a sauna stove from heat.
A few words about the tank... Only an experienced welder should take on the job of making a tank for a sauna stove. The joining seams in the container must be thoroughly welded so that vapors under pressure cannot penetrate outside. You understand that disassembling the stove due to a leaking tank is an unpleasant task. It is recommended to make the container from stainless steel with a thickness of 1.5 - 2 mm.
Formation of the base
One brick of standard sizes with mortar weighs approximately 4 kg, so the entire structure of the stove is very heavy - you cannot do without a high-quality base. The foundation is arranged as follows:
- in the area where you plan to install the stove, dig a hole 70 cm deep;
Important! When digging a hole, keep in mind that the base should protrude beyond the boundaries of the future stove structure by 5-6 cm on all sides.
- Fill the bottom of the depression with 15 cm of sand and moisten the layer so that it sinks well;
- lay a 15 cm layer of gravel (you can mix gravel with broken bricks);
- install the formwork;
- lay a reinforced metal frame on the base;
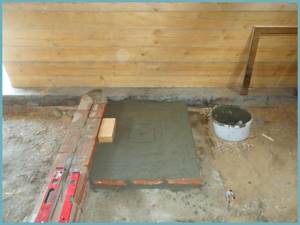
Furnace base
- prepare cement mortar and fill the hole with it;
- level the base and leave to harden;
- when the cement is completely dry, remove the formwork and fill the remaining cracks, if any, with sand;
- check the level of the foundation - if there are any unevenness, level the base using concrete - it is important that the surface is perfectly flat.
The finished foundation must be waterproofed. To do this, lay sheets of roofing felt on it.
Next, you can begin laying the stove. Let us conditionally divide this process into two large stages: before lining and after.
Foundation for a sauna stove
Furnaces weighing up to 750 kg do not require a permanent foundation.
Its role will be played by a sheet of asbestos, covered with a sheet of soft roofing iron and laid on a clay mortar. The dimensions of such a base are selected larger than the dimensions of the future oven by 25 cm on each side.
The heaviest furnaces require a foundation.
Recommendation! The weight of a cubic meter of brickwork is 1350 kg. Use this information to determine the weight of the oven.
It is unacceptable to tie (connect) the foundations of the bathhouse and the stove, since the pressure of a massive brick stove on one point of the base of the bathhouse will lead to uneven settlement and create an additional risk of destruction of both structures.
If the bathhouse is installed on a slab foundation, then a separate stove base is not needed. When choosing the depth of the furnace foundation, you should focus on the depth of the bathhouse foundation.
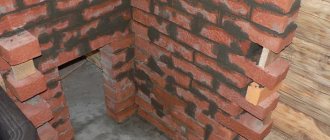
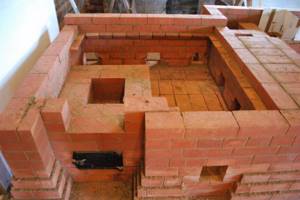
Laying a stove with your own hands: the first stage
The most difficult thing in arranging a stove is the first rows. They must be perfectly even, since it will be necessary to focus on them in the process of further laying. Let's get started:
- Starting from the corners, lay the first row of bricks around the perimeter. Once the edging is complete, fill in the inside. The layer of clay mortar for a bunch of bricks should be approximately 3-5 mm.
- Lay the second row offset - the seams of the first row should be located directly in the middle of the second.
- Lay the third and fourth rows with similar offsets, leaving space for the ash pan.
- Install the blower door: secure it with galvanized wire. To prevent the latter from interfering during further installation, cut grooves in the adjacent bricks and hide it there. After this, fill the grooves with clay mortar.
- Lay the fifth row of bricks and install the grate. Install a steel corner so that you can easily change the grates later - they sometimes burn out.
Next, begin to build the lining - an internal screen made of bricks that will protect the furnace walls from high temperatures. Lining is performed only at the level of the combustion part of the structure. In this case, a distance of 22 mm must be maintained between the protective screen and the outer walls of the firebox in order to compensate for the difference in the expansion of the internal layers.
Materials for the construction of a sauna stove
To build a rubble concrete foundation you will need:
- cement and sand for preparing mortar, filler (coarse gravel, crushed stone, broken bricks and other construction waste) lumber for formwork, waterproofing products (bitumen, special mastic)
Materials for stove masonry:
- red (fireproof) brick for laying the stove and chimney; natural stone as a heat accumulator; fireclay (refractory) brick for lining the firebox; clay and sand for preparing the solution; stove casting (doors, stove valves, grate); asbestos cord for sealing the junction of casting and masonry; wire for fastening castings; waterproofing material (roofing felt), for insulating the first row of masonry; cast iron plate 18 mm thick; water container.
The stove requires two different types of bricks: for laying the outer part of the stove and for the firebox. You should also decide on the size of the oven.
They come in both quite large and mini ovens. The amount of bricks and other materials and the costs of these materials depend on the size of the oven. A small oven will require much less materials.
Furnace laying: second stage
Once you have completed the construction of the internal and external walls of the combustion chamber, proceed to installing the combustion door. To fasten it, you can use the same galvanized wire, but it is better to twist not one piece, but three at once.
Next, lay another row of bricks and begin to build a chamber for the stones. Its size should be such that all the cobblestones are heated evenly, that is, there is no need for a structure that is too large - in this case, the heat will not reach the top stones. It is believed that the optimal height is 40-50 cm. When the chamber is laid out, finish it with steel sheets that reflect heat.
The next step is to install the second grate. After this, continue to build rows, leaving an opening for steam. Its average width is 50 cm. This is absolutely enough to replace stones or repair the internal walls of the stove. The height of the opening is 5 rows. After laying them, you need to close the holes - for this you will have to order a special door for the dimensions of a specific structure.
When the oven reaches the size you need, cover the structure with a steel sheet with a pre-cut hole. Then install the corners for the ceiling and cover them with bricks. Then start building the chimney.
After completing the laying of the stove, install a water tank nearby and connect the structures with metal or metal-plastic pipes.
As you can see, laying a brick stove with a firebox from a dressing room consists of a lot of procedures that cannot be called simple construction work. Therefore, in order to successfully cope with them, strictly follow the technology and do not neglect safety rules - there is no place for amateur performance, because every step must be thought out to the smallest detail.
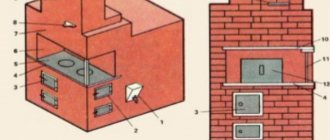
Types of brick stoves
The general principle of the construction of a brick kiln is the same. The structure consists of the following elements:
- firebox;
- ash chamber;
- heater;
- chimney;
- grate bars.
As for the nuances, chimney channels can be vertical and horizontal. In a “black-style” stove there is no chimney at all. To heat the water, a heat exchanger or tank is provided. For baths, stoves differ in the design of the heater. The stones are separated from the fire only by a grate or a blank slab is installed.
Fold the stove for a Russian bath according to one of 4 options:
- The “black” design does not provide for a chimney. The smoke comes out through the heater into the room, after which it evaporates through the cracks of natural ventilation. The advantage is the simplicity of the design. The sauna warms up faster, fills with aroma, and less wood is needed to heat it up. One of the disadvantages is the grueling waiting process. You can’t steam in a bathhouse until the wood burns out and the fumes disappear. The upper part of the steam room gradually becomes overgrown with soot. Important! Inside the bathhouse with a “black” stove installed, the walls are treated with a special impregnation that repels soot accumulation.
- A sauna stove made of gray brick is equipped with a chimney, but you can steam in the same way after all the wood has burned out. The requirement is related to the design of the heater. The firebox is separated from the stones only by a grate. Most of the smoke escapes through the chimney. However, the smoke still seeps through the stones. “Black-style” stoves can be direct-flow, where the fumes come out through a pipe, and ducted, where the gases are removed through 2 dampers.

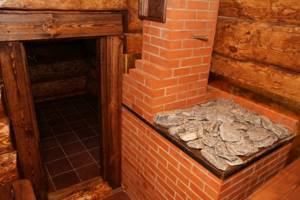
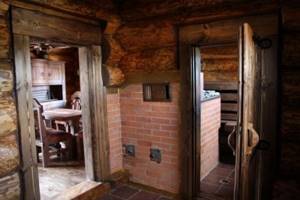
- To heat the steam room and dressing room, white stoves are installed. The brick structure is equipped with a chimney. The stones are separated from the firebox by a solid slab, which prevents children from entering the bathhouse. The firebox is located in the dressing room, and the stove itself with the heater is located inside the steam room. The advantage of brick construction is environmental friendliness. The disadvantage is the long process of heating the stones, which can take up to 12 hours.
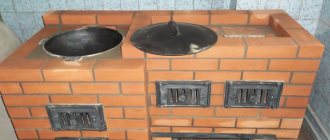
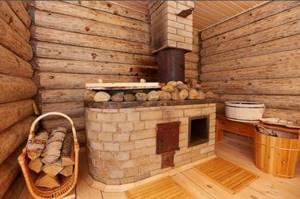
- A stove with a stove is a modern type of brick structure. In addition to stones, there is a tank of water. The heater is heated through cast iron plates placed above the firebox and chimney. The hot water tank is lined with brick on three sides. The reflective screen increases the heating rate.
Conventionally, brick stoves are divided by type of fuel: gas, firewood, coal, electricity, briquettes, diesel fuel. The best fuel for a bathhouse is firewood.
Its power depends on the size of the brick kiln. The recommended minimum dimensions are 89x102 cm. With these dimensions, the length of the structure is 4 and the width is 3.5 bricks. The optimal height is 168 cm, but this parameter also depends on the dimensions of the built-in tank.
Advice! You can put a metal stove in the bathhouse and line it with bricks on the outside.