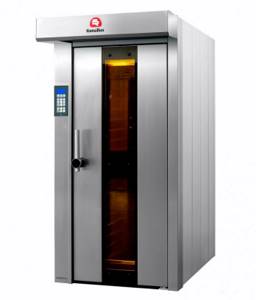
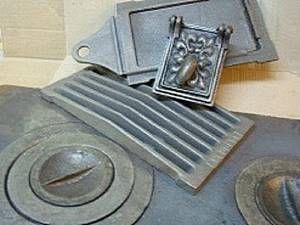
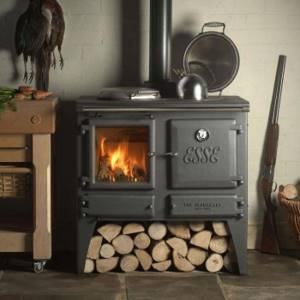
Popular wood stove models
Model range of stoves Professor Butakov
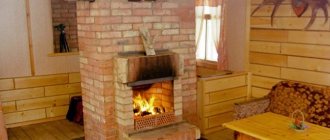
In order not to waste time and money on building a massive brick structure, you can purchase a ready-made potbelly stove, heating and cooking or sauna modification. Several brands are popular in the domestic market.
Burelyan
Canadian device with ducted heating system. The powerful stove is suitable for installation in a home, utility room, workshop, or garage. Works on all types of solid fuel, with the exception of coal. It heats up in 10-15 minutes, the second load of firewood can be done after 8-10 hours.
Breneran
Russian brand that released the AOT-08 model. The floor-standing wood burning unit is equipped with a long combustion system. Installed in residential buildings, workshops, workshops. The firebox has a volume of 50 liters, which is suitable for heating a space of 140 m2. Thermal power is 8 kW, the second loading of firewood is carried out after 10-12 hours.
Professor Butakov
Notable design features are a rectangular body, an internal firebox, the presence of a pyrolysis afterburning chamber and convection pipes. The intensity of air supply is regulated by a damper. The line includes 4 devices:
- Student with a power of 9 kW and a firebox of 60 liters.
- Engineer - equipped with a 120-liter firebox and a power of 15 kW.
- Associate Professor - a stove with a thermal power of 25 kW and a firebox capacity of 250 liters.
- Professor - power is 40 kW, firebox volume is 500 liters.
The cooking surface is flat, suitable for heating food.
Termofor
Domestic brand Termofor stoves
A Russian brand that produces convection units of the Fire-Battery brand. The selection of the unit is carried out according to several parameters:
- Fire-Battery 5 – with a width of 37 cm, a length of 55.5 cm and a height of 76 cm, it has a power of 6 kW. Designed for heating rooms with a volume of 100 cubic meters and an area of 60-70 square meters.
- Fire-Battery 7 – differs from the previous model in length (68 cm), power (10 kW). It efficiently heats a house of 100-110 m2 and a room of 150 m3.
- Fire-Battery 9 – power is 13 kW. The length of the device is 80.5 cm. It is installed in houses of 130-10 square meters and rooms with a volume of 200 cubic meters.
- Fire-Battery 11 is a modification with a length of 93 cm. Designed for heating a space of 250 m3 in volume and an area of 160-170 square meters.
Electric arc furnace design
Regardless of design features, all arc furnaces are designed almost identically. Thermal steelmaking units consist of the following basic elements:
- mechanical device;
- electrical department;
- automated system control;
- device for feeding materials into the working part;
- the container in which the melting is carried out;
- waste disposal system;
- gas purification.
The cylindrical body of the furnace includes detachable parts - a casing and a bottom. The frame is highly resistant to significant temperature influences.
The design has holders in which graphite electrodes are installed. Electricity supply cables are connected to them. During operation of the furnace, a constant arc is formed between the electrodes. Thanks to it, a temperature arises in the device, which ensures the melting of metals.
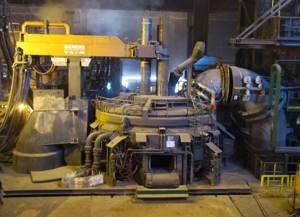
What does an electric arc furnace look like?
Devices designed for automatic control of the entire system are built into the closed body of the furnace structure. The melting process is controlled using doors. There are several cavities in the frame to remove waste. Through them, various additives are also introduced to adjust the composition of the metal.
The charge can be loaded into the furnace through the working window or from above. Devices that feed material through a special opening are usually small in size. It is fashionable to load scrap metal into such units manually using a wide shovel.
Furnaces with top charge feed are more powerful and larger devices. They have a rather complex design. The mechanism of the device can be of three types:
- rotary vault;
- roll-out housing;
- rollable vault.
The most common are arc units with a rotating mechanism.
Furnace design features
Traditional brick ovens have a fairly simple design. However, the apparent simplicity at first glance allows one to achieve very high levels of productivity and efficiency.
The main elements of the brick stove body are the firebox and chimney. Cooking stoves are additionally equipped with stoves and/or ovens; it is also possible to install a tank for heating water.
Scheme of a Russian stove
The firebox is the main part of the stove unit. It is into the firebox that firewood or other fuel used for heating is loaded. The firebox can have a wide variety of sizes. When determining suitable dimensions, several important factors need to be taken into account, such as:
- type of fuel used. If you will heat the stove with wood, make a firebox 50-100 cm high;
- required performance;
- required volume.
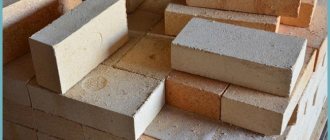
To arrange the firebox, use refractory bricks. The thickness of the walls of the structure in question cannot be less than half a brick.
The chimney is also one of the main elements of any heating stove. The chimney is designed to remove flue gases with various harmful inclusions formed during the operation of the stove.
Rules for constructing a brick chimney
At the chimney design stage, try to think through everything so that its design has a minimum number of bends and turns. Ideally, the chimney should be completely vertical. Any kind of bends will lead to deterioration of traction and a decrease in the efficiency of heating the room.
An important element in the design of a brick kiln is the ash chamber. Ash will collect in this compartment. Also, through the ash pan, air is supplied inside the unit to the fuel. The ash chamber is located under the grate and is equipped with its own door. Traditionally, the height of the ash pit is 3 bricks.
Varieties
There are several types of furnaces for heat treatment of metal:
- Induction. Most often used for melting non-ferrous metals. The heating rate depends on the frequency of the alternating current.
- Muffle. Classic stoves, for heating which any of the available methods are used. The combustion chamber is separated from the molten metal using muffles. They heat up and transfer heat to the melting material.
- Vacuum. Designs with a sealed housing. They are used for melting metals that are oxidized by oxygen during heat treatment. The finished product has improved technical characteristics.
- Climatic. Laboratory equipment used to conduct various experiments. Using such installations, it is possible to reproduce the effects of various environmental factors.
Muffle furnace (Photo: Instagram / sirius_kiln)
Oven Fire-Battery 11 (Termofor)
According to the manufacturer, the distinctive features of this stove are:
- The stylish design allows you to install the stove in the most modern interior.
- A cast iron burner with two rings of different diameters allows you to cook food over an open fire in dishes of different sizes, load fuel from above and clean the upper part of the stove from soot.
- A stainless steel heat exchanger (in versions with the letter “B”) allows you to heat water for domestic needs.
- Highly efficient slot convectors protect against harsh infrared radiation and convert 77% of useful heat into soft convection currents.
- The large vertically oriented firebox door allows you to conveniently fill the stove with wood to the very top.
- Fine adjustment of the combustion intensity allows you to steplessly select any operating mode of the stove.
- The universal chimney outlet makes it equally convenient to lead the chimney upwards and backwards.
This stove has no other special advantages.
Based on reviews on the Internet, based on the criterion of convenience, a stove of a later design, Fire-Battery 11, costing 20,000 rubles, was chosen. Taking into account all the necessary additions (chimney, fire protection on the walls...), the cost of this stove was about 40,000 rubles. Of course, you will have to do the installation of the stove yourself.
If you decide to install such stoves in a two-story house, then keep in mind that you will have to put a door on the stairs on the first floor; the second floor should be fairly hermetically separated. Otherwise, all the warm air will go upstairs (on the second floor it will be +40C, and on the first floor +5C). In addition, in some cases (with separate rooms) it would not hurt to organize forced air convection.
Furnace masonry designed by V. Grum-Grzhimailo
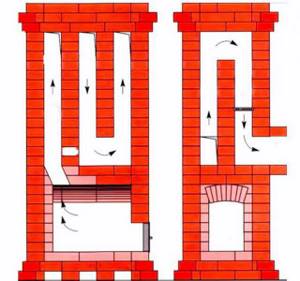
The ductless heating furnace laying scheme shown in the photo was developed by Professor V. Grum-Grzhimailo. There is no smoke circulation in this heating design. It has a round shape and is placed in a case made of sheet steel. Gases move in the furnace not due to the draft created by the chimney, but under the influence of gravity. As a result, cooled and heavier gases sink to the bottom, and light, hot gases rise to the top.
This home stove device consists of two parts - the firebox is located at the bottom. In its roof there is a small-sized haylo (mouth), which ensures the passage of flue gases into the upper part, which represents a chamber without smoke circulation.
It looks like an overturned cap, shaped like a glass.
Due to this feature, such heating structures are called ductless or bell-type. The heated gases in them do not enter their mouths into the chimney, since they first go up under the roof, and when cooled, they descend along the walls to the base. From here they enter the chimney and, under the influence of draft, are carried into the atmosphere. One vertical cut is located across the firebox, and the second horizontal cut is located along it.
Along the walls of the structure, from the ceiling towards the vault, there are buttresses designed to increase the internal heat absorption surface and to better absorb heat from the exhaust gases into the brick mass. The fins heated by gases allow the stove to retain heat for a longer time.
The efficiency of the design developed by Grum-Grzhimailo reaches 80%. The iron case allows you to make masonry with a thickness of only a quarter of a brick, despite the fact that the unit heats up quite quickly.
Types of rotary kilns
- Floor rotary baking ovens.
They consist of a small number of fully insulated tiers, each with heating surfaces - one on top and one on the bottom.
The workpieces that need to be baked are placed in the oven using specialized planters designed for this purpose. The baking process is, of course, carried out in an atmosphere of precise staticity.
Rotary ovens.
If you firmly follow modern trends, you can see that there are two different principles of technological work.
The first model includes ovens in which a trolley rotates.
In the second model, the trolley is completely motionless, and this model itself is called a baking cabinet.
In devices such as a rotary electric kiln, the process of producing products occurs precisely in a dynamic, that is, moving atmosphere.
It turns out that the air passes from the heat exchanger to the baking chamber itself, thereby blowing on the preparing bread products. Consequently, baking is done by circulating heated air.
Low power ovens.
They are perfect for the famous small service areas. For example, these are various hypermarkets or supermarkets.
These ovens are called convection ovens, and they offer their customers fresh baked goods. Basically these are some small-piece baked goods, and they are made throughout the entire working day of the store.
For stoves of this type, the useful main area is approximately 3 square meters.
The heating technology here is exactly the same as that present in rotary kilns, that is, solely due to the circulation of air, which is constantly heated in heat exchangers.
Tunnel ovens.
The length of such furnaces at various factories varies from 20 to 60 meters.
The baked products are successively advanced and moved into different temperature regions of the baking chamber.
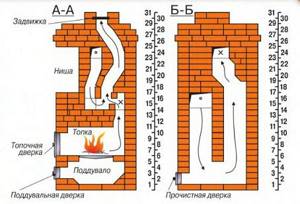
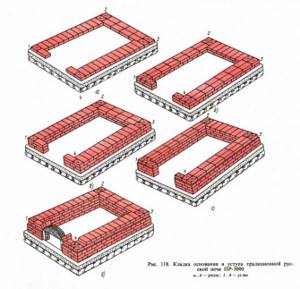
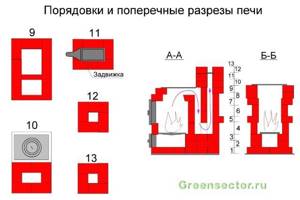
Laying a furnace created by the Thermotechnical Institute
Schemes of home stoves, developed at the Thermotechnical Institute by engineer Kovalevsky, have dimensions of 100x85x217 centimeters. They use a shaft-type firebox designed for the use of coal.
Through the channel, flue gases enter under the roof, from where they enter two side channels. Then they follow to the very bottom and move through the collection channel into the smoke riser. If the smoke valve is open, then the gases are vented to the atmosphere.
The peculiarity of the furnace arrangement lies in the different thickness of the walls of the smoke circulation channels.
The first of them, coming from the firebox, is called the fire channel. It has an outer wall 3/4 brick thick. The rest of its walls are made of half a brick. This heating structure does not fit into an iron casing. Its masonry is simple. The efficiency of engineer Kovalevsky's furnace is 75-80%. The disadvantage of the heating unit is the possibility of overheating its upper part, since the hottest gases are directed into it. They will reach the bottom of the oven completely cooled, as a result of which the degree of heating of the lower part is insufficient.
A certain amount of gases from the firebox enters the side channels through the screws, which increases the heating of the lower part of the outer walls (about
Buleryan stoves: cost, pros and cons
Advantages:
- Heated air can be distributed throughout the rooms, regardless of their location on the floors.
- Uniform heating of rooms.
- High efficiency of furnaces - about 70%.
- Minimum fuel consumption and efficiency, ease of maintenance and installation.
- The long operating life of the stove on one amount of fuel is about 10-12 hours.
Flaws:
- Analogues of this type of stove operate only using solid wood fuel.
- Regardless of the type of pipe - brick or metal - it must be insulated.
- Most of the generator gas exits into the chimney rather than being burned.
- Some areas of the furnace body heat up to 120 °C, which leads to dust combustion.
- The need for a large amount of space for placement. There must be at least one meter from the stove body to the wall or any other objects, which is why it is installed mainly in the middle of the room. In order to reduce this distance, metal sheets are placed on the walls.
- Due to the fact that the fuel does not burn completely, the stoves smoke very much, regardless of the weather outside. Manufacturers advise installing the chimney at least three meters above the roof level.
- Economical operation of the furnace and its long service life are achieved only if all dampers are adjusted correctly, which is very difficult to do.
The main problem with Canadian furnaces is the formation of a large amount of condensate in the pipe. It consists of water, tar and soot; it appears as a result of the fact that the escaping gases have a low temperature, and the fuel does not burn completely. Condensation is most noticeable at the joints of the chimney, and when the stove heats up, it forms an unpleasant odor that remains in the premises for a long time.
The cost of Canadian stoves depends on the volume of the room they can heat. Depending on this criterion, the price for a Buleryan stove can vary from 9 to 34 thousand rubles.
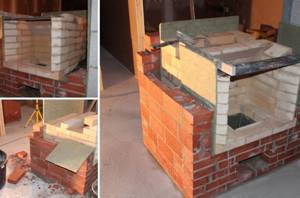
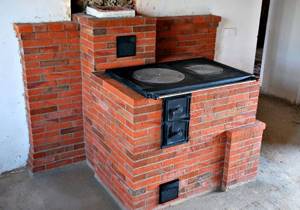
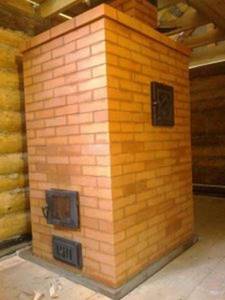
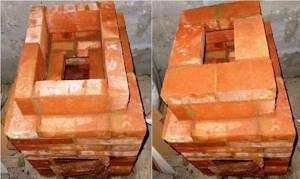
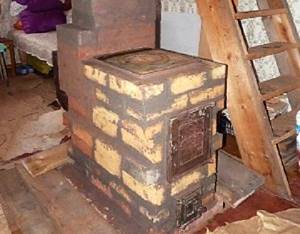
We are building a furnace with a boiler
When choosing, I tried to find a compact design that could heat a house with an area of more than 100 m², plus I could cook on it.
Tools and materials
| Illustrations | Recommendations |
| Tool:
|
| Materials.
|
|
|
|
|
|
|
|
|
Solutions.
| |
|

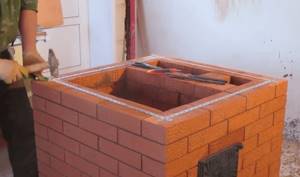
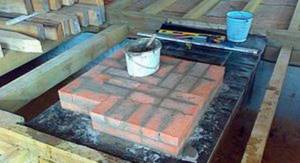
As for the foundation, a separate reinforced concrete foundation must be laid under the brick structure to a depth of about 700 mm, and it should not come into contact with the foundation of the house, the minimum distance is 100 mm.
The monolith is poured 100–150 mm wider than the furnace itself. Before laying the brick, waterproofing is laid (roofing material 2 layers).
The foundation for heavy structures must be exclusively reinforced concrete.
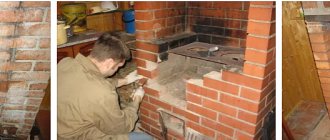
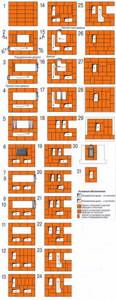
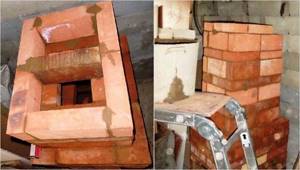
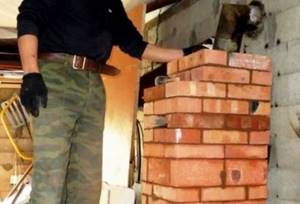
Let's start laying
| Illustrations | Recommendations |
Characteristics.
| |
| Level 1 . It is made continuous and laid on the waterproofing of the foundation. |
| 2 – 3 levels . At these levels the base for the blower is formed and the blower door is installed. They are laid out the same way. |
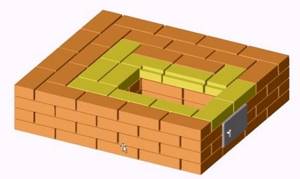
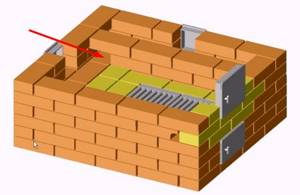
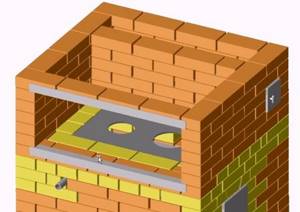
| Level 4 . We begin laying the lining of the combustion chamber. A grate will be installed in this row, so you need to cut grooves in the fireclay bricks for it. The groove is made 5 mm wider than the grille itself. |
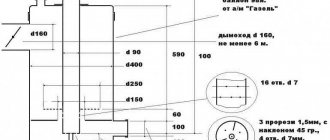
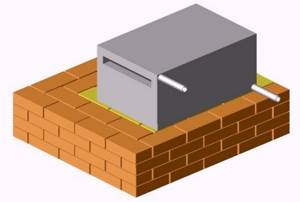
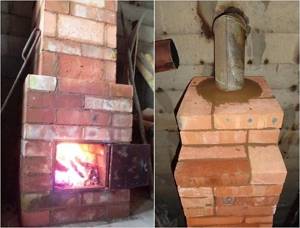
| Boiler installation. The boiler is made in the shape of the letter “P” and covers most of the firebox. I cooked a cauldron from 5 mm thick metal. Basalt cardboard or koalin wool is placed between the boiler and the brickwork, a gap of 5 mm. Boiler dimensions:
|
| The supply pipe is on top, the return pipe is on the bottom.
The window on the rear side of the structure serves to allow flue gases to escape. This boiler model has the highest efficiency; if this is not the main thing for you, then you can install a simple register in the firebox. |
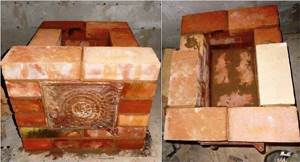
| Levels 5–6. These levels are almost identical; 2 cleaning hatches are installed in them and a side smoke exhaust channel is formed. In the 5th row, behind the boiler, a half-brick window is left for air intake. |
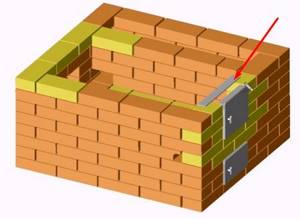
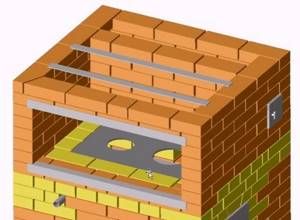
| Levels 7–8. Technologically they are the same, only in the 8th row part of the contour is laid out with refractory. At this point, flue gases will exit through a window in the boiler. We place a 50x50 mm corner above the firebox door. |
| Level 9. We lay the vault above the fire door. Please note that the central brick is cut on both sides at an angle of 45º. We divide the side channel into 2 sectors. |
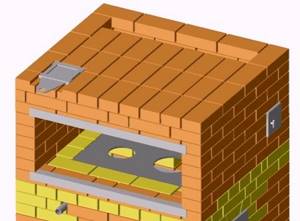
| Level 10. Here we do not make a jumper between the firebox sector and the nearest smoke channel. Gases exit the window behind the boiler, go around the boiler from above and are directed into the nearest smoke channel. |
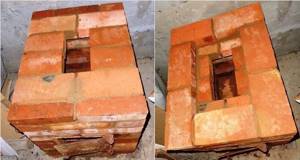
| Level 11.
Both under the hob and under the corner, cutouts are made with a gap of 5 mm. |
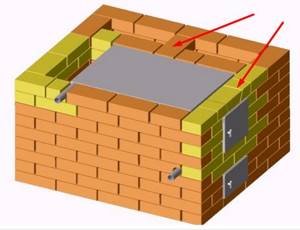
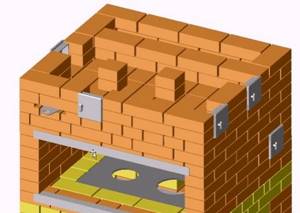
| Level 12 . We close the nearby smoke channel with fireclay bricks. |
| Level 13 . We continue laying. |
| Levels 14–15 . In these levels we combine 2 side channels and insert a cleaning door. |
| Levels 16–17 . After the 16th row, a corner and a 50x6 mm strip are laid above the embrasure of the cooking chamber, and the floor brick is laid on this scaffold. |
| 18 row . Everything is the same here, only 2 strips of 50x6 mm are placed on top of the cooking chamber. They will become a support for the ceiling. |
| Row 19 . We close the cooking chamber and install a valve on the side of the steam exhaust duct. |
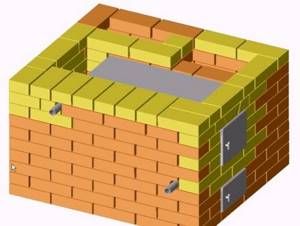
| Rows 20–21 . They are placed the same way. Here we insert 4 cleaning hatches and install 2 columns the size of half a brick in the center. |
| 22 row . Solid bricks are laid on the posts. On the left is T-shaped, on the right is L-shaped. |
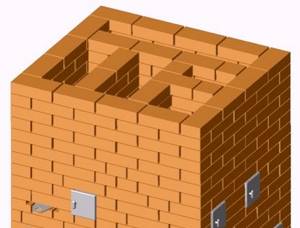
| 23 – 29 rows . These rows are laid in the same way; we drive out the main and auxiliary smoke channels. |
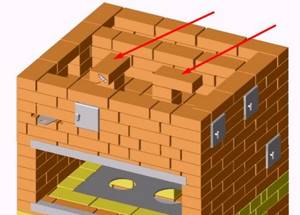
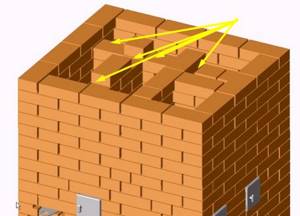
| Row 30 . In this row, we leave only the main smoke channel intact, all other channels are combined, and the roof of the hood is formed. In the diagram, the passages are shown with arrows. |
| 31 row . We begin to partially block the channels of the upper cap. |
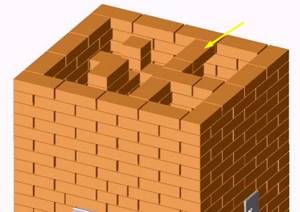
| 32 row . We continue to cover the top cap. |
| 33 row . We completely cover the upper hood, leaving only the chimney channel measuring 260x130 mm. |
| Rows 34–35. The 34th row is used for dressing the 33rd row. The chimney valve should be installed on top of the 34th row and slightly recessed into the groove cut for it. There is no thirty-fifth row as such; then we remove the chimney. |
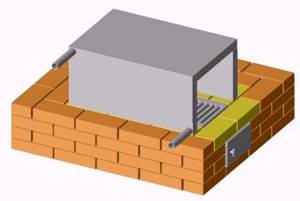
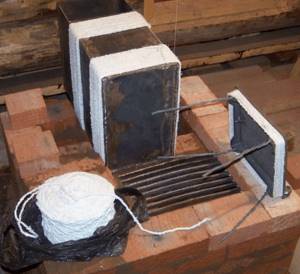
| Metal expansion compensation. A gap must be left between the metal components of the furnace and the brickwork to compensate for the expansion of the metal. To ensure this gap, heat-resistant insulators are used. In the photo, the doors and metal frame are wrapped with asbestos cord. In addition to asbestos cord, you can use asbestos sheet, koalin wool or basalt cardboard with a thickness of 5 mm. |
| Door fixation. There are fastening holes on the doors and cleaning hatches around the perimeter; previously, annealed steel wire was tied to these holes and embedded in the masonry. Nowadays, mounting tape is used for these purposes. In order for the tape to hold better in the masonry, it is additionally fixed with self-tapping screws, which are driven between the bricks into fresh mortar, as in the photo on the left. |
| Masonry reinforcement . Brickwork must be reinforced. In our case, it is enough to lay the tape between the rows in problem areas (firebox, doors, hob). |

Selection principles
When choosing a furnace for metal, you need to consider:
- What changes in technical characteristics should occur with metal blanks.
- What type of fuel or energy carrier is available for use. For example, if it is not possible to assemble and connect an electric stove, you can make a classic forge using wood or gas.
- What materials will be processed.
- Dimensions, weight of equipment.
Industrial equipment (Photo: Instagram / kgtmakc)
Advantages and disadvantages
Positive sides:
- High efficiency.
- Strength, reliability, durability.
- Fast heating.
- Convenient control system. With their help, you can set the exact temperature regime.
- Availability of an effective cooling system.
Negative sides:
- The stoves cool down quickly.
- Equipment material burns out when exposed to high temperatures.
Manufacturers and prices
Manufacturers of metal smelting furnaces:
- "PRO-Machines";
- "ROSInduktor";
- "Inductor".
The price of a compact induction furnace for a workshop is 60,000 rubles. The cost of industrial equipment is 500,000 rubles.
How to choose a place for the stove
The stove can be installed in different places in the room, but its most optimal location would be to be built into the walls between adjacent rooms. In this case, with a small area of the house, you can get by with one heating structure, if the heat-transferring surface is proportional to the size of the rooms into which they open.
It is very important to correctly determine the location of the brick kiln.
It is not recommended to install the stove near the external wall of the house, as it will dry out much faster, and, in fact, it will be useless to “heat the street”.
The location chosen for construction must be carefully measured and some points taken into account:
The height of the ceiling of the room is important, since the brick stove must fit well into the space in terms of its height. The foundation for the furnace must be 110÷120 mm larger than its base, and an area of suitable size must also be provided for it. When laid upward, the chimney pipe should not collide with the floor beams or rafters of the roof structure.
Schemes of stoves for the home with preferential bottom heating
If the heating structure has a predominant bottom heating, its size, as a rule, is 115x56x231 centimeters with a heat transfer of 2640 kcal/hour. In accordance with the smoke circulation system, this stove is classified as a combined duct heating unit with bottom heating.
When a stove heating scheme for a private house is created using such a design, it is assumed that the flue gases from the firebox will first descend and then rise along the riser to the ceiling (
We put the furnace into operation: drying and test firing
The oven is dried using shavings, chips and small logs. Initially, no more than 30% of the usual volume of fuel is added, then the volume is gradually increased. Drying time depends on the size of the kiln and the moisture level of the brickwork. The result of high-quality drying of the oven should be the complete absence of damp spots on its surface and the absence of condensation on metal elements. The valve and combustion damper are opened for the entire drying period. The surfaces of the oven during drying should have a temperature of about 50 ° C.
After drying the oven, a test fire is carried out. Pre-check the draft and tightness of closing the valves.
The first lighting of the stove is carried out in the following sequence:
- With the valve open, they place dry firewood in very dense rows, filling the furnace as much as possible. The valve at the mouth closes tightly during lighting.
- Subsequent stacks of firewood are made after the first stack burns down to coals. Their volume is already a third less than the first bookmark.
- The degree of combustion in the furnace should be adjusted using a valve.
- After all the wood has burned, they wait until all the coals have burned out. The pipe valve can be closed only after the fuel has completely burned out. If there are a few unburned coals left, it is better to extinguish them yourself so that the heat does not escape.
- To prevent cracking, the oven should not be overheated; its temperature should not exceed 90 °C.
Cleaning the oven
Before the start of the season, the internal surfaces of the stove must be cleaned of soot and ash with a poker. The chimney is cleaned more often as it becomes dirty. With proper design and proper operation of the stove, almost no soot is formed, but to prevent its formation, it is still recommended to periodically heat the stove with aspen or alder wood.
DIY paper lotus
This flower represents beauty, divine power and resurrection in the religions of many nations.
It amazes with its perfect beauty and in many countries symbolizes sacred purity.
To make your own pink lotus craft from corrugated paper you will need: colored wavy and folded paper, scissors, a sheet of thick cardboard, polyvinyl acetate glue and foam balls.
A circle of the correct shape is cut out of thick cardboard; this will become the base of the flower. To give a three-dimensional look to the flower, you should use paper of several shades. The petals are cut out in an oval shape and stretched slightly with your hands to form a notch in the center of the leaf.
Now the petals of each lotus color are glued in a circle to the cardboard base in a circle. In this case, the tips of the petals should be slightly pulled up. It is advisable to make at least three layers of petals for splendor.
The outer outer circle of the flower should be made of green petals and secure everything on a circle of thick cardboard. Half the world will want to see this flower.
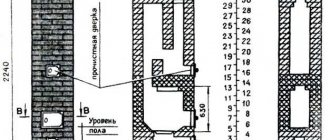
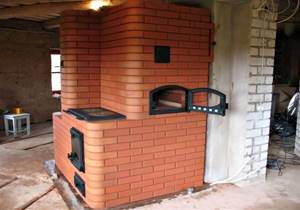
Construction of a Russian stove
Even a couple of centuries ago it was difficult to find two identical stoves. This happened because each owner made small changes to both the internal structure and the external decoration. The design of a traditional stove has constantly undergone changes and become more complex. The entire structure is placed on a foundation, which must be located at a certain interval from the wall (usually about 17 cm).
The names of the main elements of the structure - you can clearly see them in the diagram:
- An oven is a place used for drying logs.
- Guardianship is the foundation of the structure.
- The stove is a recess in front and at the top that improves heat transfer. It is used for drying things.
- The crucible is a so-called cooking chamber in which various fuels are burned and then food is prepared. The chamber arch is made at an angle towards the entrance. Thanks to this, the heated air stays at the top, heats the stove bench and the side walls of the stove.
- Damper - closes the furnace.
- The six is a special compartment in front of the mouth, which is located in front of the crucible. The lateral walls of the mouth are called cheeks.
- Hailo - located in front of the mouth above the pole. It is a socket into which smoke escapes during the operation of the stove. From this area, the smoke enters the smoke exit pipe.
- Below is the bottom of the furnace. It is built at a certain slope towards the camera. This is done to ensure unhindered passage of kitchen appliances inside. The surface of the hearth should be smooth.
- The overpipe is a separate recess where smoke collects. A pipe runs above it to allow the smoke to escape.
- A view is a cast iron plate with a hole that is closed with a lid. Located in the chimney. Thanks to it and the valve, you can control the draft.
- A lounger is an area where you can sit down to relax. It is located on the back side of the chimney. During the process of lighting the stove, this place begins to heat up quickly.
How to make a rough oven with your own hands
The oven consists of the following parts:
- A firebox is a working chamber into which fuel is loaded. Equipped with a door.
- Blower is a chamber attached below the firebox. Serves to improve traction. A door is also attached here to regulate the air supply. A grate is installed between the firebox and the blower.
- A chimney is a pipe for removing carbon dioxide from a home. Equipped with a soot cleaning door and a damper.
- Smoke circulation (convector) - vertical (sometimes horizontal) channels through which hot gases from the firebox pass. They connect the firebox to the chimney and accumulate thermal energy.
Economy and its basis or foundation
The Russian oven for bread and pastries is a heavy and massive structure, and therefore a separate foundation is required.
Of course, an electric oven can help in preparing bread, but it’s unlikely to be able to heat your home. It is for this reason that it will be problematic to build a bread house in a built home, so it is better to plan everything in advance, otherwise you will have to make specific changes to the design of the floors of the house. In terms of reliability, the ideal option is a monolithic reinforced concrete slab. The back side of the foundation should not be connected to the main foundation of the house - it is an independent structure. To construct such a slab, you can adhere to standard technology. The upper edge of the foundation and the first row of bricks should be about 50 cm. It should be noted that waterproofing must be laid before laying. Roofing material, which must be folded in half, is perfect for this.
In most cases, a corner or straight Russian stove is placed coaxially with the inner wall of the hut, which often has a shallow foundation; the base should be level with the base of the stove. To ensure that the foundations are independent, a gap of about 5 cm is left, which in the future is filled with sand.
The upper edge of the foundation of a Russian stove should not reach a distance of 14 cm from the clean floor. If it is decided to place the stove in a hut near an external wall that has a recessed foundation, the pit must be expanded and backfilled with gravel and sand with layer-by-layer careful compaction. Afterwards, arrange the foundation at a distance of 5 cm from the main foundation. The base of the foundation should be about 50 cm.
Preparatory work
The weight of the stove is considerable, so they make a full-fledged concrete foundation using formwork:
- Mark the location of the furnace. It is necessary to ensure that the door and window are not on the same line and provide a chimney outlet. The size of the foundation will be 15-20 cm larger than the dimensions of the stove. Using a grinder, dismantle the wooden floor covering.
- Formwork is arranged and the foundation is poured with concrete (the upper level should not reach the floor surface by 2 bricks). Concrete is reinforced not only around the perimeter, but also in depth. To save on materials when constructing a foundation, it is sometimes made of rubble (broken stone, brick or any large construction waste is used).
- Next, they take a break from work for 20 to 25 days to allow the concrete to set.
- Lay a layer of roofing felt folded several times for waterproofing. The layers of roofing felt are connected with a stapler. This is a very important stage, since the Dutch oven is capable of transferring some of the heat to the floor. On a note. If climatic conditions are such that the soil freezes up to one and a half meters, it is recommended to use a layer of basalt cardboard for thermal insulation.
- Plumb lines are arranged to ensure that the oven is strictly vertical. To do this, strings or ropes are pulled, which will act as beacons. If this is not done, each row will need to be monitored not only horizontally, but also with a protractor with a vertical plumb line. If the design “goes to the side,” the performance characteristics of the stove will deteriorate.
- Bricks are selected for masonry and dry masonry is carried out. Mix the clay-based solution in an amount sufficient to use it at a time. On the second day, this solution will lose its quality. Clay is placed in a trough, filled with water and allowed to soak for about 2 days. The solution is stirred, breaking up lumps. The required plasticity is achieved using sand. To improve the quality, the mixture is kneaded with a construction mixer.
How to lay out a high-quality Dutch oven if you have no experience as a mason? There is one trick: before laying out the stove on the mortar, you should practice “dry”.
Furnaces: types of furnaces by purpose
The heat generated by these units is used either for cooking food or for heating rooms. According to this principle, regardless of the chimney and body, there are different stoves. The types of furnaces are as follows:
- Heating.
- Cooking.
- Heating and cooking.
A heating and cooking unit is a type of universal economical stove that combines two functions. A similar design is most often found in traditional Russian variants. In addition to the hob, it has a dryer, oven and water heater. Previously, it was equipped with a bed located on the side of the adjacent room.
A metal stove for a summer residence can also be of the heating and cooking type. Made from modern materials, the potbelly stove with an improved design has a flat cast iron surface on its body, on which you can cook and heat food. The cooking unit, on the contrary, is a metal or brick stove with a firebox. In order to more efficiently distribute and use heat, a shield in the form of a small wall is attached to it, with which you can warm up the room.
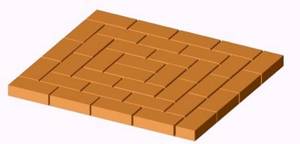
DIY brick oven. Part 1: main types of furnaces, furnace design
Today, almost all private houses are equipped with steam heating systems running on gas, coal, wood, fuel oil, etc. Despite this, stove heating not only does not lose its popularity - on the contrary, self-taught amateurs and master stove makers still build stoves with their own hands, specialists and engineers are constantly coming up with new designs and devices for stoves, and also try to improve those already in use.
A brick oven will never be superfluous in any home and can help out at any time. So, in early autumn or spring, when it seems too early to turn on the main heating, but you want to warm up, a few armfuls of firewood in the stove will help you warm up and create a homely, cozy atmosphere in the room. The heat emanating from the stove is very pleasant and comfortable for the human body; it cannot be replaced by any, even the most modern heating system.
The topic of laying a brick stove with your own hands is so vast that even our attempt to VERY briefly cover the very basics, namely, the types and design of stoves, tools, choosing a place for the stove in the house, preparing the foundation, mortar for masonry, and, in fact, the simplest masonry itself ovens with your own hands, resulted in a considerable volume. Which was divided into four logical parts:
- Theoretical - types of stoves, their features and the design of a simple brick stove.
- Preparatory work - necessary tools, choosing a place to install the stove and building a foundation for the stove.
- Practical – construction of a furnace “dry”, preparation of mortar and laying of the furnace with a detailed description of the process.
- To secure the material, here are step-by-step instructions for laying a Proskurina stove (a heating and cooking stove with a drying chamber).
So, let's start with the theory - types of brick kilns, their purpose and the design of the simplest version of the kiln.
The content of the article
Brick kilns - types and features
There are several main types of masonry stoves that are used in private residential buildings:
- heating stove,
- heating and cooking stove,
- cooking oven.
Let's look at each option in more detail.
Heating stove

Used exclusively for heating the room. Modern models can be equipped with two fireboxes - regular and fireplace. This brick stove simultaneously functions as a heat source and an interior item.
In the vast majority of cases, the stove is designed to heat two rooms; it is either built instead of a wall between two rooms, or, if the room is large, placed in the middle.
Having made a heating stove with your own hands, it can be used as the main or additional (backup) source of heat in the house. For small buildings, for example, for a summer house, it is better to use not a heating stove, but a heating and cooking stove, which will be discussed below.
Heating and cooking stove
A heating and cooking stove solves two problems at once - it heats the room and serves as a place for cooking. Often such ovens have a built-in oven or dryer in which you can make dried fruits, crackers, dry wet things, etc.
Such a stove is built into a wall, and more often it is erected instead of a wall. At the same time, the firebox, stove, oven and dryer are made in the kitchen, and in the living room the stove is no different from an ordinary wall, while warming the air in the room.
Cooking oven
Designed for the kitchen, the design of this brick oven was originally intended for cooking. The cooking stove can heat the room, since its entire body, hob and back wall are well heated. Typically, cooking stoves have very modest sizes, so they are well suited for small private houses and cottages. The owner of such a unit does not risk freezing and being left without hot food, even if the electricity and gas are suddenly turned off.
Furnace structure
Let's look at the main parts of the furnace. For example, let's take a heating and cooking stove.

- Combustion chamber . Designed for burning fuel. For laying the stove, namely for the firebox, only refractory materials are used, since the temperature in the combustion chamber can exceed 1000º C (depending on the type of fuel).
- Blower . An empty cavity located directly below the combustion chamber. It is laid out from ordinary bricks. The main purpose is to accumulate ash and slag that falls from the firebox, as well as to create a “draft” and force air into the firebox. By closing and opening the ash door, you can regulate the intensity of fuel combustion in the combustion chamber.
- Chimney ducts . The most difficult elements of any design, especially if you are installing a stove with your own hands for the first time. When passing through the chimney ducts, hot gases and smoke heat the brick, which then releases the accumulated heat into the room.
- Chimney . Designed to release smoke and combustion products into the atmosphere. Creates the draft necessary for combustion in the stove.
- Cooking surface (combined and cooking stoves). Located directly above the firebox, it is used for cooking and heating food. It heats up very quickly and releases a lot of heat into the room.
- Holes for removing soot from chimney ducts. They are mounted on the surface of a brick oven, covered with a piece of brick in clay mortar, and covered with metal doors from the outside. In addition, there are cleaning holes at the base of the chimney; they are often located in the attic.
Read more about the necessary tools, choosing a place to install the stove and building a foundation for the stove.
Advantages and disadvantages
To decide whether a tube furnace is needed in a particular production, you should familiarize yourself with the pros and cons of the equipment.
Pros of the oven:
- Small dimensions.
- Small amount of heat loss.
Each stove has not only positive aspects, but also some disadvantages.
Minuses:
- It is not possible to turn off several or one pipe in the event of an emergency condition of the unit. To do this, you will need to de-energize the entire device.
- Calculations of a tube furnace show that the resulting temperature is not used economically in two chambers.
- The coil pipes become clogged due to the ingress of combustible products used in the process. Because of this, increased fuel consumption occurs.
Types by combustion method
The Russian stove is distinguished by its economical consumption of firewood; a small amount of fuel is used to heat it, and the heat is retained for a long time. This feature is due to the special structure of the chamber, especially for a white oven.
According to the method of combustion, three large groups can be distinguished, some are now practically not used, such designs include black chicken ones. White ones with chimneys are more efficient, safer, and can be used for heating, cooking food, and warming up a steam room.
In black
The oldest option is the black-style chicken stove, which got its name for the peculiarity of the firebox. Such structures were built from ordinary clay, not brick, and did not have a chimney. When burning, thick black smoke was generated, which came out through special openings in the walls (wall windows) and a porch above the door. To avoid fire, the fire was always kept low, and strong flare-ups were not allowed. A constant flow of cold air into the house is necessary, but this significantly reduces the efficiency of the structure and increases the consumption of firewood or wood chips.
Russian oven "black"
Today, chicken models are practically not used; they can only be found in some classic Russian baths, and even then extremely rarely. This is due to the need to comply with safety measures, constant maintenance not only of the stove itself, but also of the room, the walls and ceilings of which are gradually covered with a layer of soot. However, there are a number of advantages:
- with their help you can smoke meat or fish;
- the room is perfectly disinfected under the influence of smoke;
- The stove provides the most efficient heat transfer to the room.
In gray
This option has replaced the smoke version; it is safer and more convenient; the smoke does not come out through a glass window, but through a wooden pipe or hole made in the ceiling above the structure. But among the disadvantages is an increased fire hazard - smoke escaping through the roof is accompanied by sparks and high temperatures.
In white
The safest and most convenient are traditional white stoves. A special baked brick is used for the construction, and a pipe is used to remove smoke. The special design of the chimney not only effectively removes combustion products, but also increases draft, increasing the efficiency of the firebox. The design of the pipe has a curved shape, this increases efficiency, allows you to effectively extinguish sparks, which makes the structure safe and protects the house from fires. The curved shape of the chimney ensures rapid heating of surrounding structures - a house with such a stove quickly warms up, becomes warm and comfortable. A minimum of wood is used for heating, which is a big advantage.
Stages of work
The layout of a Dutch oven is quite simple; the materials used do not have any special quality requirements. You can use ordinary solid ceramic bricks and medium-fat clay-sand mortar with the consistency of thick sour cream. Masonry work can be performed by any novice craftsman who knows how to lay a straight wall with bandaged seams.
Preparatory work
Before you build a Dutch oven with your own hands, make markings for the support of the future heating device. This should be a separate structure, not connected to the foundation of the house. And it is advisable to construct it at the stage of construction of the main building. Otherwise, under the installation of a Dutch oven, you will have to lift the floor covering and cut a hole in the plank floor, retreating 10 - 15 cm from all sides of the contour of the base of the oven.
The material should be stored closer to the place where the furnace is laid so as not to interrupt the work process. All concrete and masonry mortar fillers must be sifted and cleaned of foreign matter. Sand and crushed stone, if necessary, are sown dry, but clay must be soaked in advance for several hours and then rubbed through a metal sieve. You should also have laying diagrams for the rows of a Dutch oven for the house and its chimney at hand.
Execution of the foundation
The Dutch oven weighs less than other models of brick stoves, but still needs high-quality and reliable support. A good foundation option for it would be a monolithic reinforced concrete structure in the form of a slab.
The algorithm of actions for arranging the foundation for a Dutch oven is as follows:
- marking the boundaries of the future support,
- excerpt from a pit 60 cm deep,
- compaction of the pit bottom,
- pouring a 15 cm thick crushed stone cushion along the bottom of the pit with layer-by-layer compaction,
- installation of formwork 20 cm high,
- attaching polyethylene film to the formwork walls for waterproofing,
- installation of one row of reinforcing mesh over the entire area of the monolithic slab at a height of 6 - 7 cm from the surface of the crushed stone base. You can raise the mesh using wooden supports or metal pins, driving them into the ground,
- installation of vertical elements made of reinforcement in the corners of the cells of the reinforcing mesh with fastening at the joints with knitting wire,
- pouring concrete into prepared formwork,
- leveling the upper plane of the base,
- ironing the freshly laid mortar with a layer of dry cement 2 - 3 mm thick.
- dismantling of formwork 7 days after the initial hardening of the material.
Before you assemble the main elements of a Dutch oven with your own hands, the concrete must gain full strength within 25 - 30 days.
Expert opinionPavel KruglovKiln maker with 25 years of experienceTo prevent the concrete from absorbing moisture from the soil, the walls of the monolithic slab must be coated with heated bitumen mastic 2 times. On top of the structure, stick 2 layers of roofing material, waterproofing agent or other material with water-repellent properties on the bitumen.
Stove base
Mortar and brick
To increase the adhesion of the brick to the mortar, and also to prevent the brick from excessively absorbing moisture from the masonry mixture, it must be completely wetted before laying, immersing it completely in water for a few seconds.
When preparing clay-sand mortar for laying a furnace, it is necessary to strictly observe the proportions of the components. Otherwise, the mixture will not be sufficiently plastic, and the masonry joint will not be able to withstand prolonged exposure to condensation, and will quickly crack and collapse.
The main binding component in the solution is a natural material - clay with a low sand content (oily). It is not afraid of high temperatures; when dried, it forms a strong, uniform layer that perfectly adheres brick surfaces to each other. Only, unlike Portland cement, it needs to be prepared in advance by soaking it in water for at least 24 hours, and this kind of mixture takes 6-7 days or more to dry, depending on external conditions.
The proportions of the mortar for laying a Dutch brick stove for a summer residence are as follows:
- for the combustion chamber, where the temperature is highest, the ratio in the mixture of clay and sand should be 1:1,
- for the construction of the device body and chimney - 1 portion of clay to 2 parts of sand.
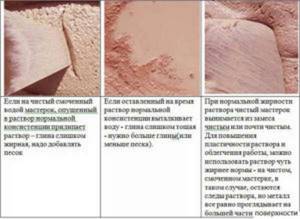
Checking the quality of the solution
Masonry and order description
The presented arrangement of a Dutch oven without a stove involves the construction of a medium-sized structure that can heat a small private house.
Dutch order
Description of the arrangement of a Dutch oven without a stove:
| Row No. | Description |
| 1 | The brick is laid flat dry and the bed level is checked. Then the row is poured on top with a clay-sand mixture. |
| 2 | The formation of the ash pit and vertical gas ducts began, and the installation of a cleaning door. |
| 3, 4 | Installation of the blower door. To hold the door frame more firmly, use wire, recessing it in the seams. Thermal insulation of stove cast iron is performed with a basalt seal or asbestos cord. |
| 5 | Installation of transverse pieces made of angle steel that will hold the ash vault. |
| 6 | Covering the ash pit, installing a grate. |
| 7 11 | Forming the firebox, lining it with fireclay bricks, installing the firebox door in the same way as the ash door. |
| 12 14 | Covering the combustion chamber, expanding the furnace body. |
| 15 16 | Installing another door for cleaning the channels of the device. Arrangement of a bypass for the exit of heated gas from the channel in the central part into the channel located closer to the rear wall of the furnace. |
| 17 18 | Dividing the gas duct in the central part into two channels. Covering the heat exchanger from the rear side. |
| 19 25 | Further formation of the heat exchanger. |
| 26 29 | Overlapping device. Starting from the 27th row, the internal space of the unit is narrowed so that its connection to the chimney is more organic. |
| 30 | Installation of a metal valve |
Appearance of the future furnace
There are several other ordering options:
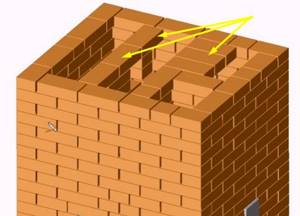
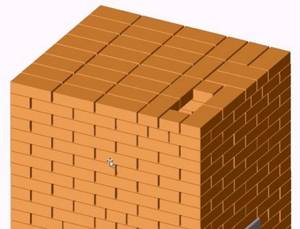
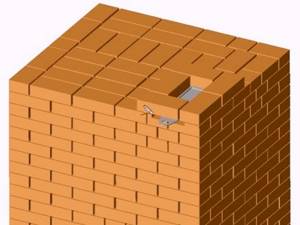
Chimney requirements
The chimney begins to be placed on top of the stove, having previously installed the cap pipe. The masonry technology is the same as when constructing the walls of the building, but there are some features:
- To build a chimney, you must use only whole bricks. Laying quarters and halves will lead to an increase in seams, which will reduce the level of reliability and safety of the structure as a whole,
- for lining, use fireclay bricks, laying them on edge,
- the height of the pipe depends on the roof configuration, but to ensure good draft in the furnace it must be at least 3 m,
- the distance between the wall of the house and the smoke exhaust duct must be at least 40 cm, and in the area of passage through the ceiling and roofing, the structure must have widening and be thermally insulated with an asbestos or lead apron,
- The masonry of the chimney must be carried out strictly in accordance with the order, the joints between the bricks must be carefully sealed to ensure the maximum possible draft and heat transfer, and also to avoid the penetration of caustic combustion products into the room.
Features of laying a brick oven with your own hands
What nuances do you need to know before starting to lay the stove?
The foundation for the stove must be strong and solid. But at the same time, in no case should it be connected to the main foundation for the house
The fact is that the house shrinks over time, which is reflected in the foundation, so it is very important to separate these two elements. With seasonal soil movements and general shrinkage of the house, the design of the stove may suffer. The foundation must exceed the dimensions of the stove by 15-20 cm on each side
It can be made of ordinary concrete, cement mortar or made of concrete blocks. To lay the furnace, you need to purchase 2 types of bricks: regular solid bricks made of ceramics and fireclay (fireproof), from which the firebox, smoke ducts and all heated elements will be built. The cost of such material is much higher than the price of ordinary red brick, so it is usually used only on those surfaces that will have direct contact with fire. All other elements are laid from red solid brick, using a mortar based on red oven clay. The composition of such a solution must include heat-resistant cement. But between the ceramic masonry and fireclay bricks it is necessary to maintain a gap of 5 mm. As the fireclay brick heats up, it will expand. Therefore, to ensure that the furnace structure does not undergo deformation during operation, it is necessary to take this gap into account. All purchased elements for the stove (grid, door, hob, oven, etc.) are installed in accordance with the general layout and purpose of the stove.
Grate
When inserting the door of the combustion chamber or ash pan, it is necessary to tie it with annealed steel wire. In this case, one end of the wire is inserted into a specially designed hole, and the second is twisted into a bundle and laid between the bricks, tightly clamped with mortar. When installing a cast-iron firebox or cast-iron stove, it is necessary to lay an asbestos cord between the brick and the metal element to compensate for the different temperature expansion of the materials. The chimney for the stove can be made of red ceramic brick, or you can use a ceramic block chimney, which is purchased ready-made. Cladding is the final stage of building a brick oven. To give a beautiful aesthetic appearance, the stove can be lined with red ceramic bricks, clinker bricks (like wild stone), and decorative tiles. This coating gives the stove a unique, authentic look and also protects it from the negative effects of the environment.
Materials needed for laying the stove.
- Red solid ceramic brick (M-150.)
M 150
- Fireclay (fireproof) brick.
- Masonry mortar (sand, red oven clay).
- Foundation material (cement, graphite, sand).
- Ruberoid.
- Asbestos cord, galvanized wire.
- Boards for creating formwork.
- Reinforcing mesh.
- Grate.
- Cooking surface (stove).
- Ash pan and ash pan (blower) door.
- Fire door.
- Chimney view.
- Chimney duct damper.
Tools needed for laying the stove:
- Building level.
- Shovel
- Construction marker.
- Measuring tape (roulette).
- Construction plumb.
- Goniometer.
How to build the simplest brick oven?
First you need to decide what you want to get from your future stove. If you only need to heat the rooms, and use bottled gas or electricity to cook food, then choose an option without a stove and oven. Anyone who loves soft healing warmth chooses the option with a bed.
For regular cooking of large quantities of food and pet food, a simple oven with a hob will be just right.
We will look at three examples of stoves with step-by-step guidance on how to lay them:
- Simple direct flow;
- With hob;
- Heating.
Let’s say right away that you cannot expect high heat transfer from a simple design devoid of gas circulation. For this reason, such stoves are installed in garages and other small rooms with an area of no more than 16 m2.
We will consider this option so that beginners get their first simple lesson in practical masonry.
Direct-flow heating design is designed to heat a small room
Such a stove does not require a strong foundation. Having poured large crushed stone in a layer of 15-20 cm, filled it with cement mortar and leveled the surface, after a couple of days you can begin laying.
Stove dimensions in plan: width 2 bricks (51 cm), depth 2.5 bricks (64 cm). Since there is no blower chamber in it, holes for air intake are drilled directly in the combustion door.
The sixth row covers the combustion chamber door. The top view helps to better understand the brick laying method.
The procedures for this design are simple. The main condition during work is to ensure that the seams are bandaged so that the top brick covers the seam between the two lower ones.
On the eighth row, the firebox is narrowed, using halves and “three-quarters” - ¾ of a whole brick. The exit from the firebox is thus obtained with a cross-section of 1 brick (125x250 mm).
The next row (ninth) is laid out in the same way as the seventh, using a whole brick.
After this, the brick tier is placed on the edge flush with the inner edge of the bottom row. The new tier is laid flat, using two whole bricks and four “three-quarter” bricks. In this way, the smoke channel is again narrowed in order to trap gases and increase heat transfer.
On the next tier, the stones are placed on edge. A brick is placed in the middle of the smoke channel. In this way, the oven is raised another five rows (one tier on an edge and a brick in the middle, the other tier flat).
The remaining four tiers are laid flat. With the last two rows of masonry, the smoke channel is narrowed to a size of 12x12 cm (half a brick). At this level, a smoke damper is placed in the furnace. A steel pipe is inserted into it from above.
Furnace structure
The design of a Russian stove includes a very large number of elements.
We list only the main design details:
- Hailo, that is, the mouth of the furnace. This is a sector located above the cooking chamber that connects the oven to the smoke exhaust channels.
- A valve or damper is a special element that allows you to regulate the movement of gases through the outlet channels (for more details: “Why do you need a chimney damper - what is a damper, types, installation rules”). A small oven may have one valve, but there are models with three and four valves.
- Chimney pipe.
- The fluff is a special heat-insulating belt around the chimney, placed where the pipe passes through the ceiling or attic.
- The view is a small hatch that allows you to control the draft in the combustion chamber and, if necessary, completely block the chimney.
- The brow is a section of the façade located above the cooking chamber.
- The valve is a metal lid that closes the entrance to the furnace.
- The six is the area above the crucible. In modern ovens, a hob is installed in this place.
- Box for heating water.
- Columns are brick elements that form treatment channels.
- Borehole is a recess in the cooking chamber through which gases from the furnace enter the side smoke exhaust channel.
- The combustion chamber is the chamber in which fuel burns. In a modern Russian oven with a stove there are 2 such chambers - one under the crucible, and the second under the hob.
- The grate is an element located at the bottom of the fuel chamber, through which air from the ash pan enters the firebox.
- An oven or wood shed is a place for storing and drying fuel (firewood).
- Below is the bottom of the furnace.
- The crucible, that is, actually, the cooking chamber.
- The sky is the vault of a crucible.
- The bed is a characteristic element of the Russian stove. It can be quite spacious or small.
Oven with hob
In the simplest version, this design has small dimensions (width 2 and depth 3 bricks - 78x53 cm). However, even in such a limited area it is possible to place a single-burner stove.
Work goes smoothly when you have everything you need at hand.
Therefore, purchase the following materials and accessories in advance:
- Solid red brick – 107 pcs;
- Blower door – 1 piece;
- Grate – 1 piece;
- Single-burner cast iron stove – 1 piece;
- Fire door – 1 piece;
- Pipe valve – 1 pc.
Fire bricks are not needed for a wood burning stove. Buying it is a waste of money. But red should be chosen carefully, discarding cracked and uneven ones.
Preparation of the solution
The masonry mixture is made by mixing four parts clay with one part water and adding eight parts sifted sand. The normal consistency is determined simply: the solution easily slides off the trowel, leaving no drips on it. When laying, it should not leak out of the seams.
The volume of the mortar is determined based on the amount of brick. With an optimal seam thickness (3-5 mm), one bucket is enough for 50 pieces.
Having prepared the masonry mixture, you can begin laying the foundation. Its width is made 10 cm larger than the width of the oven. The height of the foundation is selected so that the bottom of the first row of bricks is at floor level.
An approximate prototype of a stove
If the underground is deep enough (50-60 cm), then there is no need to dig a hole for the foundation. It is enough to make formwork on the ground with a plan size of 76 x (51 + 10 cm). Two layers of roofing felt are placed on its bottom to protect it from moisture. Having laid the concrete, it is given a week to gain strength, after which they begin laying.
The dimensions of the stove with hob we are considering are 3 x 1.5 bricks (76x39 cm).
Expert advice: lay out each new tier of brick without mortar (dry). After adjusting the bricks to size, you can begin laying.
The first row is placed on a layer of clay mortar (4-5 mm). Having leveled the base, lay out the second one, leaving space for the blower door.
Before installing the door, you need to screw a soft wire to it and put its ends into the seams for better fixation.
The frame of the cast iron door has four holes for wire, which is used for fixing in the masonry
To compensate for the thermal expansion of the metal, a gap is left between the door and the brick. Before installation, its frame is wrapped with wet asbestos cord.
The third row is laid by overlapping the seams of the second. At this level, a grate is installed in the firebox.

Order scheme from 1st to 8th row
The fourth row is placed on the edge, observing the ligation of the seams, and the walls of the combustion chamber are formed. Behind it will be the first and only smoke circulation (see section A-A in diagram No. 2). To clean its bottom, a so-called knockout brick is placed in the rear wall without mortar, which is periodically removed to remove ash. Inside the chimney, two stands are made from pieces of brick to support the internal partition.
The stones of the fifth row are placed flat, leaving space for the firebox door. In the back of the stove, in order, we see the walls of two smoke channels. During work, their surface must be thoroughly cleaned with a wet cloth to remove any clay protruding from the seams. This is an important condition for ensuring good traction.
Helpful advice! When focusing on the order drawings, do not forget to look at the two sections of the stove. They will help you better imagine its design and not make mistakes when laying out the bricks.
Order scheme from 9th to 11th row
Having raised the masonry up to the eighth row, they close the furnace door, placing wire in the seams to secure its frame. At the same level, in the back of the fuel chamber, a brick with a beveled end is placed - a smoke tooth. It improves heat output by preventing flue gases from quickly escaping into the chimney.
Having completed the ninth row, an asbestos cord is laid along it on a clay mortar. It is necessary for sealing the joints of a cast iron slab and brick. On the tenth row, the firebox is covered with a hob.
On the eleventh, a smoke valve is installed in the pipe. It is also compacted along the contour with an asbestos cord soaked in clay.
Rows 12 and 13 - formation of the pipe walls. After they are completed, a lightweight sheet metal pipe is placed on the stove, leading to the roof.