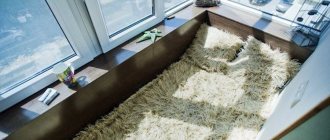
One of the important stages of repair is waterproofing the balcony. Without this, any rain or snow will become a real disaster: moisture will get inside, spoil the interior decoration, promote the growth of fungi and mold, and corrosion of metal elements. That is why it is important to think in advance about protecting the balcony from moisture. Otherwise, after a few heavy rains, the balcony will be damp, and the beautiful cosmetic renovation will be irrevocably damaged.
Types of materials
There are two large types of hydraulic materials: coating and roll. Each type has its own advantages, as well as disadvantages. Thus, classic roll materials are more durable and reliable compared to coating materials. But coating materials have a much simpler application technology. So, let's look at the main materials of each of these groups.
Rolled hydraulic materials
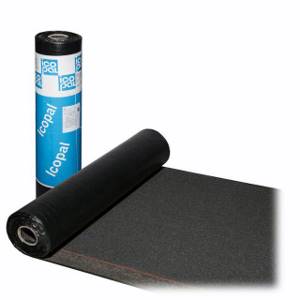
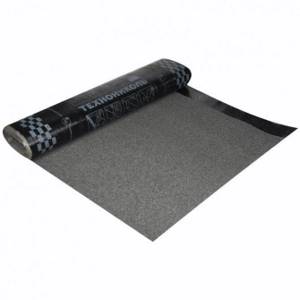
The most common lining material is roofing felt. It is roofing cardboard impregnated with a special composition. It is installed in the usual way - using a gas burner. But there are other modern materials that are widely used in repairs to provide protection from moisture. Namely:
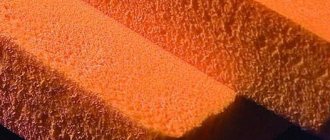
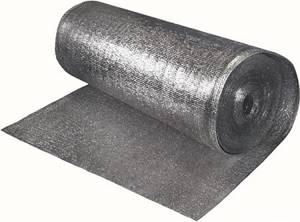
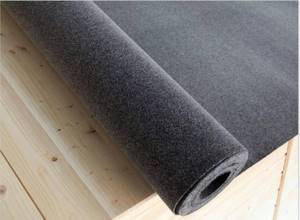
- Foam foil or foil-isolon. Essentially it is a porous film with a metallized coating. It is durable, does not absorb moisture, and reflects UV radiation. In addition, it provides excellent thermal insulation. So there is no need to additionally insulate the walls and floor on top of foil insulation. It is enough just to blow out the joints with foam.
- Isol. This is roofing cardboard impregnated with bitumen with various fillers: rubber, antiseptic and additives. Provides excellent vapor barrier.
- Stekloizol, hydrostekloizol. Unlike previous materials, the basis of glass insulation is fiberglass. The binding element is a special composition with bitumen and various additives. It is also additionally protected by a polymer film - one-sided or double-sided.
- Tol. This is roofing cardboard impregnated with tar products and sprinkled with mineral chips. A fairly simple and inexpensive option.
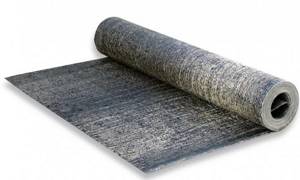
- Glass ruberoid. Unlike conventional roofing felt, bitumen in this case is applied not to roofing cardboard, but to a special glass base.
Coating hydromaterials
Coating materials are more modern, versatile and easy to use. They can be applied with a regular brush or roller. Such mixtures include various types of sealants, bitumen, cement and polymer mastics, fillers (crumb rubber, latex, plasticizer). This greatly reduces the time of waterproofing the balcony and loggia from the inside, and the resistance to external damage, moisture and other troubles of such mastics is quite high.
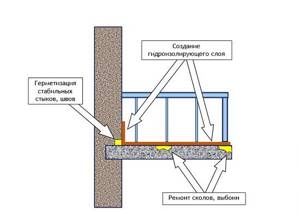
Waterproofing of roofs and balcony canopies
>
If the apartment is on the top floor, the balcony is exposed to precipitation at any time of the year. As a result of constant contact with moisture, an unprotected roof will sooner or later leak, so sealing the roof or balcony canopy in such cases is mandatory.
Selection and installation of roofing material
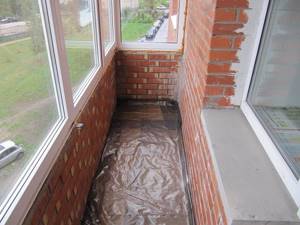
Standard designs for multi-storey buildings often do not provide anything other than a flat concrete floor for the roof of the top floor balcony. Although this design has a minimal slope, it is not able to cope with the rapid drainage of water during heavy rains or melting snow. This leads to the formation of puddles and moisture seeping into the room.
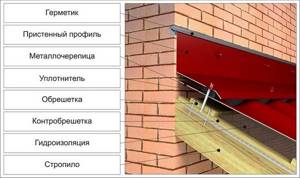
The best way to avoid this situation is to install a pitched roof with a sufficient angle of inclination. In this case, a frame is mounted directly on the concrete floor, on which hydrophobic roofing material is laid on top.
On balconies without an upper ceiling, the frame is attached to the wall, and the structure itself acts as a canopy, protecting the object from the sun, rain, and snow.
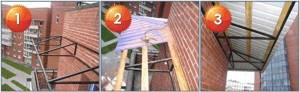
Stages of installation of a pitched canopy roof on a balcony
There are several types of roofing material, the choice of which is usually based on the personal preferences of the owners:
- Corrugated sheeting is a durable, affordable material, so it is often used if the repair budget is limited.
- Metal tiles are not inferior in performance properties to corrugated sheets, but have a more attractive appearance.
- Euroslate is a reliable, lightweight, aesthetically attractive coating with a sound-absorbing effect.
All of the listed materials are mounted with an overlap; the sheets are attached to the frame or sheathing with self-tapping screws and a rubber washer-gasket. This guarantees complete tightness of the roof covering.
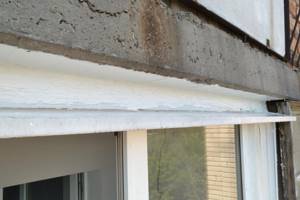
Waterproofing of the junction of the canopy to the facade
Water cannot penetrate through a properly installed pitched roof, but moisture can find a way out at the junction of the canopy and the façade wall. Therefore, on the top floor balcony, waterproofing this area is mandatory.
Standard technology for sealing the junction:
- A recess 20-30 mm deep is made in the wall parallel to the roof.
- The upper end of the protective metal apron, treated with sealant, is inserted into the recess.
- The apron is attached to the wall with dowels, and to the roofing material with self-tapping screws with rubber gaskets. For additional compaction, foamed polyethylene is placed between the apron and the roof.
Scheme of sealing the junction of the canopy to the wall
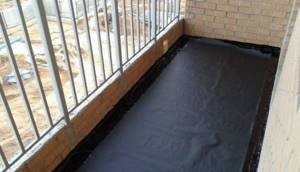
Waterproofing a flat roof with roofing felt
If there is neither time nor money for arranging a pitched roof, you can waterproof the flat roof of the balcony with roofing felt. This is an old, proven method that is used to seal many construction projects.
Ruberoid is a rolled hydrophobic material, which is made by impregnating roofing cardboard with bitumen compounds.
The procedure for laying roofing felt:
- The surface of the concrete canopy is cleaned of debris, dust, and foreign objects.
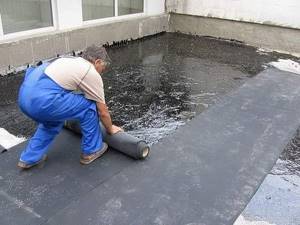
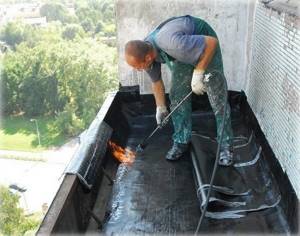
- The roofing material is heated by a gas burner and gradually rolled out over the entire surface of the roof.
- The seams between sheets of roofing material, as well as the places where they adjoin the wall, are treated with bitumen or butyl rubber mastic.
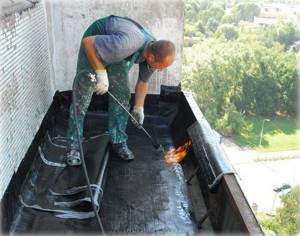
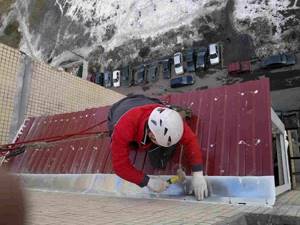
Waterproofing a balcony with roofing felt requires special equipment and appropriate skills
Preparatory work
The quality of waterproofing directly depends not only on the chosen material, but also on the thoroughness of preparation for repairs. If you want to waterproof a balcony with your own hands, then first of all, you need to thoroughly clean the surfaces of all kinds of contaminants: dirt, remnants of old finishing, dust. In this regard, it is best to use an industrial vacuum cleaner and a hard plastic brush.
After cleaning, the surface is primed with a special primer. It is important to thoroughly treat all seams, crevices, and hard-to-reach areas. For this purpose, it is better to additionally purchase a small brush. It is also worth paying attention to the following nuances:
- The surface must be flat. The maximum size of irregularities is 2 mm. Not more.
- Before applying coating materials to unprimed plaster, concrete or cement screed, the surface must be moistened with a spray bottle.
- All joints must be sealed with elastic tape.
- Fresh new screeds must have time to go through all stages of shrinkage. This will take about a month.
If all these conditions are taken into account, you can proceed to the work.
Elimination of blowing and freezing of window openings
Insufficient sealing of window units on balconies often leads to the formation of mold and mildew on adjacent slopes and walls. This problem occurs when using old wooden windows or as a result of improper installation of metal-plastic structures.
Why is it blowing from the window?
Blowing through a window is a consequence of insufficient tightness between the frame and the wall or the sash to the frame. There may be several reasons:
- Incorrect window frame installation technology. Most companies selling plastic windows hire outsiders (often without relevant experience) for installation work. It is not surprising that when using window units, unpleasant consequences of “professional” installation appear.
- Wrong choice of sealant for sealing the seams between the frame and the wall. Some installers mistakenly believe that construction foam is a sealant and therefore does not require additional finishing. In fact, under the influence of sunlight and temperature changes, the foam begins to deform and peel off from the surface, breaking the tightness of the seam.
- Misaligned sashes. The sash pressure of a plastic window is an adjustable value. To do this, eccentrics are located around the perimeter of the window, the position of which determines the level of pressure - weak, medium or strong.
The presence of a foam seam alone is not a sufficient condition for sealing a window seam on a balcony
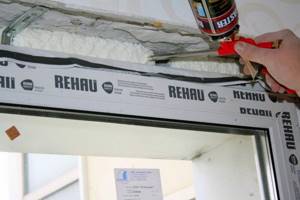
Rules for sealing window seams
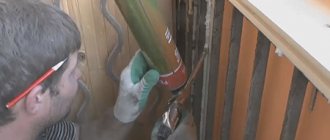
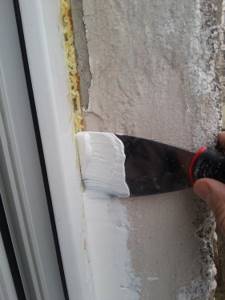
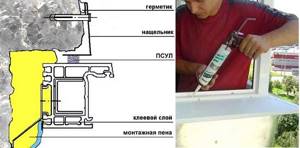
You cannot do without polyurethane foam when installing plastic windows. In this case, in no case should you skimp on the foam seam, especially since excess remains of dried material can be easily cut off. After drying, the foam on the inside and outside should be covered with a moisture-resistant sealant, which will serve as a reliable barrier to ultraviolet radiation and water.
Before applying the sealing material, the seam must be cleaned of dust and degreased.
It is allowed to seal the balcony from the inside with putty, dry putty mixture, or paint. It is recommended to cover the outside of the foam seam exclusively with a sealant that is highly elastic and will not crack as a result of temperature exposure.
Sealing the junction of the window and the wall
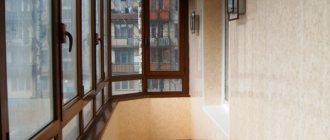
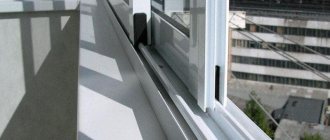
When glazing a balcony, be sure to install ebb sills for high-quality drainage.
Is it possible to do without glazing?
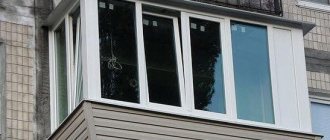
In order to provide a balcony or loggia with a sufficient degree of waterproofing, it is necessary to install glazing. Moreover, in addition to installing double-glazed windows, it is important to pay attention to sealing seams and external cornices. But you shouldn’t completely neglect treating the floor when waterproofing an open balcony: otherwise the slab will be constantly exposed to direct exposure to rain, snow, fog, etc. This is especially true for waterproofing a balcony in a wooden house. If the balcony is open, when waterproofing the floor, you should create optimal conditions for drainage due to a slight slope from the wall to the outer wall of the balcony.
Waterproofing and sealing
The work for open and closed balconies is different, so here we will describe them separately. A description of the roof insulation will also be given in a separate paragraph.
Insulation and sealing of an open balcony
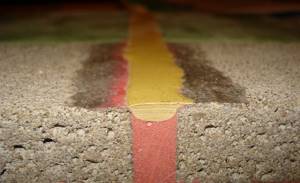
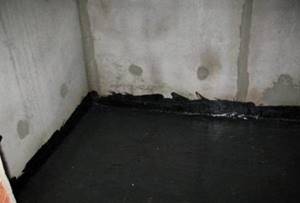
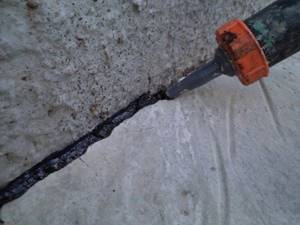
After the screed has completely hardened (14 days), we will organize waterproofing of all seams with injection materials based on polyurethane. Alternatively, the seam can be sealed by inserting an elastic band into it. It is pressed into the seam, and everything is sealed with waterproofing compound on top. This is what it looks like:
Waterproofing a loggia with your own hands: laying an elastic cord in expansion joints
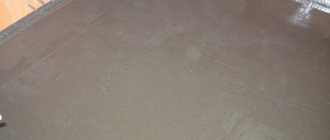
After the waterproofing has hardened, we begin sealing. The sealant is used in the same way as waterproofing, based on polyurethane, applied with a spatula. Next, the entire surface of the slab is coated with a composition that reduces water absorption by concrete.
Balcony sealing: fully sealed seam
We isolate a closed balcony or loggia
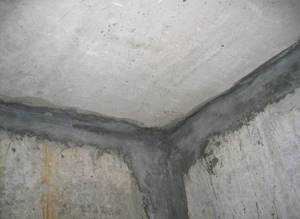
Sealing the seams of the load-bearing slab is done in exactly the same way as described above. The seams of the walls and ceiling of the loggia, which have cracks, are passed from the inside with polyurethane foam. After it has completely hardened, remove excess material using a knife or metal spatula, and treat the seams with a sealing compound.
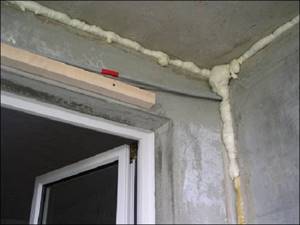
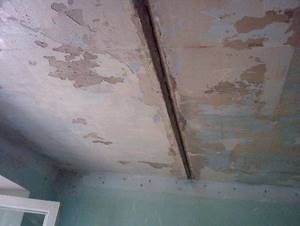
Waterproofing the balcony ceiling from the inside: foaming the cracks
In addition, a layer of waterproofing material is laid under the insulation of the loggia floor. For this purpose, special membranes or ordinary cellophane film are used. The material is laid with an overlap at joints of 15 cm and overlapping walls of 10 cm.
Waterproofing the loggia from the inside: laying the material
Waterproofing of the parapet and sides of the balcony is organized by laying a layer of material on the inside, under a layer of insulation and finishing materials. For exterior finishing, a vapor barrier for the balcony is installed. If this is a loggia with a parapet and concrete walls, then we do not do a vapor barrier.
Please note: you cannot lay a second layer of waterproofing when insulating. If water somehow gets inside, it will not be able to dry, which will lead to an increase in the thermal conductivity of the insulation and its further deterioration.
Now let's start sealing. We apply a special compound to all the joints and seams on the inside and outside of the balcony or loggia, which we have previously waterproofed. This is done using a spatula. Do not forget about the glazing of the balcony; when sealing, we pay special attention to the places where the frames are attached to the parapet and roof.
We seal the balcony after glazing. In difficult places we use sealants in syringes
Work on sealing the roof of a balcony or loggia
If this is a balcony, then the roof is most likely based on a metal or wooden frame. Everything is simple here. First, we apply a compound from the inside to seal the joints between the sheets of roofing material, then we lay a layer of waterproofing material under the sheathing.
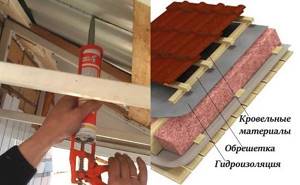
DIY sealing and waterproofing: roofing
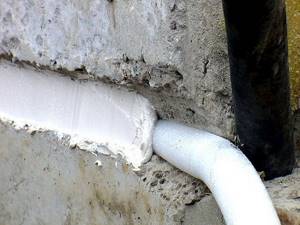
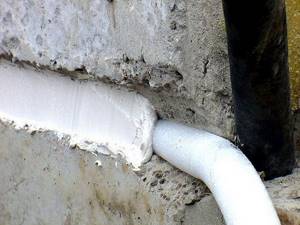
We foam the joint between the roofing material and the wall of the house from the outside, and after the material has dried, we coat it with a sealing compound. Next, we attach a strip of tin or aluminum above this joint, and also seal the connection between the metal and the wall.
How to eliminate the possibility of a balcony roof leaking: sealing the joints with the wall
The roof of the loggia, if it is a concrete slab, requires preliminary organization of a slope from the wall. This is done differently than in the case of the load-bearing slab of an open balcony. Further actions will be as follows:
- We lay a layer of vapor barrier.
- A layer of insulation if further insulation of the loggia is planned.
- We make a cement-sand screed and apply a layer of bitumen waterproofing.
- We lay roll roofing materials - some type of roofing felt.
- Now an additional layer of roofing material.
- Using self-tapping screws, we attach the edge strip 50mm wide. It should grip the edge of the roofing material.
- The upper edge of the slats is treated with bitumen sealant.
What to do to seal and waterproof the loggia roof: roofing pie.
Next, you can watch a video about what can result from a careless attitude to sealing the roof of a balcony or loggia.
Floor waterproofing
To waterproof the floor on the balcony, various technologies are used depending on the type of materials used and the methods of their application.
Reliable, but quite expensive technology that can be done independently. It is carried out by two main methods.
"Hot" option
Sequence of work:
- the surface of the slab is cleaned, plastered and dried;
- the base of the floor is primed with a layer of liquid bitumen;
- Formwork up to 40 cm high is installed along the perimeter of the floor:
- a metal mesh is laid to give strength;
- heated mastic is poured into the formwork;
- the filled layer is evenly distributed over the entire surface;
- After drying, an additional double layer of mastic is applied.
"Cold" option
The main difference is the use of unheated mastic. Otherwise, the sequence of work remains the same.
A widely used option due to its simplicity, reliability and affordable price. However, its use on open balconies at low temperatures is undesirable.
The technology is as follows:
- the floor surface is cleaned;
- all defects of the concrete slab are eliminated;
- the surface is degreased;
- a double layer of primer is applied;
- After the soil has dried, a coating material is applied.
Pasting method
Provides for gluing sheet or roll materials in several layers. It is used less and less due to a number of significant shortcomings that affect the quality of waterproofing.
Sequence of work:
- the floor surface is cleaned and dried:
- the material is cut to the required dimensions with an allowance of at least 20 cm on each side:
- the material is laid on a previously applied layer of mastic;
- the required number of layers is sequentially applied to the mastic;
- the edges of the laid material are plastered with moisture-proof mixtures.
All work using this technology must be carried out at an ambient temperature of at least +10ºС.
Plastering method
A simple and affordable method involves the use of inexpensive mixtures based on cement or polymers. Can be applied to any surface.
Sequence of work:
- the surface of the slab is cleaned, puttied and primed;
- after the soil has dried, the first layer of plaster is applied;
- after half an hour the next layer is laid, there should be no more than four of them;
- This coating takes several days to dry, but it must be moistened periodically to prevent it from drying out.
After complete drying, a finishing coating in the form of OSB boards is laid on the waterproofing layer, and linoleum, laminate, etc. are laid on them.
Required materials for waterproofing
For high-quality waterproofing you will need appropriate materials. They can be divided into separate types:
- Cast waterproofing refers to polymers that, when heated, take on a liquid state. In such a head start, the floors are flooded. After hardening, the material does not allow moisture to pass through. The downside is the fragility of frozen polymers.
- Painting waterproofing – consists of applying moisture-resistant paint. This option is low cost and easy to apply. However, wood materials must be coated continuously. Also, painted waterproofing does not tolerate sub-zero temperatures.
- Penetrating materials are a universal type used on concrete and wood surfaces. Such compositions fill all kinds of cracks, crevices and chips, and strengthen the surface to be coated.
- Pasting materials – purchased in rolls. For reliability, it is recommended to use several layers, fastening them with bitumen mastic. The main disadvantage of such waterproofing is the high price.
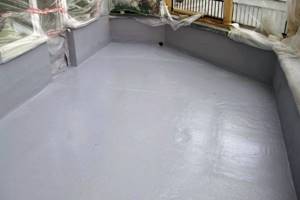
Waterproofing the floor of an open balcony with a painting composition
During the work, additional materials and tools will be needed, namely:
- metal brush;
- sand and cement;
- sharp knife;
- metal mesh or wire;
- self-tapping screws;
- wooden blocks;
- perforator;
- screwdriver;
- moisture-resistant plywood or osb boards;
- sealant;
- grinder with stone discs;
- Styrofoam;
- gun and polyurethane foam.
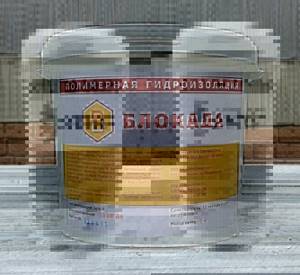
Ready-to-use waterproofing compound
Balcony ceiling decoration
To waterproof the balcony ceiling from the inside, penetrating compounds are usually used.
Sequence of work:
- the ceiling surface is thoroughly cleaned;
- leakage areas are treated with polyurethane compounds;
- a layer of penetrating material is applied to the pre-moistened surface;
- After drying, polystyrene foam boards are fixed to the waterproofing using special fungi.
For balconies on the highest floors, the roof is additionally sealed.
Floor arrangement
First of all, you should make sure that moisture is drained correctly. If the slope is made from the wall, then waterproofing the floor on the balcony can continue. If the slope is made towards the wall, then all the water will flow towards the house. You need to fix this yourself using a screed. To do this, prepare a mixture of cement and sand (ratio 1:3), apply it to the cleaned base of the balcony slab. The angle of repose for moisture removal should be 1-2 degrees to the outside.
After the screed has dried and hardened, you can proceed to further steps:
- Clean the base from dirt, dust, and thoroughly moisten it.
- Cover the slab with a layer of penetrating material. It is best to always make strokes in the same direction. This will help prevent peeling.
- After drying, the surface is covered with a second layer. This time the strokes are made in a direction perpendicular to the first layer. This will give maximum protection against water.
- This layer is periodically moistened for 3 days, not allowing it to dry out.
- The next layer is a rolled foil insulator. The sheets are overlapped by several cm. The joints of the sheets are glued together with mastic.
- Wood beams are installed on the floor, and the gaps between them are filled with polystyrene foam.
- All formed seams and joints are eliminated with polyurethane foam.
- The subfloor is laid on the beams. For this purpose, OSB boards are often used, securing them with self-tapping screws.
- The floor is being cleaned.
If you need to protect a balcony above a bay window, porch or alcove from moisture, then the insulation should be carried out as carefully as possible, since the appearance of a leak will damage the internal repairs of the room located below.
Finishing the loggia ceiling
If we are talking about waterproofing a loggia, then its ceiling is a concrete slab. As with the floor, you need to make a slope from the wall to the outer wall. If there was a bias initially, then you need to act like this:
- We install a vapor barrier film.
- Then - a thermal insulation layer (if needed).
- We perform a cement screed.
- After complete shrinkage of the screed, 2 layers of a bitumen-based waterproofing mixture can be applied on top.
- We install 1 layer of rolled waterproofing - roofing felt or foil-isolon.
- We hide the edge of the roof behind the edge strip. It will be attached with self-tapping screws.
- All joints and seams are additionally treated with sealant.
Waterproofing the ceiling on the balcony
We clean the ceiling slab and treat it with an antiseptic to protect the structure from the formation of fungal mold. Then the surface is treated with a coating/penetrating insulating compound. We seal all the cracks and cracks in the ceiling with silicone.
We fill the joints of the wall with the floor slabs with sealant. When finishing the roof with tiles/metal tiles, each joint is additionally treated with polyurethane mastic. It has good adhesion and is easy to apply to a damp ceiling surface. We recommend two layers of mastic. The second layer should be perpendicular to the first. After the first layer, the waterproofing layer is reinforced with mesh. We give the mastic 3 days so that it dries well and hardens. This will create a durable crystalline protective layer.
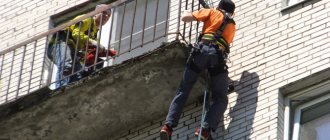
For residents of the top floors, we recommend laying a layer of roofing material on top of the balcony roof or covering it with roofing mastic. We recommend calling specialists to waterproof your roof. We do not recommend doing this work yourself. This is life-threatening.
Working with walls and partitions
The next layer of work will be insulating the walls. This section, of course, applies only to glazed balconies and loggias. Here it is better to stick to roll coverings. This way you can provide hydro- and thermal insulation at the same time, thereby saving time and money. But if you want to play it safe, it is better to apply two layers of bitumen mastic over the roll coating.
The waterproofing material is glued (or fused using a torch) to the wall, the joints are carefully treated with sealant. This is followed by layers of mastic, then decorative finishing is performed.
Please note: roll waterproofing cannot be laid in several layers! This will not only not enhance the effect, but will also be harmful: if moisture somehow gets into the gap between the layers, it will not be able to dry.
If everything is done correctly, then comprehensive waterproofing of a loggia or balcony will provide reliable protection against moisture and related troubles.
Waterproofing of walls, vertical partitions of balconies and loggias
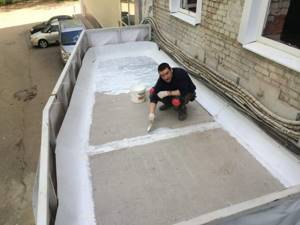
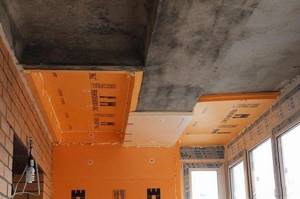
We glue foil-coated polystyrene foam to the cleaned, antiseptic-coated walls - the most optimal material for vertical surfaces, which also serves as a vapor barrier for the balcony. We seal the joints between the sheets. Apply two layers of polyurethane mastic for waterproofing. Let's move on to processing the floor.
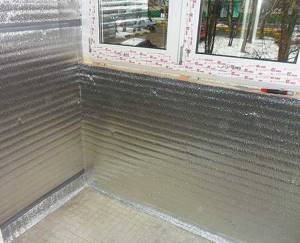
Waterproofing the loggia from the inside with a vapor barrier coating
The need for waterproofing
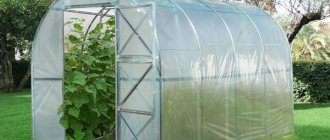
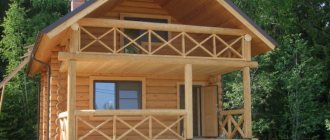
To begin with, I want to say a few words about how important it is to waterproof a wooden balcony in a country house or a concrete loggia in a city apartment. If you neglect this stage of construction and finishing, you risk in the near future not only losing the exquisite finishing of this room, but also encountering leaks in the rooms.
The waterproofing layer helps extend the life of the balcony slab.
I can name offhand only the most negative consequences of using balconies and loggias (especially open ones) without a waterproofing layer:
- damage to the decorative material that you used to furnish the auxiliary room;
- corrosion of metal parts of the balcony and reinforcement of the balcony slab;
- the appearance of fungi, mold and other microorganisms (this is especially dangerous if the balcony is wooden).
The worst option of all is a violation of the integrity of the supporting structures of the balcony. They can rot or rust to such an extent that the structure becomes dangerous to operate.
It is very important to waterproof the balcony when insulating it with mineral wool insulators. Their technical characteristics deteriorate greatly when wet, so the layer of insulating wool must be carefully protected from the penetration of atmospheric moisture.
It is mandatory to perform waterproofing when insulating a balcony with mineral wool.
Let me immediately note one more important point. If you are waterproofing an open balcony under tiles or similar flooring, you must take measures to ensure that rain or melt water that gets inside is removed through specially equipped drain holes. Otherwise, during a heavy rainfall or spring melting of snow, it will quickly turn into a swimming pool.
Sealing seams and cracks inside the balcony
Unlike external roof and window insulation, which requires climbing skills, internal balcony waterproofing can be done with your own hands. Structural seams and resulting cracks require mandatory sealing before further repairs. Delaying or neglecting this process will lead to the formation of “wet” spots and subsequent aggravation of the problem.
Types of balcony seams
More than 90% of the moisture entering the balcony passes through unprotected joints of the slabs, which in their normal state are not a serious obstacle to rain or melt water. Construction seams are divided into two types:
- fixed (cold) – formed between two stationary structures (slabs, walls, ceilings, etc.);
- moving (deformation) - made to prevent deformation of the object, which may arise as a result of soil movements and temperature fluctuations.
>
Open seams are the main reason for the spread of fungus and mold on the balcony
Methods for sealing seams
Each joint has individual characteristics (width, depth, geometry), and therefore requires an appropriate approach. Sealing seams and cracks on the balcony is carried out using several methods:
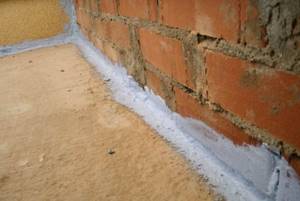
- Sealing with cement mortar. The simplest and cheapest, but not the most reliable option. The hardened mortar does not have even minimal elasticity, so if it is used to seal an expansion joint, there is a high probability of cracks appearing.
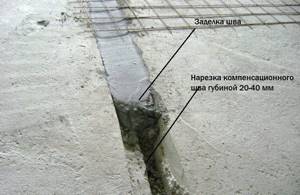
Sealing the seam with concrete
- Sealing the joint with an elastic band. One of the most common methods of sealing joints of concrete slabs. A sealing band made of foamed polyethylene or butyl rubber is pressed into the groove, after which the seam is sealed with a sealing compound.
Laying the harness and applying a layer of sealant
- Sealing of small seams and cracks. Small-width joints and structural defects are sealed using the injection method, in which the sealant is injected into the joint cavity with a construction syringe.
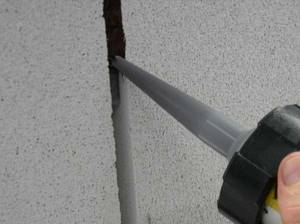
Isolation of small seams by injection
Why do you need waterproofing for a balcony?
The balcony is more susceptible to the negative influence of weather conditions than other areas of the apartment.
Waterproofing will protect the space from unpleasant humidity, fungus and dampness. If you use high-quality waterproofing materials and carry out the work correctly, you can provide reliable protection to the walls, ceiling and roof of your balcony. In the vast majority of cases (95%), a concrete slab serves as the balcony base. High-quality waterproofing of an open balcony makes it possible to increase the service life of a structure exposed to an aggressive environment by one and a half times. If this is not done, you may incur financial losses in the future.
Because reinforced concrete has a porous structure, and inside it there is an embedded metal element. At sub-zero temperatures, water enters these pores and begins to break off metal microparticles. Corrosion occurs and the metal is destroyed. Waterproofing prevents destructive processes.
It is performed for floor slabs (processed from below and above), parapet (at the same time vapor insulation is done), and roof (the rafter system is processed).
If you understand the importance of this operation, let's move on and see how to waterproof a balcony in accordance with existing technology.
Features of waterproofing a loggia or closed balcony
In a room protected from direct exposure to atmospheric precipitation, waterproofing is rather of an auxiliary nature. The main access to moisture here is at the joints of glazing and enclosing structures. Steam, condensation and water penetrate inside through cracks and gaps. Therefore, the main task is to ensure reliable sealing of the junctions.
Glazed balconies and loggias are often insulated. Condensation always forms at the border between heat and cold. To eliminate its effect on thermal insulation, vapor barriers – films or membranes – are used.
Some insulation materials have vapor barrier properties. This is expanded polystyrene, foamed polyethylene.
Rules for preparing for waterproofing
Waterproofing is not only work to “improve” the floor and ceiling, but also carefully sealing seams and installing external cornices. However, all this work requires careful surface preparation . Before waterproofing, all damaged areas must be removed and the decorative coating must be dismantled. The sequence of work is as follows:
We dismantle the balcony floor
- The floor covering of the balcony is dismantled with extreme care - it will be used later.
- The concrete slab is inspected for the presence of peeling and crumbling areas.
- Loose areas of concrete are carefully removed using a hammer drill.
- Concrete is cleaned of dirt and dust, which will require brushes with hard bristles. The result is a strong and clean foundation.
- Remains of cement or glue are carefully removed.
- With the help of a grinder, small cracks are expanded, and large ones are leveled. This will allow the future screed to fill all elements of the floor structure. The formed grooves are thoroughly cleaned of debris.
- Fragments of concrete are removed from the exposed reinforcement, after which it is thoroughly cleaned of rust accumulations. It is better to use a chemical method rather than a mechanical one, since the metal must become truly clean.
- The fittings are completely coated with an anti-corrosion compound.
- The concrete coating is restored - for these purposes, both special compositions intended for quick repairs and standard cement mortar can be used.
- The roof of the balcony is carefully inspected and its problem areas are identified, where moisture penetrates most of all.
- The roof and partitions are thoroughly cleaned of debris, dust, paint and glue, and also moistened.