Mulwatt
8132 0 7
Mullvatt September 13, 2016Specialization: Capital construction work (laying a foundation, erecting walls, constructing a roof, etc.). Internal construction work (laying internal communications, rough and fine finishing). Hobbies: mobile communications, high technology, computer equipment, programming.
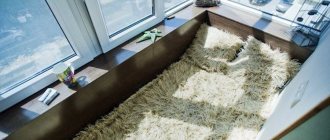
Screed is one of the most effective ways to level the floor.
Today I’ll tell you how to do a screed on a balcony with your own hands. I have repeatedly made a floor using exactly this technology, which became the reason for writing the corresponding material.
I personally think that it is better to do it immediately with insulation. Therefore, the instructions below will contain several points regarding the installation of thermal insulation material.
Step-by-step instructions for floor insulation with penoplex
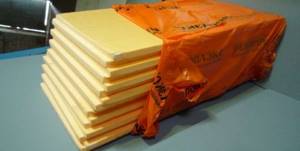
Of all the types of insulation materials used in modern house construction, extruded polystyrene foam - penoplex - is the most advanced and in demand. This is due to the high thermal insulation and strength characteristics of this polymer, which makes it possible to insulate not only the walls or roofs of buildings, or arched hangar-type structures, but also to use it when insulating floors with penoplex without creating a frame that serves to lay a finished floor on top of the insulation on a balcony or loggia .
Features of thermal insulation of a balcony
Since the balcony protrudes outward, the floor slabs are constantly exposed to the environment. They freeze, are heated by the sun, draw moisture from the air and, as a result, become increasingly destroyed. If, during insulation, the floor is covered with heavy material and a thick layer of concrete screed is poured on top, the ceilings may not withstand it and collapse. Improper preparation of the base also contributes to collapse, for example, if the reinforcing frame in the slab itself is damaged.
To avoid such complications, before starting work you should very carefully check the condition of the balcony floors, the integrity of all its structures, and calculate the maximum permissible load.
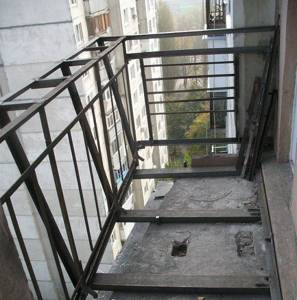
Before starting work, you should very carefully check the condition of the balcony floors and the integrity of all its structures.
Moreover, it is necessary to take into account not only the weight of the insulation, screed and finishing coating, but also the weight of the parapet, double-glazed windows, wall and ceiling decoration, as well as the furniture with which the balcony will be furnished. According to the standards, the permissible load on balcony floors is 200 kg/m2, provided that the condition of the slabs is satisfactory.
Balcony ceilings must withstand the weight of frames, windows, furniture, etc.
Thermal insulation and strength characteristics of penoplex
Like most other heat-insulating materials, the thermal insulation properties of penoplex depend on the density and thickness of the material used.
Extruded polystyrene foam produced by the Russian chemical industry corresponds to foreign analogues in almost all characteristics, and has several grades with the corresponding index, differing in density and, depending on this, in the scope of application as insulation.
| Index | Density kg/m3 | Scope of application |
| WITH | 25-32 | Walls |
| TO | 28-33 | Roof |
| F | 29-33 | Foundation |
| 45 | 35-47 | Road insulation |
The thermal conductivity of penoplex is only 0.03 W/m2, and moisture absorption does not exceed 0.2-0.4% by weight in 24 hours. That is, the material is practically waterproof. This allows it to be used without installing additional vapor-waterproofing, both for external and internal insulation work in wet rooms.
The width of the slabs is standardized and is 600 mm, the length is 1200-2400 mm, the thickness of the slabs varies from 20 to 100 mm.
The most acceptable price/thermal insulating properties/strength ratio for use as insulation in cottage construction or on a balcony (loggia) is penoplex “F”.
A slab of such penoplex does not bend under the weight of an adult, is not subject to thermal deformation in winter/summer and can be successfully used to insulate the floor of a balcony.
Advantages of using penoplex
In terms of its performance characteristics, penoplex ranks first among similar floor insulation materials. At a fairly reasonable price per square insulation, the manufacturer provides a long warranty on its use (up to 40 years). There are several advantages:
Characteristics of penoplex
- High stability of the coating under intense mechanical loads.
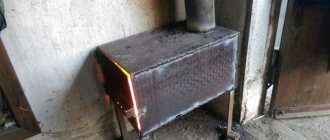
- High moisture resistance.
- Heat resistance (the stove does not ignite).
- The absence of formaldehyde in the production of insulating sheets, which ensures a high environmental class of the material.
- Increased sound insulation properties.
- Laying penoplex does not require additional costs.
Combining the properties of plastic and foam, the material is produced in the form of slabs, with a length of 120 cm, with a standard width of 60 cm. Thanks to the inclusions of air cells formed during pressing of the material, the slab is light, with high surface rigidity. Depending on the assortment, it is used to cover floors (grade 35 “Foundation”), walls, ceilings (grade 31 C “Comfort”). To insulate the floor, the material is most often laid on the following bases:
- priming;
- floor coverings;
- under the system heated floor;
- concrete floor.
How to insulate a floor using penoplex?
Insulating the floor with penoplex under a screed with your own hands on a balcony or loggia is not very difficult.
Unlike its use as a heat-insulating material, there is no need to install a hydro-vapor barrier and lathing, which is used for laying a finished floor.
In addition to a significant reduction in the number and volume of work performed and the ability to equip a clean floor without the use of additional finishing materials - floorboards, laminate, linoleum or ceramic tiles, time is significantly reduced.
Warm floors under screed on a loggia or balcony can be completed within one working day. To do this, you are offered step-by-step instructions on how to perform the work:
Insulate from outside or inside
Balconies can be insulated from the inside or outside. Each technology has its own characteristics, pros and cons. To make the right decision, you need to consider all the nuances in detail.
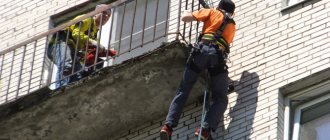
External insulation affects the parapet and side walls of the loggias. Advantages of this approach:
- Contact with the external environment occurs along the finishing surface. Load-bearing structures are protected from negative natural factors.
- Useful space is not reduced. This is true for small rooms, especially if they have custom-made furniture.
- There is no condensation and dampness, the risk of mold, mildew and damage to the finishing material completely disappears.
Insulating the loggia floor with penoplex: step-by-step instructions
Insulating the loggia in the apartment will increase the living space. In addition to double glazing, to create a comfortable environment in this room, it is necessary to insulate the floor. With the penoplex material, you can install the floor yourself, and its heat-insulating qualities will allow you to use the loggia even in winter.
Penoplex is extruded polystyrene foam, characterized by ease of installation, increased strength and durability. There are two options for insulating the loggia floor with this material yourself:
- Under flooring made of plywood sheets or boards.
- Under the screed. Screed is considered the more preferable option when installing a “warm floor” on a loggia, but keep in mind that after pouring you will have to wait a long time for it to dry.
Before insulating the floor on the loggia, preparations are carried out. This is an important stage, since the service life of the floor and the ease of performing the work depend on the quality of surface preparation. After glazing the loggia, you need to carefully clean the room from debris and dust.
Then they begin to seal all the cracks in the walls. Small cracks can be filled with polyurethane foam or sealant, but large ones will have to be filled with crushed brick or crushed stone, mixed with cement mortar.
It is important to take into account that after insulation with penoplex floors, the floors will rise by at least a few centimeters. Therefore, it is necessary to think in advance about the layout of sockets and electrical wiring. Similarly with heating, if the loggia is planned to be heated, the plan and layout of the heating system must be drawn up before starting to lay the floor.
Selection of floor material and design
Do-it-yourself insulation of a loggia floor begins with the question: Which insulation should I choose?
p, blockquote 7,0,1,0,0 –>
The most popular thermal insulation materials are:
p, blockquote 8,0,0,0,0 –>
- Styrofoam. The most popular material for thermal insulation, due to its low price and ease of use, 50% of all balconies and loggias in the country are insulated with it. Its advantages include low thermal conductivity, excellent moisture resistance and low weight, while its disadvantages include fragility.
- Penoplex. Extruded polystyrene foam, a “relative” of polystyrene foam, which differs from it in increased strength, durability, ease of installation and, as a result, higher cost, is presented in the following photo.
Insulating the loggia floor: step-by-step instructions
First, the floor level is marked. It is better to install it in such a way that the floor on the loggia is on the same level as the floor covering in the room. To do this, the insulation together with the coating should not exceed the level you set. When marking, it is advisable to use a water or laser level.
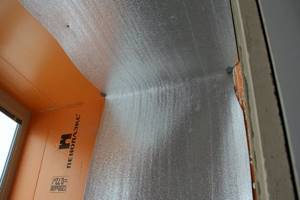
After marking, a layer of waterproofing is laid. To do this, you can use technical polyethylene or roofing felt laid in a couple of layers. The material must be overlapped; an overlap of at least 5 cm must be made on the walls.
Insulating the floor on a loggia using penoplex has its own characteristics. The fact is that usually when laying material under the flooring, logs are constructed. But due to the strength of penoplex, plywood sheets can be laid directly on it. To do this, a leveling screed is poured onto the prepared floor, which is required to prevent deformation of the foam boards.
The insulation boards should be carefully adjusted to size and glued directly to the floor with special glue. If possible, it is advisable to use a type of heat insulator equipped with a groove connection system. Without it, when installing penoplex, the joints between the slabs, as well as the gaps between the slabs and the walls, will have to be sealed with polyurethane foam.
To increase the efficiency of floor insulation, you can lay penofol or isolon on top with the foil side facing out, not forgetting to seal the joints with reinforced tape.
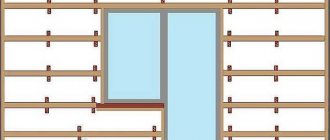
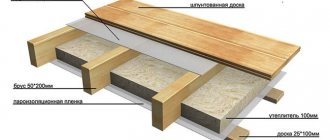
If, nevertheless, a decision is made to lay thermal insulation in the logs. The construction of the wooden log structure is made from pine beams measuring 50 × 50 mm. They should be laid in increments of 30–40 cm, and fixed to the concrete with self-tapping screws and dowels. All beams must first be treated with antiseptic impregnation.
The first beam can be fixed from the wall at a distance of 10-15 cm. Leave a gap of 3 cm between the ends of the joists and the walls so that the beams that have absorbed moisture do not bend and spoil the finishing floor covering.
Insulation boards must be inserted into the joists so that there are no gaps left between the joists; in extreme cases, they will also need to be filled with polyurethane foam. Expanded clay is simply poured into the gaps of the sheathing, expanded clay is poured. The sheathing must exceed the level of the subfloor by at least 15 cm.
To organize the flooring, boards or sheets of plywood and OSB are used. After this, the finishing coating is installed.
Insulation as a necessity
When working on thermal insulation of floors, it is necessary to take into account several important aspects that can have a serious impact on the final result, and most importantly, on the condition of the floor covering during operation. This:
- Condensate. Collecting on the floor surface, in places where it meets the walls, moisture can lead to an increase in humidity in the room, leading to the appearance and spread of mold and mildew.
- Environmentally friendly. Thermal insulation material must be “healthy” and therefore should not pose any harm to humans.
- If possible, be soundproof.
The biggest problem is, after all, the formation of condensation and everything connected with it. However, laying penoplex on the floor solves the problem! Plus, competent design and strict adherence to all recommendations are necessary.
Characteristics
Before you start gluing penoplex under the floor screed, you need to understand what characteristics this material has:
- Low water absorption. The material practically does not absorb moisture.
- High thermal insulation performance, as already noted, the material can reduce heat loss by 20%.
- High compressive strength.
- Small degree of deformation during compression.
- Long, almost unlimited service life.
Penoplex and moisture
As for the advantages, and they should be if we are talking about working with our own hands, then these are:
- Easy to install.
- Quick installation.
- No need for special knowledge.
Laying
Since penoplex has a closed-cell structure, it can be laid directly on a rigid base made of crushed stone, with a leveling layer of sand. This happens when we are talking about floor insulation in a private house under construction, and on the first floor.
Insulation material on a compacted surface
Due to its physical characteristics, and this is a fairly low weight, penoplex is very easily glued to the floor surface.
To do this you need:
- Carry out preparatory work. Clean the surface from debris and dust.
- Check the plane for distortions, and if there are differences of more than 1 cm, then it will be necessary to level the surface.
- Prepare the required amount of material.
Now laying penoplex on the floor will proceed in stages and quickly. It is not necessary to use glue for gluing; polyurethane foam will also work perfectly.
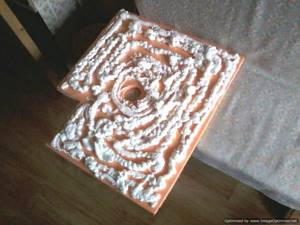
One of the foam application options
Of the necessary tools you will need:
- Roulette.
- Assembly knife.
- Hammer.
- “Gun” for polyurethane foam.
- Drill with pobeditovy drill bit.
The polyurethane foam is applied with light movements at the corners of the penoplex, and in the middle, or just around the entire perimeter, the main thing is to apply the foam carefully, the material is very difficult to wash and peel off!
After applying the foam, a sheet of material is laid on the floor surface and, with light movements from side to side, is fixed. The next sheet is glued in exactly the same way.
A completely reasonable question arises: what to do with a drill? It should be noted here that in some cases the insulation is still fixed with spacers to the subfloor. Spacers are selected according to the thickness of the material.
Fixing insulation on the floor
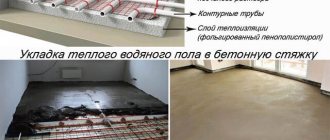
Insulating the loggia floor with penoplex under the screed
When organizing a heated floor system, it is advisable to insulate the loggia floor with penoplex under the screed. Such thermal insulation is done in several steps.
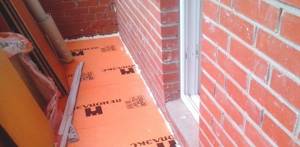
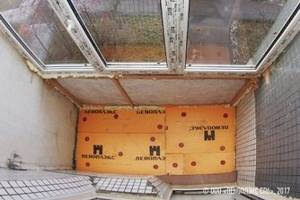
The old floor covering is removed, after which a thin leveling cement screed is poured. The fact is that without a perfectly flat surface, foam sheets can be damaged during operation.
After the screed, a vapor and waterproofing film is placed, the resulting joints will need to be taped. Next, foam sheets are laid on top. The material should be selected with a thickness of 40–60 mm. The joints are sealed using polyurethane foam or sealant.
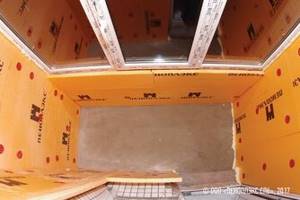
Next, a second layer of vapor barrier is laid. The foil heat reflector is placed on top with the foil facing up. A “warm floor” system of the type you choose is installed.
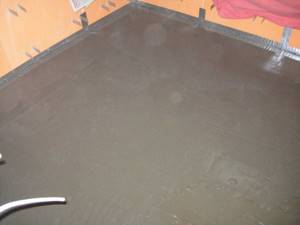
Then the screed is poured. The minimum thickness of the screed when installing a floor heating system should be at least 7 cm, without it - 4 cm.
To prepare a solution for pouring screed over a heated floor, you must use a special mixture designed for these tasks. Since a regular cement screed will crack under the influence of high temperatures.
Thermal insulation of the loggia floor with penoplex under the screed is sometimes carried out with reinforcement. To do this, after pouring the first layer 2–5 cm thick along the beacons, a reinforcing mesh is installed. Then the final screed is made with a thickness of 4 cm. After the material has completely hardened, the finishing coating is laid on the floor of the loggia.
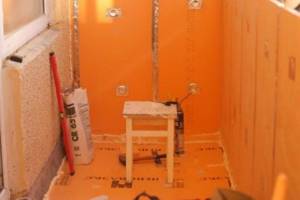
Insulation technology from the inside
When the loggia is completely cleaned and prepared, insulation work begins.
First, all the gaps, chipped places and cracks are filled with polyurethane foam. The foam hardens within a day and can be processed with a knife, creating smooth corners and surfaces. Next, you can start insulating the floor. A leveled concrete screed must be made on the loggia floor before laying the EPS slabs. By adding expanded clay to the screed, additional insulation is obtained, and foam sheets can be taken in smaller sizes in thickness. Sometimes under the slabs they do not make lathing on the floor, but lay the slabs directly on the screed using liquid nails. In this case, it is advisable to use slabs with a tongue-and-groove connection. But if you install a grate, it will be easier to attach both the slabs and other floor parts.
Possible cracks and joints are filled with foam. The slabs can be covered with penofol, and the joints can be taped with reinforced tape. Boards, plywood or chipboards (20 mm) are laid on top of the foam foam, and the finishing is placed on top.
Screed for insulating a loggia
We attach the loggia to the room and insulate it. The builder proposes to insulate the floor using the following technology: the bottom layer is polystyrene foam, on top of it is a concrete screed, and on top of that is a substrate or laminate. All articles about insulating loggias suggest placing wooden logs in the resulting penoplex cells, plywood on top, then laminate. Builder for concrete, because the wood will rot and the floor will begin to creak, etc. It’s not very clear why penoplex should be filled with screed - the concrete is always cold, and the penoplex underneath seems like a waste of money. Please advise how to insulate the floor on the loggia so that it is warm (but without a heated floor) and durable. Thank you!
A floor with joists and plywood is cheap and quick, but with concrete you need to tinker. But don’t forget, no matter how tightly the boards and plywood are fitted, gaps will still remain. This becomes the primary cause of the feeling of unpleasant coldness in the legs, and no amount of insulation will correct this situation. Also, do not forget about squeaks, this is a disease of any wooden floor. There are no such problems with concrete or cement-sand floors. So choose: either cheap and fast, or long and expensive. And as has already been correctly noted here, without additional heating, even the best insulated floor will not save you. Yes. and also about the insulation material itself: choose not the one that is cheaper, but the one with a lower thermal conductivity coefficient, combinations are possible.
make the floor on joists without concrete. It will be easier this way - there will be no fuss with concrete and water. everything is reliable - this floor will be enough for your lifetime (((
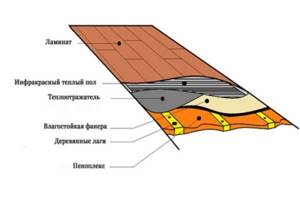
Place a foiled reflector on the floor, which reflects the heat into the room. On top are wooden beams-logs, in the resulting foam cells on the beam on top of an OSB board, a new special substrate for the laminate and laminate on top. It will be warm and forever.
How will you heat the loggia? An example is a loggia we insulated in P-44: the window sill is 50mm penoplex + 10mm foil penofol + 70mm foam block. Floor: penoplex 5mm + penofol 10mm (with a turn on the walls) + reinforced mesh + screed 40mm + el. heated floor + porcelain stoneware (or infrared heated floor + laminate). Two electric lights were installed under the windows. radiator Noirot 750W. So, in the most severe frosts, the customer only used heated floors and did not turn on the radiators. The loggia was part of the room, that is, without glazing. It is also possible to insulate the floor using logs. The penoplex manufacturer himself considers both the screed and the joists in his recommendations for insulating loggias.
Hello, Ksenia! Better are insulated logs and moisture-resistant plywood than concrete. As an alternative, dry screed, using Knauf technology, expanded clay serves as both heat and sound insulation!
With any insulation, there will be no heat on your loggia without a heat source. Your room increases by at least 14 cubic meters, plus increased heat loss from possible errors in insulation and from a large glazing area. The power of the old radiator will not be enough. Excluding exotic ones, in your case there are three options: 1. installation of an additional radiator from the heating pipes closer to the glazing (or at least replacing the old radiator with a new additional 3-4 sections) 2. Electric convector (you only need a socket). 3 Electric heated floor in screed. The first option is preferable, it’s expensive, but you won’t ask for new money. My recommendations for the screed (depending on the heat source): when choosing the 1st and 2nd options, the best subfloor is plywood over the joists, if you choose electric. warm floor - then trust the design from your builder (if you add foil insulation and a heating cable). A screed made of sand concrete and penoplex will retain comfortable warmth for a long time, is durable, does not creak and is not afraid of flooding.
Foreign enemies put email. “warm floor” (mats and cable) and in wooden logs. There are also film heaters. floors. Very good under laminate or board...
A floor with joists and plywood is cheap and quick, but with concrete you need to tinker. But don’t forget, no matter how tightly the boards and plywood are fitted, gaps will still remain. This becomes the primary cause of the feeling of unpleasant coldness in the legs, and no amount of insulation will correct this situation. Also, do not forget about squeaks, this is a disease of any wooden floor. There are no such problems with concrete or cement-sand floors. So choose: either cheap and fast, or long and expensive. And as has already been correctly noted here, without additional heating, even the best insulated floor will not save you. Yes. and also about the insulation material itself: choose not the one that is cheaper, but the one with a lower thermal conductivity coefficient, combinations are possible.
It seems to me that you are wrong, Comrade. Try warming up the concrete to the neighbor below. And don’t spare the creaks, the nonsense, the screws.
Just so as not to warm up the entire thickness of the concrete to the neighbor below (especially since it is possible that he will not connect the loggia to the room and it will be cold), a layer of penoplex is placed. In the cold winter, take a piece of penoplex and sit on it, after a minute it feels like your ass is being warmed with something. No heat will pass through even a 3cm layer of foam.
You are quite rightly advised to wait half a year for penoplex under the screed. Then you can use any topcoat, but I would recommend tiles with an electric heated floor underneath. It will turn out beautiful and warm. I still don’t understand those who say that concrete screed is time-consuming and expensive. A bag of cement 200-250 rubles, sand 50-60 rubles. If the area is about 6 sq. m with a layer 50 mm thick, 0.6 cubic m of DSP will be required. This is approximately 5-6 bags of cement and 15-18 bags of sand i.e. The material will cost a maximum of 4-5 thousand rubles. with delivery and reinforced mesh. For those who are going to combine a loggia with a room, I think this is not a critical expense. In terms of time, tiles can be glued to the screed after 5 days.
builder rights Penoplex from 5 cm and thicker. Next is a screed and preferably a warm floor. If there is condensation, replace boards and joists after 2 years.
Insulating the balcony floor: preparation, recommendations, options for insulating materials
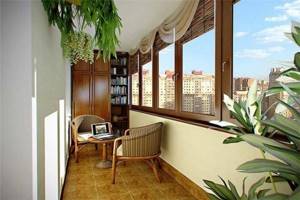
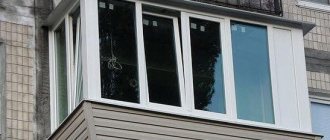
Many apartments are not very spacious and therefore all residents always look at the balcony as a possible additional room in which they can make their own office or accommodate children. Of course, to achieve this goal, you need to glaze the loggia, and also take care of its thermal insulation properties. After all, living or being in the cold is not only unpleasant, but also bad for health. Insulating a balcony is a very important process, and this article will tell you about its features. More precisely, she will tell you how to insulate the floor on the balcony.
Preparing for floor insulation
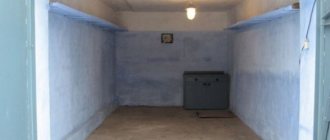
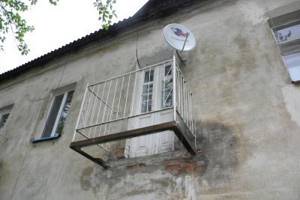
From the very beginning, apartment owners need to check the suitability of the loggia for installing an additional room on it. It is worth understanding that these elements of the house are constantly under the influence of all atmospheric phenomena. If a balcony has been open for many years, it may become unusable or partially damaged. It is clear that in such a situation, insulating a balcony without repairing it can turn into a waste of money.
Therefore, the right step is to first assess the condition of the loggia.
This is best done with the help of specialists from the management company. Its employees can also share information about the maximum permissible load. When the condition of the balcony is not very good, it is repaired. Specialists from the management company can provide advice on this process. If everything is in order with the loggia, then you can start insulating them yourself.
First they insulate the walls, then they take on the floor.
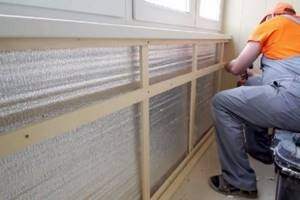
Insulate the walls
You should not think that insulating the floor on the balcony alone is sufficient. In this case, the walls will allow cold to pass through, and the desired microclimate will not be achieved.
Also, before starting a process such as insulating the floor on the loggia, the foundation is prepared. This is done in the following sequence:
- Removing old flooring (if there is one, of course). Only the concrete base should remain.
- Working out every crack. The fallen cement is removed.
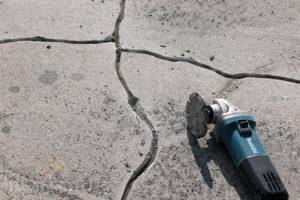
Working out every crack
- Surface cleaning. It is better to clean it using a vacuum cleaner. You can wash it, but then you need to wait for the surface to dry completely.
- The cracks are covered with a primer and filled with cement mortar. It is also used to fill joints formed by concrete slabs.

Fill with cement mortar
- Waiting for the solution to dry completely.
- Organization of waterproofing.
Insulate the floor on the loggia
You should not resort to this approach, since the screed weighs a lot and creates a strong load on the balcony itself.
Therefore, when determining how to make a floor on a balcony and insulate it, all people reject the option with a screed.
The joists raise the floor level.
Experts note that this level should not exceed the floor level in the apartment rooms.
It should be made the same or less. Depending on this rule, thermal insulation material is selected. The thinnest floor on the loggia can be made using penofol, which is always used with penoplex.
Insulating the loggia alone to create the desired temperature in winter is not enough. To do this, you need to organize heating. It can be made by anyone. The exception is centralized. It is prohibited to take him out into the loggia. Most often, electric radiators are used or they create a warm floor on the balcony.
Extruded polystyrene foam: advantages
Of course, polystyrene foam can also be used to insulate a balcony. Literally until recently this was the most popular solution. But extruded polystyrene foam, which is a new generation material, surpasses it in characteristics. It has the following advantages:
- Durability, which is associated with the integral structure and increased mechanical strength of the material. Its service life can reach 50 years.
- Resistance to temperature changes. Expanded polystyrene can withstand temperatures from minus 50 to plus 75 degrees.
- Resistant to harsh winter conditions.
- Resistance to rotting and environmental safety.
- Easy to install.
- Low thermal conductivity.
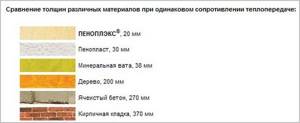
- Thickness 20 millimeters (compared to 30 mm foam and 40 mm mineral wool).
- Affordable price if calculated correctly.
- Limited liquid absorption (up to 10 days) while maintaining the integrity of the top layer.
Expert opinion
Konstantin Alexandrovich
Along with obvious advantages, extruded polystyrene foam for balcony insulation also has some disadvantages. These include flammability, which is combined with the ability to self-extinguish.
Insulation can deteriorate when it comes into contact with a number of complex hydrocarbons, such as paint thinners, polyvinyl chloride, coal tar, and also under the influence of ultraviolet radiation.
However, these disadvantages are offset by the use of special glue and the exclusion of the use of PVC-containing materials for finishing. Knowing the characteristics of the materials, we can approach the issue of direct insulation of the balcony with polystyrene. Instructions with clear recommendations on how you can do it yourself will help with this.
Insulation materials
People are often concerned with the question of how to insulate the floor on the balcony? For this process they can use:
The first option is very common due to its low cost. It is produced in sheets, the thickness of which ranges from 2 to 10 centimeters. Since the balcony is a cold room, from below which there is often only cold air, it is better to use sheets with a thickness of 10 cm.
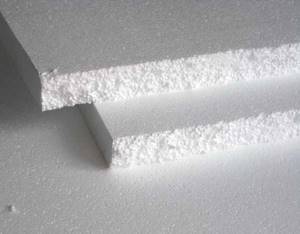
Styrofoam
Many people insulate their balcony floors with penoplex. This material is also called foamed polystyrene. In addition to the fact that it is endowed with excellent thermal insulation ability, it also allows very little steam to pass through, and is lightweight and easy to use. For insulation, you can use 2-3-5 cm thick penoplex.
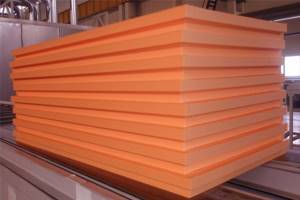
Penoplex
Mineral wool is also a commonly used material. It is produced in the form of mats or in roll form. In both cases, the thickness is 50-100 millimeters. It does not burn, but can absorb moisture. Moisture does not destroy it, but deteriorates its thermal insulation properties. Therefore, waterproofing is mandatory. During installation, it cannot be compacted, since the air placed between the fibers will escape and thermal conductivity will increase. It will be colder.
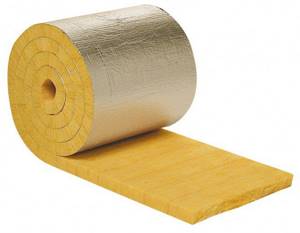
Mineral wool
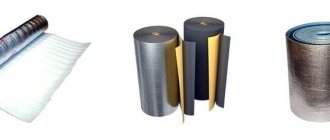
Penofol is a material that allows you to insulate a loggia with your own hands very well. It is a combination of polyethylene foam and aluminum foil. This composition also allows it to retain moisture and sounds. The foil can be on one or both sides.
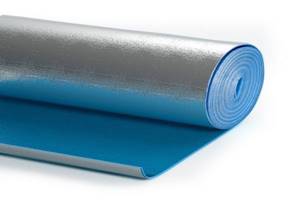
Penofol
The thickness of this insulation is 3-10 millimeters. It is produced in rolls. To connect the two strips you need to use aluminum tape. According to technology, this material must be used together with penoplex.
Use penofol together with penoplex
Expanded clay is not the best option. Its ability to retain heat is worse than that of polystyrene foam. In addition, for it to become a reliable heat insulator, you need to pour a sufficiently thick layer. Which is not very undesirable.

Expanded clay
Insulation using expanded clay
Expanded clay is a porous granule of clay rock. It is these air pores that help retain heat inside the floor. Expanded clay stones do not burn in fire and do not sink in water. Therefore, it is the most fire-resistant and safe material.
Expanded clay is small clay pebbles
As insulation, it is effective only with a layer of 10-15 cm. This means that the floor will have to be raised by that much. This is a minus.
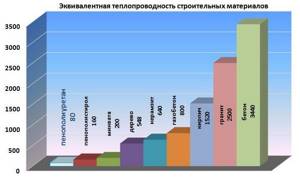
But there are more advantages. This material has good thermal insulation properties. For example, 10 cm of expanded clay is comparable in thermal conductivity to 1 m thick brickwork. Expanded clay is also light and durable. Non-toxic and retains its properties for many years.
Floor installation on joists
The logs are placed on an exposed layer of waterproofing and a layer of penofol (if used). Penofol is laid in two layers. After installation is completed, each layer around the entire perimeter of the balcony is treated with foam.
Next, measure the width of the balcony. Then they take the beams and cut them. The cross-sectional size of the beams is selected depending on the thickness of the heat-insulating material. The latter should hide between the lags or be equal to them.
The outermost logs should lie near the walls. The distance between the block and the wall is at least 5 cm. A distance of 50 cm should be maintained between all other bars.
It is worth laying out logs using a level.
For what? To reduce the hassle of leveling the subfloor. In the right places, wooden dies are placed under the block.
Screws are used for fixation. Four is enough. The last screws are placed so that there is 7-10 cm between them and the end of the bar. After fixing the lag, heat-insulating material is placed. Its sheets should fit tightly between the bars. If insulation with penoplex or other material is accompanied by the formation of cracks, then this defect is filled with foam. You should lay a vapor barrier membrane on top of the insulation yourself.
Then cross beams are nailed on top (placed along the length of the balcony) and sheets of chipboard or plywood are attached to them.
Afterwards the flooring is installed. It is worth saying that this is one of the options for how to insulate the floor on the balcony. There are many of them and everyone decides what to choose.
Compare with foam plastic
The question is quite reasonable: why buy expensive polystyrene foam, if you can buy cheap polystyrene foam - it is produced in the form of mats of the same thickness and size. But it's not that simple. These two insulation materials have significant differences, and polystyrene foam is inferior to expanded polystyrene in many respects:
- In terms of strength with the same thickness and density, it has been experimentally proven that penoplex is 4 times stronger than polystyrene foam, which is why it is used even in road construction.
- Due to its low density and special structure, foam is susceptible to crumbling.
- The degree of water absorption of polystyrene foam is 10 times higher than that of expanded polystyrene. It follows that penoplex can be used without vapor barrier.
- The density of penoplex is much higher than that of polystyrene foam.
- The thermal conductivity of penoplex is not much, but it is superior to polystyrene foam.
- The flammability of penoplex is lower.
Polystyrene foam is laid on a sand bedding
A special method for producing extruded polystyrene foam makes it possible to obtain a material with closed pores, so this material is definitely better than polystyrene foam.
Polystyrene foam in the body of the screed when pouring stairs
Warm floor
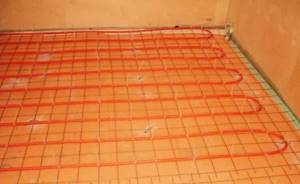
It is advisable to organize cable or film heated floors on the balcony. Water heated floors are not a good option because they are quite heavy.
Before organizing such a heating system, you always need to insulate the floor with penoplex or other material. If the heated floor on the balcony is cable, then cover the layer of thermal insulation with penofol. The side with aluminum is placed up. It will reflect the heat created by the cable.
To fix the heating element, use mounting tape.
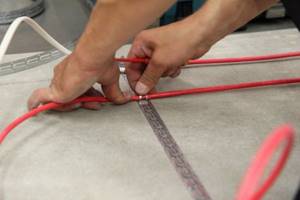
Fix the heating element
It is installed every 0.5 meters. Thanks to it, the cable is laid out, observing the required step. The tape is fixed with screws. It is best to place it above the bars.
Next, insert a temperature sensor 50 centimeters between the wires and fill in a 5-mm screed. After it dries, install the finishing coat yourself.
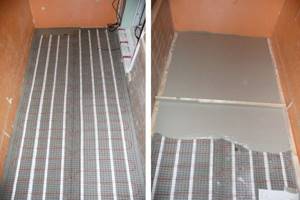
Fill the screed
A film heated floor on the balcony can help avoid screeding. It is better to install it on top of a base insulated with penoplex and covered with a subfloor. On top of the plywood they put a heat-reflecting material with their own hands - metallized lavsan. Material containing aluminum foil is prohibited. Lavsan is secured with tape.
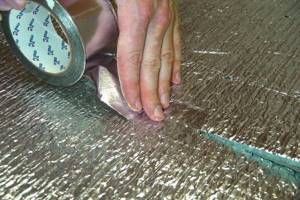
Lavsan is secured with tape
Then lay out the heating film so that the copper strips are at the bottom.
Next, fix it with tape or dowels. You can use staples. The last two elements must intersect the panel in special places. They should do this at a distance of 6 millimeters from conductive parts. Thanks to this, the warm floor on the balcony will be safe.
The terminals with wires are fixed in the film, then a temperature sensor is placed and everything is connected to the thermostat.
Next, either laminate or plywood is placed on the film (needed for laying tiles).
Insulation of balconies and loggias
general information
Insulating a balcony/loggia allows you to get rid of drafts and dampness, as well as expand the usable area of the apartment. To create effective thermal insulation, it is important not only to use high-quality window blocks, but also to insulate the walls, floor and ceiling of the loggia or balcony. The modern environmentally friendly material PENOPLEX COMFORT ® is perfect for this purpose. With the help of PENOPLEX ® slabs, anyone can insulate a loggia with their own hands. This material, unlike cotton insulation, does not require respiratory and skin protection. The use of PENOPLEX ® thermal insulation in an apartment is absolutely safe, this is confirmed by the expert opinion of the sanitary and epidemiological examination.
- High compressive strength;
- Low thermal conductivity;
- Zero water absorption;
- Environmental friendliness;
- Ease and simplicity of installation;
- Low vapor permeability, which is very important for internal insulation.
Scheme 1 - insulating a balcony with Penoplex
- Loggia wall;
- Balcony insulation PENOPLEX COMFORT ®;
- Sheet material;
- Lathing;
- Fastening element;
- Loggia floor.
How to insulate a loggia or balcony with your own hands.
- Insulation of the loggia combined with the interior of the apartment;
- Insulation of a non-combined loggia.
Thermal insulation of a loggia combined with the interior of the apartment
When combining a loggia and a room inside an apartment (for example, a kitchen), the question arises: is it necessary to insulate the walls, floor and ceiling of the loggia, and if so, how to do it. We will try to answer these and other equally interesting questions. So, why insulate the loggia? The existing walls, floor and ceiling of the loggia were not designed for indoor operation and, accordingly, maximum heat conservation. Becoming part of the interior space, the loggia walls no longer meet the requirements of both the old SNiP II-3-79* and the new SP 50.13330.2012 “Thermal protection of buildings” for such a parameter as heat transfer resistance. That is, in winter it will be cold in this room, so condensation and mold may appear on the outer wall of the balcony. Insulating the loggia with PENOPLEX ® will help avoid the negative effects listed above, and will also ensure a comfortable indoor air temperature at any time of the year. Thermal insulation of windows is recommended using polyurethane foam PENOPLEX ® FASTFIX ® - another effective material produced by.
Thermal insulation of loggias and balconies is one of the most popular ways of using PENOPLEX ® slabs in apartments of multi-storey residential buildings.
To insulate a loggia/balcony with your own hands, you will need the following building materials:
- Thermal insulation PENOPLEX ® (the required thickness for a combined loggia is 40-60 mm). The thickness can be calculated using a "calculator". However, it is important to remember that he makes calculations based on the requirements of the new SNiP, and they are increased by 3 times compared to houses built before 1995;
- Moisture-resistant plasterboard (GKL) or gypsum fiber (GVL) sheets;
- When creating a screed on PENOPLEX ® slabs, it is necessary to use a cement-sand mixture with reinforcing mesh; for a “dry” coating - two layers of board materials, such as gypsum fiber board, fiber board, OSB or plywood, overlapping the joints;
- Vapor barrier layer - foil polyethylene film or thin (3 mm) foil polyethylene foam;
- Polyurethane adhesive PENOPLEX ® FASTFIX ® ;
- Waterproofing (if necessary);
- Self-tapping screws for fastening gypsum plasterboard and gypsum board sheets to the guides.

Instructions for insulating a balcony or loggia combined with the interior of an apartment
- Window blocks are installed and seams are sealed with polyurethane foam;
- PENOPLEX COMFORT ® slabs are attached with disc-shaped dowels with plastic cores to the surface of the side walls, façade walls, floors, and ceilings. Balcony insulation with PENOPLEX COMFORT® will save usable space due to a smaller layer of thermal insulation provided by the low thermal conductivity of the slabs. The absence of the need for lathing is another advantage of PENOPLEX COMFORT ® balcony insulation;
- The joints between structures are treated with polyurethane adhesive PENOPLEX ® FASTFIX ® ; when installing thermal insulation, the joints between PENOPLEX ® boards are glued with ordinary tape;
- We attach a vapor barrier or thin-layer thermal insulation material with a reflective coating. We use foil PE film or foil foamed PE 3 mm thick. We glue the vapor barrier to all insulated structures using polyurethane glue compatible with polystyrene or double-sided tape. The vapor barrier is placed at the joint, and the joint between the canvases and the structures is glued with metal tape. Create a “thermos effect”;
- We install the balcony floor. Following the step-by-step instructions for insulating the floor of a PENOPLEX ® loggia, installation of thermal insulation can be done on the following bases:
- DSP screed (thickness 4 cm). It is necessary to leave a temperature gap of 1 cm between the vertical wall and the screed. To install it, it is enough to install a 1 cm thick strip of foamed PE around the perimeter before pouring the screed. After the screed has hardened, ceramic tiles are laid on tile adhesive;
- DSP screed with electric or water heating - according to the technology of installing a heated floor system;
- Continuous flooring made of gypsum fiber sheets (gypsum fiber sheets) is installed in two layers with the obligatory overlap of joints.
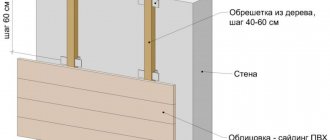
- The sheathing on the walls, ceiling and parapet is made of dry wooden beams (treated with antiseptic) and set at vertical and horizontal levels. It is attached directly to the concrete using dowels and screws. The beam can be 40x20mm in size;
- The finishing trim is attached to the sheathing. Usually these are plastic panels 25 cm wide or moisture-resistant plasterboard. In the case of using drywall, additional finishing work is required, namely: priming, puttying, corner processing, leveling, wallpapering or painting;
- Electric heaters, lighting, etc. can be installed on the loggia. Installation of electrical wiring is carried out before installing interior finishing materials.
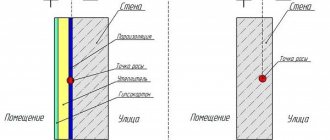
- For internal insulation, a vapor barrier is installed on the cold side of the insulation (between the insulation and the wall). This is incorrect and leads to the formation of condensed moisture on the vapor barrier.
- Wooden guides are mounted in the thickness of PENOPLEX ® slabs. This leads to the formation of cold bridges, because The main layer of thermal insulation is torn.
- A metal frame is used, installed in the body of PENOPLEX ® boards. This leads to the formation of cold bridges and may cause condensation to appear on the metal surfaces of the profile.
- Various types of mineral wool are used without ensuring their proper operation, which leads to the mineral wool getting wet and the destruction of the interior finishing, followed by a complete replacement of the insulation system.
Do-it-yourself insulation of a non-combined loggia
The insulation of an ordinary, non-combined loggia differs only in the thickness of the insulation and the exterior finish. The required thickness of PENOPLEX ® slabs for a non-combined loggia is 20-40 mm.
After insulating the walls with PENOPLEX ® slabs, we recommend plastering the loggia using specialized plasters for expanded polystyrene.
You can buy PENOPLEX ® balcony insulation in Moscow, St. Petersburg, Novosibirsk, Khabarovsk, Perm and other Russian cities. Find your nearest point of sale in the "Where to Buy" section.
Why penoplex
Penoplex, also known as extruded polystyrene foam, is best suited for insulating a balcony.
If we talk about its thermal insulation properties, then it is slightly better than its “closest relative” expanded polystyrene (in everyday life - polystyrene foam), and is much superior to another popular insulation - mineral wool. For comparison, in order to achieve the same effect, the thickness of the layer of rigid façade stone wool should be almost twice that of EPS. The only competitor is polyurethane foam, but polyurethane foam loses in other respects.
When comparing the water absorption of insulation, EPS has no competitors at the household level. Extrusion manufacturing technology ensures a closed cell structure, and if a foam board is kept immersed in water for a day, it will absorb no more than 0.2% of moisture from its volume (and only “thanks to” damage to the shells of some of the cells of the upper layer). For ordinary polystyrene foam this figure is 2%.

Polyurethane foam (foam rubber) and mineral wool mats easily absorb water like a sponge. Sprayed polyurethane foam is very heterogeneous - only the industrial (two-component) composition has good performance, while single-component (household) aerosols after application form a layer with a mixed cell structure. And when any material is saturated with moisture, its thermal conductivity increases, that is, its thermal insulation properties deteriorate.
Penoplex has good “structural” strength and durability. It does not compress like mineral wool, and does not separate into granules like polystyrene foam. Inside the “pie” of the insulated structure, it can be attached with glue to thin-sheet shells and to each other, without using fixation to the fence with mechanical fasteners (dowels or self-tapping screws).
Rigid EPS boards can simply be inserted between the outer sheathing and the sheathing for interior finishing, and then blow foam over all joints and perimeter
And this is important for insulating a balcony, which differs from a loggia in that it does not have side walls and a parapet made of concrete or brick
Video: