The modern market of construction materials offers a significant range of different insulation materials, differing in degree of efficiency. One of the representatives of the new generation of heat insulators can be called penofol. With its help, you can easily insulate any surface in the house, be it the ceiling, walls or floor. Due to the fact that this material is produced using a special technology, it has high heat-saving qualities and other valuable characteristics.
Expert opinion
Konstantin Alexandrovich
A special production technology gives this material high thermal insulation properties and other characteristics. The article widely covers its main properties, discusses the scope of application, and describes in detail the process of floor insulation with penofol.
Advantages and disadvantages of penofol
The main advantages of the material:
- Low ability to conduct heat. The thermal conductivity index can vary between 0.039-0.051 W/(m*C).
- The vapor permeability level is 0.01 mg/(m*hour*Pa).
- The heat reflection rate can be over 97%.
- Excellent sound absorption performance.
- Penofol does not absorb moisture, the moisture absorption rate is less than 1%.
- At elevated temperatures, the material is not subject to melting (up to 1100 C).
- Differs in small sheet thickness.
- Durable, resistant to mechanical stress and has a long service life.
- Very easy to install.
- Has an affordable price.
The density of penofol can vary from 25 kg/m³ to 50 kg/m³. If penofol is used in combination with other types of insulation, its effectiveness increases significantly.
Disadvantages of a heat insulator:
- Insufficient level of rigidity. It is not possible to paste wallpaper or paint it on top of insulation boards.
- When fixing penofol, it is necessary to provide protection for the electrical wiring and you will need to beware of breakdowns.
- Low level of adhesion. In order to obtain reliable adhesion to the insulated surface, you will need to use a special adhesive mixture or use dowel-nail fastening.
Laying slab material
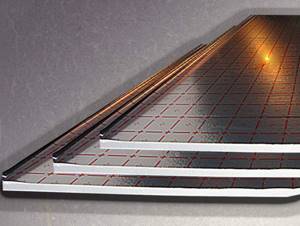
Reflective thermal insulation in slabs
Reflective thermal insulation in slabs is installed primarily under heated floors, although it can also be used as regular insulation. With foil mats, make a floating screed and lay them between the joists.
Floating screed
Step 1. The concrete surface of the floor slabs is leveled using putty and grinding. Clean from dust.
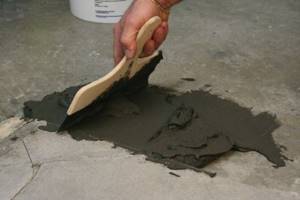
Repairing defects
Step 2. Using a level gauge, mark the screed pouring line on the walls.
Step 3. A damper tape is attached to the walls around the perimeter of the room and the base is primed.
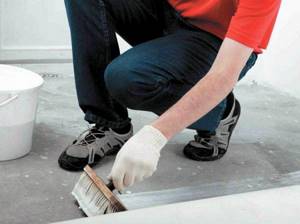
Applying primer
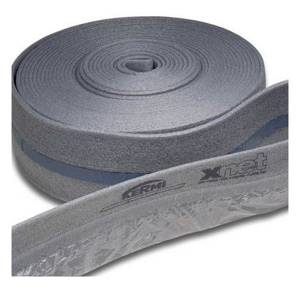
Kermi damper tapes
Step 4. Plates are taken with a metallized coating, since aluminum is corroded by cement. Glue is applied pointwise to the base of the mats, after which the insulation is laid on the floor with the reflective layer facing up. When laying insulation, carefully adjust the joints so that gaps do not form.
Step 5. The joints are taped, and then the heat-insulating layer is filled with screed mortar. Level the mixture with a wide spatula or rule and leave until dry. After this, you can lay the finishing coating.
Video - Laying foil mats
Insulation by joists
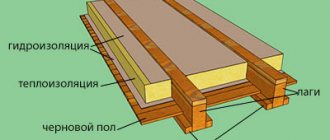
Step 1. Remove the floor covering, clear the base of debris, check the integrity of the joists, and, if necessary, repair damaged elements.
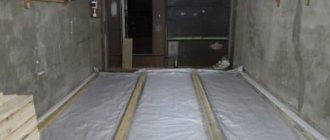
Step 2. Place waterproofing material on top of the joists and secure it with a stapler on the inside of the beams, spreading the film well on the floor. The edges of the canvases are overlapped by 10-15 cm.
Step 3. The space between the logs is filled with foil plates, laying them in one or two layers. The slabs of the second layer must overlap the seams of the lower layer. A gap of 1.5-2 cm is left between the reflective coating and the upper edge of the logs. If it is not possible to leave a gap, a sheathing of 20x40 mm slats is placed on top of the logs.
Foil basalt mats
Foil basalt mats
Step 4. Further actions depend on the type of flooring. If it is linoleum or laminate, the rough base is covered with sheet material - plywood, chipboard, OSB. If the floor is made of boards, they are placed directly on the joists.
Table of the main properties of foil thermal insulators
| Name | Properties | Thermal conductivity | Where is it used? |
| Izolon | Elastic material, lightweight, waterproof and durable | 0.040 W/mK | As a substrate for laminate and linoleum, mounted under heated floors |
| Penofol | Flexible, thin material, environmentally friendly, waterproof | 0.037-0.049 W/mK | Can be used as a vapor barrier for conventional thermal insulation materials |
| Izover | Non-flammable, dense heat-insulating material | 0.041 W/mK | For insulation of concrete and wooden surfaces |
| Rockwool | Durable, non-flammable material, resistant to deformation | 0.39 W/mK | Insulation of floors on joists, heat and sound insulation of walls and ceilings |
| Foiled polystyrene foam | Resistant to temperature changes, durable | 0.037-0.041 W/mK | For insulating a warm water floor, insulating a floating screed |
Is it possible to insulate a floor using penofol as the only insulation?
Due to its high thermal insulation qualities, this material is well compatible with any type of screed. If you do not have the opportunity to use other types of materials for floor insulation, you can use penofol without the risk of getting low-quality thermal insulation.
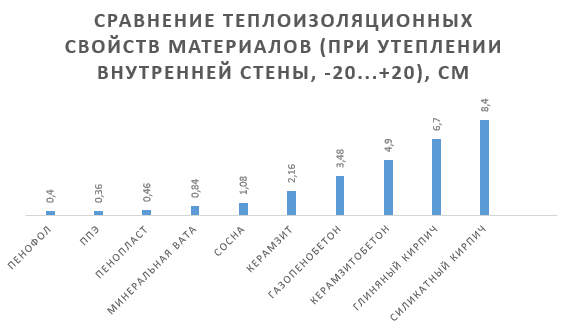
When creating the same environmental conditions, the heat saving coefficient of grade B penofol, having a thickness of 4 mm, will be comparable to:
- masonry of clay bricks 2.5 bricks thick;
- silicate brick masonry 3.5 bricks thick;
- 38.4 centimeters of aerated concrete;
- 49 centimeters of expanded clay concrete;
- 6.7 centimeters of stone wool;
- 4.6 centimeters of polystyrene foam.
Using material with foil
Installing foil under a heated floor is quite simple. With a 99% probability, even a novice builder will not encounter any difficulties or difficulties here. In order to lay this material on the subfloor, you will need scissors or a stationery knife, a tape measure, aluminum tape, and the heat-insulating material itself (for example, polyethylene foam).
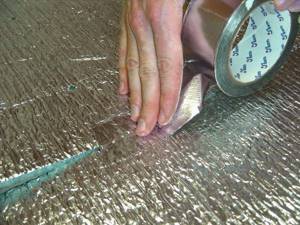
Let's start installation
The following table will help you navigate the entire installation technique.
Table. Technology for laying foil under heated floors.
| Steps, photo | Description of actions |
However, it is worth remembering that the foil underlay must be laid on a thoroughly dried subfloor if it has been leveled and filled with building mixture. Then the work on installing thermal insulation is carried out, and then the selected underfloor heating system is installed according to the diagram and certain requirements. After this, again, depending on the requirements, it is either filled with a cement mixture or simply covered with a finishing coating.
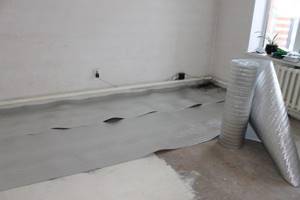
The underlay must be laid on a carefully prepared subfloor
Video - Laying rolled foil backing
It is necessary to lay insulation when installing a heated floor, especially if the floors are installed in a private house or laid in an apartment on the ground floor. And when using foil materials, the heating efficiency will be significantly increased. Therefore, you should not skimp on this subtle, but so important addition.
Anton Svistunov chief editor
Author of publication 05/24/2017
Did you like the article? Save so you don't lose!
The modern market of construction materials offers a significant range of different insulation materials, differing in degree of efficiency. One of the representatives of the new generation of heat insulators can be called penofol. With its help, you can easily insulate any surface in the house, be it the ceiling, walls or floor. Due to the fact that this material is produced using a special technology, it has high heat-saving qualities and other valuable characteristics.
Main characteristics of insulation
There are several types of penofol available for sale:
- Class A. Has a foil surface on one side. Can be used for thermal insulation of wall surfaces, floor coverings, and insulation of communications.
- Class B. Foiling is done on both sides of the material. Area of application: thermal insulation of partitions between rooms and ceilings between floors.
- Class C. Has foil on one side only. The other is coated with a self-adhesive compound and film, which protects the material from sticking together inside the roll.
- Super class - NET. It is used for insulation of communication networks, pipelines, production equipment, and also as a sound insulator in automotive production.
- ALP class. A thin film of polyethylene is applied to the surface. It is used mainly in agriculture for the purpose of thermal insulation of commercial buildings.
- Class M - R. One of the sides contains foil, the other is distinguished by its relief.
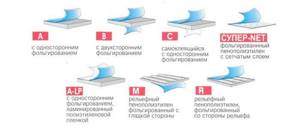
The most common types of penofol are types A, B and C. They are also most often used for floor insulation.
- These varieties have approximately equal operating temperature ranges, ranging from -60 to +100 degrees Celsius.
- Thermal reflectance ranges from 95 to 97%.
- The mass of one cubic meter of type A penofol is 44 kg. B - 54 kg, C - 74 kg.
- The level of moisture resistance when the material is soaked in water is 0.7% for type A, 0.6% for type B and 0.35% for type C.
- The vapor permeability index of all varieties is no more than 0.001 mg/mchPa.
Types of foil penofol
There are six main types of foil penofol: type A, type B, type C, type M, type R, type ALP.
- Type A. Available in thicknesses of 3, 4, 5, 8 and 10 mm with one-sided foil. The width of the sheets is 1200 mm, length from one and a half to three meters. It is used as thermal insulation together with other insulation materials, as well as for insulation of engineering systems: pipes, hot and cold, sewer risers and sound insulation.
- Type B. Double-sided foil, all other parameters in size and thickness are the same as type A. Used as additional and independent thermal insulation of partitions, loggias, interfloor ceilings and attics.
- Type C. Self-adhesive foil foam with a one-sided metal layer. The width of the sheets is 600 mm, the length and thickness are the same as types A and B. Used for insulation in hard-to-reach places when the use of fasteners is difficult.
- Type M. Penofol has a corrugated convex surface on the side opposite to that which is metallized. This is used where it is necessary to create an air layer between this insulator and the surface of the base, for example, when insulating loggias. It matters in which direction the ribs go - it is advisable to lay the material so that they run vertically, then ventilation will be provided.
- Type R. The same thing, only now the corrugated bulges come from the foil side. It is much better to provide clearance using additional slats or other gaskets, but if this is not possible, then use penofol of this type or M.
- LSA type. The metal layer is laminated with polyethylene film, therefore it has increased corrosion resistance, as well as good dielectric properties. However, this does not eliminate the need to lay the cable along it in a corrugation. Used for underfloor heating systems.
Scope of application of penofol
Even when used in a private home, this material can be used quite widely. Let's study the list of main directions.
Insulating a wooden floor with your own hands
Penofol is quite often used for insulating floors in wooden buildings. The process is as simple as possible, and it is quite possible to do it yourself. You just need to strictly follow a simple algorithm:
- Dismantle the old plank floor covering and lay penofol in the space between the joists in several layers. Each layer should be laid with the foil side inside the room. After this, you can mount the old boards in place or lay down the plywood sheets.
- In another case, you can lay the insulation directly on top of the wooden base. Then the insulation is laid in one layer, the material fragments are placed end to end. The seams are sealed using aluminum-based tape. Plywood is laid on top of the equipped thermal insulation layer. It is attached to the wooden base of the floor with self-tapping screws.
Penofol laying technology for heated floors
For effective insulation, tandem, penofol and heated floors are perfect.
In this case, penofol is laid with polyethylene foam down. Afterwards, heating elements are installed on the foil side and logs for the floor covering are laid between them.
If you plan to screed the heated floor and install tiles, then ALP type penofol is suitable. After installing the insulation, heating elements are laid on it, then reinforcing mesh, after which you can begin screeding. After complete drying, the protruding edges must be trimmed. The next step is to turn on the heating elements for a few days to improve the drying process. After the floor has dried, you can begin the process of installing the decorative covering.
Types of insulation and necessary tools
The advantages of an insulated floor are quite obvious. First of all, your feet will always be warm, which will not lead to a runny nose. Uniform distribution of warm air throughout the room will avoid drafts. You can approach the floor heating process in different ways.
These include:
- electric floor heating;
- heating with water;
- insulation using insulating materials (mineral wool, glass, basalt fiber, etc.).
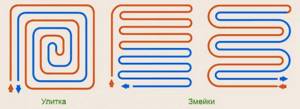
Scheme of methods for laying underfloor heating pipes.
In order to begin the process of repairing floors, you need to prepare for this matter. To do this you will need the following tools and materials:
- a hammer drill, which will be needed to remove old tiles and prepare the coating;
- a mixer or stirrer with an attachment for a hammer drill cartridge for preparing a solution for the screed;
- building level to determine the floor horizon;
- a voltmeter or tester, which will be needed to check electrical connections;
- polypropylene pipe with scissors, soldering iron and necessary accessories for preparing water heating;
- reinforcement mesh for screed preparation.
Substrate requirements
The main material for underfloor heating is polypropylene, foamed polyethylene. They are covered with lavsan film having a metallized layer. The latter serves for uniform heat distribution. All other components do not allow heat to escape to the floors below, but are completely transferred into the room to warm the air from the base of the floor.
The porous underfloor heating substrate has very high permissible temperatures, reaching up to 90 degrees. This allows heating elements to be laid directly on the film. All this indicates the excellent thermal and waterproofing qualities of the material. In addition, there are other qualities that the substrate has - sound insulation and a high degree of reflection.
Each element of the substrate for pouring the floor has a special marking resembling a grid. This facilitates quick and high-quality distribution of the heating cable of an electric heated floor over the surface, depending on the step that is selected.
The substrate allows you to save about 80-90% of thermal radiation. In this case, all energy costs are reduced to a minimum.
Use of foil thermal insulators
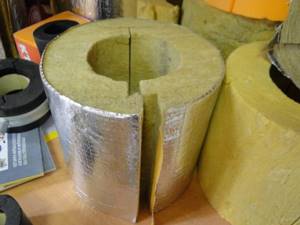
The use of such material depends on two criteria: the characteristics of the room in which the work will be carried out, and the properties of the insulation itself. It can be used to perform the following tasks:
- floor insulation;
- increasing heat transfer from batteries;
- insulation of pipe or air duct;
- insulation of individual areas of the room.
What does saving on insulation lead to?
For example, let's take a room with an area of 50 square meters.
Usually they use polystyrene foam with bosses, the cost is 1 sq. meter on average 600 rubles, thickness - 2 cm. In most cases, this thickness is not enough for insulation, with the exception of the southern regions. Additional insulation up to 4 cm will cost another 150 rubles per square meter. The total amount will be 7,500 rubles. Saving this amount is what we are talking about when choosing insulation. The owner of the house strives to cut costs and often chooses the cheapest option - underlayment for heated floors, instead of the insulation itself. Ultimately, the thrifty home owner heats the outdoors and spends even more money to maintain a comfortable indoor temperature.
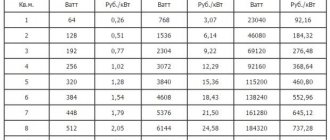
Calculation of the cost of water heated floors
We have two rooms in front of us:
- the first with normal, high-quality insulation of the required thickness;
- the second - with a substrate for a warm floor under insulation and a “thrifty” owner.
Heat flow upward
Heat flow down
Maximum floor temperature
In the first house, with 4 cm of insulation, the heat flow into the room exceeds the heat flow down three times. All the heat that the owner of the house pays for is used to heat the room, not the street! In the house of a “frugal” owner, the heat flow upward (to the room that needs to be heated) is almost equal to the heat flow downward (to the street, to nowhere). Forty watts per square meter go down the drain.
- On 1 square meter with underfloor heating we lose 40 W, on 50 square meters - 2000 W.
- 1 cubic meter of natural gas provides 10 kW of thermal power and costs 4.5 rubles (the price depends on the region, from 4 to 8 rubles).
- 10 00 W/2000 W = 5 hours – this is how much 1 cubic meter of natural gas is enough for heat loss.
- The boiler operates on average 12 hours a day. 12/5=2.4 cubic meters of gas are spent per day on heating the street.
- 2.4 (cubic meters) x 4.5 (rubles) x 30 (days) x 7 (months of the heating period) = 2,268 rubles per year.
Properties
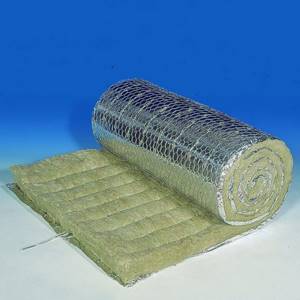
The materials used in production are most often environmentally friendly, safe for health and the environment.
Related article: Types of extensions to a house
Advantages:
- light weight;
- durability;
- resistance to loads;
- protection against moisture penetration;
- high rates of heat saving and sound insulation;
- resistance to temperature changes;
- ease of installation;
- high reflective properties.
Such insulation can be used in any premises. In addition to the described qualities, it is capable of reflecting radiation.
Do you need reflective foil for underfloor heating systems?
The most commonly used types of foil backing are polypropylene and polyethylene. But is such a layer needed when installing a heated floor, or is its necessity just an invention of marketers? So, the following fact speaks in favor of a thermal insulation substrate with a layer of foil - its use allows you to save about 90% of the heat emitted by a heated floor system. Thus, the amount of energy spent is significantly reduced. This alone is enough to recognize the need to use the material.
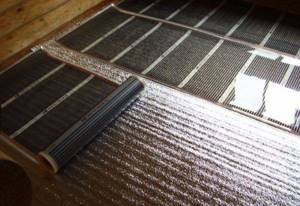
Thermal reflective underlay for heated floors
The foil backing has other advantages:
Insulation of concrete floor
Typically, a cold base must be insulated using an additional heat insulator.
This is done using the following technology:
- Preparatory stage. It is necessary to clean the surface from dust, then cover it with expanded clay. At the same time, you should dilute the cement laitance and pour it over the resulting layer. After this, you should wait 24 hours, during which time the solution will set and completely harden;
- Level the floor with a screed along the horizon line. Once again we clean the concrete, vacuum it, cover it with a primer;
- Lay out a roll of insulation on the surface and cut off the excess. If there is no sticky layer on the material, fix it with glue. Paying special attention to the edges, glue is applied to the matte side. Before gluing, give the product a couple of minutes to harden. Then place the cut on the concrete, iron and press to secure it completely;
- If the room area is large, lay the second piece here and connect the joints with aluminum tape;
- Place the slats around the room and secure them to the surface with dowels. Install the beams in a horizontal plane;
- Place another piece of material on top of the first, shiny side up;
- To complete the flooring, nail boards or plywood sheets to the joists. You can lay linoleum or laminate on top.
Instead of expanded clay, you can use polystyrene foam or expanded polystyrene with a thickness of 5-10 cm.
What insulation density should I choose?
This question often comes up during the construction of buildings; here you should rely on the standards provided for construction.
Up to 100 kg/m3
- Insulation materials with a density from 11 to 35 kg/m3. They have a low specific gravity, are lightweight types of insulation, and are also very elastic. Recommended for use on roofs and roofing.
- Insulation materials with a density from 35 to 75 kg/m3. It is used for insulating internal partitions, ceilings and walls of various shapes. It has found wide application for insulating the walls of frame houses.
- Insulation materials with a density from 75 to 100 kg/m3. This type of insulation is widely used for wrapping ventilation pipes, heating mains, and oil pipelines.
From 100 to 150 kg/m3
- Insulation materials with a density from 100 to 125 kg/m3. For facades, they must be ventilated or have siding.
- Insulation materials with a density from 125 to 150 kg/m3. It is used for insulating walls made of reinforced concrete, brick, as well as interfloor ceilings.
From 150
- Insulation materials with a density from 150 to 175 kg/m3. Used for cladding load-bearing structures.
- Insulation materials with a density from 175 to 225 kg/m3. Due to its characteristics, it is used under a screed or as a rough layer under the finishing floor covering. Such materials have increased combustion resistance.
