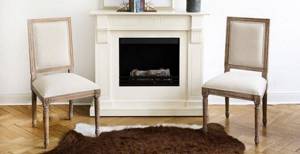
You can actively use false fireplaces as a decorative element for your apartment. They are designed to bring comfort into the home, create an aura of calm and homeliness around themselves. At the same time, such a design will certainly become the center of attention, the main accent of the room and the attraction of your interior.
There are plenty of options for making an artificial fireplace; you can choose a wooden, plasterboard, stone or even cardboard option, or you can install a fireplace made of polyurethane. In this article we will talk in detail about portals for fireplaces made of polyurethane, consider the intricacies of handling such a material, its advantages, and study the practice of creating false fireplaces from polyurethane with your own hands.
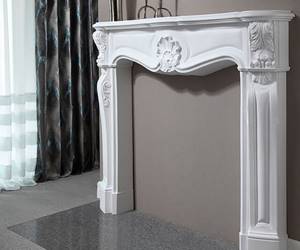
Original white false fireplace in the bedroom
No. 6. Tiles
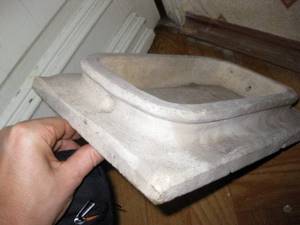
Tiles are, in fact, the same terracotta tiles or majolica. The difference lies in the special structure. The tiles have a rumpa, a square hollow projection that holds the tiles in place during installation. Rumpa is also important for another purpose - it helps to retain heat. Tiles can be used to decorate a fireplace only during its laying. If the moment is missed, you will have to choose another finishing method.
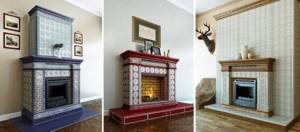
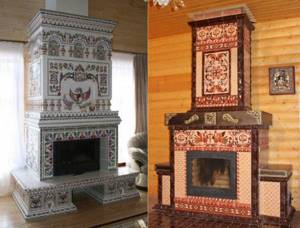
Tiles have the same advantages as tiles. The choice of colors is huge, there are very sophisticated samples that will bring special chic to the interior.
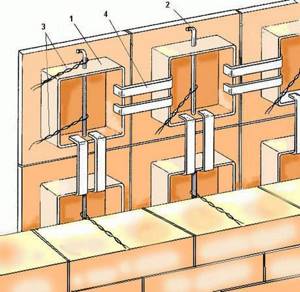
Installation of tiles is carried out in this way:
- The pump is filled ½ full with a mixture of clay and broken bricks, and the so-called crutch, thick (5 mm in diameter) wire with a bend at the top;
- a flexible soft wire is attached in the middle of the crutch, which will later be embedded in the brickwork;
- the pump is filled to the brim with clay mixture;
- As the laying progresses, the tiles are installed and the wire is hidden in the seam. The individual parts are connected to each other using U-shaped brackets.
It is difficult to do such installation yourself, which makes installing a fireplace a more expensive pleasure. In addition, the material itself is more expensive than regular tiles.
Portal fastening made of polyurethane
Sometimes a decorative portal for a fireplace made of polyurethane is mounted directly on the wall. However, they can also be mounted on a false fireplace made of plasterboard - a three-dimensional structure designed to make the imitation more reliable. In addition, you can hang an electric fireplace or an imitation flame in a deep plasterboard firebox.
To fix the portal and moldings for the fireplace, mounting adhesive is usually used, which is used to coat the back sides of all elements from the kit, after which the parts are tightly pressed to the glued base. Sometimes, in order to ensure a good fit to the surface, parts are screwed in with self-tapping screws, and their caps are recessed, puttied and painted over.
How to decorate an artificial fireplace
Until recently, decorative or real firewood was usually used to decorate false fireplaces. However, now designers are offering more and more original and bold solutions for decorating such a piece of furniture as an artificial fireplace.
Pinning Guide
To secure the polyurethane cladding, we recommend that you use the following step-by-step guide:
- According to the previously made diagram, transfer all the patterns with a pencil onto the surface of the frame and check the accuracy of the location;
- When using the mechanical method, for each part, first drill several holes to install self-tapping screws (from 2 or more, depending on the size of the pattern);
- Each corner element must be positioned correctly at the initial stage of work;
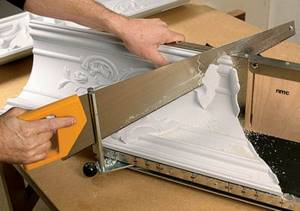
- All cuts are made using wort. Before fastening, check the accuracy of each angle and cut;
- Apply glue to the back surface of the stucco molding and level it with a spatula;
- After the first layer has partially dried, apply the second and also level it, after which we press the product tightly against the surface of the portal. We screw self-tapping screws into the pre-drilled niches;
Tip: if you plan to leave the screws after the glue has dried, try to screw them in as deeply and firmly as possible. Otherwise, on the contrary, try not to screw in the screws too much, for easier removal later.
- After finishing the cladding, it will take about a day for the structure to dry completely, after which all excess adhesive should be carefully removed. The holes drilled for self-tapping screws are puttied. The surface is primed and painted.
Attaching purchased decorative elements to a plasterboard frame with glue
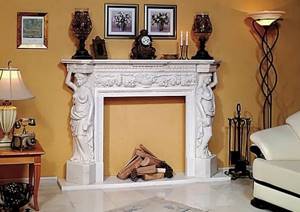
Cast portal made of polyurethane by a master
A polyurethane fireplace made in accordance with all the basic rules described in the article will be distinguished by its strength, efficiency and durability. Over time, you can freshen up its appearance by simply changing the paint color or adding additional finishes.
What should the fireplace lining be like?
Since there are many options for making a fireplace, it is difficult to name the ideal finishing material. It all depends on a lot of factors:
fireplace type. The material for a wood-burning fireplace should be selected as carefully as possible, taking into account the constantly exposed high temperature. If you decide to go with an imitation fireplace with candles or an electric version, then the finishing requirements will not be so strict;
fuel type. The combustion temperature of different types of fuel is different, which must be taken into account when analyzing the parameters of finishing materials
For example, if you are going to use firewood, then it is important that the lining can withstand temperatures of about 900C, but if we are talking about coal, then it is better to take a material that can withstand temperatures of about 1100C;
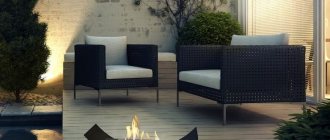
installation location. If you are going to install a fireplace on the terrace, it is important that the material has excellent frost resistance
If used in a heated room, such a requirement is not put forward. If the fireplace is located in a house where people visit it only occasionally, then pay attention to such a parameter as moisture resistance;
weight of material. A material that is too heavy (for example, natural stone) may require strengthening the foundation, which is only possible in a private house and when installed on the ground floor. If it comes to an apartment or the upper floors of a private house, then you should definitely consider what load the floors can withstand;
appearance. The purpose of cladding is to decorate the fireplace, so when choosing a material you should take into account its appearance and compliance with the chosen interior style and color scheme.
Choosing the style of stucco molding
In order for the frame with the hearth to look as harmonious as possible and fit best into the overall interior and design of the living room, we recommend that you familiarize yourself with the following features and criteria for choosing such a finish:
- Classic performance. Allows you to simulate a stone surface. Fireplaces made of stucco take on the most natural appearance and natural structure;
- Stucco molding in medieval style. Presented with large and textured elements and three-dimensional images;
- Antiquity and antiquity. Such decoration will give the installation a medieval design and mystery. The main technique of such execution is the aging of the surfaces of finishing materials.

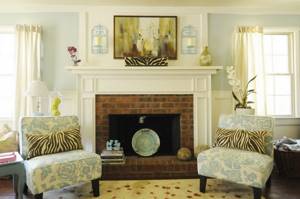
Decorating the fireplace shelf for the New Year and Christmas
Decorating the fireplace shelf for the New Year and Christmas
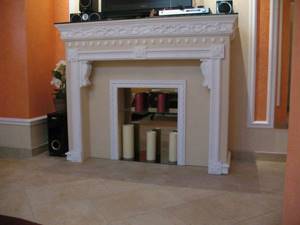
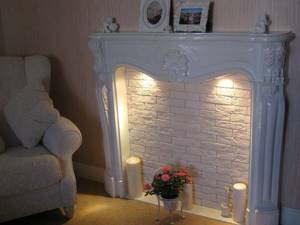
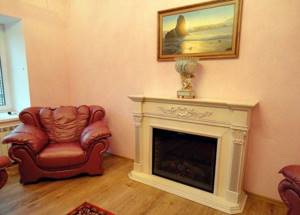
Massive portal in the classic design of a small living room
Massive portal in the classic design of a small living room
You can learn more about these trends and decoration features by watching the video in this article.
Classification of stucco
When choosing gypsum and other stucco molding, you must first carefully familiarize yourself with its classification and characteristic features of application:
- Using polystyrene foam as stucco molding. This method is one of the simplest and most cost-effective. The low cost of this design is achieved due to the availability of polystyrene foam. This material is distinguished by its good flexibility and ease of processing. This makes it possible, if necessary, to bend it, thereby giving it a certain shape, or to cut out any, even the most complex elements. The disadvantages of such material include its fragility;
- Plaster stucco. The cost of such coverage is quite high. However, this material has a lot of unique advantages. It is distinguished by its durability, environmental friendliness and high strength. The design is made of plaster and will last quite a long time. In addition, gypsum has good fire-resistant properties and is perfect for both partial and complete decoration of portals;
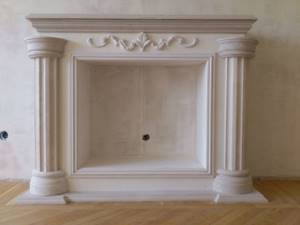
Plaster molding for a fireplace: classic frame, for subsequent installation of an electric fireplace
Plaster molding for a fireplace: classic frame, for subsequent installation of an electric fireplace
Decorative base made of polyurethane
Decorative base made of polyurethane
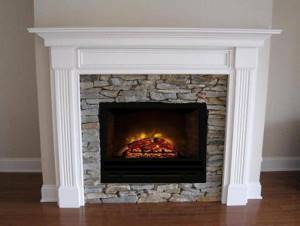
Purchased frame with plaster elements and natural stone trim
Purchased frame with plaster elements and natural stone trim
No. 5. Cladding the fireplace with plaster
The easiest and most cost-effective way to decorate a fireplace is to cover it with a layer of plaster. Moreover, with the help of plaster you can create both a smooth and decorative relief surface (using various spatulas, brushes, rollers and even household items, such as plastic bags, you can achieve an incredible result). With proper skill, even the texture of a stone can be conveyed. Plaster can be painted and drawings can be made on it. It is very easy to change the appearance of a plastered fireplace by simply repainting it. In addition, the plaster weighs a little, so it does not bear a significant load on the floors. The finish is durable and practical, if, of course, you choose the right composition.
For plastering fireplaces, it is better to use the same composition that is used when working with stoves. The easiest way is to buy ready-made material, to which the manufacturer has added the necessary additives and additives. For those who know how and like to do everything with their own hands, there is a more complex method - preparing your own plaster mortar
Its composition includes clay, sand and lime, but in order for the solution to have the necessary performance qualities, it is important to correctly select the fat content of the clay and the proportion of clay and sand - all this is done through experimentation. To be sure that such plaster will not crack and will withstand heat, you will need experience.
Many manufacturers offer both base and finishing plaster. The first is applied in a layer of 10 mm, intended for rough finishing and preparing a flat base. The finishing layer is applied with a thickness of 3 mm.
The process of plastering a fireplace is not much different from plastering walls:
- all old cladding, if any, is removed;
- to increase adhesion, it is better to unstitch the masonry seams to a depth of 0.7-1 cm. A chisel or screwdriver is suitable for scraping out the mortar;
- It is better to seal the cracks with heat-resistant sealant;
- if the walls of the fireplace are relatively flat (the height differences and the depth of the depressions do not exceed 5 mm), then you can wet the brick and proceed to applying plaster. For more significant unevenness, reinforcement with reinforcing mesh will be required. It is attached to the masonry brick with nails, on the heads of which metal washers are placed;
- Before starting work, it is better to heat the fireplace so that the brick acquires the dimensions that will be characteristic when the fireplace is in operation. If the base is not warm, the plaster may crack during the first fire;
- The prepared plaster solution is applied with a spatula and leveled along the beacons. It is recommended to apply at least two layers of plaster, with each subsequent one applied after the previous one has completely dried. The finishing layer can be leveled with a spatula. You can create a certain relief on it.
You can use paints for additional decoration. Organosilicon ones are best suited because they tolerate heating well to high temperatures. The hearth can be painted in a single color or you can draw certain patterns on it - it all depends on your imagination, skills and interior.
Connection diagrams for photo relays for street lighting
The main function of the photo relay is to supply power at nightfall and turn it off at dawn. Thus, it is an automatic switch that operates without human intervention. The role of the shutdown button is played by a photosensitive element. The photo relay connection diagram is similar: a phase is supplied to the device, it is interrupted at the outputs, and if necessary, the circuit is closed, as a result of which voltage is supplied to the lamps or spotlights.
To ensure the operation of the photo relay, power is also required, so a zero is connected to certain contacts. Since the lighting is supposed to be in an open area, there is a need for a ground connection.
It is important to correctly connect the conductors coming out of the body of the regulator itself with the lamp and the network
Unfortunately, there is no universal connection diagram that would fit all types of photo relays, but certain points are typical for all operations. They must be taken into account, especially if you install a photo relay with your own hands.
In almost all models, the output relay has three multi-colored wires that correspond to the following designations:
- black – phase;
- green – zero;
- red – phase commutating to the light source.
To provide additional functions, you can purchase photo relays with motion sensors or timers
Step-by-step instructions for connecting photo relays for street lighting
The instructions below will tell you how to connect the photo relay step by step, quickly and correctly:
- Pre-installation of the distribution panel. It is usually mounted on the wall, and conductors are connected in it.
- Connecting the photo relay according to the diagram, which is in the technical documentation attached to the device itself. Usually a bracket is used as a fastener. It is installed in a place where the relay will receive direct sunlight, but other light sources are isolated.
- Adjusting the system using a controller, that is, selecting the parameters for the device’s response to specific conditions of lighting changes.
- The regulator is installed on the external part of the device with the corresponding technical characteristics: sensitivity range – 5-10 lm; power – 1-3 kW, permissible current threshold – 10A.
If the device is mounted in the middle of an electrical panel with a complex design, where the sun's rays do not penetrate, then the relay and switch are installed separately from each other. The parts of the device are connected to each other with special cables.
The photo relay is connected according to the diagram, which is in the technical documentation attached to the device itself
When installing street lighting, it is recommended to follow the following rules:
- It is better to place a device with an external photocell in such a way as to exclude direct light from the installed lamp. Otherwise, the device will work with errors.
- To check whether the circuit is connected correctly or not, you need to connect the starter to the mains. The result will be clear when the lamp is activated.
Nuances in light sensor connection diagrams
The fact that the photo relay is selected taking into account the expected load may affect the cost of the product: depending on the power, the price increases. Therefore, in order to save money, it is possible to provide power supply not through a photosensor, but through a magnetic starter. This is a special device designed for frequent on/off operation. Using a trigger mechanism allows you to connect power using a photosensitive element with minimal load.
Thus, in fact, only the magnetic starter is turned on, so only the power consumed by it is taken into account. But at the terminals of the magnetic starter it is possible to use a more powerful load
In order to save money, you can provide power supply not through a photosensor, but through a magnetic starter
In the case when, in addition to the day/night sensor, it is necessary to connect devices with additional functions, for example, a timer or motion sensor, they are installed after installing the photo relay. In this case, the order of priority of additional devices is unimportant.
If a timer or motion sensor function is provided in the structure of the device, but it is not needed in a particular case, then these devices are simply excluded from the general circuit, that is, no wires are connected to them. In this case, if necessary, these elements of the device can be connected.
Types of fireplaces
Fireplaces differ from each other by the type of fuel used:
- electric fireplaces;
- wood;
- alcohol;
- peat;
- gas.
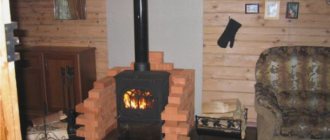
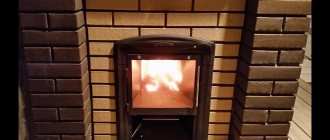
Wood-burning fireplaces, like many others, are made with a closed or open firebox
It is better to lay such a fireplace at the stage of building a house - it is important to make the chimney correctly so that the firewood does not burn out too quickly and smoke does not flow into the room. The closed one has a glass door made using a special technology that prevents the appearance of soot
It itself is made of brick, cast iron, and lined with stone or wood.
Gas ones are connected to a cylinder or a separate gas pipe and operate on methane, propane-butane. They are silent, fireproof, and also require a chimney. Electric ones are connected to the electrical network through a regular outlet. In essence, this is an ordinary heater, but stylized as a fireplace. It heats up quickly, takes up no more space than a plasma TV, and is sometimes equipped with an air filter; it does not need a pipe. Biofireplaces run on alcohol or bioethanol. They heat small rooms well with “live” fire, almost without emitting harmful combustion products into the air. Peat stoves are heated with briquettes or peat chips or coal.
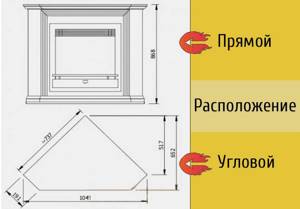
There are also differences in installation method:
- built-in;
- wall;
- island, including hanging;
- corner.
According to the method of heat radiation, the design of the firebox itself is distinguished as one-sided, two-sided, three-sided.
According to their purpose, fireplaces are divided into:
- brick;
- for barbecue;
- stoves;
- false fireplaces;
- street
How to choose plaster for a fireplace
To decorate the fireplace insert, chimney and other parts, you will need to choose the right plaster. The composition is often mixed independently using the following main components:
- clay – added for heat resistance. It is advisable to choose something that is not too “greasy” - it will quickly crack when the structure being designed is heated;
- sand - it is not afraid of high temperatures, the coating is as durable as possible, its volume is approximately twice as large as clay;
- lime is an excellent plasticizer, improves adhesion to the base, and facilitates the application process. It is recommended to purchase ready-made slaked fluff or make it yourself;
- asbestos, fiberglass - increase the thickness, heat resistance, and strength of the coating. It is preferable to add up to 7-10% natural fiberglass to the solution, even less asbestos, since it is very toxic;
- cement - as a binding component, it is added no more than 50% of the total volume of the mixture, since a larger amount will lead to cracking of the surface.
How to plaster yourself
Plastering the structure yourself is not too difficult
It is only important to choose a special composition - fire-resistant, when heated, does not emit harmful substances into the surrounding atmosphere, and does not crack under the influence of high temperatures.
How to perform plastering step by step:
- before starting work, the walls of the structure are cleaned of dirt, degreased, slightly heated, and the masonry is moistened with water;
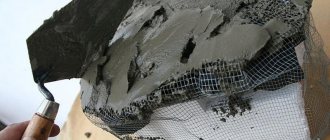
- then reinforcement is made using a special mesh to make the coating as durable as possible;
- then spray with a liquid solution - this allows you to fill the pores in the brickwork;
- when the layer has slightly set, plastering is carried out - a layer of four to six mm is applied. thick. To do this, use a trowel and a trowel;
- then apply another one or three of the same thin layers and dry;
- The covering is made with the same liquid mixture as the spray; it helps to hide the smallest defects. The plane is leveled until it hardens completely, using a wooden smoother;
- It is permissible to heat the stove after three to four days - speeding up the drying process with kindling is unacceptable, since the coating often cracks;
- the textured coating is made very thin - 0.3-0.7 cm, so that the finishing does not weigh down the structure;
- Decorative plaster is rarely tinted, so you will have to add the paint yourself. It is chosen to be heat-resistant - up to +650 degrees; silicone enamel, which almost never cracks, is best suited.
Installation and securing
If you decide to create a unique stucco pattern for your electric fireplace or stove, then first of all you need to take as a basis a few simple rules and recommendations.
At the first stage, determine the style and direction in which you want to move. Based on this, determine the dimensions and shape of each specific element. Make a detailed sketch, which will indicate the dimensions of the ornament.
To create stucco molding, you will need not only pre-created forms or blanks, but also a special tool with which you can finely work out each detail and remove the finished one from the mold.

For fixing, it is best to use fresh prepared cement-based mortar or adhesive for tiles and ceramics
It is important that the purchased composition has good fixing qualities, dries quickly and tolerates heat and high temperatures well. This is especially important if the stucco is applied to the surface of the portal of a wood-burning stove

Also, as an alternative and even more reliable way to secure fairly heavy and voluminous decor, there are nails and self-tapping screws with which you can securely, quickly, simply and cost-effectively secure each element.
False fireplace made of polyurethane
The fastest way to make a decorative fireplace is to buy a ready-made polyurethane fireplace portal. The range of portals is quite wide and you can certainly choose the style and size that suits your room. An electric fireplace can be built into a ready-made polyurethane portal; to do this, you need to know its overall and installation dimensions, as well as the requirements for ventilation and connection to the electrical network. If you want to do everything yourself as much as possible, you can go shopping and take measurements from ready-made portals; by purchasing a piece of polyurethane, you can make a similar model much cheaper than its ready-made counterpart!
To create such a fireplace, you need purchased polyurethane, contact adhesive, putty and finishing materials for the firebox, for example, decorative brick.
Step-by-step instructions for making your own from plasterboard
Creating a portal for a fireplace from plasterboard with your own hands is not a difficult, creative, and interesting task. Materials for it are sold in almost all construction stores; tools can be bought or rented.
A plasterboard fireplace is a portal in the shape of a real hearth, but the structure remains hollow inside.
Deciding on the interior design
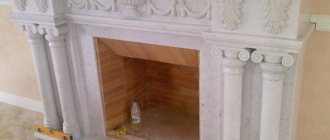
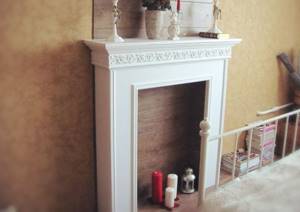
At the very beginning, it is recommended to decide on the design of the structure - the object should optimally fit into the existing interior design. It will be a “antique” fireplace decorated with stucco or covered with silver paint in a high-tech style, a simple minimalist design in white color or covered with imitation brick in a loft style. Sometimes the object is lined with flexible artificial stone, or covered with a film to imitate marble, granite, onyx and other stones.
In appearance, such a portal, with appropriate finishing, is no different from a traditional solid fireplace.
Choosing a suitable location
The fireplace can be installed in any convenient location. A niche in the wall, a free corner, just an empty, flat wall or a large protrusion (at least a meter wide) on it is suitable for it. The product is hung from the wall, placed in the middle of the room, and mounted on a pedestal. The installation site is leveled and freed from all unnecessary things.
Drywall frames are used for arranging decorative portals and for placing an electric or bio-fireplace inside the structure.
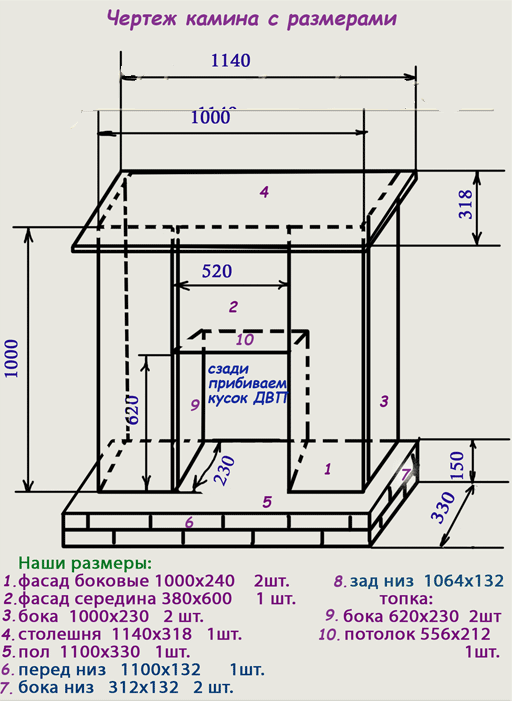
We make drawings with dimensions
After creating a preliminary sketch, you need to depict the view of the hearth from different sides to determine what details are needed. Afterwards, full-size drawings are transferred directly to the material.
Building a decorative or conventional portal for a fireplace with your own hands is a fairly simple technological process.
We create a full-fledged project, layout
For a more accurate idea of what the finished fireplace will look like, a miniature mock-up is created. Any scale is acceptable - one to three, one to five, one to eight, etc. The project notes the overall dimensions, thickness of parts, cut of the internal part and other important points.
A frame is erected from a metal profile or wooden blocks, and the top is covered with plasterboard according to the pattern of the structure.
Necessary tools, materials
To work you will need:
- screwdriver;
- perforator;
- ruler;
- iron tape measure;
- square;
- building level;
- a simple pencil;
- jigsaw;
- sheet of drywall;
- metal guides;
- self-tapping screws;
- PVA glue;
- putty;
- finishing coating.
Tools you will need for your work.
Preparation, marking
Before installation begins, the installation site is marked, indicating the location of the support strips, top shelf, and extreme side points. Average dimensions of a pseudo-hearth for a room with an area of 10-16 square meters. m.: height 770-90 cm, width 100-120 cm, depth 25-45 cm.
The thickness of the drywall is selected based on the required load-bearing load.
Frame assembly, installation
Installation of the product begins with the installation of pedestal supports. Later, horizontal jumpers are attached to it. Afterwards the main part is installed
It is important to maintain the parallelism of the supporting parts with each other - otherwise the distortion of the structure is inevitable
Drywall is the basis for any finishing material.
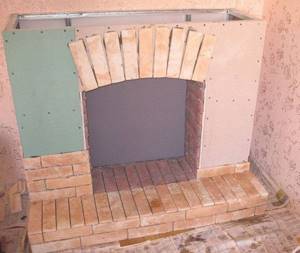
We make the arch of the fireplace chamber
The “insides” of the fireplace structure are assembled separately. If the portal is arched, to create it you will need flexible perforated profiles that are laid along the contour of the already cut parts.
Heat-resistant plasterboard is an excellent material for bio- and electric fireplaces.
Sheathing
After installing the frame, the fireplace is covered with plasterboard. Self-tapping screws are used for this - they should be screwed in so that the caps are slightly buried in the material and can be easily puttyed, completely hidden from view. On such a flat surface it is easy to apply a finishing coating and glue three-dimensional props.
The shape of the portal depends on the chosen design style.
Portal cladding
It is possible to finish a plasterboard structure with a variety of materials. These are ceramic tiles, various paints, decorative plaster, self-adhesive films with images of bricks or fancy designs. All kinds of ornaments and hand painting are also acceptable.
The advantage of decorative and electric fireplaces is that their construction does not require paperwork for a building permit.
What can you make a decorative fireplace from?
Craftsmen have come up with many design options for false fireplaces. We present to your attention an overview of the most popular of them.
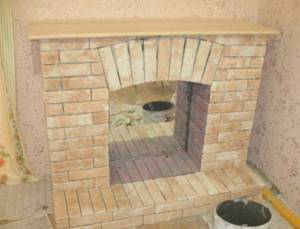
Brick
Decorative brick fireplace
This material allows you to bring the design of the decorative structure as close as possible to the appearance of a real fire. The false fireplace is laid out from decorative or facing bricks for jointing.
Anyone who has at least once encountered masonry work can handle this activity. However, you must first make sure that the existing floor can support the weight of the finished structure, especially if it has large dimensions.
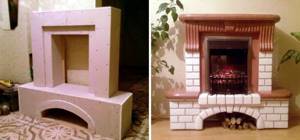
laminated chipboard
We draw sketches We prepare laminated chipboard for work Parts of a false fireplace We assemble the fireplace, fastening the parts with self-tapping screws The fireplace is almost ready The fireplace is almost ready We line the fireplace with foam bricks and cover it with a lid
Laminated boards and other similar materials are perfect for decorating false fireplaces.
In order for the structure to have a neat and attractive appearance, it is necessary to thoroughly prepare for the upcoming work. Preparation comes down to creating a drawing indicating all the dimensions of the future false fireplace. Based on this drawing, you can order cutting of the slabs from a specialized company, or you can do it yourself if you have the required skills.
If you want to save money, laminated boards can be replaced with a more budget-friendly analogue - chipboard. After assembling the structure, you can decorate it at your discretion.
Polyurethane
Polyurethane decor
Products made from polyurethane are used mainly to decorate ready-made structures. However, if desired, all kinds of moldings, platbands and half-columns can be glued directly to the wall. Such a design will not look like a full-fledged fireplace, however, special decorative techniques will allow you to benefit from the portal, making it look like a real fireplace.
False fireplace
Drywall
Drywall DIY decorative fireplace
This material is most often used to decorate false fireplaces. Drywall is characterized by extreme ease of assembly and goes well with a wide variety of finishes. From sheet material you can create spatial forms of almost any complexity. At the same time, the cost of drywall makes it accessible to a wide range of buyers.
Sheet construction requires mandatory finishing. But this is rather an advantage of the material, rather than its disadvantage - over time, the cladding can be changed without dismantling the decorative portal itself.
Beautiful fireplace made of plasterboard with an unusual plaster finish
Choosing natural stone for facing a fireplace
Cladding with real stone involves a wide variety of materials. Marble and travertine, sandstone and granite, tuff and limestone are suitable for work. When choosing the appropriate option, you should remember that smooth materials require less maintenance and cleaning from dirt. Stones such as granite and marble have significant weight, which will require a very solid foundation for the fireplace.
It is equally important that the chosen decor fits well into the interior
Properties of different stones:
- sandstone is layered, has a wide range of colors (from red-pink to dark gray), changes color when the light changes, and is resistant to temperature changes;
- slate - can be red, yellow, green, brown, black, etc., is relatively expensive, requires periodic treatment with dirt-repellent mixtures;
- travertine - usually yellowish-gray in color, porous, not too dense, therefore to improve its properties it is coated with special compounds;
- granite is the most durable, reliable, durable, resistant to impacts, chemicals, and temperature changes. The color range is from white-gray to almost black, from pale yellow to dark burgundy. The price is very high, but the appearance is strict and solid;
- marble looks luxurious, but is expensive. Colors – white, gray, black, variegated. The material easily tolerates temperature changes and physical influences, but is not resistant to aggressive chemicals or household dyes, therefore it needs a special coating;
- Onyx is a semi-precious stone, the presence of which in a room makes it unique. The material transmits light perfectly, comes in yellow, green, orange, brown, is resistant to high and low temperatures, but chemicals are destructive to it, and the cost is about three times more than other stones.
Rules for working with marble and other natural stones
Working with real stone, be it marble, granite, sandstone or others, is labor-intensive. Each tile will have to be carefully adjusted in size and selected according to tone. To work, you will need special grinding machines and stone-cutting devices.
Installation order:
- the surface of the stove is cleaned of dirt, a reinforcing mesh is installed;
- facing elements are adjusted so that all tiles are the same size, shade, thickness;
- installation begins with the largest parts, secured with tile adhesive;
- culling, if necessary, is used in inconspicuous places;
- in order not to confuse the locations of individual tiles, they are marked on the reverse side;
- It is advisable to add compounds to the adhesive that increase its elasticity; the material should not get on the front side of the tiles;
- work begins from the lower left corner, observing the order: left to right, bottom to top;
- for tiles with a thickness of over 10 mm, additional wire reinforcement is used;
- The seams are grouted two days after installation, being careful not to stain the material with grout.
Decorative design
Final decoration is the most interesting and creative part of the work, where you can realize any creative ideas. This is facilitated by a huge selection of finishing materials. The simplest and most inexpensive finishing option is wallpapering that imitates brick or stone. In this case, it is recommended to give preference to high-quality paper or non-woven trellises, which are most convenient for pasting over corner structures. In order for the structure to have a more complete look after this, all corners and edges are decorated with applied decorative corners that match the color. When choosing a color, the principle of contrast is usually used. Fixation of overhead corners is carried out using liquid nails.
Another simple and inexpensive option for decorating a plasterboard fireplace in the interior is to paint it. This type of design is usually used in cases where the walls are also finished in a similar way. In order to highlight the portal against the background of the wall surface, it is decorated in a different color (usually darker). To emphasize the outline of the firebox, it can be additionally covered with molding.
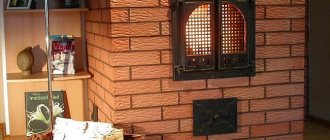
When it comes to lining a fireplace portal, it is recommended to use clinker tiles for these purposes, which cope well with thermal influences. Thus, fire safety recommendations will be followed when using electric heating devices. Clinker tiles look like bricks: the variety of colors allows you to choose the most suitable design shade. In addition to the electric fireplace, ordinary candles can be placed inside the portal decorated in this way.
False fireplaces decorated with decorative stone, which, like clinker tiles, are fixed using ordinary tile adhesive, look very nice. In classic interiors it is recommended to use light imitation stone or stucco.
We cannot ignore the design of the tabletop, which has a significant impact on the creation of the external image of the entire portal. The easiest way is to order this element from a good furniture company: as a rule, we are talking about imitations of marble or valuable wood
To give the fireplace a special authenticity, it is additionally surrounded by a forged grate.
Results
In cases where the desire to acquire a fireplace encounters serious obstacles (as happens in apartments), a decorative design can be used instead. Making a fireplace with your own hands from plasterboard is quite simple, so even a beginner can handle this work
The final design is of decisive importance here: it is very important that the new decorative element fits organically into the overall interior.
3042fb3e968e94430115777123528ae2.jpe
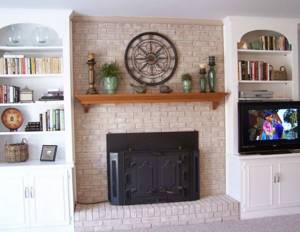
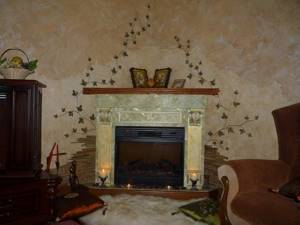
Decor around the fireplace and adjacent wall
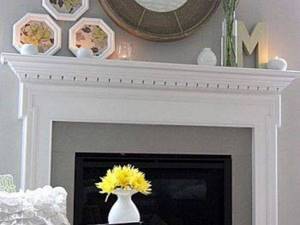
It is important to fit any fireplace beautifully into the interior and to arrange the space around it in an original way. The place near the fireplace, above it, is decorated in several ways:
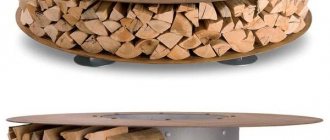
- fresh flowers in pots, cache-pots - they are placed on the mantelpiece or next to it, the most heat-loving ones are selected;
- dry bouquets, wreaths - you must make sure that they are located out of the reach of the fire;
- wire - for an artificial fireplace, a grate is made from it, which is painted with various colors;
- polyurethane - this is an imitation of stucco for walls, various “antique” patterns;
- a mirror - it is placed on the wall or attached to the mantelpiece;
- candles – thick candles, which can be scented, are placed inside the false fireplace;
- framed photographs, souvenirs, figurines - they are placed on a shelf above the fireplace, in niches on the wall;
- photo wallpapers - they are pasted behind the structure, the fireplace is located against their background;
- a picture inside - the portals of electric fireplaces are sometimes decorated with images that periodically replace each other;
- embroidered panels, knitted toys;
- framed paintings.
Fireplace location
You need to start by choosing a place and taking measurements. The plasterboard structure is not mobile; it is rigidly fixed to the wall. It is impossible to move such a structure without completely dismantling it, so you need to immediately determine where to make a decorative fireplace so that it does not disturb anyone.
Another important point when choosing a place to imitate a hearth is its central location in the interior. The entire composition of the room will be built around the burning fire and its frame. It is advisable to choose an area that will allow you to arrange furniture without interference, taking into account this rule. People who are passionate about Feng Shui should pre-establish a favorable zone for installing the future layout.
When a suitable location has been found, you need to measure the length and width of the future portal. This is necessary to calculate the amount of materials used during installation. According to the determined dimensions, make scale drawings to determine what parts will be required during assembly. Draw a sketch of the portal design.
Types and methods of production
Artistic stucco represents figured and relief ornamental patterns of architectural decor. Stucco molding decorates ceilings, walls, door and window openings, allowing you to make any surface the dominant detail of the interior. No less popular is decorating the portal of a home fireplace - the heart and soul of the room - with stucco.
Methods of stucco production:
- manual (simulation);
- production (molding, casting).
The production method involves the production of individual parts of stucco molding using casting or pressing. Hand modeling requires the search for a craftsman (an artist and a professional modeler), sufficient financial investments and labor costs, but it allows you to obtain a decor whose design will be exclusive.
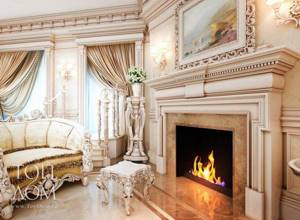
Exquisite stucco for a fireplace in a country house in southern Austria.
The fireplace panel is decorated using plaster stucco.
Components of the stucco molding of the fireplace portal:
- cornices (with ornaments and smooth profile);
- capitals and brackets (supports);
- pediments (the upper parts of the composition in the form of a triangle);
- moldings (convex relief strips);
- columns and pilasters (half-columns, three-quarter columns);
- base (pedestal);
- friezes (ornamental compositions);
- decor (ornaments, statues, corner elements, overlay panels, panels, frescoes, caryatids).
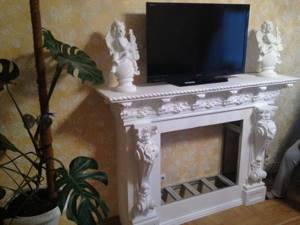
Living room in Art Nouveau style with a large fireplace decorated with decorative stucco.
Designer stucco molding in the Baroque style decorates the fireplace in the country mansion of a Moscow businessman.
Styles of polyurethane fireplaces
Polyurethane replicas of portals are made taking into account the styles of real fireplaces. However, not all areas of architecture and design are represented in polyurethane.
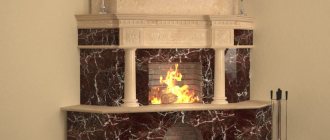
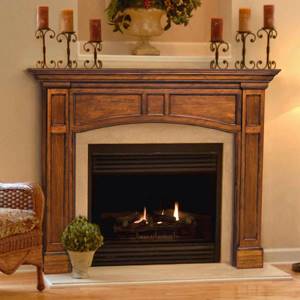
These are mainly classical portals, in the Baroque, Rococo and Empire styles.
Classical. The style is characterized by straight repeating lines, symmetry, columns with paths. The creators were inspired by ancient Greek and Roman architecture, so the fireplace columns here are decorated with antique ornaments, there are bas-reliefs and pilasters.
Portal for a fireplace in a classic style
Baroque. This style is characterized by curved lines, ornateness, an abundance of stucco molding, decorations, arches and columns, decorated with lush and elaborate capitals.
Rococo. It is easy to confuse it with Baroque, since the style arose from it and is not much different. These are all the same curved graceful lines, a lot of decorations, bas-reliefs and pretentiousness. However, Rococo is a freer, more playful style, devoid of pomposity. Its elements are decorated with flowers, garlands of fruit, wreaths, and monograms. There are figurines of fat angels, kissing lovers, etc.
Empire style portal
Empire style The style of the times of Napoleon, when the main task of artists was to praise the victories of the empire (empire - empire). The style is similar to the classical one, since it also originates in antiquity, but it is characterized by its most pompous sides. Stucco molding in the form of triumphal wreaths, ribbons, cups, heraldic symbols, coats of arms, eagles, lions. Everything about this style exudes victoriousness.
If you decide to purchase an electric fireplace, you need to think about decorating it, because such a device itself does not look very aesthetically pleasing. Do-it-yourself portals for fireplaces - read designers’ tips on making.
You will find instructions for making a brick fireplace with your own hands here.
Decorating a decorative fireplace with your own hands
When the fireplace is ready, it’s time for creativity, here everyone can try themselves as a designer. I really liked the role of a designer; I decided to decorate the fireplace using decorative stucco, which I decided to paint myself.
So, here is a list of steps I want to take to make my fireplace look like the picture:
- Plastering the fireplace at the joints of the boards and at the places where screws are screwed in.
- Painting the fireplace using white water-based paint.
- Gluing stucco to the fireplace.
- Decorating the “firebox” using mirrors and LED strip.
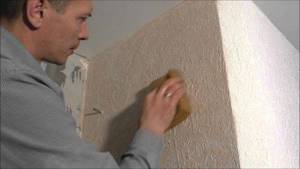
Fireplace plaster
Plastering a fireplace
When the fireplace is plastered, there comes a time of waiting. The plaster needs to be given time - 2-3 hours in order to dry, and then we will need to sand the fireplace using fine sandpaper.
Painting a fireplace with water-based paint
After painting the fireplace, you need to give the fireplace 10-12 hours to dry. At this time, you can start decorating the stucco molding.
Painting a fireplace with water-based paint
To paint the fireplace, I recommend using water-based paint, because... This particular type of paint has such qualities as: low cost, no odor. It is the second argument that is decisive in choosing the type of paint, because If you are renovating your apartment during the cold season, you won’t be able to leave the fireplace to dry on the balcony, and the smell of paint in the apartment can make you dizzy.
Photo of the fireplace after painting with water-based paintPhoto of the fireplace after painting for the second time
Fireplace decor
As I noted above, I decided to choose plaster stucco as decorative elements. It is sold in construction stores and has long earned respect from people of creative professions. I would like to immediately note that if your main task is to make an economical version of a decorative fireplace, then foam plastic decorative elements will be a good alternative to stucco molding.
I didn't use them because... It seemed to me that the stucco looks a little more expressive when painted. In addition, if you paint foam plastic with regular paint, then there is a high probability that it will dissolve under the influence of chemicals.
Decorative elements for the fireplace
The next material that I used to decorate the fireplace was a ceiling plinth (not made of polystyrene foam), but made of the same material as the stucco molding (most likely it was solid polyurethane foam). The plinth will be useful for decorating the firebox of our fireplace. The photo below shows a sample design of the firebox.
In addition, decorative brick was used to decorate the firebox; the cost of decorative brick (decorative stone) is about 600 rubles per box, but I still had it after decorating the wall with decorative stone (my husband wrote about this technology).
The process of marking and sticking stucco molding on the fireplace
The process of finishing a fireplace insert with decorative stone:
- From the outside, carefully apply glue (in my case Bergauf) to the outside of the decorative stone;
- We apply a decorative stone to the side wall of the fireplace;
- Fix the decorative stone by pressing your hand and wait 10-20 seconds for the glue to “set”;
- Using a similar technology, we line the second wall of the firebox and the bottom.
Decorating the fireplace insert with LED strip
Decorating a fireplace insert using LED strip
I'm continuing to finish the fireplace. The next material I will use is LED strip. LED strip can be purchased at almost any electrical store . I decided to use a red LED strip because... It is the red color that will emphasize the unforgettable atmosphere of warmth and comfort that looks like burning wood.
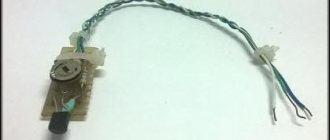
I will attach the LED strip to the corners of the firebox. Before attaching the LED strip to the fireplace, of course, you need to assemble it into a circuit in the following order: socket, cable, transformer, LED strip.
How to do
The main advantage of a fireplace with a built-in electric firebox and a portal made of polyurethane is that it can always be installed in an ordinary modern apartment. A chimney in this model is not required and does not need to be coordinated with the BTI, gas, or fire services. The design is very simple and therefore everything can be done with your own hands.
The work sequence is as follows:
- Decide on the purpose of the firebox. You need to immediately clarify whether it will be only decorative or heated. If the model has a heating element, then heat-resistant materials will be needed. Next, you need to measure the electric fireplace or look at everything in the passport. Some appliances do not have a built-in firebox, then all that remains is to decorate the niche with finishing stone and place lighting there.
- Make a wall frame. You will need bars or profiles. Everything is attached with self-tapping screws and covered with plasterboard or plywood. If there are heaters in the firebox, then you need to work with fire-resistant cardboard, the thickness of which is 12.5 mm. Otherwise, the structure will be less fireproof. If the depth of the firebox is small, then it can be installed directly on the floor and without a frame. All that remains is to level the wall and glue the polyurethane elements.
- Finishing. Attach the polyurethane fireplace portal to the frame. If necessary, adjust all parts. Polyurethane is cut with a wood hacksaw. Remove irregularities with fine-grained sandpaper.
- Gluing. Glue all the workpieces with glue (it is important that there are no solvents in it). Carefully remove excess glue. If the elements will continue to bear the load, then it is better to use self-tapping screws; the head must be recessed in polyurethane. These places are puttied, as are the joints of the portal with the frame or wall.
- Wall decoration. Finish the side walls with tiles or stone.
- Installing a fireplace mantel. It is made from a countertop or artificial stone. You can cut it yourself or order it from a furniture store. Attach the shelf to the frame at the corners using self-tapping screws.
- Painting. First, white acrylic paint is used to even out the color of the stucco. Next, individual elements can be coated with patina or bronze paint, or gold.
- Installation of the firebox. A firebox is placed inside and connected to the electrical network.
- Decoration. Various decorative elements, souvenirs, and trinkets are placed on the shelf.
The polyurethane portal for the fireplace is ready. All that remains is to place furniture near it and call loved ones.