Rock compositions, paved garden paths and alpine slides that use stone are of great importance for landscape design. Very often, when creating rock compositions and rock gardens, artificial stones, in particular boulders, are considered more advantageous.
Artificial boulders for landscapes are a popular material today, used:
In landscape design during the construction of platforms and paths, rocky gardens, alpine slides, flower beds, ponds, fountains and waterfalls;
The hollow form is used to decorate wells, sewer manholes, caissons, ugly stumps, septic tanks, pumping and other equipment that sticks out unaesthetically in the landscape.
In addition, artificial boulders, depending on the interior, may be appropriate in an office lobby, cafe, restaurant and hotel.
Artificial boulders in the landscape
Artificial boulders are used to add interest to an existing landscape or when creating a new one. With their help you can diversify dense vegetation.
And, of course, synthetic stones are used in the construction of artificial waterfalls, rocks and other structures when the use of natural material is not economically feasible. Boulder stone is an indispensable attribute of modern landscape design. And since naturalness and naturalness prevail in design today, boulders are a great way to decorate a garden in a natural style.
The artificial material used in the landscape looks as if it was not placed here by a skillful designer's hand, but has been there for a long time.
The boulder stone is lighter than its natural counterpart, but it is no less durable and can easily withstand human weight. In addition, artificial stone is difficult to distinguish from natural slate, quartzite, granite, dolomite, limestone, sandstone, etc. This similarity is achieved through the use of special imitations technologies, special dyes and pigments.
The main advantages of artificial stone:
- Strength;Low weight;Environmental safety;Resistance to weather conditions;High similarity to natural material;Variety of shades and textures.
Final stage
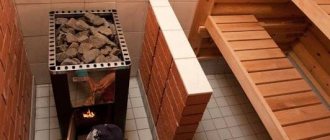
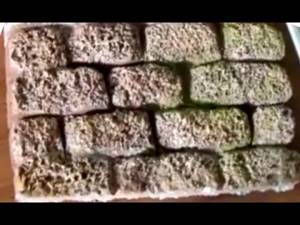
I complemented the given style of the room by decorating the opposite wall with a stone made from a mixture of tile adhesive and starting putty (1:1), diluted with water until smooth. Kneaded the mass well in small portions. The previously prepared area was covered with soil and dried. Wearing gloves, I applied a layer of mortar about 1 cm onto the wall with my hands.
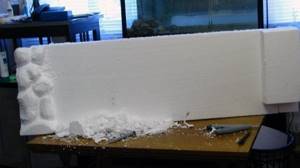
I crumpled up a piece of paper and walked it over the area with the solution, imitating the texture of stone. After 20 minutes, I drew the outline of the stones with the handle of a teaspoon. Dried it. Primed. Painted by analogy with sandstone from penoplex (photo 4)
.
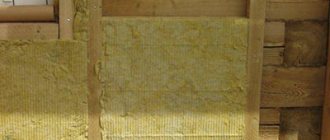
* Penoplex (extruded polystyrene foam) is an environmentally friendly thermal insulation material that is not subject to rotting, with low thermal conductivity, minimal water absorption and high strength.
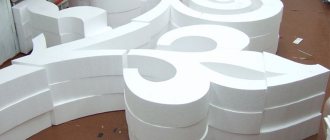
How to make an artificial boulder with your own hands
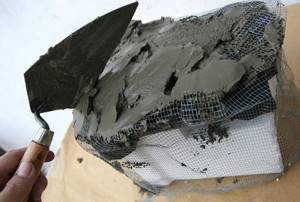
It is very easy to buy decorative material for the garden, but you can make an artificial boulder with your own hands. For the simplest method, you will need a wire mesh, a solution of cement and sand (1:3), for filling - polystyrene foam and old bags. First of all, it is necessary to make the frame of the future stone from the mesh.
The second stage is filling the frame with polystyrene foam and plastic bags. This move lightens the weight of the future boulder and reduces the volume of required solution. In addition, filling will prevent the cement mortar from falling through.
Now you need to prepare the solution. To do this, 1 part of cement is mixed with three parts of sand.

Enough water is added so that the solution is not liquid and does not slide down the frame. It is better to apply the solution to the frame in small “cakes”. After the first layer is applied, it needs to dry a little.
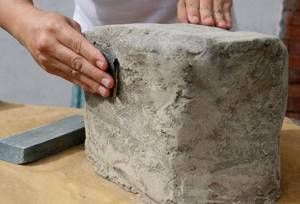
Next, you need to prepare a more liquid solution, which you need to coat the future stone with. This can be done with a spatula or by hand, forming natural depressions and bulges. The product is covered with a film for the solution and left to harden, after which it is turned over and the bottom is formed in the same way.
If you are interested in how to make an artificial boulder more natural, then you can use special pigments for these purposes. The best pigments for stone imitations are warm toned pigments and black for color fixation. It is better to purchase more expensive dyes, since cheap analogues can fade in just a few months.
For small stones, a mixture of sand and cement is poured on top, and for large ones, a solution is used.
First, the stone is sprinkled with light pigment, then black. The surface is sprayed with water and the pigment is fixed with brush movements. This way you can alternate between warm and black shades several times to achieve the desired color.
After final drying, it is recommended to apply a sealant intended for interior concrete work to the resulting surface. Thanks to this, the boulder stone will be protected from bad weather, which in turn will make it more durable.
Painting
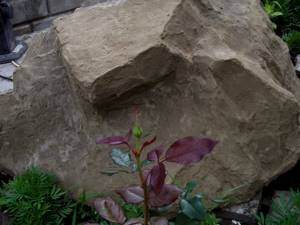
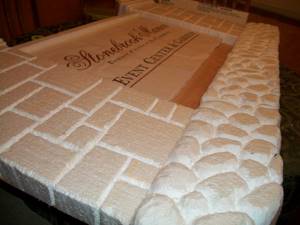
After the putty had dried, I painted the stones with brown paint with the addition of white color. I tinted the protruding texture with a lighter shade and after about 5 minutes wiped it with a damp sponge to even out the color and give the stone a more natural look (photo 2)
. Dried it. I varnished it in two layers with intermediate drying.
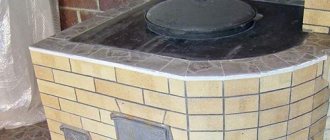
I designed the corner under the ceiling in the same way (photo3)
. After painting and varnishing, this decorative stone became very hard and is in no way inferior to its gypsum counterparts.
How to make a hollow artificial boulder
Before you make boulders with your own hands, you need to take care of the frame. To do this, you can purchase a ready-made form or make it yourself.
One option is cardboard, which must be folded so that the shape resembles natural stone. The resulting frame is wrapped in construction mesh. The solution used is a mixture of one part Portland cement and 3 parts sand.
The solution should have a thick consistency.
The resulting solution is applied with sliding movements over the entire surface of the future cobblestone. The thickness of the concrete wall must be at least 2 cm. After the form is ready, it is necessary to cover it with film and leave it for a day.
Next, mix a tablespoon of coloring pigment and a glass of Portland cement and dilute it with water. The resulting composition is applied to the stone as the main layer. You can sprinkle with cement, sand or a mixture with dye.
You can also use concrete paint and apply it both over the entire surface and in individual areas. After the mold has completely dried, you can take out the cardboard - the hollow stone-boulder is ready.
Technology for creating artificial boulders with your own hands on video:
3929
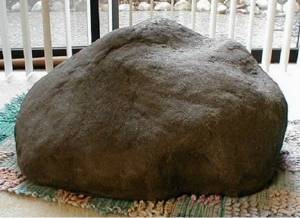
This was my first attempt to make an artificial stone, I wanted to replicate them and decorate the garden. In this instruction I will tell you how I did it. And as you can see in the photo, I still succeeded :) I prefer to learn everything myself, so I made a few mistakes along the way, which I will also try to tell you about. Let's go! To make a stone, we will need a lot of corrugated cardboard, so it's time to get some balcony old cardboard boxes.
You can fill the insides of the stone with anything, I used old newspapers and wire. You will also need to mix some cement, which means you need a bucket, a spatula, water, cement, sand or a ready-made concrete mixture. A cardboard box served as the main body, to which I glued rounded pieces of cardboard and even some foam plastic using PVA. I filled the gaps between the cardboard ribs with old newspapers and leftover polystyrene foam. It doesn’t really matter what you fill the insides of the stone with. Then I wrapped the “stone” with wire to securely hold the newspaper and foam together. Following the instructions on the package, I mixed the solution: 3 parts sand, 1 part cement, and as much water as needed to obtain the desired consistency Using a spatula, I applied the solution evenly over the entire surface of the stone.
This is easiest to do if you have a turntable like I do. There are no special recommendations here, we just apply the solution, in some places you can try to draw / engrave something, or slightly modify the landscape of the stone. Closer to lunch the next day, the cement set and I finalized some details - small cracks, gaps and places where the wire stuck out. Then I painted the stone ocher. In principle, the pigment could be added directly to the solution, and it would probably even be easier. We could stop there and consider the stone ready.
But I will give one more piece of advice - in order to prevent cement from the harmful effects of the environment, in particular humidity, it is advisable to apply mastic to the surface of the stone to seal the concrete. It will increase the life of the stone. I took the stone out into the fresh air so that it would dry out and acquire its own texture, which will be given to it by wind, rain and other weather conditions. This is something like what it looks like in the garden. I like! How about you? Find out about the most interesting instructions once a week, share yours and take part in sweepstakes! Home→Gardening Forum→Garden and Vegetable Garden→Articles→“Stone” made of polystyrene foamOksana-nik09/04/2017 03:04 Making a decorative stone from polystyrene foam is actually not possible such a difficult job as it may seem at first. To do this, you need to stock up on a little patience, imagination and a set of simple tools and materials, including: the foam itself; soldering iron; paint or coloring pigment; concrete; chain-link mesh; putty knife; sand.
In some cases, you may need wire, wire cutters, stationery tape and plastic bags. The list of tools used depends on what exactly you want to end up with: imitation brickwork or a huge decorative stone for installation in the garden. To make your own decorative stone for installation in the garden will need a chain-link mesh with small cells. The frame of the future cobblestone or rock fragment will be made from this material. The resulting form must be filled with pieces of polystyrene foam. To avoid large voids, the size of these pieces should be no more than 2-3 centimeters.
The bottom of the frame of the future stone should be tightened with thin wire or sealed with stationery tape. Construction tape is not suitable for these purposes. The next step is to prepare a concrete mixture. Portland cement in combination with river sand is best suited for these purposes. The proportions of these materials in the mixture should be approximately equal to the ratio of one to three.
The resulting mixture should then be diluted with water, mixed thoroughly, left for 7-10 minutes and mixed again. To make the mixture homogeneous, you can mix it using the cutting method. That is, cut off a small piece of concrete from the edges, move them to the center of the container, mix and repeat this operation over and over again. The output should be a mixture whose consistency resembles dough. The cement should not flow from the spatula, but fall off in large pieces.
Then the finished mixture is applied to the surface of the stone in a layer about 15-20 millimeters thick. After that, the workpiece is moistened with a spray bottle and covered with plastic film for a day. You can also wrap the future stone in an ordinary bag from the nearest supermarket, if it is the right size. After 24 hours, you can begin to prepare the surface of the cobblestone or rock for painting. Preparation for painting decorative stone is usually carried out using a coloring pigment.
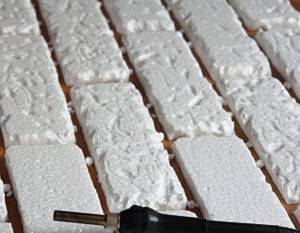
One level tablespoon of this substance of a suitable color in combination with a faceted glass of Portland cement is diluted with ordinary water to the consistency of thick sour cream. This mixture is applied to the surface of the product being manufactured using hands dressed in rubber gloves. As soon as the stone coating begins to dry, you need to use a spatula to give the stone a natural look: add chips, scratches and notches. Foam plastic is easily processed using a knife and scissors. This can also be done using a soldering iron.
The heated metal tip of the tool will leave behind uneven and asymmetrical marks, which is what is required. The surface should not be perfectly flat. In some places it should be thicker, in others thinner. This effect can be achieved using sandpaper. To consolidate the effect, make several punctures in different places, cover the stones with film and leave to dry until completely dry.
The product, dry and ready for painting, is painted using the same mixture as at the preparatory stage. The main task at the moment is not so much decoration as tinting and giving a natural color to the stone. The product should not look artificial. The coloring composition is applied with a brush using the spray method. That is, the decorative stone is not uniformly covered with paint, various inclusions, darker and lighter places appear.
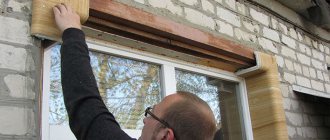
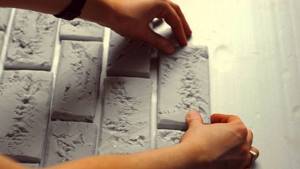
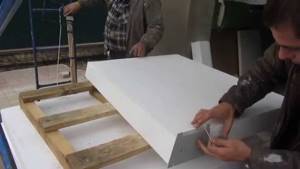
If you don't like the results of your work, you can wash them off with plain water and repeat the last step again. All that remains is to fix the result with a transparent aerosol varnish, which is sold in any auto supply store. Before starting work, you should practice a little on a small piece of polystyrene foam. Article from the dekormyhome website. The question is how to make wall decor under a stone from polystyrene foam with your own hands, today quite relevant. Such decorative panels are used to decorate all kinds of surfaces, from edging on mirrors or windows to the entire wall area. The popularity of the material is explained by the light weight of the structure and ease of installation, which is especially important in apartments located in multi-story buildings where the use of heavy brick is impossible.
Making your own decor
To make imitation brickwork from foam plastic with your own hands, it is recommended to use fine-grained polyurethane panels, which have good heat resistance and do not crumble.
If it is not possible to purchase such material, you can replace it with ordinary ceiling tiles.
In addition, you need to prepare the following materials and tools in advance:
- stationery knife; electric soldering iron; glue, putty; primer, varnish.
In addition, you can use sheets of construction extruded polystyrene foam, since it has characteristics that are ideal for this purpose.
You can see the comparative physical properties of the materials in the table below.
What do you need for work?
To make artificial bricks you will need sheets of dense polystyrene foam. We call it foam plastic in general, it can be:
- "Penoplex" used for insulation of buildings. The thinnest one will do - 20 mm.
- Styrofoam. It is better to take with high density (for example, PPS-35).
- PVC sandwich panels with expanded polystyrene, which are used for finishing slopes. This sandwich brick needs to be cut lengthwise into two parts. On one side there will be foam plastic, on the other there will be a PVC base.
In order to glue foam bricks to the wall, the following is suitable:
Glue “liquid nails” such as “Moment Installation” or “Titanium”. Liquid nails are needed when brickwork is laid out one element at a time, i.e. foam rectangles are glued 1 piece at a time.
Polyurethane foam . With its help, you can glue a whole sheet of foam plastic on which imitation masonry is made. For individual bricks this method will be inconvenient. The foam adheres well to strong, rough substrates: concrete, aerated concrete, plaster, drywall. The polyurethane foam comes off from smooth PVC panels. When purchasing, look at the mass of polyurethane in the cylinder; with the same volumes of foam, it may be less. A good option is “Macroflex” (MAKROFLEX).
Adhesive for insulation . This option is also for installing foam plastic sheets directly under the brick. The adhesive that is used for constructing wet facades is suitable: Ceresit CT 85, Unis Warm Adhesive, Weber.Therm S100, Knauf Sevener.
Glue gun . It is useful for gluing decorative bricks from sandwich panels, i.e. with a smooth PVC base.