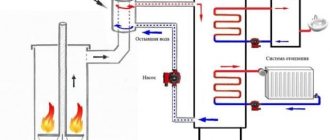
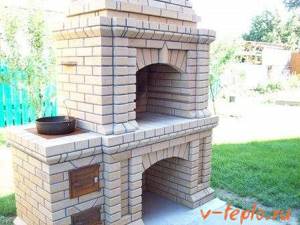
A cauldron is a massive cauldron made of cast iron and having a semicircular bottom. This shape of the bottom ensures uniform heating of all the walls of the cauldron, and in this case the food will not get stuck in the corners. Thanks to the thick walls, food does not burn, as stewing occurs evenly.
Do-it-yourself stove for a cauldron
- 1 Instructions for building a brick kiln
- 2 Laying a brick stove for a cauldron 2.1 We build a stove for a cauldron. Order
- 3.1 Video - Brick stove under a cauldron
- 4.1 Video - Stove for a cauldron from a gas cylinder
Note! Today, a cauldron is mistakenly called a dish that has nothing in common with it at all - a pot, for example, or a cast iron pot. Despite the fact that they are similar in their parameters, their shape is completely different.
Cauldrons are installed both on tagans - tripods (a fire is lit under them) - and on the stove. Today we will find out how to build a stove for a cauldron with our own hands.
Instructions for building a brick kiln
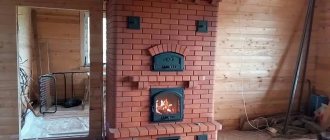
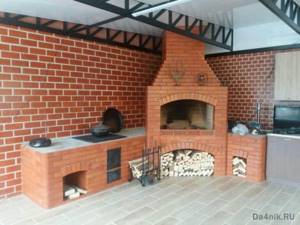
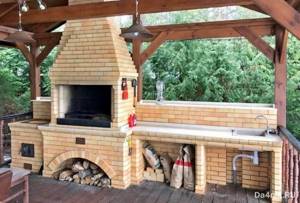
Such a stove is not only a place for cooking, but also a decorative element. For this reason, the choice of location, as well as the shape or decoration of the structure, should be taken with full responsibility. Buy in advance a beautiful stove equipped with rings of different diameters so that you can use different cauldrons, doors for the ash pit and firebox, and various decorative accessories for subsequent cleaning (poker, spatula, etc.).

Required tools and materials
For work you will need:
- fireclay brick;
- floor slab (its thickness should be approximately 2 centimeters);
- Bulgarian;
- steel corners;
- sand;
- grate;
- fireproof powder;
- doors;
- buckets;
- shovel.
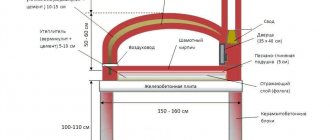
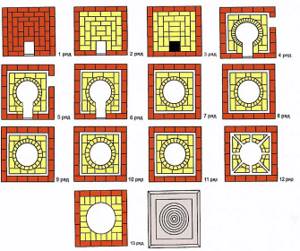
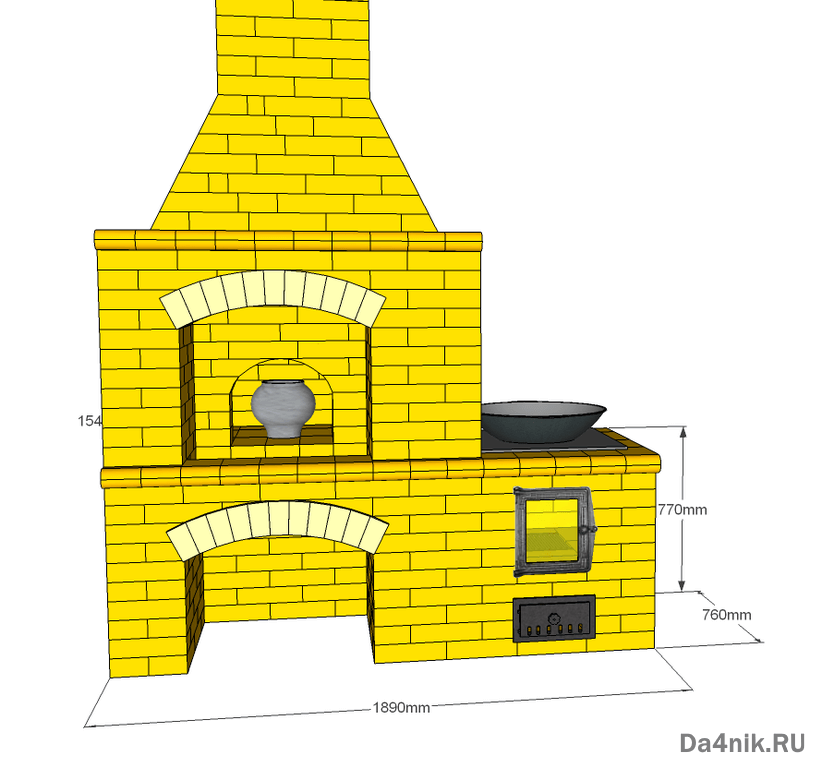
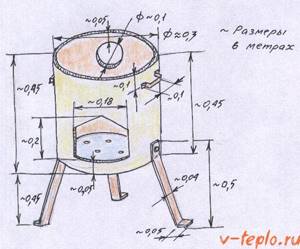
The external parameters of the design can be very diverse, but from the inside it must definitely resemble an egg cup. For more convenient operation, it rises by about 80-90 centimeters.
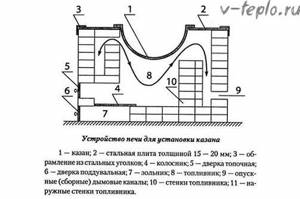
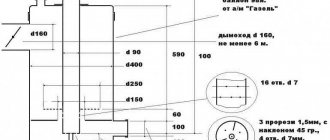
Furnace diagram
Preparing the base
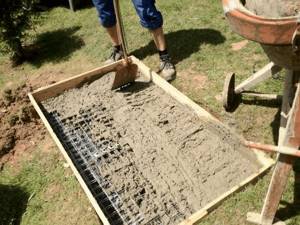
Let us immediately make a reservation that in this case there is no need for a full-fledged foundation, since the mass of the structure will be insignificant. But to prevent the brickwork from warping in the future, it will require pouring concrete and strengthening it with reinforcement. The algorithm of actions should be as follows.
Step 1. First, select a place for construction, clean it of all excess and thoroughly moisten it with water. Level the soil and then compact it.
Step 2. Make formwork from ordinary boards.
Step 3. Mix fireclay powder with sand in a ratio of 1:3, continue mixing until the solution becomes plastic.
Step 4. Fill the formwork with mortar in a layer of 50-100 millimeters. Level the surface, be sure to check it using a mounting level.
Step 5. Place reinforcement bars on the solution - lengthwise and crosswise, in increments of 10 centimeters.
Do not wait for the mortar to dry, but start laying the stove for the cauldron with your own hands immediately after reinforcement.
Installation and operation
The choice of location for the fireplace is determined by fire safety rules and ease of use. The stove requires an open space away from wooden buildings and tree plantations. There should be no accumulation of old things, flammable garbage, or canisters with flammable liquids nearby. A container of sand or water should be prepared next to the fireplace in case of fire.
Before the first cooking, a new metal hearth is cleaned from machine oil with a rag or rag using detergent. After this, the oven is heated without a cauldron. At the final stage of preparation, the walls are treated with a wire brush. After each cooking, the oven is cleaned of coals, ash, and soot.
During operation, the firewood is placed in a container and allowed to burn out a little, after which a cauldron is placed. The fireplace allows you to use charcoal as fuel. During ignition, it is necessary to ensure that the flame does not rise above 20 cm above the level of the fryer. Ideally, the design should have a high chimney, which provides convenience during cooking. Smoke does not get into the cook's eyes and does not spoil the taste of the dish.
Animals and children should not be allowed near a working oven. This rule is especially important when using a portable product, as it may tip over. It is not recommended to leave a fireplace with burning wood unattended.
The mobile hearth cannot be moved from place to place with burning coals.
Laying a stove for a brick cauldron
Note! To obtain the most even seams, place thin wooden slats between the bricks. You can pull out the slats after the masonry has set a little. In addition, this technique will allow you to easily unstitch the seams in the future if necessary.
When laying, bandage the seams, that is, start laying one row with 1/2 brick, another with a whole brick, the third with 1/2 again, and so on. Here are other recommendations.
- All iron structural elements must be installed directly during the laying process.
- If cutting bricks is done with a grinder, then a lot of dust will be generated during the work. Therefore, it is recommended to use protective equipment - glasses and a respirator.
- If you did not purchase a special factory stove for the cauldron, then in a regular stove you can cut out a circle of the appropriate diameter and clean the edges with a file (this way, ash will not get into the food, and smoke will not leak out of the firebox).
- When installing pipes, join them at an angle of more than 90 C for better traction.
- After finishing the masonry, you can unstitch the seams or finish the structure with tiles. Then the oven is dried, for which you should light a small fire in it.
How to build a barbecue oven yourself?!
You can see a detailed review, instructions for laying and ordering a barbecue oven here
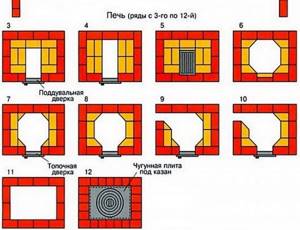
We are building a stove for a cauldron. Order
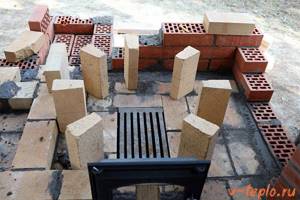
Row No. 1,2. These rows will serve as the bottom of the future structure. When laying them out, leave a small space that will allow you to clean the ash pan (it will be covered with a lid) and the stove itself. Use wire to secure the door. Clamp the wire with adjacent bricks, then secure with mortar.
Row No. 3. Here you close the ash pan doors and continue forming the walls. Also at this stage it is necessary to install the grate.
Row No. 4. When laying this row, leave a hole through which smoky gases will escape.
Row No. 5. Continue building the walls and install doors for the combustion chamber. The size of the doors depends mainly on what type of fuel will be used. If it is firewood, then it should be about 40 centimeters wide, and if it is coal, then less.
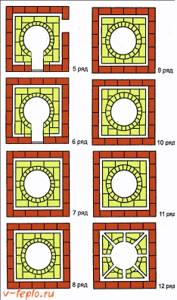
Row No. 6-8. Continue building walls and cover the combustion chamber.
Row No. 9-11. Lay the brick according to the diagram, leaving a small hole for smoke to circulate.
Row No. 12. Cover all the outer walls of the combustion chamber from above by laying a plate with a hole on the steel corners. The hole itself must be located directly above the cylindrical combustion chamber.
That’s it, our do-it-yourself cauldron stove is almost ready, all that remains is to install the chimney pipe.
How to properly make a chimney for a potbelly stove?!
Previously, we talked about how to properly build a chimney; you can see more about this here
The main stages of DIY construction
Following the step-by-step instructions will help you complete the job correctly, without complications and with good prospects for long-term use.
The process consists of the following stages:
- Planning, drawing up several versions of sketches, drawings and estimates.
- Selecting a location for installation, marking.
- Purchase of materials, preparation of tools.
- Construction of the foundation.
- Laying out the hearth body.
- Installation of shelves, chimney, doors, fittings.
- Finishing with decorative material.
Construction must be carried out in dry, warm weather to ensure high-quality hardening of the solutions used.
First stage
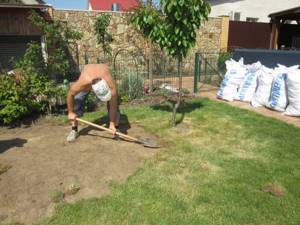
At the first stage, the site for construction is prepared.
The first phase of construction is the preparation of the workplace. Markings are made on the territory, vegetation and small adjacent objects are removed, communications necessary for work are supplied - electricity, water, sewerage. Bags or containers are prepared for the inevitable waste in such cases. If necessary, a temporary or permanent canopy is constructed.
Construction of the foundation
The stove weighs a ton or more, so it needs a stable base. To avoid possible distortions in the future, it is recommended to deepen the foundation below the freezing level of the soil. The best option is a slab mounted on bored or screw piles. On stable soil, you can make a buried strip.
Construction of the furnace
Arrangement of the stove for a cauldron
The arrangement is made at a height of 9-11 levels, which is considered optimal for a person of average height. During installation, a half-brick bandage is used. The doors are hung on a wire, which is attached to a depth of 2-3 stones with a bend in levels. In the second row a hole is left for the ash pan, and in rows 4-7 for the firebox. The grate is installed on embedded corners. A steel sheet with a hole cut for the cauldron is installed on top.
Chimney pipe installation
The chimney is one of the most important elements of the stove. To install it you will need:
- grinder with cutting discs;
- fittings, elbows with the required rotation angles;
- welding with electrodes;
- steel pipe with a diameter of approximately 100-120 millimeters;
- hammer.
The installation algorithm should look like this.
Step 1. Lay out the fittings with the pipe on a flat surface in the desired sequence, then connect them together by welding. Don’t forget about personal protective equipment – welding mask, gloves and overalls!
Step 2. Remove all bulges and scale using a grinder.
Step 3. Install the finished chimney in the required place - the hole of the appropriate diameter that was made during laying. Coat the joints with oven clay.
Step 4. Check the pipe to see if there are cracks on it - light a small flame in the combustion chamber and watch how the smoke moves.
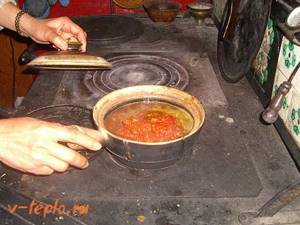
Note! If the structure was built correctly, the cauldron will heat up evenly. To test this, pour water into it. With uniform heating, air bubbles will completely cover the inside of the vessel.
There are several possible options for further finishing:
- jointing;
- painting surfaces with special heat-resistant paint;
- plaster.
We also note that the stove for the cauldron is multifunctional, because you can not only cook various dishes in it, but even boil water or fry shish kebab. For the latter, by the way, an iron rod is laid across the slab on which skewers are hung. As a result, the hot coals will cook the meat as evenly as possible.
Note! The construction of a chimney is, at first glance, a simple procedure, but in reality it is not so. Therefore, it is advisable to entrust this matter to specialists.
Video - Brick stove under a cauldron
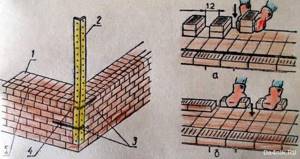
↑ What is order?
The ordering is a simple device that consists of two slats, the length of which is about two meters. They are attached to the lower rows with special brackets in order not to disturb the raw stonework. From these slats, threads are stretched horizontally, along which bricks are then laid. This simple design allows you to lay the bricks exactly vertically.
↑ Preparation
The first thing to start working on your own stove is to decide on the appearance. This is the very first and, probably, one of the most important tasks. After all, when you select a barbecue design that doesn’t suit your site, it’s sad to see an unpleasant picture every day. Although the appearance can be fixed, remodeling is not cheap. The choice of appearance includes the selection of material (red or white brick, stone, cladding) and a drawing of a barbecue with a cauldron. Today, finding a drawing that suits your capabilities is not a problem. After choosing the desired design, the area where the stove will be located is determined. Basic rules for installing a barbecue:
- The distance between a residential building and the stove complex must be at least five meters.
- Access to the main kitchen should not be limited by a wall. This is done primarily for convenience.
- Don't forget about your neighbors. The barbecue complex should be located away from the neighbors’ property. One of the reasons is so as not to irritate them with the alluring smells of your kebab.
- Those who do not have mason experience are still advised to turn to professionals who have been working in this field for several days. They will be able to do the job efficiently, and this will save your time and effort.
- Before starting construction, it is worth carefully examining the soil on the site. Only then choose the appropriate type of foundation for the construction of the structure.
- An important point is the size of the oven. If you make a low stove, then some time after cooking your back may become very sore, because you will have to bend over often. You should choose the height of the table and stove according to your height. To select your oven size, use your own elbow. The height of the working area should be slightly below elbow level. If the width does not allow you to make a wide structure, then it is best to choose the proven and most optimal barbecue size: 240-250 cm. Such a structure will not constrain you, but will be quite compact.
↑ Material
A variety of materials are used in construction: brick, metal, expanded clay blocks, stone. A beautiful solution would be to lay the stove out of river stone. The surface that will come into contact with fire must be made of fire-resistant bricks. This is important, since all other materials cannot withstand the temperatures created inside the oven. The ordinary cement mortar that holds the bricks together will not withstand the heat. Therefore, instead of cement, fireproof clay is added to the solution. When constructing a furnace complex, clay can also be used. A monolithic structure is assembled from it, avoiding laying with brick or stone. But a special kind of fatty clay is required.
Stone stoves look impressive and beautiful; they are often found on the sites of private houses. But they did not gain wide popularity due to the complexity of production.
Rubble stone, sandstone and limestone are used in the construction of such structures. The main problem with these materials is their different shapes. After all, each element must be carefully selected to each other.
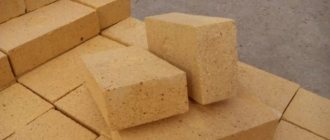
Recently, it has become popular to build garden fireplaces from metal. The material gained such popularity due to its availability and ease of processing. In addition, ready-made metal stoves are sold. But they also build barbecue stoves from this material on their own site. To do this, take sheets of steel or pipes, but with a thickness of at least 5 mm. A common option is to use old propane gas cylinders. Such cylinders have a wall thickness, and even the dimensions themselves, that are suitable for creating such furnaces.
But still, brick was and remains the most reliable and durable material. But not every brick is suitable for these purposes. For example, sand-lime brick is not used for construction. For furnace parts, such as a brazier, red fireproof and fireclay bricks are used. The combustion chamber is lined exclusively with fireclay bricks.
In addition to the brick you will need:
- concrete mixture for the foundation;
- boards for making formwork;
- reinforcement bars for constructing a frame;
- sand and gravel;
- connecting elements for reinforcing bars (wire, welding, clamps);
- waterproofing material for the foundation (dense polyethylene or roofing felt);
- for cooking: metal sink, hose (rubber), mixer, drain;
- for mounting a countertop with a sink, metal corners, fasteners for the grate.
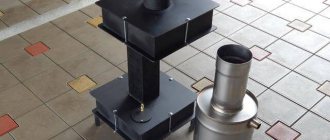
Making a metal stove from a cylinder
As noted earlier, the easiest option for creating a stove is a tripod. We will not consider it, since in this case everything is extremely clear.
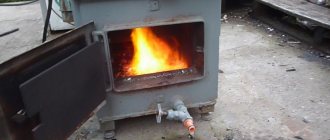
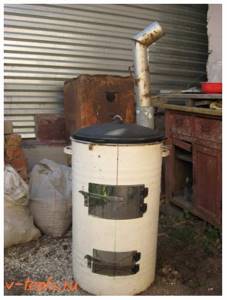
And we’ll talk about a portable metal stove, which is advisable in cases where people do not live at the dacha permanently, but, for example, only on weekends. An excellent option for this is an unused, but still usable gas cylinder with a volume of 50 liters. At one time, such cylinders were extremely popular in the village, but not so long ago they were replaced by electric stoves and natural gas. In addition to the cylinder itself, prepare a grinder for work.
The sequence of actions is as follows.
Step 1. Empty the gas cylinder - open the tap and wait at least a week.
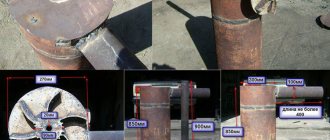
Step 2. Mark the cut line. For our design we will need the part of the cylinder with the bottom. Step back about 25 centimeters from the bottom and draw a straight line.
Step 3. Make a neat cut with a grinder, then try on the cauldron. As noted, it should go in about two-thirds of the way. If the cauldron is too large, then make several 5-centimeter cuts on top in increments of about 15 centimeters.
Step 4. Cut a window 20 centimeters from the bottom for loading fuel. The width of the window should be large so that no difficulties arise in the future.
Step 5. Try it on again to make sure that the cauldron fits tightly enough.
Step 6. Next, you should calcine the stove for the cauldron with your own hands. To this end, remove the cauldron, load the firewood and heat until the odors completely disappear.
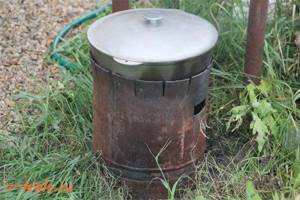
That's it, the design is ready, and you spent a minimum of materials and tools to make it!
Video - Stove for a cauldron from a gas cylinder
Construction technology
A high-quality arrangement of a barbecue with a brick cauldron will preserve the structure for a long time and improve its safety during operation. This stage is very important and requires some time even for professional builders.
Foundation
We proceed to laying the foundation for a grill with a brick cauldron. It is important to follow the sequence here:
| Stage | Comments |
| Dig a trench under the foundation, then cover it with a layer of sand | The depth should be approximately 25-30 cm |
| Cover with a sand cushion and fill with water | Layer thickness – 5 cm |
| Place a layer of gravel or small crushed stone on top of the sand layer. | Layer thickness – 10 cm |
| Make formwork from boards | The protrusion above the ground must be at least 5 cm |
| Lay a layer of reinforcing mesh | Mesh thickness – 15 by 15 or 20 by 20 |
| Fill the concrete level | After filling, wait at least three days |
| Lay layers of roofing felt for waterproofing | Number of layers – 4-6 |
Masonry mortar
At the next stage, prepare the solution. To do this, take:
- 2 buckets of cement mixture;
- 0.5 buckets of slaked lime;
- 1 bucket of sand.
Mix the ingredients in a special container, mix thoroughly and bring the mixture to a thick dough.
Base
Before you start laying a brick grill with a cauldron on the mortar, lay the future grill in rows without mortar, dry. There are two important rules for implementing this stage:
- Keep in mind that between the bricks there will be a layer of mortar 5-10 mm thick;
- When fitting bricks, be sure to use protective gloves to avoid injury;
When everything has “come together” and the result suits you as an architect, proceed to bricklaying with mortar:
- Laying the base, that is, not the hot zone, is done in half a brick;
- When laying bricks, be sure to check all horizontal and vertical lines with a building level;
- When you reach a height of approximately 70 cm on the open side, install 2 steel angles 50 x 50 mm with the shelves facing up. They are needed because from this place you need to lay the bricks of the fourth side wall of the barbecue;
- Next, continue laying 1/4 bricks, that is, lay the bricks on the edge;
- By laying bricks on the side and back walls in 1/4 bricks, you will have a supporting lip for the bottom along the entire inner perimeter. Keep in mind that these are already hot zone rows, so it is recommended to use fireproof or solid red brick.
Do-it-yourself oven for a cauldron made from car rims
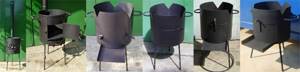
This is probably one of the simplest, fastest and most original ways to make a stove for a cauldron. Let's look at it in more detail
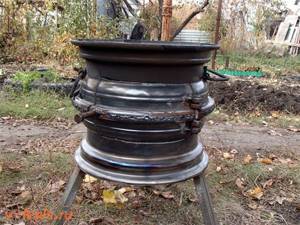
Photo of the finished structure
First of all, we saw off the partition on one of the disks with a grinder; we won’t need it anymore
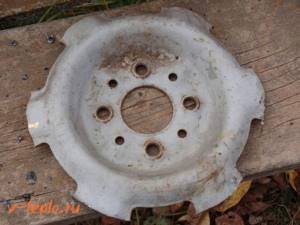
We install one disk on another, so that the remaining partition of the second disk is at the bottom, it will act as the bottom of our oven. We weld the disks together
Next, you just need to cut out the door of our improvised stove, weld the handles and stand.
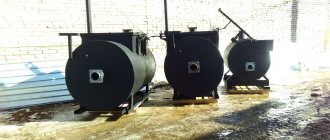
Cast iron stove for cauldron
Cast iron is one of the best materials for a stationary system. Massiveness and strength contribute to a long service life. Moisture does not affect cast iron. A huge advantage of using this metal is its flexibility.
Any shape can be cast, any size, appearance can be any. The chimney can be made permanent or removable. The body is placed on the ground. Possibly on legs. Heat in a cast iron stove is distributed evenly.
The simplicity of the design allows you to make a small oven. In this case, the oven becomes mobile. To put it simply, this is a piece of metal pipe, similar in shape to a potbelly stove, only without a top (if it is missing, a cauldron will replace it). The oven dimensions are arbitrary. The diameter of the cauldrons that are placed on the stove can be adjusted using adapter rings. Rings are added or removed depending on the diameter of the cauldron.
It is best to take cast iron stoves with the thickest possible walls. The system will keep warm for a long time, and most importantly, it will last for many years. The uniformity of heat distribution also becomes a big plus when choosing a cast iron stove.
Making a stove for a cauldron from sheet steel
This is also one of the simplest options for making a stove, which will require:
- the cauldron itself to measure the diameter of the combustion chamber;
- welding, electrodes for it;
- steel sheets - the thicker they are, the better for the structure;
- hammer;
- corners for making handles and supports;
- electric drill;
- Bulgarian.
Note! Work should be done outdoors, near a source of electricity. At the same time, safety rules must also be followed.
Step 1. Measure the circumference of the cauldron - according to the obtained size, further work will be carried out.
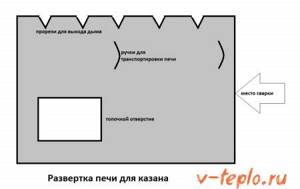
Step 2. Using a grinder, cut a rectangle from a sheet of steel, the length of which would be equal to the circumference of the cauldron. Make a hole in the rectangle.
Step 3. In the upper part of the future structure, mark and make several vertical slits so that the smoke can subsequently escape freely. Next, cut a rectangular hole at the bottom for loading firewood.
Step 4. Roll the sheet into a cylinder. To do this, use the appropriate form, wrap the steel around it and achieve extreme precision with a hammer, or (if possible) use special sheet bending equipment.
Step 5. Cut out supports and handles for the structure from the corners.
Step 6. Using welding, connect the sheet into a cylinder, then weld the bottom, handles and support elements to the structure. Although the latter can be screwed using ordinary bolts, having previously made holes in the steel.
Note! To protect the stove from corrosion, paint it with heat-resistant paint in several layers. That's it, you can put the cauldron in, load the fuel and start the fire!
Let's improve the design
For this purpose, we equip the stove with a chimney pipe, grate, ash pan and doors. The manufacturing procedure is the same as described above, but you will have to add a few points.
Step 1. Cut not only the firebox hole, but also another, smaller one located below, for the blower. At the top, cut a third hole for the chimney.
Step 2. Install a grate between the combustion and blower cutouts by welding supports - pieces of corners - inside the housing. To make a simple grate, you can use steel wire - fold the pieces of the required length and connect them together by welding. There is no need to attach the grate to the supports.
Step 3. Weld the chimney to the corresponding hole in the housing. It is important that the height of the chimney exceeds human height, otherwise smoke will get into the eyes.
Step 4. Equip the chimney with a spark arrester - a tin can with numerous holes made in it.
Step 5. You can cut the doors from the same sheet steel, although you can purchase ready-made ones.
As a result, you will get this kind of stove for a cauldron with your own hands, which is convenient to clean from soot and where it is convenient to load fuel. Smoky gases will be discharged into the chimney, and draft adjustment will be carried out by the blower door. Although it is not so convenient to transport such a structure, since it is larger.
What is a fireplace for a cauldron?
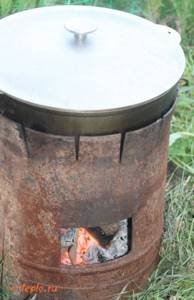
A fireplace is a stationary or portable stove, either factory-made or home-made. This is usually a round structure that looks like a barrel. Such a stove consists of a bowl, a fence around it and a chimney with a grate for continuous air circulation. Such structures are made from any heat-resistant materials that accumulate heated air around the hearth. In a stove that is closed on all sides, the flame is not blown out by the wind or flooded by rain, and the amount of wood needed is much less than for a fire.
They use both factory-made metal hearths and stoves made with their own hands from heat-resistant materials at hand.
The design should evenly heat the walls of the cast iron cookware. It is important that the size of the hole matches the dimensions of the cauldron. In addition to the cauldron, you can cook in other dishes.
Distinctive design features
The design of a stove for a cauldron is almost the same as a regular one, and the main difference is the hole located in the stove - it is in this hole that the cauldron itself will be installed. According to the requirements, the hole must be of such a diameter that 2/3 of the cauldron is located below the cast iron stove. If it is smaller, then the heating will not be uniform, and if it is large, then you can forget about conveniently removing the cauldron.
Note! Nowadays, plates with rings of such diameters are produced so that any utensil can be installed.
The oven itself can be:
- clay;
- brick;
- converted from another metal device.
Construction of a clay oven requires appropriate skills, but options No. 2 and No. 3 can be done with your own hands.
Design requirements
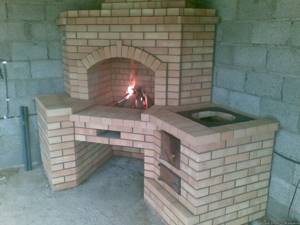
So, let's start building a stove for installing a cauldron. The simplest and most practical option is a brick stove with a chimney and a hole made for installing a cauldron. In this design you can always cook not only liquid food, but also treat your friends to barbecue. And this option can be made cheaper by doing it yourself.
- For normal cooking, there must be a sufficient amount of firewood under the cauldron.
- Ensuring uniform heating.
- Normal burning of wood.
- Dust and combustion products from the fire should not get into the cauldron.
- The structure must be fireproof. There should be no combustion products left after use.
- There should not be a need for a large amount of firewood (high heat transfer).
- The cooking process should not cause burns or various injuries. The possibility of carbon monoxide poisoning is excluded.
Furnace design for working with a cauldron
This design is not very complicated. It resembles a barbecue, but round. The cauldron is always used for cooking, only with an open flame. Therefore, this option is taken into account in the design of the stove.
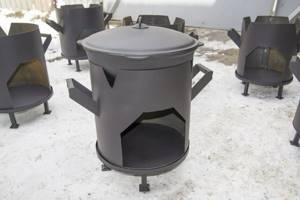
The optimal design for working with a cauldron would be a special system equipped with removable legs. A sufficiently large area allows you to install dishes and cook right in your garden. Transport the stove to any place thanks to its collapsible design. With the onset of cold weather, she can be taken home.
The stove on which the cauldron is placed resembles a metal cylinder. It is supported by massive legs. The bottom is made at the bottom, the top part is missing. If a special desire arises, it can be equipped with a chimney, but this is not at all necessary. In such furnaces, special cutouts are made at the top of the cylinder. They play the role of a smoke exhaust.
When food is cooked, there is an economical consumption of heat, since the flame is well protected from strong winds. In this design, the dishes are completely closed from the wind, therefore, they warm up much faster.