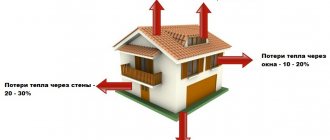
More and more families are thinking about moving permanently to their own private house with a plot of land. And what can warm you up and restore your vigor after working in the garden, if not a heater like a stove. Since ancient times, the Russian hut has been heated by these sources of warmth and comfort, be it a huge, half-yazha-sized Russian stove with a stove bench (or a rough one) or a small “Dutch oven”.
Of course, they are being improved, new technologies and materials are being used. The ancient mud stove is a thing of the distant past, but even now the stove is a symbol of the hearth.
Currently, depending on the preferences of the owners, they install stoves and fireplaces of various types and try to decorate them in accordance with their taste.
This gives the entire appearance of the premises a special zest, unique flavor and comfort. People have long tried to decorate the stove. Or paint it with patterns on the plaster or, in rich houses, decorate it with tiles.
This tradition has not died out even today. Even in a small country house, they try to give the stove a presentable appearance.
- 2 Sandstone and shell rock
- 3 Beauty majolica
- 4 The oldest type of ceramics
- 5 Clinker tiles
- 6 Porcelain tiles
- 7 Tiles - man-made beauty
- 8 Do it yourself
- 9 How else can you decorate the stove?
Finishing materials
To decorate a brick oven, they mainly use different types of tiles, but you can paint the plaster with bright colors, considering it as the most budget option.
It is necessary to understand what types of finishing materials there are for this:
- natural stone (sandstone, shell rock, serpentine);
- bright painted majolica;
- ancient unglazed terracotta
- heat-resistant clinker tiles;
- the latest novelty is porcelain stoneware;
- exquisite tiles.
All these facing materials for stoves meet the necessary characteristics:
- sufficient thickness (6-9 mm);
- withstand high temperatures;
- increased strength under mechanical stress;
- the structure is quite low-porosity.
If when tiling a sauna or stoves in a bathhouse, only heat retention is important, then when decorating a home stove, you need to think about the design of the entire room.
You can find out more about the types of brick kilns by following this link:
Decorating the stove in the house
There are a number of options for decorating the stove in the house:
- Decorative painting.
- Application of stencil stamps with various patterns and ornaments.
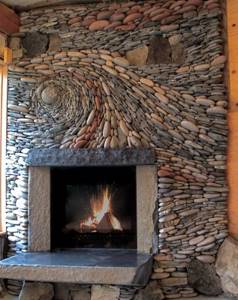
- Finishing the stove using decorative stone.
- Decoupage.
Professional stove makers prohibit decorating the stove with sheets of plasterboard, except in cases where it serves only a decorative role. If a false fireplace is installed in the room, then this method of finishing can be quite an interesting solution. The structure is created from plasterboard panels, after which it is decorated with vinyl wallpaper with imitation stone or brickwork. Setting up decorative stoves and subsequent decoration does not require much effort or financial investment.
Modern designers also decorate stoves with glass wallpaper or fiberglass mesh. Such materials are characterized by fire safety and compliance with all environmental standards. Surface treatment with such elements allows you to paint them in any color, according to the style direction of the interior.
The stove is also finished with refractory bricks. The material is not afraid of being exposed to high temperatures and is often used for blast furnace work. However, due to its high cost, it is rarely used for lining home stoves.
The use of various decorative fragments will allow you to turn the stove into a useful heating device with a beautiful appearance.
Regardless of the chosen finishing option, facing activities require careful preparation and responsibility. The process itself gives novice masters a lot of positive emotions. Therefore, if you show a little imagination, you can develop a stylish design for a heating device, turning it into an interesting addition to the interior of your home. The main thing is to know about existing finishing methods and take into account the recommendations of specialists.
Beauty majolica
The tiles, painted with bright fiery colors and covered with a durable layer of glaze, came from the Mediterranean.
Ancient Roman traders brought it from Mallorca. The area was famous for its tin-lead painting on ceramic tiles and pottery.
Glazing serves as another layer that retains heat inside the finishing material, so majolica was in demand as an excellent type of cladding.
Only wealthy people could decorate their stoves with such beauty.
Briefly about the main thing
Building a brick stove in a house or country house is far from the final stage in decorating a room. The stove structure also needs to be coated with paint.
Before decorating the structure with paints and varnishes, you should seal the cracks, treat the joints and clean up the irregularities. If you don’t figure out what paint to paint a brick stove with or don’t carry out additional surface treatment before painting, very soon the brick will begin to crumble.
The stove can be painted with polyurethane or silicone paint; the most budget-friendly method is ordinary lime whitewash.
It is important to follow the painting instructions: first treat hard-to-reach places and depressions with the composition, and only then apply the substance to the main area.
Ratings 0
The oldest type of ceramics
Terracotta is a special type of clay with a porous structure. In fact, it is the same majolica, but not glazed. It is considered the most ancient type of cladding. It has high strength and bright color.
Pressed clay of a certain grade is first pressed and then fired in special kilns. It turns out to be an excellent decor for cladding.
Terracotta was used in construction for roofing, various types of cladding, and to decorate stoves and hearths.
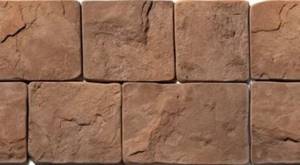
Use of stone (artificial and natural)
Natural stones used include sandstone and shell rock. They look no worse than tiles, but are much cheaper, and besides, you can do the work yourself. And artificial stone is very affordable.
Some people choose natural stone for this purpose, others prefer artificial stone because it is cheaper, has more variety of options, and the right colors. But the principle of installing them on a brick oven is the same.
Clinker tiles
A European material created for cladding fireplaces and stoves as opposed to decorative brick in houses in Holland, Norway and a number of other Northern European countries.
Usually several types of clay are pressed, with the addition of certain parts of fireclay, various dyes, and fired. The result is a tile with a pleasant shade of beige, from milky to bright orange.
This is a material 9-12 mm thick, with a microporous structure, capable of retaining heat well.
Types of cladding for furnace devices
Before carrying out work on lining the furnace, you should very carefully select the material to change the appearance of the furnace device. Properties to consider when choosing materials:
- high temperature resistance;
- good heat dissipation;
- mechanical reliability, practicality;
- strength of adhesion to the solution;
- aesthetic appeal.
Most often, materials with a thickness of at least 6 mm with a low-porosity structure are used for lining the furnace.
Since ancient times, brick, natural stone, tiled material, and ceramic tiles have been used to change the appearance of the stove. Modern industry offers artificial stone, as well as soapstone, for such work.
Application of bricks
Brick cladding can be done simultaneously with the laying of the furnace itself. It can compete in beauty with such expensive materials as granite and marble.
For better adhesion, one of the surfaces of the brick should be rough; the outer side, on the contrary, should be smooth to look most aesthetically pleasing. Of course, refractory bricks should be used for such work. This material is also used to decorate a metal stove. To “smooth out” the different heating characteristics of metal and brick surfaces, a layer of ballast made of dry sand of fine consistency is laid between them. This step will prevent deformation of the decorating layer when the heated metal expands and increase heat transfer.
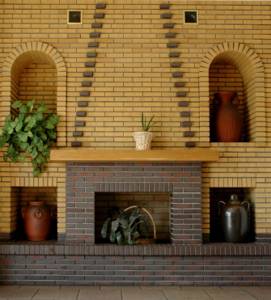
Brick cladding drives the stove to the form that is most familiar to perception
Using ceramic tiles
Glazed ceramic tiles are suitable for lining space heating devices, but have limitations on their use. This is due to the fact that it will not be able to withstand temperature deformations, since it is not equipped with special hooks and locking connections. Some craftsmen combine brickwork and ceramic fragments when facing a stove. The juxtaposition of these materials looks good and is a practical way to improve the appearance of the stove.
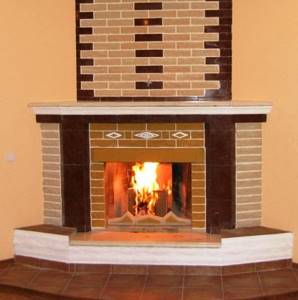
By combining materials such as brick and ceramics, you can achieve a unique appearance of the stove
There are several types of ceramic tiles that can be safely used to decorate a stove:
- terracotta;
- clinker;
- majolica;
- porcelain stoneware
Terracotta tiles
Terracotta tiles are famous for their ability to withstand super-high temperatures (up to 1000°C). This tile is environmentally friendly, because no chemicals are used in its production, even as dyes. Natural shades of different clays provide a color that is pleasing to the human eye. By using it, you can achieve optimal thermal conditions, since this material has a porous structure that retains heat well.
Terracotta tiles are very suitable for stove lining due to their heat resistance and beauty
A long service life and a relatively low price are the properties of this material that make it attractive to use for lining stoves and fireplaces.
Clinker tiles
Clinker tiles do not have such high heat transfer rates as the terracotta type. But stove masters also use it for cladding. The undoubted advantage of this material is its long-term heat retention, although there is also a significant disadvantage - slow heating. A kiln lined with clinker tiles can heat up to 1300°C.
The stove with clinker tile finish looks modern and stylish
Majolica
It is named after the island of Mallorca, from where this material was imported to Russia. Very expensive decoration of fireplaces and stoves with these tiles indicated the high wealth of the owners. The production technology is similar to the terracotta variety of tiles, except that a decorating layer of different colors and patterns is applied on top of the clay base. This fact significantly increases the cost of the material.
Only wealthy people can afford to line the stove with majolica
Porcelain tiles
Porcelain stoneware is a durable material with good moisture resistance and strength characteristics. Porcelain tile coating is resistant to various chemicals, so this coating can be washed with modern detergents.
Tiles
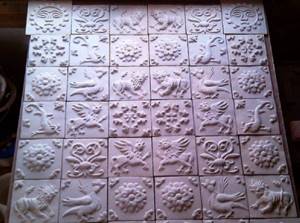
Furnace masters have been struggling for a long time to create a universal material that is resistant to temperature changes, and therefore to temperature deformations. Tiles provide significant assistance to stove makers, since their special configuration made it possible to practically use clay tiles for lining stoves.

The beauty of tiled stoves makes them the center of attention
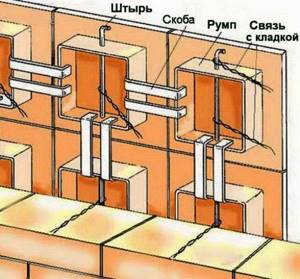
The back side of the tiles was equipped with special projections (rumps), which made it possible to reliably connect the array of masonry and tiles.
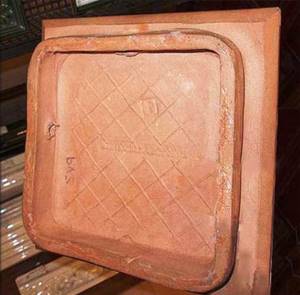
Thanks to the special design of the back side, the tiles adhere well to the stove
Special hook brackets are used to connect the tiles to each other, and mortar placed in the space between the tiles and rums is also used for the same purpose.
Real masters of this business have knowledge of the correct lining of stoves with tiles.
Working with tiles requires certain skills, so for cladding with these materials it is best to contact qualified specialists.
Cladding a home stove with stone
For the external decoration of the stove, you can use both natural stone and its artificial imitation. Environmental friendliness, strength, durability, compliance with all the requirements of a stove device - these are the main characteristics that allow the use of natural stone for cladding stoves and fireplaces. This decor looks beautiful, elegant, luxurious. Of course, the cost of natural stone is quite high, so not all stove owners can afford such finishing.
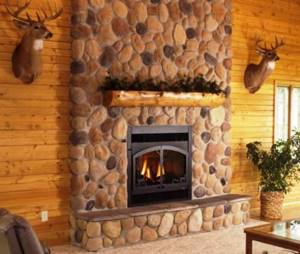
Beautiful and expensive fireplace decoration with real stone - expensive, but impressive
In the case of a budget option, you can use artificial stone, which in appearance is not inferior to its natural “brother”. The production of artificial stone is less expensive, so the price of this material becomes much lower. At the same time, many properties of the natural material are preserved - a beautiful exterior, a wide range of colors and textures.
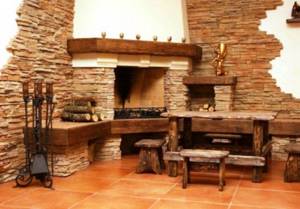
Externally, artificial stone is almost no different from natural stone
Soapstone chlorite
This modern finishing material is a volcanic rock with excellent qualities suitable for lining a stove:
- heat resistance;
- strength.
Its cost is high, most often due to skillful marketing. There are more economical and practical materials that can be used to improve the appearance of the stove.
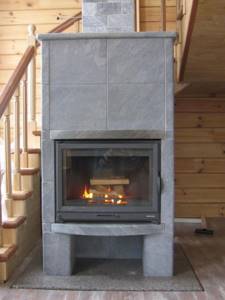
The facing material soapstone fits perfectly into a modern interior
Tree
Some wooden inserts are also suitable for facade decoration, but nothing more. Such cladding conducts heat poorly and is fire resistant. It is best to use wood for cladding the stove in fragments, making elements adjacent to the stove from this material: shelves, benches, corners. It is best to use wood for cladding the stove in fragments, making elements adjacent to the stove from this material: shelves, benches, corners.

Wood looks great as a decoration when decorating a stove
Video: how to line a Russian stove with tiles
Porcelain tiles
Its creation dates back to the 80s of the last century.
Porcelain stoneware is intended not only for finishing stoves, but is also widely used in construction. To produce it, several types of special clay are required with the addition of quartz sand, various types of natural dyes and a fine fraction of marble or granite.
The whole mass is well kneaded and pressed at fairly high temperatures under pressure. The result is a durable product that is not afraid of strong impacts and high temperatures, and retains heat well.
This is a monolithic material that can be given any color during manufacturing.
Thanks to modern technologies, porcelain stoneware can be made in the form of majolica, terracotta or tiles. The cost of such material is not high in comparison with the original ones.
Plastering the stove
Using plaster as a material for finishing a brick oven is one of the simple and affordable finishing methods. It helps to refine or restore the attractive appearance of the stove. In order to use plaster in your work, you do not need to know the secrets of preparing the mixture, since you can easily purchase a ready-to-use version in specialized stores. Heat-resistant mixtures, which only need to be diluted with water in the required proportion, are suitable for plastering not only stoves, but also fireplaces.
Types of heat-resistant plaster
Features of upcoming work:
- It is allowed to begin plastering according to the work technology only after 30 days have passed from the date of completion of masonry work;
- It is necessary to make sure that the structure (wall) has given the required shrinkage and that the solution used is completely dry;
- Before applying plaster to the brick surface, it is necessary to carry out special preparation - clean the brick surface from the remaining mortar, treat the seams, apply a layer of penetrating primer to the masonry;
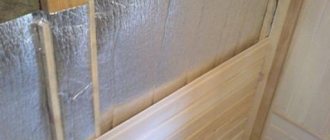
- After the primer has completely dried, a metal mesh should be attached to the stove body, which will be finished with plaster, the cells in it should not exceed 2 cm.
The mesh is fixed using long nails; they must be driven into the seams between the bricks. It is important to stretch the mesh so that it does not fit too tightly to the wall, since after heating the brick expands, therefore, the plaster may crack. The mesh must be used in the work because it makes the brick surface rough, due to which the plaster solution holds better.
Feature - the first layer of plaster should be thin, the solution for it is liquid. After its application, the corners are leveled and processed. The layer should dry completely naturally without heating the oven. The appearance of cracks is a normal process; they will need to be moistened with water and expanded slightly.
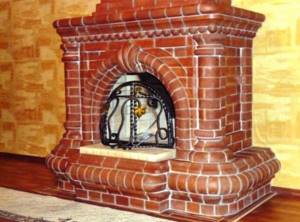
Tile - man-made beauty
This is a beauty created from different types of clay.
The manufacturing technology came from ancient Babylon and has survived to this day. The tile is a box shape, thanks to which heat retention increases significantly.
This is a piece and expensive finishing material. In past centuries, only very wealthy people could cover a stove with tiles.
Beautiful boxes, each with an individual design, were incredibly expensive, but were in great demand.
Nowadays, tiles are also popular.
Cladding the stove with tiles
The use of tiles as a facing material allows you to obtain an unusual decorative coating, characterized by luxury and sophistication. Fastening is carried out through complex installation.
The surface of any high-quality tile resembles glazed ceramic tiles; the inside has a special protrusion called a rumpa. It is this that allows you to attach tiles to brickwork. Reliable fixation to the surface is carried out using an anchor method - a special furnace wire is used.
Tiles are the most expensive finishing material. Any pattern can be applied to them, which allows you to create an exclusive, unique surface. Antique tiles are a luxury item with high artistic value. The peculiarity of modern tiles is that each element is still made by hand, including the stages of firing and painting.
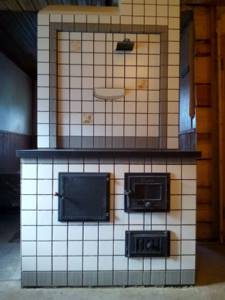
Tiled stove
There are several ways to install tiles on the stove surface, but it is more convenient and faster to do the cladding simultaneously with the construction of the brickwork. A person without experience will not be able to carry out such complex work on their own, so it is recommended to turn to specialists to ensure that the cladding is smooth and durable.
Scheme of brickwork with tiles
You should correctly understand that before you start lining a brick oven with ceramic tiles, the walls will still have to be plastered. This plaster layer is not only a preparatory layer for covering surfaces with decorative material. It also performs a protective, sealing function for previously laid brickwork.
A layer of ceramic tiles protects the walls of the stove from rapid cooling and, when heated, perfectly transfers heat into the room.
— Fixing finishing tiles with special heat-resistant glue.
— Installation of cladding without the use of glue, when ceramic tiles are inserted into the grooves of metal profiles fixed to the walls. This method allows, if necessary, to replace damaged elements by removing old ones and inserting new ones into the frame, sliding them along the grooves of the guides. By the way, this also opens up the possibility of changing the appearance of the stove over time - you can “revive” it by installing new fragments.
This publication will discuss both methods of cladding the walls of the furnace - by fixing ceramic tiles with a special glue, and without the use of glue - using a metal frame structure.
Before moving on to the description of the finishing work itself, you should first consider all the necessary operations in preparation for their implementation. We must not forget that preparation is no less important a process than the cladding itself, since the quality and reliability of the finishing will directly depend on this stage.
We suggest that you familiarize yourself with the Sauna stove cast iron or steel
The first step, before plastering and facing with any of the chosen methods, the surface of the stove must be very well prepared. These measures must be carried out with the utmost care, since adhesion between the mortar and the wall, and subsequently between the plastered surface and the facing tiles, will depend on this. In addition, a smooth, cleaned wall is more convenient for carrying out work and for leveling rows of tiles on its surface.
| Illustration | Brief description of the operation performed |
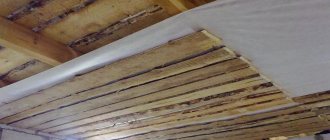
| In order for the wall to be smooth, it must be cleared of old plaster, otherwise the tiles will begin to fall off along with it over time. To simplify the removal of clay layers, it is recommended to wet all surfaces of the oven with water, and this must be done several times. It is best to carry out this process using a spray bottle, since the spray gets on and under the old plaster layers. Wet layers will be much easier to separate from the wall surface - they are picked up with a spatula or a wide chisel, and, if necessary, also beaten with a hammer. The old solution must be completely removed from the surface. | |
| The next step is to generously moisten the surface cleaned of plaster with water from a spray bottle. Next, the walls are cleaned with a metal brush, and the seams are deepened by 7-8 mm using a narrow chisel (you can also use a grinder - but be very careful not to take the solution too deep). In the case when it is planned to veneer a newly built stove, this process should be carried out only after the masonry has shrinked, that is, at least you need to wait six to eight months. | |
| The cleaned wall surface must be primed. Such penetrating impregnation will create favorable conditions for the adhesion of the plaster mortar and the brick wall, as it will bind sand and clay deep in the masonry joints. The old solution will not crumble and interfere with normal adhesion. To proceed to the next stage of work, you must wait until the soil has completely dried, as it should create a kind of film on the surface. | |
| In order for the cladding to be neat and the tiles to lie flat, the walls must be checked for compliance with the vertical plane - this process is carried out using a plumb line and a building level. If significant differences are detected, they must be eliminated, since this is unlikely to be done with tiles. To get rid of unevenness on the wall, metal beacons are fixed to its surface using gypsum or clay mortar - special metal guides are usually used as them. It is recommended to apply a leveling layer of no more than 10 mm to the brick wall. But if the wall has more serious deviations from the vertical, then leveling will have to be done in several stages, applying several thin layers of mortar. | |
| The walls are leveled with a solution mixed from a dry, heat-resistant plaster or clay mixture. | |
| The dry mixture is poured into water (the proportions for making the solution should be indicated on its packaging), and then mixed using an electric drill with an appropriate nozzle to obtain a homogeneous plastic mass. | |
| The finished solution is thrown onto the wall using a trowel slightly thicker than the level of the installed beacons. Then, using the rule, the plaster layer is leveled along them to perfection. | |
| In the case when the furnace wall does not have significant deformation, and a thin layer will be sufficient for its final leveling, the plaster solution is applied and distributed over the surface with an ordinary wide spatula (trowel). | |
| When removing the old plaster coating, chipped bricks at the corners may be found underneath. To ensure that when tiling walls there are no empty cavities left underneath in places where there are chips, it is recommended to strengthen the corners of the old masonry with a perforated metal or regular metal corner. | |
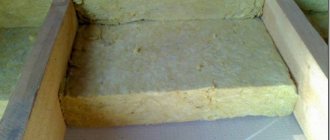
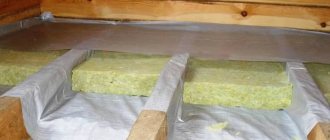
| After applying and leveling the plaster layer over the entire surface of the wall, it is reinforced with a fiberglass reinforcing mesh, which is applied to the solution that has not yet hardened and pressed against it with a wide spatula, as if pressing the mesh into the plaster. | |
| After the reinforced plaster mixture has dried, another thin, covering layer of mortar is applied on top of it. After applying the leveling layer, the oven is left until completely dry. It should be noted here that if a thick layer of plaster is applied to the walls, then it is reinforced with a metal mesh with cells measuring 15÷20 mm. It is stretched and secured to the surface with nails with large diameter heads. In any case, the tiles are glued only to a completely dry wall. | |
| If the tiles are fixed to a plastered wall with glue, the surface will need to be coated again with a primer solution. Readiness for further work is only after the last applied primer layer has completely dried. |
The process of preparing a wall for cladding is far from the most pleasant undertaking, but it must be taken seriously if the result is a neat finish that will adhere reliably to the surface of the stove for many years.
Before moving on to the description of the process of installing tiles on the walls of the furnace, a few minutes of attention should be paid to adhesive compositions suitable for this purpose. In addition, the rather complex process of cutting ceramic tiles requires lighting, since incorrect actions are quite capable of ruining the entire work.
The adhesive composition used for laying tiles on the walls of a brick kiln must have special characteristics, as it will be exposed to high temperatures.
As an example: packaging of a special dry construction mixture - heat-resistant adhesive for lining stoves.
Some tilers prefer to prepare the adhesive solution according to their own recipes. For example, one of them is quite simple. The mixture is made up of Portland cement, PVA glue and a small amount of salt. However, the difficulty in creating such glue options lies precisely in the correct selection of proportions.
Therefore, if there is no accumulated experience in this matter, then it is best to use a ready-made dry composition, sold in hardware stores in paper packaging. All the necessary ingredients have already been added to this glue, and all that remains is to add the required amount of water and mix until it becomes a homogeneous plastic mass.
Experienced tilers also add a little salt to the finished adhesive composition, as it accumulates moisture, not allowing it to completely evaporate quickly from the solution, maintaining the plasticity of the mixture.
Ceramic tiles have a very high hardness, so they are not easy to cut, especially in cases where it is necessary to cut out complex shapes. In order not to spoil the material already during cladding, it is recommended to study in advance information about the technology of correct cutting so that you get a smooth edge without protrusions and burrs. Better yet, practice on some unnecessary fragments to get better at it.
The simplest and most convenient option for cutting in a straight line is to use a special tile cutter
Do it yourself
In order to cover a brick stove with tiles with your own hands, you need to carry out preparatory work and prepare the tools needed for the job:
- rack level and plumb line;
- construction trowel and spatula;
- paint brush (it’s better to take a wide one);
- special tile cutter;
- a hammer or mallet with a rubber top;
- a brush with metal bristles;
- convenient container for the solution;
- fireproof heat-resistant adhesive.
This article will help you deal with the repair of a brick stove:
Decorating a stove with tiles is not an easy process, so professionals are invited for such work, but laying tiles can be done by an owner with good hands.
- To begin with, the stove is cleaned of the mortar remaining after laying. This is best done with a wire brush and rubbing with a damp rag or sponge.
- Cover and secure a special metal mesh over the entire surface (mesh size no more than 20mm). Self-tapping screws or nails are used as fasteners.
- The structure with the mesh is plastered with mortar, leveled and allowed to dry. At the end of drying, when the solution no longer cracks, the oven is heated well.
- They begin to glue the tiles. Masters recommend starting from the corners and bottom rows. To make the rows even, use a level and crosses.
- The simplest and most enjoyable stage is grouting the joints and applying a heat-resistant compound. Before grouting the seams, allow the entire structure to dry for about three days. After this, you can remove all construction debris and wash the tiles.
Painting
After choosing what to paint the stove in the house with, purchasing materials, preparing the surface, they put on protective clothing, take the tools they are going to use, and begin the painting process.
Step-by-step instruction:
- Close windows and doors to prevent drafts. Air currents will increase the likelihood of dust and small particles settling on the painted surface, which will negatively affect the appearance of the stove after complete drying.
- Thin the paint first if it is thick. Some experts recommend filtering the substance through cheesecloth to make sure that there are no garbage elements in it. This is also important if you decide to use a spray gun, so that the operation of the device is not hampered. This is also necessary when using paint of questionable manufacture.
- Regardless of the type of tool that is used, the work involves a certain algorithm for applying the composition: first the edges are processed, then the depressions and inconvenient places, then the main area.
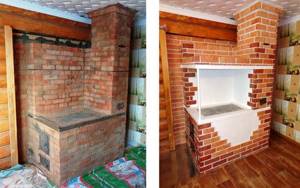
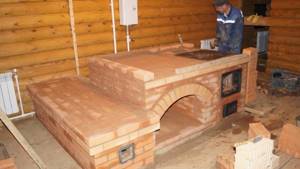
Features of masonry
A modern country house requires a special approach to the laying and design of such a complex and powerful heating unit. First they make a backfill - a chamber. It acts as a kind of battery, retaining heat in the house.
The cooking chamber is covered with a roof. It is designed strictly according to the formwork - plank or metal. When laying bricks, they are placed on both sides at once. The angle of inclination will depend on the shape of the arch. This is necessary so that the load is evenly distributed throughout the structure. At the end of the work, the master forms a wedge castle from brick.
The chimney is installed in the furnace itself. The height of the element must be higher than 5 m from the level of the blind hearth. There are no horizontal sections or turns needed. A well-formed vertical (like for a fireplace) is enough.
Other directions
Traditional Russian stoves with couches in modern apartments are often decorated in ethnic styles, very far from Slavic symbols. The most fashionable formats are oriental and Mexican.
The Russian stove in the interior of houses is a wonderful element that decorates the location and gives the room a unique atmosphere of comfort and homely warmth. With the help of the right design and well-chosen decor, you can turn your home into a real work of art.