The heating element is the most important and most frequently failing part in instantaneous, storage and instantaneous storage water heaters. Poor water quality negatively affects the life of the heating element. Over time, it becomes covered with a layer of scale and begins to rust. Through corrosion of the tube with the appearance of tiny microcracks leads to exposure of the conductive thread, which, when in contact with water, creates a danger to life and health. If the device stops supplying hot water, then first of all, check the serviceability of the heating element. Simple steps will help you save time, more accurately diagnose the cause of the problem, and protect yourself and others.
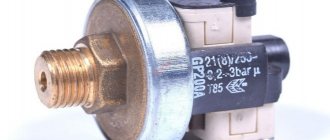
RCD for water heater
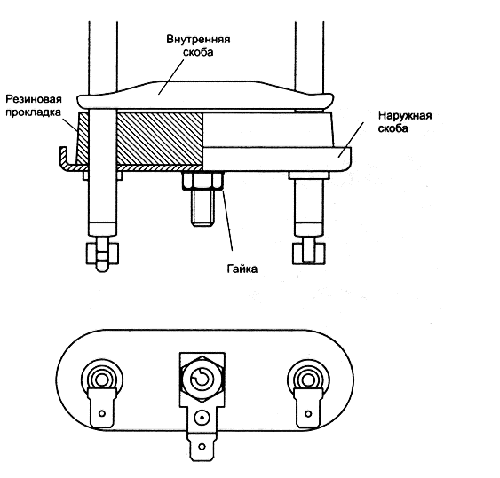
An RCD is a special device that helps protect a water heater from current leaks. The RCD looks like a small box with two lights and one button.
The operating principle is as follows:
- The RCD is installed directly in front of the water heater itself; all the electric current passes through the RCD, which powers the boiler mechanism.
- As soon as a current leak occurs inside the boiler, which can become life-threatening, the RCD will detect the leak and turn off the entire system. The RCD operates using special sensors and switches.
What does an RCD look like?
Reasons for disconnecting the RCD:
- Incorrect location of the RCD. If the RCD is connected in the wrong place, then the system will conduct through itself the wrong electric current that is needed, so in the event of a breakdown, the system will not be able to protect a person from current leakage.
- The insulation of the heating element is damaged. This function protects the entire system from the passage of current through water. In old or unknown cheap models, this element can be damaged, so even with normal hand washing a person can receive an electric shock.
- Leakage current. A common reason for tripping the RCD is a broken cable or any other wire inside the boiler. In frequent cases, the cable is damaged from the inside, so the current is transferred to the boiler body, and since it is metal, the shock can be very strong when touched. In this case, you will have to check it from the inside.
It is important to install the RCD correctly, because it is what saves you from fires, explosions and other various situations that can harm others
Checking the water heater thermostat
A water heater thermostat is a device that regulates the heating of the boiler and controls the water temperature. In simpler terms, a thermostat is needed to heat running water to a certain temperature, and then automatically turns off and also automatically turns on when the water has cooled to a certain temperature and needs to be heated again.
You can check the thermostat as follows:
First you need to remove the thermostat and find out if it is working. It needs to be switched to resistance measurement mode.
Water heater thermostat
- Then you need to set the maximum temperature and measure the resistance at the thermostat output and input contacts. The thermostat is broken and malfunctioning if the system does not respond at all.
- If the thermostat is working and the system has responded, then the regulator flag must be set to the lowest value and the tester contacts must be connected to the boiler contacts.
- Finally, you need to heat the tubular element of the thermostat using a lighter. If the system turns out to be working, the resistance indicator will increase greatly.
To check the thermostat you will need a multimeter, which was used in the first case; it is very functional.
Multimeter
Routine water heater inspections are essential to avoid disastrous results such as electric shock, water heater bursting, neighborhood flooding, and more. In everyday life, every person needs to have a multimeter, since all tests are carried out with its help. If, during the inspection, any malfunctions were noticed, then you should not do the repairs yourself; you should call a specialist who will help solve the problem.
How to check the heating element for serviceability
Inside the heating element there is a wire spiral having a high electrical resistivity. And at the moment current is passed through it, it heats up. This helps fill the space between the spiral and the body with heat, which is why the water is heated. But sometimes heating devices stop performing their direct function, and the main reason for this is the breakdown of the heating element
Checking with a multimeter
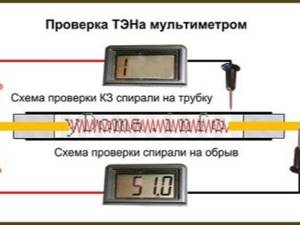
At the initial stage, the device will need to be activated in the minimum resistance measurement mode. Then we take the ends of the device and touch them to the terminals of the component. If the spiral is broken, then the value “1” will appear on the device, which will replace the real resistance. And this is the same as endless resistance. This indicates that there is a break in the circuit, and the part must be urgently replaced.
But in situations where “0” appears on the device display, they will indicate a short circuit has occurred. And in this case, an urgent replacement of the component will also be required to resume heating the water.
It is also mandatory to check for current leakage. For these purposes, we activate the buzzer mode on the multimeter. We lean one probe against the terminal, and the second against the body of the heating element. If the buzzer makes a characteristic squeak, the part needs to be replaced.
Checking with a contact lamp
You can check the heating element without a multimeter, using a test light. This device includes two copper wires with one core. Probes are located at one end, and the opposite ends are connected to the cartridge. The latter contains a 220 V lamp, which is protected by a durable casing. If you want to make such a device, you can do it yourself, and this task will be simple even for an inexperienced craftsman.
In order to check the heating element, you will need to connect a zero from the network to the first contact, and a test lamp to the second contact. If the light comes on, then there is no break, but in the opposite situation, an urgent replacement of the part will be required.
How to choose an apartment electrical panel
What else to read?
everything is clear, except for the short circuit inside the tenge when the resistance = 0... please explain..
Inside the heating element there is a wire spiral with high electrical resistivity, which heats up when an electric current passes through it.
The space between the spiral and the heating element body is filled with an electrically insulating filler with high thermal conductivity, which conducts heat well.
When the heating element is working properly, its resistance should be close to the calculated one.
When the coils of the heating element close, its resistance decreases and is close to zero.
Thank you, everything is written in accessible language.
I thank the author for the articles and video instructions provided. Although I have an engineering education, I received it from a “teacher” who did not know which terminals to connect the welding machine to when he called us to weld his garage door. Now I see that simple, well-known formulas can and should be used in practice, at home, and not be afraid that you will short-circuit or mess up. The main thing is to gain knowledge from practitioners, and what is not unimportant, from those who can clearly explain that there are no questions left.
When testing the heating element, the multimeter emits a short squeak, a resistance of about 400 - 500 Ohms, which rapidly increases to infinity. With periodic testing, the resistance tends to infinity. After an interval of 30-4 seconds or more, the story repeats itself (a short squeak at the start of measurement and an increase in resistance). During operation, it knocks out the RCD on the water heater cord and the differential. machine gun in the shield. I disassembled it and cleaned the heating elements (there was rust and scale) but it didn’t give any results. What can you recommend?
Are you measuring resistance or ringing in buzzer mode? It looks like you need to replace the heating element. And it knocks out the RCD and with it the differential. on the input because they have no selectivity.
if it shows 1 (one), the heating element is broken and also replaced (the pointer tester will show ∞). Can you explain please.
When the heating element's coil burns out, the circuit breaks and current stops flowing through it. Those. there is a break in the circuit. In this case, the multimeter shows 1 (one), and the dial tester shows ∞ (infinity).
Thanks to the author for a clear explanation. I myself have an energy tower, only for power networks (main network). There was little practice in operating electrical equipment. Now it's needed. And I’m very grateful that the author sorted everything out. Thanks again.
Please, I'm glad the information was useful!
D. day the same problem as under No. 6, only the ten produces 18 Ohms. The case does not ring, as it should be. But the RCD in the shield and on the cord immediately knocks both out when turned on. I can’t imagine under what conditions this could happen. Two years without problems.
Hello. The RCD trips if there is a current leak in the circuit. The reason may not only be the heating element. Humid environment - check for moisture.
If possible, check the insulation resistance of the heating element with a megameter. If there is a leakage current, the RCD will trip.
Both RCDs are knocked out, because there is no time selectivity, so it will be if there is a leak - both will be knocked out, or the higher one will be knocked out.
Try checking the entire electrical circuit of the boiler up to the plug. It doesn't help, try replacing the heating element.
Hello. Thanks for the article, it helped me figure out that the heating element did not burn out, but unfortunately I could not solve the problem with the boiler. I’ll try to describe the problem and I’ll be glad if you can advise where to “dig”. Timberk boiler with 2 heaters each 1Kw. Each heating element has its own switch 1 and 2. When 1 is turned on, everything works... i.e. The heating is carried out and the temperature is maintained by the thermostat. But if you turn on 2 heating elements (even without 1), after 3-4 seconds the RCD that is located on the boiler plug knocks out. I thought that the heating element had burned out or had shorted out... I disassembled the boiler, found your article, and disconnected the wires. Without the connected heating element N2, if you turn on the RCD, it does not knock out, but it also gives the correct resistance and the “buzzer” does not beep on the heating element body... I’m in a stupor... maybe there are ideas where else to “dig”.... Thanks in advance. PS: I haven’t pulled out heating element N2 from the boiler yet.
Checking the heating element of a water heater using a tester
There are a large number of ways. The most commonly used method is in which the test is carried out using a special tester. Before checking, you need to calculate the resistance for the installed boiler.
Formula for calculation: R=U*U/P, where:
- U - This is a constant value, equal to 220 volts.
- P - This is the power of the device; you can find it in the boiler’s instruction manual or on the factory sticker, which is located at the bottom of the boiler or on the back side.
Using a Multimeter
The multimeter has a flag that you can rotate 360 degrees and select to test any function. It needs to be turned to measure a resistance of 200 ohms. The multimeter contacts should be connected to the heating element connection. If the water heater rings, that is, it is completely working, then the same value will appear on the screen as was previously calculated using the formula.
If the display shows zero, one or an infinity sign, then this indicates some kind of breakdown, for example, a short circuit or break. In this case, you will have to change the part; repair will not work.
Failure of the heating element
Next, you need to check the boiler itself for a breakdown of the casing, this is even easier to do. The flag must be turned until the buzzer rings. The first contact of the multimeter must be connected to the tubular electric heater, and the second to the shell of the water heater or the ground terminal.
If the multimeter starts to beep, this indicates a breakdown of the housing, so in this case you should absolutely not touch the boiler itself, as an electric shock may occur, not fatal, but quite strong.
Application of a megohmmeter
Its flag must be turned towards 50 volts, one contact must be connected to the heating element contact, and the second to the body. If a value of more than 0.5 Mohm appears on the megohmmeter display, then the water heater is fully operational.
How to ring a heating element for an open or short circuit
The next important stage in testing the performance of the heating element is its continuity test to identify two main faults:
1. Breakage of the heater - conductive thread, rod or spiral inside the housing;
Step-by-step instructions that will help you ring the heating element include the following steps:

1. The electrical appliance is disconnected from the network;
2. Disassembled for access to the contacts of the heating element;
3. The power wires from the heater are disconnected;
4. The continuity mode is selected on the multimeter, the probes are installed in the corresponding “COM” and “VMa” connectors;
5. We touch the output studs of the electric heater with the probes, each with its own stud;
6. Possible results:
— No signal - the internal conductive heating rod, spiral or thread is damaged;
— There is a signal - the heating element is not damaged, but a short circuit between its contacts is still possible, this is usually indicated by indicators on the screen close to zero, in any case, it is recommended to check the resistance;
If, when ringing, the display shows “1” and there is no sound from the buzzer, the device is damaged, destroyed, or the conductive element is torn. This is what heats up when turned on. There is no point in repairing it; usually it is simply replaced with a new one.
If the circuit rings, the signal goes out, and the display shows indicators other than “1”, then it is intact.
But it’s too early to rejoice, there is still a possibility that the tubular electric heater is faulty; it is necessary to determine one of its main indicators - internal electrical resistance.
How to check the heating element
First you need to consider how the heating element is tested. To make it clear to you, we tried to delve into practical aspects. You can check the heating element according to the following scheme:
- Before carrying out the test, you should try to calculate the resistance. To perform the calculation, you can use the formula R=U2/P. In this formula, U will represent the voltage in your article. Indicator P is the rated power of the heating element, which can be found in the device passport.
- Before carrying out the test, the device must be disconnected from the power supply. Only after this can you start checking.
- Now turn on the multimeter in resistance test mode.

If you don't know how to use a multimeter, then don't worry. Our website already has information on how to use a multimeter correctly. If you touch the terminal with the probes, then you may encounter the following situations:
- If the value on your screen is approximately the same as in the picture, then this means that the heating element is operational.
- If "0" is displayed, then it means that the device needs to be replaced.
- The indicator “1” will mean that the network was interrupted during the test.
Also, using a multimeter, you need to check the heating element for breakdown. For this to work, the device must be switched to buzzer mode. You need to touch the terminal with one probe, and the heating element with the second. In the photo below you can see how to properly check the heating element for breakdown.
If necessary, you can also perform an insulation resistance test. This is easy to do and to do this you need to switch the device to the “500 V” range. Normal resistance will be 0.5 Mohm. Detailed information on how to check the heating element with a megohmmeter and multimeter can be seen in the video below:
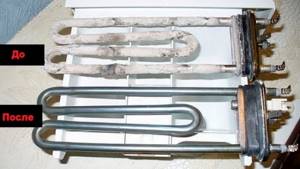
Perform a visual inspection before performing the inspection. To do this, descale the device and then test the element. If you find visual damage, then the device should be replaced.
You can also check the heater for a break using an electrician's test lamp. If the light is on, then there is no break. You can make a similar lamp from scrap materials, and we have an article on how to make a control yourself. These are all ways to check the device.
In some situations, you can also test the device without a multimeter. Below you can also find videos that will help you understand how to check the heating element in a washing machine, boiler or dishwasher.
Checking the heating element using a phase indicator
To perform such a check, first of all, you should determine in the socket where the phase is located. According to generally accepted rules, it should be on the right. Then you should connect one of the contact rods of the heating element with a wire to the phase output.
After this, we touch the opposite contact rod of the heating element directly with the tip of the phase indicator. The indicator light should light up. Then, with the sting of the phase indicator, you should touch directly the tube of the heating element. In this case, the light should no longer light up. If everything happens the other way around, this means:
- break of the spiral (no light when touching the opposite terminal of the heating element), - breakdown of the insulation (i.e. touching the tube with the spiral), if the indicator lights up when touching the tube.
IMPORTANT! This verification method requires extreme caution from the user. If you touch bare skin to those parts or circuits that are connected to the phase wire, you can cause serious harm to health (including even cardiac arrest). Simply put, when checking using phase and electrician control, after connecting to the outlet, you must not touch the body of the heating element.
Tips: how to find out the power of a heating element
In most cases, their power is indicated on the heating elements, but there are other cases. But this is an important parameter of the device that you need to know in order to measure the resistance or replace the heater. After all, when buying a heater in a store, one of the selection criteria is power.
To determine the power of the heating element, you will need:
- Multimeter.
- The current value of the heating element during operation, obtained by measuring with a multimeter.
- Calculate the power value using the formula - current multiplied by voltage. The standard voltage for residential premises is 220V.
The final value of the heating element’s power, obtained when converting from the calculated value, is important. According to the formula, power is obtained in watts, but in electrical appliances it is indicated in kilowatts
In this simple and simple way, you can measure the power of many other electrical appliances or elements, without having any electrical engineering education at all.
How to increase the service life of a heating element?
In order not to think about the need to replace the water heating element for a long time, you should order it only from trusted suppliers who supply water heating equipment. However, before purchasing, you must carefully study the instructions.
Never turn on the boiler with an empty tank. Otherwise, the device may fail and require expensive repairs or even complete replacement.
To improve the quality of the water that enters the tank, you need to install purification filters. An even wiser decision would be to organize the purification of the liquid from all kinds of impurities. Multi-stage filtration devices will help to cope with this.
Do not forget to carry out a preventive inspection of your water heater at least once a year. Regular maintenance will allow you to identify problems in a timely manner and solve them without spending a large amount on it.
How to check the heating element in an electric kettle
Before carrying out the measuring procedure, you must first calculate the resistance that corresponds to the electrical device being measured. In this case, you should know its power. This indicator is indicated in the equipment data sheet or on the case. To calculate the resistance, you must first calculate the current passing through the heating element. This is achieved by dividing the power by the voltage of the electrical network - 220 volts.
After this, the mains voltage follows - 220 volts divided by the resulting current. This will result in a value equal to the resistance. This value should appear on the display of the measuring device as a result of diagnosing the heating device.
To examine the heating element with a tester, you need to switch the device to the resistance measurement area. Then touch the rod with one tester wire. If an incorrect value appears on the multimeter display, this indicates a break in the thread located in the middle of the tube.
The resistance in a 2000W electric kettle should correspond to a value of 25 Ohms. If there is no discrepancy inside the tube, then you need to touch the rod with one probe and the metal pipe with the other. In this case, an infinite resistance indicator should appear on the display. If the reading on the display is of a certain value, this means that a short circuit has occurred.
How to calculate the electrical power of a heating element, knowing its resistance
By measuring the resistance, you can determine the real power of the tubular electric heater and understand whether it corresponds to the declared power for the device and is sufficient for heating.
To determine power, we will use Ohm's law, the following formula:
P=U2/R, W, where P – Power, Watt; U – supply voltage, Volt; R – Internal electrical resistance, Ohm;
Calculation example
So, for example, when measuring you got a result of 20 ohms. Substituting into the formula, we calculate:
P, W Heating element power = 2202V household voltage squared / 20 Ohm Heating element resistance = 2,420 W
Accordingly, the power of the heating element that we tested is 2420 W, which fully corresponds to the declared indicator in the passport. And considering that it passed all other tests successfully, it means that the problem is not in it and you need to look further, for example, ring the electrical circuits or measure the voltage in the socket.
If the multimeter shows a result of 100 Ohms, then the power will be only about 500W. This is naturally not enough for normal operation and full heating of water.
An increase in resistance can be caused by various processes: a decrease in the cross-section of the conductor, oxidation or contamination of contacts, etc. In any case, such a measurement will give you the necessary information for further search for causes.
As you can see, checking the operation of the heating element is quite simple; for this you only need a multimeter and a little free time. Many problems will be revealed by a simple test, and if this does not help, then by measuring the resistance parameters of the heating device.
How to determine resistance readings?
To check the boiler, you will need to calculate the resistance using the following algorithm, based on a school physics course.
- The network voltage is about 220 V.
- The power of the boiler is indicated in the instructions for this washing machine.
- You can calculate the resistance by dividing the square of the voltage value by the declared power. So, for a power of 1800 W, the resistance of the spiral will be 26.8 Ohms. If the device displays exactly this (or closest to it) value, then the serviceability of the heating element is obvious.
This is the working resistance of the boiler. It is this that determines the current strength that loads the electrical line approaching the washing machine - without taking into account the energy consumption from the remaining blocks and components of the unit.
All of the above methods for checking the heating element will work with any heating devices where it is used - from irons to clothes dryers.
It is very easy to check the heating element. Even without a device, it is possible to determine with a high degree of probability that it is the device that has broken down. Replacing a damaged boiler is an even simpler step than diagnosing it.
See the video for ways to check the heating element.
Checking the heating element of an electric kettle
The electric heater of these devices always has free access, and finding it is not difficult. To check it, you must first calculate the resistance of the element using the formula. Then you need to set the measuring device to the minimum resistance mode, then attach the probes to the terminals of the heating element and see what data is reflected on the tester’s display. If the heater is faulty, the value of the resulting resistance will differ markedly from the calculated one. If the multimeter shows “1” or infinity, the spiral is broken.
We can talk about the presence of a short circuit if the device produces the same indicators when one of its probes is applied to a metal pipe and the other to the heating element.
The following video shows the process of checking the heating element of an electric kettle:
Checking the current leakage of the heating element
First of all, the search for the cause of the malfunction must begin with checking for current leakage. Usually, if this happens, immediately when connected to the network, the RCD or differential switch is triggered and the line is de-energized.
The leak search is performed as follows:
- Unplug the electrical appliance being tested from the outlet;
- We disassemble it to gain access to the electric heater terminals;
- Turn on the dial mode on the multimeter and insert the probes into the “COM” and “VMa” connectors;
- We first ring one contact on the device body, then the other;
- Possible results:
– There is a signal, the indicator on the display is close to “0” – the heating element is faulty;
Where is it located?
Placed inside the drum tank, the boiler is most often located as low as possible. This will allow the water to heat up extremely quickly. The power of the boiler reaches two kilowatts - almost like a powerful electric kettle.
To find the heating element, use the following methods.
- Check the area behind the back of the washing machine. The rear wall, characterized by a large area, hides the boiler behind itself. This wall is easier to remove than the others (front, top, bottom and side). If there are no boiler leads or wires going to it, you can easily close the lid at this point.
- It is permissible to tilt the SMA to one side and look towards the bottom.
- The drum hatch is large enough to open it and look inside the washing compartment. By turning on the flashlight, you can easily find the boiler. It may be closer to both the front panel and the rear wall.
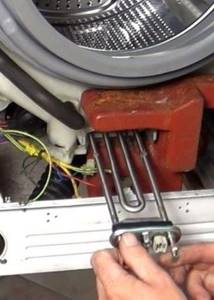
How is the heating element of a washing machine checked?
The main difficulty when checking a washing machine heater is that it is quite difficult to find - especially for many modern units, the internal structure of which is quite confusing. Most often, the heating element in washing machines is located near the back cover, just below the loading tank. However, in some models it is installed on the front side, and in top-loading machines, electric heaters are often located on one of the sides.
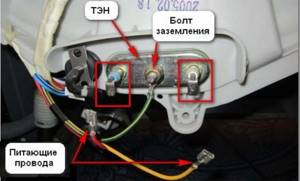
Checking the heating element of a washing machine has one more nuance - these heating elements are equipped with three outputs, but when checking you need to connect only to two of them, and it is important not to confuse these contacts. Typically, the terminals to which you need to connect (neutral and phase) are located at the edges, and between them there is a grounding contact, which is not important for testing
Otherwise, diagnostics of the heating element of the washing machine are carried out in accordance with the instructions given above.
Where is
Find out the location of the machine's heating device from the instructions. Depending on the model, it may be located in different places on the device. If the instructions for the car have not been preserved, you can find the element at home yourself:
- The device must be placed on its side. The required element may be at the bottom.
- The location of the heating element is indicated by the large dimensions of the rear panel. To ensure that the device is located at the back of the appliance, the panel can be removed.
- The search for the heating element is also carried out through the drum. To make searching easier, you can use a flashlight.
Checking the heater with a tester
The instructions on how to check the heating element of a washing machine correctly with a multimeter are quite simple. To do this, first remove all wires from its terminals to ensure the reliability of the device readings. There is no need to unscrew or take anything out. The check is done in 3 steps:
First step
Set the multimeter to resistance measurement mode in the range of 200 Ohms. And before checking the heating element with a tester, we connect the probes to each other to ensure its accuracy. The reading on the display should be 0 or close to zero. Next, touch the left terminal of the heating element with one probe, and the right terminal with the second. The middle terminal (or fastening bolt) is always ground. We are not touching it for now, as we are checking the integrity of the heating coil.
This is calculated using a simple formula:
R=U²/P, where “U” is the network voltage (220 V), and “P” is the power of the heating element (in our example - 1900 W).
In the same way, you can determine the power of the heating element, knowing only its resistance and mains voltage:
P = U²/R.
In the case when the device shows “1” (infinity), this means a break in the spiral inside the heater. And if “0” is displayed on the screen, then the heating element is closed (shorted). In both cases you will have to buy a new heater. Its power and dimensions should be identical.
It is advisable to move the original temperature sensor from the old one into the new heating element, if it is working properly. Or buy one with the same resistance. It is usually written on the side of the plastic socket. Using a multimeter, you can verify its serviceability by measuring the resistance on two contacts. If you dip a temperature sensor in hot water, it should change its resistance.
Second step
Set the multimeter to diode testing or “buzzer” mode. When the probes are shorted, a working device will make a squeak and zeros will appear on the screen, which indicates the presence of a circuit.
We touch one probe to the right or left terminal of the heating element, and the second probe to the body or ground terminal. This is done in order to determine whether the heater is breaking through to the housing. If the multimeter beeps, it breaks. The heating element needs to be replaced, as this may cause the machine to receive an electric shock or not start at all. If the tester is silent, then everything is fine.
Final actions
Set the device to resistance measurement mode at the highest range available. Ideally, use a megohmmeter. Do the same as in the previous paragraph. Try not to touch the probes of the device with your hands during measurement.
This is necessary to check the insulation of the heating element for leakage current. After all, if there is even the slightest microcrack through which current flows, then very soon it will become larger and the heater will break through. In addition, if an RCD is installed in the house, it will constantly trip and turn off the power grid.
If the device readings are less than 2 mOhm, then it is better to replace the heating element immediately. The permissible insulation resistance is considered to be more than 2 mOhm. It is recommended that before purchasing a new heating element, you ring the circuit and check its insulation resistance in a store.
Checking the heating element using an electrician's control
How to do it? Take a cord with a plug. Connect one end of it to the contact terminal of the heating element of your choice, and the other to a regular electric socket. Then any piece of additional wire should be connected to the second terminal of the cartridge. A light bulb corresponding to a voltage of 220 V is screwed into the socket.
The next steps are to connect the free wire from the socket to the free end of the heating element. Only after this is the plug inserted into the socket. If the spiral in the heating element is efficient and in good condition, then the lamp burns brightly. In the absence of light from the bulb, it will be obvious that there is a break in the spiral. The heating element is faulty and cannot be used further.
If at the first stage of the test the burning light indicates that the heating element is working properly, you can continue the test. After removing the plug from the socket, connect the lead from the socket to the heating element tube. If the light does not light when the plug is connected to the socket, it means that there is significant insulation resistance between the spiral and the tube. The heating element is operational. But a burning lamp indicates an insulation breakdown. This heating element cannot be used.
What is the purpose of the inspection?
An electric iron or boiler is equipment that includes other devices that in one way or another affect the operation of the entire system. These devices also do not last forever, therefore, in the event of a malfunction of the equipment as a whole, the owner should not reduce the cause only to the failure of the heating element. Electric kettles are often thrown into the trash because they begin to heat the water slowly or turn off too often without bringing the water to a boil. This implies, of course, that the coil in the heating element has burned out, although it turns out that the reason is not in the electrical circuit of the unit, but in the thick layer of scale that covers the entire heater tube. All that was needed was to clean the heating element from the outside.
The check will allow you to find the exact reason why the heating element does not heat, and only then you can decide what to do about it.
To understand the verification process, you should know how the heating element works and works. Inside the tube, which is also the body of the device, made of metal, ceramics or glass, one or more spirals of a material with high resistance are laid. When the heating element is turned on, an electric current moves in a spiral, the spiral heats up to a high temperature and heats up the electrical insulating material laid between the walls of the metal tube and the spiral. Electrical insulating material is selected taking into account its thermal conductivity. It should be maximum.

In turn, the electrical insulation heats the tube, and the tube heats water or air, depending on the purpose of the household unit. In all types of modern household appliances, a protective device is included in the heating element’s power circuit to protect the heater from overheating. The specified protective device may also fail, which confirms the recommendation not to rush into diagnosing the system until all its devices have been checked.
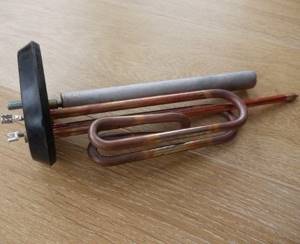
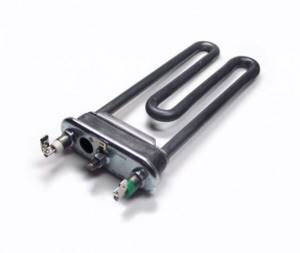
What is heating element
As already mentioned, a heating element is an electric heating element in household and other appliances in the form of a metal tube, which can have the most arbitrary shape. Nichrome or fechrome wire is placed inside the tube and twisted into a spiral shape. It has conclusions at the ends. Since the heating element has no polarity, it does not matter which terminal the phase and neutral are connected to.
In addition to the spiral, there is also quartz sand inside, which tightly occupies the entire remaining volume. Its task is to insulate the spiral and remove thermal energy from it as efficiently as possible.
Contact rods are attached to the ends of the spiral by welding. And those, in turn, are attached inside the tube using ceramic insulators. To apply voltage to the ends of the contact rods, contact plates are attached to them by threading or welding. Metal tubes can be of very different shapes (for example, spiral-shaped in a conventional electric boiler) and of very different diameters.
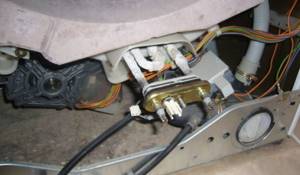
Checking the heating element of the washing machine
Before you check the heating element of a washing machine with a multimeter, you still need to find it - many people have certain difficulties with this, which is especially true for modern machine models with tricky internal structures. In most cases, the heater in the washing machine is located slightly below its tank, closer to the back cover.
On some models it is installed on the front cover side. Top-loading washing machines can be equipped with elements located on one of the sides.
When checking, you should know which contacts of the heating element you need to connect to. The fact is that the tubular electric heating element of the washing machine has three outputs, of which only two are needed for testing. As a rule, the grounding contact is located in the center, while the two outermost ones (zero and phase) are the terminals necessary for checking.
To test the heating element of the washing machine, you must follow the instructions given earlier. The normal resistance value for the heating element of a standard washing machine varies between 25-60 Ohms, small deviations are possible.
Checking without a device
How does the heating element work? It heats the water in every modern washing machine. It consists of a heating coil coated with a special insulator with heat-conducting properties, enclosed in a steel tube - it prevents moisture from getting inside.
Interesting! To make SMs more compact, manufacturers reduce parts, including the heater. To compress the dimensions, but at the same time provide a large heating area and volume, the heating element is made in the form of twisted U-shaped arcs.
We will talk about how to check the heating element in a washing machine, namely:
- How to use a tester to check the resistance of a heating element.
- How to quickly and easily check for a breakdown on the body of a washing machine.
- How to check the heating element of a washing machine yourself without a device.
Instruction: how to ring a wire without a tester
Not every home has a set of tools and instruments for checking the functionality of electrical equipment. But what to do in this case, if you urgently need to check an electrical appliance or electrical wiring for integrity?
There are several alternative ways to test wires without using a tester:
- Using a light bulb. The light bulb is connected to the network and current is supplied to it. If the circuit is broken, the light will not light.
- In the same way, an audio device can be connected to the circuit instead of a light bulb. Accordingly, it will make a sound if the circuit is working properly.
- If you need to check a wire element that is not connected to the network, use a battery and a low-power lamp.
One end of the wire is connected to one of the terminals of the battery or accumulator, the other to the light bulb. It is also necessary to run a whole conductor from the light bulb to the second terminal of the battery. If the battery and light bulb are working, and the conductor is intact, it should light up if the section of the wire being tested is not broken. There is also a method used by professional electricians - ringing wires using special handsets.
Characteristics and types
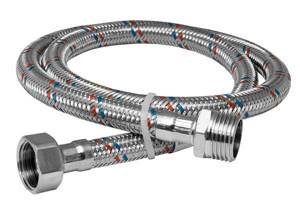
The flexible hose for connecting plumbing is a hose of different lengths made of non-toxic synthetic rubber. Thanks to the elasticity and softness of the material, it easily takes the desired position and allows installation in hard-to-reach places. To protect the flexible hose, there is an upper reinforcing layer in the form of a braid, which is made from the following materials:
- Aluminum. Such models can withstand no more than +80 °C and retain functionality for 3 years. At high humidity, aluminum braiding is prone to rust.
- Of stainless steel. Thanks to this reinforcing layer, the service life of the flexible water line is at least 10 years, and the maximum temperature of the transported medium is +95 °C.
- Nylon. This braid is used for the manufacture of reinforced models that can withstand temperatures up to +110 °C and are designed for intensive use for 15 years.
The fasteners used are nut-nut and nut-fitting pairs, which are made of brass or stainless steel. Devices with different permissible temperatures differ in the color of the braid. Blue ones are used to connect to a pipeline with cold water, and red ones for hot water.
When choosing a water line, you need to pay attention to its elasticity, reliability of fasteners and purpose. It is also mandatory to have a certificate that prevents the rubber from releasing toxic components during operation.
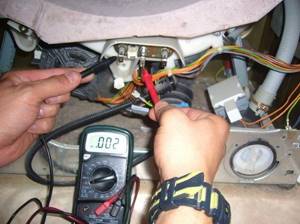
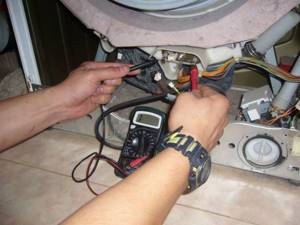
How to check a heating element with a multimeter
It is imperative that all work to identify a malfunction must be carried out with the device disconnected from the power supply. Failure to do so may result in electric shock and personal injury. In order to test the heating element for operability, you need to know the nominal value of the electrical resistance (R) of a particular heater. It is easy to calculate using the elementary formula from Ohm's law. Knowing the value of the supply voltage (U) and the power consumed by the device from the network (P), using the formula R=U squared/P. For example, the device is powered from a 220 V network, its power is 1.5 kW (1500 W). Then the resistance of the heating element is 220 squared divided by 1500 and is 32.27 Ohms. For practical use, we take the value of the electrical resistance of the heating coil to be about 30-35 Ohms.
To check the heating element for integrity, we proceed in the following sequence. After making sure that the device is disconnected from the power supply, we disassemble it to gain free access to the heating element terminals, and disconnect them from the rest of the device, having previously marked the wires.
Having set the required resistance measurement range on the multimeter, we connect the probes to the heater contacts.
Tester readings in the area of the calculated figure (30-35 Ohms for the example given) clearly indicate the absence of a break or short circuit in the spiral. If the heating element is multi-contact, you need to check the integrity of each part of the spiral one by one, touching all the terminals in pairs.
Next, you need to make sure that the insulation of the tube filler has not been damaged during operation and measure it for breakdown. To do this, select the resistance measurement mode at the highest limit. Having installed one probe on the metal body, we touch all the heater terminals in turn with the second one.
How to check a water heater temperature sensor
The boiler is designed to have a thermal relay, a device that turns off the water heater when the water has heated to the desired temperature. After the water has cooled a little, the boiler switches on again for heating. You must first check the heating element to ensure that it is in good working order. Remove the thermostat from the boiler body and disconnect the wires. Having turned on the dialing mode or measuring the minimum resistance, we stand with one multimeter probe on any terminal, and with the second we touch the remaining one.
To check the functionality of the regulator, you need to connect a multimeter to its contacts. After making sure that the device has a working circuit, lower the regulator rod into a container with very hot water. A click of the contacts and an open circuit on the multimeter will indicate the operation of the temperature sensor. When removed from hot water and cooled, the sensor should click again and the circuit will be restored, which will clearly indicate serviceability.
The water heater is powered from a 220 V network, therefore, as when checking the heating element tube, it is necessary to check the sensor for breakdown. To do this, check that there is no contact between any terminals and the metal elements securing the sensor to the body.
How to check the heating element of a washing machine
You can check the heating element and temperature sensor of the washing machine using the already described electrical testing methods, not forgetting about the mandatory disconnection of the 220 V voltage.
Having removed the wall of the machine behind which the heater is located, disconnect the wires and, if necessary, remove it from the body. To avoid mixing up the wires, first mark or photograph their original location. Then you need to check the heating element of the washing machine for the integrity of the spiral and the absence of breakdown using the appropriate measurement modes..
Methods for checking other devices
Checking other devices using heating elements does not have any fundamental differences in the methods and methods used in their repair.
Verification technology
To test the wires, the multimeter is switched to buzzer mode
If there is a problem with the boiler, you should check the heating element on the water heater with a multimeter - this is the most reliable and accurate way to assess the condition of the part. Before you begin testing, you need to separate the current-carrying conductors from the element.
Sequence of testing work:
- The device switch is placed on the range of values where the heating element indicator should fall. It can be calculated by knowing the power consumption of the device and its operating voltage. The larger the first parameter, the lower the resistance value.
- The probes of the measuring device are placed to the contacts of the heating element being called.
- If the part has not become unusable, the display will soon show a digital indicator close to that obtained in the calculations. The number “0” on the screen indicates a short circuit situation. If a unit appears on the left side of the display, most likely the element’s spiral has broken. Using an analog meter in this situation shows infinity.
- Then the heating element is tested for electrical breakdown. The switch is set to the “buzzer” type position. They work with one probe. They are sequentially touched to the heater terminals. If the multimeter does not make any sounds, the test results are satisfactory. If there was a high-pitched squeak, the heater was shorted to the housing.
The thermostat indicator is measured in a manner similar to that described in paragraphs 1-3. When encountering a unit indicating a break, press the safety unit button. When the thermostat can work again, measurements continue.
Water heater dialing methods
There are methods that allow you to evaluate the serviceability of the device if you do not have a multimeter at hand when problems are detected. They give a less accurate result than working with a digital meter, but it is quite possible to assess the need to replace a part with their help.
The simplest method to check the heating element on a water heater does not require the use of any tools. However, it will be necessary to remove the element from the heating device. The heating element must be carefully examined. If the assessment of the condition is hindered by accumulated scale, it is dissolved by soaking the part in water with vinegar or citric acid. It needs to be kept in acidified liquid for about 6 hours.
Active screwdrivers for testing the functionality of electrical appliances
If scratches, any deformations or dark spots are found on the heating element, it should definitely be replaced.
Using an indicator screwdriver on the battery is also allowed for checking. Before testing, be sure to disconnect the equipment from the current and disconnect all conductors from the heating element. The first terminal clamp is touched with a finger, and the tip of the tool is brought to the second supply clamp, touching the end contact. If the indicator lights up, the heater has not failed.
Heating elements are tested with special test lamps. This option is suitable for professional electricians or people who have sufficient experience in handling circuits. You can assemble the circuit yourself using a 220 V incandescent light bulb. It is screwed into a socket to which single-core copper wires are connected with probes screwed to them. The lamp is connected to the network between the device being tested and the power source. If it lights up, the unit is functioning normally. To check the heating device, a mains neutral is supplied to one of the contacts, and a phase wire with a connected lamp is supplied to the other.
How to determine the serviceability of the heating element? Typical faults
The element is installed in the washing machine tank to heat the water. The machine performs three main functions: fills, heats and drains water. During the process, pollution is affected by several factors:
- The laundry is treated with detergent.
- Subject to thermal and mechanical stress.
As a result, high temperature, powder and a rotating drum help remove dirt and get clean things out of the tank. Once you exclude one element, washing will cease to be so effective.
You can verify that the heating element is malfunctioning without a tester by external signs:
- After 20 minutes of washing, the sunroof glass is cold.
- Traces of powder remain on things, granules do not dissolve well.
- The laundry develops an unpleasant musty smell.
What affects the performance of the heating element? This is the quality of tap water and the stability of the network voltage. If your water contains a lot of magnesium and potassium salts, it is recommended to install filters. Otherwise, when heated, salts are deposited on the spiral. Over time, the scale hardens, disrupts heat transfer, and the part burns out.

Here are the problems that are typical for the element:
- Breakdown to the body. Dangerous problem that may result in electric shock. The insulation of the housing is broken and the heater breaks through. Modern SMA models have a built-in security system that displays an error code on the display.
- Break. Happens when there is a sudden surge in voltage in the network. The machine may freeze during the heating phase or may not start the cycle at all.
- Closure. At the same time, it can knock out a machine gun indoors. The equipment can no longer be used. Needs renovation.
If you suspect a breakdown of the heating coil, proceed to diagnostics with a multimeter.
How to remove and ring the heating element?
You need to find out which side the heater is located on. Inspect the body of the washer. The large rear hatch probably hides a TEN behind it. In the publication “How to replace a heating element in a SM” we gave an example of placing an element in different models.
Once you get to the part, disconnect the power wires from the contacts. It is not necessary to dismantle the product for diagnostics.
How to check the heating element in a washing machine with a tester:
Calculate the resistance of the part. It may differ for each manufacturer. To do this, take the operating voltage (220 V) and power (indicated in the manual). For example, the power is 1800 W. Make the calculation using the formula: R=220²/1800=26.8. It turns out that the normal resistance of the heating element should be 26.8 Ohms.
Checking the operation of the heating element of a washing machine with a multimeter is carried out as follows:
- Set the toggle switch to resistance detection.
- If the screen shows normal values (about 26.8), then the part is working.
- Number 1 on the screen indicates a broken spiral. The product cannot be repaired, only replacement is needed.
- A value of 0 means a short circuit.
Now you need to check for a breakdown in the housing.
Switch the tester's toggle switch to buzzer mode. Place one probe on the contact and the other on the ground. The buzzer beeping means a breakdown. The heater must be replaced.
When replacing a part, remember the heating element connection diagram. During the disassembly process, you can photograph the stages of work. Here is a detailed inspection video:
If you do not have a multimeter at hand, then it is better to contact a specialist. Without the device, diagnostics will not be possible.
Bad 1
Interesting
Super