Hello readers of my blog! Today we will talk about how to properly lay a pipe for a heated floor with your own hands. It would seem that the matter is not tricky, but when you are faced with this problem, you have to think about how to do it correctly, what preparation to do, what materials to choose. Thus, I decided that this article would be useful to someone, and I am devoting my efforts to this subject. In it I will answer a number of questions that will arise immediately before How to properly lay a pipe for a heated floor with your own hands, and some even after that. This topic is quite broad, because before work, thorough preparation is necessary, but how to do this? And this is a separate topic. You can learn about all this in great detail in the article below.
We assemble and integrate heated floors into the heating system
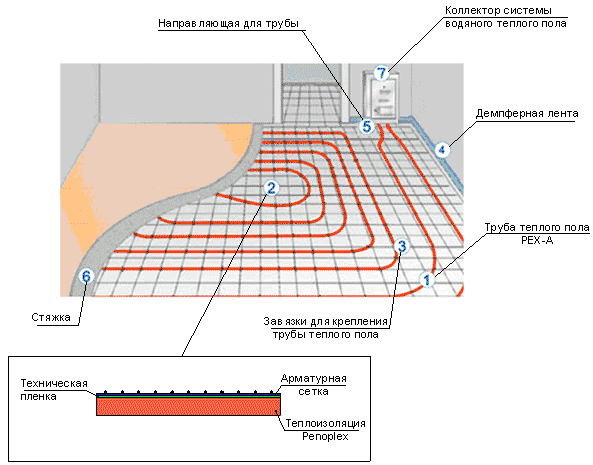
Options for arranging a water heated floor with your own hands: the equipment you will need, options for laying pipes, materials and a step-by-step work plan.
Heating with heated floors has many advantages compared to other types of heating: saving free space, saving resources, absence of drafts, healthy climate in the house.
In addition, water systems are integrated into heating, where alternative energy sources are used: heat pumps, solar panels, condensing boilers.
Before you decide to install a water heated floor yourself, find out from your housing and communal services office what permits you will need, and whether it is even possible to install water heating in the floor in your home with the existing heating system. If permits have been received, you can begin work.
PIPES. The optimal diameter of pipes for a water system is 2 cm. Materials: reinforced (“cross-linked”) polyethylene or multilayer (metalized), preferably with an anti-oxygen coating.
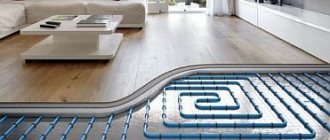
Pipes made of synthetic materials are preferable because they are easier to install, smooth inside and do not provoke electrochemical corrosion. Calculating the pipe footage is quite simple: with a pitch between pipes of 20 cm, 5 linear meters of pipe will be required per 1 m^2 of heated area. The maximum continuous length of the “loop” in the system is 80-120 m.
Also keep in mind that near the enclosing (external) walls and windows at a distance of a meter, the pipes are laid more densely (10-15 cm).
Also take into account the future location of the furniture: if the plan is to install a stationary cabinet, then you should not install heating underneath it. Important parameters: permissible maximum and operating temperatures of the coolant, operating pressure. Recommended parameters: +100° C, 10 bar (± 1 bar)
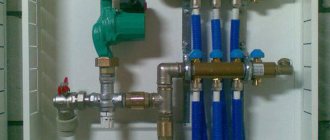
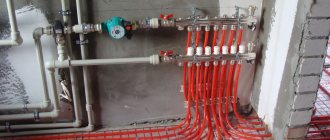
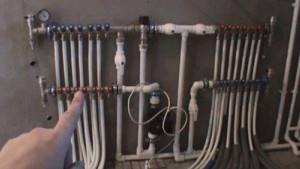
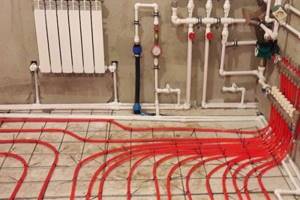
COLLECTOR. The key element of the underfloor heating system.
Some manufacturers offer ready-assembled manifolds and wall cabinets included. If you decide to install a water heated floor system yourself, this is the best option. All you need to know is the number of inlets and outlets of the water floor pipes to purchase the right model.
Modern models of control manifolds are equipped with pumps, thermostats, pressure stabilizers and allow you to connect several heating devices that require different coolant temperatures.
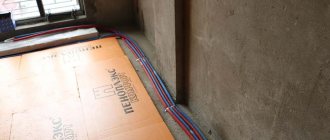
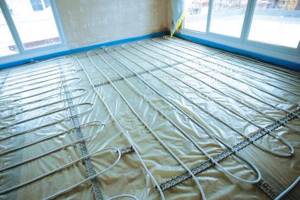
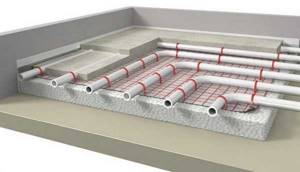
THERMAL INSULATION. A layer of thermal insulation is required for heated floors. Under the heating pipeline, you can lay end-to-end dense foam plastic with a thickness of 5 cm, thermal insulation film or thermal insulation boards of various configurations (with pipe clamps, markings, etc.) with a waterproofing coating.
If you decide to use polystyrene foam, then it must be covered on top with plastic film (waterproofing). Thermal insulation prevents heat loss to the floor (ceiling). The required area is equal to the area of the room in which the pipes are laid.
You will also need fittings for connecting pipes to the collector, reinforcing metal mesh (3-5 cm cells) for pouring screed, pipe fasteners, keys, damper tape (its length is equal to the perimeter of the room).
INSTALLATION OF WATER HEATED FLOOR WITH YOUR HANDS
The surface on which the underfloor heating pipeline will be laid must be flat, without slopes or holes. In order to obtain a high-quality surface, you can use self-leveling compounds for filling.
The collector is mounted on the wall.
The wall surface must be strictly vertical, and the distributor itself must be hung and leveled relative to the horizontal using a water or laser level. Any deviation along the axes means future difficulties and failures in the system. A damper tape is glued around the perimeter of the room at floor level.
Thermal insulation is being installed. If the thermal insulation does not have fasteners for pipes, strips with pipe locks are installed every 50 cm.
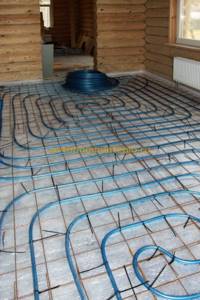
Pipes are laid according to the diagram. During installation, try not to bend them. The pipes are connected to the manifold with fittings. The manifold is connected to the system and a test run is carried out.
During startup, the temperature and pressure are gradually increased over several (minimum four) hours. If there are no leaks, testing is carried out at the maximum permissible (pressure test) pressure.
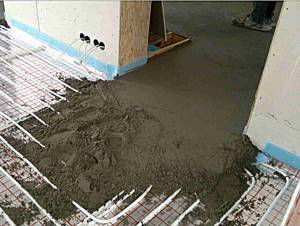
If you are not a professional plumber, you should entrust the connection of the collector to the system to a licensed technician. After testing the system, a reinforcing mesh is laid over the pipes, and the pipeline system is filled with screed. The higher the power of the system, the thicker the screed layer and vice versa.
The composition for the screed must contain special additives for heated floors, or purchase a ready-made dry mixture for the screed marked “for water heated floors.”
You need to pour the mixture from the edges to the center of the room. Some craftsmen fill the screed with the floor heating system turned on at minimum (20-23°).
The screed dries completely in at least three weeks. After this, the heated floor is started again at the minimum temperature for several hours. After the screed has dried, the flooring can be laid.
Check the surface humidity - it should be between 2% and 4%. Adhesive coatings are glued to special heat-resistant adhesives. When laying stone or ceramic tiles, remember that the thicker the layer of adhesive mixture, the longer it will take for the floor to heat up.
Assembling a water heated floor with your own hands is quite a responsible job. The efficiency and durability of the system depends on the quality of all work at each stage. If you want to be confident in the quality of the work and get a guarantee for it, then you can use plumbers (or craftsmen who will be recommended to you by the sellers of the collector) to connect the collector, and lay the pipes and pour the screed yourself - this saves you half the cost of the work.
DIY water heated floor
Traditional radiators, for many years considered the only possible source of heat, are gradually giving way to systems of warm floors and ceilings. Many people experience innovative methods and are very satisfied. However, heated floors can hardly be called an innovation.
They have proven themselves well and become a fairly common heating method. Such systems can run on electricity or use hot water energy. According to experts, a water heated floor is considered the most effective and practical to assemble with your own hands, but it is quite possible to assemble it if desired.
Important nuances of arranging a heating system in concrete
The water heating network must be walled up correctly in concrete. Therefore, some subtleties should be taken into account.
Before installing the system on the first, basement floor, it is necessary to waterproof the floors. This way the room will be protected from capillary suction of moisture from the soil. On subsequent floors, waterproofing will be insurance in case of emergency situations.
In most cases, special polyethylene films with a thickness of 150-200 microns are used as waterproofing. Mandatory rule: their panels on the floor should be laid with an overlap of 10 cm. The joints should be sealed with special tape. The panels are also placed on the walls with an overlap of at least 10 cm.
Extruded polystyrene foam is best suited for thermal insulation of concrete floors. It has the necessary strength and rigidity. In addition, it is moisture resistant, so it does not need protection with a vapor barrier.
For indoor use, polystyrene foam boards 5 cm thick will be sufficient. Only in regions with a very harsh climate is the thermal insulation layer brought to a thickness of 10 cm. The thermal insulation material must be laid out close to each other, and the joints between them must be blown with polyurethane foam.
Before pouring the screed, the perimeter walls of the room, as well as all obstacles (for example, columns, protrusions) and the boundaries of the contours must be covered with damper tape. It prevents cracking of the solution as it dries, shrinks and expands due to temperature. This happens due to the fact that the material forms compensation areas. The damper tape is made of polyethylene foam, has a thickness of 0.5-1 cm, a width of 10 cm, and a roll can range from 15 to 50 m.
Methods for fixing contours
Water heating systems can be mounted using several methods:
- Polyamide clamps. They are used to fix contours to the reinforcing mesh. The cost of fasteners is two pieces per 1 linear meter.
- Steel wire. With it, the network elements are fixed to the grid, the consumption is the same.
- Construction stapler and staples. This method is suitable for quickly attaching circuits to insulation.
- Fixing track. This U-shaped PVC fixture snaps the system elements into place as they are installed.
Installation of beacons
To simplify the work, a screed laying device such as beacons is used. They are planks mounted at the same exactly horizontal level and with the same step from each other. The beacons are a flat metal profile, along the top of which the screed will be poured. The bars determine its future level.
To find level 0, a laser or water level is used. With their help, control points are drawn along the perimeter of the room, on the walls at a height of 30 cm. There are two of them in each corner and 3-4 along the walls. The marks are connected to each other using a bevel, forming a line of precise horizontal level.
Then the height from the floor to the axis of the level is measured in the corners. Its minimum value is laid down from the level line and marked along the perimeter of the room. The marks are then connected by tapping. The highest point is called zero. From there, beacons begin to be installed. This is done using self-tapping screws or mortar.
Heated floor screed solution
The screed mortar is made from Portland cement grade M-400 and coarse quartz sand (0.8 mm) in a ratio of 1:3. Water is added to the dry mixture until it reaches a consistency convenient for easy leveling of the mixture. To increase plasticity, liquid soap can be added to the solution.
It is better to mix the components of the screed for water heated floors not with your own hands, but in a concrete mixer. To increase the strength of the coating, polymer fiber can be added to the liquid solution.
Crimping
Pressure testing is carried out after the circuits have been installed and they have been connected to the manifold. The screed cannot be filled until the end of this procedure.
Pressure testing allows you to make sure that the entire system is working properly, its connections are sealed, and the circuits have no defects. If any problems are identified during the inspection, they are promptly corrected before the screed is poured.
The system is filled with coolant and maximum pressure is applied to it. When tested, the network expands to its working size. This allows you to avoid strong pressure on the screed during operation.
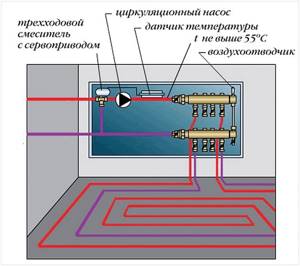
Connecting circuits to collectors
The collectors are placed in a special cabinet:
- the width and height of the box can be 0.5×0.5 or 0.4×0.6 m;
- thickness - 0.12-0.15 m.
When the cabinet is installed, supply (with heated water) and return (with cooled coolant) tubes should be connected to it:
- A manifold supplying hot coolant is connected to the supply branch using a fitting or adapter (for different sections of elements).
- A collector for a branch with cooled water is screwed to the return line.
A shut-off valve should be installed between the pipeline and the collectors in case of accidents and repairs. A drain valve must be connected to the opposite part of the comb. To accurately control the floor temperature, a control valve and a mixing device must be installed on the collectors.
Where can it be mounted?
When installing an underfloor heating system, you should not make common mistakes.
In most cases, underfloor heating is installed in your own home. Heating networks of multi-apartment buildings from Soviet times are not designed for this heating method. There is a technical possibility to implement it, but the risk that you or your neighbors will be cold is great.
Often the entire riser remains cold, because... The hydraulic resistance of the floor network is much higher than that of radiator heating. It stops the coolant flow.
Therefore, management companies do not give permission to install underfloor heating pipes in old houses. If you do this without approval, you will have to pay a fine and dismantle the system.
However, in new buildings, underfloor water heating can be installed and you do not need to take permission for this. Their heating networks are initially designed for higher hydraulic resistance.
Adjusting the coolant temperature
To make your feet comfortable, the water temperature should not be higher than +45º. In this case, the floor covering will heat up to the optimal +28 degrees. Almost all heating equipment cannot produce such temperatures (minimum +60º). The exception is gas-fired condensing boilers.
When using any other type of equipment, you need to install a mixing unit. In it, cool water from the return line is added to the heated coolant from the boiler.
Operating principle of the device:
- Heated water from the boiler flows to the thermal valve. If the set temperature is exceeded, it opens to add coolant from the return.
- There is a jumper with a two-way valve in front of the circulation pump.
- When it is opened, water is added from the return line.
- The mixed coolant flows through the pump to the thermostat. It regulates the operation of the thermal valve. As soon as a certain temperature is reached, the return flow is shut off.
Contour distribution
From the mixing unit, water flows to the distribution comb or collector. It's one thing when underfloor heating is installed in a small room (for example, in a bathroom). Only one turn of the network can be laid in it. Then the instructions recommend not making this node.
When there are several turns, you have to somehow redistribute the water between them. Then collect it and send it back. These functions are assigned to the collector. It consists of a pair of pipes on the supply and return branches. The outputs/inputs of the circuits are connected to them.
When there is underfloor heating in several rooms, the best option is to install a comb with control of the heating of the coolant. Often different rooms do not need the same temperature.
Elements of such a heating system
The operating principle of a water heated floor is quite simple.
Under the flooring there are pipelines through which hot water circulates.
The design of a water heated floor is quite simple. It necessarily includes a heating boiler, a collector, a circulation pump and a pipeline filled with coolant
Preparatory stage
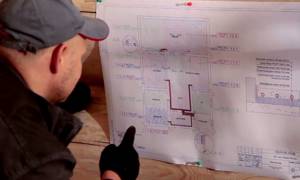
How to make a water heated floor correctly. This information will be useful later for choosing the optimal installation scheme for a water heated floor:
- To figure out how to properly lay the pipes, you will need a room plan with exact dimensions. Information about what type of ceiling is installed will be useful.
- The design of an effective water heated floor depends on the climatic conditions in the region. They are used to create sufficient layers of insulation to protect against adverse external influences. The position of the walls of the room relative to the cardinal points matters.
- If the room has windows and doors of old types that do not provide good airtightness, even precisely calculated heating will not be used rationally.
- When a heated floor is calculated, its installation is planned taking into account the position of built-in cabinets, kitchen units, plumbing fixtures, and other stationary items. There is no need to install a heated water pipeline underneath them.
Unit #1 - water heating boiler
The boiler selected for installation must have sufficient power to cope with the heating of the coolant during peak operation of the circuits. In addition, it should have a small power reserve.
Approximately, this value should be the total power of all maintained heated floors, increased by 15-20%. In addition, a circulation pump is needed. Most often, it is already included in most boiler models.
An additional device may be needed only if the area of the heated room is more than 120-150 square meters. m. In case of preventive maintenance or repair of the boiler without draining water from the entire system, shut-off valves are installed at the outlet and inlet of the heating device.
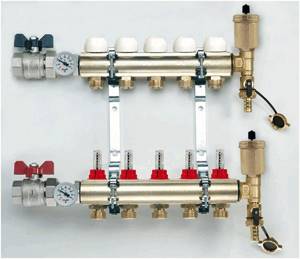
Unit #2 - collector
The collector is a device responsible for distributing hot water through heating circuits, as well as setting up and adjusting heated floors. The device must have a sufficient number of terminals to connect all circuits to them.
The simplest models are equipped only with shut-off valves. They are extremely cheap, but do not provide even a minimal opportunity to customize the system. Devices with control valves allow you to adjust the water flow for each circuit, which allows you to adjust the heated floor for the most uniform heating of the premises.
The manifold of any model must be equipped with a drain outlet and a special air vent valve. The most convenient to use are devices with servo drives on valves, equipped with pre-mixers that mix the heated water supplied to the system with the cooled water returning and thereby regulate its temperature.
Such a device fully automates the functioning of a heated floor, but its cost is very high.
Manifold with servomotors on valves and pre-mixer. Necessary system adjustments are made automatically
Methods for arranging a collector
The choice of a ready-made mechanical or automatic collector model depends on the characteristics of the heating system.
The first type of control module is recommended to be installed for heated floors without a radiator, the second can be used in all other cases.

According to the diagram, the assembly of the distribution comb for heated floors is carried out as follows:
- Installation of the frame. The following can be selected as the installation area for the collector: a prepared niche in the wall or a collector cabinet. It is also possible to mount directly to the wall. However, the location must be strictly horizontal.
- Connection to the boiler. The supply pipeline is located at the bottom, the return pipeline is located at the top. Ball valves must be installed in front of the frame. They will be followed by a pump group.
- Installation of a bypass valve with a temperature limiter. After this, the collector is installed.
- Hydraulic test of the system. Check by connecting to a pump, which helps build up pressure in the heating system.
In a mixing unit, one of the required elements is a two- or three-way valve. This device mixes water flows of different temperatures and redistributes the trajectory of their movement.
If servo drives are used to control the manifold thermostats, then the mixing unit equipment is expanded with a bypass and bypass valve.
How can water floors be installed?
Warm water floors can be laid in different ways - by laying and using concreting. Let's take a closer look at each of them.
Concreting. The pipes through which the coolant circulates are laid as required on the prepared base and filled with concrete screed. The main disadvantages: labor-intensive “wet” work, the heavy weight of the system and the complexity of its dismantling.
Layered method. It involves laying pipes in a specially assembled deck.
It can consist of plastic modules or wooden blocks with grooves prepared in them for installing pipes. Wooden mounting modules can also be found on sale. The main disadvantage is that the system takes longer to warm up than a concrete one.
What needs to be done before installation?
Proper installation of a warm water floor requires careful preparatory work. During their course, all the little things must be taken into account, on which the effective functioning of the structure will subsequently depend:
It is best to entrust the design of the future system to specialists, since it is quite difficult to make independent calculations.
It will be necessary to determine the length of the pipe, the pitch of its installation and the power of the heating circuit, if there are several of them, then for each separately. In this case, many nuances and parameters are taken into account. There are special calculation programs that many people use.
However, you need to understand that a flaw in the calculations will lead to a decrease in efficiency or simply the impossibility of functioning of the entire system. Equipment for heated floors must be of high quality, manufactured and purchased from a reliable company that offers good guarantees. It will be cheaper to pay for a quality product than to subsequently constantly shell out decent sums for expensive and labor-intensive repairs. To minimize the thermal load on the screed and prevent it from cracking, the system should be divided into sections of no more than 40 square meters. m. The base for heated floors must be carefully prepared.
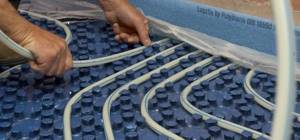
It must be clean and level, differences of more than 5 mm are not allowed. To prevent heat loss, a heat-insulating layer must be spread on the prepared base, with a height of 3 to 15 cm, depending on the operating temperature of the coolant. This could be special heat-insulating materials or mats designed for warm water floors. The latter can be equipped with pipe mounts, so-called bosses, which is very convenient.
A damper tape is laid around the perimeter of the room and between the installation areas, which can compensate for temperature fluctuations of the screed.
Mats with bosses designed for water heated floors are very comfortable. They not only act as a heat insulator, but also secure the pipes in place
When drawing up a laying scheme, you need to avoid a large number of pipe joints, which carry the potential danger of leaks under the floor. It is best to arrange the safest option, where connections are present only at the outlet and inlet of the collector. In this case, the length of the solid pipe should not be more than 90 m, otherwise the temperature of the circulating coolant may drop.
Choosing the optimal step
After selecting the material and method of pipe placement, you need to determine the distance between adjacent turns of the circuit. It does not depend on the type of placement of coolants, but is directly proportional to the diameter of the pipes. For large sections, too small a pitch is unacceptable, just as for pipes with a small diameter, a large pitch is unacceptable. The consequences may be overheating or thermal voids, which will no longer characterize the heated floor as a single heating system.
Video - Warm floor "Valtek". Installation instructions
A correctly selected step affects the thermal load of the circuit, uniform heating of the entire floor surface and the correct operation of the entire system.
- Depending on the diameter of the pipe, the pitch can range from 50 mm to 450 mm. But the preferred values are 150, 200, 250 and 300 mm.
It is important to remember that when increasing the coolant installation step, it is necessary to increase the temperature of the water supplied to the system, this will increase the productivity of the heating system.
- The spacing of coolants depends on the type and purpose of the room, as well as on the numerical indicator of the calculated heat load. The optimal pitch for a heating load of 48-50 W/m² is 300 mm.
- For a system load of 80 W/m² or more, the pitch value is 150 mm. This indicator is optimal for bathrooms and toilets, where the floor temperature must be constant according to strict requirements.
- When installing heated floors in rooms with a large area and high ceilings, the coolant laying step is taken to be 200 or 250 mm.
Warm water floor installation project
In addition to a constant step, builders often resort to the technique of variable placement of pipes on the floor covering. It consists of more frequent placement of coolants in a certain area. Most often, this technique is used along the line of external walls, windows and entrance doors - maximum heat loss is noted in these areas. The value of the increased pitch is determined as 60-65% of the normal value, the optimal value is 150 or 200 mm with an outer pipe diameter of 20-22 mm. The number of rows is determined during the laying process, and the calculated safety factor is 1.5.
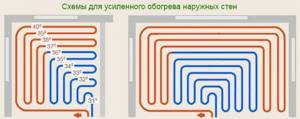
Schemes for enhanced heating of external walls
Variable and combined laying steps are practiced in external and peripheral rooms due to the urgent need for additional heating and large heat losses; in all internal rooms the usual method of placing coolants is used.
The process of laying underfloor heating pipes is carried out in strict accordance with the project
Laying a heated water floor in a screed
Work begins with determining the installation location of the collector, which is most often “hidden” in a special cabinet. It is usually mounted on the wall.
The device should be placed so that the length of pipes from each of the heated rooms is approximately the same. You can bring the collector closer to the largest contours. The main thing is that it is installed above the level of the heated floor, without venting pipes upward, otherwise there may be problems in the air exhaust system.
The next stage is marking the prepared base, taking into account the division into sectors of 40 square meters. m. Then a thermal insulation layer and damper tape are laid.
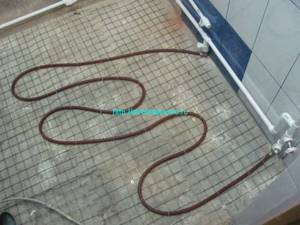
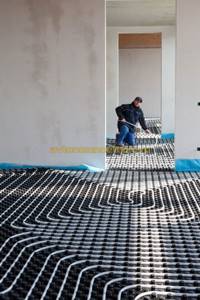
Next, the reinforcing mesh is laid on which the pipes will subsequently be attached. If special mats are chosen as thermal insulation, the mesh will not be needed. You can start laying out the pipeline.
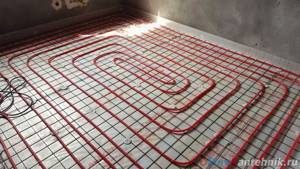
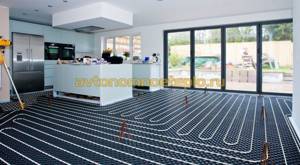
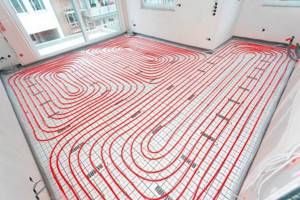
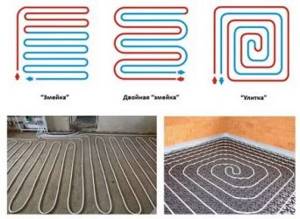
It can be done in different ways: snake, spiral, loops, etc. The laying step varies from 10 to 40 cm, and the distance from the wall to the nearest pipe cannot be less than 8 cm.
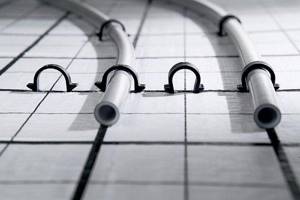
The pipes are secured to the reinforcing mesh using plastic clamps.
It is important not to pinch the part; it should be in a loose loop, otherwise, under the influence of heat, the pipe will expand and may become deformed in the area of tight pressing. The fastening clamps are installed in 1 m increments. You must work with the pipe very carefully.
Most often it is supplied in the form of a coil. Pulling it out from there one by one is unacceptable. You should gradually, as it is laid, unwind the pipe, placing and securing the element on the floor.
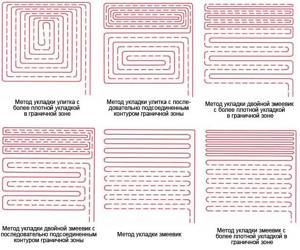
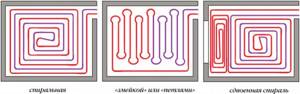
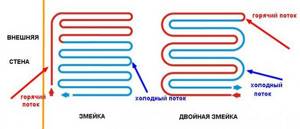
There are several options for laying pipes for heated floors. The most common: spiral, snake, loops, double snail
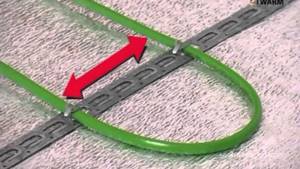
Rotations of the part are performed very carefully, observing the minimum bend radius requirements. Typically it is about five pipe diameters. If you squeeze the product, a whitish crease area will form.
It indicates a sharp stretching of the fragment and loss of its strength characteristics, which leads to an increased risk of pipe rupture. It is not recommended to install a part with such a defect in a heated floor system. The damaged fragment must be replaced, which leads to the appearance of unnecessary joints in the pipeline, and this is also undesirable.
The laid pipes must be connected to the collector. For this purpose, special compression fittings or Eurocone systems are used.
The beginning of the pipe of each heating circuit is connected to the supply outlet of the manifold, thus the number of outlets and circuits must match. The end of the pipeline is connected to the return manifold. If the pipe is laid near an expansion joint, a corrugated tube must be put on it.
Upon completion of installation, the system must be checked.
To do this, water is poured into the pipeline and a pressure of 5-6 bar is applied throughout the day. After which a careful inspection is carried out to identify possible expansions on the pipes or leaks.
If the test run was successful, proceed to pouring the screed.
It should only be carried out with pipes filled with water and operating pressure in them. After pouring, the screed will dry completely no earlier than after 28 days. After this time, you can begin work on installing the flooring.
Before you start pouring the screed, the pipes are attached to the reinforcing mesh using special plastic clamps that prevent the elements from moving
There are some nuances regarding the formation of screeds over water-heated floors. They depend on the type of flooring that will be laid on top of it. If you plan to install tiles, the screed should be 3-5 cm high or the distribution of pipes should have intervals of about 10-15 cm.
Otherwise, according to the principle of heat distribution, there is a danger of the appearance of a “thermal zebra”, which can be clearly felt by the foot. But under laminate or linoleum it is better to lay a thinner screed.
In this case, in order to strengthen the structure, another reinforcing mesh is laid on top of the heated floor, which will also reduce the thermal path to the surface of the coating.
You can find many recommendations on how to make warm water floors yourself.
However, you need to clearly understand that this is a complex and responsible undertaking. A pipeline laid in a screed is practically beyond repair, and if installation or design errors are discovered at this stage, it will be extremely difficult to correct them. That is why the work should be approached very responsibly, then the new heated floor will only delight you with its long and effective operation.
Do-it-yourself warm water floor in a bathhouse
There is no need to talk about the comfort of using heated floors; this type of heating is very popular in private homes, as it is effective and has high efficiency. Despite the fact that this type of work is not much more difficult than others related to arranging maximum convenience and comfort of one’s own home, few know how to make a heated floor with their own hands.
Let's consider theoretical and practical issues related to independent calculation and arrangement of water floor heating in small residential or office spaces.
Choice
Polypropylene pipes are presented on the market in several versions. They are divided into single-layer and multi-layer. For multilayer ones, reinforcement is carried out using aluminum or fiberglass. In a heated floor system, multilayer pipes must be used. They exist in three types:
- With an aluminum layer, which is located on the outside or between layers of polypropylene.
- Composite ones are reinforced between layers with a mixture of aluminum and fiberglass.
- With a layer of fiberglass they are optimal for installing heated floors. They do not deform due to temperature changes, are characterized by increased durability and strength, and lie well in the screed.
Preparatory work and calculation of materials
Such a responsible job as installing a heated floor with your own hands should begin with the preparation of materials and planning. Strictly speaking, an accurate calculation can only be made by specialists who have information about the level of heat leakage in a given room. But for individual needs, approximate calculations are often used that satisfy the requirements.
First you need to draw a plan for the placement of pipes. The clearest and most visual diagram will be a diagram drawn on paper in a checkered pattern, the warm floor on which can be calculated based on the square footage of the room. Each cell will correspond to a pitch - the distance between the pipes.
Are technological disruptions really that bad?
Some builders, beginners and even experienced ones, are skeptical about mistakes made when laying a water floor. They believe that there is no point in carrying out work so carefully, the result of which will be hidden under a layer of concrete-cement screed. But neglect of the requirements of technology will very soon manifest itself in the form of:
- uneven heating of the floor, some of which will be too hot, and some will not be warm enough or even just cold;
- excessive costs for the purchase of materials, in particular pipes, which will require more if not properly marked and laid;
- rising heating costs, again caused by irrational pipe laying and non-compliance with technology;
- unplanned repairs and even complete dismantling of a low-quality floor heating system.
Indeed, many violations of technology are not noticeable after installation. The feet are warm, the owners are happy. But time invariably proves the importance of a professional attitude to any task, especially to such a complex one as installing a heated floor.
The implementation of this project will be successful if all its stages are well thought out. The following factors are relevant:
- feasibility of the engineering solution and comparison with analogues;
- correct selection of components and flawless installation;
- checking and setting.
To figure out how to make a water-heated floor without errors, in the most difficult cases you will need the help of qualified specialists.

You can easily learn how to make a comfortable heated floor yourself
If you carefully study the materials in this article, it will not be difficult to perform the necessary steps yourself. This installation of water heated floors is used not only to reduce costs. It will be useful for successfully meeting the special needs of future users.
What flooring is suitable for heated floors?
A big mistake is made by those who plan to lay parquet or thick wooden flooring on a warm floor. Wood is a poor conductor of heat and will prevent the room from heating up.
The efficiency of such heating may be even lower than that of radiator heating, and heating costs may be too high.
The ideal covering for heated floors is stone, ceramic or porcelain tiles. Once heated, it will keep warm perfectly, and this is the best option for the kitchen or bathroom. Children love to play in rooms where the floor is warm, and walking barefoot there is more pleasant than on wooden parquet.
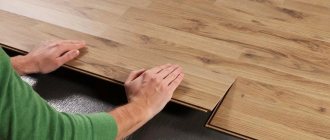
A slightly worse flooring option, but more suitable for a guest room or bedroom, is linoleum and laminate. These materials transmit heat well and will not reduce the efficiency of water heating. In this case, the laminate should be chosen with a minimum thickness, and linoleum should be chosen without an insulating backing.
Important! When heated, many synthetic materials can emit harmful fumes.
Therefore, floor coverings with chemical components must have a manufacturer’s mark indicating the possibility of their use in residential premises on heated floors.
Base for heated floors
If we are talking about a house with concrete floors, then the most affordable and generally accepted option is a water-heated concrete screed. The same method is used for the first (ground) floors of private cottages, if the base of the floor is on a sand cushion, which is located directly on the ground.
In houses with wooden floors, this option is not applicable. Wooden floor beams simply will not withstand the enormous weight of a concrete screed, no matter how thin it is. In this case, a lightweight version of heated floors is used, which will be discussed in a separate section.
Installing a heated floor with your own hands begins with preparing the base. The base for creating a warm floor must be flat, without protrusions and depressions. The maximum permissible difference is 5 mm.
If the depth of surface defects reaches 1-2 cm, then you will have to pour and level a thin layer of granite screenings (fine crushed stone) with a grain size of up to 5 mm. You will have to lay a film over the leveling layer and walk on wooden boards when laying the thermal insulation. Otherwise, the leveling layer itself will become a source of unevenness.
Laying a warm water floor with or without reinforcing mesh
There are two options for pouring heated floors with concrete screed - using reinforcing and fastening mesh and without it.
- If polystyrene foam mats with grooves for contours are used as insulation, then the mesh does not need to be used. Concrete can be poured immediately after laying the heated floor.
- When using conventional insulation, you need to use a thin metal or polymer mesh to reinforce and fix the contours. It should be slightly raised above the thermal insulation material.
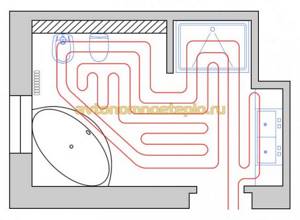
Laying schemes for water heated floors
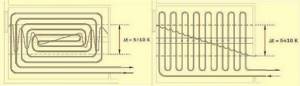
The most common layouts for laying water floors are snail and spiral. The snail evenly heats the entire floor area.
But with a spiral design, it is possible to provide a greater level of heating in the coldest zone of the room. To do this, the first branches of the pipe through which hot water is supplied are laid there. Based on the finished drawing, the exact length of the pipe is determined.
Important! For heated floors, only a single piece of pipe is used! If the room area is very large, several heating circuits are planned. The length of the pipe of each circuit should not exceed 100 m.
Otherwise, the pressure required for normal coolant flow rate will be too high. In area this corresponds to 15 square meters. m.
It is best to make a water floor with your own hands from a metal-plastic pipe with a diameter of 16 mm.
It bends easily with a fairly small radius, and it is much more convenient to work with it than with a cross-linked polyethylene pipe. It is not advisable to use a pipe with a diameter of 20 mm. A larger diameter will require an increase in the thickness of the concrete, and this has a bad effect on the efficiency of the heating system.
The sequence of laying pipes in a concrete screed
Despite all its labor intensity, installation of a heating network in a concrete screed is now the most common. The technology looks like this:
- First, the base is prepared. The subfloor is cleaned of debris; if there are sagging or bumps on it, they are removed with a hammer drill.
- Then waterproofing is laid on the floors of the room.
- After this, thermal insulation is installed on top of it.
- Further, the installation rules require installing a compensation (damper) tape between the pre-calculated areas and along the perimeter of the walls of the room.
- Reinforcing mesh is installed.
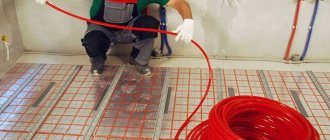
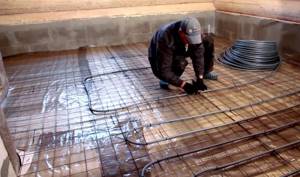
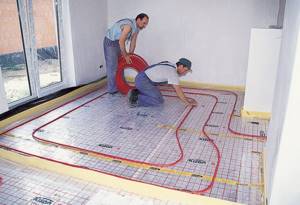
- According to the chosen scheme, the heated floor pipes are laid. They are attached to the fittings with their own hands using harpoons.
- To check the system, it is filled with water and pressurized.
- Then guide beacons are installed.
- Lastly, the cement-sand screed is poured.
Insulation and heat reflector
The optimal insulation thickness is 5 cm.
When laying on the ground or if increased protection from the cold is needed, when the level below is an unheated room, the thickness of the thermal insulation can be increased to 10 cm. To reduce heat losses, it is recommended to lay a heat-reflecting screen made of metallized film over the insulation. It could be:
The metallized layer is quickly destroyed by the aggressive action of concrete, so the screen itself also needs protection. Such protection is provided by polyethylene film, which is used for greenhouses and in greenhouse farming. The film thickness should be 75-100 microns.
In addition, it provides the necessary moisture for the maturing concrete screed throughout the entire period of its hardening. The pieces of film must be overlapped, and the joint must be sealed with tape.
Fastening connections for water heating pipes
Pipe fasteners are installed on the thermal insulation.
Its purpose is to secure adjacent pipe branches and position it along the floor in strict accordance with the preliminary plan. The fastener holds the pipe until the concrete screed reaches the desired degree of hardness. The use of fasteners facilitates the installation of the floor and ensures correct placement of the pipe in the thickness of the concrete pad.
Fasteners can be special metal strips, metal welded mesh, plastic brackets that pin the pipe to the foam base.
Metal strips are used when the thickness of the concrete pad is increased.
They slightly raise the pipe relative to the heat insulator, due to which it is closer to the upper surface of the concrete pad. The pipe simply snaps into the shaped recesses of the planks. The metal mesh not only secures the pipe, but also reinforces the layer of concrete pad. The pipe is tied to the mesh with pieces of wire or plastic clamps.
Fastener consumption is 2 pcs. per linear meter. Additional fasteners can be used in places where there are curves. Plastic brackets are installed manually.
They pin the pipe to the polystyrene foam as it is laid. Do-it-yourself semi-industrial heated floors are made using a special stapler. But its purchase is justified only with intensive professional use.
In recent years, manufacturers of underfloor heating systems have begun to offer another very convenient solution. We are talking about special sheets of dense polystyrene foam with a profiled surface. Typically, the surface of such sheets consists of intersections of grooves or rows of protruding elements, between which heating pipes are easily laid.
The surface of the sheets is smooth, extruded, all pores are closed and no additional waterproofing film is required. Having a special thermal cutter, you can cut grooves in polystyrene foam yourself. But to carry out this work you need at least minimal experience.
Important! Metal-plastic pipes are supplied in coils. When laying, the coil rolls out along the pipe placement path. Do not pull the pipe from a lying coil, as this will cause it to twist and may lead to delamination of the internal layers.
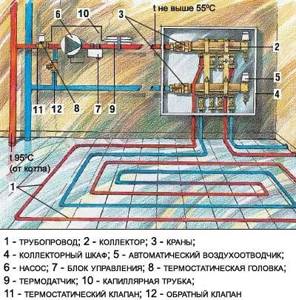
Connection diagram of the heating water pipe to the collector
Installing a concrete screed, laying a water heating pipe - engineering and technological aspects of installing a heated floor. The main stage of installation is connecting the pipeline to the mixing unit and to the manifold.
It has already been said above about where and how best to locate the manifold cabinet. Together with the installation of the mixing unit, the manifold and circulation pump make up the heating system control unit.
Usually the cabinet has dimensions of 50x50 cm. For better combination with the interior of the living space, the manifold cabinet is made in a recess of 10-15 cm. Accordingly, it is better to hide the water circuits at the connection points in the wall.
Having installed the collector, the necessary lines are connected to it. Traditionally, the connection diagram looks like this:
The difference may be in the heating method used. This can be the use of coolant supplied through a centralized heating system, or an autonomous heating system powered by a boiler.
Note: If you use underfloor heating and heating radiators at the same time, then you can get by with installing one pump. When it comes to a complete heating system, a warm floor for the entire building, a collector, a pump and the installation of a mixing unit are mandatory attributes.
The supply pipe and return pipe are connected to the manifold using special fittings. If the diameters of the pipe and the manifold inlet socket are different, adapters are used.
A shut-off valve must be installed in the system, which shuts off the supply of hot water to the water circuits. A drain valve must be installed on the return pipe.
To ensure precise regulation of the heating temperature of the heated floor, special valves and a mixing unit are installed on the collector. If you have the funds, you can purchase a ready-made, complex collector, the design of which includes all of the listed elements. Collectors may differ in their design, depending on the number of connected water circuits and the volume of heated rooms.
For reference: in houses where heated floors are installed in all living areas, collectors service all rooms at once. Under one condition, if the layout of the heating pipe is the same everywhere.
When using one pipe laying scheme, the collector has one number of inlet and outlet connection points. Using a combined installation, you will have to have a manifold with a large number of inlet and outlet pipes.
Selecting a recipe, preparing and pouring concrete
Pipes can only be poured with concrete after they have been completely laid, connected to the collectors and filled with water under a pressure of 4 bar.
Before filling, it is necessary to maintain the pipe under this pressure for a couple of days. If a leak is discovered, it is repaired immediately. If the heating system itself has not yet been installed, instead of water, air is pumped into the pipes using a compressor and the pressure is fixed with ball valves.
Immediately after injection, the pressure may drop slightly due to straightening of the pipes. During pouring and hardening of concrete, the pressure is monitored using a connected pressure gauge.
To compensate for thermal expansion, we attach a damper tape along all walls.
The thermal expansion of the concrete pad is 0.5 mm per linear meter, with an increase in temperature of 40 degrees. If the heating is only 20 degrees, the expansion will accordingly be half as much. We multiply the expansion by the length of the longest section of the concrete floor and compare the resulting value with the thickness of the damper tape.
For ordinary apartments, as a rule, it is enough to lay the tape only along the walls and at the door threshold. In addition, the damper tape also plays the role of thermal insulation of the walls from the heated floor. This method eliminates cold bridges that cause unnecessary heat loss.
Additionally, in some cases expansion stitches are made:
For extended heated floors, an expansion joint with a damper tape is installed every 10 m. To prevent the movement of concrete pads in these places from breaking the pipe, a rigid plastic corrugation (preferable) or a larger diameter pipe is placed on it. The penetration of the protective pipe into the concrete pads is at least 0.5 m on each side.
Important! It is recommended to place each circuit on its own site and avoid multiple intersections of pipes and expansion joints.
If, according to the placement scheme, there is an accumulation of warm pipes in one place (for example, near the collector), then a heat insulating sleeve must be put on some of the pipes. This will help avoid local overheating and retain heat for the desired areas of the floor.
Calculation rules and installation options
The material consumption and thermal efficiency of the finished system directly depend on the chosen installation method.
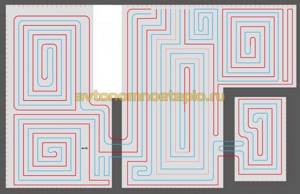
There are three ways to place pipes: snake, snail and combined.
Snake
The method is characterized by simplicity of calculations and ease of installation, which makes it very popular. This scheme is best suited for industrial buildings, rooms with low heat losses and objects that require year-round heating.
Note! The maximum temperature in the room is regulated by SNiP and is +25°C for facilities with permanent occupancy and +32°C for periodic ones.
The main disadvantage of this installation method is the noticeable temperature difference in different areas of the floor. In addition, pipes often bend at quite large angles, which makes the implementation of projects with small pitches problematic. Partially solving this problem will be the use of a steel spring, which is stretched to the location of the future bend and prevents the formation of a break.
Snail
The designation “spiral” or “shell” is also found. In this scheme, the temperature field is distributed more evenly over the floor surface, since the direct and reverse circuit pipes are laid alternately.
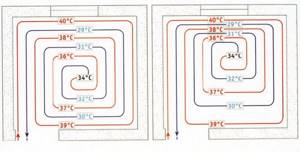
The pipes are placed parallel and mounted in the direction from the walls to the center. In the middle part of the room, the supply line ends with a loop that turns into a return circuit, running, on the contrary, from the center to the collector.
Advantages of this installation method:
- Uniform heating of the room.
- No sharp bends and, as a result, low hydraulic resistance.
- Reduced consumption of pipe material.
This method is considered the most labor-intensive for design and practical implementation.
Combined method
As a rule, this installation method is chosen for large rooms, the floor surface of which is divided into separate zones. For each zone, the optimal method of pipe arrangement is selected: in the area of windows, doors and along the perimeter - in a snake, in the center of the room - in a spiral.
Pipe laying is carried out using the floor or concrete method:
- In the first case, ready-made rack or modular panels are used, equipped with grooves and posts for convenient fixation of pipes. After laying the pipes, the structure is covered with gypsum fiber boards and flooring. Despite the convenience and speed of installation, this method has not yet become widespread.
- Installation in a concrete screed will require much more time. Just drying and strengthening the concrete layer will take at least 28 days (depending on the thickness of the layer).
The procedure for laying the screed is carried out in the following sequence:
- Waterproofing layer. Placed in the lower part of the structure, it prevents the formation of condensation.
- Thermal insulation. Any sheet insulating material will do. Its task is to prevent heat from escaping downwards, and the thickness of the layer is determined according to external climatic conditions.
- Foil film. Redirects the maximum volume of warm air into the room, allowing you to save on coolant consumption.
- Reinforcing mesh. Provides the screed with the necessary strength.
- Pipeline installation. One or more circuits through which coolant circulates.
- Control tests. Coolant is supplied to the installed system.
- Screed. Pouring the finished pipeline with a cement-sand mixture. The layer thickness usually does not exceed 35-50 mm.
- Flooring. Ceramic tiles show the best heat transfer rates.
How to make a water heated floor: concreting
Important! Any self-leveling floor must contain a plasticizer. The specific amount depends on the specific brand and purpose of this drug. The plasticizer should not be just any plasticizer, but specifically for heated floors!
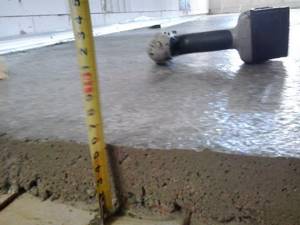
If the pipe was attached to strips or brackets, a reinforcing mesh is laid on top of it. The height of the concrete screed is selected from 5 to 10 cm.
In this case, it is necessary to provide at least 3 cm of concrete above the pipe. A smaller layer is fraught with cracking. And a concrete pad that is too thick increases heat transfer losses.
With the right choice of concrete and normal temperature, it begins to set within 4 hours. To maintain normal humidity, it should be covered with a waterproof film, and when the surface dries, water it with water. After just 12 hours, hardened concrete can support the weight of a person.
But its full ripening occurs only after 28 days. All this time you need to take care of humidity and maintain high pressure in the laid pipes. Only after the specified period has passed can the first thermal test of this floor be carried out.
Important! Both during the first test and subsequently, you cannot quickly heat the water-heated floor to a high temperature!
Flooring
You can glue tiles and other floor coverings onto the finished concrete base.
In this case, glue intended for heated floors is used. If the tile falls on an expansion joint, then one part of it must be glued, and the second must be placed on silicone. Silicone adhesive absorbs thermal movements of the base, and the tile will not crack from overstress.
Pipe spacing at external walls and large windows
Pay special attention to the fact that it is necessary to create so-called reinforced zones near the external walls. The pitch of pipes near external walls should be on average 100 mm. The reinforcement zone is made 1 meter wide.
What is it for? Our outer walls (especially the non-sunny side) are always the coldest. We need to cut off this cold as much as possible. We make this a reinforcement zone.
If you have large windows and stained glass, then the reinforcement zone should be done the same way. But there is one important point. Even the gain zone may not be enough.
Heated floors work up to a height of approximately 2-2.2 meters from the finished floor. Your ceilings are often 3 meters high. Accordingly, where the warm floor is no longer effective, your windows will begin to sweat. To prevent this from happening, you need to install an in-floor convector.
Lightweight heated floors for wooden floors
As mentioned earlier, a light heated floor without a concrete pad is installed for wooden floors. In this case, the sequence of work may differ slightly depending on the condition of the old floor and the design of the ceiling.
To prevent heat from escaping downwards, insulation is placed under the pipes. It can be placed between the floor joists, and then it is better to use mineral wool, or it can be laid on an old durable subfloor - here you will need polystyrene foam with a density of 25-35 kg/cub.m. To prevent condensation from forming, a vapor barrier membrane is placed under the mineral wool. The first subfloor is placed on top of the joists.
Just as for a concrete floor, it is advisable to lay a heat-reflecting screen made of foil or foam foam on the insulation. All joints and seams must be sealed with tape.
The logs are laid directly on the polystyrene foam, to which the subfloor boards are nailed.
There should be gaps of about 2 cm between the boards for laying the pipe. Similar gaps must be provided at the ends of the subfloor boards. Otherwise, you will have to choose transverse grooves for the pipe, and this can lead to breakage of the boards.
To ensure that heat is evenly distributed across the floor, the pipe is placed not just in grooves, but in special metal gutters designed for this purpose.
The metal transfers heat over its entire surface and evenly heats the final finish. Recommendations for its choice have already been given above - it can be a laminate with permission to work with heating or a hard polymer coating. Thick parquet and parquet boards are the least suitable for heated floors.
Compared to concrete heated floors, lightweight construction is much faster and costs significantly less. Another advantage is the ability to repair water pipes in the event of an accident. Problems with tubes in a concrete floor can only be eliminated by completely replacing it.
The main disadvantage of a wooden heated floor is its significantly lower thermal power.
Advice! It is possible to supply heated floors from the heating of apartment buildings only with the permission of the heat energy supplier. All recommendations remain in force, although we personally recommend installing a heat-resistant water filter at the pipe inlet.
Properly equipped warmth in your own home is another step towards comfortable and convenient living conditions for the whole family. But, even if you are not able to complete these works and are forced to invite craftsmen, the knowledge gained will allow you to take an active part in this process.
Well, now it's time to finish the article. All the material I wanted to share has been reviewed. I hope it will be useful to you, and you will use it if you need to lay a pipe for a heated floor with your own hands. Improve your own practical skills and gain new knowledge, as they say: “It’s never too late to learn!” That's all, thank you for your attention, successful and easy repair!
Do-it-yourself warm floor: installation instructions for different coatings (90 photos + video)
Space heating based on underfloor heating technology is much more efficient than heating with conventional radiator batteries. Underfloor heating provides the room with normal air circulation: warm air is below, cooler air is above.
There are two options for heating the floor in the house: electric and water. But the electric method of floor heating is very expensive to operate, so water floor heating is more popular.
How to organize a warm water floor in the house
To heat a house using water, you will need a certain number of pipes. Water will circulate through the system and warm the floor.
The bottom line is that you need to lay the pipes under the floor covering. The process is not the easiest, but anyone can figure it out if they want.
Which room is suitable for installing heated floors?
Since this floor heating option requires a considerable number of pipes, it is mainly installed in private sector homes.
Multi-storey buildings are not suitable for this type of heating. The management company simply will not give permission to install underfloor heating from general heating.
Most new buildings are equipped with systems for both radiator and water floor heating.
In order for the installation of a heated floor to be successful, you need to study all the nuances of this process.
Heat conductor temperature
In order for the floor to be at a comfortable temperature, the temperature of the water in the radiators should not be higher than 45C. In this case, the flooring itself will heat up to 28C.
But in most cases, heating systems produce a minimum temperature of about 65C. Only gas boilers are able to maintain the required temperature level. They are effective precisely at low temperatures.
If other heating systems are used, then a mixing unit is required. It adds cooling water from a return line to the existing heating system.
The cooling effect is as follows: hot water from the boiler enters the thermostatic valve, which opens the addition of cold water from the return line when the temperature rises greatly.
How to make a heated floor with your own hands: eyeliner
There are two technologies used to fix pipes:
Dry eyeliner. Metal strips with prepared channels for pipes are laid out on polystyrene foam mats or wooden plates. This will distribute the heat more evenly during heating.
Plywood or other hard materials are laid on top. If you plan to install heated floors under the tiles, then the entire technology remains unchanged, only the tiles are laid on OSB or plywood using a special glue.
Laying in a screed or “wet” version of laying pipes. This technology will require several layers:
- Insulation;
- Mesh or tapes;
- Pipes;
- Screed.
The floor covering is laid after the screed has set. You can put waterproofing or reinforcing mesh under the insulation.
Damper tape must be used when installing the floor. It is laid where two contours connect, having previously rolled it out over the entire area.
Which system is better?
How to make a heated floor, and what system to use? Both systems have both pros and cons.
The dry installation option will be more expensive if you buy all the components ready-made. But their mass is much smaller and they can be used faster.
The screed has a large mass, and not any foundation can support it. Only having a foundation with a reserve can installation be allowed in this way.
If pipes laid using the screed method are damaged, it will be very difficult to repair them. The screed will have to be broken, and the repair itself may cause damage to nearby pipes.
You can use a heated floor in a screed only on the 28th day after installation, because the concrete must gain strength. You will have to go without heating for almost a month.
If the house has a wooden floor, then the screed and high temperatures will contribute to the rapid deterioration of the wood.
It is necessary to study all the initial data of the house in order to avoid serious consequences. Perhaps in some cases it is better to resort to dry technologies.
Having warm floors in your home is a great idea that can be implemented by understanding the information about this process.
It is worth studying the information found, looking at photos of heated floors on the Internet, as well as diagrams of piping systems for floor heating.
Photo of a heated floor with your own hands
Source: https://sdelajrukami.ru/teplyj-pol-svoimi-rukami/