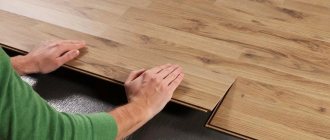
The underfloor heating system can significantly increase the level of comfort in the home. The heat generated by the system is distributed in a comfortable zone for the owners and does not stimulate the movement of air with dust. If you have certain skills and knowledge, you can make a floor with a polyethylene pipeline yourself.
We will tell you how to use the most inexpensive material in arranging underfloor heating. In the article we presented, we discussed in detail how to correctly lay cross-linked polyethylene for a heated floor, with what step and according to what pattern to arrange it. Our tips will help you build a perfectly functioning system.
How pipes for heated floors are made
The strength of cross-linked polyethylene is explained by the special technology of its production, which creates a three-dimensional molecular network.
The following methods are used for this:
- Heating polyethylene together with peroxide (PEX-a).
- Exposure to moisture and implanted silam, together with a catalyst (PEX-c).
- Electron bombardment (PEX-c).
- Application of nitrogen (this option is used very rarely).
As a result, it is possible to impart to polyethylene such characteristics that make it one of the most suitable materials for the manufacture of water-heated floor pipes.
How to install
Before you begin laying cross-linked polyethylene for a heated floor, you must choose the most optimal way to connect the individual elements of the heated floor. The easiest way to do this is with press-on and compression fittings.
Preparation for installation of heated floors made of cross-linked polyethylene
Advantages and disadvantages of cross-linked polyethylene
Pipes made of cross-linked polyethylene for heated floors have a number of advantages:
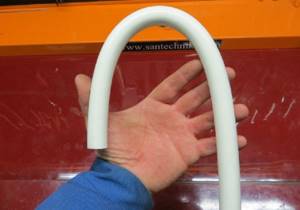
- Elasticity . This allows you to use the most optimal level of bending when laying, without the risk of subsequent cracking and fractures. Rehau products are considered to be especially high quality in this regard.
- Environmental friendliness . Cross-linked polyethylene contains no harmful components that would be released during heating. This guarantees safety in laying heated floors inside residential premises.
- High combustion temperature . The material begins to melt only after reaching a temperature of +400 degrees. As a result of the breakdown of the substance, water and carbon dioxide are formed, which are completely non-toxic.
- Excellent performance characteristics . The system, made of cross-linked polyethylene, is not afraid of rotting, corrosion and chemical influences. All this is the key to long-term and flawless operation of the water heated floor.
- Frost resistance . In the event of a significant drop in temperature, polyethylene products are not deformed.
- Sound absorption abilities . Thanks to this, there is no noise from the coolant circulating inside the circuit.
As for the weaknesses of polyethylene, they usually indicate the need for competent installation work. For example, it is recommended to securely fix turning areas, because this material does not hold the curved configuration given to it very well. In addition, the resistance of polyethylene products to direct sunlight is not very good. Laying the contour must be done as carefully as possible, avoiding any damage to the protective layer.
Recommended precautions
When bending a PP pipe, the polypropylene is stretched on the outside and compressed on the inside. If mechanical action is performed incorrectly, the product becomes deformed.
Defects on parts also appear when exposed to high temperatures, which are used to soften the material of pipeline elements. Therefore, bending must be done while observing the following precautions:
- Do not overheat the PP product. At temperatures above 150°C, ductility increases significantly. If heating is continued, the part will easily become wrinkled and may even melt.
- Do not expose to high temperatures for a long time. You need to heat it until it becomes pliable. Prolonged heating will lead to a change in the properties of polypropylene.
- The pipe part must be heated evenly from all sides.
- Do not reduce the permissible bend radius. This parameter is determined depending on the outer diameter of the tubular product. The value must not be less than 8D straight element.
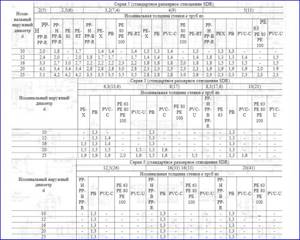
The minimum permissible bending radius of popular standard sizes of PP pipes is indicated in the table below.

Minimum bend radius
Which pipes for heated floors are better?
When deciding on pipes for a water heating circuit, it is recommended to pay attention to Rehau products.
This manufacturer produces several brands of pipes for underfloor heating made of cross-linked polyethylene:
- Rautitan stabil with a diameter of 16–40 mm. The walls of these products have a three-layer structure. Cross-linked polyethylene PEX-s is used as the inner layer, with a cross-linking degree of 60%. Next comes aluminum foil, which resists the penetration of oxygen. PE polyethylene sheets are used for external decoration. Pipes of this type are designed for operating temperatures up to +90 degrees, at a pressure of no more than 10 bar.
- Rautitan flex with a diameter of 16–63 mm. They are made from innovative polyethylene type PEX-a with a degree of cross-linking of 70%, for the production of which peroxide technology is used. The outer coating here is ethyl vinyl alcohol, which is completely airtight. Rautitan flex pipes have good elasticity, which makes it possible to organize heated floors of complex configurations.
- Rautitan pink . The characteristics of these products are basically the same as those of the previous variety. The good elasticity of Rautitan pink pipes allows them to maintain performance during bending. Recommended conditions of use: temperature – up to +95 degrees, pressure – up to 9 bar.
The selection of Rehau pipes for organizing heated floors is carried out in the diameter range of 12-32 mm: this allows you to do without installing a very thick and heavy screed. The same applies to products from other companies.
Construction of polyethylene pipe
Reinforcement. Almost all cross-linked polyethylene pipes have a complex multilayer structure.
In order to increase the strength characteristics of the pipeline and reduce the linear expansion of the material, the polyethylene product must have a reinforced layer.
It could be:
- polypropylene;
- fiberglass;
- aluminium foil;
- perforated aluminum;
- solid aluminum sheet.
The reinforced layer is able to neutralize sudden pressure changes inside the PE-S pipe when used in a hot water or heating system.
The design of cross-linked polyethylene products provides for the presence of a reinforced layer both on the surface of the product and at various depths. If it is necessary to solder two or more pipes, the reinforcing layer is stripped to 1 cm.
Pipes made of cross-linked polyethylene for underfloor heating are practically not reinforced. This material is also called “pure”.
Oxygen barrier. The manufacturer also calls it a “diffusion barrier” or “anti-diffusion protection.” This layer is mandatory for all types of cross-linked polyethylene products.
The reason for its appearance in HDPE pipes is the ability of oxygen molecules to penetrate into the material through a three-dimensional lattice, as a result of which cross-linked polyethylene is slowly but surely destroyed.
The diffusion barrier can also be either inside or outside the pipe.
Recommendations for use
One of the most attractive strengths of cross-linked polyethylene is its resistance to chemical influences. A pipe made of this material will not suffer any damage if solvent, toluene or chlorinated hydrocarbon gets on its surface. Various detergent additives, antifreezes, anti-corrosion liquids, etc. are also not harmful to polyethylene products.
However, these pipes still need to be protected from certain substances. We are talking primarily about various organic products - oils, fats, waxes. They, as a rule, provoke deterioration in performance due to the swelling of cross-linked polyethylene. You need to be especially careful when organizing heated floors in various workshops, since products made from this material do not tolerate halogens and nitric acid well.
Pipeline requirements
There are two ways to install heated floors - dry when installing a pipeline in sheet materials made of polystyrene foam, wood, plastic floor placement with channels, and wet cement-sand screed. In most cases, when installing a heated floor, it is better to use a screed - it is cheaper, has higher thermal conductivity and distributes heat evenly.
The pipeline for a water floor placed under a cement-sand screed must meet the following criteria:
- The temperature of the coolant in the heated floor circuit does not exceed 55 °C, therefore the pipeline material must withstand the specified limit with some margin in case of emergency situations. Since water is used in the heating line and its boiling point does not exceed 100 ° C (when steam forms and pressure increases in the system, the boiler safety group is activated), it is desirable that the water pipeline can withstand extreme temperature thresholds for a short time.
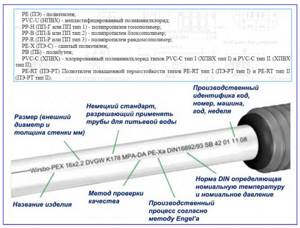
Rice. 2 Symbol of polymer pipes according to GOST 32415-2013 and their markings
- The pipe for a water heated floor gives off its heat to the screed; for heat transfer to be effective, it is necessary that its thermal conductivity be as high as possible. The leader in this criterion are copper pipes, which have the highest heat transfer coefficient.
- The pipe for underfloor heating is filled with a coolant, more precisely distilled water, which has a corrosive effect on a wide range of metals. Therefore, the pipe material should not enter into a chemical reaction with water; a polymer pipeline satisfies this criterion to the highest degree.
- The pipeline material should also not react chemically with the screed or any reagents that it may absorb during operation. Polymers and slightly worse alloyed steel alloys such as stainless steel and non-ferrous metals (copper) cope with this task best.
- All materials at a high temperature of the shell are subject to expansion; if they are placed in a screed, its coefficient must have a minimum value or the pipe shell must be elastic enough so that when the volume increases, it does not expose the screed to destruction.
- The length of the heated floor contour reaches 100 - 120 m, and it is undesirable that under the screed there are places that are most vulnerable to leakage - the joints of the connected pipe sections. Therefore, the pipe for water heated floors must be supplied in a single piece of considerable length, wound on a reel.
Rice. 3 Dependence of wall thickness on outer diameter for various series S of polymer pipes on the SDR ratio (2S+1) according to GOST 32415-2013
- Water is pushed through the heated floor pipeline using a circulation pump, while the coolant along the route experiences hydraulic resistance, depending on the length of the heating circuit, the diameter of the pipes and the quality of the internal walls. The pipe for a heated floor must be hydraulically smooth - this reduces hydraulic losses in the circuit and, accordingly, material costs for heating the coolant.
- Oxygen penetrating through the walls of the pipeline is a strong oxidizer of metals; for example, through a 100-meter section of a pipe made of ordinary polyethylene with an oxygen permeability of 650 g/m3 per day, about 3.416 kg of molecular oxygen enters the coolant during a year of operation. This amount is capable of oxidizing almost 12 kg of divalent Fe2+ iron, soluble in water, with additional oxidation to 8 kg of trivalent Fe3+, which is not soluble in water. As a result, when using PE pipes in a heating system with steel radiators, theoretically about 8 kg of rust Fe3+ can settle on the radiator heat exchanger and pipeline, and about 4 kg of iron Fe2+ in soluble form will pass into the coolant.
Therefore, the gas permeability of pipes for heated floors according to GOST 32415-2013 should not be higher than 0.1 g/m3 per day.
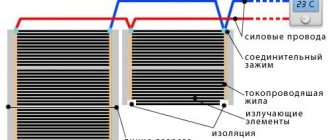
- Metal pipes do not allow gases to pass through, but polymer pipes must be equipped with an anti-diffusion layer, which is usually an aluminum shell or a copolymer of ethylene and vinyl alcohol EVOH.

Rice. 4 Linear extension of 100 m pipe sections from different materials when heated to 50 °C
- Ease of installation. When determining which pipe to choose for installing a heated floor, you should pay attention to the method of its installation. This is especially true for polymer pipelines, where the connection of some types with a manifold distributor can be carried out by simply screwing on a union nut, while for other types it will be necessary to install adapter fittings using special expensive equipment.
- Maintainability. Sometimes situations arise when a pipeline under the floor in a screed is pierced by a hammer drill during various types of work (laying electrical cables, installing radiator heat exchangers, baseboards). In this case, you will have to remove the layer of cement-sand screed and seal the hole or replace the damaged area. The simpler the method of carrying out and implementing these works, the more profitable it is to buy the appropriate pipes.
- Fracture resistance. This is the criterion by which suitable pipes made of polymer elastic materials are selected; it is desirable that the pipeline, when broken, independently restores its shape or this can be done using various types of influences (temperature, mechanical).
- Price. One of the most important criteria by which a pipe for a heated floor is selected is its price, which amounts to a considerable amount even in the most budget types.
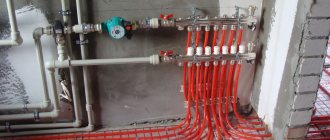
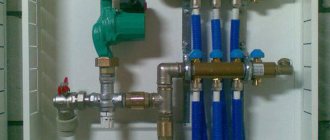
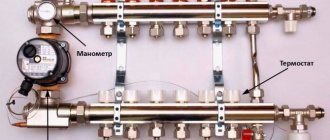
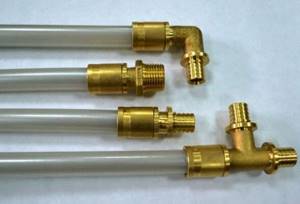
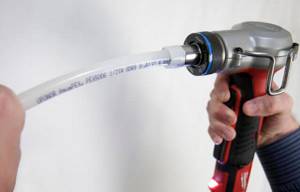
Fittings for pipe laying
Rehau offers slip-on couplings and fittings that ensure high reliability of the connection of cross-linked polyethylene pipes. During installation, the pipe is first equipped with a sliding coupling. Next, a special expander comes into play, capable of expanding the internal diameter of the product to the desired value. This operation will require several steps. Next, a fitting of a suitable diameter is fixed, followed by sliding the sleeve onto it. Such compounds are distinguished by a very high degree of resistance to most aggressive influences (including high pressure and heat).
If you have all the necessary tools, installing a water heated cross-linked polyethylene floor does not take too much time. In this case, special skills are usually not required: the main thing is to strictly follow the instructions. Due to the absence of rubber components in the system, it is possible to achieve a significant increase in service life. We are talking primarily about rubber seals, which quickly fail.
Mounting methods
There are quite a lot of ways to attach underfloor heating pipelines. Over time, new technologies appear, both means and methods of fastening are improved.
Let's consider the most common of them, which have received the approval of professionals who have been tested by time of operation.
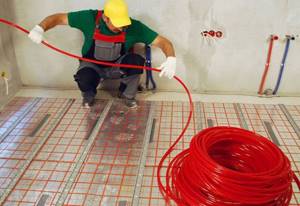
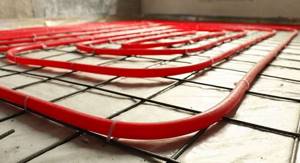
Attaching to reinforcement mesh
In laying a warm pipeline, the reinforcing mesh does not play the role of a reinforcing element, but rather the basis for fastening heating pipes. It is laid on various layers of hydro- and thermal insulation made of expanded polystyrene or polystyrene, and plastic bends are mounted on top, attaching them to the welded mesh using various means.
The following fasteners are used:
Nylon ties, clamps of different lengths. Price from 1 ruble per piece.
Wire fastening connectors made of steel. They tie the pipes to the mesh with a special hook at a distance of 75 cm between the fastening points. The price per piece is approximately 2 rubles.
Plastic swivel clips installed on the mesh. Raise the mesh above the insulation by 0.5-0.8 mm, which better connects the mesh to the screed. The pipe is inserted into the clamp and snaps into place. Price from 5.5 rubles per unit of goods.
Any home craftsman can carry out these methods with his own hands, having made the necessary calculations.
Mounting on mounting rails
Special fixing tires are produced in the form of a plastic track 50 cm long with clip clamps on top. The planks can be connected to each other into a single strip of the required dimensions. They are convenient for laying pipes made of cross-linked polyethylene PEX.
They are attached to the insulation with anchor brackets, and to the concrete floor using dowels. Price from 48 rubles per piece.
Securing the pipe with clamps
In the absence of reinforcing mesh, fastening with staples or metal clamps is used. These mounting parts are attached to the screed with dowels and nails, and to the wooden floor with self-tapping screws.
Fastening with a tucker
The use of a tacker, a device that resembles the principle of operation of a stapler, is becoming increasingly popular among professionals. In sales it is often called that. The tool is designed for fixing pipes to polystyrene foam with anchor clamps. The device is equipped with a magazine bar that can accommodate 100 or more harpoon staples. Design features allow the operator to work without bending over, without putting much effort on his arms and back, significantly increasing the speed of operations.
Previously, the price of the instrument was at least 17-18 thousand rubles; now devices costing from 4 thousand have appeared on sale.
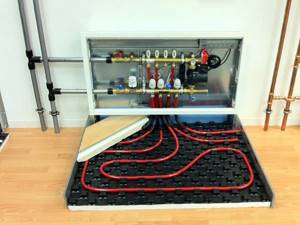
Expanded polystyrene boards with fixation
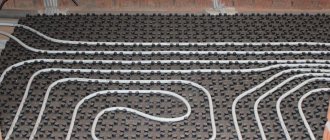
To facilitate the installation of heated floors, thermal insulation boards made of polystyrene foam have been developed. Today, products have appeared on sale that allow the installation of plastic pipes without the use of additional fixing means.
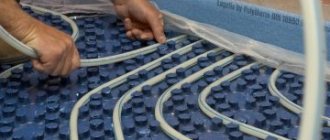
On the slabs there are bosses in rows, 2 cm high and higher, on which special protrusions are made. Thanks to these protrusions, the pipe is securely fixed to the plate. All the technician needs to do is step on the plastic outlet with his foot, and it gently clicks between the protrusions.
The material is highly durable; you can walk on it without fear of damaging the mat configuration.
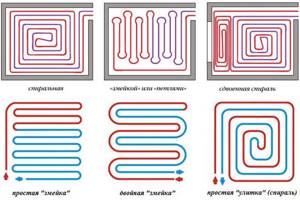
The plates are equipped with locks, which allows them to be securely connected into a single field, without gaps or the risk of opening. The advantages of this method include the speed and convenience of installing bends, the ability to mount them according to any scheme: “snail”, “snake” or another proprietary scheme.
The cost of such slabs is 680 rubles per meter2.
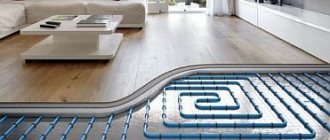
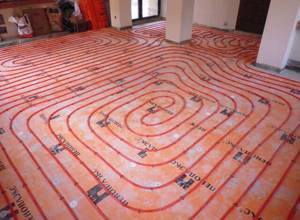
Laying scheme
To carry out installation work correctly, during the development of the project, a clear diagram of exactly how the pipes will be located is drawn up. The most popular laying patterns are single or double snake, as well as spiral.
It is important to follow the parameters recommended by experts:
- The average length of the heating water circuit is recommended within 40-60 m. In any case, making a pipeline longer than 120 m is not effective.
- The minimum pipe laying pitch is 10 cm, the maximum is 35 cm. If the room has a complex shape, or when it is necessary to increase the heating level, it is possible to use different distances between individual turns of the circuit. Reducing the laying step is allowed near external walls or the entrance door.
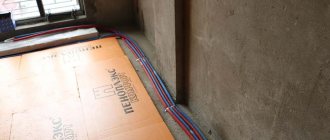
- To lay the damper tape, a distance of 20-30 cm is made from the walls around the perimeter.
Before purchasing polyethylene pipes for heated floors, the first thing you need to do is determine the total length of the circuit.
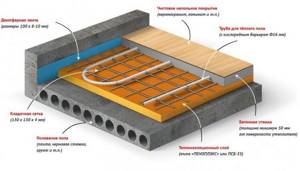
Construction of a base for a heated floor.
Warm floors must be installed on a solid foundation. For example, on a concrete slab. Then the thickness of the “general” floor layer will not exceed 8 cm. When laying the floor directly on the ground, it is necessary to level it as much as possible and insulate it as best as possible. The thickness of the insulation will depend on the weather conditions of the area and the specific location. In the event that the warm floor is laid above the basement, or on floors above the first, the thickness of the insulation will be minimal. About 3 cm.
Insulation and waterproofing.
Instead of thick plastic film, you can use roofing felt. Pieces are cut from a roll of film or roofing felt along the length of the room and laid overlapping each other (overlapping about 20 cm). Also, the waterproofing must be wrapped on the walls.
Insulation is placed on top of the laid waterproofing, which serves to retain heat in the room. Of the many options that modern manufacturers can offer, professionals advise choosing from two options:
- Extruded polystyrene foam. It has all the necessary advantages. It has reduced thermal conductivity and increased moisture resistance. It is also very wear-resistant.
- Expanded polystyrene in the form of profile mats. The main feature of this type of insulation is the surface with protrusions. This makes it easier to lay pipes. The pitch of the protrusions in this insulation is 5 cm. The main disadvantage is the increased cost compared to EPS.
When choosing the thickness of the insulation layer, several important conditions should be taken into account.
- When laying insulation directly on the ground, its thickness must be at least 10 cm. You can also consider the option of two-level installation. Two layers of insulation 5 cm thick.
- When laying insulation in the room under which the basement is located, a layer of 5 cm.
- When laying on all subsequent floors, its thickness can be up to 3 cm.
To attach the insulation you will need umbrella dowels or disc dowels. Harpoon clamps are required to secure the pipes.
Procedure for laying out insulation:
- Level the surface where the thermal insulation will lie. This is best done with sand or rough screed.
- Laying pieces of waterproofing. The seams must be taped.
- Direct laying of insulation boards joint to joint. (marked side should be up)
- The seams between the plates must also be taped.
- Secure the insulation with dowels.
If you lay insulation in two layers, you should follow the principle of brickwork. The seams of the top and bottom layers should not match.
What tools are needed
To install a water heated cross-linked polyethylene floor with your own hands, you need to acquire some tools (they can be rented to avoid unnecessary financial expenses).
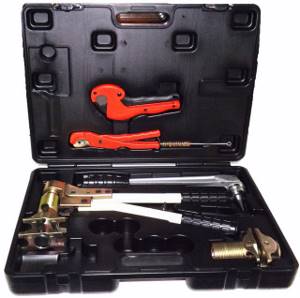
The Rehau company offers Rautool brand equipment for its products:
- Special scissors for cutting polyethylene pipes.
- Expander and nozzles of different diameters.
- Hand press. It is used for crimping of sliding sleeves that have special pins and attachments for fastening. The sliding elements have standard diameters.
- Springs used to bend Rautitan Stabil pipes. They are usually purchased separately.
Features of low pressure polyethylene
Two types of pipelines are made from low-density polyethylene (HDPE or HDPE):
- Pressure (for gas and water supply).
- Non-pressure (for sewage system).
Metal products give way to polyethylene pipes due to its features:
- opaque in a thick layer;
- not destroyed by biological microorganisms;
- resistant to the effects (up to +60°C) of aqueous solutions of salts, acids and alkalis;
- lasting;
- elastic (bends well, resistant to stretching and compression);
- does not corrode;
- durable (from 50 to 80 years in operation);
- little weight.
HDPE pipes:
- practically do not clog;
- easy to install;
- cheaper than metal ones.
Bend radius
Basically, the pipe is bent at standard angles of 90°, 60°, 45°, 30°, but if necessary, you can set any bending radius of the HDPE pipe, not exceeding 90°.
Melting temperature
At a temperature of +80°C, low-density polyethylene softens, and its melting point is from +130°C to +137°C. It is at this temperature that HDPE pipes are produced.
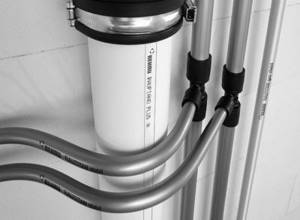
Features of installation of water heated floors
Before laying the contour, all dirt must be thoroughly removed from the subfloor. If there are differences in height, they must be leveled. If the defects are serious, it is often necessary to lay a rough screed. Insulation with a special reflector is laid on the finished base, preventing heat loss towards the ceiling. Next, a layer of waterproofing film and reinforcing mesh with fixing clamps is laid. As an alternative solution, polystyrene mats with indentations are often used.
Installation of heated floors made of cross-linked polyethylene is carried out according to a previously drawn up diagram. The above-mentioned fittings are used to connect individual sections. The finished system is connected to the collector and tested for operability. At this stage it is important to detect and repair any leaks, because After pouring the finishing screed, this will be much more difficult.
Screed rules
If the hydraulic tests are completed successfully, no depressurization of the pipes has occurred, and the system is completely filled with coolant, then the pipe installation stage is completed. Now you can begin installing the screed and finishing.
To install the screed, you must use a purchased or self-prepared mortar based on M300 cement. The minimum screed height to protect polyethylene pipes is 3 cm above the laid pipe. This thickness will be optimal for uniform heat distribution.
In most cases, the screed is made continuous without expansion joints. Thermal seams are necessary when:
- the room has an area of more than 33 m2;
- room length more than 10 m;
- the room has a complex configuration.
Damper tape is used to create seams. Thermal joints are treated with sealant.
Is it necessary to do reinforcement before pouring the screed? There is no clear answer to this question. Experience shows that the system functions perfectly without reinforcement, but at the same time, the reinforcing layer gives the screed additional strength. For reinforcement, you can use a 100x100 mm mesh made of metal or plastic.
Also, reinforcement will be useful only if the reinforcing mesh does not just lie on top of the pipe system, but “sinks” into the solution, being inside the screed when it hardens.
The correct reinforcement device complicates the laying of the screed, therefore, when there is no experience or confidence that everything can be done correctly, this stage can be skipped. After pouring the screed, the system can be started no earlier than 25-30 days later.
Any floor covering can be used as a finishing finish – the top layer of the “pie”.
Features of material production
Cross-linked polyethylene owes its strength characteristics to the special technology of its production. It consists in creating a three-dimensional molecular mesh, thanks to the use of various technologies:
- heating polyethylene in the presence of peroxides (PEX-a);
- moisture treatment with implanted silane with the participation of a catalyst (PEX-c);
- electron bombardment (PEX-s);
- nitrogen treatment, which is rarely used.
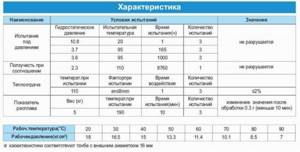
Characteristics of cross-linked polyethylene
Thanks to new characteristics, pipes made from this material are recognized as one of the most suitable options for installing water heated floors.
This is interesting: Diagram of a thermal unit: explaining the essence
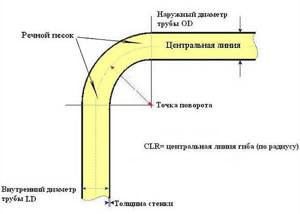
How to calculate bend radius?
Before bending a metal-plastic pipe, it is necessary to make calculations. The bending radius of a metal-plastic pipe should be 5 times the diameter. This will help prevent creases, wrinkles and other types of deformation.
Knowing the radius, you can calculate the length of the curved section, bending steps and the angle by which the pipe needs to be bent at each step.
The length of the curved section L is calculated based on the radius R and the angle of rotation. If it is necessary to rotate the pipe 90 degrees, then L=1.57R, if by 180, then L=3.14R (Derived from the formula for circumference L=2pR, where p=3.14).
For example, you need to bend a pipe with a diameter of 20 mm at a right angle. The bending radius will be 100 mm, and the length of the curved section will be 157 mm. If a right angle is made at 15 degrees per step, then 6 steps will be required - approximately every 26 mm.
Conclusions and useful video on the topic
The rules for calculating the underfloor heating system are given in the video:
After laying the pipe, it is important to test it before carrying out further installation work. About this in the video:. Home craftsmen often make mistakes when assembling heated floors
The main problems of installing polyethylene pipes are covered in the video clip:
Home craftsmen often make mistakes when assembling heated floors. The main problems of installing polyethylene pipes are covered in the video clip:
A correctly selected and installed heated floor will make your home warm and comfortable without any special expenses. The technology for constructing an underfloor heating circuit made of PE pipes is simple and can be used not only by professional builders, but also by ordinary people. If you follow all the rules and recommendations, the system will serve you well for a long time.
Basic methods of bending metal-plastic pipes
Thin pipes are bent by hand without auxiliary devices. To bend thick and hard ones, resort to additional means and tools.
At home, the required bend is given to pipes using the following methods:
- manually without aids;
- manually using means for shock absorption: bulk substances, wire or conductor spring;
- using a pipe bender.
Manual pipe bending
They bend pipes with a diameter of up to 2 cm by hand - it is difficult to handle larger thicknesses manually. This method requires practice to achieve accuracy. It is best suited when a lot of turning is not required.
The procedure is as follows:
- The beginning and end of the bend are marked on the pipe.
- Take it in two hands so that the thumbs are located along the pipe and touch.
- Bend at an angle of no more than 20 degrees; the larger the radius, the smaller the angle at each point of impact.
- Move your fingers along the pipe 1-3 cm and bend them again.
- Continue moving along the pipe until the end of the bend.
- If the angle turns out to be excessive, holding the straight sections near the bend with your hands, carefully bend it to the desired angle.
Note! A 90 degree angle is completed in 5-10 steps; a 180 degree turn will require 10-15 steps.
Use of shock absorbers
If you need to make a lot of angles and turns, or the rigidity and thickness of the pipe do not allow you to bend it with your hands, use auxiliary means. The purpose of such means is to protect the pipe walls from excessive stress when forming a turn.
This improves bending accuracy and requires fewer steps to rotate to the desired angle. Medium-hard pipes with a cross-section of up to 125 mm are bent manually using shock absorption.
Sand, salt or other bulk substances can be used for shock absorption. The sand fills the pipe evenly and helps prevent damage.
The operating procedure differs from the usual one in the presence of additional steps:
- One end is sealed or covered with a plug.
- Fine clean sand is poured through the other end so as to completely fill the pipe.
- Sprinkle a little sand so that a section of the pipe about 1 cm long remains free, and close the end with a plug.
- Smoothly bend to the desired angle as with the usual manual method.
- The plugs are removed, sand is poured in, and the pipe is washed.
To cushion the pipe, you can use easily bendable wire, for example, copper or aluminum.
- Cut the wire into pieces slightly longer than the length of the section to be bent.
- Pieces of wire are placed tightly inside the pipe at the bend.
- Smoothly bent by hand.
- Shake out or pull out the wire, check if there are any segments left inside the pipe.
The good thing about this method is that you can immediately bend the pipe to the desired angle. The wire distributes stress in the walls and reliably protects against damage.
The most painless method is considered to be bending metal-plastic pipes using a conductor - an internal or external spring made of metal that cannot be deformed. Such springs are sold in specialized stores under the name “spring pipe bender”.
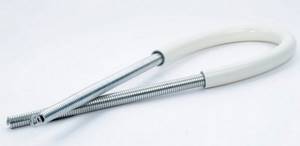
The essence of the method is that the shock-absorbing function is performed either by a spring inserted inside or placed on a pipe. The spring compresses the pipe at the bend, creating an additional frame, and prevents damage to the walls when bending. For external crimping, the spring diameter should be 1.5-2 mm larger than the diameter, for internal crimping - 1.5-2 mm smaller.
- The conductor is put on the pipe or pulled inward to the place of the planned bend.
- Smoothly bent by hand.
- Remove the spring.