Manufacturers
Among the most popular companies specializing in products of this kind are the following:
- is very famous today due to the high quality of its products. It is possible to simply install the system and adjust the mechanism manually. The only disadvantage of this brand is the high cost of materials.
- If you focus on the optimal price-quality ratio, the world-famous Grand Meyer brand will be an excellent example.
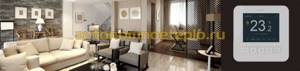
- Energy thermostats have gained great popularity due to their design, which has an LCD display. These electrical appliances work perfectly with various heated floors, thereby saving costs.
Which thermostat is suitable for IR film flooring?
When choosing a device, it is extremely important to consider several factors. First of all, the power of the regulator for infrared heated floors is taken into account. If a large room is heated, two or more regulators are installed.
The second factor that will need to be taken into account is related to the type of thermostats. The consumer is offered several types of this equipment:
There are also regulators designed for smart home systems. They are installed on a DIN rail in the control cabinet. Some manufacturers, for the convenience of consumers, immediately supply a kit with a thermostat, which is fully compatible and can perform all the necessary functions.
Where to mount the sensor correctly
Of course, it is important to choose the right programmable or mechanical temperature controller for an infrared heated floor, but you will also need to decide where to install the temperature sensor correctly, as well as what type of device to choose.
It all depends on the type of device, as well as the operating principle used.
Installation work is carried out as follows:
Thermostat location
Where to place the thermostat is an independent decision, but it is worth mentioning some rules for installing the thermostat:
- You can choose the height of the controller yourself, because it absolutely does not affect the operation of the sensor. Most often, the regulator is installed near the floor or next to switches.
- The strictest rule is the prohibition on installing the regulator in wet rooms, for example, in the bathroom. If you have installed a heated floor in the bathroom, then it is recommended to take the control unit out into the corridor, running the cables to the heating elements through the wall.
- The rules for connecting to the network are individual for each model, but they are all similar. Each model has several terminals for connecting heating elements, power and sensors. There are models with a power cable already connected, in which case its length will be from two to three meters, which is quite enough to connect to the junction box.
All additional installation rules are usually described in the instructions, so it is a must-read; in addition, you can read in it about how to use heated floors.
"Smart" programmable thermostats
Devices that can themselves change the temperature level in a room in the absence of people are much more complex, but the savings from their use are enormous. The costs of purchasing and installing them will pay off in the first winter season. We are talking about programmable thermostats. They can serve several circuits simultaneously. It is possible to connect to the “smart home” system.
A programmable thermostat solves many heating problems and ensures a comfortable stay in the room. Allows you to set certain days, hours and weeks to a given temperature. Therefore, even in the absence of the owners, he himself will switch the heating system to economical mode. All information about its operation is displayed on the display.
They can only be installed by a specially trained technician. This equipment is expensive and requires careful handling, but it is completely worth it.
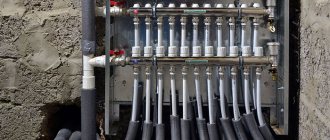
Water floor servos
Automatic control of the temperature of a warm water floor is impossible without the presence of servos. These are small electro-thermal devices that open/close the coolant supply. They are also called servomotors, and the official name is “electrothermal servodrive”. In principle, the same devices can be installed on radiators, but this is not done often.
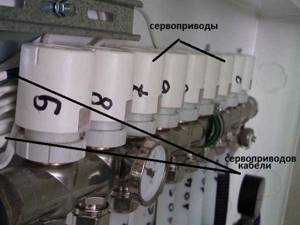
This is how the servos look “live” on the commutator
How do servos work? The main working element is the bellows. This is a small sealed and elastic cylinder, which is filled with a substance, the volume of which strongly depends on temperature. There is an electric heating element around the bellows. When a command is received from the thermostat, power appears on the heating element. It starts working, the substance inside the bellows heats up and begins to expand. The enlarged cylinder presses on the rod located below. And it, in turn, blocks the flow of coolant. As you can see, no motors or gears, only electricity and thermal energy. That is why they are called thermoelectric.
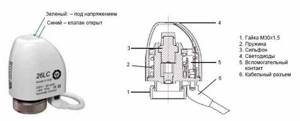
Servo drive - appearance and internal structure
A little about the varieties. There are servos that are normally closed and normally open. These names show what position the valve is in when there is no power: the first is open in the normal position, and closes when a signal appears; the second, accordingly, is closed in the normal state, and opens when a signal is present.
Which one is better to use? For our country, it is better to give preference to normally open servos. And here's why: if it fails, the coolant will continue to circulate and the floor will not freeze (although long and low temperatures are needed for the pipes in the screed to freeze).
There are also devices that operate on 220 V AC or 24 V DC. To supply 24 V voltage, you will need to install an inverter.
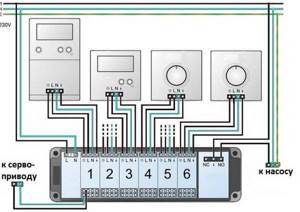
How to connect servos
The connection diagram may be different and depends primarily on the type of thermostat. If thermostats control one circuit of a heated floor, then they are directly connected to the corresponding servos by wires. If the thermostat is multi-zone, then the wires are connected to the corresponding terminals.
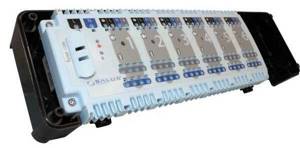
One of the switching units for water heated floors
Heated floor switches are used to organize wires. In addition to the standard function of connecting and connecting different devices, they also perform a protective role. When all circuits of the water floor are closed, a signal is sent to turn off the circulation pump. This is convenient if automated heating boilers are installed (the pump will not run idle without flow, and the system will not fail due to excess pressure).
How to connect devices through a water floor switching unit
But in systems with conventional solid fuel boilers, the pumps cannot be turned off: the boiler will not go out and turning off the pump threatens to rupture the system. In this case, install a bypass and a bypass valve (see connection diagram). The bypass valve is set to a pressure slightly lower than the maximum pressure of the pump (if it has a maximum of 5 meters, set it to 3-4 meters). When this value is reached in the system (this happens if a small number of underfloor heating circuits remain open), the bypass valve begins to turn part of the coolant flow into the “return” and feed it back to the boiler.
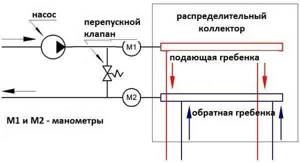
Switching circuit with a bypass valve to prevent the system from running dry
This scheme will work with any type of boiler, not only solid fuel. But for them, it is practically the only inexpensive way to protect the system from overheating.
Connecting the temperature sensor

The temperature sensor is installed in a fire-resistant corrugated pipe, placing it directly inside. This device should generally be located at one end. The other end of the pipe is for electrical wires that connect to the main system.
The corrugated pipe leads from the thermostat directly to the place of its schematic connection. During the installation process, it is recommended to avoid unnecessary bends.
The part of the pipe in which the temperature sensor is directly located must be isolated from the external environment to avoid damage during work with concrete. , maintaining a distance from the wall of about 50–60 cm.
The next step is to check the temperature sensor for mobility. This is done so that later, if it fails, a quick replacement can be made. To check the required mobility, the sensor is simply removed from the pipe and reinserted.
Warm floor
The main function of such underfloor heating is to heat the floor and/or room itself. There are two types of such heaters: water and electric. The first involves laying pipes into the base of the floor, through which warm water is released. This is a cheaper and not entirely safe option, since if the pipes are damaged, not only will you have to remove the entire coating to repair the leak, but there is also a very real risk of ruining the repair completely. Read also: about the features of operating an electric heated floor. As for the electric variation, everything is much more favorable here, although the cost of such a heating project will be more expensive. However, the costs will quickly pay off, because such a system:
- safe;
- very convenient;
- economical;
- In the event of a breakdown, repairs are much easier.
Some people fear that electric heating options use a lot of electricity, but this is not the case. After all, it is worth considering that the main expense is only for warming up. Further, electricity is required only to maintain the set temperature. And a high-quality and competently installed and configured heater will not be a very greedy consumer.
In this video you will learn how to connect a cable heated floor to a thermostat:
Features of the device and installation
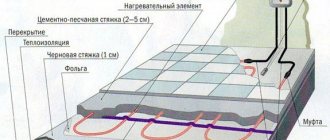
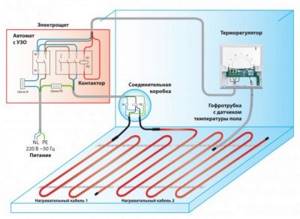
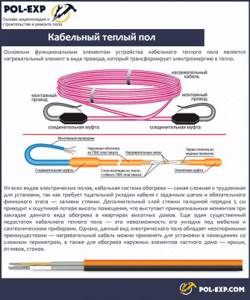
Despite the apparent complexity of installing heated floors, in reality it is extremely simple, as is the installation itself. The basis of its operation is the conversion of electricity into heat through a conductor having high resistance. This can be a cable or mat that connects to a 220 volt network. The thermostat monitors the degree of heating and temperature.
The thermostat will help maintain the required temperature without overheating the floor
The selected conductor is laid on foil, which is covered with a rough screed 1 cm thick. Under it, in turn, there is a heat insulator, which can be placed directly on the ceiling. The wire itself is secured using a special mounting tape and connected to the thermostat. A temperature sensor is also attached to it, which will record the degree of heating.
After laying and securing, you can apply a basic screed with a thickness of 2 to 5 cm, on which the finishing coating will subsequently be laid
When choosing it, you should pay attention to the admissibility of use with the “warm floor” system.
Thus, the floor heating device includes:
- heater;
- thermostat;
- temperature sensor.
Types of structures and areas of their application
Several types of heated floors are produced under the Teplolux brand.
Cable systems
The company produces 4 basic models in various modifications using single-core and double-core conductors:
- Green Box. An electric floor on a coil (to simplify installation) is used under tiles in areas with complex configurations and layouts. The product is reliably protected by a special copper braided screen. Installed in tile mortar.
- Profiroll. It has a lifetime warranty period and is intended for rapid heating of unheated areas. The line has 18 sectional sizes, and therefore is convenient for selecting the conductor of the required power. The thickness of the cable conductor is 5.7-6.5 mm. High-quality protection of the conductor and tightness of connections is ensured by a special coupling. The scheme is universal, practical and reliable.
- Standard. It is an additional heating circuit that can heat up to 30 square meters. m area. Available in single-core and double-core versions. The scheme is intended for residential, office and industrial premises. The diameter of the conductor is approximately 3 mm, which does not lead to a significant increase in the ceiling floor during installation.
- Elite. Used as the main heating option, which uses a two-core shielded cable. Installed under any type of floor covering. Not recommended for rooms with high humidity levels.
The company has also developed a series of heating devices, classified according to the characteristics of the intended purpose:
- Mini. Systems with a single conductor for heating small spaces. A thin heated floor makes it possible to reduce the height of the screed to a minimum. Installation is simple: heating mats are cut into pieces of the required size, then the floor is lined with them. The connection is provided without additional electrical wire. Maximum power – 150 W/m.
- Tropix . The floor is 3 mm thick with a two-core conductor. It has high heat transfer and a significant heating area. Installed on a mesh with an adhesive base.
- Profi. The floor with a two-core conductor, made in the form of a mat, is reliable and easy to use.
- Express (“Express”) is a mobile system. It is laid under a dry covering (linoleum, carpet or parquet). It is a thin film (about 1 mm thick).
Heating mats
Heating mats are easy to install and operate and do not require calculations. It is enough to unfold them, position them and secure them with special glue or screeds.

These products are available in two basic versions, differing in their characteristics:
- ProfiMat. Circuit with a two-core conductor mounted on a protective fiberglass mesh. The product is mounted in a screed. Universally applicable.
- Tropix. A very common heating scheme with a capacity of 200 W/sq. m is capable of heating unheated areas. The scope of application is wide: the system can be installed even in swimming pools and saunas. Product performance is maintained at temperatures of –10 degrees.
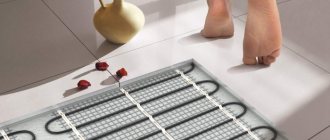
Infrared (IR) film heaters
The operating principle is based on the use of infrared radiation, which heats the surface of objects placed on top of the system.
Several modified Slim Heat series are produced, differing in technical parameters:
- IR film floors with a film 0.34 mm thick in two types: with a capacity of 150 or 220 W/sq. m, intended for heating areas from 1 to 10 square meters. m. Laying under parquet is allowed. It is not permissible to install it in a screed. Can be used as a basic heat source. The product set includes a control panel, a temperature sensor, and connecting terminals. The scheme is suitable for domestic and office premises, as well as areas with significant heat loss;
- mobile floors Express. Contain a thin heating conductor embedded in a nylon carpet. These rugs are placed on top of the floor covering. The products fold up conveniently and are easy to carry. Capable of heating a heated area to a temperature of 30 degrees in one hour.
All types of Teplolux products are equipped with reliable protection against fires and electrical surges. Warm floors are laid under tiles, porcelain stoneware, laminate.
Selecting a thermostat
To choose the right thermostat for your apartment, you must pay attention to your own wishes, as well as to ensure that the parameters of the sensors and heating elements suit each other.
What you should pay attention to:
- The most important thing is to match the power of the floor and the sensor. If the sensor does not provide enough power to the floor, then you will not be able to heat it to the desired temperature. To avoid this, first of all, pay attention to the indicators when purchasing. However, sometimes you have to install several sensors at once on a heated floor in one room, for example, you can connect the programmers to one network and create a power of 3 kW. In large rooms it happens that even a power of 3 kW is not enough, so in this case you will have to connect several regulators separately.
- The type of installation is also an important aspect. If you are ready to cut a hole in the wall, then a built-in controller that is embedded in the wall is suitable for you, and if you do not want to spoil the walls, then simply install a box with a thermostat. All other settings, such as connection to heating elements, are specified in the instructions that come with the sensor.
- Functionality is something that everyone decides for themselves. As mentioned above, control units with little functionality are often used, but if you want to control the floor remotely and program it for a long period of time, for example, a week, then it would be better to purchase a more expensive option - a programmer.
- Appearance is the final factor, which is determined by the style of the room. In the store you can find many different solutions, differing in color, shape, etc., however, most often, control panels look like small sockets.
Preparatory work
Before connecting the temperature controller, be sure to pay attention to the instructions that come with it. The point that specifically addresses the installation of the sensor and the procedure for carrying out this work deserves special attention, because these processes differ from different manufacturers.
First, you need to remove the front panel and carefully disassemble the control mechanism; on simple models it is in the form of a wheel.
To remove it using a screwdriver, you need to pry off the element, and then unscrew the screw that secures the front panel to the mechanism itself. Other models have special plastic latches that hold the front panel in place. To remove it, just press the latches with a screwdriver and it will snap off.

However, if you cannot remove the panel, you should not remove it using mechanical force. After all, in this way you can easily break the latches, and to solve such a problem you will just have to buy a new regulator. To avoid this problem, you just need to carefully study the instructions and try to remove the panel again, but in the correct sequence.
The next step is to purchase devices for installing a heated floor thermostat.
The first thing you need to have is a corrugated pipe. Usually it comes complete with a sensor, but if the manufacturer does not provide such a kit, then it must be purchased separately.
The ideal corrugation diameter is 16mm. In order to determine the required length of the corrugation, you should determine at what height the temperature regulator will be installed, and at what distance from the wall the temperature sensor will be located. Next, from the indicated height, using a tape measure, you need to measure the length to the sensor, which will be in the floor.
Installation sequence
Let's move on directly to the installation of the heated floor and temperature sensor. First you need to determine the location of the thermostat, which will be located outside. It is most often located at a height of about 1 meter from the floor. Its mounting is similar to a regular socket.
Then you need to make grooves or grooves for laying two plastic pipes. One for the power wire leading to the heating element, the other for the electrical wiring of the sensor. The tube for the temperature sensor will be located on the floor. Such a gasket will make it possible to carry out repair work without removing the tiles, at least to replace control elements. It is not possible to completely replace the heating element if it is installed in a screed.
It is important that when laying a pipe or cable corrugation there are as few bends and turns as possible. This will make it easier to replace a failed temperature sensor in the future.
The video below provides useful advice on installing a heated floor sensor in a corrugated floor:
https://youtube.com/watch?v=v-RNyu5cOPU
The next step is thermal insulation, it is carried out individually for different types of heating elements, for example, for a heating cable it is a damper tape or other insulation, the thickness of which is at least 1.5–2 cm. After this, the heating element is installed and secured with supply wires to the thermostat box.
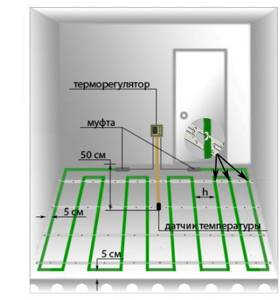
Installing and connecting a heated floor temperature sensor has its own subtleties. In order to prevent solution from getting inside the tube where the sensor is located, its end on the floor is securely sealed with electrical tape or tape. It is not recommended to connect the entire system through an outlet; it is better to supply power from a circuit breaker and through a contactor (starter).
The temperature sensor should be installed at a distance of 0.5 to 1 meter from the wall on which the thermostat is installed, and also exactly in the middle between two adjacent turns of the heating cable. After installation, it is recommended to secure the temperature sensor with mounting tape or foil tape.
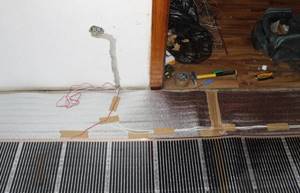
If a film heated floor is being laid, the temperature sensor must be installed under the heater sheet, as shown in the photo below. Please note that thermal insulation must be laid under the temperature sensor, otherwise the heating system will not be effective.
Important point! The location of the temperature sensor should be selected so that it is away from other heating sources. Otherwise, errors will occur and the warm floor will not work as it should.
The connection diagram for the heated floor temperature sensor is as follows:
Before making a screed, you need to check the functionality of the heated floor and the temperature sensor itself. As a rule, the resistance of both elements is measured. The system is considered operational if the resistance differs by no more than 10% from the passport data.
In order for the assembled circuit to be as safe as possible, it is recommended that in rooms where electric floor heating is carried out, protective shutdown devices are installed, which, in the event of a breakdown, will disconnect the circuit from the voltage, thereby protecting a person from falling under electrical potential. In damp areas this can be deadly.
We also recommend watching a video that demonstrates the main mistakes when installing a temperature sensor:
Connection
As a rule, each underfloor heating temperature controller comes with instructions, following which it won’t be difficult to make the connection yourself. Remember that the heating element control device is connected to the system last.
Actually, all that is needed for this is to correctly connect the power, sensor and heating cable (or heating panel).
As a rule, the terminal block has a corresponding signature, so there should be no problems with the connection. Devices are always equipped with a temperature sensor, therefore, the question of choosing one will also not worry you.
After installing a mechanical heat regulator, it is immediately ready for use. Installation of a programmable device does not mean it is ready for operation; it will need to be configured.
Before you test turn on the heated floor, make sure that the heat regulator is connected securely and correctly, otherwise the device may not function correctly or even fail.
Moreover, the warranty does not apply to this case.
Warm floor
The main function of such underfloor heating is to heat the floor and/or room itself. There are two types of such heaters: water and electric. The first involves laying pipes into the base of the floor, through which warm water is released. This is a cheaper and not entirely safe option, since if the pipes are damaged, not only will you have to remove the entire coating in order to repair the leak, but there is also a very real risk of ruining the repair completely.
Read also: about the features of operating an electric heated floor.
As for the electric variation, everything is much more favorable here, although the cost of such a heating project will be more expensive. However, the costs will quickly pay off, because such a system:
- safe;
- very convenient;
- economical;
- In the event of a breakdown, repairs are much easier.
Some people fear that electric heating options use a lot of electricity, but this is not the case. After all, it is worth considering that the main expense is only for warming up. Further, electricity is required only to maintain the set temperature. And a high-quality and competently installed and configured heater will not be a very greedy consumer.
A mixed type of heating will allow you to further reduce electricity consumption, that is, when there is both a heated floor and main heating in the room. Although without the latter, energy consumption will not become a big problem.
In this video you will learn how to connect a cable heated floor to a thermostat:
Features of the device and installation
Despite the apparent complexity of installing heated floors, in reality it is extremely simple, as is the installation itself. The basis of its operation is the conversion of electricity into heat through a conductor having high resistance. This can be a cable or mat that connects to a 220 volt network. The thermostat monitors the degree of heating and temperature.
The thermostat will help maintain the required temperature without overheating the floor
The selected conductor is laid on foil, which is covered with a rough screed 1 cm thick. Under it, in turn, there is a heat insulator, which can be placed directly on the ceiling. The wire itself is secured using a special mounting tape and connected to the thermostat. A temperature sensor is also attached to it, which will record the degree of heating.
After laying and securing, you can apply a basic screed with a thickness of 2 to 5 cm, on which the finishing coating will subsequently be laid
When choosing it, you should pay attention to the admissibility of use with the “warm floor” system.
Thus, the floor heating device includes:
- heater;
- thermostat;
- temperature sensor.
All installation and adjustment work can be carried out even by a person who does not have special knowledge in this area.
Types of thermostats
Thermostats for heated floors are compact devices that are either installed in a regular socket box or mounted on walls (overhead models). The device can be located in the same block with the switch, mounted next to it or a socket, or installed separately in a convenient place. In addition to the thermostat, kits designed to work with underfloor heating systems include a temperature sensor with an additional element - a signal cable.
Many models are equipped with a built-in sensor that monitors the room temperature. These devices are used if there are no other heating systems in the room. But even in such thermostats it is possible to connect a temperature sensor that operates in “hot spots” - on the floor. All devices can be divided into three groups: electromechanical, electronic and “smart”, programmable devices.
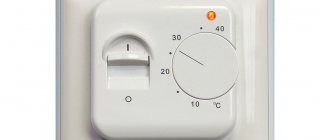
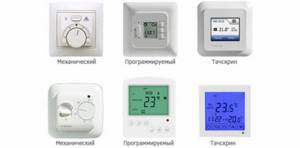
Electromechanical models
Such thermostats have a minimum set of elements. It includes a simple LED indicator, an on/off button (handle), as well as a temperature scale with a circular switch resembling a dimmer. The advantages of electromechanical equipment are maximum simplicity of design and reasonable price.
However, we must pay attention to their shortcomings. It takes practice to learn how to set the temperature accurately. The second, more serious disadvantage is the inability to program the device, so when purchasing such a model, you need to understand that significant energy savings cannot be achieved in this “semi-mechanical” case.
Electronic, digital devices
These devices are modern, functional and more convenient. They are equipped with digital displays and touch keys, making it as easy as possible to set the required temperature. Electronic devices promise greater comfort of use and accurate temperature setting, but this is where their advantages end.
Like electromechanical devices, electronic thermostats do not offer the chance to save energy, since they also cannot be programmed. The price of electronic devices is higher than the cost of simpler “colleagues”, but the functionality differs little. These are the reasons why these digital devices are not very popular.
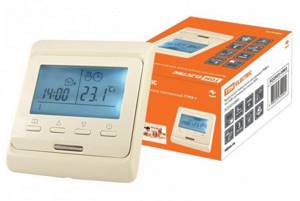
Programmable Thermostats
“Smart” thermostats are the absolute favorites and have virtually no drawbacks. They are equipped with temperature sensors that can be configured for “air” or “floor” control. These thermostats make it possible to configure several modes at once depending on the time of day, days of the week, weekends, etc.
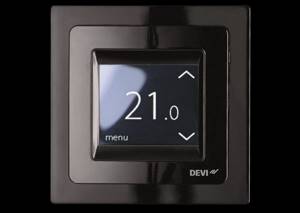
You can adjust the settings you have made, or switch to manual control for a while. If you need to disable the modes, then the owners have nothing to worry about either: all settings are securely stored in the device’s memory. Models can be equipped with a remote control. There are thermostats that can be controlled remotely - via the Internet or GSM channels.
Most programmable models are designed to control the temperature in one room, but there are dual-channel (dual-zone) devices that allow you to monitor the temperature in adjacent rooms. In this case, the kit includes two remote temperature sensors, which are connected to the corresponding terminals of the device.
Smart devices are available in three types: you can buy a surface-mounted device, a built-in device, or purchase a thermostat that is mounted on a DIN rail. It cannot be said that the latest designs are hits, since the problem in this case becomes the laying of the signal cable and installation conductors (aka “cold ends”) of the heated floor system.
Connecting the thermostat to the mains
Connection can be made in two ways:
- Connect through an outlet using a plug.
- Pass a three-core wire in a pre-prepared groove from the thermostat to the outlet.
In order to connect the regulator in the second way, you need to install it under the socket. To do this, a hole is made for a regular socket box. Using a crown, a hole is drilled into which the box is installed. There are also special boxes in plasterboard; thermostats can also be installed in these boxes.
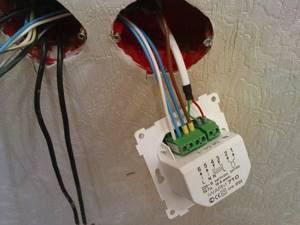
When connecting the temperature controller, you should pay attention to the contacts located on the back of the device; they are marked with three letters that indicate different wire colors:
- L – phase, brown or red wire;
- N – zero, blue or blue wire;
- PE – grounding, yellow-green or yellow wire.
Usually the cable comes complete with a thermostat, the wire length is up to 3 meters. It is connected to a temperature controller and a temperature sensor.
For the entire circuit to work, you must connect a thermostat with a temperature sensor and a heated floor. Before connecting, make a groove from the temperature regulator to the floor and lay the wires using the diagram that is in the instructions. We talked about how to perform wall gating in a separate article.
So, you can connect the thermostat to the heated floor as follows:
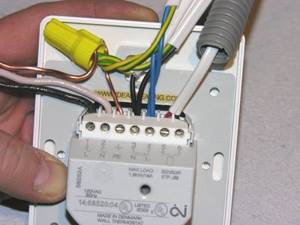
- Connect the temperature sensor to terminal numbers 1 and 2 of the thermostat.
- The wire from the network must be connected to terminal numbers 5 and 6. The phase is placed on the fifth, and zero on the sixth.
- The heating cable is connected to terminals 3 and 4.
Please note that the markings on the thermostat may be different and, accordingly, the connection diagram will be different (for example, the power cable will be connected to terminals 1 and 2).
It is also important to understand that not all houses have the opportunity to connect the regulator to a three-wire network, because many old houses do not have grounding. There are also single-core or double-core underfloor heating, this also affects the installation method
Connection diagram for a heated floor thermostat with grounding and without a grounding wire:
The temperature sensor is installed under tiles or other floor coverings, so it should be installed in such a way that in the event of a malfunction it can be removed without damaging the floor covering. Despite the simple connection diagram for the thermostat, it is important to carefully read the instructions, because if the connection is incorrect, the heated floor will not work. The video below clearly shows how to install a temperature controller and connect it to the network with your own hands:
The video below clearly shows how to install a temperature controller and connect it to the network with your own hands:
This is the technology used to install a heated floor thermostat in the bathroom and other rooms. Now you know at what height to install and how to correctly connect the wires from the heating system and temperature sensor to the regulator.
It will be useful to read:
- Errors when installing heated floors
- Installing a fan in the bathroom
- Connecting a thermostat to an infrared heater
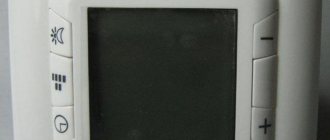
How does a thermostat work?
The thermostat is used to maintain a stable temperature in a “warm” system, as well as to turn heating mats (films) on and off. The device “reads” the temperature sensor readings and automatically turns off the power supply as soon as the floor heats up to the required limit. At the same time, he himself remains in work mode and continues to control the situation. If the sensor notifies about deviations in temperature conditions, the thermostat will again release electricity into the system and the floor will begin to heat up.
The most popular and reliable thermostats are mechanical and conventional electronic. More complex ones are electronic programmable. Despite the significant difference in their “stuffing”, the principle of connecting thermostats is very similar.

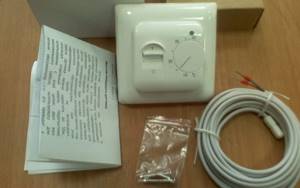
The thermostat kit includes a temperature sensor, mounting box, terminals, installation and operating instructions
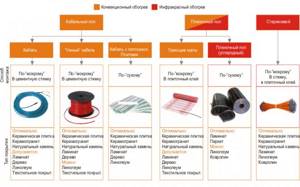
Types of floor heating systems
The construction industry offers consumers several types of heated floors, each of them has its own positive and negative sides. To make your choice easier, you need to briefly familiarize yourself with their technical data; this will make it possible to select the correct system connection diagram.
Table. Types of underfloor heating systems
| Type of heating system | Description of technical and operational features |
| Film infrared | The most modern system enjoys well-deserved popularity among consumers. It is made from modern innovative materials; carbon strips are used for conductors. These are thin, flexible and very durable elements, hermetically protected from the negative influence of external factors by heat-resistant polyethylene film. |
| Thermomat | Such systems preceded the appearance of film options for floor heating. Heat is generated by conductors of reduced diameter, due to which they can be bent and cut to the desired size. |
| Cable | An electrical cable with a precise cross-section and very durable sheaths is installed under the floor. The heating temperature changes by adjusting the length of the conductor. Quite outdated designs, but the cheapest of all electric floor heating systems. Universal purpose, have no restrictions on use. |
| Water | Pipes are installed under the floor to circulate hot water. The coolant can be drawn from a central heating system or from a separate boiler. A specific decision is made on site after analyzing the technical characteristics of the building, the types and capabilities of existing heating systems. |
The method for connecting a heated floor depends only on the type of coolant: electrical energy or water. All other systems are made according to the same schemes and do not have any effect on the parameters of the heated floor.
Selection of heated floor power
Thermostat installation
If you approach the installation of a programmable thermostat with all responsibility, you can do all the work yourself, without the services of a specialist. Before installation, first of all you need to read the attached instructions, where the manufacturer has indicated all the necessary information. Next, they determine the location of the thermostat, based on its power and the power of the heated floor. The installation site must also be protected from heat sources and direct sunlight. Having decided where the thermostat will be located, proceed to its installation according to the following scheme:
In the chosen location, a niche is made according to the size of the device and its box is installed.
Carefully install the device into the mounting box without damaging the elements.
Wires are connected to the thermostat sockets according to color assignment.
Lastly, connect the temperature sensor to the product and close the lid.
Types and principles of operation
Thermostats of different heating mechanisms have different automatic control mechanisms.
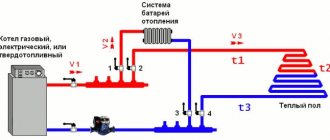
For water floors:
- Two way valve.
- Three-way valve.
Types of thermostats:
Digital. The operating feature is similar to an electronic-mechanical thermostat. A distinctive feature is the ability to set the temperature regime in the electric sensor. The electric mechanism is equipped with a touch panel where information is displayed.
Electronic-mechanical. It is a device whose operating principle is similar to the operation of an iron. Temperature regulation occurs by rotating the wheel. Turning it in one direction increases the temperature, turning it in the other direction decreases it. It is possible to determine the temperature regime only by your own intuition. The only advantage of such a thermostat is its low price and ease of installation.
Programmable. This type of device demonstrates a smart electrical mechanism. Able to turn off and on the heating system at a given temperature. It is also possible to turn on the device at a set time. All temperature modes are shown on the control panel.
Depending on the number of control channels, the thermostat is:
- Two-zone, which operates simultaneously in two areas of the heating system.
- Single-channel – processing of a special signal from one sensor.
By mounting method:
- Internal (built-in).
- External (remote, overhead).
At the moment, many varieties of heated floors with heating elements are produced, the most common among them are:
Resistive cable. There are two-core and single-core.
Cable with self-adjusting function.
Thermomat (represents a two-layer canvas, inside of which heating mechanisms are sealed).
Film (infrared). The basic basis for such heating is carbon and carbon rods.
Instructions for Teplolux thermostats
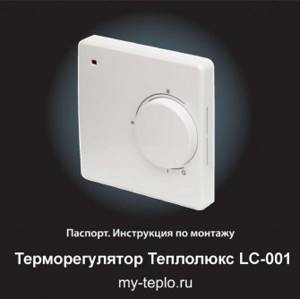
Instructions for thermostat Teplolux LC-001
Instructions for thermostat Teplolux LC-001
You can download the instructions for the Teplolux LC-001 thermostat HERE
. Or by clicking on the picture.
You can buy the Teplolux LC-001 thermostat at a low price HERE
.
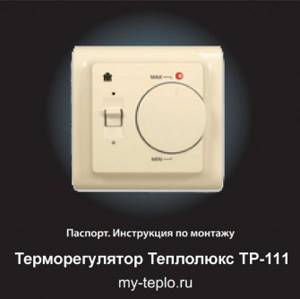
Instructions for thermostat Teplolux TR-111
Instructions for thermostat Teplolux TR-111
You can download the instructions for the Teplolux TR-111 thermostat HERE
. Or by clicking on the picture.
You can buy the Teplolux TR-111 thermostat at a low price HERE
.
Instructions for thermostat Teplolux TR-510
Instructions for thermostat Teplolux TR-510
You can download the instructions for the Teplolux TR-510 thermostat HERE
. Or by clicking on the picture.
You can buy a Teplolux TR-510 thermostat at a low price HERE
.

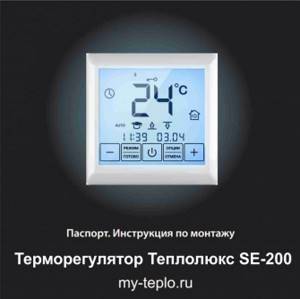
Instructions for thermostat Teplolux SE 200
Instructions for thermostat Teplolux SE 200
You can download the instructions for the Teplolux SE 200 thermostat HERE
. Or by clicking on the picture.
You can buy the Teplolux SE 200 thermostat at a low price HERE
.
Instructions for thermostat Teplolux MCS 300
Instructions for thermostat Teplolux MCS 300
You can download the instructions for the Teplolux MCS 300 thermostat HERE
. Or by clicking on the picture.
You can buy the Teplolux MCS 300 thermostat at a low price HERE
.

Instructions for thermostat Teplolux MCS 350
Instructions for thermostat Teplolux MCS 350
You can download the instructions for the Teplolux MCS 350 thermostat HERE
. Or by clicking on the picture.
You can buy the Teplolux MCS 350 thermostat at a low price HERE
.

Instructions for thermostat Teplolux TR-515
Instructions for thermostat Teplolux TR-515
You can download the instructions for the Teplolux TR-515 thermostat HERE
. Or by clicking on the picture.
You can buy the Teplolux TR-515 thermostat at a low price HERE
.

Instructions for thermostat Teplolux TR-520
Instructions for thermostat Teplolux TR-520
You can download the instructions for the Teplolux TR-520 thermostat HERE
. Or by clicking on the picture.
You can buy the Teplolux TR-520 thermostat at a low price HERE
.

Instructions for thermostat Teplolux TR-711
Instructions for thermostat Teplolux TR-711
You can download the instructions for the Teplolux TR-711 thermostat HERE
. Or by clicking on the picture.
You can buy the Teplolux TR-711 thermostat at a low price HERE
.

Instructions for thermostat Teplolux TR-721
Instructions for thermostat Teplolux TR-721
You can download the instructions for the Teplolux TR-721 thermostat HERE
. Or by clicking on the picture.
You can buy the Teplolux TR-721 thermostat at a low price HERE
.

Instructions for thermostat Teplolux TR-730
Instructions for thermostat Teplolux TR-730
You can download the instructions for the Teplolux TR-730 thermostat HERE
. Or by clicking on the picture.
You can buy a Teplolux TR-730 thermostat at a low price HERE
.

Types of heated floors
Now there are three main types of heated floors, which differ in the type of coolant, and also have different technology of arrangement. However, in general, they are united by one main advantage - the heating element is installed directly into the floor pie, due to which it is heated. At the same time, the air masses in the room also warm up, but near the floor the air will be warmer, while above this limit, at the level of a person’s head, the air remains slightly cool, which allows you to create an optimal microclimate in the room.
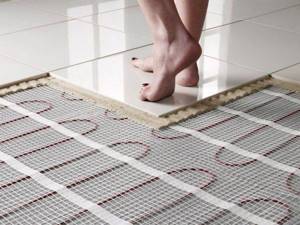
Electric floor under tiles
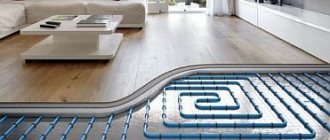
Water based heating
In this case, the coolant is ordinary heated water, which flows inside pipes laid according to a certain pattern and filled with concrete screed. The service life of such a system is approximately 20 years. A fairly reliable and safe option, but it is used either in private homes or in new buildings where it is possible to connect such a floor. In old multi-storey buildings, it will not be possible to connect a water floor without the permission of the management company, since installation will involve connecting it to a central heating system that is not designed for additional loads - in other apartments it can become very cold.
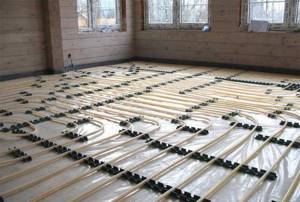
Water heated floor
The disadvantages of this design may be the likelihood of leaks and the risk of flooding of rooms located below, as well as the tendency of some types of pipeline to corrosion. Installation, of course, is labor-intensive, but this is one of the most economical flooring options. This type of heating can be installed under any finishing coating. However, if you want to use the capabilities of water-heated floors as efficiently as possible, study the features of different coatings. Our article will help you find the ideal option.
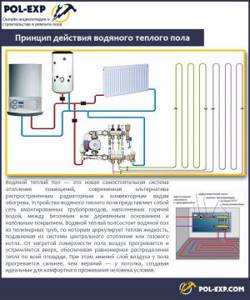
Operating principle of water heated floor
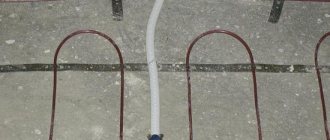
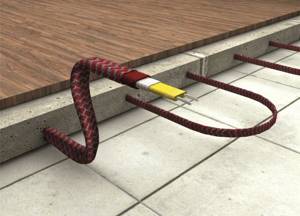
Heating with cable
Such floors can be installed in absolutely any room - be it in old or new apartments, houses, offices, etc. This option has become a real salvation for those who, for some reason, cannot install a water-heated floor. The system is quite simple to install and consists of a specially laid electrical cable located inside the screed. It converts electricity into heat.
Installation of cable heated floors
Self-regulating and resistive cables can be used to arrange heating. In the latter case, a two-core one is usually used (single-core ones often become sources of radiation harmful to the body, which is why they are not preferred to be used). Self-regulating wires do not have the disadvantages that resistive wires have. Typically, cable flooring is used if the finishing coating is made of tiles or linoleum.
Heating cable
IR floor
This is perhaps the most popular floor heating system, as it does not require pouring a new screed, is easy to install, but is not inferior in quality to other heating options. It is represented by thin mats with carbon strips connected to each other by wires. Such floors heat up quickly, but also cool down quickly (sometimes this function is needed), are very thin, allow you to quickly adjust the heating temperature, are economical in terms of energy consumption, are easy to repair and are completely safe for humans. This system also works thanks to electricity. There is a drawback - a little static and because of this - the attraction of dust to the base. Read more about infrared heated floors depending on the finish coating in separate articles on the portal: here for laminate, and here for tiles.
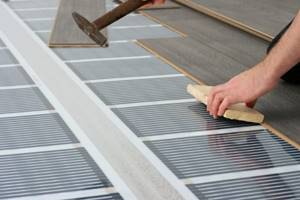
IR warm floor under laminate
Table. Comparison of characteristics of different systems.
| Characteristic | Water floor | Electric floor |
| Availability of EMR | No | Possibly depending on cable type |
| Possibility of arrangement in apartment buildings | Only in new buildings with a separate connection | Yes |
| Quickly manage settings | No | Yes |
| Dependence on heating season | Yes - in apartments and no - in private houses | No |
| Installation time | Long due to the need to fill the screed | Short |
| Possibility of laying any finishing coating | Yes | Certain types of coverings cannot be laid over an electric floor |
| Easy to repair | Complex repair | In the case of IR floors - quick repair |
Prices for electric heated floor "Teplolux"
electric heated floor teplolux
If you have not yet decided on the type of heated floor, read our article with instructions for choosing. There we examined in detail the advantages and disadvantages of different materials and compiled a list of recommendations.
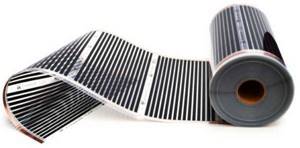
IR film for heated floors
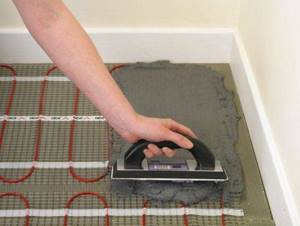
Features of the device and connection of the cable floor
Types of electric heated floors
Electric floors can be installed from infrared film or rod mats, but we will pay attention to the cable option, which is mounted under the screed. This is a modern and very reliable solution that allows you to organize heated floors not only in a private house, but also in an apartment, as well as heat rooms where there is no water, but there is electricity.
- The installation technology of such a floor is much simpler than a water pipe floor. The main thing here is to correctly connect the wires to the thermostat. The basic element of this system is the heating cable, and when purchasing it, you should find out its power per unit length. It is important that this figure does not exceed 21 W/m and is not less than 17 W/m.
Installing a cable floor is easier than installing a water floor
- To install heated floors, you can use a self-regulating cable. But it has one drawback. The level of heat it generates depends on the ambient temperature, and if the floor is covered with carpet or furniture, or tiled with ceramic tiles, the floor will cool itself.
- Therefore, in such systems, resistive cable is often used as the most optimal option, suitable for all types of coatings. It can be single-core or double-core, up to 3 and 5 mm thick, respectively. This cable is easier to install, but costs more. Wires of minimal thickness (2-3 mm) are laid under a dry screed, and thick ones are poured in a monolithic manner.
Cable heated floor
The second most important element, with the help of which, in fact, the entire system is controlled, is a thermostatic device . Its cost is the lion's share of the price of the floor, but you can't live without it. The only way to save money is by purchasing a model with a minimum set of options. And there are many options, there are wireless, touch, and push-button.
Thermostat for heated floors
You will still have to select a thermostat yourself, since it is not included in the floor kit.
Cable installation
The cable installation work is quite simple. For clarity, we present the instructions in the form of a table with pictures and comments.
Cable heated floor Electrolux Twin Cable
Table. Step-by-step installation instructions.
| Steps, photo | Description of work |
| Step 1. Calculation of the area of the heated floor | The amount of cable required to heat a room is calculated minus the area occupied by stationary furniture. The maximum power of a two-core cable is 2500 kW, and if more is required, then several cable sections are laid. |
| Step 2. Preparatory work related to installing the thermostat | First, a place is prepared for installing the regulator. It can be anything - the main thing is that it is no closer than 30 cm to the floor and does not interfere with the arrangement of furniture. If the floor is installed in a room with high humidity (bathroom, sauna), it is better to place the thermostat on the outside of the wall. |
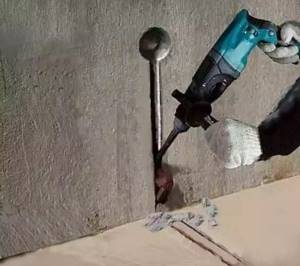
| Step 3. Drilling a recess for the regulator box | Next, using a drill with a socket attachment, drill a hole for the thermostat housing. |
| Step 4. Cutting the grooves for the wire | A grinder is used to cut a groove with a cross-section of 20*20 mm for laying the wire. |
| Step 5. Cleaning the room | After preparing the wall for installing the thermostat, you should start preparing the floor for laying the cable. You start with cleaning. |
| Step 6: Prime the subfloor | If the base of the floor is concrete, it needs to be primed so that it does not collect dust. |
| Step 7. Laying insulation | Let the soil dry and lay the insulation with the foil up so that the heat is reflected into the room. On a note! In this case, the cable floor is installed in the apartment, and a material based on polyethylene foam is used as insulation. But if you, say, have ground floors on the ground floor of a private house, you can use thicker PPS insulation or even make 2 layers. The main thing is that there is foil on top. |
| Step 8. Fixing the canvases with tape | To prevent the canvases from shifting and forming cold bridges, they need to be secured with special foil tape. |
| Step 9. Cutting the mounting tape | A metal mounting tape is used to lay out the cable. Cut it into strips of the required length, for which you need to have metal scissors on hand. |
| Step 10. Installation of tape | The tape is mounted to the base in parallel with a step of 50 - 100 cm. Fastening to concrete is done using dowels and plastic screws. |
| Step 11. Cable Laying | Start laying out the cable. At the same time, keep in mind that there should be a distance of at least 5 cm between it and the wall, and if there is a radiator or other heating device in the room, then there should be more than 10 cm from it to the outer loop of the cable. |
| Step 12. Calculation of cable laying pitch | To lay the cable correctly, you need to calculate the steps. This is done according to the formulas that you see in the photo. When laying, you should try to ensure that deviations from the calculation are no more than 1 cm. |
| Step 13. Securing the cable in the mounting tape | Installation of the section begins with connecting the cable to the location of the thermostat. The end of the cable, connected via a polymer coupling to the temperature sensor wire, is fixed in the mounting tape as shown in the photo. And from this place the layout of the contour begins. |
| Step 14. Snake cable layout | Throughout the heated area, try to strictly follow the cable laying step. It should not be overly stretched or intersect; also make sure that there are no kinks. There should be no less than 8 cm between turns. |
| Step 15. Pull the end of the cable with the sensor into the corrugation | Insert the end cap with the floor temperature sensor into the corrugation and close it with a plug. |
| Step 16. Laying the corrugation in the groove | Place the corrugation in the previously prepared groove so that the end with the sensor falls in a smooth line to the floor. |
| Step 17. Laying the corrugation with the floor sensor | The bend radius of the tube should not exceed 5 cm. The length of the part of the corrugation that lies on the floor is approximately half a meter from the bend. |
| Step 18. Fixing the sensor in the tube | The position of the sensor must be fixed to the same mounting tape. Since the diameter of the tube is too large compared to the cable, this is done using a plastic clamp. Note! The length of the tube should be such that its second end reaches the thermostat box. This will allow, if necessary, to replace the sensor without dismantling the floor covering. |
| Step 19. Connecting the end of the cable to the thermostat | The end of the cable - the one from which it began to be laid along the contour - is brought out along the wall to the location of the groove. |
| Step 20. Connecting the cable to the thermostat | All that remains is to connect the wires to the thermostat. This is not difficult to do, since the terminals on its back side are marked in a color that matches the color of the mounting wires. Instructions are also included. |
| Step 21: Preparing the Wire Ends for Connection | The ends of the wires need to be tinned, connected to the thermostat, and, turning on the electricity for a minute, check the operation of the system. Measure the resistance with a multimeter and write down the readings in your passport. |
| Step 22. Sketching the outline of the floor | The instructions for installing a cable floor have a special appendix on which you need to sketch the location of all elements of the system with obligatory reference to the room. Your drawing should look approximately as shown in the picture. |
Example of a cut out technological window
If your heated floor will be covered with a monolithic screed, then before you begin its implementation, in the heat insulator, at a distance of 30-40 cm from each other, you need to cut out technological windows like those in the photo. When embedding, they are filled with a solution and tightly fix the substrate with the cable in the screed.
Prices for heated floors Caleo
heated floors Caleo