Installation of a heated floor thermostat
The article was published by: Nikolay Strelkovsky
The floor heating system allows you to maintain a comfortable microclimate in the room, giving the owner the opportunity to independently determine the required temperature. To control the heating intensity of this type of system, they are equipped with a device known as a thermostat.
Installation of a heated floor thermostat
If desired, you can install the mentioned device yourself. The performer must initially prepare himself for the seriousness and responsibility of the upcoming event, while not forgetting about the safety regulations.
Types of devices
Manufacturers offer several types of regulators - mechanical and electronic, which in turn are:
- With power saving mode. Setting up a floor heating regulator of this type reduces the supply of electricity during the absence of residents.
- With timer. The temperature regime is regulated by time programming. The timer controls the heating intensity during the specified period.
- With intelligent programming. Installing a heated floor thermostat of the design in question involves automatically alternating an economical mode with a heating one. The “smart” device calculates the time of “command” of the heating elements.
- With limit sensor. The product is adjusted to the required temperature and regulates the heating process according to the specified values.
In terms of their available power, the products must correspond to the selected heating system. They should not exceed the values prescribed by the manufacturer in the operating instructions for the thermostat for heated floors. The maximum value is considered to be 3 kW.
The following devices are considered popular today: Nexans N-Comfort, ProfiTherm, Teplolux, mechanical Devireg and touchscreen Castle. They are distinguished by affordable cost and high service life.
The principle of operation of the thermostat
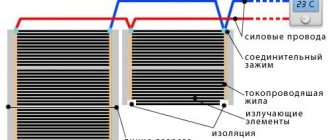
The thermostat is designed to control the operation of the underfloor heating system (WHS). It consists of a control device and one or more sensors. Information from them is taken into account when turning heat mats on and off.
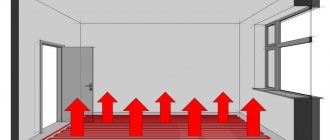
Thanks to the operation of the device, an even temperature is maintained in the rooms and energy consumption is minimized.
Thermostats are easy to use and even teenagers can use them. In this case, the operating mode of the STP can be changed several times a day without fear of breakdown or premature failure of the equipment.
The minimum temperature can be adjusted separately for each room. In addition, some models allow programming of the device’s operating mode during the day.
FAQ about regulators for heated floors
We connect 2 independent circuits to the regulator
We want to install heated floors in the bathroom and kitchen; the rooms are located nearby. Is it possible to connect two independent underfloor heating circuits to one regulator? Are there such thermostats?
Yes, there is such a thermostat - it’s I‑Warm 730
I‑Warm 730 allows you to control two underfloor heating circuits separately, essentially these are two TP 715 in one housing. I‑Warm 730 is installed in a standard one-and-a-half box, two floor temperature sensors and two mats (cables) are connected. It does not have automatic shutdown settings, like the TP 725.
To what temperature will the controller heat the floor?
If we talk about electronic thermostats TP 715 and TP 725, then the temperature setting range is from +5 °C to +45 °C (usually tmax is no more than 33 °C).
If you are interested in high temperatures, then only a cable (not mats) with an increased design power is suitable, but walking on such a floor will no longer be comfortable and hot.
As for the mechanical thermostat TP 115, the adjustment scale on the front panel is quite arbitrary, and when setting it you have to rely more on your own feelings than on the exact readings of the device. The thermostat, according to the technical data sheet, allows you to set the floor temperature to +5 °C. +45 °C.
Based on practice, you can see that in an ordinary apartment the floor temperature range will be from room t °C to +33 °C; and the lower the heating temperature, the more economical the energy consumption.
Differences between thermostats
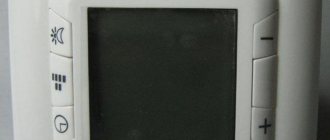
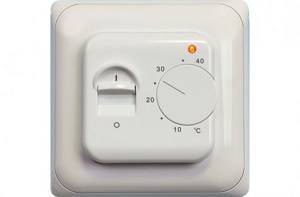
On the front panel of the thermostat TP 115 there are:
- power key;
- temperature adjustment wheel;
- LED indicating floor heating.
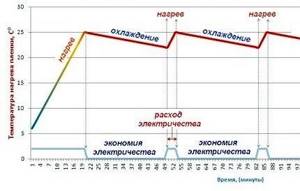
The thermostat works on the principle of a refrigerator, that is, it heats the floor to the set temperature - it automatically turns off the heating, the floor cools down by 2.3 °C, the regulator turns the heating back on. This mode maintains a constant floor temperature.
Unlike electronic thermostats TR 715 and TR 725, TR 115 does not require the user to study instructions to control the settings and is the most economical model in terms of price, allowing you to reduce energy costs by up to 30%.
The electronic thermostat TP 715, unlike the mechanical TP 115, has an LCD display on the front panel, it displays:
- floor temperature;
- room air temperature.
TR 715 has the following functions:
- self-diagnosis - when the cable or sensor exits the operating mode, information is displayed;
- protective mode (if the sensor breaks, it is not necessary to change it immediately, but you can set the system to work on a time basis, where 1 hour is taken as 100% and the floor operation is adjusted as a percentage, for example, at 50% the floor will heat up for 30 minutes, and the next 30 minutes - cool down).
TP 715 works in the same way as TP 115, maintaining a constant temperature of the floor according to the principle of a refrigerator or iron, that is, it heats the floor to the set t °C, then automatically turns off, then cools down by 2°. 3 °C turns on again.
Unlike TP 725, there is no possibility of programming by time and by days of the week, although outwardly they look the same.
Both thermostats have an LCD display and are very similar in appearance.
TP 715 you set a certain floor temperature in degrees, the warm floor begins to heat up and when this temperature is reached it turns off, cools down for a while and turns on again.
You can program TP 725 in the way that is most convenient for you. Let's say, if you go to work 5 days a week, you can program the regulator so that it heats the floor only in the morning, before you wake up, and after leaving it turns off automatically, and in the evening it heats the floor, and at night, when the warm floor is not needed, again will turn it off. And on weekends, you can program the warm floor for the whole day if you are at home, or, conversely, to turn it off completely when you leave for the country.
Preparatory work
Before connecting the temperature controller, be sure to pay attention to the instructions that come with it. The point that specifically addresses the installation of the sensor and the procedure for carrying out this work deserves special attention, because these processes differ from different manufacturers.
First, you need to remove the front panel and carefully disassemble the control mechanism; on simple models it is in the form of a wheel. To remove it using a screwdriver, you need to pry off the element, and then unscrew the screw that secures the front panel to the mechanism itself. Other models have special plastic latches that hold the front panel in place. To remove it, just press the latches with a screwdriver and it will snap off.
However, if you cannot remove the panel, you should not remove it using mechanical force. After all, in this way you can easily break the latches, and to solve such a problem you will just have to buy a new regulator. To avoid this problem, you just need to carefully study the instructions and try to remove the panel again, but in the correct sequence.
The next step is to purchase devices for installing a heated floor thermostat. The first thing you need to have is a corrugated pipe. Usually it comes complete with a sensor, but if the manufacturer does not provide such a kit, then it must be purchased separately. The ideal corrugation diameter is 16mm. In order to determine the required length of the corrugation, you should determine at what height the temperature regulator will be installed, and at what distance from the wall the temperature sensor will be located. Next, from the indicated height, using a tape measure, you need to measure the length to the sensor, which will be in the floor.
You will also need the following accessories:
- mounting screws;
- screwdriver;
- mounting box (socket box);
- indicator screwdriver, which can be used to determine the presence of voltage in the network;
- level.
How to set up a floor heating thermostat
Electrical wires run to the wiring box. The indicator identifies a phase cable (black or brown), a cable with a working zero (blue), as well as a grounding wire. The voltage between zero and phase should be 220 V.
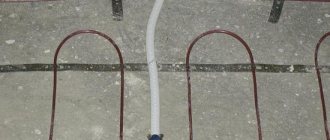
Before installing a heated floor thermostat, you need to place a temperature sensor between it and the heating element and cover it with a corrugated pipe that protects it from mechanical stress. The sensor wire is pulled to the thermostat housing.
Experts strongly recommend following the instructions for the heated floor thermostat when connecting.
After the manipulations have been carried out, the thermostat cover is installed in its place. Electricity is supplied to the device to check that it is installed correctly and is ready for use. It is necessary to set the desired temperature parameters and run the system for a day in test mode. Only after you make sure that there are no problems and that there is an uninterrupted supply of current to the device, you can begin finishing.
Modern thermostats are electronic devices with a complex structure, so it would be more advisable to entrust the setting of the heated floor thermostat to qualified specialists. Errors made during installation and incorrectly selected modes can lead to failure of the entire system and damage the floor surface. For consultation, call the phone number listed on the website.
At what height should I install a heated floor thermostat in the bathroom?
Greetings to all masters. Please help me decide on a place for a heated floor thermostat in the bathroom. 1) First of all, the installation height is of concern. In my opinion, no matter what kind of thermostat it is (mechanical, electronic or programmable), the optimal height is 90 centimeters or higher. Those. The height is the same as that of light switches - it’s convenient to turn on/off and adjust if something happens. Because Even a programmable regulator does not relieve the need for manual activation at moments “not according to the schedule.” However, the repairman recommends installing it at a height of 30cm from the floor, supposedly “everyone” installs it this way. I don’t understand what advantages this location has? Do people lack logic or does this really have its own nuances? 2) How relevant is it to move the thermostat outside the bathroom? After all, a bathroom is an area with high humidity and some thermostats do not have moisture protection at all, and the presence of moisture protection cannot guarantee anything. I find it convenient to do next to the light switch in the bathroom. Minimum chance of moisture ingress, maximum convenience. It's easy to control whether it's on or off when leaving home.
Tonus wrote: it’s convenient to turn it on/off and configure it if something happens.
But no. From experience. If the regulator is equipped with a display, then when adjusting you have to kneel in front of it. But he's not a young lady.
Tonus wrote: repairman
- This is not an electrician, right? Well, so in >| Installation of thermostats for heated floors
First of all, you need to decide on the location of installation of the thermostat , which will control the heated floor. This can be any convenient place on the wall, it does not matter at what height from the floor level your thermostat will be located. But if you chose Themoreg with an air temperature sensor, then for correct readings the thermostat must be installed at a height of at least 30 cm from the floor level.
Installation of the box and supply of wires
Once all the wires have been removed and the wiring box has been installed, you can begin connecting the electrical wires. Before doing this, you need to make sure that the power wires are disconnected from the power supply. Make connections as shown on the back of the thermostat.
Thermoreg TI 200
- Floor sensor(s).
- Floor sensor (b).
- Output to air sensor.
- Heating cable (phase).
- Supply wire (phase).
- Heating cable (zero).
- Power wire (zero).
Thermoreg TI 200 Design
- Floor sensor(s).
- Floor sensor (b).
- Output to air sensor.
- Heating cable (phase).
- Supply wire (phase).
- Heating cable (zero).
- Power wire (zero).
What is a thermostat
Choosing a location for installation
To install, we first need to determine where we will install the thermostat. Most modern devices are designed for a standard wall box with a diameter of 65 mm. Whether they are installed in the socket frame or placed separately - this is not so important for installation. It is advisable to power the thermostat from the electrical panel using an automatic protective shutdown system. But it is also possible to use connections to an outlet (AC mains 220 V, 50 Hz).
The location of the temperature sensors is critical for proper operation of the thermostat. If your model has a remote air temperature sensor, you need to install it at a height of at least 1.5 m from the surface of the heated floor, and generally away from heat sources (for example, a window or radiator). It’s better to choose models with an air temperature sensor built into the device itself - there’s less hassle with them, and you can immediately install the thermostat in the right place. This option is implemented in Teplolux EcoSmart 25.
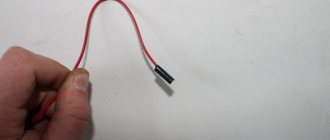
Any thermostat for a heated floor has a remote sensor that should be installed next to the heating element. But consider how long the sensor wire is. It is better that it is at least two meters.
In the same Teplolux EcoSmart 25, thanks to the presence of an air temperature sensor, a function called “Open window” works. If the room temperature drops sharply by 3 degrees within five minutes, the device considers that the window is open and turns off the heating for 30 minutes.
Warmly bright
from 9:30 to 21:30, seven days a week
Calculation of heated floors
Use the smart floor heating calculator to select components and calculate the cost of the heating system directly on the website!
Or just call tel. in St. Petersburg 458-45-67 (from 9:30 to 21:30).
Repair Tips
Where to install a thermostat (thermostat) for a heated floor
The location of the thermostat for a heated floor should, first of all, be functionally convenient for use, i.e. it must be located in such a place that it can be easily controlled, read, and repaired. This obvious point is often completely ignored by the customer and installer. Over the years, we have come across some absolutely incredible thermostat locations. In this note, we will draw your attention to factors that will be useful to consider when choosing a location for the thermostat.
It is advisable to place the thermostat as close to the heating zone as possible. Firstly, this minimizes the length of the sensor, which sometimes breaks and which may need to be replaced. Based on experience, this is why we recommend a thermostat height of 30-40 cm from the floor. This arrangement is certainly less convenient than the 90 cm recommended by most manufacturers, but it significantly reduces the length of the sensor cable. If there are small children in the house, the thermostat must be placed higher. When using air sensors, the supplier's recommendations for thermostat height and location must be followed.
Secondly, it is advisable to install thermostats closer to the beginning of the cable layout (to the so-called cold ends, this is especially true for mats). Here it may be useful to draw a preliminary installation diagram.