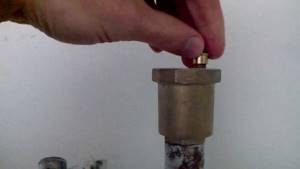
Replacing a heated floor sensor
It is quite possible to replace the temperature sensor with your own hands, provided that it has previously been correctly installed in a corrugated tube that goes into the junction box.
To replace a warm house sensor:
Turn off the power supply and remove the thermostat. Disconnect the temperature sensor wires that are connected to the correct terminals on the rear panel. These clamps are labeled "sensor" or "sensor" and may be located separately from the main terminal of the block. The sensor is disabled. Check its resistance. As a rule, it should be in the range from 5 to 15 KiloOhms. The resistance of your device is indicated in the passport for the thermostat
Important! Please note that there are household multimeters that will not be able to measure resistance if it is more than 2 KiloOhms.
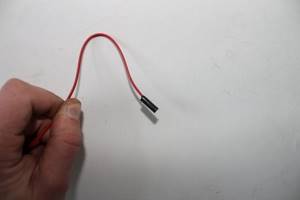
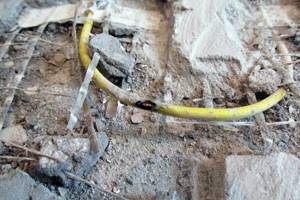
Heated floor temperature sensor
So, if the electrical resistance of the temperature sensor corresponds to the nameplate, then the cause of its malfunction is poor contact in the terminals (clamps). To make sure of this, connect the temperature sensor wires to the corresponding terminals one more time. The thermostat should go into operating mode. If it does not work, then take it to a special service center for checking.

You may also be interested in the article - Nuances of design of floors of different tones in combination with other interior elements.
How to prepare a wooden floor for tiling
About the color of the floor in the interior - read the review article at: https://remontspravka.com/tsvet-pola-i-znachenie-ego-v-interere/
You will also find information about what is best to cover the floor on our website.
And if the resistance of the temperature sensor differs from what is in the passport by more than 20%, replace it. This is easy to do, because... The sensor is already disconnected from the thermostat. That's why:
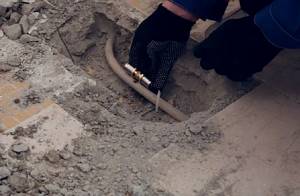
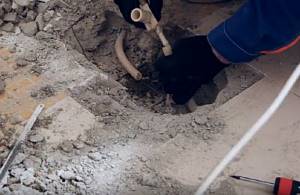
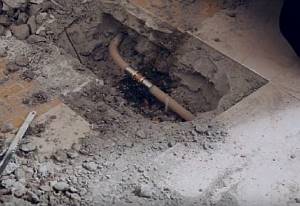
- Pull the sensor out of the corrugated tube and replace it with a new one. Namely:
1) Place the new device in a corrugated tube to the same length as the former sensor.
Replacing a heated floor sensor
Important! Please note that the temperature sensor is an accessory of the thermostat, and not of the “warm floor” system. And the nominal electrical resistance of temperature sensors from different manufacturers is different, and the sensor of one company may not fit the thermostat of another
Therefore, when purchasing a temperature sensor, be sure to check the manufacturer of the thermostat. Is it the same as your temperature sensor?
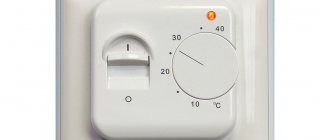
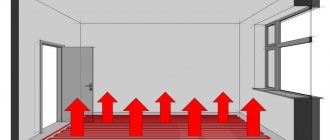
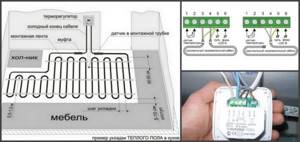
Maintaining a constant floor temperature
Mechanical regulators for internal wiring (for hidden installation in apartments, when the wiring is hidden in the wall under the plaster). Models differ in the number and nature of floor temperature sensors.
All mechanical thermostats work on approximately the same principle: maintaining a constant warm temperature on the floor. The heated floor is turned on and off using a button, and the floor temperature is adjusted with a wheel.
Temperature sensor at the thermostat:
- located in the floor (this is a remote sensor),
- the temperature sensor in the regulator is built inside the housing and it reacts to changes in air temperature (not the floor),
- has two temperature sensors - an external floor sensor and a built-in air sensor; accordingly, the regulator operates from a combination of these two temperature sensors.
An additional function of thermostats is monitoring the temperature sensor; a green LED at the moment when the heated floor is not heated indicates that everything is in order.
Correct installation
You can avoid repairs if you install the heated floor according to all the rules. To do this you need:
- Choose the right type of power of the electric heating cable and correctly approach the installation of thermal insulation.
- Purchase the necessary equipment and building materials in specialized stores, in consultation with a specialist.
- The length of the heating cable must correspond to the length of the room, since cutting the cable negatively affects its strength properties.
- Do not lay the heating cable under furniture to prevent overheating of the system.
- Before laying the heating cable, the floor should be cleared of debris.
- While laying the cable, do not step on it.
- The temperature sensor should be installed in a special corrugated pipe; this will provide quick access to the device during repairs.
- There should be no void around the heating element, which could lead to overheating.
- Before installing a heated floor system, we recommend drawing up an installation diagram, this will allow you to avoid accidental damage to cables or pipes in the future.
- After installation, you should check the operation of the cable by measuring the resistance.
- You can turn on the system only after the screed has completely dried.
- It is necessary to take resistance readings before and after installation. The values must correspond to the indications in the data sheet.
Remember that it is better to prevent the occurrence of malfunctions than to eliminate them due to your own carelessness. Correct and high-quality installation of heated floors will allow you to avoid quick repairs. And designing a laying scheme will make it possible to protect the system from breakdown by construction tools in the future.
To learn how to repair a heated floor, see the following video.
Do-it-yourself water heated floor repair
If the installation of this heating system was carried out professionally and using high-quality components, then you can be sure that it will serve with dignity and without breakdowns for fifty years. However, unforeseen situations arise that may require repairs. An urgent call to a specialist will help correct the situation, but you can solve this problem on your own, without extra financial costs.

Schemes for installing heated floors.
The first thing you need to do immediately if a leak is discovered in your water heating system is to turn off the water as quickly as possible. Then dismantle part of the floor covering above the place where the water broke and inspect the pipes to identify the cause of the malfunction
If the pipe has received mechanical damage due to careless handling of a drill or hammer drill, the nozzle must not be removed until the access of water to the system is stopped
Short circuit protection
There are usually no fuses installed in thermostats, so don’t look for them inside. In fact, the function of a fuse in electric underfloor heating systems should be performed by a circuit breaker + RCD or differential circuit breaker in your panel.
Some models of regulators (for example RTC 70) have a built-in switch. They can be used to manually turn off the heated floors without running to the electrical panel.
Many people mistakenly think that it is through it that all the current passes to the heating cable. This is wrong. This switch is only responsible for supplying power to the board, hence its low operating current - 6A.
Malfunctions of electrical transformer stations
Diagnosing damage to electric underfloor heating is easier than to diagnosing damage to water heated floors, because... this is a simpler system.
If electric heating heats poorly or does not heat at all, then the reasons may be the following:
- There is no power supply to the heating elements (power cable is broken).
- The thermostat is faulty (see above).
- The temperature sensor is damaged or incorrectly installed (see above).
- The heating cable of the mat is broken (the floor does not heat, but the thermostat indicator is on).
- The film floor does not heat well - one of the infrared bands may be damaged.
- The rod floor heats unevenly - one of the infrared rods does not work.
How to find a broken wire
The search for a broken contact should begin by inspecting the terminals on the thermostat. There may be a loose connection of the contacts coming from the temperature sensor and the wires from the heating mat.
The next check step is to inspect the connection between the power cable and the electric heating element.
You need to pay attention to the tightness of the connection and the presence of burnout. Next, the tester checks the voltage in the power cable. If the current does not flow, then look for a break in the wiring
When testing a heating wire, you need to measure the resistance in the conductors, as well as the resistance between each conductor and the insulation. Specialists use a megohmmeter for this. If there is no such device, then a household multimeter will do. The resistance in the heating conductors is checked against the passport data. Discrepancies should not exceed 15%.
If the resistance values are much different from the nominal values, then there is a break.
Damage to the heating cable
You can find a break in the heating cable under the screed in one of the following ways:
- Using a reflectometer. This is a high-precision device for finding faults in any metal cable lines. It sends a pulse along the wire, which, upon reaching the point of damage, is reflected and goes back to the device. By the nature of the pulse, you can find out what’s wrong with the wire: a break or a short circuit. The reflectometer will also show the distance to the damaged area with an error of 0.01 - 0.2%.
- Burning the cable with a high-voltage device, for example, Devitector II (available at Devi service centers). Strong heating occurs at the break point, the cable core is connected to the screen (insulation). Next, this place is searched using an electromagnetic sensor or thermal imager.
Both of these methods require specialized equipment, so you can’t do it without calling a specialist.
How to fix a heating cable
When an electric heated floor is installed without filling the screed, you can find the break yourself by removing the floor covering and inspecting the cable. If you were able to determine the location of the damage yourself, then you can repair it without calling a specialist.
For repairs you will need:
- crimp lugs for wires;
- sleeves in an insulating shell;
- adhesive heat shrinks;
- crimping tool.
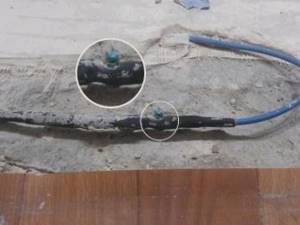
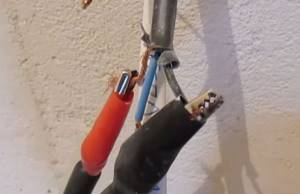
The ends of the cores are stripped and folded in half. Tips are put on them and crimped.
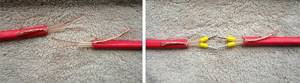
Prepare ends
Then the tips are inserted into the sleeve (red in the photo). It is also crimped without damaging the shell. The shielding braid is stripped off on each wire, twisted and connected together with an insulated wire (brown wire in the photo).
Crimp the wires into the sleeve
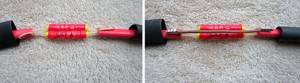
The restored cable is covered with heat shrink, which is heated with a hair dryer. It is needed to protect the connection from water.
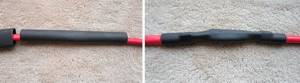
Sealed with heat shrink
Installation errors
When installing an electric floor heating system, mistakes may be made that lead to damage to the cable:
The location of the heating cable under heavy pieces of furniture or plumbing fixtures. After laying the cable, you should be careful when walking on the floor, without stepping on the wires or placing equipment and materials on them. Before pouring the screed, you must once again ensure that there is no damage and that the system is operating correctly. When laying the floor covering, also be careful and ensure the integrity of the screed layer
Sometimes the heating cable is placed directly under the tile in a layer of adhesive. It can be damaged, for example, when opening seams with a spatula.
Previous Heated floorMeasuring the resistance of an electric heated floor Next Heated floorBasic connection diagrams for a water heated floor
Preparation
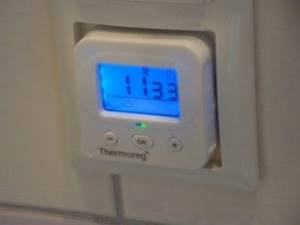
- We start by checking the presence of electricity in the house and the supply of electricity to the thermostat, i.e. whether the indicator light or panel is lit (for programmable thermostats).
- If, however, there is electricity in the house and it is supplied to the thermostat through which the heated floor is powered, then you need to check the temperature settings. How many times does it happen when children spin the “wheel” out of curiosity, or when a housekeeper inadvertently “accidentally touches” the buttons on the device?
- After making sure that the electricity is flowing, the thermostat is on, the temperature is set correctly, and the floor is still cold, then you need to make an important decision:
- show “who is the boss of the house” and call an electrician. End. All that remains is to prepare the money and wait.
- show “who is the master and unsurpassed master of the house”, identify the malfunction and, heroically eliminating it, receive the admiring look of his beloved wife.
If you are no longer sitting in front of the TV and decide to act on your own, then you will need a screwdriver and a tester (a device that can measure resistance and voltage) or, at worst, a voltage indicator.
Causes of malfunctions
Successful repair of this heating system lies in the correct diagnosis of the cause of its failure
If the system stops working or the operating mode changes, it is important to know the causes of these breakdowns

Heating cable
The main and most common reason is the initially incorrect selection of the characteristics of the electrical cable and its power. If there is a discrepancy between the power of the heating element and the network voltage in the device, the floor heating will be weak, and will subsequently lead to failure of the entire system. Such cases are not uncommon when designing a system yourself. Only qualified specialists who know all the intricacies and features of installing heated floors will help correct the situation.
Another common reason for a poorly heating cable is failure to comply with standards when installing the structure, as well as accidental mechanical damage to the wires. These malfunctions will lead to the cessation of heating of the floor surface around the entire perimeter of the room. This failure leads to a complete replacement of the injured area.
Cable mats
The cause of failure of cable mats is often accidental mechanical damage, caused by improper operation of the structure or careless installation. Failure to follow the rules for installing cable mats also leads to breakdowns of the entire system.
Thermal sensor
An incorrectly installed temperature sensor can stop the heating of the system, which will lead to the stop of the heated floor and heating of the room. There are also frequent cases of system failure due to improper power supply to the structure, lack of thermal insulation, and non-compliance with material parameters. Thus, incorrect calculations at the design stage of a heated floor can lead to serious consequences, which are quite difficult to solve on your own.
Malfunctions of the thermostat may be due to poor contact of the connecting terminals. In this case, the terminals will be subject to strong heating and will eventually lead to breakdown of the entire system.
Incorrect installation of the system
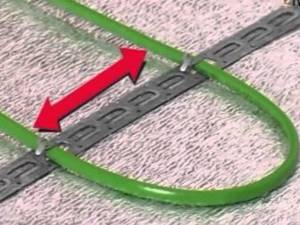
If certain rules are not followed, even from correctly selected and fully functional components, you can assemble a poorly functioning system. First of all, this concerns the distance between the branches of the heating cable. It depends on the power and must be maintained in strict accordance with the requirements of the instructions. If the cable laying step is made too large, a so-called thermal zebra will appear on the floor surface - a temperature difference that is noticeable to users.
If, on the other hand, the cable is laid too often, it may become damaged due to overheating.
Cable options for heated floors
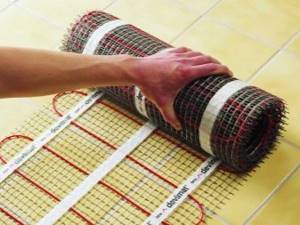
To avoid such mistakes, it is better to make a heated floor from cable mats. The mat is a fiberglass mesh on which the heating cable is already laid with the correct pitch and fixed. All that remains is to spread out this product, connect the individual sections and fill everything with screed.
Remember that a regular non-regulated cable (it can also be self-regulating) cannot be shortened or lengthened as you please.
As the length decreases, its resistance will also decrease, causing the current in the circuit to increase, and this, in turn, can damage the wires or the thermostat. If the length is increased, the resistance will increase and the power of the cable may greatly decrease. Length changes are allowed within 5% - 10%.
Another common installation mistake is placing the temperature sensor in the screed too close to the cable. In this case, it will turn off the system too early. If you encounter such a problem, do as described above: disconnect the sensor from the thermostat and connect a timer or air temperature sensor instead.
Do-it-yourself underfloor heating (electric) repair
Cable fix
If the cause of the breakdown is the heating cable, then the steps to detect and eliminate it are as follows:
- Disconnect the cable from the thermostat and the entire system from the power supply.
- A high-voltage generator must be available to allow the location of the rupture to be located. It will create an electric arc at the site of the breakdown.
- If there is no high-voltage generator, you can use an audio detector, which will make a sound similar to a metal detector at the location of the cable break.
- A voltage tester is the easiest and most effective way to check, as it not only shows that there is a cable under the tie, but also where it breaks.
It is difficult and expensive to repair a cable if an electric heated floor has been broken, because it is located under a layer of screed, then troubleshooting must be taken very seriously, starting with measuring the resistance of the heating element to a break.
When the area with the gap is found, you need to:
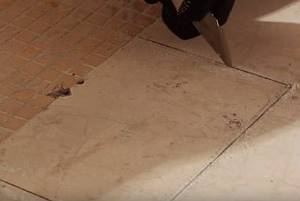
Remove the floor covering in this area.
Carefully break the tie, trying not to hit the cable located under it, so as not to aggravate the breakage situation. Repairs can only begin if sufficient cable has been released. When purchasing a ready-made set of heated cable floors, the consumer receives the “little things” necessary for its repair - special heat-shrinkable sleeves and sleeves
It is enough to strip the wire at the break point, connect it with a sleeve, crimp it with pliers, put a sleeve on the cable and heat it with a hairdryer. Under hot air it will become smaller and the film will insulate the repaired area. Before the floor covering is restored, the system is connected and checked for serviceability. The screed is made and the finishing coating is put in place.
If you don’t have the necessary tools, it’s cheaper to call specialists who will find the cause of the problem and fix it efficiently and quickly.
Troubleshooting the Sensor
This part of the heated floor is the easiest to repair:
- Since the temperature sensor is installed in a corrugated tube, it will not be difficult to detect it.
- The device must be removed and replaced with a new one, then returning the tube with the sensor to its place.
- The good news is that even if you use a grouted cabling system, you won't have to open the floor because part of the corrugated tubing is in the wall. Just take it out, pull the wire and the sensor will come out.
- In the reverse order, the new device is inserted into the tube, and then the groove in the wall is sealed and returned to its original appearance.
Thermostat malfunction
A common cause of thermostat failure is the terminals that connect the power cord, cable and temperature sensor. They may come loose and tighten them enough to get the floor working again. When turned on, the voltage in the power supply and at the terminals must match.
If this does not help, and the resistance measurement shows a large deviation from the technical indicators, then the thermostat must be replaced.
These are the simplest ways to repair an electric heated floor with your own hands.
Typical causes of breakdowns
The easiest way to understand why the heated floor is not heating is to call a professional. However, before doing this, it is still worth trying to find out the cause of the breakdown. After all, it can be corrected on its own.
So, if the floor does not work at all, the reasons may be as follows:
- No voltage . Perhaps this is the only reason for the heating to be completely inoperable. In this case, you may need to check for damage to the line or the condition of the circuit breakers.
- Faulty thermostat . If there is voltage, but the thermostat does not turn on or turns off before the required temperature has been reached, you will have to replace it. It is probably not advisable to repair this element, because its cost is not so high that it is not possible to make a banal replacement with a new one.
- Temperature sensor failure . The situation is the same as with the thermostat. If the connection is made correctly and the temperature sensor does not work, it should be replaced.
Another common problem is not related to loss of performance, but to insufficient heating of the floor, regardless of the set temperature. It is usually associated with low voltage on the line. This is possible both due to objective circumstances (for example, problems with electricity in a country house), and local problems with the wiring - if the cable is selected incorrectly.
The main reasons for weak heating of underfloor heating
- Supply voltage. It’s good if the network has a stable voltage of 220 - 230 V. But if it decreases by at least 10%, the built-in power will decrease by 19%! In this case, installation of a voltage stabilizer is indicated.
- Heating cable resistance. When it increases by 10%, the released power decreases by 10%.
- Heating cable length. If its factory length increases even by 2%, the linear and total power decreases by 2%.
If a faulty heating cable is detected, the floor covering and screed will have to be opened
When damage occurs in a cable covered with a screed, troubleshooting is useless because replacement or repair is extremely rare. If we are talking about a film field, then you can lift the covering and try to independently find the place where the short circuit occurred.
Proper installation and operation is the key to ensuring that the heated floor will work efficiently. But even if you need to replace system components, you can do it yourself.
The machine knocks out when the heated floor is turned on – Malfunctions of heated floors
alexxlab30.09.2019
: 0
|
Why does the machine knock out when turned on? Reasons for shutdown
What to do if the machine goes off, but household electrical appliances are not connected? Most likely, part of the conductive line connected to this machine is damaged.
The problem lies in the sockets
junction box assembly
apartment panel
switch
Housewives know that sometimes the machine “knocks out” when the apartment lighting is turned on. Short circuits occur in lamp sockets and at the connection point of the chandelier.
Cases when the machine should be replaced
1 Machine malfunction. The test is carried out by replacing the device or reconnecting the wire to another device. If another machine turns off, then the problem is in the wire, and not in the old machine.
Otherwise, replacing the machine is the only way out of the situation.
2 A short circuit in the sockets can also cause the machine to turn off. It is necessary to open and inspect all sockets for cable burns.
3 Sometimes it happens that the machine knocks out without a load, in which case the problem may lie in hidden wiring when the wires are shorted together.
Troubleshooting should be carried out using a special device - a multimeter
or indicator screwdriver
4 Poor contact connection becomes one of the reasons for turning off the machine.
This may be indicated by melting of the machine body at the wire connection point.
xn——7kcbiaqb5akjkjooffije6agi.xn--p1ai
Find and eliminate the reason for the RCD tripping when the heated floor is turned on in Moscow inexpensively
Price is negotiable
The main task is to determine the reason for the operation of the apartment RCD when the heated floor is turned on on one of the loggias. The machine, which has a heated floor, does not knock out. Depending on the reason found, eliminate it, if it is within the power of an electrician
When: , 14:00
Address: Konny Lane, Moscow
Want to find the best repairman?
Latest added tasks
- 7,000 rubles Laying tiles on the floor It is necessary to lay tiles on the floor, Kitchen corridor 13 m2 Anton K. Obvodnoe highway, 5, Rublevo village, Moscow, Russia
- Price is negotiable Fix low pressure in the bathroom faucet The cold water faucet in the bathroom has very low pressure. The problem is not in the aerator - if you remove it, the water flow is very weak. It is necessary to diagnose and solve the problem. Alexander Kerchenskaya street, 9, Nizhny Novgorod, Russia
- Price is negotiable. Author's print on denim. Offer your price for the task. The task is relevant. Firsova M. Marshala blyukhero house 6
- 1,500 rubles The shower cabin is leaking from belowThe shower cabin is leaking from below when water flowsAlbert Akademika Pilyugina Street, Moscow, Russia
- 200,000 rubles Installation of vrfInstallation of vrf, one outdoor unit 45 kW + 8 cassettes of 5 kW each + 4 wall-mounted units of 3.5 kW each. Last floor of the business center. Room 15 by 60 mCatch P. St. Petersburg, Russia
remont.youdo.com
Knocks out the machine for reasons
As soon as the voltage in the apartment disappears, the first thing you will do is run to the electrical panel. Because if the wiring or appliances in the apartment are at fault, the machine will knock out. By and large, if your machine is turned off, you should be happy, because this means that the protection is intact and working. The reasons for the shutdown can be completely different. Let's look at them in this article.
Turning off the machine indicates some kind of malfunction in the electrical wiring, and even successfully turning it on again does not negate the fact that there was some kind of breakdown or overload. In modern machines, the off position is recognized very easily. A knocked-out machine will have a tab facing down and the number “0” will appear on it.
So, what causes the machine to knock out? The reasons may be as follows:
Network overloaded
You have a machine with a rated current of 25A, and you simultaneously plugged into the sockets a load much larger than this 25A. It is quite natural that the machine will turn off after a certain time, protecting your wiring from overheating and fire. How do you know if the machine is turned off for this reason? Very simple. Your machine will most likely turn on again and crash again after a short period of time.
This will happen until you unplug any device from the outlet. In this case, it is highly not recommended to change the machine to another one with a higher denomination. It is better to install a separate group of wiring and switch some of the sockets to an additional circuit breaker.
Short circuit
The cause of a short circuit can be either damage in the wiring itself or damage in connected devices. In the event of a short circuit, the machine turns off and when you try to turn it on, it immediately triggers again. If the cause is a short circuit in the device, then the problem is easily found and solved by simply disconnecting the device from the network. If you have several devices connected, to find the faulty one, disconnect them from the network one by one until the machine turns on.
If the machine knocks out due to a short circuit in the wiring, then you will have to tinker with it longer. When you have an input machine and several outgoing ones in the switchboard, but only the input one knocks out, then most likely look for a short circuit in the switchboard itself. If the outgoing ones are turned off, find out what it supplies. A group of sockets or a group of lighting?
The circuit breaker of the socket group is triggered
First, unplug all electrical appliances from the outlets. And try turning on the machine. Knocked out again? Open all electrical boxes and sockets. 90% of all damage occurs at the contact junctions. If a visual inspection shows nothing, then you will have to disconnect the wires in the boxes.
After this, take a multimeter, and in diode testing mode, connect one probe to the phase conductor and the other to the neutral conductor. If there is a short circuit, the device will emit a signal and show zero resistance. This way you can find a piece of damaged wiring from one junction box to another or to an outlet.
In order to turn on the machine, this section will have to be disconnected and subsequently replaced.
The automatic lighting group is turned off
To find damage, first turn off all lights. If the machine turns on after this, start turning them on one by one.
On a defective lamp the machine will go off again. Then you need to find out where exactly this defect is. Disassemble the lamp, its socket and the switch itself. If there is an internal short circuit, the causes of the short circuit will be clearly visible. When nothing is found, all that remains is to blame the wiring from the switch to the lamp. You can check it with a multimeter as described above.
The machine is knocked out due to damage to the machine itself
This case is not quite as rare as it might seem. Here the machine turns off due to defects or low-quality parts. A particularly common option is when the manufacturer does not meet the parameters of the thermal release. And a 25A circuit breaker does not hold these same 25A, but turns off at lower currents - 20-24A.
This is all checked using current clamps by measuring the actual load. What if such a device is not available?
Then you can temporarily switch the wires from the suspicious machine to another working one. And check everything again under load. But in general, the main advice here can be one - purchase products from quality manufacturers.
Why does the RCD knock out | Electrician's Notes
Hello, dear guests and readers of the Electrician's Notes website.
I continue the series of articles about RCDs. And today I want to answer your question why the RCD knocks out.
After all, it works unexpectedly and suddenly, which leads many citizens to a dead end. By the way, I’ve been wanting to write this article for a long time.
Source: https://priority-perm.rf/raznoe/vybivaet-avtomat-pri-vklyuchenii-teplogo-pola-neispravnosti-tyoplyx-polov.html
Functionality check upon purchase and after installation
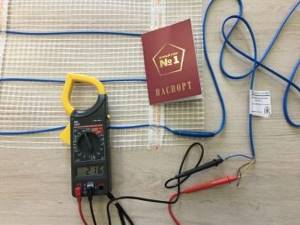
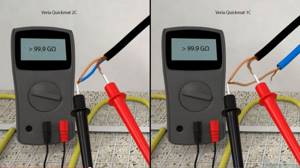
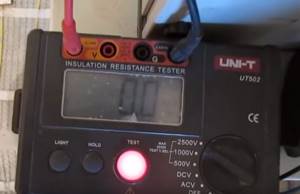
The first check is carried out when purchasing the system. You need to ask the seller to demonstrate the operation of the device. If the attached documentation indicates the resistance values of the mats, it is advisable to check their actual values with a multimeter or tester. You can also check the insulation resistance. This can be done using a multimeter in high resistance mode, or a megohmmeter.

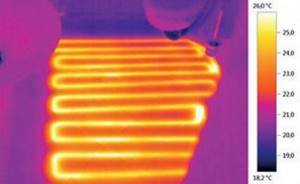
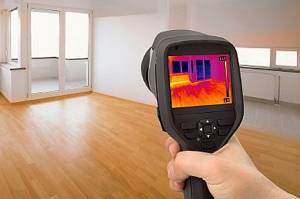
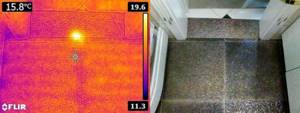
After installing the heating elements, before laying the tiles and before pouring the screed, you need to connect the electric heated floor to the power supply and observe its operation for a while in different modes. You should make sure that the thermostat, temperature sensor are working properly and that the heating cable is intact. With a working system, all sections of the cable should be heated evenly, the temperature of the heating elements should change in accordance with the setting of the thermostat.
If there is such a possibility, it is most convenient to check the uniformity of heating of the elements with a thermal imager, on the screen of which you can see whether each section of the floor is working or not. This device produces an image that is created by infrared rays, as shown in the photo below:
At this stage, if any malfunction is detected during testing, it is better not to look for the cause and not try to eliminate it. You need to take advantage of the warranty and replace the system.
Let's sum it up
In the event that problems in the functioning of the floor appear immediately after installing the floor covering or screeding, we are most often talking about mechanical damage. In the case of cable flooring, you will need professional equipment to find out where the problem is. To resolve this issue, we recommend contacting a professional.
Malfunctions in the operation of the thermostat and temperature sensor can be determined independently. Just as the problem with tension is revealed independently.
Have you already encountered problems with heated floors? Tell us about your experience in the comments!
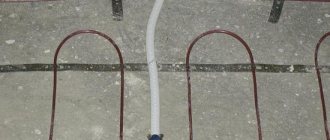
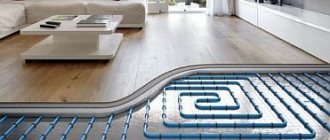
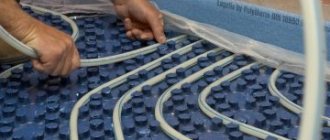
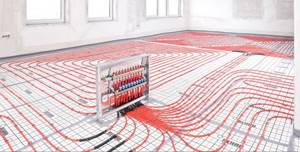
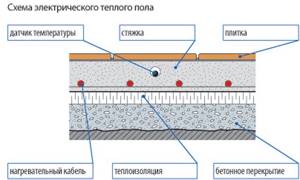
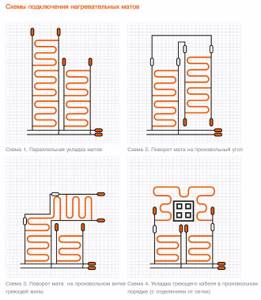
Cable designs and placement
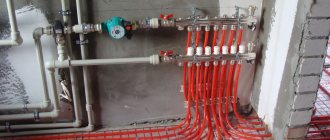
A floor heating system, created from an electric cable or infrared film, in any case has certain elements. This is the heating cable itself, which is the source of heat, a temperature sensor that takes readings of the heating temperature of the wire, as well as a thermostat, which is responsible for connecting all the floor elements into a single whole and regulates the processes of turning it on/off depending on the heating level of the cable.

Cable heated floor
Cable for heated floor
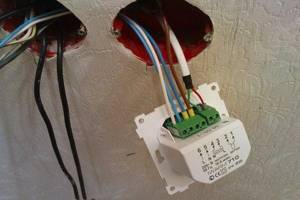
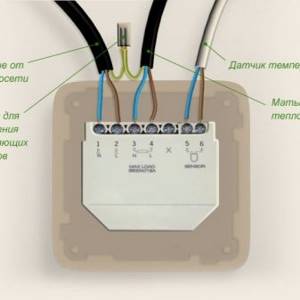
A thermostat or thermostat looks like a small switch; it regulates the amount of voltage that is supplied to the wires. It is connected to a regular electrical network using two wires - phase and neutral. The device regulates the voltage automatically; it is supplied to the heating cable as soon as the floors in the room cool down. The heating of the floors is monitored by a temperature sensor, which is installed in close proximity to the cable and filled with screed.
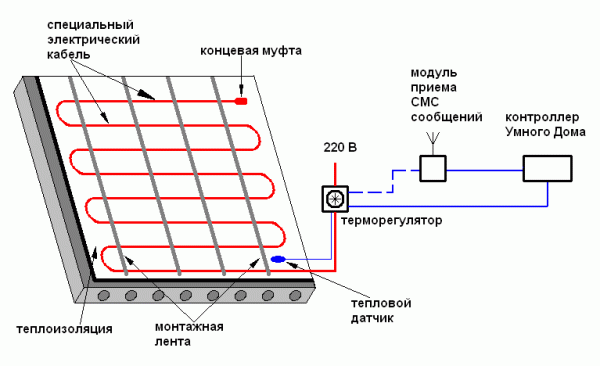
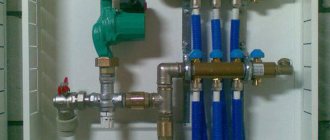
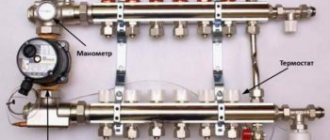
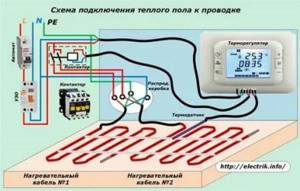
Connection diagram for electric heated floor
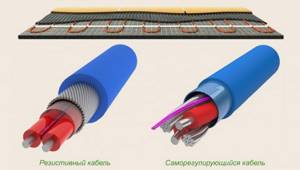
The cable used during the installation of heated floors can be divided into two types - resistive and self-regulating. The latter itself reacts to temperature changes and changes the resistance level. But a resistive cable does not have this ability.
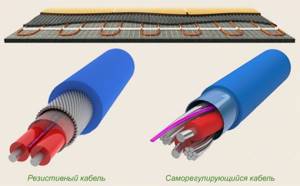
Cable for underfloor heating - resistive and self-regulating
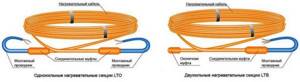
To create a warm floor, you can use a single two-core cable or two single-core cables arranged in parallel. The first is a grid consisting of wires with a plug on one side. Such a cable cannot be cut and it cannot be laid in a screed where large-sized furniture or equipment will be located.
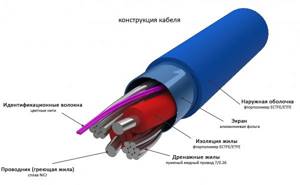
The structure of a two-core heating cable for heated floors
But as for single-core cables, you can cut them any way you like - no harm will happen to the insulation. Yes, and infrared floors can be cut to the size of the area in need of heating, but only along strictly designated lines.
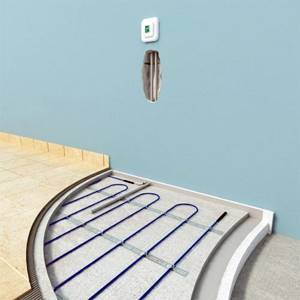
Connecting a heated floor to a thermostat
Maintaining a constant floor temperature
Mechanical regulators for internal wiring (for hidden installation in apartments, when the wiring is hidden in the wall under the plaster). Models differ in the number and nature of floor temperature sensors.
All mechanical thermostats work on approximately the same principle: maintaining a constant warm temperature on the floor. The heated floor is turned on and off using a button, and the floor temperature is adjusted with a wheel.
Temperature sensor at the thermostat:
- located in the floor (this is a remote sensor),
- the temperature sensor in the regulator is built inside the housing and it reacts to changes in air temperature (not the floor),
- has two temperature sensors - an external floor sensor and a built-in air sensor; accordingly, the regulator operates from a combination of these two temperature sensors.
An additional function of thermostats is monitoring the temperature sensor; a green LED at the moment when the heated floor is not heated indicates that everything is in order.
Checking when a fault occurs
During the installation or further operation of a heated floor, as with any other devices, malfunctions may occur. The user can call a technician to fix the problem or do the repairs themselves. In general, no special difficulties should arise. However, diagnostic methods and causes of malfunctions may differ for different types of systems.
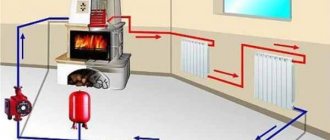
Diagnosis of water heated floor malfunctions
First of all, check the pressure in the underfloor heating circuit
When a water heated floor is installed in a house, which is connected to central or autonomous heating, there may be several reasons for the lack of heating. Diagnostics of the system is performed when it is fully turned on.
If there is no heating throughout the house, the hydraulic pump is faulty or the filter is clogged. There may not be enough water in the distribution tank or the water heating boiler is not working. The first step is to check the liquid level in the expansion tank, because in 20% of cases this is the cause of the malfunction.
If some part of the heated floor does not heat up, for example, one room, the coil is most likely faulty or the filter is clogged.
When there is enough water, the filters are cleared of contaminants, but the heating problem persists, you should check for an air lock. For this purpose pumping is carried out. The air valve opens, water gradually squeezes air out of the expansion tank. Once the air is completely released, liquid will begin to drip from the air valve. Next, the valve closes tightly and the system is refilled with water.
Due to a breakdown of the circulation pump, liquid will not flow into the circuit
The cause may also be incorrect operation of the circulation pump. It should work smoothly, without extraneous noise or vibration. If this is not the case, the pump should be replaced.
It would be a good idea to check the pressure in the system. To do this, a pressure gauge is installed after the pump. In normal condition it should show 0.5 bar. The cause of low pressure is a leak in the pipe. In this case, it is necessary to determine the location and open the problem area to repair it.
Diagnosis of electric floor heating faults
If the cable is disconnected at the panel, this indicates a short circuit
First, you should make sure that there is electricity in the house and that it is supplied to the thermostat. Check the glow of the light bulb or display panel on the device. Next you need to check the temperature settings. If everything is normal here, check further.
- There is no heating over the entire area. When the heated floor is connected to the network, the circuit breaker in the panel is switched off by the protection, this indicates a short circuit in the cable. To determine the location of the damage, the voltage is turned off and the supply wires are disconnected from the thermostat. You need to ring the section between the shield and the regulator. The multimeter shows zero resistance - the wiring in this place is damaged. Otherwise, the search continues. The heating cable is disconnected from the thermostat; you need to measure the resistance at its input. If a short is detected here, the damage is inside the regulator and it must be replaced. If there is no short circuit, only the heating cable itself remains. The resistance between its wires is measured. If the readings on the device screen tend to infinity, this indicates a cable break.
- Temperature is not regulated. If the underfloor heating elements warm up over the entire area, but do not respond to changes in the values on the thermostat, it means the regulator is not functioning correctly or the temperature sensor is faulty. In the first case, the thermostat must be replaced. In the second, the temperature sensor wires are disconnected from the regulator and the resistance between them is measured. The value must match the data from the manufacturer's documentation. If the values do not match, the floor covering is removed and the sensor is replaced with a new one.
- Certain areas do not heat up. The heating uniformity is checked using a thermal imager. If heating is uneven, you need to check the amount of power consumed. If it is less than that declared by the manufacturer, the heating cable has broken and some of the elements remain de-energized. The system consumes increased power - a short circuit has occurred between individual cable elements. With this option, some of the heaters do not function, and the other part consumes an excessive amount of electricity.
Water heated floor does not heat - reasons and ways to eliminate them
Why doesn't the water heated floor heat?
The guarantee of good operation of water heating is correct installation, high-quality components that are correctly selected in terms of power.
As with electric floors, poor thermal insulation will significantly reduce the heating efficiency, and correcting this error requires a complete redesign of the structure. Therefore, the selection and construction of a water heated floor should be taken seriously.
We will talk about the main reasons that lead to a malfunction of the heating water system.
Damaged pipeline
The main problem that arises when using hydrofloors is leakage. The reason will be a sharp decrease in pressure inside the pipeline.
To identify the presence of a leak, you should inspect the floor covering. You may find wet spots at the joints of the finishing product. If such an inspection does not produce results, then you need to conduct an inspection with a thermal imager. Having determined the location of the damage to the pipeline, you can proceed to repair work, but before that you should drain the water from the system.
The sequence of repair work is as follows:
- We dismantle finishing materials.
- We remove the screed; it is better to use a hammer drill for this.

- We cut the pipe using a hacksaw at the damage site.
- We clean the pipe from contamination.
- Align the edges of the pipe with a reamer.
- We put a coupling on both ends of the pipe and crimp it with pliers.
After testing the system for leaks, you can pour the screed and lay the topcoat.
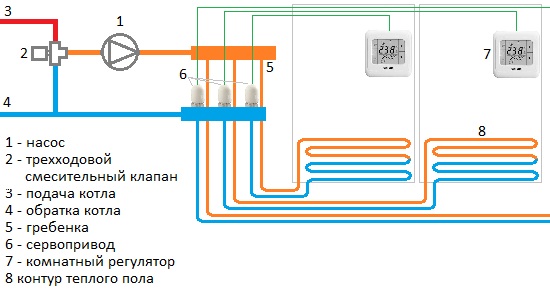
Uneven heating due to different circuit lengths
If the floor warms up weakly or unevenly, then there is probably an uneven supply of coolant through the pipeline. This happens due to different lengths of the contours. In long loops, with equal coolant supply speed, cooling occurs faster.
To correct the situation, it is necessary to adjust the volume and speed of water supply to each branch. Depending on the connection diagram, this is done using comb valves or a three-way valve. To find out the result of the changes made, you will need to wait until the floor warms up.

If you use automatic devices (temperature sensor or servo drive), the adjustment process will be significantly simplified. Water supply adjustment will start automatically.
Electrical equipment is faulty
If there is no leakage, the fault must be looked for in equipment operating from the electrical network - this is a thermostat, temperature sensor and electric pump.
First, you should check that there is voltage in the temperature sensor and each terminal of the regulator; this is done with a multimeter or an indicator screwdriver. If the sensor or thermostat is broken, it is better to replace them with new ones.
A pump failure is indicated by the absence of sounds when it is turned on. Interruptions in operation are associated with the deposition of salts from the water. You can start the motor by turning the impeller with a screwdriver, but first you need to remove it. If such measures do not produce results, the pump should be replaced.
The boiler does not warm up completely
There are only two reasons why the hydrofloor does not heat:
- Low boiler power. To heat one room of the apartment, you should reduce the temperature in others.
- Incorrectly selected pump - there is not enough power to circulate the coolant through all branches. The solution is to replace the pump with a more powerful one.
Return problem
There are several reasons why the return may be cold, which in turn leads to a decrease in floor efficiency:
- Low pressure - the coolant does not have time to push out cold water. To fix this problem, you need to install a pump. It will ensure the required level of coolant circulation, pushing it into the circuits. The same problem can arise if there is a pump, but if it is not of suitable power, therefore the calculation of the power of the device must be taken seriously.
- Reduced patency of pipes - they should be cleaned. This can be done in different ways: using a pulsating water mixture and biological products, or using pneumatic hydraulic shock.
- Small pipe size - pipes of the wrong section were selected. The situation can only be changed by replacing the pipes with products with the required cross-section.
- Incorrect installation - return and supply pipes are mixed up. Follow the new scheme to correctly connect the floor pipes to the comb.
- Airiness of the system - the presence of air in the system leads to poor coolant flow. To remove air from the pipeline, you need to open the air vent.
Poor insulation
Absence or poorly laid thermal insulation is a common reason for underfloor heating to not work effectively. Often, ordinary polyethylene film is used as a substrate, but it is not thermal insulation. Requires laying polystyrene foam boards 5 - 10 cm thick.
The solution is to rebuild the system. But this is a labor-intensive process and leads to additional expenses. You can set the temperature higher or install more powerful equipment, but you should consult with specialists, as this is not safe.
After all, 70 degrees is the maximum limit for heating the coolant for a heated floor. And the system can only operate in this mode temporarily, otherwise it will quickly fail.
Incorrectly selected power
On average, heat loss at home is calculated as follows: 100 W per 1 m2. But sometimes these values are exceeded and this leads to ineffective functioning of the system.
In this case, a recalculation of heat losses in all rooms is required. You can use an online calculator. After which, it is necessary to analyze heat loss in rooms where the floor does not heat. Taking this into account, make adjustments on the collector of those branches that do not heat up.
After reconfiguring, you need to give it 2 - 3 hours and check the result. If the situation does not improve, you will have to upgrade the heating system.
Outline size too large
Excessively large circuits can also be the cause of poor heating of the heated floor, or one of the longest circuits may not work. The recommended pipeline length is 80 - 90 meters.
Small excesses are acceptable. But if the length of one circuit is much greater than the average standard, then the pump cannot circulate fluid in such a pipeline.
The pump can be replaced with a more powerful device, but if the size of the circuit is significantly exceeded, even it may not be able to cope with this task. Therefore, when constructing the floor, you must adhere to the recommended contour length.
The collector is not working
If the warm floor does not heat, then another problem may lie in how the distribution comb works. There are two main reasons leading to collector failure:
- Wrong choice of pumps if there are two of them. The pump on the distribution group must have less power than the pump on the boiler or in the system itself.
- The mud trap is clogged - you need to unscrew and clean it.
We looked at the main problems that may arise when using heated floors. In most cases, you yourself can identify problems with the system and fix them. If you are not confident in your abilities, then it is better to invite specialists.
How to find a heated floor malfunction
Kinds
The choice of the type of electric floor heating system depends on the type of heating (main or additional). You also need to consider the size of the room and flooring.

Cable
This version of heated floors was invented much earlier than other types. It is a wire (cable) through which heating occurs. There are two types of such warm floors - directly cable and heating mats.
The cable heating system, as the name implies, is based on heating the cable. The system consists of a thermostat, a temperature sensor and a double-insulated wire. This is the most labor-intensive heating option, because it must be installed in a cement screed.

Heating mats are a fiberglass mesh on which electric heating elements (cables) are already attached. The advantage of mats is that they can be installed without much effort. You just need to lay heating mats on the base and connect to the network.
Film coating based on infrared film
Film coating is a thermal film consisting of a carbon base. The heating element is an alloy of copper and aluminum. All elements are connected in parallel and sealed in film. This type of heating does not require the use of a cement screed, and the finishing coating is applied directly to the film.
For open wiring
Thermostats for open wiring are simple mechanical thermostats; in fact, they are analogues of thermostats for hidden wiring - both are designed to maintain a constant floor temperature with switching on and off on command from the floor temperature sensor in the regulator (floor and air).
The main difference between such thermostats is that they are designed for open wiring (for example, in a country house, where the wires are laid openly along the wall or in a cable duct).
In addition, we can add that a regulator with a floor sensor is more convenient to use for heated floors in city apartments; a regulator with a floor and air sensor is more convenient to install in country houses, where it can control not only the floor temperature, but also the air temperature in the room.
Questions about the article
Add site to bookmarks
Today there are a huge number of different heating systems. Both standard heating options and modern systems are widely popular. For example, in many homes you can find a heating system such as underfloor heating. It can be equipped in isolation or in combination with other systems. Quite often, heated floors are installed in rooms where it is necessary to maintain special temperature conditions, for example, in the bathroom or children's bedroom.
For high-quality functioning of the heated floor, it is necessary to install a device such as a thermostat. Thanks to a special sensor, it detects the smallest temperature fluctuations and sends a signal to the central control unit in order to correct them. There are mechanical, electronic and touch thermostats. A mechanical device has the lowest cost. However, it is only able to detect gross temperature fluctuations. The operation of the touch thermostat is based on a highly intelligent computer program. Such a device not only detects temperature fluctuations, but also sends a signal about the occurrence of an emergency. There are situations when the thermostat turns off by itself. There is no need to rush to change the device; first you need to understand the cause of the breakdown.
Principle of operation
A heated floor system can be used as additional heating of a room or as the only source of heat in it. If homeowners prefer the second option, then they should entrust the installation of the system exclusively to professionals. Otherwise, you can make an irreparable mistake and leave the house without heating.
Professional craftsmen can easily select the latest materials, have the necessary equipment for installing a heated floor, and begin how to install it quickly and without difficulty. If you have decided to install the electric floor yourself, it is worth studying the principle of its operation. Let's start by studying the main elements of this design:
- materials for hydro and thermal insulation of the base prevent heat leakage in the system;
- heating elements - pipes for circulating heated water for a water floor, cable mats or cables with self-regulating heating cores for electric floors, infrared film in the case of an infrared floor;
- a temperature sensor that allows you to control the heating level of the structure;
- fasteners;
- heat-conducting layer and concrete or other materials;
- flooring;
- a pump that provides forced supply of thermal fluid for a water floor or a power cable for an electrical panel in the case of an electric floor.
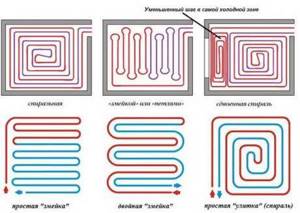
Laying options
Scheme
Thus, heated floors can be made from different materials and using different technologies. But the principle of operation of such systems is similar: thanks to the power source, the floors heat up and become very comfortable even for bare feet.
Principle of operation
How to use electric heated floors correctly
On the one hand, an underfloor heating system can of course be individually configured based on the heat generated, just like a classic radiator. On the other hand, you can still save a lot of energy in the “background” if you set up the floor heating or have this setting done directly by a specialist. The outside temperature plays a decisive role. In addition, factors such as the warm-up phase and the cooling phase are also important. In this article you can read about the connection and settings of the heated floor that you should make for the best effect.
What to do if the breakdown cannot be determined
If the cause of the electric floor malfunction cannot be determined, it is necessary to measure the voltage and compare it with the operating voltage specified in the attached technical documentation. The result should not deviate from the recommended value by more than 5%. You should also check the power-on indication. You will need to check the voltage at the terminals with the light not on. If there is no voltage, the reason may lie in loose contacts of the thermostat, damage to the sensor or thermostat. It is also necessary to check the remote temperature sensor. Disconnect it from the temperature controller to measure the resistance. The readings should be between 5-30 kOhm. The instructions contain more precise information.
When checking thermostats, turn off the heating elements. If the sensor and thermostat are in good condition, the reason that the floor is not heating should be looked for in the cable. To check this, you need to measure the cable resistance and insulation resistance. The obtained readings are compared with the indicators from the technical data sheet attached to the equipment. A cable break is indicated by a decrease in insulation resistance.

Thanks to the use of special search equipment, the dismantling of floor coverings is reduced to 10 centimeters or less
Damage to the heating cable and heating mat
If you have checked the sensor, thermostat, all contacts and there are no comments on their operation, and the floor still does not heat, then all that remains is to look for damage in the heating cable itself.
An obvious short circuit can be diagnosed with a simple multimeter. But to establish its exact location, unfortunately, one cannot do without special expensive devices.
At the beginning of diagnostics, use a tester to check the resistance between the cable cores. It should be within the factory specifications - from 11 to 700 Ohms, depending on the length.
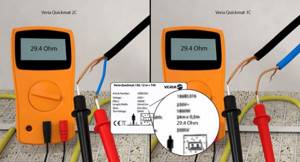
Therefore, always keep the passport documentation for heated floors. Paste nameplates from cable products there, write down the readings of the initial insulation resistance and core resistance.
Then, if problems arise, it will be easy to determine what kind of cable is laid, its length, and factory resistance. It also doesn’t hurt to take a photo or sketch of the laying areas.
If there is no short circuit between the cores, then the problem is poor insulation, we move on. Check the resistance, again with a tester, between the core and the screen.
Here the readings should tend to infinity - or a unit is displayed on the left side on the current clamp screen. With zero readings, everything is clear - the core somewhere is clearly shorted to the screen.
But if the multimeter shows a resistance of several hundred Ohms or even kOhms, then connect a 2500V megohmmeter and apply increased voltage between the braid and the heating core.
And if at the same time your insulation resistance drops to zero, then this means that the cable is broken and you need to look for the place of damage.
Moreover, at a lower voltage of 500V or 1000V, this may not be recognized.
For new heating cables from quality manufacturers (Devi, Veria, etc.), the resistance must be at least 1 GOhm at a voltage of 2.5 kV.
For example, manufacturers test heating mats at the factory with a voltage of 3 kV and immersion in water.