Carbon mat on the floor – warmth throughout the house
A system of heating elements made of carbon strips fixed to a polypropylene base effectively heats the floor in a relatively short period of time.
Carbon elements appear in the form of thin rods, fibers or strips.
Such structural components are fastened together by soldering and layers of polypropylene.
To connect the elements to each other, the manufacturer also uses copper wire, which is in a protective sheath. As a rule, the connection type is parallel. Due to this fastening feature, uninterrupted operation of the floor is ensured even if individual elements are burnt out or do not work.
Main advantages
Rod carbon flooring began to be used not so long ago. But already in such a short time it has undeniable advantages over other types of floor heating:
- Does not dry out the air. Thanks to carbon, it is not so much the nearby objects in the room that heat up, but the air itself, but it does not dry out. Humidity does not fall below 60%.
- The base is flexible, suitable for many decorative finishing materials.
- Useful heating with infrared waves that do not harm indoor plants and humans.
- Ease. Installed on any floor coverings.
- There is no possibility of spontaneous combustion.
- Installation is possible even in rooms with high humidity.
- Quickly warms up the air without drying out.
- The intelligent carbon system is able to self-regulate when overheated and evenly distribute the air temperature throughout the room.
- Over time, furniture can be placed on a carbon floor if it was not previously intended to be there. And this will not serve to heat the wardrobe or cabinet.
Properties of film CTP
Film carbon heated floor heats up quickly and evenly. It can function continuously for quite a long time, is very durable, is not afraid of mechanical stress and is not subject to corrosion.
Due to lamination into a special film, the possibility of water and steam getting on the contacts is completely eliminated. The film is also fireproof and has a high melting point (120 degrees).
A significant advantage is the mobility of film CTP. It can be easily dismantled and taken with you when moving, used on walls, inclined surfaces and heated individual areas of the apartment.
Absolute noiselessness, the ability to ionize air and hygiene make it possible to install film carbon heated floors in medical institutions.
Why else should you choose carbon fiber floors?
The operating principle of such a heating element is definitely simple: under the influence of electric current, carbon intensively emits heat waves (8-14 microns).
In turn, long heat waves easily pass through floor coverings of any density without heating the surface. That is, the air is heated, and not the floor itself, which already shares heat with the air when overheated. Part of the heat naturally goes to heating the floor surface. But in this case, the space, not the objects, heats up more. Compared to centralized heating and radiators under the windows, this heating system is more efficient. The most comfortable microclimate is ensured, and energy consumption is minimal.
Electricity savings when using a carbon floor in comparison with other electric heaters are 20%.
Carbon fiber rod floor
Contrary to advertising brochures, this is not a new generation of carbon fiber technology: rod mats have not replaced film carbon. This configuration is used where film cannot be used (poured into a screed or self-leveling floor). It is a set of parallel connected hydrocarbon rods with an admixture of graphite and silver, connected in parallel.
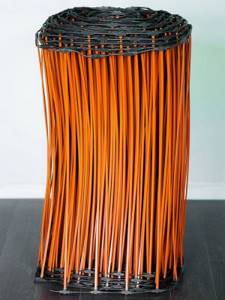
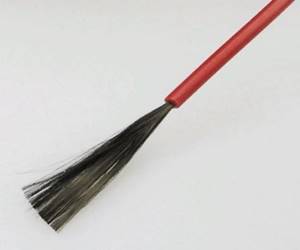
Technologically, the heating element is not even a rod. A bundle of carbon fiber threads is assembled to the required diameter and securely covered under insulation. The shell material conducts heat well and protects the material, which is quite fragile to fracture, from mechanical loads during installation and use.
Graphite threads combined with carbon and silver, when electric current passes through them, emit infrared waves. The material allows one to calculate the resistance with precision and obtain the necessary thermal characteristics.
Since each rod is connected independently (on parallel buses), the failure of one (or several) elements will not affect the performance of the system. Unless there will be less heat. However, the installation method (pouring into concrete) implies high requirements for reliability. Unlike carbon film, these heaters cannot be simply replaced; you will have to destroy the entire surface of the screed.
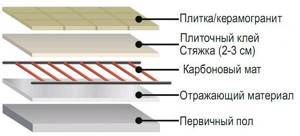
Since the system is a monolith with an overlap, it is necessary to take care of the direction of thermal radiation (infrared waves). They diverge evenly in all directions, so when laying it is necessary to provide a screen on the back side.
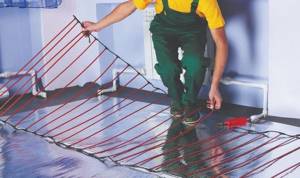
Otherwise, a significant part of the energy will be spent on heating the neighbors below (or the basement in a private house).
An interesting feature of carbon rods is their ability to self-regulate temperature. When overheated, the resistance decreases and the rod cools down somewhat. This allows you to install heaters over the entire area of the room, without highlighting the location of the furniture. This is very convenient, especially given the inability to reconfigure the location of the thermal mats after the concrete has hardened.
Kinds
The carbon floor is installed exclusively permanently (it is not mobile). Today it is possible to buy and install a warm carbon fiber floor of film or rod type. These floors differ in the method of fastening, operating features and price.
Film
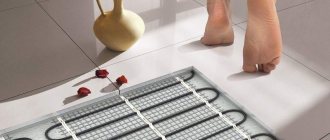
Thermal film is visually similar to a solid fabric with black stripes, 0.23-0.47 mm thick.
Such a continuous warm floor is welded, and pure carbon acts as heating elements. A mixture of carbon and graphite is less commonly used. This nuance does not affect the heating efficiency.
Using spraying, a liquid composition is applied to polypropylene with heat-resistant characteristics. On both sides, the canvas is covered with a 3-layer protective film, which subsequently protects the carbon from scratches and deformations. This polymer film can withstand incandescent temperatures up to 120°C. Power consumption – 130 W/m. It has high strength and does not lose its original characteristics. Copper busbars are used to connect several strips.
Film floors are not used:
- for felt-based linoleum;
- under the carpet;
- under carpet tiles;
- under ceramic tiles, self-leveling floor.
In the latter case, the installation of the coating is a “wet” installation process.
Natural wooden parquet or boards are used when the operating temperature of the flooring does not exceed 28 °C.
The convenience of using carbon film on the floor is that it can be cut to fit non-standard spaces. The width of the roll is 50 or 100 cm. If one section breaks during the heating process, the entire system continues to work effectively without temperature changes.
Rod infrared
The rods are made from heat-resistant polymer. The design necessarily includes a temperature control sensor. The parallel connection method helps the system operate without changes if one element fails somewhere. Same feature as the tape type. A distinctive characteristic of the system is the ability to self-regulate. Thus, when the temperature readings in one of the areas increase to a critical norm, the power consumption of the elements decreases. This is convenient, for example, if you place furniture on the floor. Carbon will not heat up, just like in an open space, evenly distributing temperature values.
The unique characteristics of carbon fiber flooring allow installation in any room. In this case, there is no need to take into account the ban on arranging furniture in any order.
Types of electric heated floors
Depending on the heater used, electrically heated floors are divided into 2 categories: with a heating element in the form of a cable and with infrared.
According to the production method, they are divided into 4 types:
- Heating cable. It can be single- or 2-core, including self-regulating.
- Heating mats. It is a cable on a mounting grid.
- Film. Polymer flexible sheets with a built-in infrared heating element.
- Rod. Consists of carbon rods connected in series.
A warm electric floor is calculated based on the size of the part of the room free from furnishings. It is not recommended to install heating elements under furniture due to the excess load on the system in these areas. The floor power is chosen based on 0.1 kW/m² on average. This indicator differs for different rooms.
Electric floors cannot be called economical to operate. You will have to pay for electricity consumption, but in the device they are much simpler than water ones
For the installation of electric floors, there is a wide range of systems on sale that simply need to be laid and connected to power and control devices
Unlike water heated floors, the construction of which is allowed only in private houses, electric floors can be installed in high-rise apartments, in offices and other public places
The screed over electric underfloor heating is much smaller than over a hydronic floor. The room warms up faster
The installation of an infrared floor does not require a screed at all. Laminate, for example, can be laid immediately after organizing the flooring system
Cable laying is much faster and more convenient if it is built into a reinforcing polymer substrate, together with which it forms a so-called mat
An infrared floor is installed simply and extremely quickly, the construction of which can be undertaken by a contractor without experience
Before starting work, it is important to calculate the step with which the cable will then be laid out. To do this, find the quotient of the area planned for laying the heating system in m², multiplied by 100 and divided by the length of the section in m, taken from the passport

If there is no alternative source of heat in the house other than a warm floor, the area occupied by the system must be at least 70% of the area of the room as a whole
Installation technology
Film and rod heating elements have distinctive installation features.
This involves laying some systems directly under the floor covering. Otherwise, you can install it under the screed. In any situation, the work is done with your own hands.
Under screed or tiles
If the rod system is to be laid under the tiles, it is necessary to apply a screed or a thin layer of adhesive. Be sure to ensure that the adhesive mixture is of high quality and that the thermal insulation of the rough base is dense. The best thermal insulation substrate is made from metallized materials. This is necessary to ensure that the coating is resistant to the elements of the screed.
Foil coatings are not suitable as they quickly collapse.
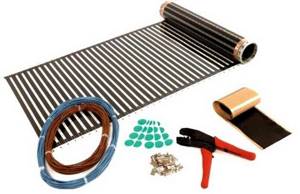
Before laying the film covering, it is necessary to check the components of the kit. If necessary, purchase missing items:
- roll of infrared thermal film;
- contact terminals;
- scotch;
- copper wire (2.5 or 1.5 mm);
- instructions.
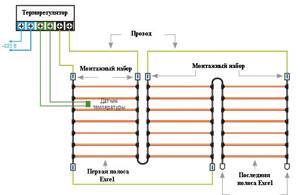
Sequence of work:
- Measure the width and length of the floor surface, taking into account the peculiarity of laying out the substrate along the entire base close to the wall. And the distance between the film and the wall is 5 cm, between the strips - 2 cm. It is important to remember that the film does not spread where the furniture is planned to be placed (but rod ones can).
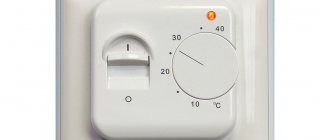
- Determine the location on the wall of the thermostat. The best option is at a height of 70 cm from the floor. It is important to ensure comfortable access to the regulator.
- Make a recess in the wall for the thermostat housing and a groove for the connecting wires.
- Remove dust and dirt from the groove.
- Prepare the rough base, remove the skirting boards, and, if necessary, level the surface with a screed.
- Spread the backing in strips, end to end, securing with tape (aluminum).
- Install the thermal film, for which you first cut it along the drawn lines so as not to spoil the heating sections.
Each strip of thermal film should be continuous from the beginning to the end of the room. Separate sections cannot be connected.
When laying, maintain indentations around the perimeter of the room and leave gaps 10-20 mm wide between adjacent strips of film. Once installation is complete, seal the seams with tape.
- Connect the contacts: insert one end of the terminal into the gap between the busbars so that the other end lies on top of the copper busbar.
- Clamp the terminal with pliers.
- Similar actions are performed on the other side of the film.
- Connect the terminals to the wires: phase, zero (and so on for each film). Also tighten all terminals.
- Insulate the joints with bitumen tape.
- Insulate the cut of the copper busbar.
- Cut holes in the substrate under the insulated contacts so that there are no floor protrusions.
- Glue the thermostat to the strip of film near the wall with tape, moving 10 cm from the edge.
- Cut a hole in the substrate for the sensor, also making insulation.
- “Sink” the sensor into the hole, and lay the wire along the cut. Secure the wire with tape.
- Install a thermostat.
- Place the wire in the groove.
- Connect the sensor.
- Turn on the system for testing. If the film heats up, seal the groove with gypsum or cement mortar when the device is turned off.
The main thing in this method is to perform a sequence of actions and follow the rules of the instructions that are included in each kit.
Without screed using dry method
Installation of film carbon flooring is carried out exclusively on a dry surface without unevenness or holes.
The finishing coat is pre-applied and there are no wet installation processes. This installation technology allows you to significantly speed up the process of arranging any area with heated floors, and if dismantling is necessary, the flexible floor system can be reused.
On a tree
Installation of the system on wood is carried out only if the heating temperature does not exceed 28-30 degrees. It is also worth checking the degree of processing of the wooden base. But it is better to dismantle and lay the film or core floors using a similar method.
Infrared floor installation instructions
An infrared heating system is the best option for flooring such as linoleum.
The first stage of installation is to establish the boundaries where the floor heating will be installed. Places under furniture and household appliances must be immediately eliminated. To have fewer points where wires will be connected, the film is laid out along the entire length of the room.
Electrical cables may run under the floor and should be kept less than 5 cm from the infrared film. If these are pipes or a fireplace, then at least 20 cm.
The next stage is cutting the film along the heating strips. They are designed to ensure that the internal structure of the infrared system is not damaged. When the film is cut into pieces, contact clamps are attached to it (they should be located in the place of the two-layer film and the copper strips through which the current passes). Using a hammer or other available means, a grommet is inserted into the hole.
Next, the sections of the infrared contact strips are insulated. Copper wires are passed to the tip, clamped and insulated using a waterproofing strip. The film elements are attached parallel to each other so that they do not overlap in any way.
The maximum load on the thermostat should not exceed 3500 W. Here it is worth considering not only electric heating elements, but also other electrical devices that are connected to the same network
There are situations where the total system power exceeds the 3500 W limit. In this case, you will need to install a separate wiring harness with a separate circuit breaker to remove the large load from the main wiring
It is important to use a magnetic starter here
After working with the film, insulating material with a heat-reflecting layer is laid. This material is attached with tape. Heating elements are laid on top. They should be positioned with the copper strips facing down.
Rules for laying heating elements:
- attached only to a transparent border;
- the heating element must be located at a distance of at least 0.5 cm from the area through which the copper wiring passes;
- the main wires must be routed under the baseboard;
- In order for the insulation to lie flush with the floor, it is necessary to make cutouts for the thicker areas.
After completing the work steps, the system needs to be checked in detail.
First of all, you should pay attention to the quality of the wire insulation and their fastening. Next, you need to eliminate the possibility of short circuits in the system, and, if necessary, correct the problems
The system must be tested until possible failures or malfunctions of the floor heating elements are completely eliminated.
Next, you need to attach the temperature sensor to the thermostat. This procedure is carried out using tape, and the fastening is done in a place where there is no heat. Then the thermostat turns on and waits a short amount of time to see if it is functioning correctly. If everything is done correctly, then you can feel the warmth emerging with your hand.
If the entire system is working properly, then it is covered with a special material that regulates the release of steam. The material is attached with tape. Sheet plywood or fiberboard is laid on top. They are attached to the base with screws and perform the function of leveling the floor.
The plywood should be positioned so that its fasteners touch the transparent part of the infrared film and do not touch the copper gasket. The fasteners should be located no closer than 0.5 cm from the insulated parts of the film through which electricity passes.
Depending on the base on which the heated floor is laid, the technology for its installation may differ slightly:
- Laying on a wooden floor.
- Laying on a concrete base.
Having selected linoleum with optimal technical characteristics (moderately dense, quite elastic, which is not subject to deformation due to high temperature), it is worth laying it correctly, eliminating the possibility of an uneven surface that may result.
After spreading the linoleum over the heating system, you should wait a few days for it to take its natural shape. There is no need to secure it initially
Next, fastening is performed using adhesive mastic or double-sided tape. In this case, mastic will be a priority, since it will make the floor more uniform.
Features of care
The main advantage of a carbon floor is the absence of special maintenance requirements.
Once you have done the correct installation, you don’t need to worry about the need for repairs later. In order for the carbon base to serve for a long time, it is worth following the manufacturer’s requirements regarding exposure after installation. Thus, the waiting time after laying a warm core floor under the tiles is 28 days. This means that it is undesirable to use such a device before the specified period.
Furniture cannot be placed on top of the film covering. While any furniture can be installed on top of the rod. The quality of heating will not deteriorate, and the furniture will not heat up.
The manufacturer guarantees a minimum shelf life without repair - at least 10 years. Some models come with a 20-25 year operational warranty.
Why are electric underfloor heating systems so popular in modern homes?
- Heated air is formed at the lowest level, rising evenly throughout the volume of the room.
- Large heat exchange area minimizes losses.
- You can walk barefoot on a heated floor in winter;
- Flat heating elements fit perfectly into the interior: they are simply not visible under the floor covering.
- Electric cable heated floors make it possible to fully automate the climate system. The controller not only maintains the set temperature; you can set reduced cost modes (when you are not at home), or turn on the heating using a timer.
- There are no problems with energy delivery: almost 100% of the housing stock is electrified.
- Simple installation: no need to lay pipes for the coolant liquid, install heating radiators, fans, pumps.
- No maintenance required: a properly organized heated floor lasts a long time. Any self-respecting manufacturer provides a minimum 10-year warranty.
There are also disadvantages, which, however, are covered by advantages:
- To install the system, you will need to open the floor covering. In the case of linoleum or laminate - no problem. And if you want to introduce a carbon heated floor under the tiles, you will have to carry out a complete renovation of the room.
- Relatively high cost of equipment, especially thermoelements. True, this problem only arises once, during purchase.
- The cost of obtaining heat is higher than when using gas or solid fuel.
And yet, the main advantage: the carbon floor can be laid and connected independently. This requires ordinary household tools and basic home craftsman skills.
The best manufacturers
Infrared warm tape or rod type heating is not a cheap pleasure. Therefore, most buyers make their choice based on the name of the brand, which has earned positive reviews. Among those in demand:
- Devi;
- Phoenix;
- Caleo;
- Energy;
- Teplolux.
Carbon-type film heating system is energy efficient and less expensive during operation and repair. In addition to the fact that such a floor heats the room as comfortably as possible and does not dry out the air, it is easy to install and repair. However, breakdowns are extremely rare if the installation was carried out by professional builders.
