The heated floor does not work and the reasons for the failure of water systems
By and large, there is nothing to break in water floors - the pipe, which is used as heating elements, has a very long service life, and if it is not broken on purpose or by accident, it will serve for a long time. Breakdown is the most common answer to the question why a warm water floor does not work. Such an accident can be resolved quite simply, if you do not take into account the difficulty of finding the damaged area (if this damage occurred as a result of careless drilling of the floor, then finding the accident site will not be difficult). In such a situation, the floor around the damage is opened, the pipe is cut and reconnected using a repair coupling.
How to repair a heated floor photo
But these are not all possible accidents that will require you to repair your water heated floor. If you make a list of possible breakdowns, it will look something like this.
- Clogged system control elements. Faucets with thermal heads usually become overgrown with dirt over a long period of use - their valves stop working and, in the worst case, allow water to flow into the pipes. This is the whole point of the breakdown: no circulation - no working heated floor. The issue can be resolved simply by replacing the taps with thermal heads and purging the heated floor system.
- Failure of the circulation pump. It can be determined quite simply - we put our ear to the pump, and if it doesn’t buzz, it means it’s broken. We unscrew a couple of union nuts, disconnect the pump from the power supply system and take it for repair (and possibly to the trash heap). It's better to repair first, as they say, hope dies last. This happens all the time, and it happens because the pump is old - they age quickly, especially if we are talking about not very high-quality Chinese products.
- Failure of control electronics. It is better not to meddle in these matters on your own, since everyone must do their own thing. And if you can still somehow figure out the pipes and pump on your own, then you need to at least be familiar with electronic circuits. This breakdown is closely related to the circulation pump, and if any are present, then also to the electronic thermostatic heads - it is with their help that the electronics control the operation of the heated floor, giving them various signals to turn on or off. So you should rush to throw away the pump only if your floor heating system is simple, without automation or electronics. Otherwise, it is better to immediately contact specialists.
There are other breakdowns, but the specificity of a water heated floor is such that, by and large, there is nothing to break in it - as mentioned above, it can only become clogged with dirt. Well, everything else happens extremely rarely.
Basically, that's it. This is the essence of solving the question of how to repair a heated floor - and any heated floor can be repaired in this way. Difficult? Then be vigilant and avoid accidental damage to the system - remember that repairing a heated floor is expensive in any case.
Types of heated floors
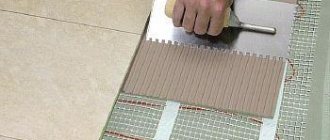
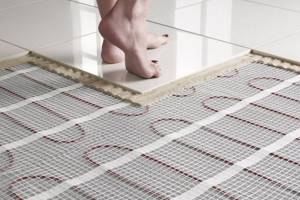
Laying electric heated floors under tiles
Floors are divided according to the type of heating element:
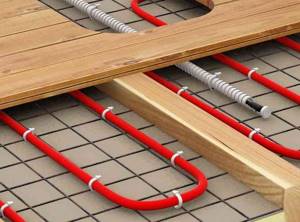
Heating cable. There are two types of this floor: a reel with a wire, which, during installation, is sequentially unwound over the surface of the base, or mats - the cable is already unwound and fixed on the substrate; during installation, the mats themselves are laid and connected to the thermostat.
In the first case, before the finishing coating, the floor is covered with a screed. In the second, the screed device is optional.
Infrared heating element. There are also two types: a film in which thin carbon plates are built in, and mats with carbon rods. Both can be installed without a tie on top. The rod floor is considered more durable, but it is more expensive.
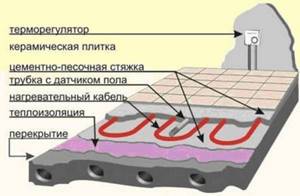
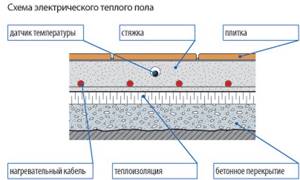
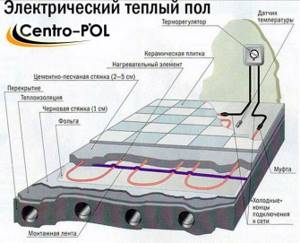
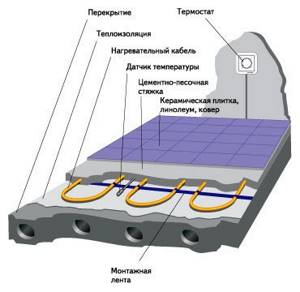
Any floor consists of the following components:
- heating element (see above);
- thermostat (the main unit for controlling the operation of the device);
- temperature sensor - a sensitive device placed together with a heating element under the screed or coating. It monitors the state of the system and transmits data to the thermostat.
How to find a broken floor heating cable
To avoid having to tear off the entire screed and inevitably repeat the process of pouring the floors, you must try to determine where the cable is broken. Finding a break is quite difficult and even professional installation teams do not always succeed, but by using some tips and recommendations, you can increase the chances of success.
The search for a break is carried out as follows:
- Malfunctions of electric heated floors associated with mechanical damage during drilling. After laying the finishing coating, you have to attach some types of furniture to the floor, install a door stop or closer, etc. Professional installation teams always leave the installation diagram to the owners to avoid getting caught in the cable when drilling. If the floor stops working immediately after installing furniture and door stops, finding the break point is usually not difficult.
- It is much more difficult to determine the location of the damage and repair the cable yourself if you do not know where exactly the break is located. First, you need to make sure that the reason for the inoperability of the heating system lies precisely in the heating wires. To do this, use a tester to check resistance indicators. A deviation in values greater than 5% indicates that there is mechanical damage or a cable break. In this case, it is more difficult to repair an electric heated floor, due to the fact that it is quite problematic to determine exactly where the break is located.
Electric floor repair
Installation of warm water floors in a private house
Finding the location of the electrical cable break
To repair the system yourself, you need the following tools:
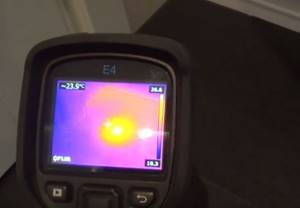
- Thermal imager;
- Network voltage indicator;
- Putty knife;
- Drill;
- Rule;
- Level;
- Pliers;
- Cable;
- Cable clamps, couplings;
- High voltage generator;
- Press jaws.
When choosing a thermal imager, pay attention to the manufacturer's recommendations. As a rule, the entire list of tools required for replacement is provided in the data sheet
One more thing: replacing the thermostat will require a certain type of screwdriver; it is better to have a complete set.
If the electrical floor contact is damaged, the entire system must be turned off. The defective section is dismantled, and a sleeve is put on the cable. If the heating element breaks, the problematic part is isolated, the torn pieces are released and connected using sleeves of the required diameter. A thermal imager will help identify breaks or kinks, so it is better to always have such a device on hand.
Electric floor troubleshooting
Controllers for heated floors Devireg
Main faults:
- burnt contacts;
- wire break;
- breakage of the heating element;
- short circuit;
- failure of the sensor or regulator.
The design of an electric heated floor is such that each room is heated by one system. Therefore, deterioration in the performance of the floor in any room indicates a malfunction of the heating element or control system of this room and is in no way connected with others.
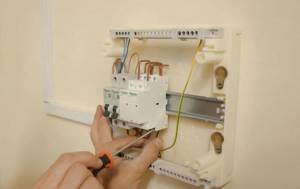
Start checking with the sensor and control unit. Using a voltmeter, measure the voltage at the contacts (terminals) to which the electrical network wires are connected. Compare with the voltage in the outlets in another room. A difference of more than 10 volts indicates poor contact between the network and the terminals of the control unit. Turn off the electrical plugs, unscrew the terminal screws, remove and strip the wires. Then install them in place and secure with screws. If the voltage difference does not disappear, the problem is in the wiring of the room or apartment (house).
If you do not have experience working with electrical circuits and devices and do not know safety regulations, do not attempt to inspect or repair electric floor heating yourself. This may result in personal injury and damage to the floor controls.
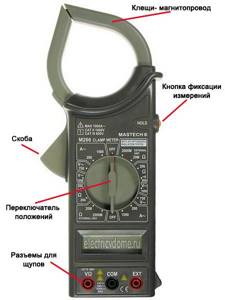
Check the voltage at the heating element wire terminals. When the relay is off, it should be zero. Set the regulator to maximum temperature mode. The voltage must be at least 210 volts. If it is lower, the problem is a poor connection, a faulty regulator, or a faulty heating element. Check the current using a current clamp; it must correspond to that specified in the regulator's passport. If the current is less, the problem is in the regulator. Repair of the heated floor thermostat is carried out in specialized workshops. The current may be less if several elements of infrared heated floors break or burn out. The absence of current indicates a break in the heating element or the wire leading to it. A current above the rated value indicates a short circuit.
Short circuits can occur due to overheating, high humidity or installation errors. Overheating of the wires is accompanied by an unpleasant smell of burnt insulation. If the current is increased by more than 20%, but there is no smell, the problem is under the floor covering. Cable heaters are not subject to short circuits, unlike infrared heaters, which are hidden by a self-leveling floor or screed. To check the elements, contact a specialist. Repairing an electric heated floor requires basic knowledge of electrical engineering, the ability to find faults in electrical circuits and eliminate them.
If you cannot eliminate the cause on your own, or you are not confident in your abilities, contact the service center, workshop or organization that installed your heated floor.
Setting up a heated floor with a faulty sensor
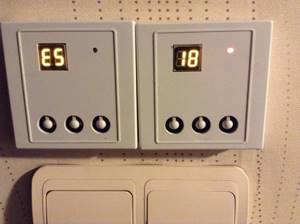
Electronic models, unlike mechanical ones, should themselves help users identify faults. For example, if a temperature sensor breaks down, non-typical values or error E5 will be displayed on the screen.
In order to continue to use heated floors, despite the malfunction, some models allow this, you must do the following:
- disconnect the wires to the sensor from the terminals
- Set the thermostat to timer mode
Some models do this automatically, while in other types you need to press the up and down buttons at the same time.

- The program number is displayed on the screen
- By moving the up and down buttons you can select a comfortable temperature according to the program
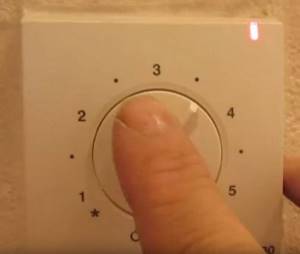
In mechanical brands, for example DeviReg 130, this method is also applicable. Pull out the wires from the sensor and unscrew the adjustment wheel between positions 3-4.
In this mode, it will be possible to achieve the optimal comfortable temperature of heated floors. True, you will always have them turned on.
And if there is no obvious break, and the multimeter even shows some values, how can you find out that the thermistor is faulty? It is necessary to compare its passport data with those that are actually determined during measurements.
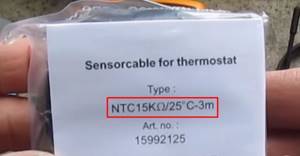
For example, the factory thermostat data is 15 kOhm at t=25C.
And here’s what the tester shows when taking measurements:
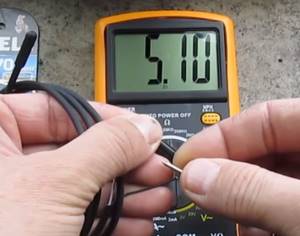
Here, of course, you need to take into account the temperature coefficient. If it is negative, then as t increases from 25C, the resistance will fall. At lower temperatures, resistance increases.
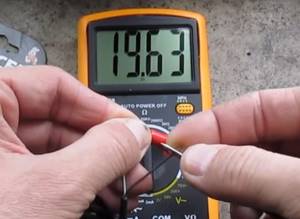
That is, it will be higher than 15 kOhm. Here is the result of measuring the same serviceable sensor at t already 20C:
High-quality thermostats, temperature sensors and other components from leading companies, as well as current prices for heated floors today, can be found here.
Do-it-yourself water heated floor repair
If the installation of this heating system was carried out professionally and using high-quality components, then you can be sure that it will serve with dignity and without breakdowns for fifty years. However, unforeseen situations arise that may require repairs. An urgent call to a specialist will help correct the situation, but you can solve this problem on your own, without extra financial costs.
It is quite possible to repair a water floor if it is damaged with your own hands if you have at least some skills in working with tools.
Schemes for installing heated floors.
The first thing you need to do immediately if a leak is discovered in your water heating system is to turn off the water as quickly as possible. Then dismantle part of the floor covering above the place where the water broke and inspect the pipes to identify the cause of the malfunction
If the pipe has received mechanical damage due to careless handling of a drill or hammer drill, the nozzle must not be removed until the access of water to the system is stopped.
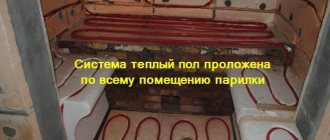
Principle of operation
A heated floor system can be used as additional heating of a room or as the only source of heat in it. If homeowners prefer the second option, then they should entrust the installation of the system exclusively to professionals. Otherwise, you can make an irreparable mistake and leave the house without heating.
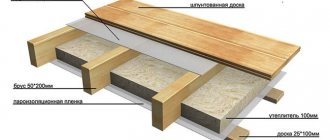
Professional craftsmen can easily select the latest materials, have the necessary equipment for installing a heated floor, and begin how to install it quickly and without difficulty. If you have decided to install the electric floor yourself, it is worth studying the principle of its operation. Let's start by studying the main elements of this design:
- materials for hydro and thermal insulation of the base prevent heat leakage in the system;
- heating elements - pipes for circulating heated water for a water floor, cable mats or cables with self-regulating heating cores for electric floors, infrared film in the case of an infrared floor;
- a temperature sensor that allows you to control the heating level of the structure;
- fasteners;
- heat-conducting layer and concrete or other materials;
- flooring;
- a pump that provides forced supply of thermal fluid for a water floor or a power cable for an electrical panel in the case of an electric floor.
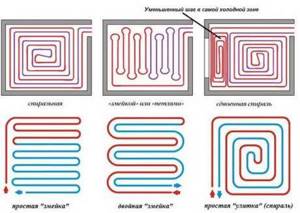
Laying options
Scheme
Thus, heated floors can be made from different materials and using different technologies. But the principle of operation of such systems is similar: thanks to the power source, the floors heat up and become very comfortable even for bare feet.
If the system malfunctions, a number of repairs will need to be performed. To do this, you can call a specialist or try to do it yourself. It is quite possible to repair a heated floor with your own hands; the main thing is to read that article to the end.
Principle of operation
The main mistakes in installing heated floors
To prevent malfunctions in the heating system and not subsequently repair the heated floor, you need to carry out the installation efficiently. The installation itself has some features:
- The calculation of the length of the heating parts is made taking into account the size of the space not occupied by pieces of furniture, since the cable is not laid under it so as not to damage the structure.
- There is no need to purchase too much heating element; cutting it can ultimately ruin the entire system, reducing its strength.
- It is imperative to carry out work to clean the surface on which the “warm floor” is installed from dust and dirt.
- Do not step on the cable during installation.
- The temperature sensor must be installed strictly in the corrugated tube.
- Do not allow empty spaces to appear around heating elements.
- For subsequent repairs to the room (so as not to accidentally touch cables or pipes), you need to lay out the layout of the “warm floor” with dimensions.
- After installation, you need to check the wire by measuring the resistance. It should not differ from the values intended by the system manufacturer.
- The system is turned on after the screed has completely dried.
And remember, it is better to prevent a breakdown than to fix it later. Often it is our negligence that becomes the cause of all the misfortunes that happen to technology and various devices.
Prevention of breakdowns
By strictly following the recommendations of professionals and the operating instructions for the electric heating system, you can avoid problems and achieve a long service life of the heated floor. There are a number of technological measures, the implementation of which when installing electric heating initially guarantees good operation.
The main stage is the correct selection of qualified specialists for installation. Compliance with installation rules:
- making correct measurements and calculating the required power;
- selection of the cable cross-section according to the size of the room, since trimming the wire significantly reduces its strength;
- cutting infrared film strictly according to the markings;
- selection of cable mats, their cutting is unacceptable;
- fulfillment of technological parameters for thermal insulation;
- You cannot install heated floors under furniture and household appliances to prevent overheating;
- it is necessary to place the sensor in a special corrugated pipe to protect it from damage;
- mandatory testing before performing concrete work;
- Do not start operation until the screed is completely dry.
Repairing an electric floor heating system is not difficult if you have the necessary skills. An important stage in the repair is not only the correct diagnosis of the malfunction, but also the sequence of repairs to avoid fire and life-threatening situations.
Installation process
Before laying the wire, its resistance is checked and checked against the data sheet. A run of approximately 10% of the passport data is allowed. Installation of an electric heated floor can be carried out either by securing it to the reinforcing mesh using ties (without tightening) or using special fastening tapes.
If you install a heated floor in a bathroom or bathhouse, you must ground the reinforcing mesh underneath and connect the ground to the regulator. For this, tinned copper wire is used. Actually, this is the answer to the question, is it possible to install an electric heated floor in a bathhouse? Yes, but the RCD module and grounding must be installed.
An infrared heated floor is simply spread over a layer of insulation. According to the technology proposed by the manufacturer, it may be necessary to secure it with special tape or to special ears on the strip.
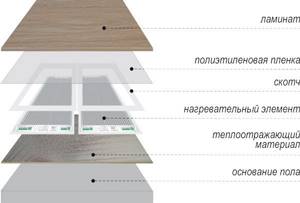
Layers of film flooring when laid directly under the laminate
In places where the wire passes above the dividing line of two floor slabs, it should be hidden in a piece of corrugated pipe 10-15 cm long. This will reduce the risk of cable breakage due to possible thermal expansion of the slabs.
The connection point between the heating cable and the power wire is located at a distance of 10-15 cm from the groove so that the connecting clips are subsequently recessed into the screed.
Important: Be sure to mark the position of the connection point on the apartment plan. This may be necessary later in case of forced repair of the heated floor.
When all the elements are in place, the wire resistance is checked again. Only if it differs slightly from previously made measurements can the heating elements be tested by turning on the heated floor.
A corrugated pipe is lowered from the regulator along the groove, the other end of which is placed in the middle between the nearest strips of the heating cable. A temperature sensor is inserted inside the corrugated pipe, with which you can regulate the operation of the heated floor. Once again it is worth checking that the sensor is easy to get and there will be no problems with replacing it.
If everything is normal, then the entire system is de-energized and the regulator is removed until all finishing work is completed. A heated floor screed is formed. After it has completely dried, the operation of the system is checked again and, if everything is normal, the floor covering is installed. If a screed is not needed, as is the case with film heated floors, then laminate or linoleum is laid immediately.
Cable burning and signal generator
To find the exact location of the fault, you need to have specialized devices, which include:
- transformer for burning
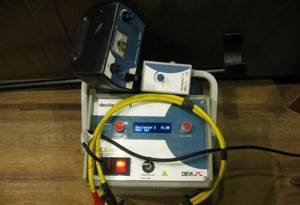
- signal generator
- electronic magnetic signal receiver

- thermal imager

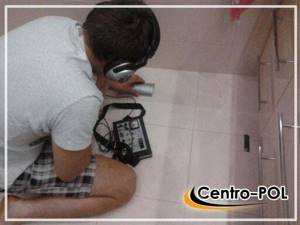
No one has such devices at home, so you will have to call a specialist. How to find such faults can be found in a detailed video from a real object:
The order is:
- a place of weak insulation is burned through
To do this, increased voltage is supplied to the breakdown point (up to 10 kV!). With simultaneous voltage on the cores up to 350V, a welding arc is ignited.
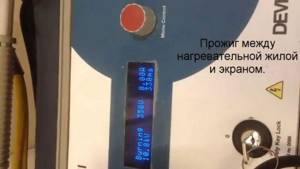
This arc, as it were, welds a carbon track at the junction of the conductors, with a current of up to 3A and forms a closed circuit.
- the generator supplies a signal to the cable
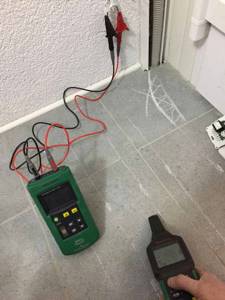
- An electronic magnetic sensor acting as a receiver locates the approximate location of the short circuit. All this without opening the tiles or other floor covering.
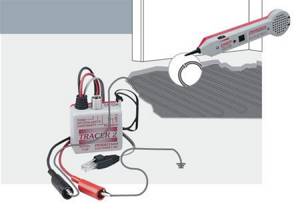
- The thermal imager scans the entire area more carefully and visually determines the exact location of the short circuit. Where the burning was done, there will be an increased temperature.
The search is easier with heating mats because they are located close to the surface. But with a cable it is much more difficult, especially under a thick tie. It greatly weakens the signal, and searching for a short circuit can take much longer.

If at the stage of testing with a multimeter it was shown that two wires are shorted together, then there is no need to burn anything here. Immediately connect the generator to them and look for the point.
Electric floor problems and solutions
Schematic design of a heated floor on a concrete floor.
Structures of this type are demanding to maintain and often restoration and adjustment on their own do not bring the desired result. If the floor stops heating or the temperature drops sharply, the following problems may occur:
- Reduced network voltage. The most common “illness” that the master forgets to mention. When the voltage drops, the system stops working at full capacity and the warm floor stops heating. The solution is to install a more powerful cable, which guarantees a larger supply of power. You will need few tools, and the cost of the work depends on the choice of cables.
Advice! It is best to foresee such a situation at the stage of laying out the system, since a complete replacement of the cable will cost a lot. In particular, the company's services start at $45 per m². At the same time, take into account the time for work and dismantling of the floor covering.
- Thermostat failure. If the voltage is sufficient, the cables are intact, but there is no heat, it is worth checking the temperature sensors and thermostat. The supply of electricity and the operation of the heating elements depend on the correct installation and connection of the device. Tightened terminals, equal output voltage with the power supply when fully turned on - guarantee the operation of the device. If you have a data sheet, it is a good idea to check the resistance of the floor temperature indicator.
Important! Calling a technician to replace the thermostat depends on the brand of the system. But you shouldn’t take on the work on your own; it’s better to look for the device in a store and buy it on the advice of a professional
In this case, the service will cost no more than $15-20.
- Insufficient thermal insulation or incorrectly selected cable. Low power is a guarantee of poor heat supply; a small layer of thermal insulation is checked by heating the floor for half an hour and checking the readings of the temperature sensor with temperature indicators. The difference indicates a malfunction that can be easily fixed with your own hands, having a home craftsman’s tool with you.
- Mechanical damage to the cable. The reason is the final finishing. When installing flooring, installing screed or laying tiles, the cable is damaged. Checking serviceability requires disconnecting from the power supply and measuring the voltage between individual wires. The readings must correspond to the data specified in the data sheet.
- Incorrectly installed electric floor system. If the sensor was poorly secured, for example, close to the heating element, the system will not work! There is no need to call a technician here; just move the sensor to its proper place and check the wire connections again.
Once the reasons have been determined, you can repair the heated floor. Of course, it’s not worth taking on the task of eliminating complex defects, but the simplest problems are quite easy to solve on your own.
What to do if the heated floor does not heat
Modern heated floors are a convenient and affordable solution for heating an apartment or country house. But there are situations when even a properly installed floor is unable to increase the temperature in the room. The main reason for this phenomenon may be increased heat loss, drafts and the flow of cool air through open windows and doors. In addition, the low efficiency of a heated floor can be explained by low voltage in the electrical network.
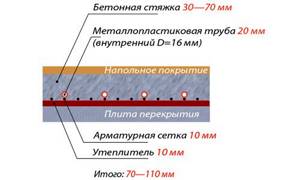
Diagram of the heated floor surface.
What way out can be found from this situation? First of all, you need to try several methods that can eliminate the cause of the uncomfortable room temperature:
- Reduce heat loss, insulate poorly sealed door and window structures.
- Increase the power of your floor heating system by increasing the voltage supplied to the heating section.
If these methods do not lead to the desired result, you should carefully examine the entire system and identify the reason for the poor performance of heated floors. How to check the operation of a heated floor? Most heated floors operate using electricity, so to study their operation it is necessary to prepare the tools that are used by electricians. This:
- an electric current tester (a device that measures voltage and resistance levels) or a voltage indicator;
- screwdriver.
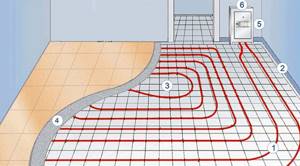
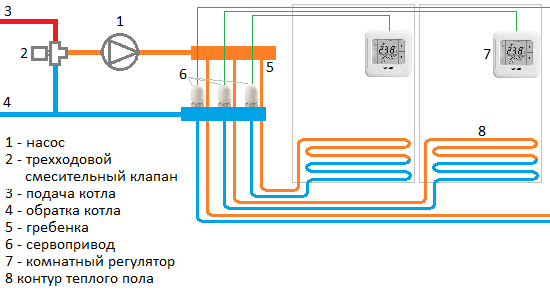
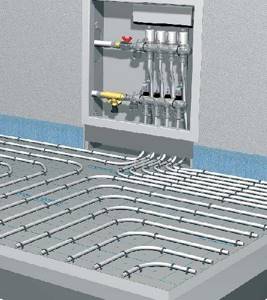
Heated floor installation diagram: 1 - Pipeline, 2 - Damper tape, 3 - Heat-reflective coating, 4 - Plasticizer, 5 - Water heated floor manifold, 6 - Manifold cabinet.
The test begins with examining the supply of electric current to the thermostat, which is required to be equipped with every heated floor. If the power supply is correct, the light or indicator panel on the thermostat lights up.
Then you need to check the temperature setting in the system. It is possible that the tuning wheel was accidentally moved to a lower setting. If everything is in order with the electrical wiring, the thermostat, and the settings, you can try to fix the problem on your own.
How to identify and, if possible, eliminate the malfunction of a heated floor?
Functionality check #1
When working, you must adhere to the following algorithm:
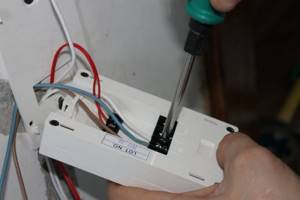
- Disconnect the power supply to the thermostat.
- Create access to the back of the device.
- Carefully check that the wires are connected to the contacts correctly. There are situations when a poorly functioning heated floor was incorrectly connected to the control system. With proper connection, wires are connected to contact No. 1 to supply voltage from the distribution panel, the wires of the “Heated Floor” system are connected to contacts No. 3 and 4, the temperature sensor is connected to contacts No. 6 and 7.
- If necessary, correct the contact settings and check whether the system heats or does not heat.
Heated floor connection diagram.
If all your actions have not led to the desired result, the next step is to check the load created by the heating cable or heating film used in the underfloor heating system. To do this, measure their resistance by applying the tester contacts to contacts Nos. 3 and 4. The load resistance must correspond to that specified in the technical data sheet of the device.
You can also calculate the resistance required for proper operation of the system yourself. To do this, use the formula R = U x U: P, where U is the voltage of the electric current in the network, P is the power of the device. For example, a heated floor is used in the room, the power of which is 1.2 kW, and the electric voltage is 220 V. 220 x 220: 1200 = 40.3 Ohms. If necessary, you can independently calculate the power of the installed heated floor. To do this, the area of the room is multiplied by 150 W/sq.m.
According to the instrument readings, it is possible to determine why the room is not heated. If the tester readings are 0, there is a high probability of a short circuit occurring in the underfloor heating system. Most often, a short circuit is caused by overheating of wires of the wrong cross-section. If the tester shows the “infinity” sign, the problem lies in the burnout (break) of the heating element located in the coupling of the device. If all the tester indicators are normal, this indicates that the heating elements of the system are in order, and the heated floor is not working for another reason.
Possible causes of failure
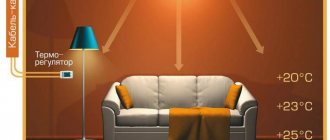
The operating principle of a warm electric floor is not much different from other types of electrical appliances. The current hitting the heating element heats it up, which gives off its heat to the screed or floor covering, thereby warming the air in the room.
The passage of current to the heating system is carried out through a thermostat, the main function of which is to turn the floor on and off, and to regulate the strength of its heating. As soon as it reaches the set temperature, the thermostat turns off, which also happens when the coating is overheated.
What can cause weak floor heating or a complete lack of heat?
Typically, the most common culprits are:
- The thermostat, so you need to start checking with it. To verify that it is faulty, you should dismantle the device, first turning off the light, and check it with a multimeter.
- If the floor is cable, then the cause of the breakdown may be its breakage. This happens either during installation or by some mechanical influence, for example, with a drill during repairs. The cable is checked by measuring its resistance and insulation. If the data exceeds the data sheet readings by more than 5%, it means it is damaged or there is a break in it. In an infrared system, rapid deterioration of the film is possible due to insufficiently dense coating. If, for example, thin linoleum was laid, then even a woman’s heel can push through the film floor.
- The temperature sensor can also cause a malfunction. If the base does not warm up to full capacity, then it simply does not turn off and the floor works non-stop around the clock, which leads to high energy costs. On the other hand, if the temperature sensor is too close to the heating elements, it will quickly heat up and turn off, and the floor will not reach the desired temperature.
Whatever the cause of the breakdown, you can repair an electric heated floor yourself, if you have the necessary tools.
Read below on how to repair an electric heated floor.
Causes of malfunctions
When using a heated floor, problems may arise related to its operation. There are two types of malfunctions - complete loss of heating and the inability to control it. For some breakdowns, you will have to remove the finishing coating and dismantle the screed, and for others, you will have to repair the temperature controller.
The reason for the breakdown of the heated floor may be a malfunction of the thermostat or a cable break.
Before you undertake the repair of warm electric floors, you will need to determine the reason that led to the breakdown. For example, it could be construction work due to which the heating wire was broken, or a flood that flooded the control unit.
If the heating has completely disappeared, then the presence of voltage is checked on the line supplying electricity to it. Sometimes a breakdown occurs due to a circuit breaker tripping or poor contact.
When the input voltage is present, but there is still no heating, you need to find the cause of the malfunction. It may be hidden in a heating wire or thermostat . To understand what caused the breakdown, you need to disconnect the underfloor heating contacts from the regulator and measure their resistance. For this you will need a multimeter. The resulting resistance value should not differ by more than 10% from that specified by the manufacturer.
A significant deviation from the norm indicates damage to the cable under the tie. It can be caused by an insulation breakdown (when the resistance value decreases) or a cable break (the multimeter will show infinity).
If everything is in order with the resistance and there is voltage at the input, then the breakdown is in the thermostat, which is easiest to check by replacing it. Malfunctions in it also lead to incorrect setting of the heating temperature, but in this case the culprit may also be a broken sensor.
Thermostat failure
A common failure in practice is insufficiently tight contact of the wires in the regulator terminal block. Before removing the thermostat, you should try to tighten these contact points.
Before disconnecting the thermostat, try tightening the contacts, this may be the reason
You can understand that it is the thermostat that is to blame by directly connecting the underfloor heating wires to a 220 volt network. If after this the floor becomes warm, the thermostat will have to be replaced . If you have the appropriate skills, you can try to repair it yourself.
The most common radioelements that fail are key transistors, voltage stabilizers, electrolytic capacitors and relays. Often a breakdown of the mains capacitor also occurs.
If the microprocessor fails, it will still be more cost-effective to replace the entire unit. Failures of the mechanical thermostat may be due to a faulty switch. To restore it, you can try washing it in an alcohol solution.
Cable damage
Repairing the wire under the screed is a very serious task, since it will have to be dismantled. But in order not to tear off the entire coating, special devices are used to help narrow down the location of the breakdown.
Repairing a broken cable requires dismantling the tie
To repair a broken cable, you will need to prepare :
- thermal imager or hidden wiring detector;
- generator;
- connecting sleeve;
- heat shrink;
- press tongs.
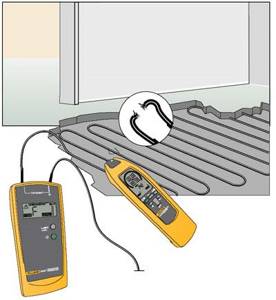
Before determining the location of the damage, the wire laid in the floor is disconnected. High voltage is then applied to the cable through a generator or high-frequency transformer. Next, using a thermal imager, a point with a higher temperature is determined.
Once a place is found, the section of screed located above it is dismantled . The ends of the damaged cable are stripped and connected to each other through a copper sleeve, followed by crimping. After this, the cable connection is protected with electrical tape or heat shrink tubing. Before restoring the screed, the system is turned on and checked for functionality.
Sensor repair
If the sensor malfunctions, you will not have to destroy the floor to replace it, since it is installed in a special protective tube.
The sensor cannot be repaired; it must be replaced with a new one.
To dismantle it, you only need to find the exit of this tube and pull it out by the ends of the wires. But in rare cases, the tube may be embedded in the wall.
The sensor itself cannot be repaired; a new one is purchased instead. If necessary, a wire of the required length is soldered to it, which is installed in place of the old one.
If for some reason you cannot get the sensor, then, in order not to dismantle the floor covering, you can simply replace the thermostat with a model with an independent timer. After this, heating will turn on and off only at the specified time.
Source
Troubleshooting a water floor
Main faults:
- installation errors;
- the circulation pump is broken;
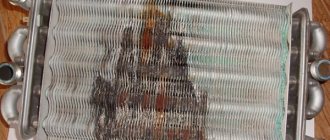
- the filter is clogged;
- water leaked out.
Diagnostics
Repair of warm water floors begins with diagnostics. To find the problem, determine whether the floor does not heat only in one room, or in all? If in one, the problem is in the manifold or coil of that room. If in all, the problem is in the boiler, low water level, clogged filter or faulty pump. Start diagnostics by checking the water level in the heating system. Add water until it flows out of the drain tube. In 20% of cases, after adding water, the performance of the floors improves.
Even if hydronic underfloor heating doesn't heat just one room, check the filter. Unscrew it and inspect the cartridge. If it is dirty, then all heating elements need to be washed. A dirty filter, like mud deposits, impairs the movement of water through the system, so in half of the cases installation errors appear after a decrease in pressure. After all, coils are made from pipes with an internal diameter of 5-10 mm. Incorrect pipe bending and dirt blockages will result in poor floor performance.
If you have air bleed valves installed, try bleeding the system. Open the tap and the water from the expansion tank will push the air out. When liquid comes out of the tap without air, close it and fill the system until water comes out of the drain pipe. If you do not have such taps, contact those who installed the heated floor so that they correct their mistakes or show them where to install them. Often, repairing heated floors comes down to reading the instructions and learning how to use them correctly.
After releasing the air, turn on the pump and listen to it. A normally operating unit produces a monophonic hum without clicks, knocks, vibrations or extraneous sounds. If it runs rough, vibrates, makes a loud hum, or sounds come and go, drain the heating system and turn off the pump. Take it to a service center for diagnosis and, if necessary, repair.
If a pressure gauge is installed after the pump, plug the return pipe and turn on the pump. A properly operating pump will create a pressure of 0.5 atmospheres (bar) or 7-9 pascals. Less pressure indicates poor performance or fluid leakage. Leave the pump on for 1-2 hours. Then add water to the system. If there are no leaks, water will immediately flow out of the drain pipe. If the water does not pour out immediately, you will need to pressure test the entire system and each circuit separately. It is difficult to do such work on your own - equipment is required. Only based on the results of pressure testing, the technician will determine the location of the water leak, due to which the heated floors are not heated.
If you do not know how to turn on the pump without turning on the heated floor system, contact a specialist. Otherwise, there is a risk of damage to the pump, electric shock, short circuit and fire.
Repairing leaks
If you notice a manifold leak, drain the system. If the coupling connecting metal-plastic pipes is leaking, unscrew and remove the fixing nut, remove the ring, and remove the coupling from the pipe. If any rubber ring is damaged, replace the entire coupling. To eliminate a leak in the coil, you will need to replace the heated floor in a separate room.

Flushing
If the floor is used correctly, washing should be done no more than once every 10 years. If you poured unfiltered water into your heating system, dirt got in with it. High temperatures lead to the formation of dirt plugs, which narrow the lumen of the pipe and reduce the efficiency of the entire system. For washing, contact specialists - to carry out this work, a selection of reagents is required, which can only be done by a specialist.
Types of underfloor heating systems

It is comfortable to walk barefoot on the heated floor
There are three types of underfloor heating systems: electric, hydronic and infrared. They differ mainly in their heat transfer elements: in a water floor system it is a concrete surface under which metal-polymer pipes are located. The water in them is heated by a boiler or central heating system. In electrical systems, the role of the heating element is performed by an insulated cable, and the temperature is controlled by a thermostat. The infrared system in the form of a film fits under any covering and is controlled by thermostats using a remote control. Each of these systems has its own design features, so not only the causes of problems differ, but also the procedure for diagnosing and repairing them.
Main problems during operation
The water heated floor system is quite simple in its structure, so there are not many reasons for poor performance. In general, heating is not carried out when:
- The water floor circuit is not functioning. We check the distribution panel with shut-off valves for each circuit - they must be open;
- We listen to whether the circulation pump is noisy (usually it is installed near the boiler, in the distribution panel). If power is supplied to it, but there is no noise, it will have to be replaced.
- Air entering the system. Let's look at this problem in detail.
Preventing damage to heated floors
To avoid damage to the heated floor, a number of nuances should be taken into account when installing it:
- When calculating the size of the heating elements, you need to take into account the area of the room not occupied by furniture. This is due to the fact that underfloor heating elements are not recommended to be laid under bulky interior items due to possible overheating of the system and its failure.
- The purchase of floor heating elements should be carried out taking into account their required dimensions, since cutting cables during installation can lead to breakdown of the system due to a decrease in its strength.
- The heating cable should not be placed on a dirty floor. Before installation work begins, it must be thoroughly cleaned.
- When laying a heated floor, it is not recommended to walk on it to avoid breaking the heating elements with hard shoe soles.
- The temperature sensor should be installed so that when repairing the thermostat, this part of the system is easily accessible. It is recommended to place the sensor in a corrugated tube.
- There should be no voids around the heating element; they can cause the cable to overheat and fail.
- During the installation of a heated floor, it is recommended to make a diagram of it on paper indicating the dimensions. It may be required during repair work and will allow you to avoid touching the cable or pipe of the system when working with cement screed.
- After laying the wire, it should be checked by measuring the resistance. The heated floor cannot be turned on until the screed has completely dried.
The electrical resistance of the floor must correspond to its passport value specified in the documentation included with the kit. Resistance measurements should be performed before and after installation of the system.
In any case, it is easier to prevent the occurrence of a problem in advance than to later eliminate the results of poor-quality heating installation. Strict adherence to the work rules will avoid repairing the heated floor in the near future.
Diagnostics of breakdowns
A possible reason for ineffective floor performance is low mains voltage. Below what the floor is designed for.
If the system does not have a power reserve, voltage stabilizers can be used to normalize heating.
In most cases, the reason that the floor has stopped functioning is the failure of one or more basic elements.
Cable integrity failure
The cable could be damaged mechanically (when laying the floor, during repair work using a hammer drill or angle grinder), or it could burn out on its own.
For diagnostics, it is necessary to remove the finishing coating, disconnect the system from the network, and disconnect the cable from the thermostat. Measure the resistance of the cable itself and the insulation (between the braid and the core), check it with the values indicated in the data sheet. The permissible error is 5 percent maximum.
How to repair a heated floor yourself
Warm floors are becoming increasingly popular these days. In a private house, this system prevents cold air coming from the ground from entering the rooms. In apartments where there is no confidence in reliable communal heating, laying heated floors serves as additional heating for the home. Many even make this type of heating the main one, freeing up additional space due to the absence of bulky pipes and heating radiators. This makes it possible to independently regulate the air temperature and have a comfortable and warm surface under your feet at any time of the year. But, like any technical structure, heated floors are not immune to breakdowns. Their reasons may be different, it all depends on the circumstances and the type of heated floor that was installed in the room. How to repair a heated floor on your own, without turning to professional repairmen for help? It all depends on what kind of heating system you have in mind and what kind of repairs will have to be performed to eliminate the malfunctions.

If the house has a “warm floor”, there is no need to install additional heaters.
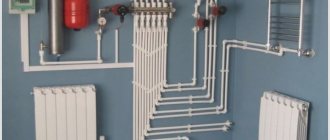
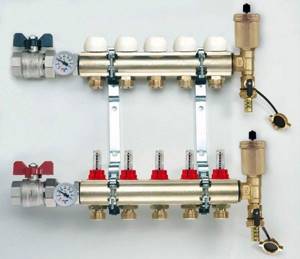
Rules for installing a collector group
In all of the above methods of installing a heated water floor, it is necessary to install a cabinet for the collectors, which is purchased ready-made on the construction market. After the manifold cabinet has been successfully installed, the supply and return pipes are inserted into it. The first comes from the boiler and, accordingly, is filled with hot water. The second pipe, designed to perform the exact opposite function, is responsible for collecting water that has passed through the heating system and has already transferred part of the thermal energy to the coating. The cooled water is sent again for subsequent heating. The process begins again in a circle. Water circulation is ensured by a pump built into the system.
To install the collector box, try to choose a place on the wall located as close to the center of the room as possible. The installation of this cabinet is most often carried out in close proximity to the floor
In this case, shut-off valves are installed on each pipe (both supply and return), which allow you to disconnect the system from the general heating network for repairs or in order to save money. The plastic pipe and metal shut-off valve are connected using a compression fitting. Next, a manifold is connected to the valve, installing an air vent on one side and a drain valve on the other. You can simply install a plug, but this is less functional. After assembling the manifold cabinet, perform all other work described above in each system.
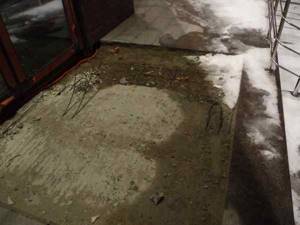
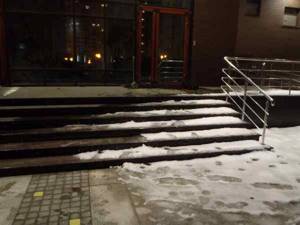
Repair of snow melting cable systems in open areas
Diagnostics and repair of cable anti-icing systems for open street areas is required if the heating system does not work at outdoor air temperatures in the operating range from -15 to +5°C, snow lies on the heated area and does not melt, and ice forms.
If a fault is detected on the heating cable, both resistive and self-regulating (break, short circuit, insulation damage, burnout), we begin to search for the problem area. If the damage site is successfully located in an open area, the Customer is required to have a construction worker remove the tiles (granite, screeds). Next, we restore the integrity of the heating cable, which allows the anti-icing system to operate for many years to come.
The appearance of snow on a heated surface at temperatures below -15°C does not apply to abnormal operation, because Most anti-icing systems of any Russian and foreign manufacturers operate in a narrow range of air temperatures (-15 to +5°C).