Having become the owner of a country plot, we begin planning and erecting buildings on it that can make our life comfortable and cozy. It’s rare that a household can do without a bathhouse, so familiar to the Slavic population.
It is considered a kind of temple of purity and peace of mind, which means it should warm up well and maintain the temperature. It is unlikely that anyone would want to wash in a cold, drafty room. Therefore, much attention is paid to the question of how to properly make an electric heated floor in a bathhouse. This article is devoted to its study.
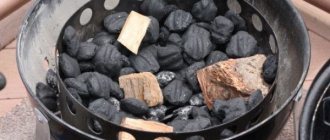
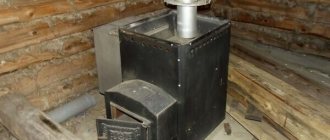
Warm floor from a stone stove
To equip the floor with heating from the stove, you will need to install a metal jacket. Its appearance can be described as follows: a central pipe is laid, and branches go from it in different directions, forming a skeleton. Each outlet is connected by pipes, forming a closed system. This structure is installed inside the furnace directly above the firebox. Water circulation can be natural or forced (a circulation pump is used).
In addition to arranging the shirt, you will need a thermal (buffer) tank. Its installation is carried out outside the furnace, and is connected to the jacket by a metal pipe. The volume of the buffer tank can be from 100 to 1 thousand liters, it is calculated based on the boiler power. If the heating circuits contain coolant with a volume of more than 100 liters, then there is an option for arrangement without a thermal tank. If you want to create natural circulation of water, then mount the buffer tank and the jacket at the same level. Circulation will be carried out due to the difference in coolant temperature.
What is the key role of the buffer capacity? Its presence helps prevent water from boiling in the system. It is for this reason that the container should not contain less than 100 liters of water. Even if the existing boiler has low power and a heat capacity of only 20 liters, then when the boiling point of water reaches 100°C, the coolant will boil in 5 minutes. For this reason, the buffer capacity is an integral part of the entire system.
To whom are floors good in Rus'?
Warm bath floors were invented a long time ago, by the ancient Greeks, and improved by the ancient Romans. However, keeping the Greek name for this invention is hypocaust.
From the point of view of convection and efficiency of the entire heating installation, the hypocaust can be called the optimal design. However, this design also has disadvantages, and significant ones.
Water floor heating
For water heated floor installations, the most suitable pipes are:
- metal-plastic;
- polyethylene;
- become.
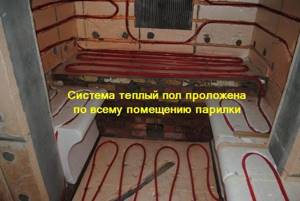
The design of any underfloor heating with water heating consists of the routing of pipes located between the base and the floor covering, according to a clearly established diagram.
In addition to water, you can also use coolants such as:
- antifreeze;
- ethylene glycol;
- other special solutions.
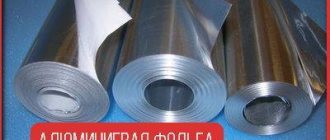
To minimize heat loss, pipes are laid on a heat-insulating material, and to improve heat transfer from the floor, aluminum foil should be placed under the pipes.
Laying pipes for such a floor is done in two ways:
- Laying pipes in meanders or “snake”. This method is relatively labor-intensive; professionals do not recommend choosing this installation method without certain skills and dexterity. The disadvantage of this method is that large temperature fluctuations occur on the floor surface. At the entrance to the room, the floor temperature is the highest, since the supply of water or other coolant is carried out on one side, and in the depths of the room the floor becomes colder, as cooled water comes out through the “return”.
- Laying pipes in a spiral or “snail”. The installation method is simpler and has the advantage that heat is distributed evenly across the floor. Over the years of using underfloor heating systems in construction, this method has proven itself to be the most efficient and most reliable.
Pipe laying can be done:
- on a wooden base;
- with concrete filling;
- using polystyrene plates with special grooves.
Advantages of wooden floors
When trying to make a warm floor in a wooden washing bath with your own hands, you need to take into account all the pros and cons of the chosen floor covering. After all, floors perform several functions at once: they are safe movement and a component of the entire water drainage system in the bathhouse. Therefore, before choosing one or another flooring option, you should carefully consider the organization of a particular building.
Two types of technologies can be used for installation: leaking and non-leaking floors made of wooden planks. The main advantages of leaky flooring are ease of installation and low cost of materials, which saves not only time, but also money. But the main disadvantage of such a floor is the loss of heat in the room. Leaking floor coverings have good ventilation properties and therefore do not retain heat well in the room.
Features of the installation of heated bath floors
Depending on the operating conditions, technical features of the bathhouse, and the structure of the foundation, options for installing a heated floor system are used.
The water floor operates on the principle of a closed pipeline loop. A liquid-type coolant circulates through it, which is driven by a special pump. The coolant can be ordinary water or antifreeze, ethylene glycol. The system demonstrates a high level of heat supply and creates comfortable conditions in the bathhouse.
An electrical type system is created using infrared mats made of film and cable floors. Each option has a number of features during commissioning and installation, which must be taken into account by the technicians during installation.
The water system requires additional installation and constant operation of the pump, the use of plastic or copper pipes, and fittings. Despite the installation costs, a water heated floor pays for itself in just a few years, which distinguishes it from its electric counterpart. Installation using infrared or cable heating is cheaper, but affects energy consumption.
Repairs with cables look similar. An infrared floor would be a practical and reliable option. Damage to one area will not affect the functioning of the equipment. The film type does not require a wide screed, which is practical in operation. Installation of heated floors for baths is carried out using special heat-insulating materials based on a cement-sand mixture and dry screed. The front side of the covering is laid on the top part. In some cases, additional waterproofing is used. A thick film of polyethylene, mineral wool, expanded clay or penofol is used.
Which system is relevant for bath rooms?
The modern market offers the consumer two models of electric heated floors:
- Infrared
- Convection
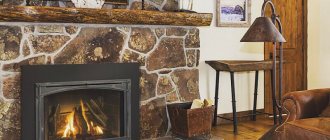
By installing an electric heated floor in your bathhouse, you can create a comfortable microclimate. But its use will lead to an increase in energy consumption. Despite this fact, heated floors have a number of advantages.
Let's watch the video on which electrical system to choose:
Convection cable – a cable located on a mesh base. Among the advantages are: the ability to adjust the temperature, installation under any coating.
Film (infrared) - consists of thin carbon strips sealed in film. It is laid in a bathhouse on a heat-reflecting material, and the system is covered with polyethylene on top.
The advantage of the model lies in the parallel connection of elements. If one segment fails, the entire system will operate in standard mode. The disadvantage of this model is its poor moisture resistance. Therefore, its use in the washing room is excluded.
Installation work
Having completed the preparatory work on the foundation, they begin laying a system of pipes through which the water coolant will move:
- As waterproofing, roofing felt material is used, which is laid in two layers. The joining areas are coated with mastic. Stripes in layers should be placed perpendicularly.
- Next is the thermal insulation material. But remember that you must maintain the slope towards the drain.
- To protect the insulation, a reinforcing mesh is laid, and heating system pipes are laid on it.
- Having made the connection and organized a performance check, they begin to pour the concrete screed (for more details: “Filling the floor in a bathhouse - how to do it yourself”). Before this, a damper tape is laid around the entire perimeter to protect the floor from thermal deformation. The screed is made of sand and cement, reinforced fiberglass is added to the solution. It is allowed to use ready-made dry mixtures.
- The poured screed is aligned with the installed beacons. It is necessary to arrange a slope towards the drainage hole.
- After waiting the time necessary for complete hardening, floor coverings can be laid on the screed.
In a word, it is quite simple to set up a floor heating system from a stove. This method will provide an opportunity to save a lot on the purchase of a separate boiler and the cost of electrical energy.
Before making a warm water floor in a bathhouse, you must:
- make sure that the mounting surface is level;
- think over the route of laying pipes;
- select pipe material.
Water often acts as a coolant, but if the bathhouse is not heated additionally, then it makes sense to use antifreeze. This will avoid freezing of the liquid inside the pipes and, accordingly, the risk of their rupture.
Corrugated bending pipe
A warm water floor in a bathhouse has the following advantages:
- environmental friendliness;
- efficiency;
- ensuring gradual natural heating;
- absence of electromagnetic radiation.
It is important to remember that making a heated water floor in a bathhouse with your own hands is quite problematic, since this is a multi-stage process that requires utmost attention. The slightest mistake can lead to incorrect operation of the system
Layers of warm water floor
In particular, the pattern according to which the pipes are laid is carefully selected:
- snail;
- snake;
- double snake.
This is appropriate if the steam room itself is a separate building.
In order to organize a heated water floor in a bathhouse from a stove, it is necessary to install a metal tank above it - it is in it that the water for the entire system will be heated.
Installation diagram for a warm water floor from a stove
There is an option to locate the container below floor level, but in both cases there is a need for a pump: it will ensure proper circulation of liquid in the pipes. Heating the floor in a bathhouse from a stove is a somewhat lengthy process, so a separate wood-burning boiler is often used. Regardless of the method of heating water, the procedure for installing the floors themselves does not change:
Leveling the surface. The base on which the pipes will run must be level. If we are talking about logs and wooden floors, then special openings for pipes are made in the necessary places. Thermal insulation. To increase the efficiency of heat transfer, a layer of thermal insulation material is placed under the system. Installing the mounting surface. Most often, this role is played by a special heat-insulating mat with bosses, between which a flexible pipe is laid. However, fastening can be achieved using other suitable means. Laying the pipe
It is important to take into account that there should be no sharp turns in the turns. Connecting and checking the system. At this stage it is checked whether there are leaks. Screed and laying flooring.
An example of connecting a water floor to a heating circuit
If the stove power is not enough, it is recommended to weld the battery tank
Laying contours in a bathhouse is no different from similar work in any other room.
Installation of a sand cushion on the ground
I would like to make a reservation right away that I made the floors directly on top of the ground - inside the strip foundation. In principle, for baths most often they make strip or columnar foundations, where the floor is initially a ground covering.
So, first we remove the fertile layer of soil, preferably down to the clay, that is, 15-20 cm. Pour sand into the resulting hole and lay a drain pipe. Make sure that the drain pipe has a water seal, otherwise there will still be odors in the sink! Also, be sure to provide a plug with which you could close the pipe outlet in winter.
The sand cushion should be spilled with water and compacted thoroughly.
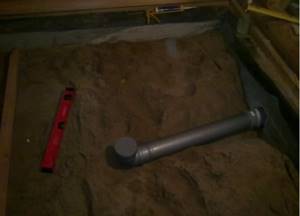
The drain pipe is laid in a sand bed
Comparison
For comparison, only the heating cable and amorphous tape remained.
| Heating cable | Amorphous tape | |
| Working temperature | 50–80˚C | 38˚C |
| Increasing floor height | Minimum 4 cm (1 cm cable 3 cm tie) | 0.2 cm (thickness of mat with amorphous tape) |
| Actual heating area, relative to the floor | 1–3% | 20–30% |
| Zebra effect | Present | Absent |
| Heating rate/thermal inertia | Medium/high. To reach the operating mode, you need to heat the screed layer. | High/absent. |
| Energy consumption (all other conditions being equal for power and operation) | High | Low. Compared to the energy consumption of the cable system, it is 40–50% lower. |
Regarding uneven heating, it should be explained separately. In the cross-sectional image of an electric heated floor, it is clearly visible that the amorphous tape heats up at a lower temperature of the working element, but at the same time the area is much larger than that of the cable.
This figure schematically shows the principle of formation of the “Zebra” effect. The fact is that the minimum distance between the turns of the cable is 8 cm. And to the floor surface is at least 4.5 cm (3 cm minimum screed thickness 1 cm tile thickness 0.5 cm thickness of the adhesive composition).
The temperature sensor is located between the turns of the cable, at an equal distance, that is, approximately 4 cm.
At a superficial glance, the heating rate should be the same. But according to the Debye model (1912), during heat transfer, the phonon energy is weakened when moving from one medium to another. And in this case, there is a transition of thermal phonons from the screed to the glue, then to the floor covering.
If you increase the thickness of the screed so that the heating is uniform, this will increase the energy consumption and inertia of the structure.
From all the above factors, it follows that the use of amorphous heating tape when organizing an electric heated floor in a bathhouse is the only investment option to achieve the optimal balance between price, efficiency and reliability.
How to make a frame
Floors in a washing room in a wooden bath can have three types of frames. The first is designed to create a space between the floor and the raised floor, which is filled with insulation. This is a lattice made of standard section logs.
The second version of the frame provides rigidity to the wooden flooring if it has a permanent structure. Finally, the third option is to support a thin reinforced concrete drainage screed.
In a wooden bathhouse on a screw pile foundation, you can get a floor with drainage by pouring concrete onto a wooden frame, but there is another option.
Information. The construction of a foundation for a furnace necessarily requires the use of concrete. At the same time, a screed for the sink is cast in the wooden structure. It should not be made very thick. Mesh is used for reinforcement.
The frame is assembled from beams of the same section. Antiseptic treatment is required even if the frame is located under a drainage screed and under a layer of waterproofing. It will ensure a long service life of the entire structure.
More about water systems
Discarding the classic scheme of a hypocaust with a stove in the basement, we can say that there are two main types of heated floors - water and electric.
Water floors
The coolant of a water heated floor is most often water. Sometimes antifreeze or ethylene glycol is used. In any case, such a floor requires an autonomous heating boiler.
In this case, the boiler is needed directly in the bathhouse. The idea of diverting a main from the main cottage heater is usually a bad idea and not cost effective. The system should not be allowed to freeze in winter. To adjust the entire underfloor heating system, you will have to install a manifold box - so the system turns out to be very cumbersome.
Some craftsmen recommend powering the water floor system from a sauna stove. This cannot be done. Let me explain why.
- Firstly, you should not take away the heat needed to heat the heater.
- Secondly, stoves are heated irregularly, and the water circuit just needs a clear periodicity - freezing is destructive for it. So the water floor must have its own separate boiler.
Electric floor
Electric underfloor heating systems are simple. Rolled mats are easy to repair and simple to install. However, they are completely unsuitable for washing and steam rooms.
Even with all precautions
More precisely, at the time of using the steam room, these systems must be de-energized for safety reasons. And, taking into account the human factor, it is easier not to place them in wet rooms at all.
A significant disadvantage of electric floors is the high cost of operating costs and the need for increased electrical power. But they are very light and are not afraid of frost. It is worth mentioning the ease of adjustment and changing the heating mode.
Water systems are laid in a snail or wave pattern. The first method is more difficult, but gives more uniform heating.
The installation of warm water floor heating in a bathhouse is not only expedient, but also a necessary solution. Unlike
, using a water heating system is completely safe.
It is possible to lay the contour under the tile and get a warm base without additional energy costs. The coolant will be heated from a boiler, steel or brick stove.
What are the benefits of this solution?
- The circuit is mounted inside the screed and does not reduce the usable area.
- High heat transfer with relatively low energy consumption.
- Uniform heating of the room, absence of cold zones.
- Possibility of heating several rooms at once from one boiler or stove.
- Possibility to turn off the heating system in the summer.
Another undoubted advantage is the ability to install warm water floor heating systems in a bathhouse with your own hands. Although the installation process is labor-intensive, the resulting result will fully meet all expectations.
Pipes for the circuit are selected 24 mm in diameter to reduce the risk of water freezing due to infrequent use of the room
The source of heat in the bathhouse is a brick or metal stove. Its task is to heat the room and heat a certain volume of water. In such a device, there is basically no heat exchanger. To connect a heated floor system to the stove, both structures are modified.
- A heat exchanger is equipped - a stainless steel tank or a register made of pipes. The heat exchanger is placed above the firebox. A pipeline is pulled from it down to the floor and into other heated rooms.
- The pipes serving the heat exchange tank need non-standard ones - 24 mm in diameter, not 16 mm.
- The system is equipped with a pump, since otherwise it is impossible to ensure the return of the cooled liquid to the heat exchanger.
- There is no way to regulate the degree of heating. The sauna stove gets very hot and supplies almost boiling water to the system. This is unacceptable. The device is equipped with a special unit for mixing water from the furnace and return water.
- Since the dimensions of the sauna stove are small, a small heat exchanger is installed here. To compensate for insufficient power, a battery tank is installed near the furnace and connected to a heat exchanger.
How to do it correctly in a steam room
The choice of how to make a floor in a steam room is made according to the allocated construction budget and the necessary characteristics of the finished coating.
In a paired compartment, made separately from the washing area, wooden floors are optimal.
Wood, when heated even to 90 C, does not release any harmful compounds into the air.
In addition, the floor in a steam room made of wood contains resinous compounds that give the air a pleasant aroma.
All coniferous species are suitable: pine, spruce, larch or the most elite option - cedar.
In some cases, the smell of resinous wood may be undesirable. For this option, there are practical floors for a steam room in a bathhouse made of aspen or linden. The mechanical strength of these rocks is low, but they have a beautiful appearance (uniform light surface). They are also completely odor neutral. Aspen and linden are often used in elite baths.
Information. The floor in the steam room is made of edged or tongue and groove boards. The dimensions of the paired compartment are small. Lumber is purchased in multiples of 2 floorboard lengths.
Bathroom flooring options
Since ancient times in Rus', baths were built very quickly and did not require any special expenses. Logs were brought, laid out on the ground, and construction of the log house began. To construct the leaking floor, the same logs, split in half, were used. Baths were built without a foundation; they began to be used already in the 18th century.
A bathhouse built on a foundation turned out to be more durable, since the lower tier of logs, which were laid directly on the ground, did not rot. It has also become possible to install a warm floor rather than a cold one. But from constant exposure to dampness and moisture, the wooden floor quickly became unusable, and the flooring needed replacement or repair again and again.
Then, as an alternative, a concrete floor began to be used, requiring the installation of a drainage system. If in a bathhouse with a floor made of split logs or boards the water simply went through the floorboards into the ground, then a whole drainage system was already needed here. The concrete floor was made with a slight slope to allow water to flow to a certain place, from which the water flowed through a trench into a drainage well and was sent further to the sewer system or drainage pit. The concrete floor in a Russian bathhouse was very rarely covered with boards or mats to create more comfortable conditions. The concrete floor turned out to be quite durable. It is not afraid of dampness and moisture, lasts longer and does not require constant maintenance. You can learn about the secrets of insulating the floor in a wooden house.
Installing a heated floor system in a bathhouse has become the most optimal option.
It can be done:
- with electric heating;
- with water heating.
Pipes are installed in the floor through which the coolant fluid circulates. The principle is similar to a steam heating system, however, before installing such a floor, you should familiarize yourself with its varieties and installation features in more detail.
There are two main types of heated floors used in baths:
- Water floor. Warm floors of this type are a modern alternative to traditional radiators.
- Electric floor heating
According to the principle of heating, an electric floor can be:
- convection;
- infrared.
By execution:
- film;
- cable;
- pivotal.
In order to properly install a heated floor with your own hands in a bathhouse or other room, you should choose the best option for your structure. A more detailed consideration of the types of heated floors will help you make the right choice. You can familiarize yourself with the material - warm water floor.
Infrared floor: what you need to know about it
The easiest way to make a warm bath floor yourself is when it comes to infrared floors. Initially, this type was developed so that it could be easily installed in any conditions. This kind of floor is also called film: inside the transparent material there are special heat-conducting inserts.
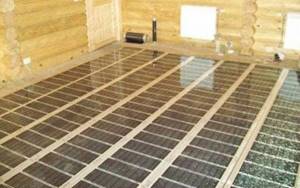
Installation stage of infrared floor
The advantages of such a system include:
- affordable price;
- simple installation;
- precise temperature control;
- If one plate fails, the others will continue to work.
Installing heated floors in a bathhouse with your own hands must begin with thermal insulation. In principle, this type of heated floors can be laid on any surface, since there are no requirements in this regard.
The rolls are rolled out over the entire area of the room, after which they are connected to the thermostat and to the general power supply.
You can make heated floors in a bathhouse within a day, which is also a nice feature of this electric heating system.
The floor covering is placed directly on top of the film. Installing a heated floor in a bathhouse under tiles or wood is equally possible, although tiles are preferable - they conduct heat better.
Installation of a water floor from a sauna stove
Heating circuits through which the heated working environment moves.
A mixer (collector) in which the liquid is separated along circuits. In it, water heated from the stove is mixed with cooler water. The thing is that the stove is not able to heat water to a certain temperature. Often the temperature of the working medium does not allow it to be placed in the heating circuit and therefore it has to be mixed with cold water.
Heat exchange block. It transfers heat from the stove to the coolant. The module designs are described below.
Plastic or metal pipes are used to arrange the heating system. Only, you must remember that when laying them you need to use a single piece of pipe. When laying the heating element, it is prohibited to use fittings or other forms of connection. Such joints increase the likelihood of a leak, which will require opening the floor covering and screed to eliminate.
A concrete slab should be located at the base of the pipelines through which coolant is supplied from the sauna stove. To reduce thermal energy losses, a layer of insulation is required between the pipes and the concrete base. For this purpose, it is permissible to use foamed polyethylene with a foil surface. You can use polystyrene foam, penoizol or mineral wool.
Initially, water heated floors were not intended for installation in a bathhouse. Therefore, when laying such a “pie” in a bathhouse, it is required to equip it with additional elements.
The installation of a water heated floor from a sauna stove includes several components:
The heated floor contour is the main working element, which is laid evenly across the entire floor of the room with a certain pitch, filled with a concrete-cement mixture screed. You should choose the right pipe model; in this situation, not every one will be suitable. It is best to use copper, metal-plastic or stainless steel corrugations. However, many people prefer cross-linked polyethylene pipes with increased heat resistance, with a service life of at least 30 years, or polypropylene pipes, with a warranty period of at least 50 years.
The mixing unit is an important part of the system, since the stove is not capable of heating the coolant to the required level. It heats the water almost to the boiling stage; in this state it cannot be supplied to the circuit. Therefore, a mixing unit is needed, in which boiling water will be mixed with the waste coolant to the required 40 degrees, and in this form it will be sent into the pipeline. It is used to regulate, configure and automatically maintain the temperature level of the heated floor in the desired mode.
Heat exchanger - a container, coil or register located above the firebox, where the liquid from the furnace is heated. When using antifreeze as a coolant, you will need to equip a separate heat exchanger, then the antifreeze will not be able to get into the washing water.
A circulation pump is necessary to ensure that the coolant is evenly distributed and moves through the pipeline. Without it, a warm water floor cannot function, as it provides the circuit with additional pressure for fluid circulation. When selecting the pump power yourself, you need to take into account the area of the heated room; the larger it is, the higher its performance should be.
To reduce the load on the pump, it is recommended to divide the pipeline into several parts of equal length.
Drainage is necessary to remove excess liquid from the steam room and washing room of the bathhouse. You can equip it with your own hands, taking into account the following two points: by constructing a water outlet - a drainage hole, through which the water will flow into the pipe and be discharged into the sewer pit; fill the screed with a slope in the direction of the drain hole - then all the water will flow towards the slope.
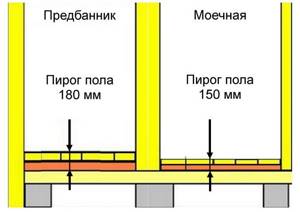
If we consider the installation of a warm water floor in a bathhouse from a stove in the form of a “pie,” then it consists of:
- subfloor - concrete or wood;
- waterproofing layer - it prevents the formation of condensation;
- insulation - reduces heat loss;
- reinforcing mesh - protects insulation;
- foil reflector - directs heat in the desired direction;
- heating element - pipes laid in a spiral;
- concrete screed - having a slope in the direction of drainage;
- finishing coating.
When laying a heated floor on the ground yourself, you need to equip a sand cushion, fill it with expanded clay on top, and spread a waterproofing layer on it.
In addition, additional installation of a mixing unit, heat exchanger and pump will be required.
Materials for floor insulation
The following types are suitable:
- Basalt, glass wool. Both varieties have a high level of heat conservation. But laying such material requires high-quality waterproofing. Otherwise, wet cotton wool loses its properties. It is better to use for ceiling insulation than for floors.
- Polystyrene. An excellent option for arranging the flooring of bath rooms. Has low weight. It's inexpensive. Waterproof. Installation is quick and easy. Installed with vapor barrier polyethylene. Suitable for plank and concrete bases.
- Expanded clay. Small light pebbles made of foamed slag and clay. The structure is porous. It is actively used for thermal insulation of floors in residential premises. It is poured dry onto the subfloor or mixed with cement mortar.
- Penoizol. Foam insulation. Reminds me of polyurethane foam. They fill any gaps, cracks in the foundation or basement. Serves as a good sealant. Does not create a load on the floors. Suitable for insulating wooden floors.
For insulation, craftsmen use cement mortar with the addition of perlite (layer up to 10 cm), slag (up to 30 cm), foam concrete (up to 25 cm).