What types of thermostats are there for autonomous heaters?
It is customary to distinguish two main types of thermostats:
- mechanical devices;
- electronic (programmable) devices.
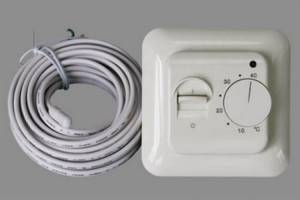
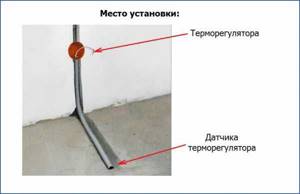
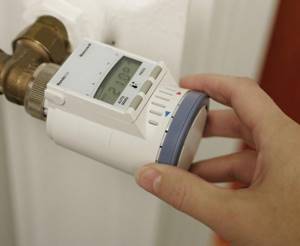
Mechanical thermostats are characterized by their simple design. They are not connected to a stationary power supply; the temperature level is controlled by a special membrane that is sensitive to heating and cooling. When a certain temperature is reached, the membrane disconnects the network and the heater turns off. The sensitivity of such a device is half a degree, the temperature range is from +5 0 C to +30 2 C. Mechanical thermostats are mounted on the wall. Mortise or overhead installation allows them to be used with any type of wiring.
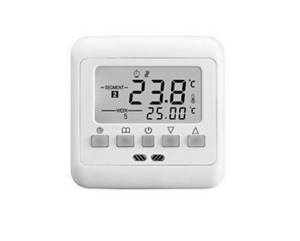
Electronic thermostats are equipped with a display that displays processes in the heating system. They can be equipped with two sensors that monitor the temperature of the air and heated floors. Electronic devices are more precise than mechanical devices, the adjustment range is from +5 0 C to +45 0 C. More expensive programmed models can be built into the Smart Home system and allow you to regulate the air temperature over a certain period of time. Thermostats are universal devices; if necessary, they can serve electric heated floors.
Features of connecting thermostats to heaters
The heater is installed like all electrical appliances; it is powered through an outlet or a separate line. The thermostat is mounted between the electrical panel and the heating device. The thermostat has 4 contacts, two for input and two for output. The machine from the electrical panel is connected to the input terminals, and the heating equipment is connected to the output terminals in accordance with the polarity. According to this principle, one thermostat is installed for one heating device. In the case when it is necessary to connect a pair of heaters in series, a pair of wires goes from the thermostat to one, and then to the other heating device. With the parallel type of connection, 4 wires are removed from the regulator per phase and neutral and directed to the heaters. Electrical cables are not included with the thermostats and must be purchased separately. For correct operation of the devices, thermostats should not be mounted in drafts, in direct sunlight, or on the outside of the wall.
How to connect a thermostat to an infrared heater
Using a thermostat is very convenient; you just need to determine how to properly connect the thermostat to an infrared heater in order to get the maximum effect from using this device.
Necessary materials
Preparing to install the thermostat will not take much time, nor will the installation itself. Even if you have no experience connecting thermostats, you can easily do all the work yourself.
But if you do not have experience working with electrical equipment and even installing a socket is difficult, and you are not familiar with the operating principle of an indicator screwdriver, you should not try to figure out how to connect a mechanical or electronic thermostat. In such cases, it is safer to entrust this work to a professional.
For those who are well versed in electricity and know for sure that before work they should turn off the power to devices and equipment, it is necessary to prepare the following set of tools:
- Drill or screwdriver. They are only needed to drill a hole in the wall to mount the thermostat.
- Pliers for working with electrical cables.
- Indicator screwdriver or tester.
- Pencil, tape measure. They will help determine and mark the place where the temperature regulator will be located.
Also for work you will need an electrical cable that will connect the thermostat and the infrared heating device, a collapsible socket and hardware for attaching the regulator and fixing the cable. When the materials and tools are prepared, you can begin marking and installation.
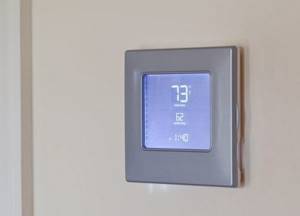
Electronic thermostat that controls the operation of the IR heater
Connection diagram
The connection diagram of the thermostat to the infrared household heater is selected depending on the device used, the experience and knowledge of the electrical installation specialist.
Standard
In the standard scheme, the thermostat is installed in a ready-made network between the heater itself and the circuit breaker on the panel. The starting point of the network will be the machine. Two wires come from it - phase and zero, which are connected to the corresponding contacts of the thermostat. There are also two wires coming from the thermostat, which are connected to the heating device.
This scheme is also convenient if two or three heaters need to be connected to one thermostat. Located in different rooms, they ensure the same temperature throughout the apartment. For their effective operation, the connection is made as follows:
- Two wires lead from the machine to the thermostat: phase and zero.
- Two wires come from the machine for each heating device.
- Infrared heaters do not connect to each other.
Parallel connection will allow you to safely control several devices at once, without purchasing additional controllers for each of them.
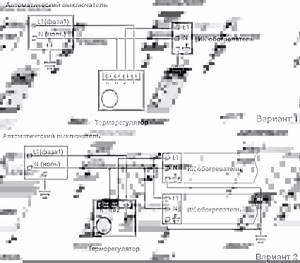
Options for connecting infrared heaters via a thermostat
Important: Multiple heaters can be connected in series. But it is considered less convenient, so it is used extremely rarely.
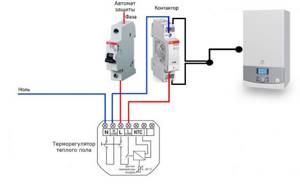
Using a magnetic starter
This scheme is a little more complicated and will take a little longer. But thanks to the use of additional equipment in the form of a magnetic starter, it is possible to connect several heaters to one thermostat at once, including equipment with higher power and industrial systems.
Devices are connected in the following sequence:
- A thermostat is connected to the machine using a cable (phase and neutral).
- The thermostat is connected to the magnetic starter through the output terminals.
- The magnetic starter is connected to heating devices.
In this case, the circuit for connecting the magnetic starter is calculated individually. This will ensure the devices operate safely and efficiently.
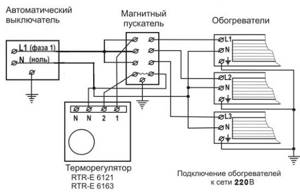
Using a magnetic starter
Installation and connection of the thermostat
The thermostat is usually mounted into the wall, like a regular switch. A place is selected for it near the existing electrical wiring, for example, near an outlet. First, a recess is made in the wall, a thermostat mounting box is installed there, and the wires (phase and neutral) of the power supply and temperature sensor are connected to it. The next step is connecting the thermostat.
There are “sockets” located on the side of the thermostat. The wires of the network (220V), sensor and heating cable are supplied here.
General thermostat connection diagram
It is useful to know that the wires that are connected when installing the thermostat are color coded:
- white (black, brown) wire – L phase;
- blue wire – N zero;
- yellow-green wire - ground.
Connecting the heated floor to electricity is carried out in the following order:
- Network wires with a voltage of 220V are connected to “sockets” 1 and 2. Polarity is strictly observed: wire L (phase) is connected to contact 1, wire N (zero) is connected to contact 2.
- A heated floor heating cable is connected to contacts 3 and 4 according to the principle: 3 contact - wire N (zero), 4 contact - wire L (phase).
- The wires of the temperature sensor (usually built into the floor, that is, determining the temperature in the thickness of the floor) are connected to “sockets” 6 and 7. Polarity principles do not need to be observed here.
- Check the functionality of the thermostat. To do this, turn on the -220V power supply, set the minimum temperature on the device and turn on the heating element system (by turning the knob or pressing the button). After this, the heating mode is changed to maximum, that is, the thermostat is “programmed” to the highest temperature that is possible for it. The correct operation of the device will be indicated by a click, which will indicate that the heating circuit is closed.
Connection diagrams may vary slightly depending on the types and models of thermostats. Therefore, so that the user does not make a mistake, all contacts are usually marked on the device body.
When connecting the thermostat, follow the connection diagram shown on the device body
Small differences in connection are also dictated by the characteristics of underfloor heating cables. According to their structure and number of cores, they are divided into single-core and double-core. Accordingly, there are some nuances in their connection diagrams.
Connecting a two-core cable to the thermostat
A two-core heating cable has two current-carrying conductors under a protective sheath. This type of cable is more convenient than a single-core design, since it is connected to the thermostat only from one end. Let's look at a typical connection diagram:
Connection diagram of a two-core cable to a thermostat
We see that in one two-core cable there are 3 wires adjacent: 2 of them are current-carrying (brown and blue), 1 is grounding (yellow-green). The brown wire (phase) is connected to pin 3, the blue wire (zero) is connected to pin 4, and the green wire (ground) is connected to pin 5.
The thermostat kit, the circuit of which we just looked at, does not include a grounding terminal. If there is a grounding terminal, installation is much simpler.
Two light green wires are connected to the ground loop through the PE terminal
Connecting a single-core cable
A single-core cable has only one current-carrying conductor, usually white. The second wire - green - is the grounding of the PE screen. The connection diagram could be like this:
Connection diagram of a single-core cable to a thermostat
White wires (both ends of a single-core cable) are connected to thermostat contacts 3 and 4, and a green ground wire is connected to contact 5.
Connecting a heated floor thermostat to a gas boiler
Consumers often wonder whether it is possible to use a standard 220V thermostat for underfloor heating to work with a gas boiler?

What if you haven’t found a special thermostat with dry contacts, but you already have a model for heated floors in stock. Such a connection is possible.
However, for this you will need to “untie” the 220V voltage. In most underfloor heating thermostats, it comes to the power terminals and is then removed from the terminals going to the heating cable. And as mentioned above, when working with a gas boiler, “dry contacts” are used, through which low voltage pulses are transmitted.
If you directly connect the cable from the boiler control board here, you will cause a short circuit and damage your boiler.
For a safe connection, you will have to add an intermediate relay or an additional contactor with normally open contacts to the circuit.
From the thermostat terminals, instead of the underfloor heating cable, you supply 220V voltage to the relay coil (contactor), and through its normally open contacts (1-2 or 3-4), connect the wires to the gas boiler.
The principle of operation here is the same as discussed earlier. However, keep in mind the following feature.
Since this is a thermostat for heated floors, most likely it will work according to the scheme: air sensor + floor sensor. This means that it will require you to install and set a temperature limit using a floor sensor, which you will not have.
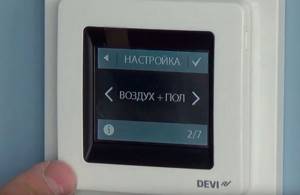
Therefore, in the settings you will have to unplug the floor sensor and leave only the air sensor in operation. How to do this, read in detail in the instructions for your model. There may be differences between different devices.
For example, with the Devi Touch, for this you have to break a special jumper on the back side.
In order to avoid all these difficulties and problems, it is better to initially choose the right thermostat model.
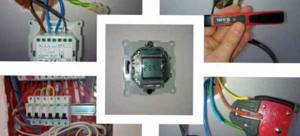
Preparatory work
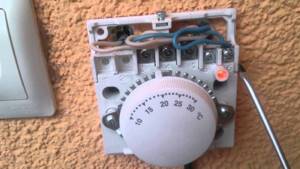
Before connecting the temperature controller, be sure to pay attention to the instructions that come with it. Particularly noteworthy is the point that specifically refers to the installation of the sensor and the procedure for carrying out this work, because these processes differ for different manufacturers
First, you need to remove the front panel and carefully disassemble the control mechanism; on simple models it is in the form of a wheel. To remove it using a screwdriver, you need to pry off the element, and then unscrew the screw that secures the front panel to the mechanism itself. Other models have special plastic latches that hold the front panel in place. To remove it, just press the latches with a screwdriver and it will snap off.
However, if you cannot remove the panel, you should not remove it using mechanical force. After all, in this way you can easily break the latches, and to solve such a problem you will just have to buy a new regulator. To avoid this problem, you just need to carefully study the instructions and try to remove the panel again, but in the correct sequence.
The next step is to purchase devices for installing a heated floor thermostat. The first thing you need to have is a corrugated pipe. Usually it comes complete with a sensor, but if the manufacturer does not provide such a kit, then it must be purchased separately. The ideal corrugation diameter is 16mm. In order to determine the required length of the corrugation, you should determine at what height the temperature regulator will be installed, and at what distance from the wall the temperature sensor will be located. Next, from the indicated height, using a tape measure, you need to measure the length to the sensor, which will be in the floor.
You will also need the following accessories:
- mounting screws;
- screwdriver;
- mounting box (socket box);
- indicator screwdriver, which can be used to determine the presence of voltage in the network;
- level.
Connecting an infrared heater in stages
Initially, you need to choose the place where the infrared heater will be installed. It can be installed on:
- Wall.
- Semi.
- The ceiling.
Here everything depends only on the preferences of the owners, but please note that it is better to install it in an open place where nothing will interfere with heating
How to connect an infrared heater
- When you have chosen a place, you need to make calculations and mark where the fasteners will be installed. We recommend using “Level”, it allows you to set everything up easily.
- Next, we make all the holes; if the wall is wooden, you can use a drill; if it’s concrete, you can use a hammer drill.
- We insert our structure, drive in the dowels and screw in the brackets.
- We install the heater in its rightful place.
Now that the first stage is behind us, now we move on to a more complex one.
Manufacturers and popular models: ranking of the best and prices
The rating of the best models, mechanical and electronic, will help you not make a mistake in choosing a thermostat. A user who is familiar with the features of their operation will be able to buy the most convenient thermostat for their heater.
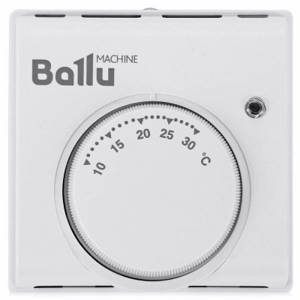
thermostat Ballu BMT-1
A mechanical thermostat designed specifically to work in conjunction with IR heaters of this brand. The range of adjustable temperatures is from +10°C to +30°C. Compatible with single-phase heaters up to 2 kW. The thermostat housing is made of impact-resistant white plastic. On the front panel there is an LED indicator of the device operation.
Characteristics:
- dimensions - 83x83x38 mm;
- weight - 165 g.
Cost 615 rub.
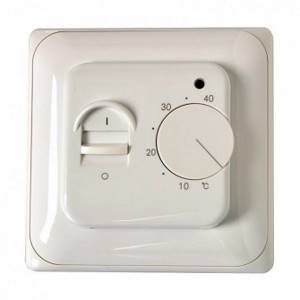
Mechanical temperature controller Neoclima RQ-1
Surface-mounted mechanical thermostat with white plastic housing. Recommended for connection to PPI and thermal curtains. The range of adjustable temperatures is from +5°C to +30°C. Widely used for temperature control in heating and air conditioning systems. Has a high degree of moisture and electrical protection. Weight - 100 g.
Cost 715 rub.
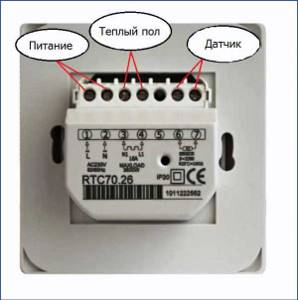
EASTEC RTC 70.26
Electromechanical thermostat, one of the most popular for temperature control in heating systems and “warm floors”. Equipped with a remote sensor that measures the temperature and transmits a signal to the control unit. This, in turn, transmits a signal to the heater automation, which controls the operation of the heating element. It is easy to install and operate. The front panel contains an operation indicator and a temperature control knob.
Characteristics:
- dimensions - 85x85x5 mm;
- power of connected devices - 3500 W;
- weight - 215 g.
Cost 700 rub.
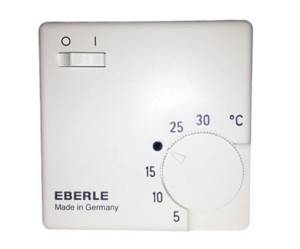
Surface mounted thermostat EBERLE RTR-E 6121
An electromechanical overhead thermostat with manual control allows you to set the desired temperature in the range of +5-30°C. You can connect several heaters to the device, the total power of which does not exceed 3.5 W. The thermostat is installed in rooms where the air humidity is no more than 95%. The formation of condensation on the housing is unacceptable. A bimetallic plate acts as a heat-sensitive element. The maximum power of connected devices is 3.5 kW.
Characteristics:
- dimensions - 75x75x2.5 mm;
- weight - 100 g.
Cost 1200 rub.
BiLux T08
Programmable thermostat with touch display and backlit screen. It has a high moisture protection class, which allows operation in conditions of high humidity. Two control modes: manual and programmable
The thermostat attracts attention with its modern stylish design, is equipped with a temperature sensor with a connecting wire 3 m long. It has the function of storing a given program, and after an emergency shutdown it starts working in the same mode
Regulates temperature in the range of +5-30°C.
Characteristics:
- dimensions - 100x100x60 mm;
- weight - 220 g.
Cost 2990 rub.
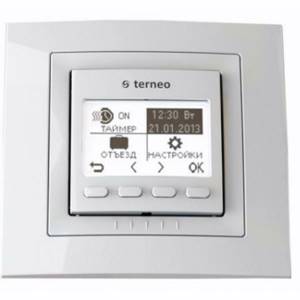
Programmable thermostat Terneo PRO
Programmable electronic thermostat with touch screen. Data about the operation of the device is stored in the cloud, which allows you to view it from a smartphone or tablet. The manufacturer has developed appropriate applications for this purpose. The device has the function of weekly programming of the operation of equipment connected via a thermostat. You can set 16 heating modes for every day. The thermostat is equipped with a remote temperature sensor with a network cable.
Characteristics:
- dimensions - 100x100x100 mm;
- weight - 500 g.
Cost 3470 rub.
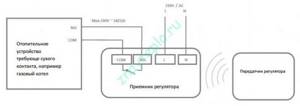
Connection diagram for electronic thermostats.
An electronic thermostat has an electronic circuit inside instead of a bimetallic plate. This electronic circuit requires a supply voltage. It can be equal to 220 or 24 volts and is supplied through a wire.
Here the control signal is the potential (voltage), which is supplied to the terminal box of the boiler or special hub. To make it clearer, look at the picture below:
From the picture you can see that there are not 2, but 3 wires going to the electronic thermostat:
- L—supply voltage.
- N - neutral wire.
- I is the output signal.
The unconnected port is used to enable the “night” operating mode, in which the room temperature is reduced by 4 degrees without adjusting the thermostats.
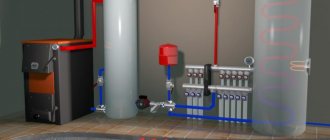
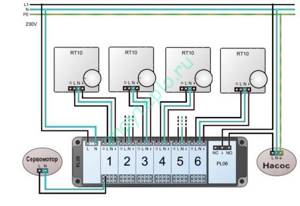
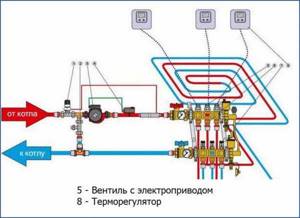
Electronic thermostats are used to organize complex climate control systems in the home; such systems are popularly called “Smart Home”. They can be used to control pumps and valve actuators in heating systems. You can see how this looks in the figure above.
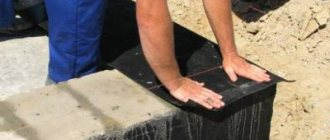
Support pillars
Massive fences are installed on a foundation, but for wooden pallets ordinary posts will be sufficient. They must be leveled strictly so that there are no distortions, otherwise the fence will collapse. The part that is in the ground is wrapped in roofing felt or painted with bitumen mastic.
For installation, holes are dug, the distance between which is equal to the length of one section.
Support posts can be installed in several ways:
- just drive it into the ground;
- fill and compact with crushed stone;
- partially or completely concreted.
The last option is the most reliable. If, according to the plan, a fence made of wooden pallets looks like a picket fence, then the posts are driven into a previously prepared hole. The immersion depth is about 50 cm, and the width of the hole should be greater than the corresponding size of the post. On clayey and loamy heavy soil, it is better to cover the supports with crushed stone and compact them.
If partial concreting is planned, then you need to dig a hole, install a pillar in the center, sprinkle it with crushed stone, and pour cement mortar on top. To prepare the solution, take three buckets of sand per bucket of cement and dilute with water. After pouring concrete, check once again that the installation is vertical and level, and allow at least 3 days to harden.
Metal pipes, fittings, and protruding parts of various buildings can act as supports. To secure the wooden elements in this case, you can weld brackets to the metal parts or drill holes for bolts.
Advantages and disadvantages
Like any other device, a floor heating thermostat has a number of advantages and disadvantages.
Among the main advantages of the device are:
- Ease of control.
- Affordable pricing policy.
- Saving energy costs.
- Ergonomic qualities of the device.
- Ease of installation.
- The ability to automatically configure the system for turning the heated floor on and off.
- The ability to regulate the temperature.
- High quality equipment.
- Reliability of the regulator.
- Installed functional memory, which ensures that the settings are saved in cases of power failure.
The device has practically no disadvantages. The main disadvantage is the complexity of functional programming of the settings system. However, having figured it out once during installation, there will be no further difficulties.
Each type of floor has its own type of thermostat.
Connecting a thermostat to a heated floor
Before answering the question of how to connect a heated floor to a thermostat, you need to study what a regulator is and how it is connected to the circuit.
The main task of this device is to regulate the temperature in the room. The heating elements are also connected to the power supply through the thermostat.
The thermostat, which monitors the air temperature in the room, is mounted on the wall at a distance of at least one meter from the floor level.
There are two main ways to connect a thermostat. This is a connection to a separate power line from the distribution panel or a connection to an existing outlet.
The delivery package always includes a diagram for connecting heated floors, which means this procedure can be performed without outside help.
After installing the thermostat, we drill two channels. The power wires will be laid in one, and the control wires of the sensor, which will be placed directly in the thickness of the screed, will be laid in the second. Upon completion of the main operations described above, you can install and connect the heated floors in the room to the configured and installed sensor.
The market offers a wide selection of regulators, ranging from the most primitive mechanical systems to a regulator with intelligent control (set it once and then use it constantly without intervention). How to connect a heated floor to a thermostat is not a difficult task.
Thermostat connection diagram - ElectrikTop.ru
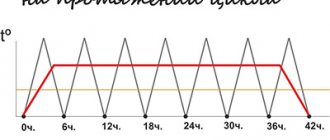
Any physical body has the property of thermal inertia. It manifests itself in the fact that both heating and cooling do not occur instantly. The speed of this process depends on many factors - both on the physical properties of the material and on its shape or size. Many people probably know how much faster tea cools in a saucer than in a cup.
The same rule fully applies to house construction. In frame houses, heat does not last long: as soon as its source cools down, in an hour or two the temperature in the rooms can become equal to the outside one. And in buildings made of timber, logs, aerated concrete or brick, the time period from comfort to complete freezing can last up to a day and a half.
Using this interval allows you to significantly save on heating, since you can reduce the power of, for example, electric heaters. Or turn them off completely. But to control it, you need to use additional devices. They are called thermostats.
Types of thermostats
Thermostats, also called thermostats or thermostats, come in several types. They differ in the following ways:
- Method of measurement.
- Location of the sensitive element.
- Control method.
Measuring method
It can be electromechanical and electronic. In the first case, two properties of metals are used:
- Elasticity, when under the influence of an external force they change their shape and return to their original position after the cessation of its action. It is used, for example, in capillary temperature sensors of air conditioners - when heated, the liquid expands, presses on the membrane, which bends and opens the electrical contacts;
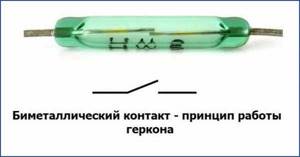
- Shape memory. If two plates of dissimilar metals (copper and aluminum) are mechanically connected, then when heated they deform, and when cooled they return to their previous position. These are so-called bimetallic contacts.
In the second case, the property of metals to change electrical resistance when heated and cooled is used. Or the so-called thermoelectric effect (thermocouple), when current begins to flow through two conductors connected in a ring with different conductivities if their ends are heated to different temperatures.
Location of the sensing element
It can be located either directly on the heat source or outside it.
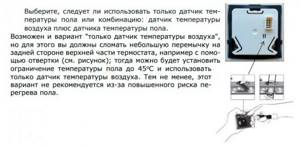
In the first case, the entire control unit is attached, for example, to the body of an electric convector. It reacts to the amount of heat emitted by the device. This is the simplest solution, but it is ineffective because it is not related to the actual temperature in the room. In the second case, the sensor is installed on any of the structures. For example, on the wall, at a distance of 1-1.5 meters from the floor. Moreover, it can be either combined with the control unit or installed separately, but maintaining a galvanic connection with it.
For example, if you are installing a control system for an electric heated floor, you can install a thermostat with a sensor in its housing somewhere on the wall. But if water heating is used, then the sensitive element is mounted next to the pipes, in the floor mass.
This is done for the reason that the coolant cannot cool below a certain limit - the entire system may freeze and fail. A sensor on the wall will probably miss such a moment. The connection diagram for a heated floor thermostat with a steam heating system is shown in the figure below.
It is also worth taking out the meter if the atmosphere in the room is too humid (steam room in a bathhouse). In this case, it is necessary to exclude any possibility of electrical breakdown through the human body. And this will happen if you touch the control unit with wet hands.
Control method
It can be of two types:
- Mechanical, when the physical characteristics of the opening contacts change. For example, their length.
- Electronic. In this case, the magnitude of the control signal to which the opening relay reacts is adjusted. It is precisely this element that is a sign of electronic control, and not the presence of a mechanical vernier on the block body. This wheel can be used to rotate the potentiometer shaft.
The advantage of the first is simplicity. However, it has a huge error. Therefore, if you use a heater for special purposes - creating a favorable microclimate for animals and plants, use exclusively electronic models. This method allows you to include many additional elements in the circuit that increase the comfort of use.
For example, a liquid crystal display that displays the temperature. Or a remote switching device: you go to the dacha, connect via GPRS to the heating system and upon arrival enter a warm house.
Connecting thermostats
Before considering the connection diagram for the same infrared heater paired with a thermostat, you should understand that it consists of two circuits: power and signal. You will not deal with the latter until you want to repair or improve the device - if you do not have special knowledge, it is better not to try.
The basis of the power circuit is an electromechanical relay or semiconductor switch - a thyristor. It is switched so that it is connected in series with the power line (phase). The diagram for connecting the thermostat to the heater is shown in the figure below.
In order to get to the terminals of the device, depending on the model, you will either have to open a separate cover on the case, or separate it from the base. The markings of the clamps on the ruler may vary. For example, you will see: L1, L2, L3, N and a ground symbol. In this case, you don't even have to read the instruction manual. If you only have numbers, you must consult the manual.
The phase supply line is connected to terminal L1, L2 is the output and voltage supply to the heater. If there is no visible electrical contact between them, you need to make a jumper. The presence of L3, L4 and further means that you can connect several more heaters or other devices to this thermostat that ensure the operation of the heating system - water supply valve, circulation pump and others.
There can be either one or two terminals N. They are equivalent and can be connected with a jumper. If the regulator is mechanical, then these clamps are an intermediate point for convenient connection of the neutral wire. In principle, you can ignore them and run the neutral to the heater separately. In electronic models, they provide power to the signal circuit. If you do not connect the neutral, the device will not work.
The thermostat can be connected either directly to the power supply or to the pull-in coil circuit of the magnetic starter, if there are two, three or more devices controlled by it. This allows the use of low-power models in circuits with high operating currents.
Connecting thermostats does not require special knowledge. Follow the operating instructions exactly and be sure to carry out all work with complete stress relief.
electrictop.ru
Reviews of popular models with a power of 2 kW
The modern market offers a huge number of convectors with a mechanical thermostat. The best models are presented with all the necessary functionality: double insulation of live parts, overheating protection, power selection and electricity saving. Let's look at some models.
ENSTO EPHBM20P
The electric convector with a mechanical thermostat 2000 W has dimensions of 152.3 x 38.9 x 8.5 cm. The temperature can be adjusted using a mechanical thermostat. The installation of the device is universal: both floor and wall. Weight approximately 8.6 kg. The device has additional options: frost protection, overheat shutdown. The disadvantages include uneven heat distribution over the housing area.
Convector ENSTO EPHBM20P
Noirot CNX-2 2000
The convector with a mechanical thermostat is of high quality. The French company Noirot is the largest manufacturer of heating equipment. The heating area of the device is 25 square meters with a power of 2 kW. The body is made of a protective coating. Dimensions 74 x 44 x 8 cm. Model CNX-2 2000 – compact, silent, with reliable wheels. The disadvantages of the model include low-quality legs, which break off during use, and a short cord. The product is premium class.
Convector Noirot CNX-2 2000
Electrolux ECH/AG2-2000 MF
The convector is made of a moisture-proof housing and has dimensions of 80 x 41.3 x 11.2 cm. The weight is small - 5.15 kg. Can be wall mounted and comes with additional wheels. Using a mechanical thermostat, you can set two power levels: 1000/2000 W.
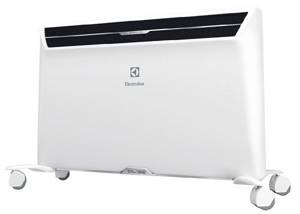
Convector Electrolux ECH/AG2-2000 MF
Ballu RED Evolution BIHP/R-2000 White
An inexpensive mechanically controlled convector made in Russia has an original design. Product dimensions 80 x 41.3 x 11.1 cm. This model is distinguished by a switch with an indicator light. The front surface is made of metal mesh. Weight is 5.4 kg. The advantages include the versatility of the model: the device can be installed on the wall and as a free-standing device.
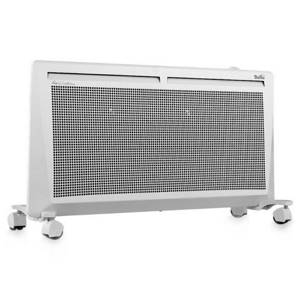
Convector Ballu RED Evolution BIHP/R-2000 White
Electric convectors with mechanical control are the best option for those who value safety, convenience and reliability. The beautiful design of heating equipment combined with high efficiency makes climate control equipment indispensable in a residential area.
Thermostat connection diagrams
Depending on the characteristics of the equipment used, several connection options are offered. Among them:
- with connection without control wire;
- with control wire;
- using “carrier current”, connecting with or without a control wire.
Let's consider each option separately.
Connecting a thermostat without a control wire
This scheme has two options:
- when connecting convectors with a power of less than 1100 Watts;
- with convectors with a power of more than 1100 Watt.
In the first case, there is no need to install a power switch. The connection diagram will look like this:
If it is necessary to connect devices whose power exceeds 1100 W, it is recommended to use a power switch. In this case, the scheme is undergoing changes and will be implemented in a similar way:
This circuit involves connecting a phase to the second terminal of the programmer. The control wires are connected to the terminal block of the electrical distribution panel. The wire common to all control elements is connected to the remaining terminals (1 or 3) of the programmer, with each terminal intended for one zone.
Connection diagram:
Connecting a heating thermostat using “carrier current”
In these devices, signals from the “carrier frequency current” enter the electrical network. Receivers located on the convectors catch these signals and, based on the signal characteristics, carry out the processes of turning on the required convectors.
A specific receiver is selected taking into account the characteristics of the convector, namely: being equipped with a control wire. To make the right choice, it is recommended to consult store specialists. This connection option will be composed as follows:
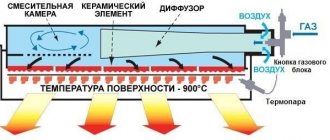
How does a thermostat work?
The thermostat is used to maintain a stable temperature in a “warm” system, as well as to turn heating mats (films) on and off. The device “reads” the temperature sensor readings and automatically turns off the power supply as soon as the floor heats up to the required limit. At the same time, he himself remains in work mode and continues to control the situation. If the sensor notifies about deviations in temperature conditions, the thermostat will again release electricity into the system and the floor will begin to heat up.
The most popular and reliable thermostats are mechanical and conventional electronic. More complex ones are electronic programmable. Despite the significant difference in their “stuffing”, the principle of connecting thermostats is very similar.
The thermostat kit includes a temperature sensor, mounting box, terminals, installation and operating instructions
This is interesting: Cement-sand mixture for floor screed: we study in order
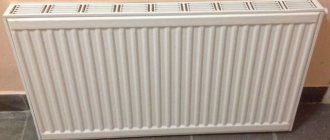
Screens for heating convectors
The screen for a heating convector is a special overlay on the device that improves its aesthetic appeal. Decorative screens are made from different materials: plastic, glass, wood, metal. This panel must have holes for air circulation. They provide efficient heat exchange. If the number of holes is insufficient or their size is small, the heating efficiency is reduced by a maximum of 50%.
When choosing a screen, pay attention to the following important points:
The material from which the element is made. Wooden linings are not recommended for use in rooms with high humidity, and glass screens transmit thermal energy worse. When choosing a plastic cover, give preference to elements made of heat-resistant plastic that do not deform when heated. Metal panels are the most reliable and durable, but they must have a protective powder coating. Depending on the mounting method, screens can be hinged, sliding or attached. The easiest way is to install a hinged or attached structure. The hinged screen has special fastenings that allow it to be hung on the radiator from above. Attachment panels are attached to the niche in which the heating device is installed. Both types can be easily dismantled if necessary. A sliding screen is much more difficult to install because it has doors. But this model provides quick access to the heating device. There are many color options and screen configurations available
It is important that the dimensions of the panel match the dimensions of the heating unit or niche. Most often, white overlays are produced, but there are also models with interesting decor and different color options on sale.
If necessary, the white screen can be painted in the desired color.
When choosing a suitable radiator cover, consider how easy it is to maintain. Please note that in the kitchen, a fine grate will quickly become dirty, and it is not easy to clean it from grease and soot. Plastic covers are simple and easy to use. They are inexpensive and come in a variety of colors.
Water convector
Peculiarities
The central element of this type of convector is the heating battery. It uses a coolant - hot water, which heats the battery itself, and it releases heat into the room.
A water convector consists of two elements: a pipe where the coolant (hot water) flows and a heat exchanger, which consists of special metal plates located on this pipe. All this is covered with a housing with a grille, which allows air to circulate freely and heat up. For heaters of this type, convection can be natural or forced. The latter implies the presence of a fan, which accelerates air convection and, as a result, its heating.
Water convectors can be mounted on a wall or built into the floor (covered with a grille).
Such devices can be used as an auxiliary or main source of heat.
Installation
When connecting such a heating device, the most important thing is to choose the right location so that the room is heated evenly, as well as its power. The material used to make the heating element is also important. Its sections can be copper-aluminum, made of aluminum or bimetallic plates (this option is the most popular), or a more budget option - made of steel.
The water convector, first of all, needs to be mounted on the wall. To do this, you need to drill holes and install special fasteners on which the device will be held. After securing it, the device must be connected to the heating system. This is done using steel or plastic pipes that connect the heater and the heating system through pipes.
Installation of this type of convector requires certain skills, so you must strictly follow the instructions or, best of all, call specialists to install it.
Instructions - how to connect a heated floor to a thermostat
Before connecting the device, it is recommended to check with an ohmmeter whether the indicated resistance corresponds to the real one. With indicators of ± 5 - 10%, everything is normal, the device is working properly.
Large discrepancies indicate a malfunction of the sensor, then it should be replaced.
Connection process
The thermostat is connected after installing the heated floor, socket box and connecting all wires.
Connecting the thermostat to the heated floor and to the network is not difficult; you must adhere to the following sequence of work:
The wires coming out of the socket box are trimmed - the length should be 80 - 100 mm.
Trimming the wires
Grounding is carried out - the green-yellow wire of the power cable is connected using the “Wago” terminal with the copper shielded braid of the heating cable. The braided end must be twisted tightly, treated with flux, and covered with a thin layer of solder.
We carry out grounding
Remove the top cover with the screen from the thermostat.
Remove the cover from the thermostat
The terminals are loosened; for this you can use a 3 mm screwdriver.
Loosen the terminals
The temperature sensor is connected to terminals 6 - 7. Polarity is not necessary. The existing parameters of the heated floor sensor indicate that its resistance at +25 degrees is 10 kOhm.
Connecting the temperature sensor
- The power source is supplied:
- connector number 1 - phase cable L is connected to it;
- slot 2 - zero N.
Connecting the power
- The heating cable is connected, the level of the maximum permissible current is 16 amperes.
- wire N is inserted into the third terminal;
- in the fourth - phase L.
Connecting the floor cable
The device is placed in the socket - to do this, bend it upward, and place your finger under the wires from below. Then we turn the thermostat down and insert it into the opening.
We place the device in the socket
The thermostat is fixed with self-tapping screws to the socket box.
Fasten with self-tapping screws
The upper front panel is put on.
We put on the front panel
The thermostat is installed, you can proceed to testing it.
The “cold wires” of the heating mat are stranded, so before connecting them to the terminals, you should put a lug on them. Feeding - can be connected without tips.
Phasing
Phasing is a critical step when connecting a thermostat. Incorrect connection of phase and zero does not affect the operation, but safety is in question.
There are thermostats equipped with a separate switch; when pressed, both conductors are turned off. But this is only possible with manual adjustment, and even then not for all models. With automation, only one conductor is disconnected.
Do you need land?
More often, thermostats are not equipped with protective grounding. Usually this is a separate terminal, through which heating wires are connected to the conductor.
On the devices themselves there is a “square within a square” icon, it indicates double insulation.
Double insulation icon
Using programmers: ease of control of heating devices and efficiency
Programmers, which are a separate type of thermostat, are used to control the heating system in the house, including remotely via the Internet or via SMS notification. But the possibility of remote access to the heating system as a whole and its individual elements is a kind of bonus that adds convenience to operation.
Using a programmer, unlike other types of temperature control devices, can significantly reduce energy consumption by optimizing its consumption while maintaining conditions to ensure the desired level of thermal comfort in the house. To do this, depending on the needs of the family, you can choose a weekly or daily programmer. The first allows programming according to the 5+2 or 5+1+1 scheme, which is most convenient for those families for whom staying in a country house is limited to two days off. But in addition there is the possibility of separate interval settings for weekdays and weekends.
Daily programmers are installed in cases where a family lives in the house permanently and their algorithm allows you to set the temperature control in the house in three modes:
- comfortable overnight;
- comfortable daytime;
- economical.
The first mode is used at night and its main characteristic is that the thermostat is set several degrees lower than during the day, which is more comfortable for sleep and allows you to save energy.
Daytime comfort mode is most in demand at a time when all family members are in the house, that is, in the morning and evening. When all residents are outside the house, it is possible to set an economical mode, in which the temperature is maintained at a minimum level.
An important advantage of using programmers is that these devices are as informative as possible: all the necessary information is displayed on the LCD screen:
- date of;
- air temperature;
- operating mode of the system or its element (if a local device is installed);
- boiler operating mode;
- on/off time;
- Battery charge level (for standalone programmers).
In some models of programmer, information about the operating status of the devices can be displayed on the display screen, including error codes indicating a problem.
Depending on the type of connection, programmers can be wired or wireless, consisting of two functional elements, the exchange of information between which occurs remotely, via a radio channel.
Wall-mounted room thermostat SRT C21
One of the simplest and most convenient ways to heat a country house is to use electric convectors. A huge advantage is their ease of installation and use. Electric convectors are divided into two types according to the method of connecting the power; floor convectors are usually connected to a 220 V outlet; wall-mounted or built-in convectors are connected directly to the electrical wiring of the house.
With the help of electric convectors it is very easy to create an automatic system for maintaining a comfortable temperature in the house. To control the convector, only two devices are required:
- Z-Wave Relay to which the convector itself is connected
- Z-Wave thermostat that controls the relay
Z-Wave Relay
To turn on/off a convector plugged into a 220 socket, Z-Wave plug-in modules, such as Fibaro, Z-Wave.Me, Everspring, are excellent.
Fibaro and Z-Wave.Me built-in relay modules are suitable for controlling the wall convector.
Z-Wave thermostats
The most suitable thermostats for convector control are Secure thermostats. The main advantage of Secure thermostats is that they operate on batteries, which means you can install them in any place convenient for you without wiring or repairs.
The Secure thermostat periodically measures the temperature in the room and if it is lower than the set one, the thermostat sends a command to the convector to turn on. When the room temperature reaches the desired temperature, the thermostat will send a command to turn off.
The wall-mounted room thermostat SRT C21 with a dial is perfect for easily and accurately adjusting the temperature in the room. Such a thermostat can control 4 convectors, and to set up communication between the thermostat and the relay, a controller is not required; the thermostat itself is a controller and can include other Z-Wave devices in its network.
The wall-mounted seven-day thermostat SCS C17 allows you to set a climate schedule for 7 days. The large display displays information about what temperature the thermostat is aiming for now and when the next temperature mode will turn on; in addition, the time and real temperature are displayed. The thermostat is a controller and can include other Z-Wave devices in its network.
To accurately control the climate in the room, the thermostat must be installed in a place where there are no drafts and away from the convector itself at a height of approximately 1.5 meters.
2014 Yurkin Vitaly
rus.z-wave.me
Connecting thermostats to electric heated floors
connection diagram
This type of floor implies the presence of heating elements in the form of infrared films or cables, which have high resistance and gradually heat up.
Step by step connection guide:
- The first step is to determine the location where the thermostat will be located.
- We draw up a connection diagram.
- Let's think about the layout of all the elements. It is recommended to carry out installation in places with access to wires, since the operating process of the system requires a voltage of 220 V.
- When laying warm material, you should first consider where the temperature sensor will be placed, since its installation is impossible under furniture or in minimal proximity to the regulator. Using infrared film involves installing the sensor on the reverse side.
- Once the flooring process is complete, you can begin installing the thermostat. In a pre-selected location, you should make a recess in the wall for built-in devices or make markings on the wall surface when installing an external device.
- We compare the switched type of power of the regulator with the power level of the heating elements. If the indicator is significantly lower, you should install a specialized magnetic starter, which is designed to carry out the work process in a 220 V network.
- Let's start connecting the wires into a single chain. The connection diagram must be located on the device body. By following all the rules and advice, anyone can assemble wires into a single circuit.
- Finally, you should connect to the power supply and check the functionality of the entire system. It is recommended to carry out an inspection before the floor covering is completely laid, which will allow you to quickly fix it if a problem is detected and easily access the heating elements at the right time.
Wireless thermostat connection diagram.
At the moment, wireless thermostats have become widespread and have seriously displaced their wired counterparts. They are easier to work with; you don’t need to run wires from the thermostat to the sensor across the entire house. It is enough to simply set the address of the sensor and install it in a place with stable reception of the signal from the thermostat. As for the connection diagrams for such devices, there can be two of them:
Open circuit connection diagram.
The diagram is no different from the connection diagram for a mechanical thermostat. The boiler, pump or servo drive is turned on when current appears in the circuit.
Connection diagram based on potential (voltage).
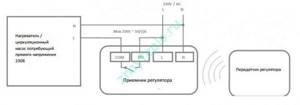
In this circuit, when the circuit is connected, the thermostat transmits a voltage to the boiler input, which turns on the boiler, pump or servo drive.
Thermostat connection diagrams
Depending on the characteristics of the equipment used, several connection options are offered. Among them:
- with connection without control wire;
- with control wire;
- using “carrier current”, connecting with or without a control wire.
Let's consider each option separately.
Connecting a thermostat without a control wire
This scheme has two options:
- when connecting convectors with a power of less than 1100 Watts;
- with convectors with a power of more than 1100 Watt.
In the first case, there is no need to install a power switch. The connection diagram will look like this:
If it is necessary to connect devices whose power exceeds 1100 W, it is recommended to use a power switch. In this case, the scheme is undergoing changes and will be implemented in a similar way:
Connecting a heating thermostat using “carrier current”
In these devices, signals from the “carrier frequency current” enter the electrical network. Receivers located on the convectors catch these signals and, based on the signal characteristics, carry out the processes of turning on the required convectors.
A specific receiver is selected taking into account the characteristics of the convector, namely: being equipped with a control wire. To make the right choice, it is recommended to consult store specialists. This connection option will be composed as follows:
Installation Tips
Some tips:
- Before purchasing a TR, you need to make sure that the characteristics of the regulator and heating elements are compatible.
- You need to choose to install the device in the most accessible location.
- When deciding whether to purchase a device, you should evaluate the economic feasibility of using a specific thermostat model.
- If you do not have enough experience in installing such devices, then it is better to seek help from specialists.
A person sometimes has no idea about the number of thermoregulatory devices around him. They became a part of everyday life. Their work brings significant savings in energy costs.
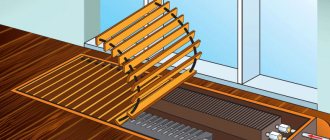
Warm floor
The main function of such underfloor heating is to heat the floor and/or room itself. There are two types of such heaters: water and electric. The first involves laying pipes into the base of the floor, through which warm water is released. This is a cheaper and not entirely safe option, since if the pipes are damaged, not only will you have to remove the entire coating in order to repair the leak, but there is also a very real risk of ruining the repair completely.
Read also: about the features of operating an electric heated floor.
As for the electric variation, everything is much more favorable here, although the cost of such a heating project will be more expensive. However, the costs will quickly pay off, because such a system:
- safe;
- very convenient;
- economical;
- In the event of a breakdown, repairs are much easier.
Some people fear that electric heating options use a lot of electricity, but this is not the case. After all, it is worth considering that the main expense is only for warming up. Further, electricity is required only to maintain the set temperature. And a high-quality and competently installed and configured heater will not be a very greedy consumer.
In this video you will learn how to connect a cable heated floor to a thermostat:
Features of the device and installation
Despite the apparent complexity of installing heated floors, in reality it is extremely simple, as is the installation itself. The basis of its operation is the conversion of electricity into heat through a conductor having high resistance. This can be a cable or mat that connects to a 220 volt network. The thermostat monitors the degree of heating and temperature.
The thermostat will help maintain the required temperature without overheating the floor
The selected conductor is laid on foil, which is covered with a rough screed 1 cm thick. Under it, in turn, there is a heat insulator, which can be placed directly on the ceiling. The wire itself is secured using a special mounting tape and connected to the thermostat. A temperature sensor is also attached to it, which will record the degree of heating.
After laying and securing, you can apply a basic screed with a thickness of 2 to 5 cm, on which the finishing coating will subsequently be laid
When choosing it, you should pay attention to the admissibility of use with the “warm floor” system.
Thus, the floor heating device includes:
- heater;
- thermostat;
- temperature sensor.
What types of household IR heaters are there?
Modern modifications of household infrared heaters can be divided into several classes, according to the type of design, method of fastening, and functionality.
Classification by type of fastening
Stationary installations - mounted on the ceiling or wall, have maximum performance. Both local and general heating of the apartment using wall-mounted infrared heaters is allowed. The angle of inclination of the emitter for better heating of the room can be changed using a special bracket.

Mobile heating devices - this type of climate control equipment is installed on the floor or a special tripod. The efficiency of portable heating devices is slightly lower than that of stationary radiators. There are a large number of obstacles along the radiation path that prevent uniform heating.
Classification by radiation source
3
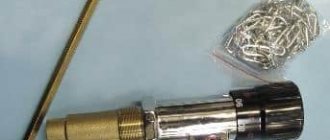
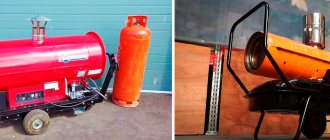
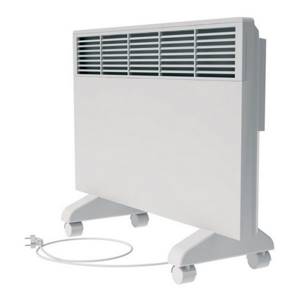
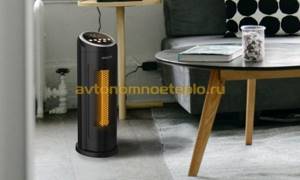
Floor standing infrared unit
One of the popular types of heating devices are floor-mounted infrared electric heaters with thermostats. Their cost is not much different from other models, but due to their maneuverability and mobility, they are more preferable. Infrared heaters from the Vallu line are especially popular. Connecting the device through a thermostat is carried out according to the standard scheme.
The thermostat for this model is located inside the heater housing. One of the most popular models of electric heaters of this type is considered to be BALLU BIH-L, Bali series. This device is equipped with a modern steel telescopic tripod BIH-LS-210, which provides reliable fixation of the electric heater and allows it to be used in open areas.
Description of the configuration and technical characteristics of the electric heater BALLU BIH-L:
- power ≈ 3 kW;
- the fixation height on the tripod reaches 4.5 m;
- steel body;
- the presence of a heating control function for the device;
- set of brackets;
- special reflector with a ribbed surface.
This model is considered the most universal, since it can be installed almost anywhere. By uniformly heating the air, a comfortable temperature is created for everyone within the range of the device. To create a cozy microclimate in an open area, you should think about purchasing an infrared umbrella , which is designed specifically for heating when staying outside for a long time during the cold season.
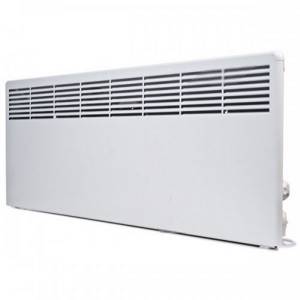
Wall-mounted infrared heater for home