Where to install the stove
You can’t just put a stove in the middle of the steam room; it’s important to take into account the location of the air ducts, correctly calculate the distances from the walls, and think about protecting the walls of the bathhouse from heat.
If you look at the “Appendix to SNiP 41-01-2003”, you will find lines where it is clearly stated that if the walls of the bathhouse are not flammable, that is, they have a fire resistance limit of 60 minutes or more, then a metal stove is allowed to be installed at any distance, but it is better when there is more than 380 mm of free space between the steel stove and the wall. If you look at the “Appendix to SNiP 41-01-2003”, you can find lines where it is clearly stated that if the walls of the bathhouse are not flammable, then there is a fire resistance limit 60 minutes or more, then a metal stove is allowed to be installed at any distance, but it is better when there is more than 380 mm of free space between the steel stove and the wall.
It is quite difficult to find completely brick or concrete walls in a bathhouse without cladding; often the finishing is done with highly flammable wooden paneling.
It’s another matter if the wall material is wood. In this case, you should adhere to the following rules:
- When purchasing a factory stove, ask for instructions for it and carry out the installation strictly according to the manufacturer’s diagrams. This rule is stated in SNiP 41-01-2010, namely in paragraph 6.6.2.19 (Individual stove heating);
- there should be more than half a meter from the hot walls of the unit to the walls not protected by screens;
- the wall or partition through which the fuel channel is discharged must be made of non-combustible material from the floor itself to a mark of 25 centimeters above the combustion door;
- the thickness of the non-combustible wall through which the fuel channel is routed must be 12.5 cm;
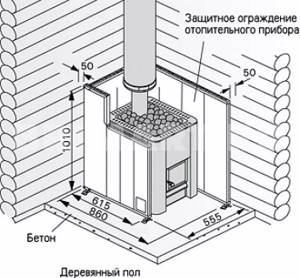
- if the ceiling in the steam room is thermally insulated and protected with plaster over a metal mesh or similar, then the distance from the top of the metal stove to the ceiling should be more than 80 cm;
- in cases where the ceiling is not protected by fireproof materials, the distance from it to the stove should be more than 1.2 m;
- from the fire door to the opposite wall there should be more than 125 centimeters;
- Leave 3 cm between the wall and the front wall of the stove with an external firebox.
Fireproof distances from the stove to the walls
When choosing the best location for your own furnace, take into account the location of such elements as external heat exchangers, wall-mounted heaters, hot water tanks, and pipelines for remote tanks. These elements must be freely accessible for repair and maintenance.
Advantages of metal screens
The most popular fireproof insulation deserves a more detailed description. Note that only one such screen is enough to protect the surface of a wooden wall from dangerous temperatures.
Other advantages of refractory material are presented below:
- steel screens are mounted on legs that can be adjusted;
- reduction in the intensity of infrared radiation (the consequence is a safe stay inside the steam room for health);
- improvement of air convection between the furnace body and metal protection;
- ease of installation.
If the steel sheet is not enough, which is not often the case, the insulation can be reinforced without any problems. To do this, insulation is laid between the stove wall and the screen - for example, mineral wool.
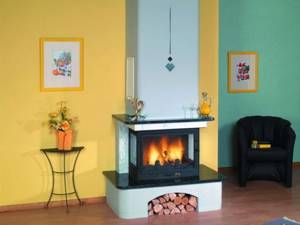
The wall behind the stove! Option to protect a wooden house from accidental fire
The wall behind the stove (more precisely, its protection) is a very important issue of fire safety. This issue is especially relevant if the house is wooden. And for good reason! After all, a negligent attitude towards such a place as the “stove wall” can lead to disastrous consequences.
To neutralize the dangerous effects from the main heater in a building on walls located close to it, various methods and construction technologies are used. Starting from the use of protective mastics and impregnations that are used to treat the wooden surface, and ending with the arrangement of so-called “fire-retardant shields”.
In the first case, the wall near the stove retains its original appearance. Those. a wooden house remains that way internally. This option will be useful when you want to preserve the image of wood in the interior. But there is one significant drawback. Over time, wood shrinks, becomes deformed and even cracks. And this leads to the formation of “weak points”. And to neutralize the possible risk of fire, the wall behind the stove requires periodic treatment of the wooden surface with protective agents.
The second option is more durable and more reliable. He suggests that insulation of the walls from the furnace is carried out by installing a fireproof shield. Let's look at this option in more detail using an example.
The easiest way is to install a sheet of metal to the wall of a wooden house from the stove side. Yes - simple and fast. But this approach will clearly harm the interior of the house! In this case, decorative finishing of the wall behind the stove will be difficult. And, besides, the efficiency of such a design will not be the highest.
There are many options for arranging a shield. And here is one of them. The wall near the stove is lined with non-flammable thermal insulation to reduce the impact of hot air on the wood, and the top is covered with non-flammable sheet material to prevent the surface from igniting when a coal or spark hits it. It usually consists of a sheet of metal (not the best option), fireproof gypsum plasterboard, LSU, etc.
So, we've sorted out the materials. Next, let's look at an example of how a wall near a stove is insulated from harmful influences.
First of all, the wall behind the stove is prepared for work. We remove sawdust and other debris that is on it. This, of course, is not necessary, but it will not be superfluous.
Next, a metal profile and self-tapping screws are used. With their help, we equip the frame of the future “thermal shield”.
When the frame is ready, we install thermal insulation slabs of stone wool into it...
... and sew it up with LSU sheets.
This is how the wall is insulated from the furnace by installing a “fireproof shield”. This design also meets fire safety requirements and is suitable for further decorative finishing. Most often, ceramic tiles are used for this. As a result, the wall near the stove will be fireproof and beautiful (after applying a decorative coating).
Covering bathhouse walls with non-combustible insulating materials
Before insulating the stove from a wooden wall, it is recommended to decide on the insulation.
Thermal insulation allows you to reduce fuel consumption. The joints between the chimney and the walls are subject to heating when smoke escapes. As the temperature drops, the material contracts. To prevent the walls from overheating, you can use materials with increased thermal insulation properties and inertness to high temperatures. Two types of materials are used:
- reflective;
- fireproof with lining.
The first type includes materials for wall cladding, consisting of thermal insulation with fire-resistant properties and a metal covering in the form of a sheet.
A protective cake with reflective materials is done this way. First, the thermal insulation is attached using ceramic bushings directly to the wooden walls, then it is sewn up with a stainless steel sheet.
Advice! It is better not to use galvanized metal, since heating may release heavy metals harmful to the human body.
Stainless steel with a polished surface reflects the heat flow inside the steam room, reducing heat loss. In this case, reflected heat is more useful than direct heat. For thermal insulation use:
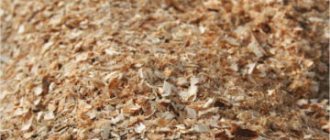
- basalt cardboard or cotton wool, the only material with increased hygroscopicity, non-flammable, environmentally friendly;
- asbestos cardboard, which reliably protects against flames and has a long service life;
- mineralite, an artificial material made specifically for these purposes.
Protective sheathing requires ventilation gaps of 2 cm from the wall to the insulation, 2 cm from the insulation to the steel sheet. If it is necessary to install the stove as close to the wall as possible, make a double skin of non-combustible insulation, use ceramic bushings to maintain gaps of 2-3 cm and sew them up with a steel sheet.
Measures to protect walls with cladding are necessary in order to preserve the interior decoration of the room. They are more expensive, but no one has canceled the aesthetic advantages of the bathhouse. It is based on tile cladding, which is laid on fire-resistant cladding made of gypsum plasterboard, non-deformable gypsum-based cardboard with fiberglass, mineralite, non-flammable cement-fiber material, moisture-resistant and resistant to biochemical influences, LSU, fiberglass material bound with magnesium additives, resistant to high temperatures, high humidity. Heat-resistant glue is used for installation.
Advice! Use heat-resistant reinforced Terracotta glue, made from fireclay dust bound with kaolin additives, intended for tiling stoves, fireplaces, and all heated surfaces.
The recommended facing materials are quite varied, the best of them are:
- terracotta tiles, they are made from specially fired clay, which gives increased heat resistance and durability;
- clinker, denser clay tiles with a surface of various colors, similar to facing bricks;
- tiles, also made from clay, having an original embossed surface;
- porcelain stoneware made from a mixture of clays, kaolins, quartz sand, feldspars by high-temperature firing under a pressure of 400-500 kg/cm², with imitation of stone, wood, durable artificial material;
- soap chloride, a rock mineral consisting of talc, magnesite and chlorite, an environmentally friendly natural material that does not absorb moisture at all, has an attractive appearance, does not crumble, and is not afraid of high temperatures.
Advice! Use soap chloride to finish the steam room, this mineral has a healing effect on the human body, regulates blood pressure, stimulates cerebral circulation, expels viruses and microbes due to the release of vitamin D when heated.
All of the listed tiles are an element of protection that forms a cake, the basis of which is a fire-resistant material. Just like a screen, sheet material is installed on ceramic bushings with a gap of 2-3 cm from the wall. The minimum distance to the heat source from the tile should be 20cm.
Protection with cladding decorates the room, creates a positive mood, and helps to increase the efficiency of procedures. And most importantly, properly installed insulation prevents wooden walls from overheating and catching fire. Have a nice steam!
Table of contents
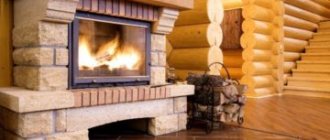
Installing a stove is a complex process and requires a lot of attention to each stage, from preparing the installation site to the nuances of removing the chimney pipe from the roof. In this article we will talk about how to properly insulate a wooden wall from a steel or cast iron stove. Any wood has a predisposition to ignition, so a constantly hot stove design can easily cause a fire.
Any builder understands that insulating the wooden wall behind the stove is a mandatory process. Let's look at an example of installing a Bavaria stove-fireplace on a wooden floor next to a wooden wall. The furnace does not have a separate foundation, so a light base for a metal structure is required. The base for the stove will be laid out with bricks in one layer.
In this case, wall insulation can be done in two versions: asbestos cement sheets or flame sheets (non-hot composition). There are several opinions about asbestos - sometimes they say that they emit toxic fumes. But flamm has its drawbacks: they have standard sheet sizes of 600x1200 mm, which can be inconvenient when working, and also in terms of price they do not beat asbestos cement at all.
get rid of the existing partition, replace it with a fireproof one and cover it with tiles or stone. You can also place a screen and use a circular saw to remove the wood on the partition completely. Next, finish with tiles, plaster or paint. There is no doubt that the tree needs to be removed. After all, if you cover it with non-flammable materials on top, there is still a chance that the wooden surface will ignite.
In this case, it is better not to take risks and remove the partition from wood. Thermal radiation from the oven will not only be from the back wall. Lateral radiation will also emit radiation onto the wall at a distance of 0.8-1 meter. You should carefully read the installation instructions - the manufacturer describes everything very clearly there, including what concerns safety. For example, when a stove with a glass door is on and there is a chair next to it, it is better to move it further away (more than 1 meter).
Initially, the base for the stove was supposed to be one brick thick, but such a thickness for a wooden floor is not very good. Regarding the non-combustible partition, you should also note the importance of the situation - where the chimney will go, at what distance from the beams, walls and rafters. In the area of this Bavaria stove, it is best to use a concrete slab as a base - lay it along the beams, flush with the floors or a little more - it will turn out like a podium, reliable and ensuring safety.
However, the bottom of this stove practically does not warm up; there is an additional part for firewood, which takes on the heat. Therefore, you can make it simpler - lay mineralite or CSP on the floor, then tiles or porcelain tiles on mastic or hot melt adhesive. In places where the chimney pipe is laid, you can use basalt, non-flammable or kaolin wool.
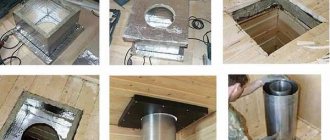
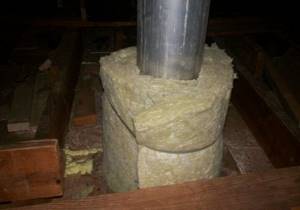
Cotton wool plays the role of additional insulation and is placed in the ceiling section. In this case, you should make an opening in the ceiling - in accordance with safety standards - from the contour of the two-layer pipe - sandwich, 250 mm in different directions. The furnace cutting should be made of non-combustible materials - superisol, mineralite, calcium silicate, vermiculite. When passing through a chimney pipe, the groove should be filled with cotton wool.
It is, of course, very difficult to get rid of a beautiful partition, because it was built for aesthetics, a lot of time was spent on it, but if it was decided to install a metal stove against this wall, then you should get rid of the additional threat of fire of wooden parts.
We invite you to familiarize yourself with How to properly steam and wash in a bathhouse for health - rules and procedures, the benefits of steaming
Facing materials are often made from cement, the complete hardening of which can take several years. As a result, even after the work has been completed, changes in size, bends and deflections may be observed. Some manufacturing companies (for example,), use an effective and efficient method of keeping facing materials in an autoclave in a high-temperature, high-pressure oven. And it turns out that shrinkage due to drying and expansion by exposure to heat can be avoided, and reliable strength is also ensured.
Those same Nitikha panels are made from fiber cement, a universal material that consists of 90% cement and 10% cellulose fibers and various mineral fillers. In this case, technology without the use of asbestos is used by pressing the ingredients.
Panels of this type are environmentally friendly; their production does not use formaldehyde resins, chlorine compounds or asbestos. Fiber cement has excellent fire-resistant properties; it fully fits into the category of non-combustible materials. Fiber cement siding has many advantages, including the fact that it can easily be used to select various design variations, and it is also easy to install. Instead of mineralite, you can also use glass magnetic sheets - this is a more budget option.
Here's another example of making a fire-resistant wall located behind the fireplace:
- treating the wall with fire protection (about 5 layers);
- fireproof mats are attached with a stapler;
- The slabs are attached through ceramic bushings - there are gaps at the bottom and top.
The decorative panels available are slightly flammable according to the fire classification. It turns out that only a 5 mm layer of basalt cardboard really protects the wall from fire. However, the oven is convection in nature and its outer surface does not heat up much. If you follow the manufacturer's instructions, it will not heat up more than 60 degrees.
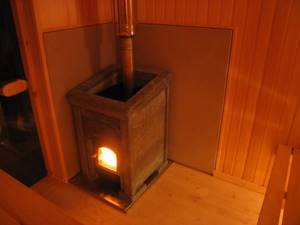
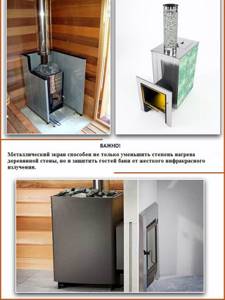
Protective screens near (around) the stove
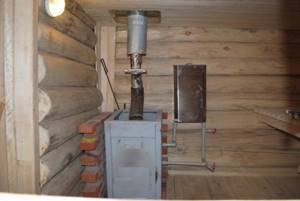
Protective screens are insulation panels that cover the side surfaces of the furnace and reduce the intensity of thermal radiation. Screens can be metal or brick. As a rule, they are used for metal furnaces.
Method #1 - metal screens
The most common protective screens are factory-made steel or cast iron sheets. They are installed around the stove, at a distance of 1-5 cm from the walls of the firebox. Depending on the need to insulate one side or another of the furnace, you can purchase side or front (front) screens. Many metal furnaces are initially manufactured with protective screens in the form of a protective casing.
Protective screens make it possible to reduce the temperature of external metal surfaces to 80-100°C and, accordingly, reduce the fireproof distance to 50 cm. The total distance from the firebox to the wall (including a gap of 1-5 cm) will be 51-55 cm.
Installing protective screens is not difficult. Thanks to the presence of legs, metal panels are easily bolted to the floor.
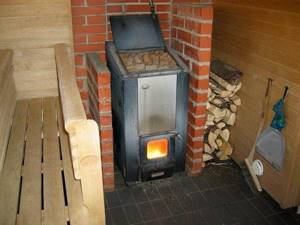
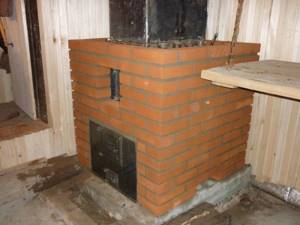
Method #2 - brick screens
A brick screen can cover all the side surfaces of a metal furnace, representing its outer cladding. Then the stove will be in a casing made of brickwork. In another case, a brick screen is a wall separating the stove and the flammable surface.
To lay the protective screen, solid fireclay bricks are used. The binder is cement or clay mortar. It is recommended to use half a brick (thickness 120 mm). But, if there is a lack of material, it is possible to make a wall of a quarter of a brick (60 mm thick), although in this case the thermal insulation properties of the screen will be reduced by half.
Small openings (sometimes with fire doors) are left at the bottom of the shield for air convection between the brick wall and the stove.
The brick walls of the screen must end at least 20 cm above the top surface of the oven. Sometimes the masonry goes all the way to the ceiling.
The brick screen is not installed flush against the walls of the stove, the optimal distance is 5-15 cm. The acceptable distance from the brickwork to the flammable wall is 5-15 cm. Thus, the use of a brick screen allows you to reduce the distance from the stove to the wooden wall to 22-42 cm (stove - ventilation gap 5-15 cm - brick 12 cm - ventilation gap 5-15 cm - wall).
When is it necessary to create fire walls?
The need for protection arises when basic fire safety conditions are not met. Fire walls are necessary if:
- the distance between the brick stove and the wall is less than 32 cm;
- from the metal stove to the ceilings - less than 100 cm;
- from a metal stove lined with fireclay or brick from the inside to the wall - less than 70 cm.
In small rooms there is no possibility of complying with standards, therefore, when arranging a heating device, it is necessary to consider the issue of protecting the building from fire.
Finishing the walls around the stove
Today there are 2 methods of protection:
- creating protective screens around the furnace body, which can be metal or brick;
- covering walls with reflective materials or heat insulators with low thermal conductivity.
Application of protective screens
Screens are shields made of brick or metal that protect walls from intense thermal radiation. Similar protection is used when installing metal stoves.
- Metal screens are made from steel or cast iron sheets, these
casings surround the heat source with a distance of 3-5cm.
Advice! When purchasing a metal sauna stove, you should give preference to a model equipped with a metal casing. Its cost is not much higher, but the issues of wall insulation are eliminated.
Additional frontal or front shielding, which is located on the walls depending on the location of the stove, will not hurt. The protection guarantees the wood from overheating, reducing the temperature by 100 degrees or more, and provides the opportunity to save space in the steam room. A stove protected by a casing can be installed at a distance of 50-55cm from the wall.
Installation of screens is simple. The casing, equipped with legs, is secured to the floor by side or front screens - with galvanized nails or self-tapping screws.
- Brick screens are masonry used to cover the stove with
on all sides, the same casing, only made of brick. Another method is to lay half a brick between the firebox and a wall made of solid fireclay bricks laid on a solution of clay and cement. The width of the wall should be 120mm, although there is an opinion that it is permissible to put 60mm in a quarter of a brick, but it should be remembered that in this case the thermal insulation value is reduced by exactly half. It is recommended to raise the height of the masonry 20-30 cm above the surface of the firebox, but if you raise it to the ceiling, it will not be worse.
The screen should be placed at a distance of 10-15cm from the wall, 5-15cm from the stove, that is, the space saving is 30-40cm
Important! Functional openings for heat exchange should be made at the bottom of the masonry. Protective screens are effective, they reduce the temperature to a level acceptable when using high-temperature fuel units
The same function is performed by wall cladding made of non-combustible materials.
Protective screens are effective; they reduce the temperature to a level acceptable when using high-temperature fuel units. The same function is performed by wall cladding made of non-combustible materials.
When is this required?
There are times when there is no need to protect walls. If the stove is located at a safe distance from the wall from a fire safety point of view, the installation of protective screens and other measures can be neglected. The distance from the walls that is required to reduce the heat from the source varies:
- A stove laid in a quarter of a brick should be located no closer than 35-40 cm from the wall;
- A metal stove without lining should be placed a meter away and no closer;
- A metal one with a lined furnace can be installed 70-75cm from the wall.
However, not every steam room has the opportunity to fulfill these requirements, due to the small area. The layout of steam rooms with an area of 6-8 m² can hardly accommodate the necessary set of items for the steaming procedure. Therefore, the need to insulate walls with special sheathing is relevant.
Protective screens near or around the oven
Such a system will need to be implemented when installing a potbelly stove in the corner of the room. You can mount or lay out several screens from brick, installed at a short distance from each other. In this case:
- The first screen protects a person from touching the iron stove and getting burned. It is usually made of refractory or fireclay bricks;
- To protect walls made of flammable material, a second layer of protection is provided. It can be made of brick or covered with a barrier made of sheet steel with a mirror-like front surface. In this case, heat waves will be reflected from the mirror and spread faster throughout the room;
- if the foundation is insufficient in size or it is impossible to manufacture it, it will be necessary to lay a protective screen made of durable fire-resistant material on the wooden floor. This can be a sheet of steel or a decorative layer of heat-resistant clinker tiles or porcelain stoneware. The surface will first have to be covered with a layer of thermal insulation.
Installation of metal screens
This is the easiest way to make surface protection. It is better to use sheets with a polished front surface. Before fastening, the wall surface at the required level along the height of the screen is covered with a layer of thermal insulation. In this way, we protect the surface of the walls from the effects of heat.
You can lay a layer of thermal insulation or fasten the metal with self-tapping screws with inserted ceramic spacers. But it is better to attach the screen to strips or a metal profile treated with a layer of protection. In this option, the air gap will not allow heat to pass freely to the walls, and reliable insulation of the stove from the wooden wall is ensured.
A special gap is made at the bottom of the wall for the passage of cold air, ventilation of the wall and screen. When arranging a wall with a layer of thermal insulation, a number of longitudinal guides are installed on the surface. The space between them is filled with a layer of mineral wool or other material. Then sheets of metal are installed and screwed to the sheathing with self-tapping screws.
In this design, there is no need to leave a gap at the bottom. The air will not be able to pass through calmly, but the wall will be reliably protected from high temperatures. To protect the floor of the house, a slab made of non-flammable durable material can be used.
Brick screens
This protection option is usually installed near the stove. Thus, you can protect not only the wall, but also the person from burns. By installing a brick wall, you can reduce the distance from the stove to the wall. For laying, it is better to use ceramic or fire-resistant bricks.
The work is carried out in several stages:
- you will need to make a small foundation or remove boards from the floor along the marking lines for laying the screen and, by drilling holes in the concrete of the base of the building, insert metal rods to fasten the bottom of the wall and the foundation;
- Having leveled the floor surface, lay out a layer of mortar and lay the first row of bricks; you need to place the bricks in the same plane without distortions. This determines how level your entire wall will be. Do not forget to make small grooves for ventilation; for this you can move several bricks of the bottom row.
- checking the level and pulling the twine for laying each subsequent row, all bricks are laid on a mortar of clay and sand. Having raised the wall to the required height, the top is sealed with a layer of mortar or covered with a board. This way you can make a shelf for decorative ornaments and all sorts of little things.
The brick is laid no higher than the top of the furnace at a distance of at least 40-100 mm from it.
Using both types of protective screens, you can reduce the distance from the oven to 500 mm.
Examples of installation of protective brick screens in the photo:
SNiP standards for the location of the furnace from the walls
The standards for these requirements are specified in 2 main documents:
- SNiP III-G.11-62;
- SNiP 2.04.05-91.
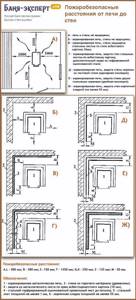
Based on these regulatory documents, each owner of a solid fuel stove is required to maintain minimum clearances from the wall and ceiling, taking into account the surface material:
| Parameter | Requirement |
| Installing the stove on a floor made of flammable materials. | The distance to the bottom of the stove must be at least 140 mm. |
| Foundation size. | When installing a steel stove on a wooden floor, the size of the foundation should be 1000 mm larger than the dimensions of the stove. |
| The ceiling is protected by asbestos slabs, plaster and sheet metal up to 1 cm thick. | In this case, the brick-lined stove is made in height so that the gap to the ceiling is at least 250 mm. |
| When installing a steel stove with a protective layer of thermal insulation. | The minimum distance to the floor slab is 700 mm. |
| Installation of a steel stove without a protection layer. | This size increases to 1000 mm. |
| Minimum dimensions for walls according to SNIP from 1962 | |
| Distance from stove to wood stove with unprotected surface. | From 1000 mm. |
| The walls are lined with brick and plastered with lime mortar with a layer of 25 mm. Or an asbestos heat insulator 4 cm thick is fixed. | 130 mm |
| The wooden walls are lined with brick, 120 mm thick and plastered with lime and asbestos. When installing protection on the walls in the form of a 40 mm asbestos-vermuculite slab. | 300 mm |
By maintaining the minimum dimensions, or better yet, making gaps with a small margin, every owner of a wooden house can be sure that its walls and ceiling are protected from high temperatures.
One of the main methods of protection is the manufacture of devices installed to protect the front and side surfaces near the stove itself.
Types and rules for the manufacture of fireproof cladding
Fire walls can be created using sheathing made from non-combustible materials. Today, 2 variants of such designs are used:
- reflective coverings;
- sheathing with cladding.
To produce reflective protection, thermal insulation material is attached to the wooden surface of the walls, which is covered with a steel sheet. A few years ago, galvanized and stainless steel sheets were used equally widely. However, studies have shown that when heated, galvanized steel can release harmful substances, so it is preferable to build fire walls from stainless steel.
In order for the reflective effect to be as intense as possible, the surface of the sheet must be well polished (almost to a mirror finish).
Protective screen reflector made of stainless steel
The following can be used as a heat insulator fixed under steel:
- basalt wool, which has good thermal insulation characteristics and absolute environmental safety;
- basalt cardboard, the base of which includes basalt fiber;
- asbestos cardboard, characterized by good fire-resistant qualities;
- mineralite, made specifically for shielding surfaces.
Fire walls sheathed with steel sheets are quite simple to install. The main thing is to remember what each layer of cladding should consist of:
- wall;
- a gap of 2-3 cm, providing ventilation between the wooden surface and the heat insulator;
- thermal insulation material (at least 1-2 cm thick);
- sheet of steel.
The distance from the furnace body to the steel sheet must be at least 38 cm. It is recommended to use ceramic bushings for fastening materials. They are not exposed to heat and do not deform, ensuring the safety of the ventilation gap between the heat insulator and the wood.
Construction of a fire-resistant wall
When the distance between the heater and the wall is less than 38 cm, it is necessary to use a double layer of fire-resistant material. The best choice would be mineralite. It is secured with ceramic bushings with a gap of 2-3 cm from the wooden wall and covered with stainless steel.
Other methods of insulating walls from the furnace
Thermal insulation of a stove from a wooden wall can be carried out using modern materials, with which it is possible to apply a sufficient layer of thermal insulation not only to the walls, but also to apply it to the stove:
- Sheets of environmentally friendly basalt wool with an outer layer of foil. This material can withstand temperatures of at least 7000. This material can be used to insulate fireplaces and chimneys;
- Gypsum fiber sheets. They are produced by pressing natural gypsum material and cellulose. This material does not require additional surface treatment with a layer of waterproofing. Can be used for thermal insulation of the combustion chamber and the body of the potbelly stove from the outside;
- The use of calcium silicate allows you to reliably insulate the firebox and internal surfaces of fireplaces. But the material is expensive, so it is not in high demand.

Calcium silicate panels
Step-by-step instruction
Thermal insulation work is carried out taking into account certain rules and safety standards. It is first recommended to decide on the method of insulating the stove. The following elements are thermally insulated in the furnace structure:
The first structure is insulated in the following cases:
- reduction of heat consumption - thermal insulation work is carried out when the fireplace or stove is not designed correctly, when all the heat comes out through the chimney (due to excessive draft or the use of materials with high heat transfer);
- insulation retains heat;
- elimination of condensate: if the pipe is not insulated, condensate collects in it, it destroys the pipe masonry or welded coating joints.
Experts recommend insulating the surface of the stove located close to the walls of the house. Otherwise, cracking of the brick will occur due to temperature fluctuations. Thermal insulation between the wall and the stove is carried out using the following materials:
- asbestos slabs;
- thermofoil (as a heat reflector).
The method under consideration is used if the space between the stove and the wall exceeds 5 mm. If the distance is small, then asbestos cannot be used (due to the composition of the material).
It is possible to carry out thermal insulation work using the following technology:
- strengthening the wall using metal sheet hangers;
- installation of slabs of ceramic or asbestos insulating material;
- filling gaps and seams with mineral wool;
- winding the pipe with an external reflector (foil).
Since mineral wool does not tolerate condensation, a special material should be used to insulate this seal. A similar technology is used for furnace thermal insulation. At the same time, the wall does not heat up or heat up.
Technology for installing fire-resistant materialheat-resistant materials for finishing walls near the stove
Multilayer protective technology, using the example of wall cladding near a heater in a bathhouse, consists of a sequence of actions:
- A layer of vapor barrier and waterproofing is attached to a wall made of combustible material. As a vapor barrier, you can use a three-layer film consisting of foil, polyethylene, and kraft paper for strength. It is attached using a metal profile (wooden blocks can be used instead of a metal profile).
- Next, insulation is installed, for example, foiled mineral wool. It is placed inside the sheathing so that the foil layer is on top. The joints of mineral wool slabs must be sealed with aluminum tape.
- Using self-tapping screws, fire-resistant boards, for example, made of fiber cement, are attached to the sheathing. An alternative to fastening a multilayer structure is to install the plates with self-tapping screws through a sleeve. This creates a space between the slab and the wall.
- After fixing the slabs, they can be faced with ceramic tiles for aesthetics. To do this, a metal mesh is screwed onto the self-tapping screws onto the slabs, onto which heat-resistant adhesive is subsequently applied and the tiles are glued.
If the installation is carried out in compliance with the technology and ventilation gaps, the wall near the stove will not heat up and will not create a fire hazard.
A budget-friendly way to protect between a stove and a wooden wall is to use profile metal used for the roof. To do this, you will need two sheets of such metal and hollow tubes. Hollow metal tubes are attached to the wall, and a metal profile is mounted to them. The distance to the floor and ceiling should be at least 10 cm. The tubes are attached to the sheet in the same place as the first ones and covered again with the sheet. Hot air moves in the gaps between the wall and the floor, while the wall remains unheated.
Conclusion
Thermal insulation materials for stoves are an important component of the stove itself, without which it will not be possible to properly arrange the work.
Also, it is worth adding that it is very important to choose the right material, install it firmly and not overpay a lot of money for it. Fortunately, there are now a huge number of materials and by studying them, you can understand for yourself which one will suit your stove or wall
Fireproof decorative panels for stoves can not only protect you, but also complement your interior. Experts say that choosing insulating material should be like choosing wallpaper. Sheets, panels or slabs must fit correctly into the overall picture of the room, especially if we are talking about a stove inside the house.
Heat-resistant insulation for furnaces is not a luxury, it is a necessity. You could even say that this is an important element of the stove, which you cannot do without. When equipping your stove, do not forget to immediately make a list of the necessary materials for thermal insulation of the surface around the stove.
We invite you to familiarize yourself with a DIY flower vase made of cardboard
Protective devices in the Teplodar assortment
The screen is not the only possible obstacle to hot air. A full range of measures to prevent fire due to overheating involves the use of the following materials:
The pre-furnace sheet protects the floor from sparks and combustion products.
- pre-furnace sheet (protects the floor from sparks and combustion products; located in front of the door for loading fuel);
- door with heat-resistant glass (can be installed on any Teplodar stove);
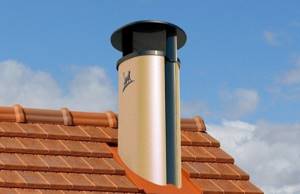
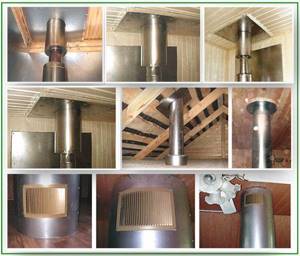
- ceiling trim (a product that encircles chimneys with a diameter of 11.5-20 cm);
- sandwich mesh (mesh chimney fencing that protects the chimney from contact with a hot surface);
- economizer (placed on the first single-wall pipe module, performs protective and decorative functions).
Installation of a Jotul stove-fireplace in a country house
When choosing and purchasing a cast iron fireplace stove for your home or cottage, clients of our Stove Center often have questions:
- – how to install the stove and chimney?
- – what materials are preferable to use for installation and fire safety?
- – what options are there for installing the stove and chimney?
- – how and on what can you save when installing a stove?
In order to answer these questions, our stove installers will use a specific example to explain to you the features of installing a fireplace stove, the stages of installing the stove, and the materials used. In this case, the client of Pechny decided to buy a JOTUL cast iron fireplace stove. From the range of fireplace stoves, the JOTUL F100 IVE stove was chosen. This stove is covered with light enamel in “ivory” color, has double combustion, is equipped with a clean burning function, the nominal power of the fireplace stove is 5.5 kW. The stove is designed to heat a room with a volume of 50 m2 with a ceiling height of 2.5 -2.7 m with average heat loss at home, and is ideal for quickly heating a client’s country house.
How and on what you can save when installing a stove
Of course, there are options for saving on installation and materials. But you should always remember that the miser pays twice! In search of cheapness, you can attract private “traditional craftsmen” - or a “charazz-montazh” company - who will promise to do everything in the best possible way for a penny and, after the work has been completed, will disappear. Or you can attract experienced, proven specialists who give a guarantee and, in case of identified deficiencies, undertake to correct them.
There are also savings options when choosing related materials and a chimney for installing the stove. Currently, there is an abundance of stove materials on the market; there is plenty to choose from. You can choose an inexpensive chimney - which will become unusable in two or three years, and you will have to replace it with a new one. Or you can immediately install a chimney that is more expensive, but of higher quality and for a long time, for example, Schiedel Permeter, which has a 10-year warranty!
When choosing materials for installing a stove, it is necessary to take into account that the stove is a fire hazardous device, and therefore, in no case should you skimp on safety! In the example below, modern, reliable, environmentally and fireproof materials were used, with an optimal price/quality combination - supersil, basalt, superisol
and others.
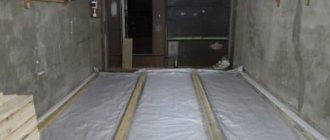
Arrangement of the podium.
The weight of the JOTUL cast iron fireplace stove is relatively small and does not require a special, capital foundation. Sometimes it is enough to simply use a flood sheet on the floor covering where the stove is installed. This is the advantage of ready-made fireplace stoves over brick ones, as it significantly reduces installation costs. The podium, or flue sheet for the stove, is made of non-combustible materials, and is designed to cut off the flow of warm air from the floor, and prevent burnout when coals may fall out of the open stove.
Installation steps
Many questions regarding installation rules vary, depending entirely on what type of fireplace was preferred. The easiest way to install the device is to purchase ready-made models, free-standing, which only require finishing the floor covering and nearby walls. Installing a metal stove yourself is not difficult, since all elements are supplied assembled.
Devices with gas equipment, on the contrary, require only qualified work. Even though all the manipulations are elementary, you cannot start working independently without appropriate approval. Otherwise, the installed fireplace will not be allowed to be connected to the natural gas main.
The framing of a cast iron stove or firebox follows the brickwork algorithm of a classic fireplace. Work begins with the formation of the foundation. It is carried out even if the design mass of the structure is quite acceptable. Trim elements add significant weight to the fireplace.
The foundation for a brick fireplace must be strong and isolated from the foundation of the building itself. The depth of the pit is 50-60 cm. Rubble can be used if necessary. But the upper layers of the foundation must be filled with mortar. To adjust the filling height to the floor, you often have to use wooden formwork.
A fireplace built in the future not only does not come into contact with the walls of the house, but is also insulated to prevent fire. The walls are insulated before they begin laying the fireplace body. The area for work is determined based on the size of the housing. To the basic indicators, an overlap of 1 meter is added in all directions.
In wooden houses, the walls are insulated using a multilayer principle. Vertical slats made of metal profiles are attached to them. Insulation material is placed in the space between them and the top is covered with sheets of plasterboard.
The second layer will be installed on the drywall sheets. To do this, you will have to use metal profiles again. Now heat-resistant plates coated with foil are inserted into the space between them. If for some reason it is not possible to produce multi-layer insulation, then a wooden wall can be protected with a brick barrier. The only difficulty is that this barrier requires building its own foundation.
The fireplace is laid according to one of the selected schemes. The back wall of the firebox cannot be the wall of the house. There should be a small gap between the fireplace body and the insulation you just installed. Otherwise, the work is no different from construction in ordinary premises. The order in the form of a diagram serves as a guide to action. Installing a fireplace stove in a wooden house follows the general rules. The masonry sequence includes the formation of the ash pit, firebox, combustion chamber, smoke tooth and chimney.
Despite the fact that the most heat occurs in the firebox, which has already been insulated from the walls, the most stringent requirements are imposed on the construction of the chimney. Where the pipe exits through the ceiling and through the roof, a distance of 15 cm must be ensured to the ceiling. The chimney itself, if the fireplace design allows, is constructed from two pipes of different diameters. The resulting insulation is not ideal, but it does its part. The space formed by the difference in diameter (between the pipes) is filled with mineral wool for insulation purposes.
Although it is quite possible to build a stove or fireplace in a wooden building, you should think twice before taking on such responsibility, because the slightest flaw can lead to dire consequences.
Products used
The following materials can be used for chimney insulation:
- mineral wool;
- glass wool;
- brick;
- slag slabs or heat-resistant cement mortar.
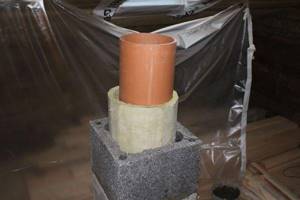
The insulation of a chimney depends on the material from which it is made. If the pipe is steel, then construction wool is used. The design consists of 2 parts (length does not exceed 1.5 m), which simplifies compaction of the insulating material. The size of the casing should be 12 cm larger than the diameter of the pipe.
The first part of the structure is first put on. Then the insulation is applied evenly. The second part of the chimney is installed. The building is insulated. The pipe is installed with a slight slope. The resulting gap is covered with cement mortar.
A steel chimney consists of 2 pipes of different sizes. A protective casing is placed on the smaller pipe (chimney). A thermal insulation layer is laid between the pipes. A pipe with a smaller diameter is placed in a structure with a larger diameter. The gap formed between the pipes is filled with construction wool.
A brick chimney is insulated using the following technology:
- applying the base;
- installation of reinforced mesh;
- sealing cavities and cracks with a solution;
- applying plaster in several layers (their thickness should not exceed 5-7 cm);
- complete thermal insulation;
- mineral wool is cut taking into account the size of the chimney;
- fixing the heat insulator with metal tape or wire;
- lining the pipe with ceramic or asbestos slabs;
- plastering the surface.
This method of thermal insulation allows:
- reduce heat loss by 2 times;
- seal the chimney;
- prevent the formation of condensation and destruction of the chimney;
- improve quality and safety.
Furnace insulation is a necessary procedure for a high-temperature furnace used to heat a home.
Thermal insulation work can be done with your own hands, following the recommendations described above.
On the construction market, the most common metal protective screens are made of steel or cast iron. Many manufacturers of iron furnaces provide thermal insulation for their products, providing them with special casings.
Choosing protective screens is quite simple, because depending on the side of the furnace to be insulated, you can purchase a front or side panel. Installing such screens will also not cause difficulties, because the manufacturer provides special legs that can be easily attached to the floor.
Next we should talk about the installation rules. The panels themselves are installed at a distance of 1-5 cm from the stove, but a distance to the adjacent wall is also required. Protective screens reduce the radiated temperature to 80-100°C, which allows them to be installed 50 cm from a parallel wall.
Purchase and installation of a fireplace
- Prepare a floor plan, as well as all interfloor ceilings. It is also important to know the volume of heated rooms, the height of the ceilings and roofs. With this information, go to the store and choose a model to suit your taste and budget. Immediately purchase all the chimney parts recommended for this stove, do not skimp on safety!
- The area for a cast iron fireplace for a summer cottage is prepared as follows: level the floor using a level and suitable non-combustible building materials, and, if necessary, reinforce the floors. If the wooden walls are located too close to the side surfaces of the fireplace stove, it is recommended to finish it with tiles, artificial stone or install a screen made of thick foil. Non-flammable stove panels are also available for sale.

Cast iron fireplace in the interior
Types of metal furnaces
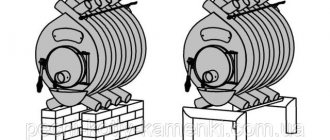
Recently, metal stoves have been in greatest demand.
A metal stove is a long-burning apparatus. It can be used periodically or continuously. The body of the product is made of alloys that conduct heat well, so this heater warms up the house much faster than a standard brick stove.
The advantage of iron structures is additional functions. Based on their purpose, they are divided into 3 types.
- Heating - used only for heating. The stove itself conducts heat. However, the device can be equipped with air pipes that transfer heat to adjacent rooms.
- Cooking and heating - more often found in dachas. The design is equipped with a hob, sometimes even an oven. It can be used as a kitchen gas oven and cook food on it.
- Household - this is the name of the most compact models designed for quick heating of the room. They are placed in a garage, barn, bathhouse, that is, in rooms where there is no need to maintain a comfortable temperature for a long time.
There are other modifications of the stove. For example, products with firebox doors made of heat-resistant transparent glass are popular: the model replaces a fireplace. For the steam room, choose products with nets for stones.
Furnaces are also differentiated according to the material they are made of.
- Ordinary steel is used more often for household structures. With prolonged use, the body will burn out. Maximum heating temperature + 400°C. If you use the model for less than 2 hours, then +600°C.
- Heat-resistant steel – can withstand prolonged heating up to +800°C. For the furnace, use steel with a thickness of at least 3 mm. Models made of heat-resistant alloy are used as heaters and kitchen appliances. They are compact, very light compared to brick ones, and can be installed anywhere in the room, but must be equipped with a chimney.
- Cast iron is an alloy that conducts heat well and accumulates it to some extent. Cast iron is very durable, does not rust and is not afraid of water and steam. However, such a stove weighs much more: for production they take material with a thickness of 6 to 25 mm. In addition, it is effective on an area of no more than 60 m².
All metal stoves are a fire hazard for a wooden house, since the body of such models becomes very hot.
Types of chimney insulation
It is necessary to insulate the chimney from two negative destructive factors: from overheating of structures and from leaks at the joints. Therefore, in this article we will consider two types of chimney insulation:
- Fireproof thermal insulation;
- Waterproofing.
It is recommended to immediately carry out comprehensive insulation, solving not only the main problems, but also improving the operating conditions of the furnace. For example, insulating a pipe running through an unheated attic reduces the risk of overheating of wood roofing elements and reduces the risk of condensation that can lead to excessive soot deposits, corrosion or pipe failure. Waterproofing the pipe will help avoid rotting of the rafter system and ceilings, as well as pipe destruction if it gets wet.
Methods of fireproof insulation of chimneys
The simplest and most reliable, but not always the cheapest, way is to install a “sandwich” chimney made of ceramic or metal. In such chimneys, the inner pipe, which performs the function of removing smoke, is made of heat-resistant steel or ceramics and is thermally insulated with non-flammable insulation: mineral, stone or basalt wool. The outer layer of a sandwich chimney is made of steel or ready-made expanded clay concrete blocks.
Prefabricated ceramic chimney - a safe solution to the problem
Prefabricated chimneys are equipped with elements for fastening, inspection, maintenance, as well as for connecting several heating devices. Installation of such a chimney is simple, but requires following the instructions, only then will it be completely safe.
Thermal insulation of sandwich type pipes
Video - sandwich diaphragm for passing pipes through ceilings
Another insulation method used when building a stove is a brick chimney. Due to the low thermal conductivity of the brick, its walls do not heat up to dangerously high temperatures, so no additional measures to insulate such a chimney are required, except for the correct implementation of fireproof cutting of the floors and roof. To save money and facilitate construction, a brick chimney is sometimes finished with a pipe made of metal or ceramics. In this case, they are thermally insulated using the technology described below.
Thermal insulation of metal and ceramic single pipes is possible using boxes made of non-combustible materials and mineral non-combustible thermal insulation - stone or basalt wool. It is possible to operate such chimneys without thermal insulation, but fire-proof cutting according to all the rules is mandatory in any case.
Methods of waterproofing chimneys
Chimney waterproofing is installed where it exits onto the roof. The larger the pipe and the farther from the ridge it is located, the more difficult operating conditions await it: when it rains, more abundant flows of water, in winter - an increased snow load. Rain and melt water, if waterproofing is insufficient, penetrates inside the house, leading to leaks, rotting of wood and destruction of concrete and brick structures, including the chimney itself.
The method of waterproofing depends largely on the shape of the pipe and the type of roofing. For round pipes, metal or polymer grooves are used, for rectangular pipes, metal aprons and junction strips are used. How to waterproof a pipe is described in detail in the article “Roof cutting of a chimney”, and then we will talk about the technology of thermal insulation of a chimney.
Features of interior and exterior decoration
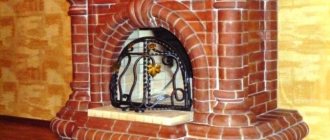
The fireplace consists of a portal and a hearth. A hearth is a place for burning or simulating it. The portal also performs a decorative function and is richly decorated with various materials. Each detail requires a certain finishing.
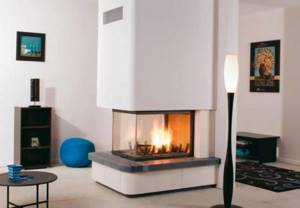
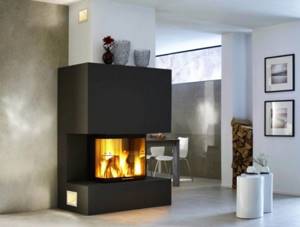
Three-sided fireplaces
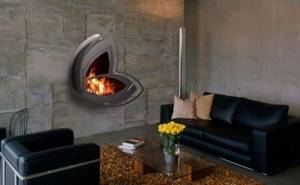
According to many, a three-sided fireplace best displays the beauty of fire and looks great in a home or apartment. It is a fireplace with a combustion area closed on three sides by a glass-ceramic window.
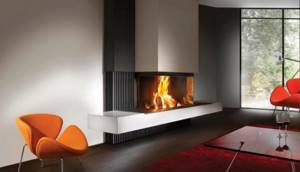
In most cases, a false wall is used to decorate the exterior of a three-sided fireplace. It is less common to see a similar model located in the center of the room. Fireplace shapes are different. It can be a cube, pyramid, cylinder and other original options.
The design of three-sided fireplaces stands in the way of modernity. Here you can see styles such as modern, high-tech and country.
False fireplaces
For those whose dreams constantly lead to thoughts about a fireplace, but the possibility of placing it in the apartment does not exist, false fireplaces were invented. They do not have a hearth or fire, so they are the safest.
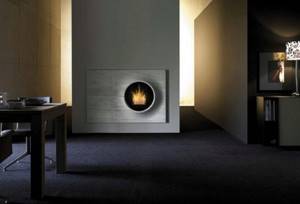
Why do you need a false fireplace? All for the same comfort. For example, such a design can cover the unaesthetic appearance of radiators, place a heater for additional warmth, use it as a stylish shelf, place candles, or complement a cozy interior.
Drywall is most often used for the base of the fireplace; it is decorated with wood, artificial stone, decorative brick or ceramic tiles.
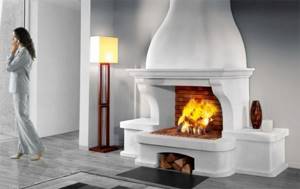
Artificial fireplaces
In most apartments, installing a fireplace with a real fire is problematic and, as it turns out in practice, unrealistic. Indeed, it is much safer and easier to save the soft light of a real fire for a country house. For an apartment, the optimal solution would be an artificial fireplace.
The same materials are used for its finishing as for a false fireplace, because it does not pose a threat or any danger when operating from an outlet. Drywall, brick, tiles - these are the finishing options for artificial models.