Greetings, my readers! I decided to write this post for those who are trying to figure out how to connect an electric boiler to the wiring.
The article is devoted to heating devices using heating elements as heating elements.
I will write about electrode boilers separately. There are several options for performing this operation, and I will discuss them below in turn. We start, as you may already be accustomed, from simple to complex.
Design and operating principle of the structure
The electric heating element, which is installed on the battery, has a specific device that every person who wants to install equipment for their radiators should know about.
In appearance, the product is represented by an ordinary metal tube, in which there is a special small spiral made of copper. Using a special filler, this spiral does not come into contact with the walls of the tube in any way. This entire element is built into a special protective housing, which ensures the reliability of the use of electrical products.
The operating principle of the heating element is as follows:
- cold and hot coolants have different weights, a unidirectional current is created;
- The heated liquid is directed upward, and the cooled coolant goes down.
It is believed that for heating radiators. on which an electric heating element is installed, transformer oil is considered an excellent choice as a coolant. It heats up very quickly and also takes a long time to cool down.
System installation features
Before starting work, it is important to decide. what power should the heating element have?
so that it can perfectly cope with the heating of a particular room. The comfort of using the equipment depends on this. Because if it does not cope with the task, then the room will not have the optimal temperature. Therefore, the performance of an electrical appliance must be chosen wisely.
It is best to choose a product with a thermostat. although it will have a higher cost compared to a design without this element. However, after the work is completed, it will be possible to set certain parameters, which will significantly improve the process of using the room.
The installation itself must be carried out in accordance with numerous safety requirements and regulations. If there are any errors or violations, this may lead to danger in the use of the housing itself or poor-quality operation of equipment that will not be able to cope with heating the room.
Therefore, it is advisable to additionally install a special protective box, which should be selected in accordance with the power of the heating element itself.
Carrying out calculations
At the first stage of work, you need to make certain calculations. which determine how many heating elements need to be produced and what power they should have
It is important to consider which batteries will be installed on, since some products are intended for an aluminum radiator. and others - for a cast iron battery
The power of the heating elements depends on the characteristics of the room itself, which requires the installation of electric heating. The fact is that there may be high-quality thermal insulation of various surfaces, or it may be absent. Additionally, the presence of modern and warm double-glazed windows and the material from which the walls of the building are made are taken into account.
It is important to know the thickness of the walls and the properties of the foundation, since it can be well insulated, so heat loss through the floor will be small
In accordance with correctly carried out calculations, it is possible to determine which heating elements should be purchased and in what quantity. Here it is decided where they will be installed, what additional elements they will be equipped with, and what the features of their installation will be, depending on the type.
Independent creation of an electric heating system
As a rule, any heating element is installed according to the same principle, regardless of its power, appearance and features. It is best to immediately equip it with a thermostat that ensures efficient and comfortable use of this product.
The entire installation process can be divided into the following steps:
Initially, the device in which the heating element will be installed is de-energized; the supply of coolant in the batteries stops, then the liquid must be completely drained from the radiator; in the place where there is a lower plug, the installation of the heating element itself begins, and it must completely go into the pipe, which is intended to supply coolant; then you can reintroduce liquid into the system, but it is important to make sure that the resulting structure is sealed; The heating element is equipped with a thermostat and other elements if necessary, after which it can be connected to the electrical network.
Water heater device
[rek_custom1] The design of an electric heating element for heating or water heating is quite simple:
- housing made of steel or plastic;
- it houses a stainless steel water tank;
- a heating element is installed in the tank.
According to the design of Ariston, the water heating element assumes a spiral with a shell. This spiral is taken and compacted with dielectric powder with a certain filling, most often it is magnesium oxide. Therefore, the period of operation depends on the stability of the film and on the maximum temperature set. In modern heating units, thermostats are certainly installed - devices that regulate the temperature, turn off the heating or turn on the heating elements, depending on the desired temperature.
Also, thermostats can help save a lot of money , since they do not allow the device to work in vain if the required temperature is reached, so when the water is heated to the set value, it turns off. If water and electricity work together, then you need to worry about a reliable safety system, which is guaranteed by the regulator. If problems or breakdowns occur, it turns off the heating system. Such water heating elements have the following operating order:
- a stream of cold water flows through the tube to the heating coil or through several similar coils;
- then the thermostat regulates the water temperature;
- The output will be hot water at the required temperature.
Schemes for connecting heating elements to a single-phase network.
Tubular electric heaters are designed for a specific power
and
voltage
, therefore, to ensure the nominal operating mode, they are connected to a supply network with the appropriate voltage.
According to GOST 13268-88, heaters are manufactured for rated voltages: 12
,
24
,
36
,
42
,
48
,
60
,
127
,
220
,
380 V
, however, heating elements designed for voltages of 127, 220 and 380 V are most widely used.
Let's consider possible options for including heating elements in a single-phase network.
2.1. Plugging in.
Heating elements with a power of no more than 1 kW (1000 W) can be safely plugged into an outlet through a regular plug, since the majority of electric kettles and boilers that we use to heat water have this power.
in parallel via a regular plug
two heating elements, but both heaters should have a power of no more than 1 kW (1000 W), since when connected in parallel their total power increases to 2 kW (2000 W). Thus, you can turn on several heaters, but their total power should be no more than 2 kW, and to plug into an outlet you must use a more powerful plug.
There may be a situation when you have several heaters lying around at home, designed for an operating voltage of 127 V, you can’t throw them away, and you can’t plug them into the home network. In this case, the heaters turn on sequentially
, which makes it possible to apply increased voltage to them. When two heaters with a voltage of 127 V are connected in series, their power remains the same, but the total resistance doubles. For example, when two 500 W heaters are turned on, their total power will be 1000 W.
However, this scheme has one drawback: if any of the heating elements fails, then both will not work, since the electrical circuit will break and the power supply will stop.
You must also remember that when two heaters with an operating voltage of 220 V are connected in series, their total power decreases
twice as much, since due to the increase in total resistance, each heater will receive about 110 V instead of the required 220 V.
2.2. Switching on via circuit breaker.
It will be much more convenient if voltage is supplied to the heating elements using a circuit breaker. To do this, it is necessary to provide a machine in the house panel, or install the machine directly next to the heating device. The voltage supply and shutdown will be carried out by turning on/off
circuit breaker.
The next option for turning on the heaters is carried out with a two-pole switch, which is the most preferable, since in this case the phase and zero are broken simultaneously and the heating element is completely disconnected from the general circuit. Voltage is supplied to the upper terminals of the switch, and the heater is connected to the lower terminals.
If an electric heater is used to heat water and the house is grounded
, then to protect against electric shock in the event of a breakdown of the heater insulation, it makes sense
to install an RCD
or a circuit breaker.
In this case, the grounding conductor
connected to the heating element body or connected to a special screw fixed to the container body. Next to such a screw there is a grounding sign. Let's consider a circuit with a difavtomat:
Protection with a difavtomat works as follows: when the heater insulation breaks down, a phase appears on its body, which, using the least resistance, will “go” along the PE
and will create
a leakage current
.
If this current exceeds the setting, the automatic circuit breaker will operate and turn off the voltage supply. If a short circuit
, then in this case the automatic circuit breaker will operate and de-energize the heating element.
When using an RCD, an additional single-pole circuit breaker must be installed between it and the heater, which, in the event of a short circuit, will cut off the voltage supply to the heater and protect the RCD from short circuit current. In the event of an insulation breakdown, the RCD will cut off the voltage supply.
How to connect heaters correctly: in parallel or in series?
So, should heaters be connected in parallel or in series? This question arises when more than one heater needs to be connected to the power supply. Any number of heaters can be connected in parallel, but usually only two heaters are connected in series. Reliably daisy chaining more than two heaters is challenging. If the heaters are connected in series, the failure of one heater stops the operation of all heating elements in the chain. When heaters are connected in parallel, the failure of one heating element usually does not affect the other heaters.
Most often, two heating elements are used when connecting. In this case, if the heaters are connected in series, the voltage of each heating element should be equal to half the total available voltage. For example, two 240-volt heaters connected in series to a 480-volt power supply. Also, the power of each heater should be the same. (If the power and voltage of each heater are not equal, the heaters will not share the total voltage equally.) If two heaters are connected in parallel, the voltage of each heater must be the same as the supply voltage.
Criteria for selecting a device
Before you buy a seemingly simple Ariston device, you can take note of certain points:
- Equipment warranty. When selecting a heating element, warranty obligations cannot be ignored, because the device ensures normal and safe service of the water heater. Incorrect operation of the installed heating element is also manifested in the fact that the water unit will probably turn off continuously and even give an electric shock.
- Consumable materials for the heater. The standing magnesium anode used to protect the device must be changed once at least once a year. Therefore, when selecting, you need to choose modifications with available consumables.
- Power. It is necessary to take into account that the more powerful the boiler itself, the more powerful the water heating element must be. Productivity ranges from 2-9 kW.
- Types of thermostat. Particular preference is given to a thermostat with a heat-protective function.
- Temperature range. If the user knows what temperature he wants to achieve, then the heating element must be selected with the appropriate rating.
The length of the Ariston heating element and the tubes for the thermostat play a significant role in ensuring optimal power and heating speed. More famous are heating elements with a power of 2-5 kW. Also separately distinguished are those heating elements that are installed in instantaneous water heaters. Structurally, such devices do not take into account containers for storing water, so the purpose of the heating element is to heat the full flow passing through it to the desired temperature.
Heating elements with a regulator are used in everyday life and in various fields of industry. It, as well as the fitting - the fastening component - is made from different metals. More and more, a heating element is becoming a necessary component for obtaining warm water. And its use in conjunction with a thermostat will significantly reduce utility costs and increase the service life of the device.
How to connect a heating element with a thermostat
Now you know how and by what parameters heaters are selected. But how is the connection made? In order to connect a heating element with a thermostat, you must select a wire with reliable insulation
We also pay attention to the cross-section - it must be such that the wire can provide adequate power to the heater and not melt. For example, for a 3 kW heater, the wire cross-section must be at least 2.5 mm
We recommend choosing cables with copper conductors for connection.
Do not forget to pay attention to the presence of an RCD - it will instantly turn off the power in the event of an unexpected failure of the heating element or a short circuit. The RCD must be installed as close as possible to the heater itself
You should also ensure a reliable connection of the conductors with the contacts of the heating element (without “snot” and flimsy contacts that can spark).
Installation
Sometimes situations occur in which the heating element of the water heater is functioning properly, but the thermostat for some reason has already failed - it does not turn off or does not work correctly. In this case, you can postpone the purchase of a new water heater and limit yourself to replacing the thermostat yourself. To do this, you should take the technical passport of the boiler and, based on its operational properties and technical characteristics, select the appropriate model.
For a more accurate choice, you should rewrite all the data from the markings of the old device, and based on the data sheet and these data, you can purchase a new thermostat.
Installing a thermostat with your own hands requires certain skills and knowledge in the field of electrical installation work. It is very important to comply with safety regulations, without knowledge of which work cannot begin. The thermostat should only be replaced with a model similar in its technical characteristics; the use of a home-made device for installation in a factory-made boiler is not allowed.
At the first stage, you should turn off the power to the water heater and stop supplying water to it from the water supply system. Then you need to drain the existing liquid and remove the bottom panel of the device, thereby opening access to the heating element. After opening the cover, you need to remove the pressure ring and remove the old thermostat along with the control unit.
Next, you should install and connect the new thermostat, put the pressure ring in place and fix the bottom panel. After installation is complete, you need to fill the water heater tank with water, turn on the heating element and check the operation of the new device by setting it to the minimum temperature value.
If the thermostat turned off the heating element after the water had reached the desired temperature, then the installation was carried out correctly and the thermostat is functioning in operating mode. At the last stage, you should adjust the thermostat, giving it the necessary operating parameters.
Diagnosis of failure and selection of a new device
It is quite simple to detect damage in a timely manner in order to avoid unnecessary expenses and maintain your health. What can be detected even with the naked eye is that the water has stopped heating. To check its functionality and serviceability, remove it from the heat exchanger itself, and then put it to measure resistance (Ohm). A special tester is used for this. If the tester does not show any reaction (no changes occurred on the device screen during testing), then we can conclude that the device is faulty and needs to be replaced with a new one. Thermostats cannot be repaired.
We would like to draw your attention to the fact that any independent actions for the purpose of inspection or repair without the appropriate knowledge, skills and compliance with safety rules can cause injury. It is better to seek help from a specialist.
It is best to choose a new one from the same company. Thus, all their parameters will coincide and function smoothly. The form and principle should be similar to the previous one. It is determined by the temperatures that need to be regulated, the quality of the materials from which the device is made, the brand, manufacturer, etc.
At first glance, it may seem that the heating element plays a key role. Some people think that the most important thing is the volume of the device. But experts say that you should not forget about quality and service rules. Set adequate heating degrees, the power of the heating element, carry out regular checks, and also be attentive to the main “symptoms”. This way you will protect full functionality and make it safer for you and your family. Moreover, the service life of household appliances will be extended, and finances will be saved.
Purpose of a thermostat for a water heater
In addition to all of the above, the thermostat is responsible for the safe operation of the boiler. To be more precise, as the water temperature rises, the pressure inside the sealed tank also increases, and if this growth is uncontrolled, an explosion will soon occur. This can be dangerous not only for equipment, but also for human health if you are nearby at that moment. A temperature regulator is a device through which the optimal temperature level is also maintained.
Starting with the hot water tank. When hot water is used, cold water enters the bottom of the tank at the same time. This will cool the lower thermostat and the lower element will heat up. If enough hot water is used to cool the top thermostat, the bottom element will turn off and the top element will heat up.
Electric Water Heater Repair Tools You May Need
Taking the above information, let's say that you have a normal amount of hot water, but when you use a lot, it takes a long time to heat the backup. Let's say you have hot water, but it's running out quickly. Garden hose - into the drainage tank Multimeter - for checking power, thermostats or elements.
- Elemental tool - for replacing elements.
- Screwdriver - for replacing elements or thermostats.
It is designed to cut off power to the water heater if the water temperature must rise to dangerous levels. This is a kind of thermal valve that prevents:
- Overheat;
- Explosion;
- I damage not only equipment, but also nearby property.
It is he who is responsible for controlling the heating of water at the moment when the device is connected, as well as for ensuring that the heating element is blocked in time. Almost every manufacturer strives to equip the boiler with a thermostat. The products come in different models, however, they all have the same operating principle. At the moment when you need to connect the equipment to the network, you need to immediately adjust the water heating level.
If the limit switch should stop, the reset button will pop out. When the water in the tank has cooled, the button can be pressed to reset the limit switch. When a limit switch trips, there is a reason. This could be a faulty thermostat, a grounded element, or the limit switch itself.
It is a kind of thermal valve that prevents
Water heater thermostats control the temperature of the water and act as switching relays, sending energy where it is needed. The elements will always be 120 volts, even when the thermostats are turned off. When the thermostat calls for heat, it will send another 120 volts to the element it controls. This will give the element 240 volts, causing it to heat up.
Next, controlled heating of the water is carried out, and the relay installed on the thermostat is responsible for opening the contacts of the heating element. When the tank cools completely, the temperature drops below normal, and the contacts of the heating element of the relay close, due to which the system starts up, and the liquid in the tank heats up again.
How to install your own electric heating system
Before using heating elements in heating radiators, it is worth deciding on the required heating power
It is also important to have information about the characteristics of the electric heating element, in particular its performance. This will avoid wiring burnout and unnecessary costs for purchasing a new cable.
You need to understand that independent installation of heating, if there are some errors, can lead to insufficiently efficient heating of the home or even incorrect operation of the system. In order for everything to function stably, it is recommended to acquire a thermostat. Additionally, it is worth installing a special protective box, the functioning of which is designed for the power of certain heating elements.
The number and performance of devices for heating a house based on an electric heating system is calculated taking into account the volume of the premises. To begin with, average power indicators are selected that are sufficient for high-quality heating of 1 m3 of living space.
Average values for premises:
- with reliable thermal insulation, equipped according to European standards - 20 W/m3;
- with modern double-glazed windows, effective insulation of floors and walls - 30 W/m3;
- with insufficiently reliable thermal insulation - 40 W/m3;
- with frankly poor insulation - 50 W/m3 or more.
Based on the above calculations, the required power for high-quality heating of a particular room is determined. Based on the same values, a sufficient number of heating elements is selected.
Doing the calculations correctly is extremely important. As practice shows, with proper selection of equipment and reliable installation, installing electric heating even in a wooden house becomes an absolutely safe solution.
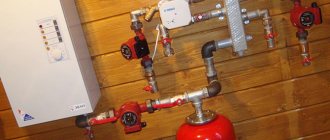
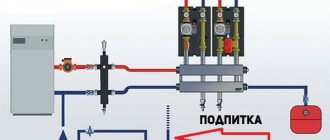
Connecting heaters according to the STAR scheme for an electric boiler
In electric heating boilers, heating elements can be connected in various ways, but to demonstrate the STAR-type connection diagram, we will describe the option of installing dry heating elements to a 3-phase power supply network with a voltage of 220V.
The high power of dry water heating elements imposes certain requirements on the quality of connections. The reliability of the connections must be ensured by high quality heat-resistant wires and strict compliance of all actions with the diagram described in the instructions.
The first thing to do is to screw on the M4 nut when connecting the phase drives. Next, you need to apply the washer and install the ring terminal of the power wire. The next step is to apply another similar washer, on top of which another special Grover spring washer is placed. And all this needs to be securely fixed with an M4 nut.
The wires that lead to the neutral phase are secured using an M8 bolt. The neutral wire must be placed in a jumper, which is located between the contacts of the heating element holes.
Be sure to ground the body of the heating element and power wires after connecting all the wires to the supply and neutral contacts of the heating element. In most cases, in standard electric boilers, the grounding bolt is located on the left side near the block with heating elements. We must connect the grounding wire to it.
After connecting the wires, ground the heater body and the heating element connection wires. Typically, grounding boilers have a bolt on the left side of the electric heater block, to which the grounding conductor should be connected.
You can use either a separate potential equation wire or a wire from the grounding terminal block of the control unit for grounding.
You can clearly see all of the above described in the figure below in the form of a diagram and photo of connecting the heating element.
If you have done everything in strict accordance with the instructions, the connection of the heating element of the electric boiler can be considered complete. All that remains is to return the protective casing to the heating unit.
In electric boilers, heating is controlled based on data from temperature sensors. Thermostatic devices are located on the main control panel of the boiler. The thermostat will receive data on the temperature of the heating element and the temperature of the coolant. Based on these readings and the settings set on the thermostat, a decision is made automatically to supply or turn off power to the heating elements. While the temperature is below the set one, power will be supplied and the heating elements will produce heating, and when the threshold value is reached or exceeded, the power will be turned off and the heating elements will stop heating. When it cools down to the lower threshold, the heating element will turn on again.
The thermostat allows a person to set the temperature (upper and lower thresholds) just once, and then the electric boiler will operate automatically, and the temperature will be maintained at the desired level.
There is an option to use thermostats with several types of temperature sensors, which will not only control the heating of the heating element itself, but also the air temperature in the room. To do this, the temperature sensor must be installed at a distance from the boiler and coolant.
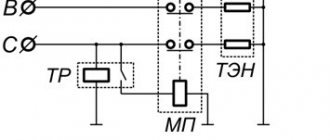
Connection option to a three-phase STAR power supply network
The STAR type is used in dry heating elements from the Polimernagrev company in connection option No. 3 with four bolts as the current output type. Also, the “star” connection type can be used when connecting a block of heating elements. In these cases, the heating coils are connected according to the following electrical diagram:
Let's now look at how we can connect heaters according to this scheme, if we have not special, but standard electric air or water metal heating elements.
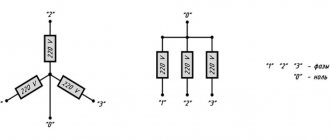
Only one terminal from each heating element should be connected to the supply voltage. That is why, to connect to a three-phase network, we must have a multiple of three electric heaters. The remaining contact terminals that are not connected to voltage must be connected to one so-called zero point. Thus, we get a three-wire connected load.
Let's take a closer look at the three-wire connection diagram at 380 V for turning on 3 water heating elements. In the first figure, you can consider the circuit for switching on the heating elements described above, and in the second, a special device is added to the diagram for supplying voltage to the heating elements with protective switches. As can be clearly seen in the diagram, every second heater current lead is supplied to phases A, B and C, and the rest are connected together.
By connecting heating elements in this way, we obtain a power supply voltage value on each electric heating element between the connection to the network and the neutral point equal to 220 V.
In the above diagram you can see that the heater terminals on the right are connected to phases A, B, C. The terminals on the left are connected at a common neutral point. The operating voltage between the terminals on the right and the neutral point is 220 Volts.
There is also an option for connecting to a three-phase STAR network, which uses a four-wire circuit. With this method, three-phase power is used with a voltage of 230V, and the zero point is supplied to the neutral of the power supply.
Here, as in the previous case, some terminals are connected to the zero point, while others are connected to a three-phase network. If the connection to the zero point is transferred to the zero bus of the power supply, we will receive a voltage of 220-230V on each heater between the power supply and zero.
When it becomes necessary to completely turn off the power to the heaters, you need to use switches of the 3+n or 3p+n type, capable of operating in automatic mode. Automatic machines of this type can be used to completely transfer all power electrical contacts to a fully automatic operating mode.
Let's look at how the STAR connection type should be used in practice, using the example of installing heating elements in an electric boiler.
How to use it correctly
In addition to the banal failure to follow the operating instructions and safety regulations, heating elements can break due to:
- shell corrosion;
- its rupture as a result of overheating;
- constant changes in mains voltage;
- and just a general depressurization of the tube.
In order for the device to heat your home for as long as possible, you need to follow simple rules:
- When connecting the wires, you should not be too zealous and over-tighten the contact nuts of the output ends of the heating element - they may burst.
- The device must be connected to the network only when it is in water. Otherwise, lowering a heated spiral into water can result in a fairly strong explosion.
- The surface of the heating tube must be regularly descaled. It all depends on the quality of the water, but during constant operation, it is best to clean it once a quarter, avoiding scale build-up of more than 2 mm.
- If there are problems with the quality of the power supply, you should connect an uninterruptible power supply or stabilizer.
- For the coolant, it is best to pour distilled water into the system; the percentage of impurities in it is minimal. They are the reason for the appearance of scale on the shell of the heating element.
- Use residual power supply devices (RCDs) - if the heating element breaks down, it will be immediately disconnected from the network.
- Grounding is mandatory.
It's important to understand. Not every heating element can be mounted in a heating radiator. You need to select specialized models in strict accordance with the required diameter
You need to select specialized models in strict accordance with the required diameter.
Let's sum it up
Follow all these simple rules and instructions. They will help you carry out safe and efficient heating of premises with electric heating elements, which can be used to form local heat sources or complement a centralized heating system.
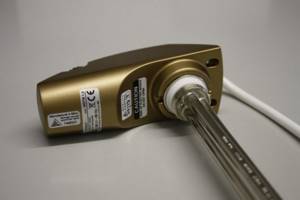
Heating element with thermostat for water heater
Today, modern household water heaters successfully cope with the problem of lack of hot water supply. The design of any such device necessarily includes a heating element - a tubular metal rod. It is he who converts electrical energy into thermal energy and then gives it to water, heating it to the desired temperature. The thermostat built into the heating element allows you to set the degree of water heating.
A heating element with a thermostat is a device of simple design. It consists of several elements, namely:
A metal tube, the material of which can be titanium, steel, brass or copper with a protective coating against corrosion.
Inside the tube there is a spiral of wire, which has a high resistivity, which means that when an electric current passes through it, it can become very hot.
Insulating filler is a material that is designed to prevent the spiral from coming into contact with the walls of the tube.
Contact rod, which serves to connect the heating element to the electrical network;
Porcelain insulators located at the ends of the tube;
Thermal sensor (temperature regulator), which turns off when the set temperature is reached, and turns on again when the water cools down to the lower mark, and so on all the time the water heater is in the on mode.
A water heating element with a thermostat has significant advantages that will ultimately help optimize the water heating process from a financial point of view:
- Thermostats for heating elements allow rational use of resources. When the water in the water heater reaches the set temperature, the heating element turns off and turns on when the water has cooled significantly.
- Simplicity and reliability of design. The water heating element with a thermostat is designed for continuous operation for several years.
- Easy installation. Each water heater model has a special mount for the heating element. Some models provide the ability to use several heating elements simultaneously.
- The low price of a heating element with a thermostat makes it the optimal solution.
Tubular metal heating elements have only a few significant disadvantages. One of them is that if the heating element burns out, it cannot be repaired; it will have to be completely replaced. In addition, with constant contact with water, scale forms on the metal surface of the heating element, which reduces the efficiency of heat transfer. Also, such heating elements often suffer from voltage surges.
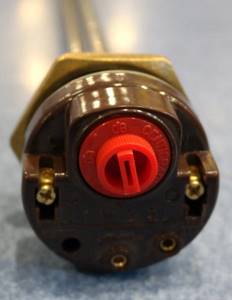
Thermostats for heating elements can be of several varieties. First of all, they are divided into mechanical, their action is based on the properties of various metals when heated, and electronic, based on a sensor.
Water heaters with a thermostat are also available in various designs, differing from each other in the material of manufacture and the method of installation on the water heater.
You can buy a heating element with a thermostat in Moscow for installation in water heaters and other household appliances. In our catalog you will find different models of heating elements that are suitable for all types of modern water heaters, boilers, washing machine tanks, tanks, etc.
We supply heating elements directly from the manufacturer, which allows us to keep prices low and be able to quickly supply the necessary devices in the required quantity. Each large customer can count on individual terms for calculating costs.
Legal address: 117105, Moscow, Varshavskoe highway, no. 26, building 2, floor 2, office 86
Installing the heating element
[rek_custom4] Water heaters with an Ariston thermostat , in addition, are produced in different designs, differ from each other in the material of production and the method of installation on the water heater. The principle of installing the heater is quite simple; you must adhere to the following algorithm:
- You should make a hole in a container with a diameter of 42 mm; the hole should be located in the lower part of the container.
- Install the heating element with the regulator into the hole.
- Tighten the element nut from inside the container into the heater flange.
- Connect the power cable to the thermostat according to the connection diagram.
- Determine the desired water heating temperature in the thermostat in the range from 40 to 80 degrees.
- Cover the control thermostat with a safety cover, cap, or box.
We do not recommend using the device as a constant source of heat and advise giving preference to ready-made, high-quality and economical products for heating water.
Heating element and single-phase network. What to screw to what
This case is typical for dachas and old-built village houses. First you need to generally understand what we are talking about and the easiest way to do this is by looking at the following figure:
So, a single-phase electrical network has two conductors - zero and phase. The picture itself shows two ways to turn on the load - parallel and serial. These methods differ in how the initial voltage is divided between the elements. In most cases, heating elements are connected in parallel so as not to lose useful power; a series circuit is suitable only for various specific cases. A block prepared for connection to one phase will look like this:
It is also worth paying attention to the choice of cable, but we will touch on this point a little later, and now let’s move on to the three phases
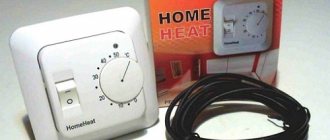
Connecting and installing the thermostat
There are two known options for connecting a thermostat. These are methods for connecting two-core and single-core wires.
Connecting a two-core cable to the thermostat
A two-core wire is used in the case when the TR requires full power from the electrical network for the functioning of a closed system for controlling the heating mode of a certain volume. These are integrated circuits built on microprocessors.
The data received from the sensor in the form of changes in current strength and resistance values are analyzed by the device. As a result, commands are sent to the starter of the heating elements with a given period of time and a boundary threshold for heating a specific space.
Note! An example of connecting a two-core wire is a diagram showing how to connect a thermostat to the circulation pump of a water heating boiler.
Connection diagram to the circulation pump
Connecting a single-core cable to the thermostat
A single-core cable is used in the connection circuit of thermostats in the case when the device itself is installed in the break of the phase wire leading to the positive terminal of the heating element. That is, the cable serves as a phase break in the mains current supplying the heating elements.
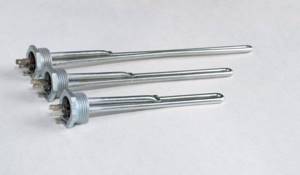
Correct choice of heating element model
When going to purchase a heating element, the buyer needs to know a number of technical characteristics:
- required power of the device;
- length, diameter and shape of the tube;
- length of the insulating cap;
- overall length;
- connection type;
- method of fastening.
To calculate the power of a heating element intended for heating water of a certain volume, use the formula:
P – power of the heated element, measured in kW;
m is the mass of the heated coolant circulating in the device, in kilograms;
tH – initial temperature of water or liquid, in °C;
tK – final temperature of water or liquid, in °C;
T – heating time of water or liquid.
Heating element in a heating radiator - video review:
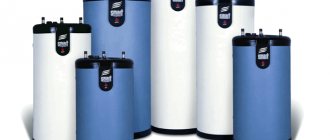
Storage water heaters (boilers)
Without physical and mathematical formulas, a household calculation is described as follows: in 1 hour, 1 kW heats 860 liters per 1 K. To more accurately determine the heating time, power characteristics, and volume, a universal formula is used, from which the remaining results are then derived:
This formula consists of several and reflects a number of parameters, taking into account the heat loss factor. (With low power characteristics and large volume, this factor becomes more significant, however, in household heaters this accounting value is often neglected):
N full – power characteristics of the heating element,
Q c – heat loss of the water heating tank.
- c= Q/m*(tк-tн)
- C – specific heat capacity,
- Q – amount of heat,
- m – mass in kilograms (or volume in liters),
- tк and tн (in °С) – final and initial temperatures.
- N=Q/t
- N – heating power characteristics.
- t—heating time in seconds.
- N = N full — (1000/24)*Q c
Simplified formulas with a constant coefficient:
- Calculation of the power of the heating element for heating water at the desired temperature: W= 0.00117*V*(tk-tn)/T
- Determination of the time required to heat water in a water heater: T= 0.00117*V*(tк-tн)/W
Formula components:
- W (in kW) – power characteristic of heating elements (heating element),
- T (in hours) – water heating time,
- V (in liters) – tank volume,
- tк and tн (in °С) – final and initial temperatures (final – usually 60°C).
Volume is often equated to mass (m). Then the power of the heating element will be determined using the formula: W= 0.00117*m*(tk-tn)/T. The formulas are considered simplified, also because they do not take into account:
- actual power of the electrical network,
- ambient temperature,
- design features and potential heat loss of the tank,
- recommendations of some manufacturers regarding temperature (about 5-8 °C in summer and 15-18 °C in winter).
When purchasing a device, you must take into account that the relatively low power characteristics of storage water heaters compared to instantaneous water heaters do not yet guarantee financial savings. Savings ones “take away” less, but due to the fact that they work longer, they spend more. For financial savings, a more reliable strategy would be a general reduction in water consumption through the installation of various types of savers (https://water-save.com/) and strict accounting of water consumption.
How to choose a heating element for a radiator
A relatively inexpensive heating element with a built-in thermostat; the sensor responds to the temperature of the coolant, not the air in the room
- Design. Heating elements for cast iron radiators are not fundamentally different from heaters for cast iron and steel; the difference may be in the material of the plug and the shape of the outer part of the housing with the thermostat. The instructions for the heating element must indicate the types of heating devices for which it is intended. The diameter of the plug in standard radiators is 1 1/4″ (40 mm), the thread can be right or left.
- The length of the heating tube is an important factor affecting the completeness of heating. The fact is that a short heating element will not be able to create normal liquid circulation in those sections where it does not reach. Therefore, ideally, the length of the heater should be 6-10 cm shorter than the battery.
When selecting a heater, you need to take into account not only the power, but also the length of the tube
Automatic control can be external or built into the heating element. In the first case, the water heater does not have a thermostat, but is connected through a thermostat that measures the air temperature in the room. In the second, the thermostat can be built into the outer part of its housing. The sensor usually measures the temperature of the coolant. The manufacturer is not that important. Famous European companies do not produce such devices, but Polish, Turkish and Ukrainian heating elements are quite similar in quality
Chinese heaters should be treated with caution, although there are decent models among them.

The “correct” heater - insulated safe housing, convenient thermostat