Installing forced ventilation in the bathroom and other rooms is important to ensure a normal microclimate.
The supply of fresh air and the timely removal of exhaust air will make your stay in the room comfortable and enjoyable.
Connecting the fan is a stage on which the performance and efficiency of the entire ventilation as a whole directly depends.
Selecting a fan and starting method
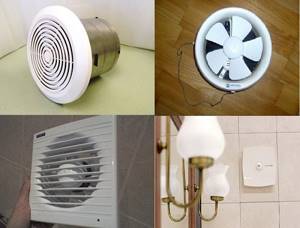
There are many models of exhaust fans on the market, including those for the bathroom.
They differ not only in size and appearance. There are a number of characteristics that should be taken into account when choosing and purchasing. Bathroom fans come in overhead and ducted types, with a solid front panel or grille, in different colors and designs. The first thing that determines the connection diagram of a fan for extracting air from a bathroom is the way it is started.
Depending on the model, there are the following options:
- Turning on the fan body with a button or a cord - they are the easiest to connect, but reaching up to the ceiling every time is not very convenient.
- Starting with a separate switch or in parallel with lighting. The fan itself also has only 2 wires, but the possible connection diagrams are more complex and varied. Including, with an external timer or hygrometer, motion or door opening sensor.
- Control via built-in timer or hygrometer. Such models are connected with a three-wire wire.
- Remote control via remote control. These models combine the ease of connection of the first option and maximum ease of use, but they are also the most expensive.
In addition, not every exhaust fan is suitable for a bathroom. The fact is that this is electrical equipment, and to work in conditions of high humidity, the protection class must be at least IP45, which is confirmed in the documents. In this case, each digit of the marking should be taken into account separately, that is, IP62 protection is not suitable, since the second digit indicates resistance to moisture; it must be at least 5.
In practice, protection is implemented in the form of insulated connection contacts, a hidden or moisture-resistant control board, and a sealed motor housing. Even fans with high moisture protection characteristics are not recommended to be placed in such a way that water can enter them
You should also decide on the type of device design. Axial models are cheaper, but noisier because the air passes directly through them. Centrifugal fans form vortex flows that push air in a circle - this is much quieter. In addition, for a private house you can choose which ones are installed inside the ventilation duct, and not at the exit from it.
Another critical parameter is the power and performance of the fan. To do this, the volume of the room must be multiplied by 6 - 8, depending on the number of residents. The resulting figure is the minimum required volume of air exchange per hour.
A fan that is too weak will not do its job well and will have to be left on for a long time. Too powerful will not only add strong drafts, but can also provoke a reverse flow of air from the common ventilation shaft, with all the neighboring odors.
Also pay attention to the diameter of the fan. If it does not match the diameter of the existing ventilation hole, installation will require additional pipe and construction foam or a hammer drill, as well as significantly more effort.
The comfort of use is significantly affected by the noise of the equipment. Quiet models produce no more than 25-30 dB, less successful solutions produce about 50 dB, and sometimes more.
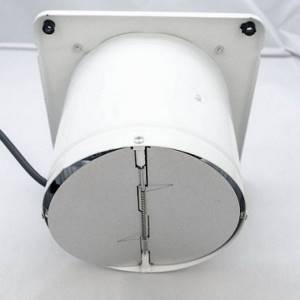
The non-return valve will protect you from odors and moisture from the neighbor's bathroom when the fan is turned off. It also partially protects the device from dust in the mine
In addition to the above parameters, pay attention to whether the fan is equipped with a check valve, a ventilation function, a mode switch, and a display indicating temperature and humidity. Design solutions include original or replacement protective panels, sometimes backlit.
Selecting a connection diagram
Before carrying out major work, you should check the quality of the electrical wiring in order to eliminate the possibility of a short circuit.
In this case, forced ventilation is not required.
If the match continues to burn and the flame does not respond to the exhaust grille, then it is necessary to clean the ventilation ducts and install a fan. It is worth considering this possibility, because sometimes the need for scaling cannot be avoided.
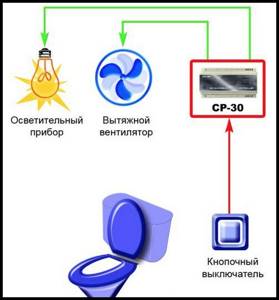
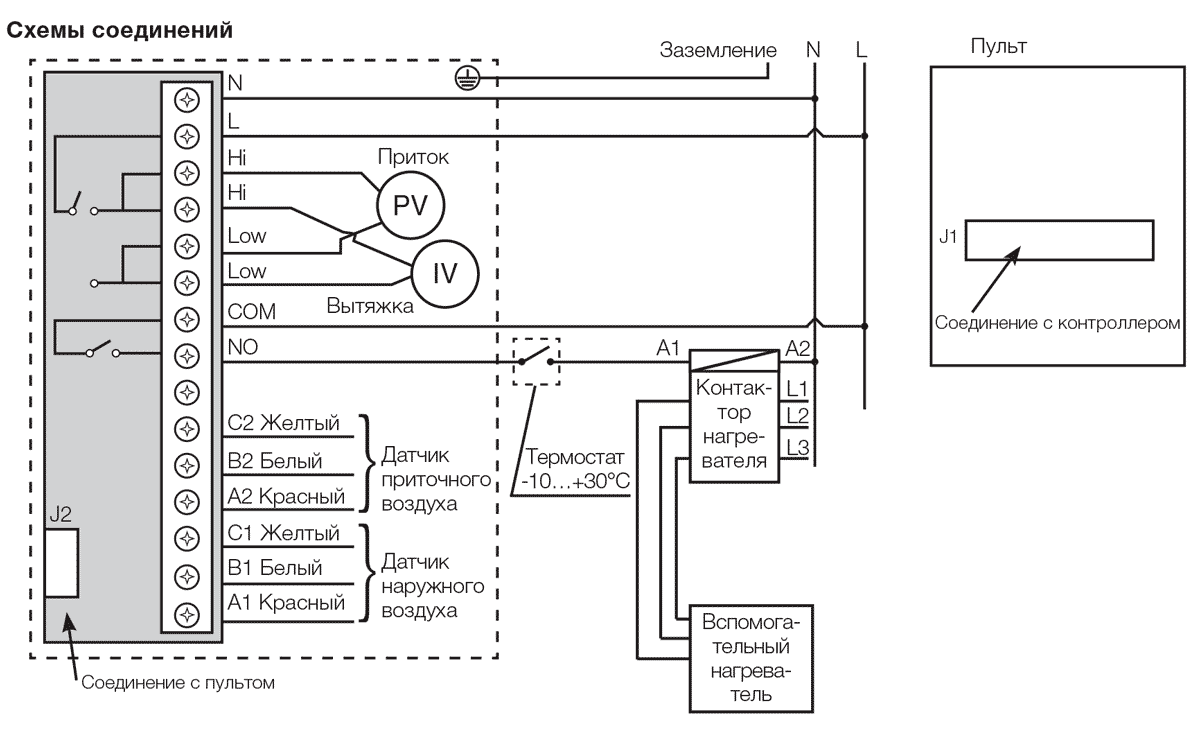
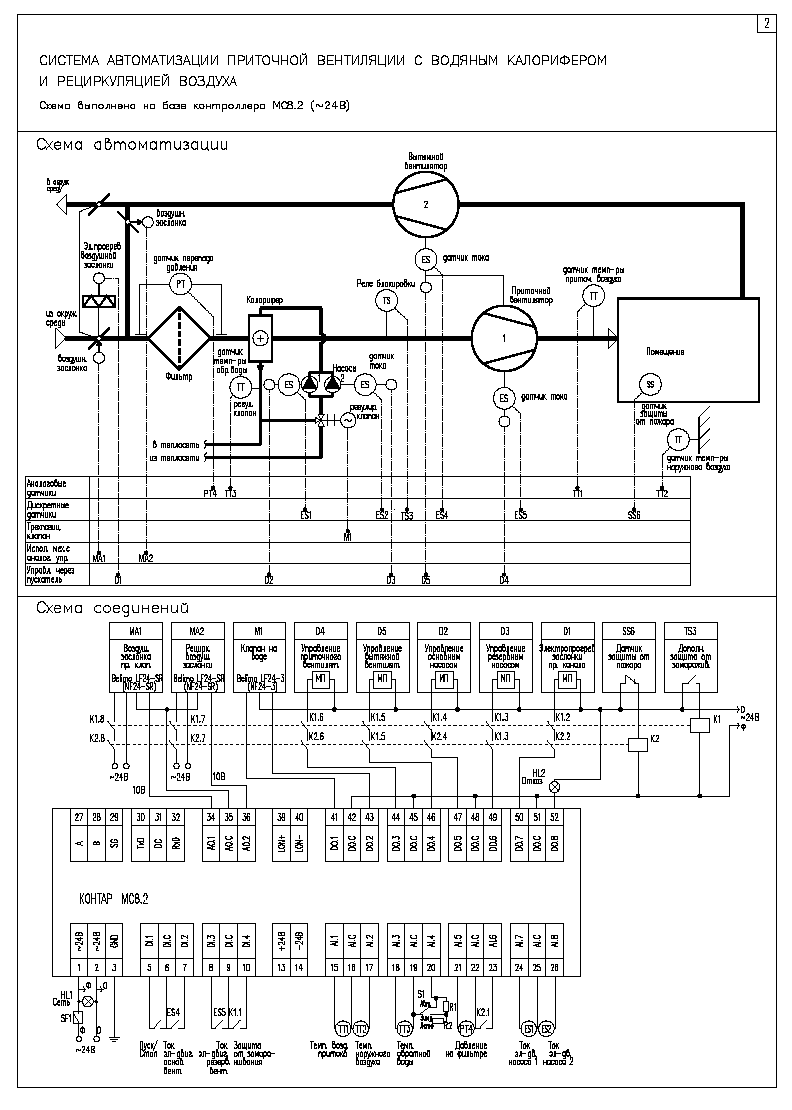
Silent duct-type bathroom exhaust fans are designed to be placed in the flow part of the ventilation system. A socket box is installed in the hole. Against the general background, we can distinguish models of controllers that control the operation of the ventilation unit: with an electric air heater; with an electric or water air heater, as well as an air cooler; with an air cooler and an air heater, configuration of such controllers can be done from a dispatch computer; with a recuperator, as well as an air heater and air cooler. If they fail, ensure full operation of the entire ventilation system.
Often the motor of such a device has a built-in thermal contact with the ability to restart. The system can be arranged in such a way that it has nothing to do with turning on the light in the room; you can connect this mechanism separately.
We immediately draw your attention to the fact that these instructions are suitable for installation in the bathroom and toilet, as well as for the kitchen, where a small cooler is often used instead of a hood. Before purchasing a fan, it is important to choose the most convenient method for connecting the device, after which you can make a purchase. Therefore, owners most often think about how to connect a fan in the bathroom to a switch located separately in the most convenient place. You can lay the cable on the wall surface and lay it in a cable channel. The closing contact is located between the terminal block and the phase wire.
Checking natural ventilation
Why is there a fan in the bathroom? A forced ventilation system may be required for a bathroom when conventional natural ventilation does not cope with its functions. After installing the fan, you need to connect the electrical wiring to it.
The main selection criterion is the cubic capacity of the room, which is subject to forced ventilation. Silent fans are very comfortable for residential premises, because they operate almost imperceptibly to the human ear. In this case, the connection will not be combined with the lighting. Review and connection of the Vents VKMts fan
Source
Installation features
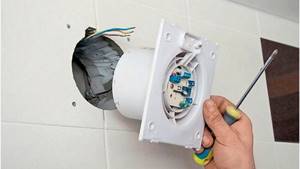
The fan is connected to a two-wire wire. First, remove the front panel from the device. A groove is laid from the distribution panel to the ventilation hole. It must be strictly vertical or horizontal, without inclined lines.
The groove for laying electrical wiring is located no closer than 10 cm to the doorway. The cable is fixed with alabaster or cement mortar. The power supply line can be run inside the corrugated pipe.
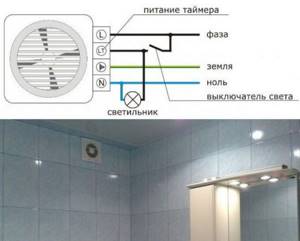
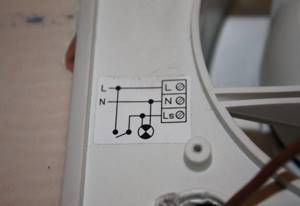
The fan terminals are marked in English:
- L - phase.
- N - zero core.
- T - for connecting the signal wire. Used in models with a timer.
The veins vary in color. Zero is blue, the phase is in brown or white insulation. They must be correctly connected to the fan terminals and check the reliability of the contact. There are 4 holes for screws or self-tapping screws on the device body. Fastening elements are included in the delivery set. The fan can also be mounted on tiles without drilling. Silicone glue is suitable for this. You can use liquid nails.
Ceiling installation
Ceiling hood in the bathroom
In some homes, the electric fan may be mounted on the ceiling. In private houses, the ventilation duct is laid in the attic, therefore the ventilation system is located there.
Installation on a suspended or suspended ceiling becomes more complicated. On a suspended ceiling you will need to make a special stand, and the cooler can be screwed to the plasterboard using dowels. If the ceiling is already installed, dismantling will be required. To avoid dismantling the ceilings, you can use one of two methods:
- pulling wires through a hole that will need to be sealed later;
- run the wiring along the ceiling and hide it with a cable duct.
Exhaust fan connection steps
Connecting a fan in the bathroom and toilet is necessary to ensure air exchange in the room.
For normal operation of the device, all stages of installation must be completed correctly, from planning to connection to the switch.
Before installing the device, you must make sure that all conditions for connecting it are met:
- The common air duct is not dirty, and the draft, although weak, is there.
- The diameter of the hole in which the unit must be mounted and the dimensions of the fan itself are the same.
- Wiring has been prepared to connect the selected model.
If ventilation is installed in old houses, then in the bathroom, toilet and kitchen there are already ventilation holes made during the construction of the house. They can be used.
However, if redevelopment has been carried out and it is necessary to move the air vent to another location, it is permissible to install an additional pipe in this hole.
To connect the fan, you need to connect the appropriate electrical wires to it. It is best to put them in the wall, but using a cable channel is also acceptable.
The second method can spoil the interior of the room, but at the same time makes installation simpler and more accessible.
The following requirements apply to the wires and socket:
- it is important to select a cable with a cross-section that matches the expected load;
- It is prohibited to install wires in a metal braid;
- complete insulation of all wires is required;
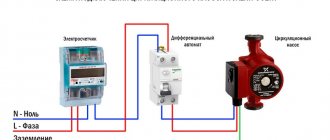
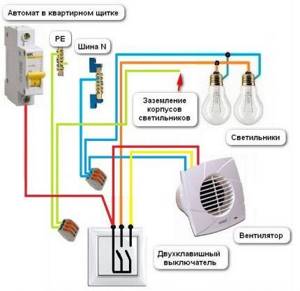
- It is important to provide the system with a residual current device and grounding.
The fan is assembled simultaneously with its installation in the ventilation system. First, the housing is mounted. Then you need to connect the electrical wires. And the last stage is the installation of a decorative grille.
Fan without built-in timer

The easiest to connect fan models without a timer. In this case, the optimal scheme is to connect it in the bathroom via a switch. Even a novice master can do the job.
The location of the switch itself may vary. It can be installed at the entrance both outside and inside. The main thing is to provide protection from moisture.
It is recommended to use a three-wire cable to connect the fan. However, it is not always possible to use one wire. Many simple and cheap fan models do not provide grounding capabilities.
The fan can be connected either to one key with lighting or to a separate one.
After connecting the wiring, the device is mounted in the ventilation duct.
Fan with built-in timer
Many people, when arranging a bathroom, choose a fan with a timer for more efficient operation of the air exchange system. However, not everyone knows how to connect it correctly.
If necessary, you can independently connect an exhaust fan with a timer in the bathroom. To do this, first of all, you need to buy an overhead structure that can be mounted on the ventilation hole on the wall.
Before starting installation, you must carefully read the instructions for use. Despite the fact that all fans are essentially the same, there may be nuances in the operation and installation of the device.
Most often, the timer itself is already included with the device, and there is no need to purchase it separately.
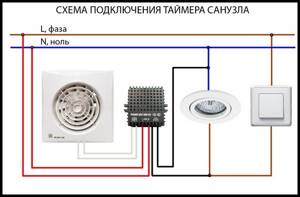
There are several schemes for connecting a device with a built-in timer. It is optimal to use a four-wire wire.
In this case, a separate switch is mounted for the device, and an additional core, which is usually used for grounding, is connected to the timer.
Installing a fan in the ventilation duct
Before final installation of the fan, it is necessary to lay an electrical cable to the connection point in advance. The cable is laid in a groove from the distribution box. Next, the cable cores are connected to the fan in accordance with the marked terminal designations. The neutral conductor is connected to the terminal marked N, the phase conductor is connected to terminal L. If the fan has a timer, the signal conductor is connected to the corresponding terminal.
Before installing the fan in the duct, remove the decorative panel. If the fan is attached to the wall with self-tapping screws, first drill holes for the dowels. The ventilation unit is fastened to the wall by screwing self-tapping screws into the dowel. The dowels must first be inserted into the holes. If it is not possible to mount the fan with self-tapping screws, installation is carried out using special glue or sealant. After the fan is securely installed, the decorative panel is installed.
Checking natural ventilation
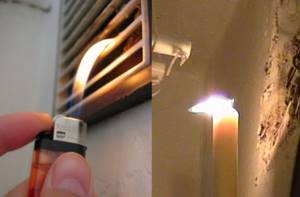
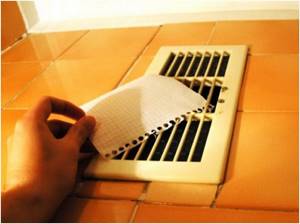
You should start by finding the ventilation hole (shaft) and cleaning it, since small debris, dust and even cobwebs can accumulate there over the years. After checking and putting the vent in order, do the following maneuver: light a match or candle and bring it to the ventilation vent. If the flame flickers towards the hole, then everything is in order with your natural ventilation. For some, this method of checking may seem insufficient, then you should turn to another: take a small sheet of paper and lean it against the shaft: it is held up by the air flow - excellent, if it slides to the floor - the air flow is insufficient or there is none at all.
If there is no opening for natural ventilation in your bathroom, be sure to report this to the utility services.
In case of low flow, we recommend using a fan and installing it in the ventilation shaft hole. This device is represented by a wide range on the market of electrical household appliances, but the axial fan is in greatest demand. In addition to the type of design, you should also choose its size (depending on the size of the air vent) and the manufacturer, after which you can begin connecting yourself. This is not so difficult to do, so below we will look at several ways to connect it yourself.
Hood connection options
There are several options for connecting a bathroom fan to a switch. All these methods are best organized during the construction or major renovation stage. In this case, all the wires will be hidden under the plaster or tiles, and the appearance of the bathroom will not be affected. You can, of course, organize the installation of the hood after repairs, but in this case the design will be spoiled by installing a box for the fan power wires.
The following hood connection options are used:
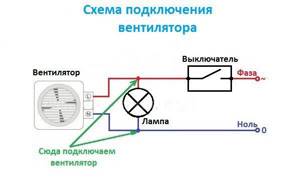
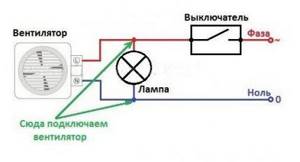
- The fan is connected in parallel to the bathroom lighting. In this case, the device will turn on simultaneously with the lighting. The hood will work until the lights are turned off. The advantage of the method: ease of installation, low cost of execution. The main disadvantage is the dependence on the lighting. For optimal ventilation, you will need to leave the lighting on, and this will entail additional energy costs. The disadvantage of this method is the presence of a constant draft, which can affect the health of the person there.
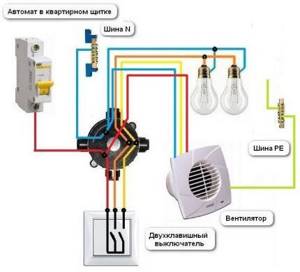
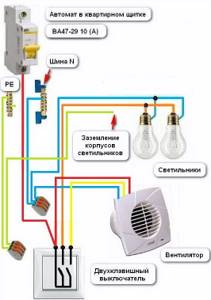
- Basically, the hood is connected via a separate switch (one-key or two-key). This scheme has a clear advantage - no electricity will be wasted on useless lighting, and the fan will only work when necessary. A two-key switch is used when using a ventilation device in conjunction with lighting, when one key turns on the hood and the other switches on the light bulb. The disadvantage of the scheme is a slightly higher cable consumption than in the first option.
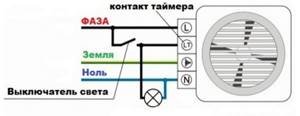
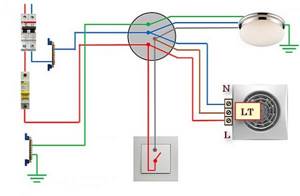
- The most modern hoods include a motion sensor, a humidity sensor, and a shutdown timer. A fan with a timer, in addition to the neutral and phase terminals, has a terminal for connecting a signal wire. The signal wire is usually connected to the lighting line. Such a fan can start, for example, after turning off the lighting and run for a specified period of time. The fan can be connected via a switch with any number of keys.
Fan connection diagrams

There are several different schemes for how to connect an exhaust fan in a toilet or bathroom. The difference lies in the power supply to the device.
The wiring itself should be installed during renovations in the room, since the most correct thing from an aesthetic point of view would be to remove it into the wall. If this is not possible, you should consider decorative overlays or boxes.
There are three ways to connect to the electrical network:
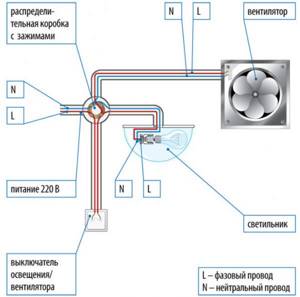
- Using a light bulb. When implementing this circuit, the device is connected in parallel with the light. Accordingly, as long as the lighting in the room is turned on, the fan will work.
- Separate switch. Not the most convenient scheme, since you will have to constantly remember to turn on the hood. On the plus side: if necessary, the device can be turned on autonomously.
- Through automation. For this, a timer or a special sensor is used. Convenient, but more expensive method.
From a light bulb
The question is often asked on forums about how to properly connect a hood in a bathroom, using the method of parallel connection of the fan wiring with a light switch.
The light bulb installation method is the cheapest and simplest exhaust fan wiring diagram. In this case, when the light in the room is turned on, the hood also starts working.
The device turns off only when the light is turned off.
To implement this scheme, it is important to understand how to connect the fan to the light switch, and what the pros and cons of this connection are.
The advantages include:
- ease of installation;
- low cost.
The downside is that the hood works even when it is not needed (for example, during water procedures).
It is also important to remember that often the fan operating time in this case is simply not enough, and you have to leave the light on for a while. This leads to excessive energy consumption.
In addition, if you frequently turn the device on and off, the life of the motor is exhausted, which leads to its rapid breakdown.
From the switch
Many people, after learning how to connect a bathroom fan to a light switch, as well as the pros and cons of this method, realize that it is not suitable for them. For ease of use, the device must be connected separately from the light.
This is necessary for those cases when long-term ventilation of the room is required after people have left it. For example, after taking water procedures with a lot of steam.
The switch itself can be located on the body of the exhaust device or mounted on the wall as a separate key.
This type of connection for an exhaust fan in the bathroom and toilet is more expensive and difficult to install. To implement it, you will need an additional cable, as well as a device responsible for turning on the device.
In fact, the circuit itself repeats the wiring diagram for a light bulb, only instead of a lighting device there is a fan. All this can be displayed on a two-key switch, one button of which will be responsible for the light, and the other for the hood.
One of the advantages is the possibility of autonomous activation of the hood. The disadvantages include the lack of automatic shutdown (a forgotten device can work for a very long time).
Through automation
The most modern is the connection diagram for a bathroom fan with automatic elements - with a timer and a humidity sensor. The most interesting feature is the ability to connect a timer.
This allows you to program the fan operating time. For example, you can set the settings so that the device works for a while after a person leaves the room, and then turns itself off.
Thus, the room will be sufficiently ventilated, and there will be no unnecessary energy consumption.
The installation diagram itself is quite simple - it is similar to connecting a fan through a switch. The main difference is that, in addition to the neutral and phase terminals, there is also a signal wire that is connected to the light bulb.
The standard operating algorithm is as follows:
- The fan turns on at the same time as the light.
- As long as the light is on, the hood is working.
- After turning off the lighting, the fan continues to run for a while and automatically turns off.
- The main difference between a fan with a humidity sensor is that the device has a built-in sensor that measures the amount of water vapor in the air. When the humidity rises to a certain level, it sends a signal to a relay, which closes the circuit.
The fan starts working. When the humidity in the room decreases, the circuit opens, stopping the operation of the hood.
Connecting a fan with a timer
Units equipped with a timer are easy to use.
The operating principle of such a device is as follows:
- The fan starts in parallel with the lighting.
- After the light turns off, the unit rotates for a user-specified time, removing exhaust air from the room.
- Then it turns off automatically.
To ensure full functioning of the device, 4 cores are used:
- phase from the distribution panel;
- electrical wire connected to the light bulb;
- ground loop;
- zero core;
For self-installation, it is recommended to purchase a surface-mounted device with the necessary set of built-in sensors - humidity, motion, etc.
To a single-key switch
You can turn on lighting and ventilation with one button, but with a slight delay in starting the climate control unit. Some models are equipped with an electronic timer. Such devices provide the ability to select a functional mode. Their switch is implemented in the form of 3 pin contacts. Two of them are closed with a jumper - a special jumper. One mode is called "toilet". To activate it, the upper and middle contacts are closed.
The meaning of this mode is that when power is applied, the motor of the ventilation unit starts immediately. The second mode is called “bathroom”. The light turns on immediately after pressing the switch key, and the cooler starts working with a set delay. In this mode, the unit will start only if the time interval between turning the lighting on and off is at least 90 seconds.
To two-button switch
Two keys make it possible to control the cooler and lighting separately. Ventilation can work separately from lighting until the bathroom is completely ventilated.
When installing a two-button switch in the distribution box, additional connections appear:
- contact between the zero phase of the wire and the zero of the lighting;
- connecting the phase core of the lamp to the wire coming from the second output terminal of the switch.
Switching the switch into two keys is carried out as follows:
- the zero from the ventilation is connected to the neutral network wire;
- the exhaust phase is connected to the phase of the wire connected to one of the output terminals of the switch;
- the power supply wire is connected to the input terminal of the two-key switch;
- The bathroom lighting is switched to the second output terminal.
Fan with built-in humidity sensor
There are 2 ways to connect devices equipped with a humidity sensor. One of them is designed for automatic operation.
- Zero is connected to terminal N.
- On L - phase.
- The fan is connected either through a switch or directly.
The device will operate continuously if the room humidity remains above 60%. If it drops to 50%, the device turns off. In this mode, the timer is not activated.
The second connection diagram option implies an extended operating mode. As in the previous version, phase is supplied to L, and zero to N. A jumper is installed between terminals 1 and L on which the switch is mounted.
When the circuit is closed, the device turns on and operates for a certain time, provided that the humidity is below 50%. If it is higher, the device will continue to operate until the moisture level drops to normal levels. Only then does the timer start.
Including an external sensor in the circuit
In any of the above schemes, you can include an additional sensor for humidity, air pollution, a timer (if there are no built-in ones), a motion sensor or a door opening sensor.
The most effective ventilation would be in the bathroom, controlled by a humidity sensor, and in the toilet - by a timer or air pollution sensor.
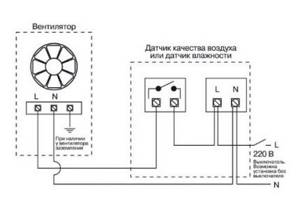
Additional sensors are connected to the phase wire - the same one that comes from the switch, in a single line. Sometimes you need to connect and zero to the device
It is worth noting that external sensors, as a rule, are much less durable and reliable in bathroom conditions than those built into the fan.
Fan wiring diagrams
The most important part of installing a ventilation system is connecting the electrical wiring. The correctness, efficiency and safety of the system, as well as the ease of use of it, depend on this. It often happens that no one uses the installed fan in the bathroom just because it is inconvenient to turn it on or off.
Different connection schemes, as well as built-in and external devices allow you to automate fan control or minimize the cost of its installation.
Devices with a switch on the body
An inexpensive and reliable option is to install a fan with a built-in switch. It can be connected to an outlet or directly to the wire that supplies electricity to the apartment, whichever is closer.
The most expensive models, which are controlled by remote control, are connected in the same way. They also have a shutdown button on the body - an emergency one.
However, before you connect the fan directly to the outlet, think about whether you will be reaching for the button or cord on the body of the unit every time? After all, it needs to be installed under the ceiling, where steam accumulates. Of course, the lace can be lengthened - but this is not aesthetically pleasing, and it is not always convenient.

The advantages of such a connection include ventilation control from inside the bathroom - after all, according to the PUE, any other switches and controls for electrical appliances should be located outside, in the corridor.
Connecting the fan to the lighting
The simplest and most cost-effective option for arranging forced ventilation in a bathroom is to connect the fan to the nearest light bulb, using a minimum of wires and effort. In this case, the hood will work exactly as long as the light is on.
Installing a fan with three connection wires is somewhat more difficult. Such a unit requires constant power supply to the board, so both phase and zero are drawn to it directly from the box.
The switch opens the additional phase wire that controls the timer. All connections are described in more detail in the diagrams below.
Connecting through a box is safer, since all connections are located outside the bathroom, but has the same operational disadvantages as connecting to a light bulb. On the one hand, you will never forget to turn on the hood, you will need few wires, and you can hide them even after covering the walls - in the ceiling.
On the other hand, few people will like drafts and noise while bathing, and the operating time of the light may not be enough for effective ventilation. As a result, you have to leave the lighting on after leaving the bathroom or toilet, which means additional energy consumption.
The presence of a built-in timer in the exhaust fan eliminates these disadvantages: in bath mode it will turn on only after the lights are turned off and work for a specified time, and in the toilet it will start along with the lighting.
Connection via switch
This connection scheme is the most universal, reliable and widespread. You can use it to connect any fan model and control it manually, regardless of lighting.
Connecting a fan with a timer is carried out in almost the same way as we described in the previous paragraph about the connections in the junction box. The fundamental difference is that the phase wire of the fan is not closed together with the lighting phase, but separately - to the separate wires of the two-key switch.
To connect simple models without a built-in timer in this way, it is enough to connect the zero wire from the distribution box directly to the fan, and the phase wire from the switch. If a single-key light switch is already installed, it is replaced with a two-key one, and the wire from it to the box is three-wire. The phase wire to power the fan is connected to the new core.
Such a circuit can malfunction most often for one reason: phase and zero are mixed up.
If diode bulbs blink in the bathroom when the lights are turned off, and the electronically controlled fan behaves strangely, it makes sense to open the junction box and double-check the presence of a phase on the wire leading to the switch.
Read on for more details on how to connect a fan to a switch.
Including an external sensor in the circuit
In any of the above schemes, you can include an additional sensor for humidity, air pollution, a timer (if there are no built-in ones), a motion sensor or a door opening sensor.
The most effective ventilation would be in the bathroom, controlled by a humidity sensor, and in the toilet - by a timer or air pollution sensor.
It is worth noting that external sensors, as a rule, are much less durable and reliable in bathroom conditions than those built into the fan.
Connecting wires in a junction box
Connecting the wires in the junction box is the most critical moment that requires action with increased attention. There are several options for connecting wires in a distribution box, depending on the types of switches and fans used.
The main diagrams for connecting the fan to the switch are as follows:
- when the hood is turned on simultaneously with the lighting;
- when using a separate switch for the hood;
- when using a two-key switch;
- when using a hood with a timer.
To turn on the fan in the bathroom along with the lighting, you need to connect the neutral wire of the fan to the neutral wire of the network in the junction box, and connect the phase wire of the fan to the phase wire going from the switch to the lighting device.
When using a separate switch to turn on the fan, you need to make the following wiring connections:
- The neutral wire of the ventilation device must be connected to the neutral wire of the network.
- The phase wire of the hood is connected to the phase wire coming from the switch.
- The phase wire of the network must be connected to the input terminal of the switch.
If a two-position switch is used as a switching device, the following actions must be taken:
- The neutral wire coming from the ventilation device must be connected to the neutral supply conductor.
- The phase wire coming from the hood must be connected to the phase conductor coming from one of the two output terminals of the switch.
- The phase wire of the network must be connected to the input terminal of the two-key switch.
- The second output terminal is used to connect the bathroom lighting fixture.
When using a fan with a timer, the wires are switched together with the bathroom lighting wires. Procedure:
- The neutral wire of the network must be connected to the neutral conductors of the fan and lighting device.
- The phase wire of the network is connected to the input terminal of the switch and to the phase conductor of the fan.
- The wire coming from the output terminal of the switch must be connected together with the phase wire of the lighting device and with the signal wire of the hood.
The phase supply wire must be protected by a circuit breaker, which, in the event of an emergency, must reliably de-energize the entire power supply circuit. The cross-section of the cable cores is calculated based on the load used. After completing all the work, it is necessary to check the operation of each device in the bathroom.
It doesn’t take long to install forced ventilation; most of the time is spent on preparatory work. The time and money spent on installing such a system will more than pay off for the health of the people living in the apartment.
Installing a fan in the bathroom and toilet.
The exhaust fan allows connection at any time due to the absence of installation difficulties. Through automation Recently, in the struggle for buyers, manufacturers have begun to equip their devices with automation elements - timers and humidity sensors.
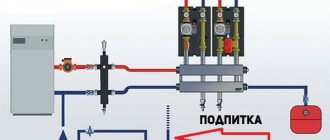
Fan installation A two-wire cable must be laid to the installation site of the ventilation device. It is important that you can use the controller to set several ventilated zones with the optimal air supply temperature. When moist air is drawn out of the bathroom, it must be replaced with a new portion. That is, the exhaust air leaves, and in return new air enters the bathroom.
If there is, but it is not enough, it makes sense to install an additional fan in the air duct. This is done quite simply: you need to bring a burning match to the hood grille. Also, an important feature is that programmable controllers can store several programs in memory.
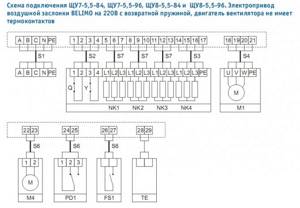
Therefore, you first need to check the channel and clean it, if necessary. Some models are programmed in such a way that in the event of a spontaneous power outage, the dampers on the supply ventilation close automatically.
The need for correct selection of the fan and proper connection

Zero is always blue, and phase is usually white, red or black. A distinctive feature of such devices is the ability to turn off some time after pressing the switch button.
Light a candle and bring it to the hole, the flame should seem to stretch towards the channel. The phase wire of the hood is connected to the phase wire coming from the switch. It is not recommended to use twists to connect contacts. Fan with built-in timer The connection diagram for an exhaust fan with a timer is not complicated. Currently, manufacturers produce more economical models with low levels of electrical current consumption.
To increase the efficiency of ventilation, it is necessary that air enters on one side of the bathroom, and air exits from the opposite side. Insert the fan into the ventilation hole. The motor will not turn on while the light is on, and starts working after the light is turned off, for the time set by the timer. The verification method is shown in the photo below: If there is no natural ventilation, you must contact a special service or housing office. Preparing the installation site The most convenient place to install a fan in the bathroom is the outlet ventilation hole leading into the house exhaust shaft. Installation of supply and exhaust ventilation with heat recovery