The main mistakes made when installing a boiler
If the homeowner decides to independently connect the storage water heater, under no circumstances should the following things be done:
- replace the components supplied with the device;
- connect the device to the AC power supply if there is no water in the tank;
- disassemble the device when connecting a water heating device to the electrical network;
- turn on or use an ungrounded device;
- operate equipment with inappropriate water pressure parameters in the central water supply;
- Completely drain the water from the tank while the storage boiler is operating.
And most importantly, under no circumstances should safety precautions be neglected when connecting a boiler - a fairly powerful electrical appliance. If you have any doubts about the correctness of carrying out installation work yourself, it is advisable to seek help from professionals.
To understand what water heaters are, how to connect such devices and what are the benefits of using them, you do not need to be a professional electrician or builder. All installation work can be performed by every person who is at least slightly familiar with the structure of the water supply system and can understand the simplest electrical circuits. The main thing is attentiveness, following all safety rules and, of course, desire, without which it is better not to take on such work on your own.
https://youtube.com/watch?v=HA9JlpwQXTI
Types of boilers
Modern boilers come in two types, which differ significantly in the principle of heating water:
- Flow-through - heats water as it is used. The volume of hot water produced by such a water heater is unlimited. At the same time, its power consumption is very high.
- Storage - they have a reservoir in which the water is heated by heating elements. The temperature of the water in the tank is maintained at a fixed level constantly.

The choice of a boiler with different storage tank volumes is based on several rules:
- 10-15 l - such a boiler will provide hot water for small household needs (for example, a washbasin);
- 50 l - this volume will be quite enough to supply hot water to the shower;
- 80-100 l - this volume of hot water can satisfy all needs (bath, shower, kitchen sink).
Storage boilers are more in demand in everyday life. And this is quite justified, because they will provide hot water to several points at once. In addition, there will always be a supply of water in the house.
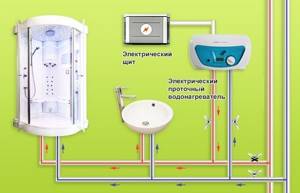
The procedure for connecting a water heater - preliminary work
Preliminary work begins with the installation of the water heater. Moreover, first you need to choose the optimal location of the column or boiler.
The first type of heating devices - the column - should be located close to the free valve of the household gas pipeline (no further than 2-3 meters), in a well-ventilated room.
A storage boiler can be installed literally anywhere. After all, electricity and water can be supplied anywhere. But before connecting the boiler to the water supply, it is necessary to take into account the heavy weight of the filled heater and the accumulative “nature” of this device, which limits the volume of hot water consumed.
Having decided on the location of the water heating device, you need to attach the column or boiler to the supporting surface. For the boiler, this stage proceeds as follows:
- Holes are drilled in the wall for anchor bolts, the position of which can be determined by “trying on” the empty (and light) water heater to the surface.
- Next, the boiler is “attached” to the wall, driving mounting anchors into the holes through the eyes in the heater brackets.
- You then simply tighten the anchor bolts, locking the fastener into the hole.
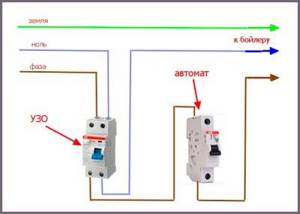
- Finally, you connect the heater to the mains. To do this, it is advisable to draw a separate line from the central panel using a 4 mm three-core cable. Well, as a plug and socket you should use a separate residual current device - a fuse, to which the electrical line and cord from the boiler are connected. Moreover, the installation of a separate line and RCD must be completed before connecting the boiler to the water supply.
A gas water heater requires a lot of trouble:
- First, you put a galvanized sheet on the wall, the dimensions of which coincide with the supporting edge of the speaker body. However, galvanization can be replaced with tiles or fire-resistant plaster.
- Next, you “try on” the speaker to the wall, marking the location of the fasteners along the lugs of the brackets of your speaker body.
- The next step is drilling the mounting holes.
- Next, you mount the column on the anchor bolts, driving them through the eyes and tightening them until they stop.
- The last stage - connecting the dispenser to the gas pipeline - is carried out only by a representative of the territorial gas industry. Self-connection may cause an accident or a fine for illegal tapping into a gas pipeline.
After completing the installation of the heater, you can proceed to connecting it to the “cold” water supply.
Types of water heaters
In stores you can find boilers for every taste and color. Manufacturers are also diverse: Ariston, Termex, Vailant, Buderus and others. But the main attention should be paid to the principle of operation and type of connection. For example, equipment may differ in heat source:
- Gas type.
- Electric.
Not everyone has the opportunity to connect the device to gas. In addition, self-installation of gas equipment is prohibited - it should only be carried out by a specialist. Electric heaters are often used and can be installed with your own hands.
By design, the boiler can be flow-through or storage type .
Flow tanks are equipped with a powerful heating element, which instantly heats up the water flow. The devices are compact in size and easy to place. However, they consume a large amount of electricity (power from 6 kW). Therefore, separate wiring may be required.
Storage water heaters have tanks of varying volumes. Water accumulates in it, which is heated by a dry or wet heating element. Due to the thermal insulation of the tank, heat loss is only 0.5% per hour. To connect, a small power is required - 1.5-3 kW.
In turn, storage technology is divided according to the type of heating:
- Direct.

- Combined.
- Indirect heating.
If the first two types heat water using heating elements, then the last (indirect) needs solid fuel, connection to heating or solar panels.
Preparing to connect
When planning to install a boiler yourself, you need to carefully work out the work plan. This stage is a very important one and any mistake made by the master can complicate the further process.
The stage includes the following actions:
- The master performs calculations and selects the necessary anchors. The thickness of the mounting bolts is set depending on the weight of the filled tank. Since the fasteners will be constantly under load, it is necessary to allow for an error in the calculation. It is better to take massive anchors.
- Make a hole in the wall and screw a metal base plate to it. The unit will hang on it.
- A metal strip is attached to the heating device, which is mounted on the wall. For reliability, it is tightened with bolts.
It must be taken into account that the heater must be positioned strictly horizontally or vertically. Even a slight tilt is unacceptable, so marking is carried out using a mounting level. After completing the preparatory work, they begin to connect the device to the water supply system.
Installation Rules
If you decide to install the boiler yourself, then you need to know exactly how to do it. Mistakes made during installation will lead to burnt out wiring, flooding of the home, and failure of the device. Let's consider the basic rules for installing a water heater:
- First you need to select the location of the device. The boiler is usually installed in the bathroom, toilet or kitchen. Electrical appliances are provided with free access.
- The wall or any other support for the boiler must withstand double the weight, for example, with a capacity of 80 liters, the load indicator is 160 kg.
- Old wiring must be replaced, otherwise it simply will not withstand the load.
- The wiring of ten-year-old metal pipes will similarly have to be changed.
Other rules and installation nuances will be specified in the installation instructions.
Electrical connection
To begin with, we want to introduce you to the basic rules for connecting a water heater to the electrical network. Compliance with these recommendations will allow installation to be carried out as safely and efficiently as possible.
- The socket for the boiler must be located in a place inaccessible to water splashes. Experts strongly advise using special waterproof sockets for these purposes.
- The water heater can only be turned on when the ground is connected to the electrical outlet. This can be done using a three-core wire (in this case, the socket must also be designed for three poles).
After making sure that all safety rules will be followed, you can proceed directly to work. The procedure will be as follows:
- measure the distance between the installation location of the water heater and the outlet;
- disassemble the device plug into elements;
- remove the insulating material from the cable;
- we strip the veins using side cutters;
- armed with a soldering iron, we connect the wires to the plug contacts (red - to phase, yellow/green/black - to ground; blue - to zero);
- remove the water heater panel and open the contacts;
- we strip the conductors at the opposite end of the cable;
- connect them to the contacts of the device and return the panel to its place.
You can connect to the electrical network differently - connect the water heater directly to the panel. In this case, you need to proceed as follows:
- lay the cable from the device to the electrical panel;
- We install an automatic machine near the water heater;
- we run the cable through the machine;
- remove about 100 mm of insulating material from the cable;
- we expose the phase from the machine;
- We connect the phase from the machine to the upper terminal, and from the water heater to the lower terminal;
- remove the insulating material at both ends of the cable, free the cores;
- remove the boiler cover, connect the wires to the device terminal;
- turn off the current supply and connect the heater to the electrical panel.
The following video shows water heater connection diagrams and their descriptions, which will help you understand how to connect the boiler correctly.
Designs for masking the boiler
At the initial stage, it should be taken into account that manufacturers of water heaters provide at least an average level of decorative value for the body of the water heater, meaning its installation on walls or on the floor without additional camouflage.
Thus, choosing a ready-made cabinet for a bath, hallway, kitchen or corridor, inside which a water heater will ideally fit, without gaps and dismantling some shelves, is a very difficult task. Since the owner does not yet have either a cabinet or a boiler, he runs around the shops and compares their mutual dimensions until they are completely compatible.
The exception is “under the sink”, “under the sink” boilers installed in floor cabinets. However, they are all low-power, since it is physically impossible to stuff large-volume tanks into small-sized furniture.
Therefore, structures inside which a storage water heater can be hidden are usually built by a home craftsman himself.
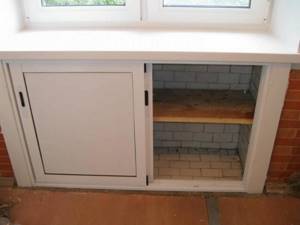
Box
A box is a structure that protrudes outward relative to the plane of the wall. Roughly speaking, this is a cabinet made of gypsum plasterboard sheets screwed onto a frame made of galvanized profile. Unlike a cabinet, the structure is stationary and non-removable. Instead of a door for access to the interior, an inspection hatch is used - hinged, sliding, push-button, removable.
The box manufacturing technology is as follows:
- fastening, piping the water heater (this will be problematic to do later);
- fixing the guide profile;
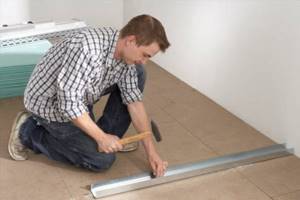
Attaching the starting profile. - installation of a rack profile;
- frame assembly;
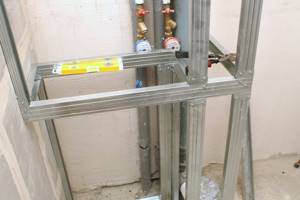
Frame installation - installation of an inspection hatch;
- covering the frame with plasterboard;
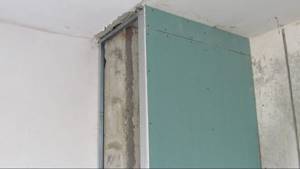
Fastening gypsum board sheets. - finishing of external surfaces with tiles.
The box can be vertical from the ceiling to the floor or half the length of the wall, horizontal, stepped, of a complex configuration, depending on where the water supply and boiler are located.
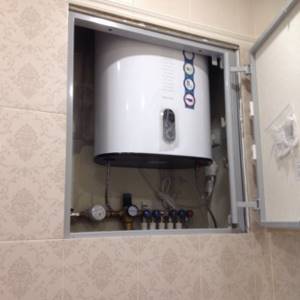
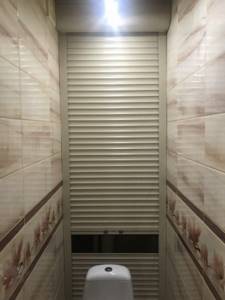
Niche behind the toilet
Unlike the previous option, the niche is sewn up with one panel; there are no sides.
Material consumption is reduced and the labor intensity of the process is reduced.
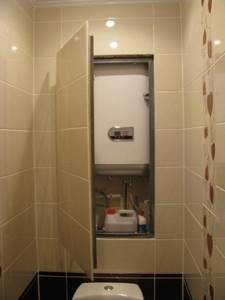
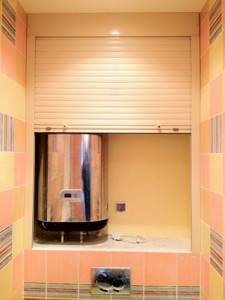
A popular way to disguise engineering systems and water heaters in the niche behind the toilet are blinds, as in the bottom photo.
Pipes may interfere with fixing the electrical appliance to the wall using standard fasteners. In this case, brackets or special fastening systems are used.
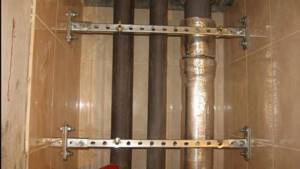
Adjustable fastening system made of profile perforated pipe with brackets.
In this case, a stepped box is used, the wall is built up only above the toilet.
Niche under the kitchen window
Step-by-step instructions for hidden installation of a storage water heater in a niche under a kitchen window are as follows:
- dismantling standard doors, shelves lining internal surfaces;
- sewerage, electrical, water supply installations;
- finishing niche surfaces;
- installation of a water heater, installation of engineering systems;
- installation of inspection hatch, sliding and swing doors, blinds.
Access to the water heater body is necessary in order to clean the tank from scale and change the anodic protection electrodes.
Mezzanine
In the standard version, the mezzanine shelf is used to store household items. In this case, the purpose of this architectural structure changes. The shelf is equipped with blinds or doors, and a storage boiler is installed on it. The sequence of operations for manufacturing a mezzanine for a water heater is as follows:
- horizontal mark on opposite walls of the corridor;
- fastening bars or profiles to walls;
- laying the shelf on profiles/bars; Installation of the mezzanine step by step.
- installation of doors or blinds;
- installation of a water heater, connection to the electrical network, water supply, sewerage. Installation of the boiler on the mezzanine.
Attention: Only horizontal models of water heaters must be installed on the mezzanine. It is not allowed to lay vertical boilers on their sides.
Wall cabinet
The option of installing a single-circuit electric boiler in an industrially manufactured wall cabinet is the least labor-intensive, but the most costly in terms of finances. The main installation nuances are:
- the standard cabinet fasteners will not support the weight of a storage heater with a full tank of water;
- the boiler is attached directly to the wall, either through the back wall of the furniture, or after its dismantling;
- to connect to sewerage, cold water, and hot water circuits, it is best to install water sockets inside the cabinet on the wall of the room;
- To connect to a 220 V network, an electrical outlet with grounding is inserted into the cabinet in the same way.
Plastic and composite pipes are always cheaper than long flexible metal hoses and last several times longer.
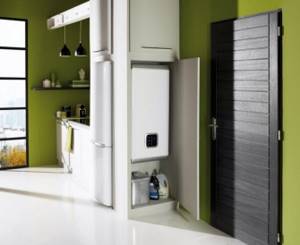
Closet
The interior solution “boiler inside a wardrobe” is optimal for a corridor or hallway. It is in these rooms that such furniture is used most often, and they are located in close proximity to the bathroom and kitchen. You can connect to the sewer/water supply through the wall. To do this, the back or side wall of the wardrobe must be the enclosing structure of a bath, toilet or kitchen.
The design of the built-in wardrobe is extremely simple - the doors move from ceiling to floor on rollers along guides, there are no side or rear walls. The upper part of one furniture compartment is allocated for the boiler; standard shelves for storing things are installed in the remaining space.
Floor stand
Due to the small size of bathroom cabinets and floor cabinets for kitchen sinks, it is impossible to fit a large-volume storage single-circuit electric boiler inside this furniture. Single-door cabinets accommodate a device with a maximum 30 liter tank, double-door cabinets - with a 80 liter tank.
Water heaters are installed on a cabinet shelf or attached to the wall of the room, and may have legs.
What is required for installation?
Before installing an electric or gas boiler, you need to allocate a suitable place for it, taking into account the following points:
- placement of a water heater in an apartment or private house should be done taking into account ease of use and maintenance;
- it must be taken into account that when emptying or repairing the apparatus, a significant part of the water may spill onto the floor;
- It is convenient to connect the water heater yourself when the water supply and electrical networks are nearby and in the same room;
- Do-it-yourself installation and connection of a gas boiler involves connecting a pipeline supplying natural gas to the room.
Based on the listed conditions, the installation and connection of a storage water heater can be performed in the following areas of a private house or apartment:
- kitchen - above the sink;
- bathroom - above the bath;
- boiler room - above the tiled floor.
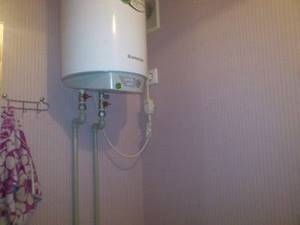
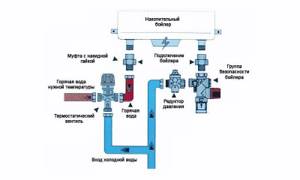
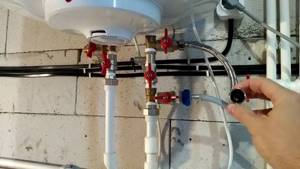
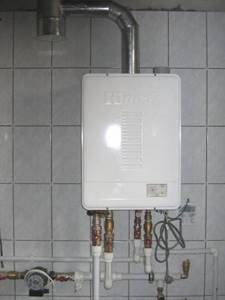
Before deciding how to connect the boiler to the water supply, you need to hang it from the wall. To complete all work, you will need an electric drill with an impact function (or a hammer drill), carbide-tipped drill bits and a standard set of plumbing tools, including a gas and adjustable wrench. The boiler connection diagram is assembled from the following elements and materials:
- check valve with safety valve in one housing (usually included with the boiler);
- bronze tee DN 15 (1/2");
- ball valve DN 15 (1/2") - 3 pcs., 2 of them - with American connection;
- pipes for connection (usually metal-polymer);
- FUM tape, flax or special thread for sealing joints.
https://youtube.com/watch?v=HA9JlpwQXTI
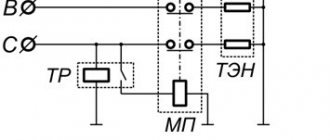
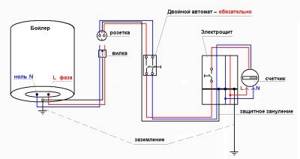
There is also an electrical diagram for connecting the boiler, according to which it is necessary to purchase differential circuit breakers for a current of 16 A (2 pcs.), a socket and plug with a grounding contact, as well as a power cable of the required length. The connection of a device operating on natural gas is carried out using a gas hose.
Features of connecting a flow-through boiler
The flow-through design of an electric boiler, as in the photo, is installed directly into a branch of the water supply system intended for supplying hot water.
- The water supply in the central pipeline is cut off.
- At the point where the heating device is inserted, the pipe is cut, creating a rupture.
- Shut-off valves are attached to the ends of the breaks, which will allow repairs to be carried out in the future without shutting off the central water supply.
- Hoses connecting the boiler with shut-off valves are screwed onto the inlet and outlet pipes of the flow-through water heating system.
When independently carrying out work on dismantling heating equipment, instead of the central water supply, turn off the tap installed on the inlet pipe and only after that on the outlet pipe. Also, when using a flow-through water heating device, first turn on the water and only after that the heating device. If there is no need for hot water, then turn off the power supply and then the water.
Figuring out how to connect a boiler correctly is not that difficult, the main thing is to have the desire. But to be more confident, you can practice on pipe scraps so as not to spoil the main elements of the system. This will allow you to gain experience and avoid stupid and unnecessary mistakes.
Examples of connecting a boiler to a water supply
List of required tools
Before you learn how to properly connect a boiler to the water supply in an apartment, you should start selecting the necessary tools to carry out the work. It should be noted right away that for installation it is not necessary to use high-quality and expensive tools; most often, most of these materials are at hand for each owner. If there are none, they can be easily purchased at construction points of sale.
Fastening can be done using:
- construction and assembly gun;
- hammer drill or electric drill;
- metal hooks;
- dowels;
- high quality hose;
- screws;
- cable;
- special pipes;
- the unit itself.
Special steel hooks with a diameter of 10 mm and dowels are used as fastening elements for the tank. All this is secured using a construction gun; if one is not available, then holes for fasteners are made using a drill or hammer drill.
If there is a layer of finishing material on the wall, you can use ten centimeter screws; the part made of plastic should be at least eight centimeters.
You should not use flexible hoses or cheap products when supplying water to the unit. They become unusable very quickly and need frequent replacement. It’s better to spend a little more money on quality materials once and be calm while using the installation. It is also not recommended to use metal products; copper components are ideal for such work.
Step-by-step instructions for installing a storage boiler
The installation diagram for a storage boiler is a little more complicated. Here you will need to correctly route the pipeline, securely secure the tank, and make electrical connections.
Choosing a location for the tank and its installation
The storage container takes up a certain space in the room, so it must be placed efficiently so as not to take up unnecessary space. But at the same time, the boiler should be located as close as possible to the water supply points. The remote location of the water tap from the heater increases the wait for hot water to arrive.
Convenient placement of a storage boiler with a separate bathroom
The mounting location is selected according to the layout of the room:
- The layout in a private house is different from apartments. Here the bathroom, toilet and kitchen can be located far from each other, and one boiler must supply hot water to all rooms. Here you need to determine the important room where heated water should be supplied first and install a water heater closer to it;
- The traditional layout of the apartment provides for the combination of all these rooms, so choosing the location of the tank here will be easier.
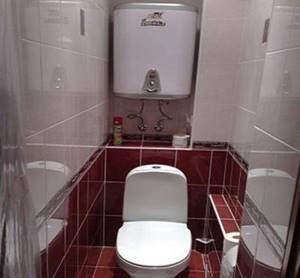
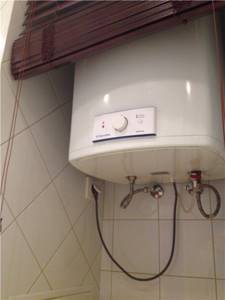
Most often, the tank is installed above the toilet. It does not take up useful space and is located close to the sewer, which makes it convenient to drain water from the safety valve. The unit is secured to the wall with anchors. A water tank has a lot of weight, so if the wall is loose, an additional support is welded under it from a profile pipe.
Connecting the water supply
The optimal connection option is considered to be a circuit with the ability to drain water from the container.
The step-by-step execution of the work looks like this:
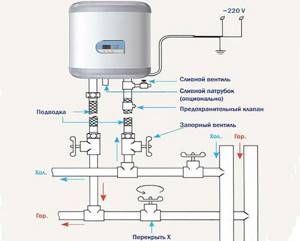
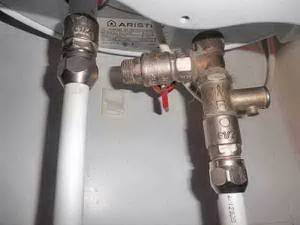
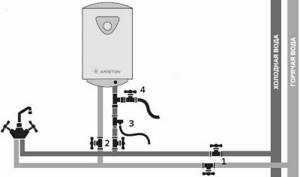
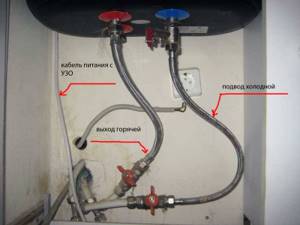
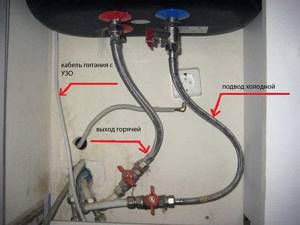
- The house is disconnected from the cold water supply, and the hot water riser in the apartment is additionally shut off. The collection of all components of the circuit begins from the water heater suspended on the wall. To seal the connections, flax or FUM tape is wound around the threads.
- At the bottom of the tank there are two threaded pipes. On the right is the cold water inlet, marked in blue, and on the left is the hot water outlet, marked in red. Packing begins with cold water.
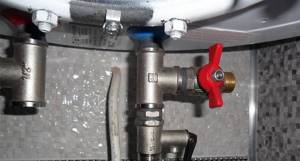
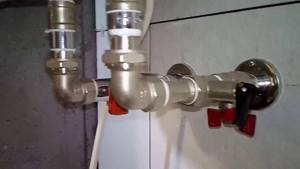
- A brass tee is screwed onto the inlet pipe. It must be turned with a transverse hole in a convenient direction to drain the water. A ball valve is screwed into the same hole through a brass adapter. A pipe with a hose for draining water is connected to it. A ball valve is also screwed into the downward thread of the tee to shut off the supply of cold water inside the container.
- Now it’s time for the most important thing – the safety unit. The boiler is equipped with a safety valve, which is mounted immediately behind the lower valve on the tee. To install it correctly, there is a guide arrow on the body. On the side of the valve there is a fitting for bleeding water. A transparent reinforced hose is attached to it with a clamp and lowered into the sewer.
- Original valves are not always reliable, so they often buy a “safety group” separately. It consists of a check valve installed on the tap coming out of the bottom thread of the tee. The safety valve is installed separately on the middle outlet of the tee.
- Next, it remains to supply cold water. This can be done with any pipes, for example, metal-plastic or eco-plastic, if desired. In order not to cut the main water supply pipe, the connection can be made through a tee, installing it on the threaded connection of the toilet tank or washbasin tap.
- The hot water unit is assembled in the same way as the cold one, only without a valve. In a private house, from the outlet of hot water from the boiler, pipelines are laid to water supply points. In the apartment, the water heater outlet is connected to the hot water supply pipeline. In this case, when the boiler is operating, close the tap on the riser supplying centralized hot water.
At this point, the water heater is connected to the water supply system, all that remains is to connect the electrical wiring and can be used for its intended purpose.
https://youtube.com/watch?v=HA9JlpwQXTI
How to install a instantaneous water heater
As already mentioned, a instantaneous water heater has smaller dimensions, so it is easier to find a place for it. You can hang it nearby on the wall, or you can hide it in a cabinet. Its dimensions are usually 15*20 cm*7 cm or so. In general - small. Weight is at most 3-4 kg, so the requirements for fasteners are minimal. Usually it is either hung on two small diameter dowels screwed into the wall, or has a mounting plate that is screwed to the wall, rather than where the water heater is already hung. We figured out how to install a instantaneous water heater, now about the connection.
Connecting an instantaneous water heater to the water supply
From this side everything is simple. But the disadvantage is that it can only supply water to one point at a time. Depending on the installation location, either a shower head with a flexible hose or a gander for washing dishes is installed at the warm water outlet. It is possible to install both a “gander” and a watering can through the tee (as in the picture on the far right).
How to connect an instantaneous electric water heater
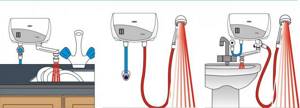
To make it possible, if necessary, to remove the water heater without shutting off the water in the entire apartment or house, ball valves are installed at the inlet and outlet. They are mandatory equipment. The connection from the pipes to the point of insertion into the cold water supply line is carried out in the same way as when connecting a boiler: with corrugated stainless steel hoses or plastic pipes. If necessary, hot water is supplied to the point with a flexible hose: here, in principle, temperatures do not get too high, so it should be able to withstand it.
Connection diagram for instantaneous water heater to water supply
Another feature of instantaneous water heaters is that they can only heat a certain amount of water properly. If the flow increases or the inlet temperature is too low, they cannot cope with the task. Therefore, most often such a water heater is used as a temporary one - at the dacha or when the hot water supply is turned off for maintenance (for the summer).
It is not difficult to solve the problem with an excessive amount of water (when the pressure rises above the standard): either install a reducer at the inlet or a flow limiter. The reducer is a more serious device and is recommended to be installed at the entrance to the apartment, and the flow limiter is a small cylinder with a valve. It is screwed onto the cold water inlet pipe. An example of how to install a instantaneous water heater and where to screw the flow limiter is in the video.
Connection to different types of pipes
It should be taken into account that the diagram for connecting the boiler to the water supply may differ. It depends on the pipes. The most difficult work will be if steel pipes are installed in the apartment. They are difficult to shorten or lengthen without additional equipment. The master may need a grinder and other equipment. Each case is discussed in detail on video.
Polypropylene pipes
To carry out the work, you will additionally need a soldering iron and a wood file. Tees and couplings for connections must be selected from the source material. A polypropylene coupling with metal thread is the best solution; it is reliable.
The work process is simple if the pipes are on the surface. If the communications are embedded in the wall, the top covering will have to be opened to carry out the work. It is impossible to make a connection without damaging the finish. This will require the apartment owner to spend additional money on cosmetic repairs.
Metal-plastic pipes
Metal-plastic pipes most often pass along the surface, so there is no need to additionally tap the walls. Fittings are required for installation. Any connection scheme can be used. Tees are used for insertion. A heating device is connected to them through auxiliary pipes or flexible tubes
Steel pipes
You can do without welding when working with steel pipes. To do this you will have to buy a special tee. It looks like a clamp with a bend. The principle of use is simple, it is put on the pipe and the position is fixed with clamps. For a tight fit, a seal is used. It is prohibited to use dry welding for this purpose. The reliability of this substance is not enough for the system to fully operate.
Before installing the adapter, the pipes must be thoroughly cleaned of dirt, rust and traces of old paint. A threaded hole is made in the pipeline. It is needed to connect the tap and underwater hose.
Connection sequence
When installing a heating device, a safety valve is required. It will reduce the risk of a dangerous situation and ensure full operation of the device.
When ensuring self-installation, you need to proceed according to the following scheme:
- a tee is connected to the pipe;
- install a shut-off valve to drain remaining water;
- connect the tap to the adapter;
- connect a fuse with a drain outlet;
- install a shut-off valve.
In some cases, a filter and thermostat are connected. A special filter is required if the water in the pipeline is hard. It will prevent the formation of scale on the heating element and the walls of the container.
Preparatory work
Connecting a boiler to a water supply with your own hands is not a very difficult task, which any self-respecting owner can cope with.
Preparatory work for connecting the boiler includes:
- Detailed study of the instructions supplied with the boiler.
- Installing a boiler on the wall.
- Supply of water pipes to the boiler. If the boiler is located near a water supply, and an open one at that, the task is simplified and this point can be omitted. Otherwise, the water supply must be connected to the boiler using metal-plastic or polypropylene pipes.
- Preparing the necessary tools: tape measure, pipe cutter, soldering iron for plastic pipes or welding, adjustable wrench.
- Purchase of related materials: shut-off valves, fittings, tees, pipes or flexible connecting hoses, American women, flax tow and fum tape.
Advice. When choosing related fittings, keep in mind that cheap, low-quality materials will not last long.
The principle of drawing water from a tank
There is one correct scheme for connecting a storage water heater, taking into account the features of its design and allowing, if necessary, to quickly empty the tank. This need arises for the following reasons:
- scheduled cleaning of the tank and heating element from scale;
- occurrence of a malfunction;
- moving or replacing the device with a new one;
- emptying a water heater in a country house or in a house with periodic heating in winter.
Connecting the water heater to the water supply, the diagram of its installation and placement must take into account that water is drawn from the upper zone of the tank. This is explained by the fact that at the top the water is the hottest, and in the lower zone it is replenished with a cold flow if there is a water supply in the hot water supply system. Selection occurs through a vertical tube, the cut of which is located in the upper zone.
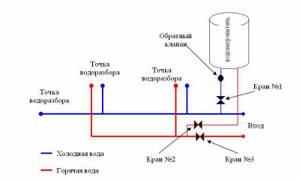
Water from the container must not be allowed to return to the cold water supply system, so the boiler is connected to the water supply through a check valve. If the pressure in the network drops as a result of turning off the water, the valve will prevent the contents of the tank from flowing back into the pipe.
As a result of the standard connection of the boiler to the water supply, it will not be possible to quickly empty it by opening the hot water tap. Even unscrewing the hot water pipe from the fitting will not have an effect, since the water intake is located too high, and there is a check valve on the cold side. The drainage problem is solved by a simple diagram of connecting the water heater to the water supply system, assembled at the installation stage of the device.
Water heater installation location
The easiest way is to install the boiler near the existing water supply distribution in the area between the hot water supply/hot water supply risers and the plumbing fixture farthest from them. That is, in the toilet, bathroom, kitchen. The adjacent rooms – corridor, hallway – are used less often.
Modern boilers have a nice body design that does not require camouflage. Electrical appliances can be used in the interior, and techniques can be used to make the water heater invisible. There are modifications specifically designed for installation under a sink with a maximum volume of 30 liters.
Despite this, many users prefer to install water heaters hidden - in niches, cabinets, on mezzanines, inside gypsum board boxes.
Combined bathroom
A combined bathroom was used in the standard series of Khrushchev houses. Accordingly, hidden installation is used during the renovation of secondary real estate. In this case, you can hide the storage heater in several ways:
- inside the niche behind the toilet;
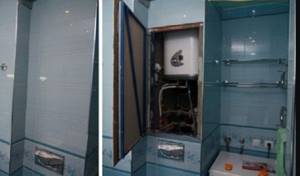
Boiler in a niche. - in a box for risers of the drainage system, cold water supply, hot water supply;
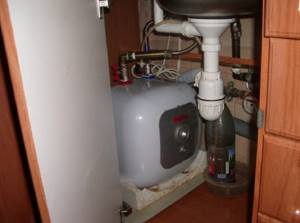
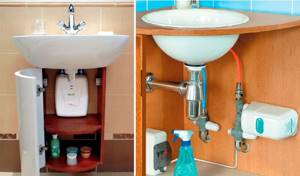
Boiler in a box. - under the sink inside the floor cabinet (flow-through only);
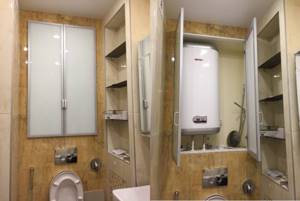
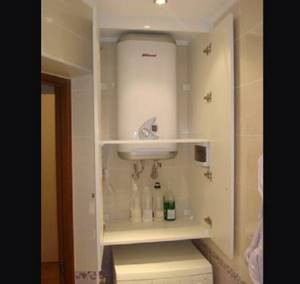
Water heater under moydodyr. - in a wall cabinet above the toilet or washing machine;
Heater in the cabinet. - on the mezzanine above the front door. Mezzanine in the bathroom for the boiler
In the last two options, connecting the device to the water supply is very inconvenient, expensive, and potentially dangerous due to the possibility of leaks.
Bathroom
A separate bathroom was included in the Stalinist and Brezhnevok projects. The layout of an apartment with a separate toilet and bathroom dramatically increases the flow capacity of the bathroom in the morning, when the whole family is engaged in hygiene procedures at the same time.
To install the water heater correctly, you should consider the following nuances:
- minimum bathroom dimensions 1.4x1.75 m;
- there is very little free space, the washing machine does not fit;
- there are no risers for water supply or sewerage, that is, no niches are provided, boxes are not made;
- one rotary mixer is used for the bath and sink or two taps for each plumbing fixture separately;
- one side wall is occupied by a bathtub, a heated towel rail is attached to the other;
- A wall cabinet is usually attached above the moydodyr.
There are fewer options for masking the water heater for this room than in the previous case:
- mezzanine above the door with blinds or doors;
- blinds over the bath;
- cabinet under the washbasin.
You can hide the boiler above the bathroom with horizontal metal blinds.
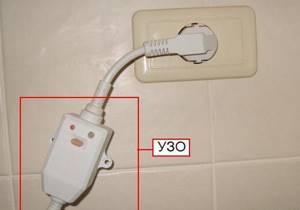
Attention: Electrical wiring in wet rooms should be routed inside a plastic corrugation. The device body must be grounded in accordance with the PUE standards. The water heater must be installed on a separate line with a circuit breaker and an RCD or automatic circuit breaker. It is prohibited to use a heated towel rail, water pipes, or fittings inside the walls of the building for this purpose.
Now there are RCDs that are placed between the device and the socket.
If the apartment is remodeled to combine a bathroom, the options for hidden placement of the boiler from the previous paragraph of this guide are used.
Toilet
The smallest room in the apartment is the toilet in the separate bathroom. On the other hand, this is where the cold water/hot water supply risers, drainage systems are located, water flow metering devices, shut-off valves, and filtering devices are located. Therefore, the project often includes a niche behind the toilet, or the apartment owner hides communications inside the gypsum plasterboard box himself.
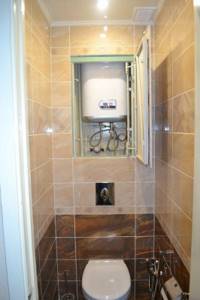
These designs usually disguise the storage water heater. Access to it for maintenance/repair is provided by installing a sanitary inspection hatch. A boiler in a niche can be decorated by installing blinds.
The dimensions of the restroom - minimum 0.8x1.2 m, maximum 1x1.5 m - do not allow the use of other options for hidden placement of a water heating electrical appliance in this room.
Kitchen
Of all the options considered, the kitchen is the largest room. However, inside it it is necessary to combine several zones for different purposes:
- dining room - table, chairs or kitchen corner;
- cooking - stove, oven, cutting table, sink;
- storage of equipment, products - refrigerator, wall and floor cabinets.
In some apartments, there is one more utility system in the kitchen - there is a gas pipeline riser on which a gas meter is installed.
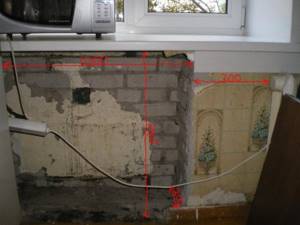
On the other hand, in Khrushchev and Brezhnevka buildings, under the kitchen windows, a niche was usually made for a refrigerator measuring 75x75 cm with a depth of 25 cm. In the internal space of this cavity, a horizontal flat storage water heater with a volume of 50 liters can be placed. Manufacturers produce boilers with a tank at least 23 cm thick.
The remaining installation options are similar to the previous methods:
- mezzanine;
- wall cabinet;
- under the sink in the cabinet;
- inside the gypsum board box.
The further the boiler is located from the water supply, the more difficult it is to mask the routing of hoses and cables. You will have to ditch the walls or install frames for plasterboard false panels, which leads to loss of kitchen workspace.
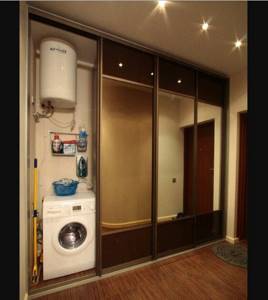
Corridor and hallway
The only rooms in the apartment adjacent to the kitchen and bathroom are the hallways and corridors. Therefore, there are options for installing a boiler inside them:
- typical - wall cabinet, plasterboard box, niche for pantry;
Water heater in the hallway. - non-standard - inside the wardrobe, on the mezzanine above the front door.
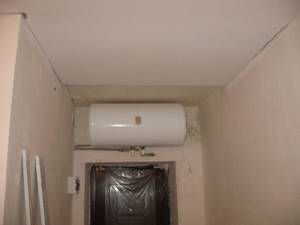
The boiler above the front door is hidden on the mezzanine.
Having decided on the installation location, the connection diagram of the water heater to the pipes and the power supply line, you should choose an architectural design that fits beautifully into the interior of the room.
Preparation
If you have not previously installed a boiler, then first of all decide on its future location, then select tools and materials.
Selecting a location
When searching, follow these guidelines:
- The wall must be strong, preferably load-bearing, in order to support the large weight of the tank (add the weight of the water to the weight of the device).
- Free access to communications and to the device is important, since the water heater will have to be serviced in the future.
- Do not connect the boiler to bad wiring. Typically, the power of models is from 3 kW.
- Do not connect the tank to rotten or rusty pipes.
- Choose a place closer to the pipeline so that you don’t have to cut into the system from the next room.
- An acceptable choice for installation is a bathroom or kitchen, less often a toilet or hallway.
It's actually not that complicated. Regular high-quality wiring will easily withstand an average power electric heater. There are no installation requirements or restrictions for this device.
We still recommend running a separate line from the meter to the tank to relieve the burden on the main wiring.
Tools
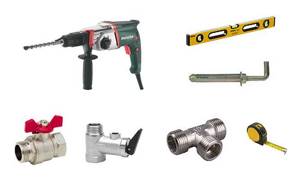
Tools and materials needed to install the boiler.
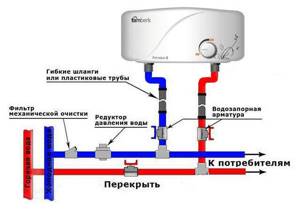
If you do everything from scratch, you will have to work hard. First, cut into the pipeline with cold water, make the wiring for hot water, and only then start connecting the indirect heating boiler. You will also need special tools and materials:
- metal-plastic pipes;
- tow;
- paste;
- sealing tape;
- flexible hoses for connecting the boiler and water supply;
- tees;
- Ball Valves;
- check valve;
- hammer drill (a drill is recommended only for lovers of masochism, since you will have to drill fairly deep holes in a strong concrete wall);
- roulette;
- level;
- screwdriver;
- gas or adjustable wrench;
- a set of regular keys.
Installation of gas equipment
Naturally, it is prohibited to install a gas boiler from scratch. This should be done by gas service workers. You can replace a gas water heater yourself when representatives of the gas service have installed a meter.
When installing a gas water heater, the following work is performed:
- places for holes for dowels are marked;
- holes are drilled and hooks are installed;
- a gas boiler is hung;
- the corrugation is attached, which removes carbon monoxide into the chimney;
- the gas pipe is connected to a hole through which gas enters the boiler;
- connections are checked;
- Water is supplied to the boiler and the normal operation of the system is checked.
When installing the corrugation, one end of it must fit tightly with the elements of the chimney. The other end of the corrugation is put on the outlet of the water heater. Before purchasing corrugations, all measurements are carefully taken. Its internal diameter must match the external dimensions of the boiler opening.
A special rubber hose is used to connect the gas pipe to the inlet. After the hose is securely fixed, all joints are covered with soapy water. The gas supply valve opens.
While the gas is being sent to the boiler, you need to carefully inspect the connections. If soap bubbles appear in any area, this indicates a gas leak. Using a wrench, tighten the nuts in the “problem” areas. If the leak cannot be eliminated, it is better to contact gas service specialists.
After correctly connecting the gas to the boiler, you need to supply water to it. Flexible hoses are also used for this. The water supply to a gas water heater is carried out in the same manner as an electric boiler is connected.
Schematically, the sequence of elements is displayed as follows: “pipe—adapter—faucet—pipe—hose—water heater.” The inlet with cold water is indicated in blue, the outlet with hot water in red. To increase the operating life of the boiler, a salt filter is installed on the pipe that supplies cold water.
Hot and cold water taps open. We check all connections. If there are leaks, they should be fixed by tightening the nuts or using new tow. Gas is supplied and the hot water tap is opened. After 20-30 seconds, hot water should come out of the mixer.
Boiler installation.
Using the method described below, you can connect a storage water heater from companies such as Elenberg, Eltron, Etalon, Ferroli, Gorenje, Polaris, Stiebel, Thermex, Vega, Termex, Ariston, Atmor and others. It is considered the most effective option for connecting a simple vertical boiler, but first, let’s look at the design of the device.
The boiler consists of the following parts:
- heating element - element that heats water;
- Tank - maintaining the water temperature at the required level;
- Thermostat;
- Water drainage and supply systems.
The most important thing when choosing a boiler is the method of attaching it to the wall (vertical or horizontal) and the volume of the tank. Vertical devices are most often used: they take up less space than horizontal water heaters and connect to the water supply system much easier and faster
Termex boilers
Some tips
- Before choosing a boiler, you should take into account not only the width and height of the wall on which it will be mounted, but also how much the water heater will protrude forward. In addition, installing a boiler in an apartment, taking into account the specifics of the wall material, requires the selection of special fasteners.
- Horizontal water heaters should only be installed horizontally. Vertical ones do not need to be placed on the floor: at the bottom of the water heaters there are devices that ensure their operation.
- To connect the Termex water heater to the water supply, it is recommended to use copper pipes in a plastic braid. This is a more reliable option; in addition, such pipes look very neat when installed.
- Thermex can only be connected to the network when the tank is full. Otherwise it may fail.
- It is not recommended to connect any other device besides the water heater to the same cable. In addition, you cannot connect the boiler directly to the machine.
- Even if the water heater is not in use, it is not advisable to drain water from it.
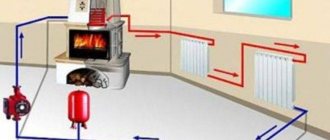
Indirect heating boiler - what kind of unit?
This phrase means a tank filled with water, which is equipped inside with a heat exchanger coil connected to a boiler responsible for heating the house, or to another system within which some coolant circulates. The water in such a unit becomes hot due to the fact that the liquid supplied directly from the boiler to the heat exchange coil gives up its energy to the liquid located in the boiler tank itself. That is, it does not heat up directly, but only absorbs heat from another source. This is where the name for this unit came from – an indirect heating boiler.
Water heated in the unit can be used for a variety of household needs. Moreover, it remains in a heated state for a long time, since the system itself maintains the desired temperature level. By the way, you can install such a boiler not only in a cottage, but also in an apartment, hotel or other premises.
The boiler itself is a metal or plastic container, parallelepiped or cylindrical. The capacity of the tank can be anything and sometimes amounts to thousands of liters.
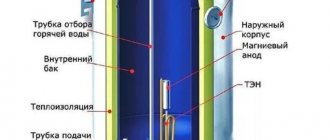
The water container is usually enclosed in another housing, and thermal insulation material is often laid between these two structural elements. It helps retain heat longer and also protects the outer casing of the tank from extreme heat. The water, which is directly responsible for heating the liquid in the boiler tank, usually circulates through a heat exchanger coil. The tank elements are protected from corrosion by the presence of a magnesium anode. To control the pressure in the unit, a so-called safety valve and thermostat are installed. Water circulation occurs thanks to the presence of a special pump system.
So BKN is a kind of “thermos” for water in the house. It does not heat the water itself, but is able to keep the liquid heated by the coolant in a warm state.
Gas heater installation
Installing a horizontal gas water heater is more difficult than an electric one. In this matter, it is better to turn to professionals. But in case of self-installation, you must strictly follow the instructions, symbols and rules. The ceiling height must be at least two meters, and the room area must be more than 7.5 square meters. meters. In addition, the room must have a window; in addition, the room must have a door. Most often, such devices are installed in the kitchen, next to the gas pipe.
A very good way to detect gas leaks is to install a gas analyzer. Such a device detects a propane leak and gives a warning signal. But ventilation is also required. For proper operation of a gas water heater, a chimney must be connected to it. It can be included in the overall system or taken separately directly to the street. It should not have more than two right angle bends, and its total length should not exceed three meters. When installing equipment on a wooden wall, the chimney should not come into contact with it. Be sure to lay thermal insulation, for example, from mineral wool.
You need to know that a gas water heater should not be placed on a load-bearing wall. The distance to the opposite wall must be at least one meter. Gas pipes must not be installed in walls. But you also need to take into account that gas equipment cannot be placed above the stove. It is not advisable for the water heater to be constantly exposed to sunlight and overheat. In order to check the tightness of gas pipes, you can use ordinary soap. It needs to be dissolved in a container of water, and then applied to the pipe joints with a brush. If bubbles appear, there is a leak. And it must be urgently eliminated. It is prohibited to check pipes for leaks using fire. This can lead to irreparable consequences.
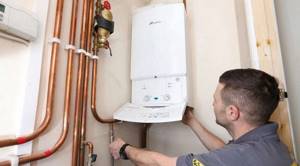
Self-installation of a boiler
You can install an electric boiler yourself. This will require plumbing and electrical work.
Preparatory stage
This stage of work includes calculating the volume of water consumed, choosing a good location for the device (it is necessary that the user can easily reach all connecting elements of the system to simplify maintenance of the device).
If the boiler is storage, you need to make sure that the wall can support its weight with water (partitions that are too thin or plasterboard will definitely not work). The closer the device is to the water supply pipes, the better, since you will not have to lay an additional section of the water supply pipeline.
To work you will need:
- building level;
- ruler or tape measure;
- perforator;
- adjustable wrench;
- pliers;
- tees-fittings;
- shut-off valves;
- connecting hoses (for water drainage);
- additional pipes (if necessary), you must first ensure that the pipes are able to withstand the required load;
- sealing tape, tow or special paste (for sealing connecting elements).
After making sure that the location is chosen correctly and all the necessary materials and tools are available, you can proceed directly to the installation, working according to the finished scheme.
Installation and connection of a water heater
The first thing to do is to place the device at the mounting location: the distance between it and the ceiling must be at least ten centimeters, otherwise it will be simply impossible to hang the tank on the fasteners.
Carefully mark the attachment points (with a pencil or marker). You need to drill holes at the marked points and tighten the fasteners to the required depth.
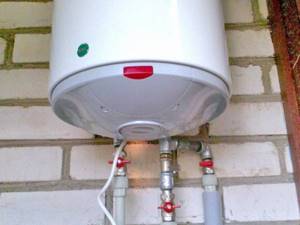
The photo shows the main elements of connecting the boiler
For fastening, it is better to use steel hooks that come with the device. If they are not provided, then you need to choose a mount based on the weight of the boiler. Afterwards the tank is hung on them using grooves specially provided in its body.
Before installing the tank, you need to make sure that everything is in order with the threaded connections, since they are often unscrewed by 1-2 turns. In this case, it is recommended to drive the threads with a die 1/2 inch, but carefully, without excessive force.
Next, connect the device to the water supply. These works may have their own characteristics and differences depending on what material the pipeline is made of.
For polypropylene, metal-plastic and steel pipelines, you will need to use a special tool designed specifically to work on each of these materials. Also, for inserting into the pipeline, you will need to select various auxiliary parts (tees, couplings and fittings).
But the order of work is the same in all cases. First, turn off the water supply. The pipe is cut, and a branch is installed at the cut site. To do this, a tee is soldered into the pipeline. Pipeline branches are equipped with an MPH coupling, to which a shut-off valve is connected. The shut-off valve is connected to the boiler pipes directly or using flexible hoses.
Installation of shut-off valves
To ensure that water is supplied to the tank from a cold pipeline, the following steps are performed:
- installation of a tee on the tank pipe;
- connecting the drain valve to the side of the tee;
- installation of a check valve or explosion valve on a tee;
- shut-off valves are mounted in series behind the valve;
- connection of shut-off valves to the water supply system.
It is recommended to perform these manipulations at a branch from the central pipeline. This will prevent damage to water taps during installation.
Installation procedure
The boiler installation process includes the following steps:
- hanging on the wall;
- connection to water supply;
- power connection.
Floor-standing boilers are also produced, but in everyday life you most often have to deal with wall-mounted ones. When filled, the device is heavy, so it can only be attached to a solid wall.
It is important to choose the correct diameter and length of fasteners:
Table for selecting the size of anchor bolts taking into account the volume of the water heater and the wall material
| Water heater volume, l | Pull-out load, kg | Base (wall) material | Recommended bolt diameter, M | Recommended bolt length, mm |
| 30-50 | 15-25 | Cinder block, brick | 8-10 | 80-100 |
| Concrete | 6-8 | 60-80 | ||
| 80-100 | 25-35 | Cinder block, brick | 10-12 | 100-120 |
| Concrete | 8-10 | 80-100 | ||
| 150-200 | 45-60 | Cinder block, brick | 12-14 | 120-150 |
| Concrete | 10-12 | 80-120 |
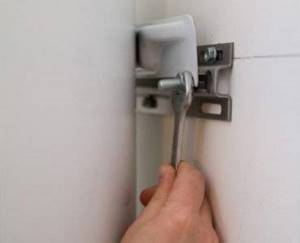
The most convenient are anchor bolts with hooks - you just need to hang the boiler on them after screwing it into the wall. But some devices do not have hooks for hanging on such bolts - they will require anchor bolts with heads for a Phillips screwdriver or hexagon.
Water heater connection diagram
On a thin wall made of brick (half or even a quarter of a brick thick) or made of foam blocks, gypsum blocks, reinforced gypsum, the water heater must be mounted using ordinary bolts, which must penetrate right through the wall. A washer 1.5 - 3 mm thick is installed under the nut, the diameter of which should be larger, the heavier the boiler is and the thinner the wall.
When fixing devices with a volume of more than 100 liters, sections of corners are placed under the nuts, with the help of which the load is distributed over a sufficiently large area.
Anchor bolts located at the same height must lie on a strictly horizontal straight line, so markings for them should be made using a building level.
The distance between the boiler pipes and the water pipes must be sufficient to accommodate all the necessary fittings (they are listed below). Usually 30 - 50 cm is enough.