Often the floors in wooden houses are made to “float”. This means that they do not form a single structure with the foundation, but are laid on special columns or intermediate walls. There is a small distance between the walls and the floor, which allows air to circulate freely. Underfloor ventilation organized in this way helps prevent the development of mold and protect the foundation.
Why is underfloor ventilation necessary?
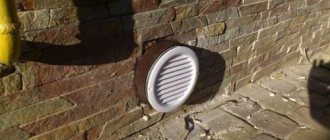
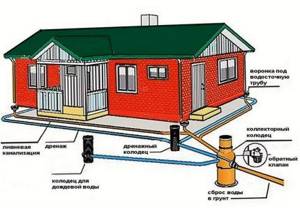
Ventilation grille for the underground space
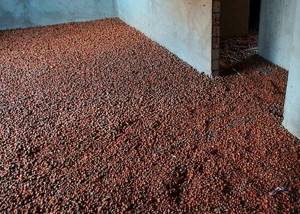
If the underground space is made closed on all sides, there will be constantly increased humidity.
Taking into account the fact that in the underground, even in the most severe frosts, the temperature is above zero, ideal conditions are created here for the development of fungal and bacterial microorganisms, the harm from which should not be underestimated. Firstly, all building structures deteriorate much faster, including concrete and iron reinforcement, not to mention a wooden floor, if the design of the device is such that it is in contact with the underground. Secondly, microorganisms emit gases during their life processes, many of which are toxic to humans. You can easily verify this if you go into a damp, unventilated basement and feel all the “delights” of the local microclimate. The same thing happens underground, where there is no ventilation.
Why is it necessary to provide underground ventilation? (+video)
Normal ventilation for this space is necessary to prevent high humidity. It can occur from autumn to spring due to:
- groundwater;
- melting wall, rain;
- condensate
If the subfloor is not ventilated, high humidity in it leads to the following problems:
- The appearance of mold.
- Dampness on the first floor.
- Acceleration of destruction of wooden elements (beams, joists).
A common situation: the house was built well, insulated, with a good heating system. But in winter the floor is damp for some reason. This happens precisely because the underground floor of the cottage is not ventilated, the humidity in it rises, and the floor boards become saturated with moisture - which is why it is already felt in the living quarters.
This situation is especially dangerous for a wooden house - because wood is most “afraid” of moisture, and most quickly deteriorates because of it.
The need for underground ventilation
Organization of underground ventilation in a private building is mandatory for the following reasons:
- Due to the temperature difference outside and under the floor, condensation settles on the joists with the floor beams and on the base. Without proper ventilation, drops of water containing acid destroy concrete, brick, and wood, causing corrosion of building materials.
- Humidity contributes to the appearance, spread and development of mold and mildew, affecting wood, metal and concrete. Mold that has already appeared does not disappear when the moisture level naturally normalizes, and with its subsequent increase it will begin to develop more actively in the affected areas;
- The enclosed underground space accumulates carbon dioxide, especially if autumn preparations with the harvest are stored in it.
The humidity of the underground increases due to contact with soils, which always contain water in different proportions.
Humidity is especially felt at the soil level, i.e. soil-vegetative layer up to 40 cm thick, actively absorbing precipitation and regularly irrigated during irrigation.
If the ventilation system is absent or insufficiently effective, the underground will be damp. Due to the lack of oxygen, a favorable environment for the development of anaerobic bacteria will be formed. In addition to this, carbon dioxide will begin to accumulate
Underfloor ventilation is necessary for almost any design solution. An exception is the construction of a floor on the ground, according to which beams or slabs are laid directly on the sand or crushed stone fill, and do not cover the spans between the foundation walls.
Preparing the cellar for permanent use
The installation of ventilation in the basement intended for storing food does not end with installation work. To ensure a normal microclimate in the cellar, it is necessary to dry it well, check the efficiency of the system and follow certain rules during further operation.
Ways to dry a new room
Before you start drying the cellar, you need to check the efficiency of the installed system. This is due to the fact that moisture must be removed during drying and the easiest way to do this is through an exhaust pipe. To test, roll up an old newspaper and wait for it to burn about a quarter of the way through.
After this, extinguish it so that it continues to smolder. If the smoke from the newspaper is freely removed through the hood, then the system is working normally, if not, then you need to once again check the correctness of the calculations and the height of the outlet of the pipe head.
Drying should be carried out in the warm season, before storing food in the cellar for storage. The essence of common and accessible drying methods is to increase the indoor air temperature, which will provoke increased air exchange and removal of evaporated moisture through the hood.
Moisture-absorbing materials
It is possible to use hygroscopic substances, such as quicklime, calcined table salt or expensive technical silica gels that actively absorb moisture. These are very time-consuming methods and also require additional financial costs.
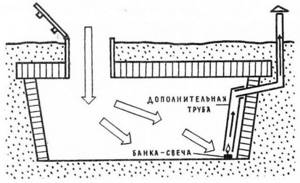
Flame at the entrance to the exhaust pipe
If you light a large candle or a simple alcohol lamp and bring it to the exhaust vent, the air will begin to heat up and the circulation will increase. Dry and warm air coming from the street will begin to warm up the cellar, actively absorb moisture and go outside. However, more than one candle is required and the process takes several days.
Using a Heat Source
Warming up the cellar room is much faster if you install a heat source of any type. This could be a brazier, a stove, an electric heater, or even a simple gas burner. The use of a flame makes it necessary to solve the problem of effective removal of combustion products, so they are usually lowered down on a suspension.

Drying using a broiler.
Electric heaters of any design are safer due to the absence of carbon monoxide, but will require payment for electricity. Therefore, the choice of heating method is yours. You can also read about the fight against dampness in the basement in this article.
The importance of underground ventilation
Ventilation under the subfloor is developed at the design stage
Ventilation of the subfloor in a wooden house prevents the destruction of load-bearing structures. In its absence, moisture accumulates on the wooden elements of the house. The tree becomes moldy and is attacked by a fungus. Structural elements lose strength. Treatment with special solutions and impregnations, painting is only a temporary protective measure. Therefore, the formation of air holes in the part of the house that rises above the foundation (in the basement) is mandatory. They are responsible for ventilating the space between the subfloor and the ground.
Features of the ventilation device
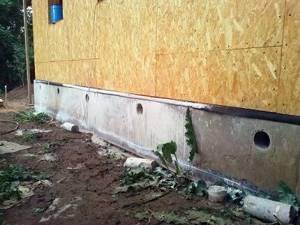
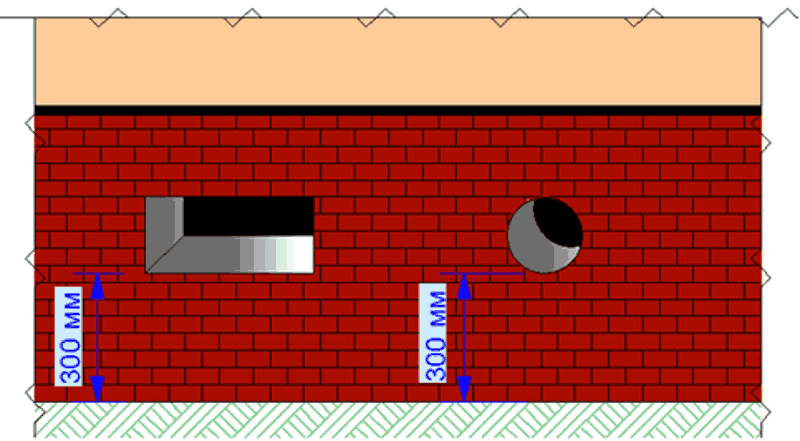
If there is space left under the floor of the house, its ventilation is most often organized by installing vents inside the base. Ventilation openings are designed at precisely calculated distances from each other, from the ground level, from the corners of the building and taking into account other factors.
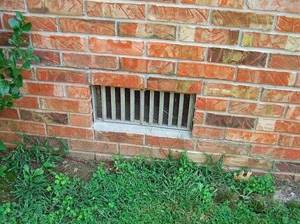
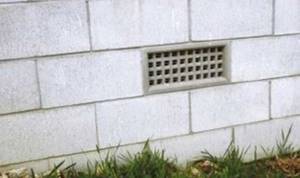
Ventilation openings are covered with ventilation grilles to protect against rodents. This is a traditional solution for organizing a natural ventilation system
For greater efficiency of the ventilation process, vents are selected on the leeward side and in the wall of the base/foundation located opposite. The ventilation holes should be opposite each other. With this solution, cravings increase naturally.
The wind, flying into the hole on one side, will fly out into the ventilation hole on the other side, taking with it moisture, volatile carbon dioxide molecules and a musty smell. During further operation, you just need to make sure that the ventilation openings are not blocked by any objects from the inside and are not overgrown from the outside.
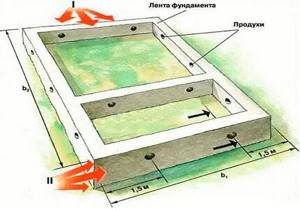
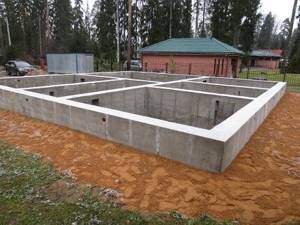
In a strip foundation, the vents are located opposite each other to ensure a stable natural air flow
If there are partitions inside the foundation, ventilation holes are also made in each of them. To ensure that the movement of air masses is stable and free, the internal vents are located directly opposite the vents selected in the external walls.
If it is impossible to select the required number of holes in the walls of the plinth or foundation, increase the area of each mini-opening. It is important that the total ventilation area meets regulatory requirements.
For normal ventilation of the subfloor, it is necessary to ensure sufficient air flow - the dimensions of the ventilation holes must meet regulatory requirements
You can make a series of holes of the same size, or you can make one wide window with a grille or an opening sash. When installing a window, there must be a passage or hatch inside the structure that can be opened for periodic burst ventilation.
You can cut ventilation openings in the foundation/basement of an already erected structure using a mobile drilling machine designed for horizontal drilling and drilling walls. To form a hole, you will need a projectile equipped with a diamond crown.
Ideally, vents in the external and internal walls of the foundation, passages and large openings for ventilation pipes should be laid before pouring the mortar into the formwork.
If there is an additional foundation inside, for example, for a brick oven or a massive floor-standing gas boiler, then inside the outer base the number of holes must be increased by 1.5-2 times.
Vents can be not only round, but also square, rectangular and even triangular. The main thing is not to reduce the total cross-section specified in the building regulations. The size of the hole should not impede the flow of the required amount of air.
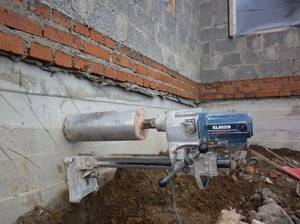
It's never too late to make vents in the foundation or basement. They can be punched with a hammer drill or drilled with a mobile machine with a drill with a diamond bit.
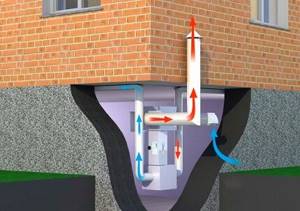
The second method of organizing a ventilated space is more labor-intensive and more resource-intensive. Exhaust is arranged from the underground through a ventilation pipe to the roof. In this case, air enters the system through grilles in the rooms.
In this case, there are no vents in the foundation, but external insulation of the foundation, basement and blind area will be required. This is the best option if you plan to build a well-insulated eco-house, the construction of which used energy saving principles.
Ventilation of the underground in a wooden house
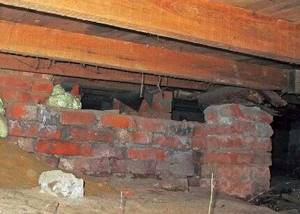
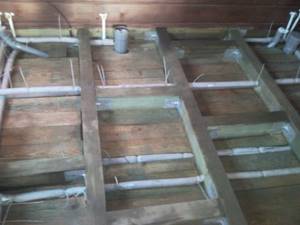
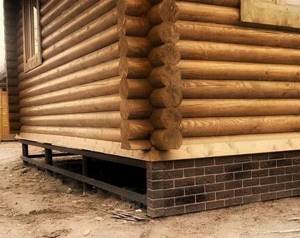
The frame of a wooden house is most often built on a columnar foundation. A lower crown is mounted on it, which served as a kind of grillage for laying floor beams. The gaps between the foundation pillars are most often not filled with anything at all, which ensures natural ventilation.
Houses made of logs or timber are now placed on strip foundations made of brick and concrete sides. When building a foundation from piece materials, openings are formed during the laying process
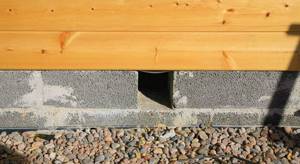
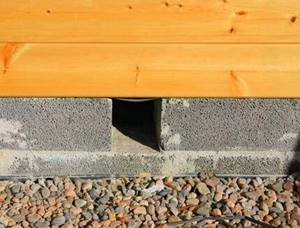
If the floor in the house is decided to be finished with a non-wooden floor covering, then it is installed using floating technology, i.e. the subfloor has no connection with the walls. In this case, a small gap remains between the covering and the crown, through which the underground and floor will be ventilated.
The gaps are covered with baseboards, but the presence of small gaps allows for full ventilation. On opposite sides of the rooms you can place special baseboards with ventilation holes.
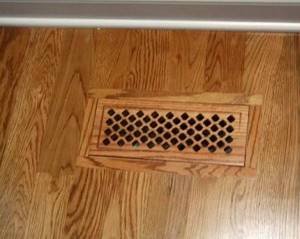
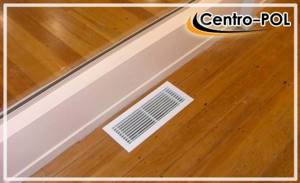
The flooring in a wooden house is laid according to a floating pattern, i.e. with a gap around the perimeter. Moist air escapes from the underground through this gap. In addition, ventilation vents with grilles are installed in the floor.
In addition, in the corners near the walls you can leave slots in the floor for ventilation, covering them with ventilation grilles. This solution will also help improve air circulation under the floor of the building.
Air exchange standards
How to organize underground ventilation? It is necessary to lay holes for ventilation at the foundation construction stage.
To ensure stable air exchange in the space under the lower ceiling, the following rules should be observed:
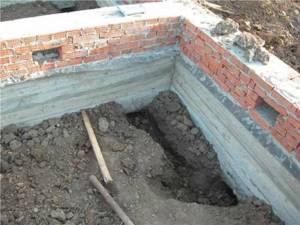
- When installing vents 15-20 cm below the top edge of the tape (if the base is low), a pit is made in front of the hole.
- The step between adjacent openings should not exceed 3 m.
- The holes in the base/foundation are located at a distance from the corner to 1 m.
If the house is built on a hill, it is likely to be well ventilated from any side. In this case, the number of ventilation holes can be slightly reduced.
If the house is built in a region with little wind activity, is located in a lowland or is surrounded by forest, the number or size of ventilation openings should be increased
In the basement or foundation of a house built in a low area, the total cross-section of the ventilation holes should be increased: either in number or in area.
The dimensions of the openings for ventilation of the foundation and underground are regulated by SNiP number 41-01-2003 or an updated version of the rules SP 60.13330.2012.
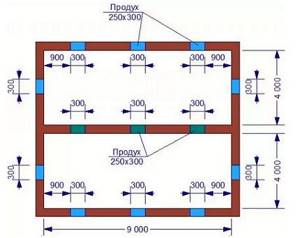
The area of all vents must be at least 1/400 of the total area of the subfloor. That is, if the house measures 9 m by 9 m, then the underground area is 81 m2. In this case, the total area of vents in the foundation should be 81/400 = 0.20 m2 or 20 cm2.
The minimum ventilation area should not be less than 0.05 m2. That is, rectangular holes should have a size of 25x20cm or 50x10cm, and round holes should have a diameter of 25cm.
If in a private house such vents look too large, they can be made 2 times smaller by increasing the number of ventilation holes so that their total area is no less than the calculated one.
Sleeves for forming ventilation holes, as well as for the passage of all types of pipes, are placed in the reinforcement frame before pouring the solution into the formwork
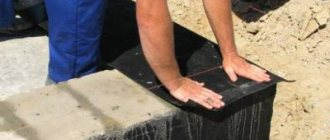
When installing vents in a strip foundation, the mortgages are secured after installing the reinforcing frame. These can be plastic or metal pipes or asbestos cement pipes. Their edges are brought to the same level as the formwork and are well secured.
To prevent concrete from flattening the plastic when pouring, sand is poured into the pipes and closed with plugs. After demoulding, such mortgages remain in place. Rectangular vents are made using boxes from knocked down boards. A wooden box is also installed in a reinforcing frame; after the concrete has hardened, it is removed.
It is easier to make ventilation holes in a brick base. In this case, you can trim the bricks or install a half brick instead of a whole one. In plinths built from concrete blocks, you can take several blocks with a couple of large holes, make them through and put them instead of normal ones. If the construction material is reinforced concrete blocks, vents are made at the joints.
If the house is installed on a bored, pile or columnar foundation, there is no need for ventilation. Even if the perimeter is covered with siding, ventilation is carried out through seams and gaps in the structure or perforated elements
If in a columnar foundation the gap between the supports is closed with brick or concrete blocks, the required number of holes is left in the building material. It is necessary that their area is equal to one four hundredth of the area of the subfloor.
How to improve air exchange in an already built house?
If the house is already standing, and the available ventilation is not enough, high humidity is constantly felt in the underground and fungus has begun to form, measures can be taken.
To increase air flow and improve ventilation, you need to:
- Drill new vents or increase the size of old ones. The easiest way is to drill many holes around the perimeter of the vent using a hammer drill with a thick drill bit. Then drill out the remaining gaps and level the walls. However, a more productive method is drilling with a diamond core without shock loads, which leaves smooth and neat holes;
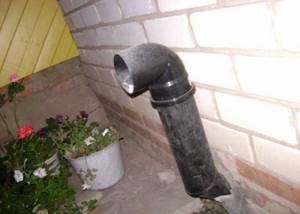
- Improve ventilation draft by extending several pipes from the exhaust openings to the roof. The thrust will increase due to the greater pressure drop;
- Install automatic forced ventilation with a timer;
- Build a channel at the base of the stove, combined with a blower. Then the air will be drawn from below, providing the stove with the oxygen it needs for combustion. However, this option is applicable only for buildings with brick stoves, and then only at the stage of construction or alteration of the unit.
- Reduce groundwater penetration by installing powerful waterproofing. A method that does not allow one to abandon ventilation, but reduces the level of humidity characteristic of structures buried in the ground.
Waterproofing materials, thick construction polyethylene or a polymer membrane, must be laid with an overlap of 10-15 cm, overlapping the walls by 20-30 cm and secured with a plank. To prevent the film from being damaged, a thin 3cm screed is poured onto it.
With an insulated foundation, plinth, and blind area, the effect in combination with a ventilation pipe will be multiple. Without insulation, condensation will collect on the film, which, by making a slope, can be diverted away from the subfloor.
To reduce the temperature difference within the underground, it is better to fill the soil base with expanded clay. It is undesirable to lay polyethylene on the ground; anaerobic bacteria will breed under it and a persistent swamp smell will appear.
But expanded clay, due to its hollowness, will itself draw water from the surrounding soil. Therefore, this material can be filled only if the hot water level does not rise above 2.0 m from the day surface. If not, you will have to arrange underground ventilation in the house according to the scheme described above, adhering to standard principles.
Forced ventilation device
Natural circulation of air flows cannot in all cases provide the necessary drying of the underground space. Then a mechanical ventilation unit or supply ventilation valves are installed.
Mechanical forcing of air to move is required:
- If the house is built in a valley between the hills.
- If the natural movement of air masses is impossible due to the climatic characteristics of the area (high humidity, for example).
- If the base of the building is buried in soils with low filtration properties, due to which atmospheric water weakly seeps into the underlying rocks. It can be identified by stagnant puddles after rains and poorly drained flood waters. In this case, in addition to ventilation, you need effective wall drainage, which can be built after the construction of the house.
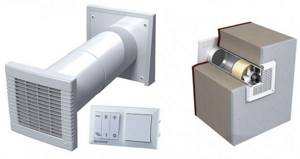
Forced ventilation systems are characterized by the presence of installed supply/exhaust fans in the air openings, which promote more intense circulation of air masses. The most common and economical option is to install one exhaust fan.
If the owners of the house are not limited in funds, it is better to install a forced system with fans for complete air exchange within the subfloor
It is enough to turn on such fans for half an hour once a day. You can install a system for automatically turning on/off ventilation devices. When there is periodically increased humidity - for example, during the spring melting of snow - heating equipment can be used to quickly drain the subfloor.
Features of the combined system
A combined ventilation system in the basement is installed if the natural type ventilation system does not cope with its tasks, and using only a mechanical one is too expensive. A huge advantage of the combined system is that it is not influenced by natural factors and temperature differences and can operate all year round.
Combined ventilation, like natural ventilation, is arranged using supply/exhaust openings. A fan is installed in the exhaust opening to quickly remove stale air from the underground. If the underground area is large, the fan is also installed in the supply air duct.
The natural type of ventilation can easily be converted into a combined version by installing a wall ventilation valve on the supply or exhaust opening
In small underground spaces this is not economically feasible, as there will be excessive energy consumption. A fan will help quickly dry the space if natural ventilation cannot cope with this problem.
Most often, fans with a power of up to 100 W are used to equip a combined system. You can choose both centrifugal and axial devices. Axial ones are more economical, and also provide a fairly powerful air flow, while consuming a moderate amount of electricity. When installing axial devices, you need to install a check valve in the pipe.
How to make perfume
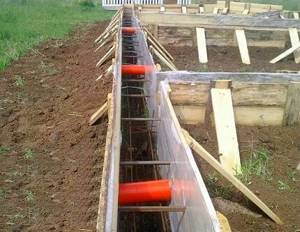
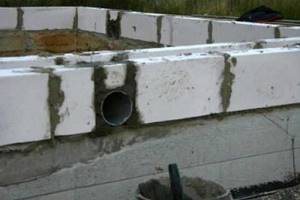
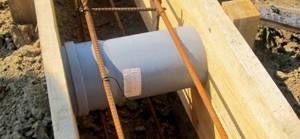
Vents are formed at the foundation manufacturing stage. If we are talking about a strip monolithic foundation, then the embedded parts are laid and secured after installing the reinforcing frame. To organize round vents, plastic or asbestos-cement pipes are laid. Their edges are brought flush with the outer edge of the formwork and secured well. If plastic pipes are used, sand is poured into them and the edges are closed with plugs. This is necessary so that the mass of concrete does not flatten them when pouring. These mortgages are not removed after the formwork is removed.

Installed plastic pipes for vents in the basement
Rectangular vents are formed from boards, knocking down a box of the required size. It is also installed in formwork, but after the concrete has set, the wood is removed.
If the base is built of brick, you can periodically trim the bricks or install a half instead of a whole. In concrete block plinths, take several pieces with two large holes and make them through. Installed instead of one of the “normal” ones. If the foundation and plinth are built from reinforced concrete blocks, vents are made at the joints.
The formwork was removed
Vents are organized in approximately the same way in columnar and pile (screw, bored, TISE) foundations. When the gaps between the supports are covered with the selected material, the required number of holes is left, the total area of which is equal to 1/400 of the area of the subfloor.
This way you can insert a pipe for an vent into a base made of blocks

An example of the formation of air in a wooden house made of logs
Air vents in a brick basement
Cover with a fine mesh grill
Features of underground ventilation in a private house
As a rule, if there is space under the floor of the house, it is ventilated using a vent inside the base. This is the simple, most commonly used option. Ventilation holes are installed with a certain distance from each other, from the corners of the building, ground level, etc.
The openings must be closed with metal shutters and perforated grilles to protect against rodents, which in the fall often take up residence in private buildings for the wintering period.
For optimal organization of the ventilation process, it is best to make vents inside two sides of the base: the leeward one and the one located opposite. This will increase your cravings naturally. Ventilation openings should not be blocked by any objects; it is necessary to control that the plants do not interfere with the natural circulation of air.
Ventilation of the space under the floor of a finished building can be organized using diamond drilling technology. If there is an additional foundation inside under the interior walls, but it is impossible to make ventilation holes there, the number of openings inside the outer base increases by 1.5-2 times.
How to properly organize ventilation in winter? >>>>
Typical device methods
Ventilation holes (vents) can be of any shape. When constructing brick foundations, it is advisable to give them a rectangular shape; when pouring concrete, it is more practical to install asbestos-cement or plastic pipes into the formwork.
You can make wooden boxes of any configuration and secure them in the formwork before pouring concrete. But wood will last much less as ventilation openings. When installing, it is advisable to immediately provide for the possibility of closing them during the cold season.
The use of metal pipes is undesirable. During the cold season, cold bridges will appear in them; at the inner ends there will be a low temperature and frost. It is advisable to install the vents during the construction of the foundation, otherwise later this work will require too much physical effort and the presence of a rather expensive special tool.

The minimum size of ventilation holes is not less than 0.05 m2, the maximum recommended is no more than 0.85 m2. If you want to arrange larger ventilation openings, the foundation in these places should be strengthened by installing additional reinforcement. This option can be used with a significant height of the basement floor and underground construction.
Instead of vents, you can install small windows. This option, in addition to ventilation, will help create solar lighting when installing an underground floor. If the foundation has a small height, special pits can be installed near the windows, filled with concrete around the perimeter or lined with brick.
To protect against precipitation, canopies made of tin or polymer materials are installed over the windows. A layer of waterproofing should be installed on the outside of the pits.
Seasonal maintenance of the ventilation system with vents
The main controversy when caring for the ventilation system is the question of whether to close the vents for the winter or not.
There are 2 points of view here:
- With open vents. Moisture that falls in the form of condensation in heated, overly insulated rooms will be removed through them. The floor in them that is directly connected to the ground will always be cold, which means that during the heating season the formation of “dew” will increase. However, if you invest in floor insulation, this can be avoided.
- With the vents closed for the winter. Warm, humid air from the living space will hit the cold surfaces of the subfloor (basement walls). Condensation will drain into the ground. In spring/summer it will evaporate, increasing humidity, so it will be necessary to dry the subfloor with heating devices.
The vents will have to be closed if the house is made of wood and the flooring is made using floating technology, i.e. There are gaps near the walls, and there are also ventilation holes with grilles in the floor. Otherwise, the floor will become very cold.
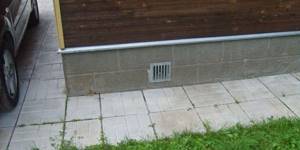
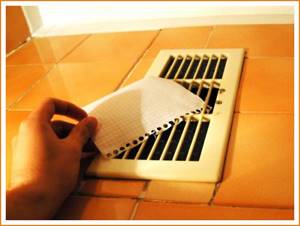
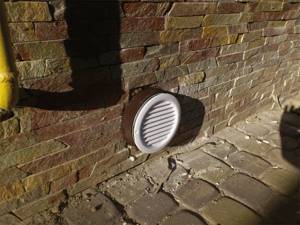
It is not recommended to close the vents for the winter; underground ventilation should be carried out in all weather conditions. It makes sense to reduce the air flow using the method shown in the photo.
In other cases, you can consider both options. In addition, in winter it is necessary to regularly clear the snow from the base so that the ventilation openings do not become completely blocked. After all, even in a closed state, they will contribute to ventilation, even if in a reduced state.
At other times of the year, caring for the ventilation system is simple:
- in the spring - open the vents and dry the underground;
- in summer - make sure that the ventilation openings are not filled with debris and are not obscured by grown plants;
It is necessary to install ventilation grilles (preferably metal) on all types of vents so that rodents and raccoons do not get inside, and regularly clean them of debris so that the air flow is not reduced.
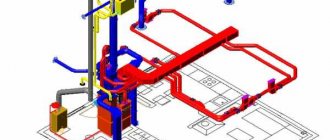
Supply and exhaust ventilation device
Now let's look at how to make ventilation in the basement. The easiest way would be to make ventilation in the cellar or basement of the supply and exhaust type or forced.
First, let's do the calculation.
For 1 m2 of area there should be 25 cm2 of the cross-section of the air duct.
As the ceiling height or humidity increases, the diameter of the duct increases. A wooden box can be divided into two halves for supply and exhaust ventilation, but it is best to use plastic pipes or metal corrugated boxes.
Wooden ventilation parts must be treated against mold and painted.
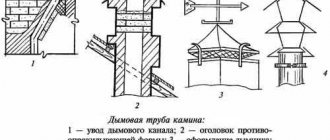
The supply and exhaust ventilation device can be supplemented with a deflector on the roof of the house. It will create additional vacuum in the pipe and improve the release of warm air.
A controlled forced system will be much more effective with comparable labor costs. To do this, we will need special duct fans that operate on a voltage of 36 V. This feature is associated with the category of all basements that allow the use of only such currents.
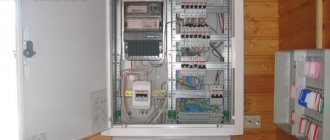
Therefore, a transformer is installed in the electrical panel, reducing the voltage from 220 V to 36 V. And the wiring must be laid in cable channels. These and other rules can be found in SNiP 41-01-2003 heating, ventilation and air conditioning.
For small rooms, only one such fan per exhaust arm will be sufficient. The flow of fresh air will be carried out due to the vacuum in the basement. But the efficiency of the system will be much higher if you install a second supply pump and combine their work into one control panel.
Now on sale you can find programmable control panels with temperature and humidity sensors, and the duct fans themselves are available in all sizes and are compatible with almost any ventilation ducts. For convenience, they are already built into the body, have a protective grille and replaceable filters.
It is preferable to use PVC as pipes for ventilation ducts in your own home. They are strong and lightweight enough to be attached to walls and ceilings using regular dowels. They are not afraid of moisture and temperature changes, and the cost is lower than steel structures.
Condensation will always form in the exhaust ventilation ducts, which must be removed periodically. To do this, you can provide a special hole for draining water. Excess moisture leads to corrosion of metal structures and increases the likelihood of air duct freezing in winter. If this happens, you should definitely clean and defrost the channel.
Functionality check
Determining air circulation is quite simple. To do this, you can use the open flame of an alcohol burner or candle, or attach a sheet of paper to the opening of the exhaust duct. A good hood will hold the leaf securely. A thermometer installed in the area of the supply air duct will not do any harm.
The following signs indicate poor ventilation in a basement or garage:
- Condensation appears on the walls , and humidity exceeds 95%. The permissible maximum humidity for storing workpieces and crops is 85-90% at a temperature of 3-40C. For residential premises and garages, humidity levels should not exceed 40-50%;
- Mold and fungal growths on walls and ceilings;
- Unpleasant smell in the room and heavy stale air;
- Sudden changes in temperature indicate an incorrect design of supply and exhaust ventilation or errors in calculating the cross-section of the channels;
- In warm weather, condensation may not be noticeable, but in winter the walls will be covered abundantly with frost;
- Carbon dioxide can accumulate in the cellar with vegetables. You can identify it by a dying candle or match. In this case, it is necessary to open all the dampers and ventilate for 24 hours, without going into the room without protective equipment.
Ventilation in the bathroom and toilet: selection and installation of an exhaust fan - detailed article.
How to flush the heating system in a private house with your own hands: instructions.
The installation of ventilation systems will be much more effective if, together with it, measures are taken to maintain the microclimate:
- Periodic ventilation with the opening of all doors and hatches. This requirement is especially relevant for cellar owners. It is best to do this in the summer, and remove all wooden objects from the cellar;
- Regularly treat walls with lime or special compounds. They will protect against mold and unpleasant odors in the room. An approximate recipe for this composition: 3 kg of lime and 50 g of copper sulfate per bucket of water;
- Excess moisture in the air can be dealt with using a box of sand , sawdust, salt, and quicklime. Periodically, the box is taken out and thoroughly dried in the sun. In the cellar, you can leave the hole unlocked and cover it with old blankets or mattresses to improve air circulation;
- Installing an additional heat source (small stove, brazier, air heater, lamp) or just a burning candle helps;
- Waterproof the basement or cellar with bitumen compounds;
- Install adjustable dampers for supply and exhaust ventilation. With their help, it will be possible to eliminate drafts and freezing of the basement in winter;
- If the cellar is located in a garage, then it should have a separate ventilation system. High humidity in a vegetable cellar is contraindicated for a car;
- Install a regular home fan.
Difference between systems based on the principle of air exchange
Any ventilation system based on the air exchange principle can be:
- natural - without the use of fans;
- forced - fans are used for both supply and exhaust;
- natural-forced - fans are used either for supply (very rarely) or for exhaust (almost always).
Below we will look at exactly how these schemes are made.
Natural system (breaths)
For an underground space, a natural ventilation system is usually sufficient (you can read more about its arrangement) - there is not much space there, too rapid air exchange is not required.
Rectangular and round vents
The option is more economical (no electricity costs) and simpler (you can actually do it yourself, with just one grinder).
This scheme is good if the house is located on a hill, or at least in a windy area. If there are other houses or trees around, or you have a high brick fence, or the house is located in a low area, natural ventilation is unlikely to help.
To make such a system, you need to cut holes (rectangular or round) - vents - in the leeward and opposite sides of the foundation. Through which air will flow. They should be located evenly along the entire length of each side. Both air supply and exhaust will be carried out through them.
To calculate the number and size of holes, we use the building code: the area of the vents should be 1/400 of the area of the subfloor. That is, if you have a house with a total area of 100 square meters, then the total area of the vents should be about 0.25 m².
Other rules to consider:
- Area of 1 hole: from 50 cm².
- There should be at least 90 cm from the corner of the foundation to the vent (otherwise this corner will not ventilate well).
- If the soil on which the house stands has a high radon content, the area of the vents should be 1/100 relative to the area of the subfloor.
- The center point of the hole should be at a height of 30 cm from the surface.
- If there are intermediate walls in the foundation, there should also be holes in them.
- The distance between the vents is no more than 3 m.
If you attach a pipe to the formwork, the ventilation holes do not have to be drilled: they will remain in the foundation
From the outside, the vents are covered with ventilation grilles, ideally with a mesh (with cells no larger than 5 mm).
When can you do without perfume?
It is not necessary to make holes in the foundation if:
- the soil in the underground is covered with vapor-proof material, overlapping by 15 cm, and glued at the edges to the foundation;
- the underground space communicates with the premises of the first floor (for example, it is used for storing something and is periodically opened);
- An air duct was installed into the underground floor, providing a minimum of 0.5 l/s for every 5 “squares” of area, and at the same time, the foundation was insulated from the outside.
Compulsory system
In some cases, a natural-forced scheme is relevant. It's worth doing if:
- You have a large house, and therefore a large amount of underground space. In this case, the natural system may not cope.
- The house is built in a low area or covered by other houses or trees. In this case, natural ventilation does not work well, and it will not be possible to ventilate the space normally.
- Dampness and/or mold quickly develops in the underground. This happens when, during the construction of a house, the foundation was not insulated and/or waterproofed.
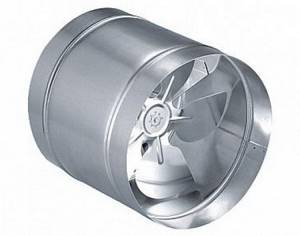
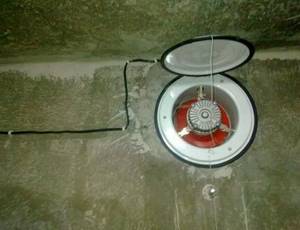
This type of fan is placed in the ventilation hole to blow out air.
It’s also possible to implement it yourself. To do this, vents are made in the foundation, as mentioned above, only fans are inserted into the holes. Their purpose is to distill air, maintaining stable air exchange.
In most cases, a natural-forced scheme will be more than enough - it is not necessary to install fans on the supply side . That is, only exhaust ventilation is forcibly organized, and supply ventilation is done naturally: through ordinary openings.
Fans can be installed in all vents on one wall, or through one. If you install them through one vent, then there must be fans in the outer holes (close to the corners).
It is also recommended to create such a system for those owners who have not encountered dampness or mold in the underground - just in case. Getting rid of it due to inattention and saving several thousand rubles will be more difficult than taking preventive measures one-time.
An unusual option: underground ventilation through a stove (video)
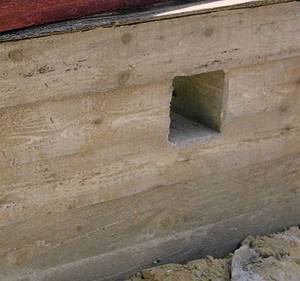
What should be the vents in the foundation and how to position them
Ventilation holes in the foundation are made of round or square cross-section. If desired, it can be triangular or any other shape. If only they were large enough in area to effectively remove moisture from the subfloor.
Dimensions
The dimensions of ventilation holes in the foundation are regulated by SNiP (SNiP 31-01-2003). Paragraph 9.10 states that the area of the vents must be at least 1/400 of the total area of the subfloor. For example, if you have a house measuring 8*9 m, the underground area is 72 square meters. m. Then the total area of vents in the foundation should be 72/400 = 0.18 sq.m. or 18 sq. cm.
The same paragraph of the standard specifies the minimum ventilation area - it should not be less than 0.05 sq.m. If we translate into dimensions, it turns out that rectangular holes should not be less than 25*20 cm or 50*10 cm, and round ones should have a diameter of 25 cm.

Larger holes can be made
In multi-storey buildings this is done, but in private buildings such holes look too large. Usually they are made two times smaller, while increasing the number of vents so that the total area of the vents is not less than the recommended one.
How to position
Make vents in the foundation 15-20 cm below the top edge of the tape. If the base is low, a recess is made in front of the vent - a pit. But ventilation of the underground is required.
The vents in the base are placed evenly on all sides of the foundation opposite each other. This is necessary for the foundation ventilation to work properly. The wind, “flying” into one hole, will fly out into another, taking with it water vapor and radon.

Place the vents in the foundation opposite each other
The distance between two adjacent vents in the basement is about 2-3 m. If there are any partitions inside, at least one vent is needed for each “room”. It is also necessary to make vents in the partitions themselves to allow air masses to move and form a draft. This is exactly what we need. In order for movement to be more or less free, the area or number of holes in the internal partitions must be larger and better, if it is 2-3 times larger. You can make several holes the same size as in the base, or you can make one, but wide one. The second option, by the way, is preferable - the resulting passages can be used to service the underground.

If you don’t find a grate of a suitable diameter, you can do this
Vents in the foundation of any format must be covered with gratings to prevent living creatures from entering the underground. It is desirable that the grilles are metal and the holes are small. For mice, plastic is not a problem, and keeping them out is easier than dealing with them later.
This option improves ventilation conditions and protects against rodents
Additional humidity reduction
To ensure that the ventilation system does not have to be strengthened by increasing the total cross-section or installing fans, the following work must be carried out:
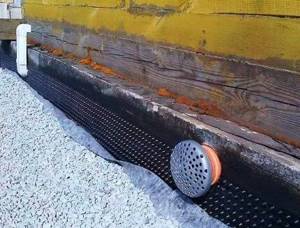
- Installation of an effective drainage system - removal of water from the foundation.
- Waterproofing the base of the house and the basement. There are many types of waterproofing: it can be rolled, built-up, coated, etc.
- Performing insulation. The best material in terms of economy and efficiency is EPS. This is a good heat insulator that does not allow water to pass through. It is not of interest to rodents and does not rot. EPS can also insulate the blind area.
The listed measures do not cancel, but simply supplement ventilation. Only in combination can you achieve ideal drainage of the space in the basement compartments.
If the house is built on a soil foundation that does not drain water well, in addition to the ventilation system, drainage and storm drainage are required. The drainage system will collect water from the soil and upper layers of soil, the storm drain will collect and drain precipitation
When installing a system according to a forced scheme, the costs for installation, maintenance and service will be higher than when organizing a natural type. It should be taken into account that in winter condensation can form on the walls of the ventilation pipes themselves, and in cold weather the cross-section can become completely clogged.
To avoid this, pipes can be thermally insulated with penofol. At the bottom turn of the pipe, you can come up with a condensate collector - for example, drill a hole or install a tee instead of an angle.
Materials and tools for installing ventilation in the cellar
From the general description of the systems given above, it can be understood that to install ventilation in the cellar you will need:
- steel, plastic or asbestos-cement pipes of calculated diameter and length;
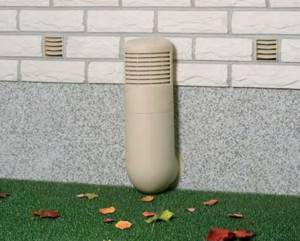
- round bends in the presence of turns along the exhaust or inflow line;
- protective visors or deflectors to protect the ends;
- axial fan with a design capacity with a working blade width corresponding to the pipe diameter;
- louvered air distribution grilles.
Grilles are not a mandatory element of the system, but with their help it is much easier to limit the flow of cold air in winter and prevent the cellar from freezing.
Tool
The set of accessories for the ventilation device in the cellar is selected depending on the selected type of pipes. For plastics it will be minimal, consisting of a measuring tape, a pencil, a cutting tool, a screwdriver and a hammer.
Steel pipes additionally require welding, which in this case can be replaced with clamp connections, but this will cost more.
Pipe selection
Based on this, we can conclude that the most inexpensive and simplest option is to use plastic sewer pipes with a diameter of 110, 150 or 200 mm. Rolled steel will cost much more, and the use of welding will complicate installation.
Industrial production of asbestos-cement pipes has now been discontinued due to the environmental hazards of the material. Therefore, even if you manage to find inexpensive warehouse stock, problems may arise with the availability of couplings. As a result, the system will not be sealed and will become susceptible to moisture penetration.
How to close the vents
Through openings should be covered not with blind, but with air-permeable grilles. Plugs are required to be installed; they protect the underground from the penetration of rodents, cats, birds and other animals.
Plastic ventilation grilleSource roomester.ru
There are many different types on sale that are mounted on a street hole:
- large openings are covered with bars made of steel reinforcement with corners or metal mesh, including stainless steel;
- plastic products differ in shape (including in the form of an outlet at an angle of 90), sizes, and have an aesthetic appearance;
- In the workshops, gratings are made to individual orders.
When choosing a product, you need to pay attention to the presence of a check valve. For foundation ventilation, the valve is an unnecessary element (it must always be open, and this will have to be monitored). You should choose options without it.

Grilles with decorative designSource luxury-kamin.ru
How to use it correctly depending on the season
The main misconception of owners of wooden houses is to completely close the vents in the cold season and open them to maximum in the summer.
The reasons for covering them in winter are clear - if the floors are not insulated along the joists, cold air penetrating through the vents quickly cools down the rooms on the first floor and leads to drafts.
But this approach contradicts the requirements of SNiP and building standards, namely, maintaining the air temperature in the underground slightly higher than outside. For this reason, completely blocking the vents in winter is considered a violation, fraught with the accumulation of condensation (including due to soil that has not frozen under the heated floors) and rotting of the wood. When used correctly, the vents close only:
• If there is a high risk of water getting inside during periods of inter-seasonal floods or snow melting. Raising the holes to the required height (20-30 cm above ground level) reduces them to a minimum, but in a number of regions or when the house is located in a lowland, this point cannot be discounted. Opinions about the need to clear snow from air vents are ambiguous; some owners specifically throw it over the openings covered with perforated covers (thereby reducing heat loss with reduced but sufficient ventilation), while others, on the contrary, always clear them after heavy snowfalls. But for obvious reasons, during a thaw, the underground is in any case protected from the penetration of excess moisture.
• On days of particularly severe frosts when the thickness of the insulating layer in the first floor floor pie is insufficient (less than 15 cm). In particular, holes near sewer and water pipes without insulation and additional heating need to be closed.
• Partially, from the windward side under the same adverse weather conditions.
To completely or partially close the vents, both specialized adjustable dampers (an expensive but convenient option) and plugs made from pieces of insulation or scrap materials can be used. During the period of spring thawing of the soil, all vents are opened to the maximum along with inspection hatches or cellar doors (if any), excessively damp underground areas are forcedly vented or heated with a cannon. In summer, problems with ventilation can arise only if there is excessive growth of green spaces near the openings or if there is no difference in the average daily temperature of the underground and outside air of more than 1-2°. In the fall, the grates on the openings are inspected more often and, if necessary, updated or cleaned of leaves and large debris.
When venting is not necessary
Conditions have been identified whose presence makes it possible to do without vents:
- the inside of the foundation is filled with sand, while a concrete slab is installed on the foundation walls;
- the soil under the house is covered with a vapor barrier film, which does not allow moisture to penetrate inside;
- the underground is equipped with an independent, high-performance ventilation system, the foundation and basement are well insulated;
- the underground floor is directly connected to the heated room (additional space is created for storing items).
The question often arises: are vents needed in a foundation without a basement? If at least one of the first three points is fulfilled, there is no need for vents. In other situations, vents are required.