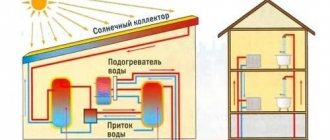
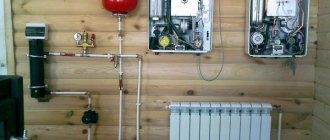
How to assemble a solar water heater for your home with your own hands?
The advantage of solar water heaters is that they are quite easy to make with your own hands without special training.
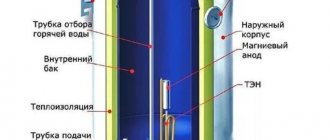
So, 18 steps necessary for self-assembly of a solar collector: We make a grid from parallel metal pipes (10-15 mm in diameter), fastened by two transverse pipes (with a diameter of at least 20 mm). To connect, we drill holes in wider pipes (according to the diameter of narrow parallel pipes). We weld the absorber - a metal sheet - to the frame. For better heat transfer, you need to press the metal sheet as tightly as possible to the frame (weld all sections of the connection). Cover the absorber with black heat-resistant paint. We wait until it dries completely. We make a wooden frame with a height of about 100-150 mm. The width and length of the frame are calculated based on the dimensions of the absorber. We place the absorber inside a wooden frame. We cover the frame with ordinary window glass (from 4 mm thick). Double-glazed windows can also be used. At the same time, the efficiency of the water heater will increase, but its total weight and the cost of the project will also significantly increase. We treat the frame with an antiseptic and paint it with paint (preferably resistant to humidity, to protect it from precipitation). We drill holes in the frame so that cold and hot coolant can enter the metal frame of the absorber. We cover the rear part of the structure (under the absorber) with heat-insulating material. It is recommended to use min. cotton wool
It is important that the insulating material is able to withstand temperatures up to 200 degrees. Cover the bottom of the frame with plywood or boards. The main thing is to ensure that moisture does not penetrate into the water heater. We nail the strips for fastening the glass (in the inside of the frame). Attach the seal, insert the glass and another seal onto the glass
All this is attached using galvanized sheet. All cracks in the structure are filled with silicone to reduce heat loss. We find the battery capacity. It could be an old boiler, metal barrels... the main thing to remember is that the container must withstand the water pressure in the system (several atmospheres). There are 4 holes in the tank. Two for the heat exchanger. One for cold water entering the tank (at the bottom of the tank) and one for hot water exiting (at the top). We place a spiral-shaped heat exchanger (made of copper or stainless steel) in the tank. We connect the collector and the battery tank. To do this, you can use plastic or metal-plastic pipes (to prevent heat loss, we insulate the system well). At the top point of the system, we attach an expansion tank (to regulate the pressure in the system).
We hope that our article was useful to you and will help you in building a solar water heater with your own hands.
Types of instantaneous water heaters
Instantaneous water heaters are divided according to the type of energy used for heating. Therefore, they can be divided into the following types:
- Electric, in which passing water is heated by a heating element (tubular electric heater) or a metal tube, which is exposed to an alternating magnetic field (inductor). Therefore, they are divided into two types: induction and heating elements. This type of water heater consumes electrical energy, so it is not suitable for places where it is not possible to connect to the mains;
- Water, powered by a heating system. These devices do not require an electrical connection, so they can be used even in non-electrified homes. However, dependence on the heating system does not allow their use in the summer;
- Solar, receiving heat from the sun. They do not depend on a heating or electricity system, so they can be used in summer cottages. However, these devices heat water only on warm sunny days;
- Gas, powered by liquefied or main gas. Such devices are used only in houses and apartments connected to a central gas pipeline.
This device heats the flow of water passing through it.
The basis of an electric water heater is nichrome wire, which has high resistance, wound on a ceramic frame. An induction heater works on a different principle. A thick copper busbar is wound onto a metal pipe, then high-frequency (up to 100 kilohertz) voltage is applied. The alternating magnetic field heats the metal pipe, and the pipe, in turn, heats the water. There are flow-through heaters that are built into boilers or heat accumulators filled with water. That's why they are called water creatures. The best option for a summer cottage is a solar instantaneous water heater. It runs on solar energy and heats the water to 38–45 degrees, which is enough to take a shower. Gas instantaneous water heaters appeared among students out of despair caused by a broken water heater or other similar factors. They are a copper tube twisted into a spiral, located above the fire of a kitchen gas stove.
What you can do yourself
Before choosing a specific type of water heater, you need to determine what tools, materials, and skills are available to you. If you know how to work well with a welding machine, you can make an electric water heater. If you already have a working heating system with a heat accumulator and you know how to use a welding inverter, you can make a water heater. If you do not have such talents or you do not have electricity or water heating, then a solar water heater is quite possible for you.
Gas instantaneous water heaters are a high-risk product. To work with any gas devices, you must undergo special training, otherwise there is a high probability that instead of an instantaneous water heater you will receive a time bomb that will one day explode. If the gas concentration in the room is 2–15%, then an explosion will occur from any spark. Therefore, this article does not contain any instructions with which you can create a gas instantaneous water heater.
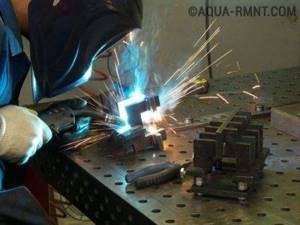
To create most water heaters you will have to learn how to use welding
Classification
Depending on the type of circulation
- Natural circulation occurs through the physical properties of the liquid. The heated coolant has a lower density and a larger volume, so it tends to rise up through the collector tubes, and the cold coolant takes its place.
- Forced circulation. For natural circulation to occur, the reservoir must be located above the collector. And this is not always feasible from a technical or architectural point of view, especially if the water heater is equipped with a large-volume tank.
Forced circulation solar collector
Considering that the water heater panel is usually installed on the roof slope, the tank for natural circulation will have to be placed on the ridge, which will seriously test the strength of the structure and is unlikely to decorate the appearance of the roof. Therefore, the reservoir is often installed traditionally, in the lower part of the building, usually in the basement, and the coolant is circulated forcibly using special pumps.
In addition, forced circulation allows the use of coolant oils, which are more effective in this capacity than water, but due to their low expansion coefficient they practically do not support natural circulation.
Depending on the type of collector
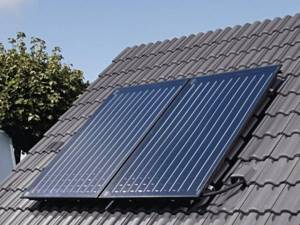
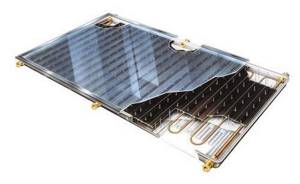
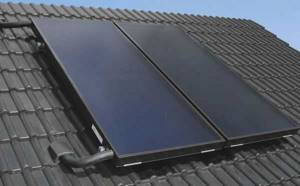
- The panel collector is the simplest option without any special complaints. Painted with black light-absorbing paint, the tubes for coolant circulation are mounted in a simple panel housing and covered with glass or transparent plastic. The efficiency of such a device is quite low due to the fact that the coolant begins to give off heat to the surrounding air before it has time to leave the collector. And given that the collector is similar in design to a radiator, losses can be quite significant. Therefore, it is advisable to use a panel collector only in areas with high solar lighting efficiency or for auxiliary needs.
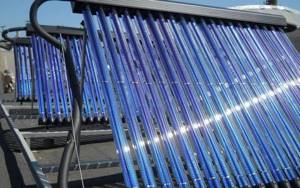
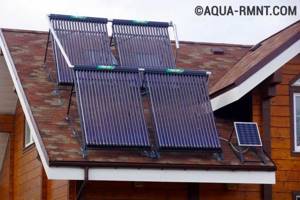
- The vacuum collector does not have the main disadvantage of the previous type of design: the coolant tube is laid inside a vacuum flask that allows solar radiation to pass through. This practically prevents the transfer of heat from the collector to the environment and allows you to heat water to boiling temperature, and the coolant oil to 200-300 degrees, which is perfect for heating a house. Of course, a vacuum manifold has a higher price, but the difference in price is fully recouped during operation.
Depending on the circulation circuit
- An open loop water heater is used to supply hot water to a home's water supply. The coolant in such a system is water, which is directly used for domestic needs without returning to the circulation circuit.
- A single-circuit system is used to heat a house. The heated coolant from the reservoir enters the heating system (usually used as a supplement to the coolant heated in the traditional way), after passing through which it again enters the tank and is supplied to the collector.
- The dual-circuit system can be used for any purpose (both for hot water supply and heating) and allows you to choose any coolant - water, oil, or antifreeze for use at sub-zero temperatures. The coolant from the collector reservoir enters the heat exchanger, where it transfers heat to the coolant of the secondary circuit, which in turn is used for the intended purpose of the system (for heating or hot water supply).
Some recommendations regarding the installation and construction of the device

It doesn’t matter whether you have a solar vacuum water heater or any other, it is important that the device meets all consumer parameters, so it is recommended to follow the tips below:
- It is best to install drain valves in the lower area of the heat exchangers so that the air can bleed out.
- The hydraulic system must have a valve, which eliminates the circulation of coolant. If there is a sharp drop in temperature, then the valve should be closed.
- Collectors can be integrated into an integral hydraulic network if you need to improve radiator performance.
- To obtain the desired water temperature, you will need to use mixers to supply heated water.
- Thermal insulation must be reliable!
As you can see, you can create a device on your own, the main thing is to be patient, stock up on all the materials and start designing. Anyone can create this water heater for their home, you just need to put in a little effort.
DIY water heating tank
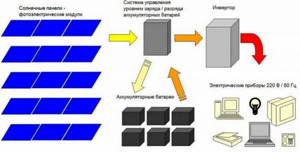
Diagram of solar modules.
The most common solar heater is the outdoor shower. You can construct such a hot water supply system with your own hands. It's not difficult at all. Its basis is a water tank, which is heated by solar radiation. Despite its primitiveness, such a structure is quite capable of satisfying the need for hot water in the warm season.
The biggest disadvantage of this heating method is that, despite the fairly high temperature of the water in the tank during the day (sometimes up to 45ºC), it drops during the night. In order to reduce heat loss at night, it is necessary to either insulate the tank at night, or drain the remaining hot water into an insulated tank. Such a reservoir can be gas or electric boilers, widely used in households. The choice of a boiler as a storage tank is also justified because on a cloudy day the water in the tank will not warm up above 30ºC, and in any case it has to be heated.
When choosing this type of solar heater, you need to consider several of its disadvantages:
- the need to fill and drain the tank daily;
- on a cloudy day, the water in the tank does not heat above 30ºC.
Related article: How to make wall moldings with your own hands
Installation of a water heating tank
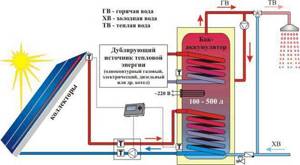
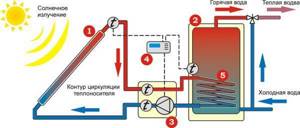
Diagram of a solar water heating system.
To build a solar water heating tank with your own hands, we will need:
- heating tank;
- boiler;
- water supply with three taps;
- water level sensor.
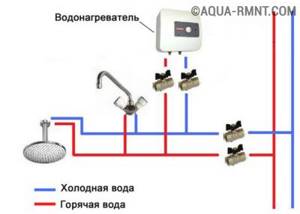
Any water container can be used as a heating tank: a steel barrel, a cube, or even large-diameter pipes. However, the most convenient for installation and use is a special polyethylene tank for a summer shower with a volume of up to 300 liters. It has a flat shape, light weight, painted black, does not rust. All this ensures rational heat absorption and easy DIY installation. For water supply, you should choose metal-plastic or polypropylene pipes for cold water. The water level sensor is mounted on the tank lid and is used to monitor its filling level. The installation and operation diagram of this system is shown in the figure.
To fill the heating tank with water, tap 3 must be closed. Taps 1 and 2 remain in the open position. After filling the container, the pressure water supply is turned off with tap 1. At the end of the day, the heated water is drained into the boiler by opening tap 3. If there is no need to use the heater, you should turn off tap 3 and use the boiler as usual.
DIY Solar Installation Options
The peculiarity of self-built solar water heaters is that almost all devices have the same design of a thermally insulated box. Often the frame is assembled from lumber and covered with mineral wool and heat-reflecting film. As for the absorber, metal and plastic pipes are used for its production, as well as ready-made components from unnecessary household equipment.
From a garden hose
A garden hose folded like a snail or a PVC water pipe has a large surface area, which makes it possible to use such a circuit as a water heater for the needs of a summer shower, kitchen or swimming pool heating. Of course, for these purposes it is better to take black materials and be sure to use a storage container, otherwise the absorber will overheat during the peak summer heat.
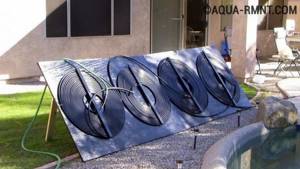
A flat manifold made from a garden hose is the simplest way to heat water in a pool.
From an old refrigerator condenser
The external heat exchanger of a used refrigerator or freezer is a ready-made solar collector absorber. All that remains to be done is to equip it with a heat-absorbing sheet and install it in the case. Of course, the performance of such a system will be small, but in the warm season, a water heater made from refrigeration equipment parts will cover the hot water needs of a small country house or cottage.
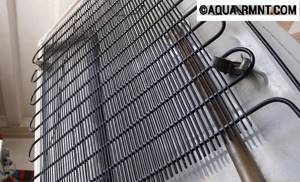
The heat exchanger of an old refrigerator is an almost ready-made absorber for a small solar heater
From a flat radiator of a heating system
Making a solar collector from a steel radiator does not even require the installation of an absorbent plate. It is enough to cover the device with black heat-resistant paint and mount it in a sealed casing. The productivity of one installation is more than enough for a hot water supply system. If you make several water heaters, you can save on heating your home in cold, sunny weather. By the way, a solar installation assembled from radiators will heat utility rooms, a garage or a greenhouse.
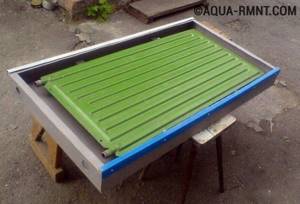
A steel heating radiator will serve as the basis for building an environmentally friendly water heater
Made from polypropylene or polyethylene pipes
Pipes made of metal-plastic, polyethylene and polypropylene, as well as fittings and devices for their installation, allow you to build solar system circuits of any size and configuration. Such installations have good performance and are used for heating rooms and obtaining hot water for household needs (kitchen, bathroom, etc.).
The advantage of a solar collector made of plastic pipes is its low cost and ease of installation.
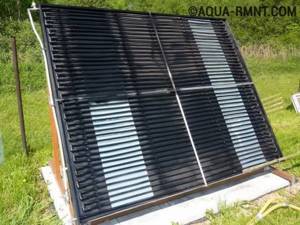
From copper tubes
Absorbers built from copper plates and tubes have the highest heat transfer, therefore they are successfully used for heating the coolant of heating systems and in hot water supply. The disadvantages of copper collectors include high labor costs and the cost of materials.
The use of copper pipes and plates for the manufacture of the absorber guarantees high performance of the solar installation
Solar Water Heater Designs
Now that the idea of a solar water heater is clear, let’s try to design it ourselves. The truck's tank does not need modification. Black, with a neck on top for filling with water, and often an outlet on the bottom. All that remains is to place it on the shower, fill it with water, and wait for the Sun to do the work. Of course, the water will be cool in the morning; you can wash in the afternoon. The advantage of the device is its simplicity. You will have to clean the tank of gasoline and oil so as not to go bald. Not everyone can afford to buy a factory-type solar water heater.
It is necessary to fill the tank with hot water and detergent, let it settle, and drain. Repeat the process, rinse with clean water, achieving crystal clear drainage. Most of the crap will be removed from the tank. In the future, you can put the unit in the sun for a week, drain the water, and do not wash it. After the procedure, the tank can be used for showering.
As for the question of where to get it, today electronic message boards are full of offers to sell used containers. Modern ones are often made of aluminum, while older ones are made of steel. The issue price is 2000 rubles. We consider the use of complex structures inappropriate. If you have steel (not cast iron) radiators like the one shown in the picture lying around, try to assemble a standing device, only for the summer. We will not use glass or gas tanks; we will need black paint and pipes. We believe that the design should contain a container for hot water located in the house of a sufficiently large volume.
You will need a low-power flow pump with fitting dimensions for a standard pipeline. We offer to make homemade solar water heaters in the image and likeness of factory ones. Let's place on the roof slope series-connected radiators of at least three, painted black.
We paint the pipes of a homemade solar water heater in the same way. We insulate the home tank with liquid rubber. Forget polyurethane foam, no other sprayed thermal insulation comes to mind. There are four holes in the homemade solar water heater tank:
Three at the top:
- Water intake.
- Replenishing water supplies.
- Battery output.
Below, hot water from the batteries will enter the tank.
Convection currents in the tank will take on a natural character. Warm water enters from below and begins to rise upward. It is necessary to install a horizontal reflector plate opposite the entrance to prevent the formation of a vertical flow above the entrance. We install the flow pump on the hood near the corresponding upper hole. For the location of the radiators of a homemade solar water heater, we choose the southern slope of the roof. It can also be a horizontal roof. The bottom of the radiators is finished with reflective insulation like Penofol. Only the sunny side can be painted with black paint.
The structure is ready. It is not advisable to cover the assembly with glass; it is advisable to protect it from the wind. The winnings will be received. The population will benefit from solar water heaters for their summer cottages. At night we turn off the pump and remove the structure from the roof for the winter. Factory-made solar water heaters for heating will give you a hundred points head start in efficiency, but we will crush you with price. A cheap factory manifold costs 15,000 rubles. If you want to spend money, we’ll look into a heat pump for heating for a substantial sum.
We will leave solar-powered water heaters to Germany and similar countries. In Europe, there is a government support program for energy-saving technologies; electricity can be pumped back into the grid (no joke). We will assemble a solar water heater for a swimming pool using the technology discussed above. Radiators can be laid out on a platform; the tank will be an artificial reservoir; do not forget to disinfect the water. It's a good idea to use mirrors lined with aluminum foil. You can stick the film on thin plywood panels and collect energy in the right place. It will turn out cheap and cheerful. There will be protection against the wind, and the radiators will heat up faster. The installation location is north of the collectors.
Now readers know how to make a solar water heater.
Average prices
Due to the fact that an increasing number of inhabitants of our planet are trying to use alternative energy sources in everyday life to obtain heat, electricity and hot water supply, therefore the offered range of products is quite wide.
Solar water heaters are produced by enterprises in our country and abroad. On
The cost of installation is affected by the country and manufacturer, the design (flat or vacuum) of the water heater, the delivery package and the region of purchase.
The cheapest option will cost the buyer 1500.00 rubles, for this money you can purchase a “Solar water heater for a swimming pool” (China) with the following technical characteristics: water heater blade size - 1200 x 1200 mm, intended for use with filter pumps with a capacity of no more than 9500 l/hour, weight - 3.7 kg.
The solar water heater “DACHA-LUX” (Russia) with a volume of 125.0 liters will cost the buyer 28,850.00 rubles. The delivery set of this device includes: a storage tank, a set of vacuum tubes (15 pieces), and a controller. The absorbing area is 2.35 m2.
The German installation for hot water supply “AuroSTEP plus” can be purchased for a price from 190,000.00 to 450,000.00 rubles, depending on the configuration. For this money, the buyer purchases: a hot water supply system that eliminates the possibility of boiling (Drain-back design), a water heater with a capacity of 150 - 350 liters. and 1 – 3 solar collectors.
The unit is equipped with a control regulator and an additional electric heater.
As can be seen from the above figures, the cost range is very large, so each potential purchaser can choose a device in accordance with the requirements for it.
Types of solar collectors
The standard device has the form of a metal plate, which is placed in a plastic or glass case. The surface of this plate accumulates solar energy, retains heat and transfers it for various household needs: heating, water heating, etc. Integrated collectors come in several types.
Cumulative
Storage collectors are also called thermosiphon collectors. This DIY solar collector without a pump is the most profitable. Its capabilities allow you not only to heat water, but also to maintain the temperature at the required level for some time.
This solar heating collector consists of several tanks filled with water, which are located in a thermal insulation box. The tanks are covered with a glass lid, through which the sun's rays shine through and heat the water. This option is the most economical, easy to operate and maintain, but its effectiveness in winter is practically zero.
Flat
It is a large metal plate - an absorber, which is located inside an aluminum case with a glass lid. A do-it-yourself flat-plate solar collector will be more efficient if you use a glass cover. Absorbs solar energy through hail-resistant glass, which transmits light well and practically does not reflect it.
There is thermal insulation inside the box, which can significantly reduce heat loss. The wafer itself has low efficiency, so it is coated with an amorphous semiconductor, which significantly increases the thermal energy accumulation rate.
When making a solar collector for a swimming pool with your own hands, preference is often given to a flat integrated device. However, it copes just as well with other tasks, such as heating water for household needs and heating a room. Flat is the most widely used option. It is preferable to make an absorber for a solar collector from copper with your own hands.
Liquid
From the name it is clear that the main coolant in them is liquid. A do-it-yourself water solar collector is made according to the following scheme. Through a metal plate that absorbs solar energy, heat is transferred through pipes attached to it into a tank with water or antifreeze liquid or directly to the consumer.
Two pipes approach the plate. Through one of them, cold water is supplied from the tank, and through the second, already heated liquid enters the tank. Pipes must have inlet and outlet openings. This heating circuit is called closed.
When heated water is directly supplied to meet the needs of the user, such a system is called open-loop.
Non-glazed ones are more often used to heat water in a swimming pool, so assembling such thermal solar collectors with your own hands does not require the purchase of expensive materials - rubber and plastic will do. Glazed ones have higher efficiency, so they are able to heat the house and provide the consumer with hot water.
Air
Air devices are more economical than the above-mentioned analogs that use water as a coolant. The air does not freeze, does not leak, and does not boil like water. If a leak occurs in such a system, it does not cause as many problems, but it is quite difficult to determine where it occurred.
Self-production does not cost the consumer much. The sun receiving panel, which is covered with glass, heats the air that is between it and the heat-insulating plate. Roughly speaking, this is a flat-plate collector with space for air inside. Cold air enters inside and, under the influence of solar energy, warm air is supplied to the consumer.
Such options are durable and reliable and are easier to maintain than devices that use liquid as a coolant. To maintain the desired air temperature in the cellar or to heat a greenhouse with a solar collector, just this option is suitable.
Purpose of a solar collector, its advantages and disadvantages
A solar water heater (liquid solar collector) is a device that uses solar energy to heat the coolant. It is used for heating premises, organizing hot water supply, heating water in swimming pools, etc.
The solar collector will provide the house with hot water and heat
The prerequisites for using an environmentally friendly water heater is the fact that solar radiation falls on the Earth all year round, although it differs in intensity in winter and summer. Thus, for middle latitudes, the daily amount of energy in the cold season reaches 1–3 kW*h per 1 sq.m, while in the period from March to October this value varies from 4 to 8 kW*h/m2. If we talk about the southern regions, then the numbers can safely be increased by 20–40%.
As you can see, the efficiency of the installation depends on the region, but even in the north of our country, the solar collector will provide the need for hot water - the main thing is that there are fewer clouds in the sky. If we talk about the middle zone and southern regions, then a solar-powered installation can replace a boiler and cover the coolant needs of the heating system in the winter. Of course, we are talking about productive water heaters of several tens of square meters.
Table: distribution of solar energy by region
| Average daily amount of solar radiation, kW*h/m2 | |||||||||
| Murmansk | Arkhangelsk | Saint Petersburg | Moscow | Novosibirsk | Ulan-Ude | Khabarovsk | Rostov-on-Don | Sochi | Nakhodka |
| 2,19 | 2,29 | 2,60 | 2,72 | 2,91 | 3,47 | 3,69 | 3,45 | 4,00 | 3,99 |
| Average daily amount of solar radiation in December, kWh/m2 | |||||||||
| 0,05 | 0,17 | 0,33 | 0,62 | 0,97 | 1,29 | 1,00 | 1,25 | 2,04 | |
| Average daily amount of solar radiation in June, kWh/m2 | |||||||||
| 5,14 | 5,51 | 5,78 | 5,56 | 5,48 | 5,72 | 5,94 | 5,76 | 6,75 | 5,12 |
Advantages of solar water heaters:
- relatively simple design;
- high reliability;
- efficient operation regardless of the time of year;
- long service life;
- possibility of saving gas and electricity;
- no permission required to install equipment;
- small weight;
- ease of installation;
- complete autonomy.
As for the negative aspects, not a single installation for producing alternative energy can do without them. In our case, the disadvantages include:
- high cost of factory equipment;
- dependence of the solar collector efficiency on the season and latitude;
- exposure to hail;
- additional costs for installing a heat storage tank;
- dependence of the energy efficiency of the device on cloudiness.
When considering the pros and cons of solar water heaters, we should not forget about the environmental side of the issue - such installations are safe for humans and do not harm our planet.
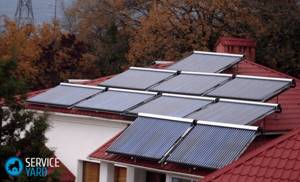
A factory solar collector resembles a construction set with which you can quickly assemble an installation of the required performance
How to make a solar water heater at home?
We bring to your attention detailed instructions for making a solar boiler with your own hands. The process is quite labor-intensive, but the result is worth it.
First, you need to prepare the materials and tools necessary for the work. You will need:
- Glass 3-4 millimeters thick;
- Wooden slats 20x30 millimeters;
- Beam measuring 50x50 millimeters;
- Boards 20 millimeters thick and 150 wide;
- Tin strip or pipe fasteners;
- OSB sheet or plywood 10 mm thick;
- Metal corners;
- Furniture hinges;
- Tin strip or pipe fasteners;
- Insulation with metallized coating;
- Sheet of galvanized sheet;
- Mineral wool;
- Metal and copper pipes with a diameter of 10-15 millimeters and 50 millimeters.
- Connecting clamps and couplings;
- Sealant;
- Black paint;
- Rubber seal for doors and windows;
- Aquamarkers;
- Plastic barrel or metal tank with a volume of 200-250 liters.
Once everything necessary for the work has been prepared, you can proceed directly to the manufacture of the solar water heater. The process itself is divided into four stages, which we will discuss in more detail below.
Stage 1. Making the box
At the beginning of the whole process, you need to make a housing for the future water heater. This should be done based on the following sequence of actions:
- From the prepared boards, assemble a box of the size you need.
- Sew the bottom of the case with a sheet of plywood or OSB.
- Once the box is assembled, seal all joints and cracks.
- Cover the inside of the case with a heat reflector. This way you will avoid heat loss.
- Cover all surfaces with a layer of mineral wool.
- Cover the finished layer of thermal insulation on top with tin sheets and treat all cracks with sealant.
- Treat the inner surface of the case with black paint.
- Install a glazing frame made of wooden frames. To do this, cut the slats to the sizes you need and connect them using metal corners for these purposes.
- Install glass on both sides of the frame, having previously treated one-fourth of the slats with a liquid-consistency sealing material.
- Attach the frame to the base of the cabinet using furniture hinges.
- Glue strips of rubber seal to the ends of the body.
- Prime and paint all exterior surfaces of the water heater housing.
That's all, the body assembly is complete. Now you can safely move on to the next stage.
Stage 2. Making the radiator
You can make a radiator for a solar water heater by following the following steps:
- Prepare two pieces of pipe with a diameter of 20-25 millimeters and the length you need.
- In a pipe with a large diameter, drill holes at a distance of about 10 centimeters from each other.
- Insert the sections of previously prepared pipes into the holes so that the ends protrude 5 millimeters from the reverse side.
- Weld or solder connections.
- Weld threaded bends for external connections diagonally to the ends of pipes with a diameter of 50 millimeters. The remaining ends need to be muffled.
- Paint the radiator with black heat-resistant paint in several layers.
Stage 3. Installation of the collector
Immediately before installing the radiator in the box, you first need to mark the places in its walls through which the outlets will pass to connect the water supply and extraction pipes. After that:
- Using these marks, holes of the required diameter are drilled.
- Next, install the radiator into the housing close to the bottom and fix it along the entire length of each element. This should be done in 4-5 places using strips of tin or other fasteners designed for this purpose.
- Now the collector body is covered with a frame and rigidly fixed with screws or corners.
- Next, all cracks are sealed.
The final stage. Arrangement and connection of a solar water heater:
- Insert threaded outlets into the container that you are going to use as a heat accumulator. One point should be made at the bottom of the container for supplying cold water, and the second should be placed at the top for heated liquid.
- Afterwards, the container must be insulated using mineral or stone wool, as well as other heat-insulating material for these purposes.
- An aqua chamber complete with a float valve is mounted 0.5-0.8 meters above the tank in order to constantly create a constant low pressure in the system. In addition, to install the pressure pipeline from the water supply to the aqua chamber, half of one pipe should be used.
- After the container is completely filled, water will flow from the drainage hole of the aqua chamber. Next, you can turn on the water supply from the water supply and fill the tank.
That's it, your solar water heater is ready!
Device diagram and operating principle
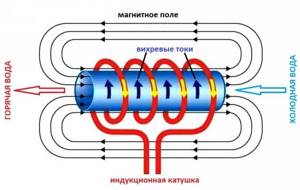
Using a high frequency generator (tens of kHz), alternating current is generated in the induction coil. According to the laws of physics, at this moment a magnetic field with a constantly changing vector appears. Random eddy currents arise in a conductor exposed to a magnetic field. The molecules begin to move chaotically and the material quickly heats up.
With the help of such an inductor you can even heat a metal workpiece red-hot. Since water is flowing through the pipe, there is no excess heating.
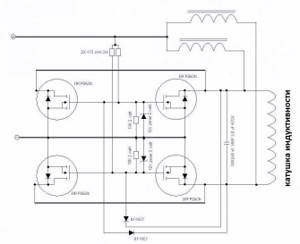
The generator can be borrowed from a hob (induction, of course), or you can make it yourself.
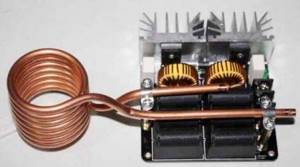
Another donation option is an inverter welding machine.
Although, given the simplicity of the electrical circuit, many home craftsmen make similar generators from available radio elements.
Prices and what do they depend on?
As for specific figures, water heaters produced in Russia will cost approximately 700-800 US dollars. We are talking about a vacuum type model. Approximately the same prices for similar Chinese products. Water heaters from German manufacturers cost approximately 800-900 euros. It is more expensive, but they come with the necessary fasteners, and copper and stainless steel are used to make the collectors. So the money will not be wasted.
Water heater Viessmann Vitosol 200 The price of a solar water heater is influenced by the following factors:
- Brand;
- Housing and heat sink material;
- build quality;
- method of laying insulating material and the cost of the material itself;
- glass thickness.
Naturally, the price reflects the design differences discussed above.
About the solar system
Solar water heaters are used to increase water temperature and for heating systems. They simply connect to existing systems, and the economic effect of using them is enormous - up to 60%.
This technical device works simply:
- Water is heated by the sun in a heat exchanger located in a specially designed storage tank. As a rule, using two tanks at the same time is most effective. They are usually made of copper, since the thermal conductivity of this metal is high. This allows you to use heated water for domestic needs and in the heating system.
- By convection, the hot air is directed upward, and the cold remains below. With built-in electronics, it is possible to regulate these processes and quickly respond to all changes in the functioning of the system. There cannot be direct human contact with these functions, because everything can be monitored remotely.
If the weather is cloudy, then the required amount of heat will not be generated from solar energy, but the heating system continues to function. And, on the contrary, if it is hot outside, then you can get a sufficient amount of energy from the sun. In this case, a redistribution of the coolant occurs in the expansion tank due to the expansion of the material under the influence of high temperatures.
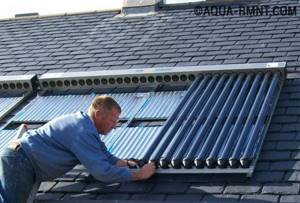
Installation
All that remains is to secure the SV at the place of its further work.
If we are talking about a storage tank, then it is important to install reliable supports. The load from the weight of the tank itself, and even with water, will be considerable, so the frame of the shower or other support must be reinforced with metal corners
The length of the pipeline between the tank and the boiler should be minimal
The load from the weight of the tank itself, and even with water, will be considerable, so the frame of the shower or other support must be reinforced with metal corners. The length of the pipeline between the tank and the boiler should be minimal.
Flow-through SVs are installed on roofs or other elevated areas so that at any time of the day, nearby objects do not block the light (fence, neighboring buildings, trees, etc.).
The inclination of the solar collector is fixed (optimal for summer - 35).
Even simple homemade water heaters can save up to 60% on electricity costs. And don’t let the opinion that the Russian climate is too cold for such technologies stop you. In the Moscow region, for example, the annual rate of solar energy is the same as in Germany, and there solar technologies are used successfully!
DIY solar water heater
A solar water heater can run forever; all it needs to function fully is solar energy and hot water flow. But even in the absence of owners and inadequate consumption of heated water, there is no need to worry, it will cool down and again rise to the first level of heating, and will always be at a temperature of at least 60 degrees. Drawing conclusions, you can understand that the solar water heater does not depend on third parties and no one except you can turn off your hot water.
Below is an example of how to make a simple, but high-quality and reliable solar water heater. To get started we need:
- Large pipes and copper tubes (you can use a ready-made coil);
- Roll insulation;
- Tank;
- OSB (can be replaced with another type of chipboard tile);
- Sheets of copper;
- Glass;
- Fittings, plugs, dowels, screws, corners;
- Black paint.
If all the parts are available, you can immediately begin manufacturing the solar water heater.
Creating an absorber
One of the most labor-intensive processes in the manufacture of a device, if it is completed, only the smallest detail remains. Many people use a ready-made coil from the refrigerator as it, in order to do less and quickly get a ready-made water heater. This is a big mistake of many, since it is much more difficult to correct existing problems due to poor quality assembly. If you do decide to use the coil, rinse it thoroughly. We will discuss with you an option that is much more reliable and durable. Let's start creating the absorber step by step:
- We make an absorber frame from 2 copper tubes, their diameter should not exceed 22 millimeters. On one side of each pipe we install a fitting and a plug, and on the other we make 2 threads. To make it clear what an absorber is, let’s imagine a coil from a refrigerator.
- We make holes in the pipes; they should be clearly symmetrical and located at a distance of 10 centimeters from each other. The diameter of the holes should not exceed 9 mm in diameter.
- Insert tubes into the resulting holes and seal each one so that there are no gaps left.
- In order to completely make sure that the entire system is sealed, pass water through it; in places where there are small holes, it will definitely leak.
- Using a sheet of copper we make a backing for the coil. Copper is considered one of the most durable materials in the modern world, which is why we use it. We weld 2 sheets to the coil and weld the sheets together. If desired, you can paint the sheet black, this will increase the functionality of heating water.
Solar water heater housing
- The first step is to knock down a box that will be equal to the finished absorber. The box must have no top, and in order for it to be strong and last a long time, iron corners must be screwed into the corners using self-tapping screws. The height of the walls should be within 25 cm.
- The next step is to lay insulation in the finished box; it is better to choose rolled insulation; isover works well.
- Now we need to make a layer that will reflect the sun's rays. This will significantly increase the efficiency of the water heater. Thanks to this step, all the heat will remain in the system and will not leak out.
- We cover the finished box with glass, fill all joints with foam or cover it with mounting glue.
The second stage of the solar water heater is completed.