Features of DIY boilers
- Installing such a device saves the home owner’s finances.
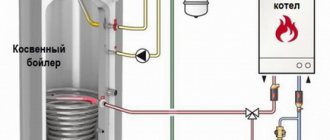
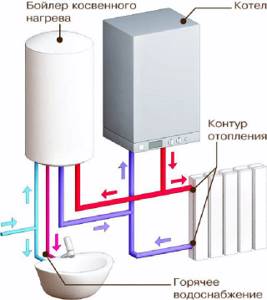
- The device is connected to the heating system of the house and must be installed next to the heating boiler.
- From such a device the user receives water at a constant temperature.
- If the boiler capacity is large, heating the water in it takes quite a long time. Moreover, during this heating, the intensity of heating the premises of the house decreases.
- Scale is gradually deposited on the heat exchanger tube, so it will have to be cleaned mechanically or using chemicals 1-2 times a year.
- Hot water from such a boiler can only flow during the heating season. In order for the device to provide water in the summer, a heating element should be built into it.
Features of choice
In one of the articles we wrote how to choose an indirect heating boiler, so we will consider the features of choosing gas instantaneous water heaters. What parameters should you pay attention to first?
Rated power
To make the right choice, calculate in advance the required amount of hot water depending on the number of consumers. Speakers can be divided into three types based on power consumption:
- Low power - from 17 to 19 kW. Such devices are suitable for servicing two consumers and two intake points (for example, a washbasin and a shower). They give out about 8 liters per minute.
- Average - from 22 to 24 kW. Installed in private homes for 3-4 users.
- High - from 28 to 30 kW. Can be used for bathroom fittings and other purposes at the same time. Provides good pressure and heating.
Pay attention to the efficiency indicated in the document. There may be useful and consumed power - you need useful. Otherwise, you risk buying equipment that will not meet your needs.
Ignition type
The convenience and safety of operation depends on this criterion.
- Manual ignition . One of the first and budget models. To start heating, you need to hold the button and bring a match to the igniter. This method is inconvenient and unsafe.
- Piezo ignition . The difference with the first option is that a spark appears when the button is pressed. Mechanical activation is convenient if the device is nearby.
- Electronic type . As soon as you open the faucet, a spark appears and starts the process. It lights up when the batteries are fired.
- Hydrogenerator . The built-in mini-turbine rotates with the flow of water and generates current. The flame appears when the tap is opened. The higher the pressure in the system, the more efficiently the turbine will operate and heat.

Modulation system
The flame intensity of the burner can be adjusted by the user or by an electrical relay. Modulating burners regulate power automatically. This is convenient if pressure drops are observed in the system. In this case, the device independently adjusts the heating strength - the water coming out is the same temperature.
Type of radiator (heat exchanger)
Their quality and service life depend on the material of manufacture. There are heat exchangers from:
- Become. They are distinguished by significant weight and resistance to corrosion.
- Highly purified copper. To the above qualities you can add high heat transfer.
- Copper. The radiator heats up unevenly, so cracks appear in it quite quickly due to temperature changes. Some manufacturers coat the product with heat-resistant paint, but still such a heat exchanger does not last long.
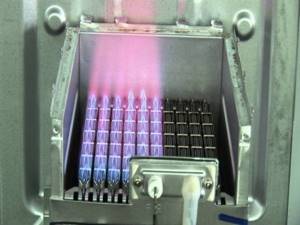
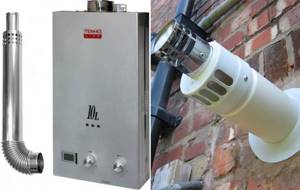
Removal of combustion products
Since heating in a flow-through heater occurs due to gas, its combustion products must be discharged somewhere. Combustion chambers are divided into:
- Open. Such devices are equipped with a chimney and ventilation. The air that supports combustion comes from the room. They have a high efficiency. But not all apartments can have a chimney.
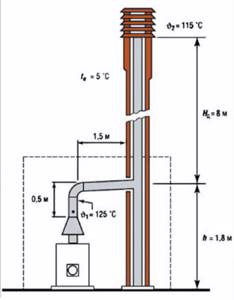
- With a closed camera. The output is carried out using a fan through a coaxial pipe. Since there is no need to install a chimney, you can save money.
Important to consider! If you have plastic windows installed, they may interfere with natural ventilation. As a result, the ignition may not work or function unstably. Way out of the situation: installing a ventilation valve. It crashes into the window part.
Operational safety
If you take a gas water heater for an apartment, take care of your safety. To do this, make sure that the equipment is equipped with devices that control its operation.
- Traction sensor. Triggers when the chimney malfunctions. It closes the fuel start valve, eliminating gas poisoning.
- Ionization detector. Turns off the device when the flame goes out.
- Electronic control unit. Controls the operation of nodes, allowing you to set optimal parameters to avoid overloads.
- Flow sensor. Starts the burner when the mixer is opened.
- Safety valve. Triggers when there is increased pressure in the system, releasing excess pressure.
- Pressure detector. If there is insufficient pressure in the line, the burner will not turn on to avoid damage to the radiator.
What else should you take into account when choosing? First of all, the features of the room.
- The presence of a chimney to remove combustion products.
- Amount of water consumed and points of collection.
- Availability of free space for installation, ease of use.
- Design of the room and equipment.
It is better to entrust the installation of the device to a specialist. He must determine the draft and bring the pipes to the column.
If we compare gas and electric, the latter are easier to install. However, gas is cheaper to operate. Below we have collected the best water heater models.
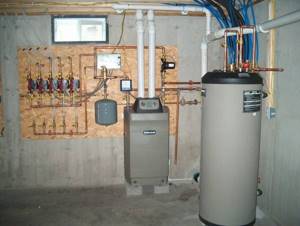
Advantages and disadvantages of an indirect heating tank
The system is not powered by electricity, but operates from the heating system. With proper design, a water heater has high performance at minimal cost. The advantages also include the durability of the device due to the isolation of the device from running water. At the same time, there is always hot water in the bokeh; you just need to open the tap. The boiler can be powered by a boiler or central heating; sources can be changed.
Among the advantages of an indirect heating tank, one should note the long service life and efficiency
- Re-equipment of the system requires financial investment;
- An indirect heating device is more expensive than a gas or electric boiler;
- The first heating may take several hours, which may cause damage to the heating system;
- With large system volumes, the design takes up a lot of space.
When buying a boiler, first pay attention to its size. Next, take into account the material of manufacture of the internal tank
This is what determines the quality and durability of the device. It is best when the inner walls are made of stainless steel.
Available materials
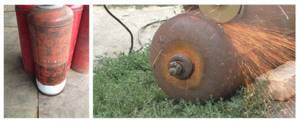
We have already talked about stainless steel tanks from old washing machines. However, finding such a blank is not easy. A discarded 100 liter propane tank can be an excellent donor. It doesn’t hold pressure (that’s why it was written off), but it will still serve as a water tank. Of course, a gas cylinder boiler must be thoroughly cleaned (especially from the inside) and painted with high-quality waterproof enamel.
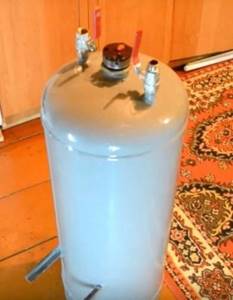
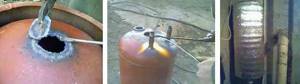
No industrial equipment is required for production. All you need is a grinder and a welding machine. The upper part is cut off, then heating fittings are formed in it.
If you have free access to other materials, you can make the heater even from stainless steel sheets. You can see how to make an indirect heating boiler with your own hands in the video (watch below).
Perhaps the aesthetics suffer, but the quality and durability of the manufactured heater is no worse than the factory one.
- We already know that in the warm season, when the heating boiler is not working, indirect heaters remain out of business. In this case, an electric heating element built into the tank as a backup element will help.
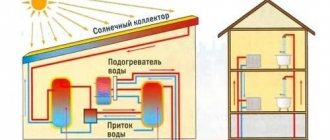
- Another option for obtaining hot water in the summer is to install a second heat exchange circuit connected to solar heating systems.
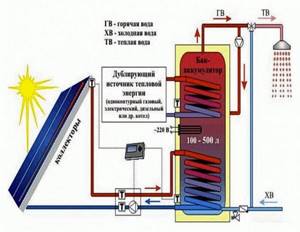
- As a result, you can assemble a 3 in 1 heating system. From a heating boiler (regardless of the type of fuel), from an electric heating element and from solar energy. If two of the three energy sources disappear, you will still be able to provide your home with hot water.
The simplest heat exchanger
A homemade heater looks like this:
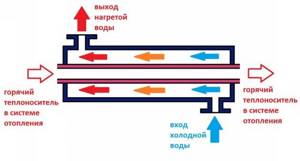
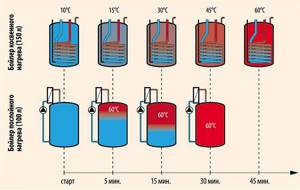
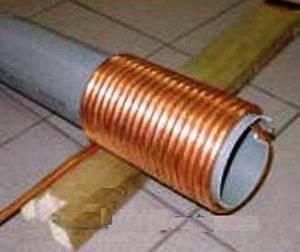
A larger diameter shell is welded onto the central heating pipe. The result is a sealed vessel with hot coolant flowing inside it. On opposite sides of the outer pipe (in fact, this is a boiler), flanges are installed for supplying (draining) cold water. When the coolant is hot enough, the water in the boiler heats up quickly. After which the top tap can be opened and the hot water supply can be used until the hot water is replaced by cold.
If we leave aside the legality of re-equipping the collective heating network (there is hardly any serious liability for this), the system works effectively. Hot water is conditionally free, minus one-time investments in materials, and a bottle of strong drink for the welder.
If you install such a instantaneous water heater with your own hands in a private household, there will be no conventional problems.
The only limitation is the volume of the outer container. In real time, the water will not heat up; the reserve of thermal energy in the heating pipe is too small. Therefore, the system works cyclically: heating - use - heating. The higher the diameter ratio (or the longer the pipe), the greater the supply of hot water. Accordingly, the longer it will take to warm up.
Another serious drawback: in the summer (with the heating turned off) such heaters do not work.
How to choose a geyser
The purchase of instantaneous water heaters is made taking into account the needs of the user - the volume of hot water consumed, the composition of the family, the number of water intake points. The right choice will ensure comfort in using the equipment and significantly extend its service life. When studying our official website of geysers, we recommend paying attention to the following criteria:
- Performance - small-capacity models up to 13 l/min are suitable for installation in apartments; more productive options will be ideal for private homes or small commercial establishments (for example, a bar or cafe).
- Water intake points - if you plan to use hot water only for washing dishes in the kitchen, it is enough to choose a model designed for one water intake point. When using a shower or bath, it is better to give preference to multi-point heaters.
- Type of ignition - can be automatic, with water heating when the tap is opened, or on piezoelectric elements that require a preliminary press of a button.
In addition, geysers on our official website may have electronic or mechanical control, vary in size and the presence of additional functions. Taking these characteristics into account will help you choose the optimal solution specifically for your premises.
What can BKN materials be made from?
- preparation of storage tank;
- heat exchanger production;
- installation of heating elements;
- thermal insulation of the body.
How to make an indirect heating tank
- suitable for food water;
- withstands heating up to 90°.
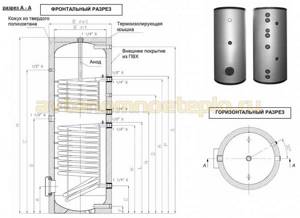
| Dimensions | Description | 1500 l |
| N | Height | 2285 mm |
| ø ext | External diameter (including insulation) | 1200 mm |
| ø int | Inner diameter | 1000 mm |
| F | Cold water inlet (1″1/4) | 315 - 1″1/4 mm - » inch |
| G | Water outlet from the lower coil (1″1/4) | 470 mm |
| L | Hole for bottom temperature sensor (1/2″) | 582 mm |
| M | Water supply to the lower coil (1″1/4) | 1180 mm |
| N | Water outlet from the upper coil (1″1/4) | 1330 mm |
| P | Hole for top temperature sensor (1/2″) | 1500 mm |
| Q | Recirculation (1″) | 1460 - 1″ mm - » inch |
| R | Water supply to the upper coil (1″1/4) | 1735 mm |
| S | Domestic hot water outlet (1″1/4) | 1935 - 1″1/4 mm - » inch |
| A | Inspection flange (ø internal 114 - ø external 168) | 520 mm |
| B | Additional electrical resistance (1″1/2) | 1255 mm |
| C | Thermometer (1/2″) | 1825 mm |
What material is the heat exchanger made of?
L = Q / D* (Tg – Tx) * 3.14
- coil length - L;
- thermal power - Q;
- heat exchanger diameter - D;
- the expected hot and cold water temperatures are Tr and Tx, respectively.
Heating element for combined BKN
P= 0.0011*m*(tk-tн)/T
- P is the power of the heating element;
- M is the mass of heated water;
- tk is the desired water temperature;
- tн - initial water temperature;
- T is the water heating time.
Indirect heating boiler with electric heating element
How to make thermal insulation BKN
- The body is coated with heat-insulating paint - it contains ceramic components that retain heat. At the same time, the paintwork protects the surface of the tank from corrosion.
- Mineral wool - a thermal insulation layer of about 5 cm. It is optimal to use basalt insulation. The material prevents heat loss, is resistant to moisture and at the same time allows steam to pass through, preventing liquid from accumulating in the layers of the material. The mineral wool is covered on top with any material with a foil base. You can use Penofol and derivatives.
- Instead of three-layer insulation, the use of Polinor is allowed. The insulation is similar to polyurethane foam. Easy to apply and prevents heat loss.
Do-it-yourself drawings and calculation of an indirect heating boiler
Making the device with your own hands is based on the drawings drawn up. You will also have to carry out certain calculations of the system. But first you have to decide on the design parameters.
Required characteristics of the boiler for operation:
- Water consumption and storage tank dimensions;
- The position of the coil and its dimensions;
- Additional design elements - thermostat, heating element.
This data will help you decide on the design of the boiler. Taking them into account, a drawing of the future design is created. The optimal capacity for the tank and the material for constructing the boiler are also selected.
The volume of the tank is determined by calculating the daily water consumption. It is believed that each family member spends 50-80 liters of water per day. This amount will be enough for bath procedures, laundry, and washing dishes.
If hot liquid is used exclusively for household needs, a smaller water heater will be required. A 50-70 liter boiler will be enough. No need to purchase a larger tank unnecessarily. Precious heat is wasted on heating water, and this increases the cost of operating the device.
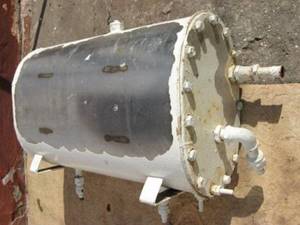
DIY boiler body from a gas cylinder
The body of the product is made of steel. The walls can be thin, since the water temperature should not exceed 70 degrees. A homemade boiler can be made from a gas cylinder or a plastic barrel. To clean the tank, you will need to weld a large flange on one end. But this is not a prerequisite.
Required holes in the housing:
- Heating connections;
- Hot water supply;
- Hot water circulation;
- Supply of tap fluid;
- heating element and magnesium anode;
- Temperature sensors.
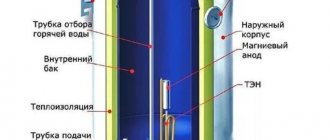
The heat exchanger can be located below or along the entire surface of the internal structure. The hot water outlet is located at the top, and a little lower there is a pipe for circulation. Cold water is supplied from below. The heating element must always be in water, so it is mounted at the bottom. Temperature sensors occupy a place in the middle of the structure.
A metal pipe is welded to the holes that work with water and sensors. The diameter of all pipes must be the same. A large tube is provided under the anode; a cover, bolt and anode are mounted on it.
Before buying a boiler, you need to ask the seller for a certificate that confirms its quality
The heat exchanger is secured with a clamp or nuts. The first option is considered more reliable. It is not necessary to install a drain. For these purposes, you can use a tee, which is mounted on the liquid supply.
Manufacturing technology step by step
We proceed like this:
- If the water heater is going to be made rectangular, then from stainless steel sheets of the appropriate size it is necessary to weld a box without a lid and one side wall. If you are going to make a boiler tank from a round piece, then it needs to be cut lengthwise into two halves.
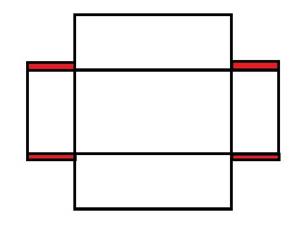
This is what the “pattern” of a rectangular tank looks like - In the side wall of the rectangular tank or in one of the halves of the round one, we drill a hole with a diameter of 38 mm into which the coil outlet will be threaded. The same hole will need to be drilled in the second, not yet welded wall (in the case of a round tank - in the second half).
- Now you need to make a square coil by sequentially welding pipe sections and bends to each other.
The outer sections of the pipes must be rotated so that they are parallel to the axis of the coil - these will be the outlets. Square profile coil - Next, install the coil in a box or one of the semicircular halves, placing its outlet in the hole drilled in the wall. From the outside, the outlet must be welded to the wall of the tank with a sealed seam.
- To eliminate vibration of the heat exchanger, it is advisable to fix it by welding a piece of pipe between it and the bottom.
- Now we install the missing side wall or the second semicircular half in place, putting it on the second outlet of the coil, and weld it. This release is also hermetically scalded.
- If the boiler is a pressure boiler, the lid should also be welded; if it is a non-pressure boiler, you can simply put it on top.
Next, you need to drill several holes in the tank to which the pipes are welded:
- for supplying cold water (for a pressure boiler - at the bottom, for a non-pressure boiler - at the top);
- for hot water selection (top);
- for installing a thermal cylinder (in the lower part);
- for inserting a relief valve if the boiler is pressure;
- for connecting the recirculation system, if provided (bottom);
- for heating elements (you will need a model with flange mounting).
The length of the pipes should be selected taking into account the thickness of the thermal insulation. A flange must be welded to the pipe for installing the heating element.
Also at this stage, you need to weld brackets to the tank for attaching the casing and for hanging it on the wall (if the model is floor-standing, the legs should be welded).
Further:
- We cover the tank with basalt fiber mats, securing them with a cord.
- We screw a protective casing made of thin steel panels, powder-painted or zinc-coated, to the brackets.
Now we install the heating element, thermal cylinder and relief valve or float valve in place.
Manufacturing of an indirect heating boiler
The process of assembling a water heater may vary depending on the type of design, but in most cases, equipment for gas and electric boilers is manufactured in the following sequence:
- Two holes are drilled in a pre-prepared cylinder using an electric drill with a crown attachment. One hole will be located in the lower part and used for supplying cold water, the other - in the upper part for discharging hot water.
- The resulting holes are cleaned, fittings and ball valves are installed in them. Then another hole is drilled in the lower part, into which a tap is installed to drain stagnant water.
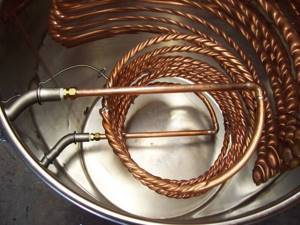
- To make a coil you will need a copper pipe with a diameter of 10 mm. It is better to make a spiral bend using a pipe bender. If such a tool is not available, then you can take any round piece - a large diameter pipe, a log, a barrel, etc.
- The coil is being manufactured according to the previous calculations. The ends of the heat exchanger are bent in one direction at a distance of 20–30 cm. To mount the coil, two holes are drilled in the bottom of the cylinder. Threaded fittings are installed and welded into them.
- Before installation, the coil is lowered into a bucket or large container with water and blown out. If the structure is sealed, then the coil is lowered into the cylinder, aligned with the inlet and outlet openings and welded.
- If the cylinder was cut in the middle, then an anode is mounted in the upper part. To do this, a hole is drilled into which a threaded nozzle is screwed in, and a magnesium anode is mounted into it. If the container is assembled from three separate parts - bottom, lid and central part, then the anode can be installed at the last stage.
- Thermal insulation material is installed on the outside of the boiler. It is best to use spray polyurethane. Before application, all pipes are protected with thick polyethylene and cloth. If funds are limited, then you can use regular polyurethane foam, which, after hardening, is wrapped in reflective insulation.
- Fastenings for hanging on brackets are welded to the back of the boiler. For floor-standing boilers, support legs made of angle steel or reinforcement are welded to the bottom of the equipment.
At the final stage, fittings and taps are screwed on and the top cover is mounted. If possible, you can not weld the lid, but make clamping fasteners from steel wire with a cross-section of 3 mm.
When making a boiler for use with solid fuel boilers, instead of a copper coil, a U-shaped steel pipe is used, which is mounted at the bottom of the device. From the side of the furnace or boiler, the pipe is connected to the outlet pipe. The pipe is taken out from the boiler and connected directly to the chimney.
Design features of an indirect boiler
The indirect type boiler is a tank made of stainless steel. The inner walls of the container are covered with a special material, which not only protects the surface of the water heater from corrosion processes, but also reduces the concentration of harmful bacteria and microorganisms.
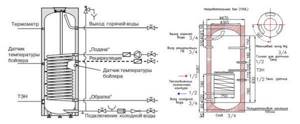
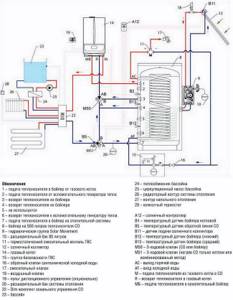
Diagram of an indirect type boiler with a single-circuit coil
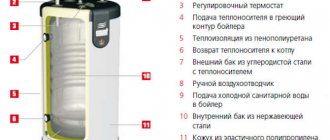
Otherwise, a boiler of the simplest design consists of the following components:
- heat exchanger - a spiral pipe or smaller tank. Depending on the volume of the tank, it can be located in its upper and lower parts;
- inlet pipe - a fitting at the bottom of the device for supplying a pipe with cold running water;
- outlet pipe - fitting for connecting the hot water outlet pipe;
- magnesium anode - additional protection of the tank walls from corrosion processes;
- internal thermometer - a device for measuring the temperature of heating water;
- thermostat - a device that prevents equipment from overheating;
- control unit - rotary knob with divisions for setting the heating temperature;
- thermal insulation - a layer of insulating material that helps maintain the desired temperature of the heated water;
- outlet - valve for draining stagnant water;
- revision - a large diameter hole intended for maintenance, repair and modernization of the boiler.
The design of new tank models may differ slightly and have a number of modifications from manufacturers, but in general, any indirect type boiler consists of the listed elements.
Operating principle of the boiler
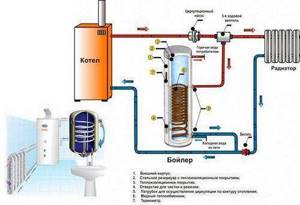
An indirect type boiler is part of the heating system and is connected directly to a gas, electric or solid fuel boiler, which heats the coolant using the energy released when fuel is burned.
The coolant circulates through the DHW system and passes through a heat exchanger located in the indirect heating boiler. Due to the release of thermal energy from the hot coolant, the cold water that fills the device’s tank is heated. From it, heated water is transported through an outlet through a pipe to the bathroom, kitchen and other rooms with plumbing equipment.
An indirect type boiler can work with any type of heating boiler
When the heating boiler is turned off or switched to an economical operating mode, the coolant quickly cools down. Thanks to the design of insulating the tank walls with urethane foam, the water in the tank cools very slowly. This allows you to use the entire volume of warm water for several more hours.
Diagram of a homemade boiler
The standard design of a water heating device in the form of a boiler may have significant differences depending on the type and design features. Indirect heating devices are not capable of independently producing thermal energy, but can be equipped with built-in heating elements, through which the water temperature is effectively maintained within predetermined limits.
The device diagram assumes the presence of the main components in the design, represented by:
- storage tank;
- outer casing;
- thermal insulation;
- heat exchanger;
- a place for connecting an additional heating element;
- inspection hole;
- cold water inlet;
- input and output for thermal fluid;
- thermometer connection point;
- recirculation line;
- hot water outlet;
- magnesium anode.
A heating element with a supplied coolant is built inside the insulated tank. Cold water enters through the lower part of the tank, and hot water is taken from the upper part.
Water heating equipment of this type is equipped with a protective magnesium anode. The most modern and expensive models are equipped with a pair of redundant coils. Maintaining the temperature is ensured by a heating element with a thermostat built into the upper part of the tank.
Heating diagram for two types of boilers
Boilers with an indirect heating type are also produced, completely devoid of a coil. This special design is called a “reservoir in a tank”, which is due to the presence of a second tank inside one tank. Water heating in such water heating devices occurs inside the tank, and the coolant moves between the walls.
Factory models of boilers with indirect heating and a circulation pipe are equipped with mandatory elements, represented by a magnesium anode and a safety group, as well as a temperature sensor.
Homemade boiler for heating water: technology and volume calculation
Before you start constructing a homemade boiler, you need to find out the characteristics and volume of water you need. Namely:
- Tank volume and amount of water consumption;
- Calculation of the dimensions and type of coil;
- The presence of additional elements, namely a thermostat and heating element.
We have received all the necessary answers and now we can choose a tank to create a tank and material to make a coil, as well as determine the dimensions and appearance of the boiler. To get enough hot water, you need to imagine its daily consumption. As practice shows, one family member needs from 60 to 90 liters of hot liquid per day. This amount of water will allow a person to take a bath or shower, and makes it possible to do laundry, clean up, and wash dishes. Based on this, a family of 3 or 4 people needs a tank of 250 liters. If you need hot water only for household needs, then a 50-liter tank will be enough. Unnecessarily, do not select a large volume of water tank, as this will increase the duration of heating of the liquid and reduce the efficiency of the heating system.

Factory models of boilers with indirect heating and a circulation pipe are equipped with mandatory elements, represented by a magnesium anode and a safety group, as well as a temperature sensor.
What container to make a tank from?
Any corrosion-resistant container is suitable for this.
- The tank can be made of enameled metal, stainless steel, plastic or other containers.
- Containers coated with a layer of glass ceramics and enamel will require replacement within a year after use, since they are not particularly resistant to corrosion.
- If the tank is made from a metal container, then a welding machine will be needed to manufacture the structure.
- Much more durable and reliable than stainless steel containers.
- To make a boiler, you can use a gas cylinder. It is advisable to purchase a new one, but if this is not possible, then you can make a tank from a used cylinder. The cylinder is cut into two parts, thoroughly cleaned and primed. This should be done so that the water entering the container does not smell of propane.
Four holes are made in the selected container:
- one for the tap through which hot water will be poured;
- one for supplying cold water;
- two for mounting a coil with coolant.
How to make a heat exchanger from straight pipes
To make a coil using a parallel circuit, you need to have metal welding skills. For such work, steel pipes are used, which are very problematic to bend, although with a good pipe bender it is still possible. But in most cases you have to resort to welding.
Steel coil made of round pipes.
- cut straight sections of steel pipes;
- lay them parallel on a flat surface;
- connect them with elbows rotated 180 degrees - if there are no such elbows, then you can weld two corners 90 degrees each;
- Weld plugs with a pipe for connection to the heating system into the lower and upper ends.
In addition, you can install a plug in the lower part, in the center of which a hole is cut. Then a nut is welded into this hole. Its internal diameter should be suitable for a standard electric heating element. In this case, it will be possible to use a homemade heat exchanger as an electric heater.
Do-it-yourself coil for a boiler
For the heat exchanger, a copper or brass tube is used. The diameter of the pipe can be from 8 to 20 mm. At the same time, a calculation is made of the pipe molding so that there is enough power to heat the tank.
Data for calculation:
- Diameter (the parameter is taken in meters);
- Fluid temperature in the heating system;
- Temperature indicators of tap water.
To determine the length of the heat exchanger, a special formula is used. In this case, the thermal power is divided by the number Pi, then multiplied by the diameter and by the temperature difference between the heating and water supply. It is better to round the obtained data and take the pipe with a margin.
To give the heat exchanger a spiral shape, the pipe is wound onto a blank. The diameter of the coil must correspond to the diameter of the tank. A small distance is provided between the spirals. The end of the coil is equipped with fittings. Before welding the system, its functionality is checked.
How to calculate a heat exchanger
It is necessary to make a calculation of the coil heat exchanger, otherwise its thermal power may not be enough to heat the room. The heating system is designed to compensate for heat loss. Accordingly, we can only find out the exact amount of thermal energy required based on the heat loss of the building. It is quite difficult to make a calculation, so on average they take 100 W per 1 sq. m. with a ceiling height of 2.7 m.
There must be a gap between the turns.
The following values will also be required for the calculation:
- Pi;
- diameter of the pipe that is available (take 10 mm);
- lambda of metal thermal conductivity (for copper 401 W/m*K);
- delta temperature of supply and return coolant (20 degrees).
To determine the length of the pipe, you need to divide the total thermal power in W by the product of the above factors. Let's look at the example of a copper heat exchanger with a required thermal power of 3 kW - that's 3000 W.
3000/ 3.14 (Pi)*401 (thermal conductivity lambda)*20 (temperature delta)*0.01 (pipe diameter in meters)
From this calculation, it turns out that you will need 11.91 m of copper pipe with a diameter of 10 mm for the thermal power of the coil to be 3 kW.
Operating principle of an indirect heating boiler
This option is ideal for an apartment building, but it can be used without extra costs only during the heating season. For the period when the central heating is turned off, an electric heating element can be provided. In this case, you will have to pay more for electricity, but you can turn on the heating as needed.

Schematic diagram of the operation of an indirect heating water heater
The same system can be installed in a private house if it has autonomous heating from a boiler.
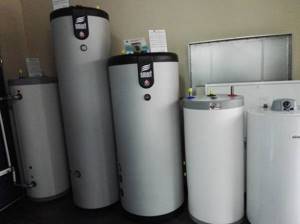
Construction and materials
A boiler of this type consists of a container that can have any volume. It is better to make it from stainless material, so it will last longer, and the heated water will always be clean. For the boiler capacity, they usually use a barrel, a new gas cylinder, or a custom-made tank.
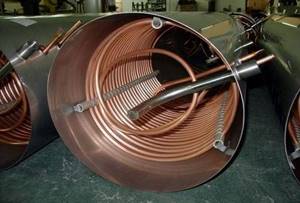
- A pipe twisted in the form of a coil is installed in the middle of the container, and the coolant will circulate through it. It is good to use copper or brass as a pipe - metals with good heat transfer. However, as an option, it is possible to choose a small-diameter metal-plastic pipe for this purpose.
- To make a neat coil, a long tube (about 15 meters) is wound onto another pipe of larger diameter, onto a flat wooden log or onto another suitable cylindrical object.
Coil winding
- The number of turns on the coil depends on the shape and height of the container, but the longer the pipe twisted into the coil, the faster you can get heated water.
- The ends of the pipe come out of the tank in different places. On top of the container there is a pipe into which coolant from the heating system will flow. Having passed through the coil, it returns to the heating circuit through another pipe located at the bottom of the tank.
- There are two holes in the tank: for filling it with cold water and for taking heated water. The first is located at the bottom of the tank, and the second at the top, from where hot water is distributed to the required points: shower or kitchen tap.
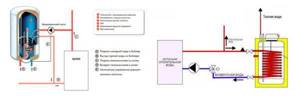
Connection diagram for an indirect heating boiler
The diagrams provide a good look at the connection and circulation of water and coolant in the heating system.
Another option would be a boiler of the same type, but without a coil. It will require two containers - a large and a compact size. A small container is installed in the middle of a large tank, and it will act as a heat exchanger. The coolant will not circulate through the tubes - it passes through the internal compact container. The principles of operation and installation of pipes for circulating heated water are identical to the first option.
It must be said that the design principle of such a device is quite simple, therefore, based on it, you can invent your own design of an indirect type water heater.
If desired, you can equip the boiler with a heating element
In these boiler options, it is also possible to use an electric heating element, which is built into the container from below. Therefore, it is better if the boiler is hung on the wall using brackets. You can also install the body on high legs, which can be easily made from angle iron or fittings. A heating element, in fact, is the same as a boiler, you just need to choose its power correctly - it will depend on the volume of the boiler. This heating element can be purchased at a specialized store.
Diagram of an indirect heating boiler with heating element
Manufacturing recommendations
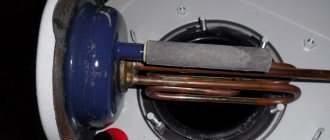
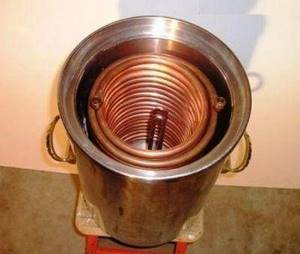
To make an indirect heating boiler at home, you will need 2 main elements - the tank itself and a heat exchanger made of a copper tube. The ideal shape for a tank is cylindrical, so it is better to use some kind of cylinder, metal barrel or thin-walled pipe of large diameter. The copper tube should not be too thin; such a heat exchanger will not be effective. Suitable diameter is 15-20 mm.
Having selected a suitable tank and decided on its size, you can begin winding the coil. It is recommended to use a template in the form of a pipe or log, whose diameter is half the size of the container. Having fixed one end of the tube, wind it onto the template as tightly as possible, turn to turn. In this case, you need to monitor the height of the product so that it subsequently fits inside the boiler made by yourself.
First of all, you need to select a container for making the tank. The best material choice is stainless steel. You can use a ready-made barrel, order a tank of the required size, or purchase a gas cylinder. It has sufficient strength, suitable dimensions and shape. Another option for making a tank could be a container made of heat-resistant plastic.
Holes of the required size should be made in the tank. Two holes will be needed to connect the cold water supply and hot water supply pipes. One of them is done at the bottom of the tank, and the other at the top of it. Two more holes will be needed for the installation of a coil intended for the passage of coolant.
A tube made of brass or copper is perfect for making a coil. These materials transfer heat well and can be easily shaped into the desired shape. You can also use small diameter plastic pipes.
In order to make a coil, a pipe of the required length is wound on a base, which can be a strong metal pipe or a rounded log.
In order for the tube intended for the coil to be bent evenly, without creases, it is completely filled with sand before starting work. Then the coil will be of the correct shape, with the same diameter along its entire length.
Often, novice craftsmen do not know how to correctly calculate the dimensions of the coil. Its parameters depend on several factors - you should take into account the volume of the container, the material of the coil and the temperature of the coolant. It is believed that
Read more: Energy-saving heating systems: how and on what can you save?
for every 10 liters of water volume, 1.5 kW of thermal power is required for heating
.
Based on the volume of the tank, the temperature of the coolant and the temperature of the incoming water, the required length of the coil is calculated. To do this, use a special calculation formula. For a container with a volume of 200 liters, when using a coil with a diameter of 10 mm, its length will be about 15 meters.
Even before installing the storage boiler, you should decide how its thermal insulation will be carried out. It will not be possible to do without it, since natural heat losses are high and the efficiency of the water heater will be too low. The ideal way to insulate a tank is to place it inside a suitable container and then fill it with foam.
To assemble the boiler, you should ensure that you have fittings, nuts, rubber seals, and ball valves. When making a structure from a gas cylinder, welding equipment will be required.
Before you start making your own boiler, you need to decide on its parameters and characteristics:
- water consumption and tank volume;
- type of coil and calculation of its dimensions;
- the presence of additional devices - heating elements, thermostat.
Based on the answers received, you can choose a container for the storage tank, a material for making the coil, as well as decide on the dimensions and make a sketch of the future boiler.
Volume calculation
To ensure you have enough hot water, you need to be aware of your daily consumption. It is generally accepted that each person permanently living in a house needs 50-80 liters of heated water per day.
This amount will allow you to take a shower or bath, and will also satisfy the need for hot water for laundry, cleaning and washing dishes. Thus, for a family of 3-4 people you will need a boiler with a 200 liter tank.
If water is needed only for household needs, for example, washing hands and dishes, a smaller tank of 50-70 liters is sufficient. You should not unnecessarily choose a tank that is too large - this will increase the heating time of the water and lead to a decrease in the efficiency of the heating system.
The coil in the boiler can be made of a metal pipe in the form of a spiral or snake, or it can be a smaller internal tank. It is better to make it from a material that has high heat transfer and resistance to corrosion, for example, copper.
You can also use a stainless steel pipe, but it is more difficult to bend and give it the desired shape. It is not recommended to use ordinary steel pipes - running water, when heated, will release oxygen bubbles, which will cause rapid corrosion of the metal. The most convenient is a copper tube with a diameter of 10 mm - it bends without using a torch according to a template.
Some craftsmen also use metal-plastic pipes. They are resistant to external and internal corrosion, but they must be used strictly at temperatures below 90 degrees. Any overheating will lead to deformation of pipes, leaks and mixing of water in the circuits. Under certain conditions, this can lead to air pockets and poor circulation.
A pipe coil is wound in the form of a spiral from the calculated number of turns and placed in the lower part of a circular tank. For normal heat transfer, it should not touch the walls. When making a rectangular tank, the heat exchanger is made in the form of a snake and placed near one of the walls.
The dimensions and number of turns of the coil will be determined using the formula: In this formula:
- P is the thermal power of the coil, which should be 1.5 kW for every 10 liters of tank volume;
- d is the diameter of the pipe used, expressed in meters, we take 0.01 m;
- l is the total length of the pipe, in meters;
- ∆T is the temperature difference before and after heating, usually 65 degrees is taken for preliminary calculation.
Preparing the tank for water heater assembly
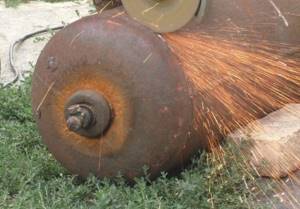
To make an indirect type boiler, you can use a new or old gas cylinder. This container is made of thick stainless steel 3-4 mm thick and is perfect for working with hot water.
Before assembling the heating structure, you will need to carefully prepare the cylinder. To do this, the product is cut in half using a grinder. The inner surface of the container is cleaned using an angle grinder with an appropriate attachment.
Before assembling the boiler, the cylinder must be opened and the inner surface cleaned
After this, the inside of the cylinder is washed, dried and coated with nitro primer paint. This work must be carried out without fail, otherwise after putting the boiler into operation, the heated water will smell like gas.
When using a tank from other metal containers, preparation is carried out according to a similar scheme.
Conclusions and useful video on the topic
A used gas cylinder is often used to make homemade devices. We present a video on how to make a BKN from a cylinder body.
Here we describe only one option out of all the possible ones that exist and are successfully used. It should be noted that there are many options for independent designs of indirect heating boilers.
For example, instead of a cylindrical storage tank, rectangular vessels are used. The winding of the coil spiral is not single-layer, but multi-layer. The water heater is supplemented with an electric heating element. Design ideas have no boundaries.
Would you like to share your own experience in making an indirect heating boiler or useful information on the topic? Please write comments in the block below. Here you can ask questions, express your opinion and post photos.
Installation methods and shapes of boilers
Boilers come in wall-mounted and floor-mounted versions, horizontal or vertical models. The capacity of the product, which is mounted on the wall, is naturally lower: it does not exceed 200 liters. Floor-standing devices can hold one and a half thousand liters. Boilers are mounted on the wall using standard brackets and suitable dowels. The most common boilers are cylindrical in shape.
Working pipes for connecting the system are located at the rear of the unit for convenience and aesthetic purposes. There is a temperature sensor and a thermostat on the front panel. There are models with the possibility of additional connection of heating elements if the power of the main heat source is not enough.
Stages of work on creating a boiler
The boiler drawing may look like this.
Creating a Heat Exchanger
When choosing the diameter of the future coil, it is important that the water in the tank comes into maximum contact with such a pipe. To do this, leave free space between the turns of the pipe.
To make the work easier, you can use a log or pipe around which the heat exchanger tube will be wrapped. One end of this tube is fixed, and then turns are smoothly created, controlling the density of the resulting spiral.
Preparing the boiler tank.
Having chosen a suitable container, you need to make two holes in it for cold water in and hot water out. Ball valves should be built into each of them for ease of operation. You also need two holes for mounting the heat exchanger. Another hole will be needed for the drain valve, which is located at the bottom of the device.
Preparing the boiler tank
If the container used as a tank is solid, then it will have to be cut to install the coil inside. For this purpose, the top part is cut down and a lid is made, which is then closed with bolts. The joints between the lid and the tank are carefully leveled and polished. To avoid leaks, use a rubber gasket.
Preparing the container for the boiler
In order to place a coil in the tank, one cover is enough. But since the structure will require periodic maintenance during operation, it is more advisable to make two covers: one on top and one on the bottom. This will make it easier to clean the coil of deposits.
When the cover is ready, all that remains is to drill holes for the coil tubes and place it inside the structure. The holes are cut out to the same diameter as the threads of the fittings that will be inserted into them, leaving a gap of a couple of millimeters for gasketing.
After the holes are drilled and the fittings are inserted into them and sealed with a gasket, counter fittings are screwed onto the outside of the tank and the connection is tightened.
This fastening method reliably fixes the spiral inside the tank, but for reliability, additional support elements should be provided. Since hot water moves through the pipe under pressure, vibrations often occur as a result. Additional fixation of the coil will definitely not be superfluous.
Holes are drilled in the tank through which cold water will flow in and hot water will come out. Shut-off valves are installed on the pipes extending from these holes.
Thermal insulation
To minimize heat loss and increase the efficiency of the boiler, it is necessary to insulate it. For this purpose, they use polyurethane foam, mineral wool, or simply place the tank inside a larger tank, and fill the free space between their walls with foam plastic or other insulating material. The outside of the tank is covered with sheets of metal or foil insulation to give it a neat appearance.
Choosing a tank for the boiler
The volume of the storage tank of the water heater should be calculated based on the daily consumption of hot water in the house. If several people live in an apartment or house, a tank of 100 liters will be sufficient. And for a family of 4-5 people, you should choose a container with a volume of 200-300 liters.
The tank used should be made of an aluminum alloy, stainless steel or other metal that is resistant to corrosion. You can use a large-sized gas cylinder, the walls of which are additionally cleaned and primed. If the walls of the cylinder are not primed, the hot water may have an unpleasant gas smell.
Five holes must be drilled in the selected tank. Two at the bottom for the inlet pipe and emergency drain, two at the side for installing the coil and one hole for water extraction at the top. If you plan to use such a boiler outside the heating season, you must also make holes for installing an electric heating element. For the heating element, one or two holes are drilled from below. Ball valves or shut-off elements are installed in the holes made, after which the tightness of the storage container is checked.
Types of coil heat exchangers
A heated towel rail is also a coil heat exchanger.
You can make a coil with your own hands of different designs and from several types of metal (steel, copper, aluminum, cast iron). Aluminum and cast iron products are stamped in factories, since the required conditions for working with these metals can only be achieved in production conditions. Without this, you can only work with steel or copper. It is best to use copper as it is malleable and has a high degree of thermal conductivity. There are two schemes for making a coil:
A helical pattern implies the arrangement of spiral turns along a helical line. The coolant in such heat exchangers moves in one direction. If necessary, to increase the thermal power, you can combine several spirals using the “pipe-in-pipe” principle.
To reduce heat loss as much as possible, you need to choose which insulation is best to insulate the house from the outside. It also depends on the material of the walls.
The choice of insulation for a wooden house should be made based on the vapor permeability of the insulation.
In a parallel circuit, the coolant constantly changes the direction of its movement. Such a heat exchanger is made of straight pipes connected by an elbow rotated 180 degrees. In some cases, for example, for the manufacture of a heating register, swivel elbows may not be used. Instead, a direct bypass is installed, which can be located at one or both ends of the pipe.
Heat transfer methods
The principle of operation of a coil heat exchanger is to heat one substance using the heat of another. Thus, the water in the heat exchanger can be heated by an open flame. In this case, it will act as a heat sink. But the coil itself can also act as a heat source. For example, when a coolant flows through the tubes, heated in a boiler or by means of a built-in electric heating element, and its heat is transferred to water from the heating system. Essentially, the ultimate goal of heat transfer is to heat the air in a room.
DIY assembly and connection instructions
The boiler is assembled after preparing all the components.
Holes are drilled in the tank: for the water filling tap, coolant inlet and outlet. If you decide to install a heating element, then a hole is also made for it at the bottom.
- Next, a coil is installed in the container, and the tubes are passed into the holes using special adapters, which it is advisable to weld into the boiler body. Other options are possible, but the main thing is that the holes are sealed hermetically.
- The legs are welded to the bottom (if provided).
- A heating element is installed if this was planned.
- Then the coil is connected to the heating system circuit, according to the diagram.
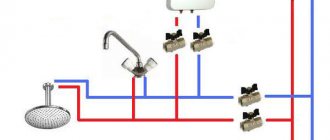
- A pipe for cold water supply and a tap for heated water are connected. You can immediately make connections to water collection points - to the kitchen and bathroom.
Thermal insulation
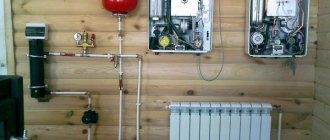
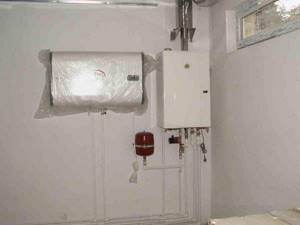
To keep the water warm for a long time, the container is thermally insulated. For it, foiled mineral wool or polyurethane foam is used. The boiler body must be completely covered in thermal insulation material - the efficiency of the device will directly depend on this. To make the insulation look neat, you can place a casing made of thin sheet metal (for example, galvanized) on top of it - you get something similar to a sandwich pipe. A visual example is in the first picture of the article.
The principle of operation of a wood boiler
Wood boiler
Another type of indirect heating water heater is wood-burning titanium, which will only require the cost of creating a supply of solid fuel. This boiler has a samovar design and operates autonomously from all power sources, so it is ideal for installation in a private home.
The principle of operation of a titanium boiler
To build such a device with your own hands, you must first build a stove, which will heat the water inside the tank. Such a boiler can have a round or square tank, and it can be installed either on a small stove made of brick or on a stove like a potbelly stove welded from a piece of metal pipe of a sufficiently large diameter.
The second option is more complicated due to the fact that sections of metal will have to be cut out of the pipe to install firebox and vent doors in these places. In addition, using welding inside the pipe, you need to strengthen the brackets for laying the grate. The bottom and top of the stove pipe are welded with solid sheets of metal. A round hole is made in the upper part, a chimney pipe is welded into it, which will pass directly through the container with water and heat it to the desired temperature.
The tank must also be welded to the furnace lid.
If you decide to make the stove out of brick, the boiler tank can be either round or square. The top of the stove is covered with a metal panel, into which a chimney pipe is also welded. Next, a container without a bottom (water tank) is hermetically welded to the upper metal plane of the furnace.
The chimney, after passing through the water tank, is discharged to the street.
Two or three pipes with valves must be welded into the tank: for water inlet, for outlet to the mixer tap and to the shower.
Water can enter the boiler either from the main line or be filled in manually. In addition, a water storage tank can be installed above the boiler, from which water can also flow into the heating tank.
If such a water heater is installed in the bathroom, it will not only provide hot water, but also heat the room.
Anyone who has used geysers or flow-through heaters powered by electricity is familiar with the situation that when the tap opens, you have to wait a while for hot water to flow. When installing an indirect heating water heater, this factor is completely eliminated - by opening the tap, you can immediately get heated water.
Compared to water heaters running on gas or electricity, this type of boiler will help you save on energy.
Installation procedure
Installation of an indirect heating boiler, in which the coolant is supplied through a coil, begins with its installation. A thread is cut at the ends of the coil, onto which a lock nut is screwed, and then they are inserted into the prepared holes in the tank so that the lock nuts have a stop.
The threaded part of the coil should extend beyond the surface of the tank. Rubber gaskets are put on them, and threaded couplings are screwed on top of them. As a result of these manipulations, the coil is securely fixed, and it becomes possible to connect it to the heating system.
The next stage of work is to connect the tank to cold water and drain the hot water tap to the required location. The final part of the installation will be insulating the water heater, but before that you should check the tightness of all connections.
This way you can provide your home with enough hot water at minimal cost. The cost of purchased materials will cost a small amount, especially if you compare it with industrially manufactured models. The price of a factory-made boiler starts from 20 thousand rubles for models from Drazice OKC.
We have selected eight more useful articles for you, see below.
- How to weld polypropylene pipes: instructions and tools
- Copper pipes and fittings for water supply - quality guarantee for 200 years!
- PVC pipes and fittings for water supply: product descriptions, current prices and installation
- How to install water pipes in a private house with your own hands
- Have you decided to install a new faucet in your kitchen? We'll show you how to do it right
- Which pipes are best to choose for water supply in a private house?
- Installation of the washing machine and connection to the water supply
- Let's figure out how to increase the working pressure in the water supply system: reasons for the decrease and solutions
Similar articles:
- Indirect heating boiler device and principle of operation
- Heating element for a washing machine: tips for choosing, instructions for replacing it yourself
- Do-it-yourself garage stove, homemade stoves and manufacturing diagrams
- Do-it-yourself pipe bender for profile pipes, homemade options