Is it possible to install a gas boiler yourself?
Yes, but it is strictly recommended to turn to professionals for help, since the boiler will be processed and registered by gas service employees who will check for compliance with SNiP rules .
If the installation rules are violated, the boiler will be marked as arbitrarily connected and registration will be denied. If the installer is confident in his abilities and has read the current SNiPs, then why not try to save money?
Selection and equipment of premises for installation
In many ways, the choice of equipment and accessories depends on SNiP 42-01-2002 “Gas distribution systems”. This significantly narrows the range of choices, since a particular boiler may not be suitable for the selected room due to a discrepancy between the area and specific power.
IMPORTANT! SNiPs are regularly updated, and current laws amend them. It is necessary to check the legal framework immediately before installation.
Previously, for example, it was impossible to install a boiler in the basement of a house, but now it is possible if the house is single-family.
General requirements:
- The room should be well ventilated;
- The room should have window openings;
- The larger the boiler power, the larger the area.
The best known manufacturers and models: characteristics. Advantages and disadvantages.
All the models listed below are the most well-known and widespread, one of the most trouble-free and proven, optimal price-quality ratio double-circuit wall-mounted boilers. It is quite difficult to sort them into a rating based on reliability or quality, since most of them are the most successful models on the competitive market, almost identical when assessed based on a set of parameters, but clearly having their own characteristics.
Double-circuit gas boiler Lemax Classic 30V
- Manufacturer Lemax
- 3 year warranty
- Country of origin: Russia
- Combustion chamber type Open
- Thermal power 32 kW
- Efficiency 90%
- Fuel type Gas
- Number of circuits Dual circuit
In modern houses and apartments, centralized heating and hot water supply are almost 100% present. However, in some cases, highways run too far from the building, and if we talk about suburban buildings, this is even more likely. But every person, without exception, wants to live a comfortable life, so buying a gas boiler is the necessary minimum, without which there is no need to talk about comfort. Our website presents a large assortment of heating equipment, and in this particular category we offer you atmospheric gas boilers. These boilers are considered one of the most economical options for organizing heating. Atmospheric gas boilers are a one-piece structure with a built-in burner. Low noise levels and the release of waste materials through natural draft make an atmospheric gas boiler a welcome guest in every home. The attractiveness of such a boiler lies in its low operating costs and a wide range of capabilities with unstable fuel pressure in the pipeline. Most models of atmospheric boilers are equipped with one circuit, i.e. designed to heat the room. To connect a hot water supply circuit (DHW), you need to purchase an indirect heating boiler, or a combined boiler with an electric heating element. Additionally, equipment such as an expansion tank, circulation pump, etc. is purchased. A double-circuit atmospheric gas heating boiler acts as a kind of mini-boiler room because By default it is equipped with a boiler and piping. In terms of functionality, atmospheric gas boilers are in no way inferior to forced-air ones. The use of atmospheric boilers is rational and economically justified, since they are fully adapted to the domestic gas supply system, have high power and are durable (up to 50 years of uninterrupted operation). It is important that the installation of atmospheric heating boilers is carried out by qualified workers, taking into account all design and estimate standards, only then will the equipment have maximum efficiency and serve you for as long as stated in the production documentation.
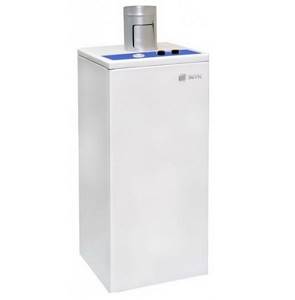
Floor-standing gas boiler Rostovgazoapparat Siberia 11 K
- Manufacturer Rostovgazoapparat
- Country of origin: Russia
- Thermal power 11.6 kW
- Combustion chamber type Open
- Efficiency 90%
- Fuel type Gas
- Number of circuits Dual circuit
Zhukovsky AKGV-17.4-Z ZHUK
Domestic non-volatile gas double-circuit floor-standing boiler with a capacity of 17.4 kW. Consumes up to 1.87 m3 of gas per hour. The design is equipped with a simple steel heat exchanger without the inclusion of a water heating boiler, so overall this unit is quite inexpensive.
Manufacturer : Zhukovsky (ZhMZ), Russia.
Baxi SLIM 2.230 I

The most common Italian boiler unit, proven by long-term practice, with a capacity of 22.1 kW. Equipped with an open combustion chamber, circulation pump and built-in 65 l boiler. Made of high quality materials: primary heat exchanger - gray cast iron, burner - stainless steel. Maximum gas consumption is 2.59 m3/h.
Manufacturer : Baxi (Baxi), Italy.
Double-circuit gas boiler Lemax Classic 16V
- Manufacturer Lemax
- 3 year warranty
- Country of origin: Russia
- Combustion chamber type Open
- Thermal power 16 kW
- Efficiency 90%
- Fuel type Gas
- Number of circuits Dual circuit
Double-circuit gas boiler Lemax Classic 20V
- Manufacturer Lemax
- 3 year warranty
- Country of origin: Russia
- Combustion chamber type Open
- Thermal power 20 kW
- Efficiency 90%
- Fuel type Gas
- Number of circuits Dual circuit
Floor-standing gas boiler Lemax Premium 12.5N (B)
- Manufacturer Lemax
- 3 year warranty
- Manufacturer's article number 28541
- Country of origin: Russia
- Thermal power 12.5 kW
- Combustion chamber type Open
- Efficiency 90%
- Fuel type Gas
- Number of circuits Dual circuit
Double-circuit gas boiler Lemax Classic 12.5V
- Manufacturer Lemax
- 3 year warranty
- Country of origin: Russia
- Combustion chamber type Open
- Thermal power 12.5 kW
- Efficiency 90%
- Fuel type Gas
- Number of circuits Dual circuit
Sources
- https://masterok-remonta.ru/otoplenie-i-ventilyatsiya/kotel-gazovyy-dvukhkonturnyy-napolnyy.html
- https://GradusPlus.com/kotly/gazovye/napolnye-dvuhkonturnye/
- https://expert-dacha.pro/otoplenie/kotly-ot/gazovye-k/dvuhkonturnie-napolniye.html
- https://sovet-ingenera.com/otoplenie/kotly/dvuxkonturnyj-napolnyj-gazovyj-kotel.html
- https://GradusPlus.com/kotly/gazovye/nastennye-dvuhkonturnye/
- https://tavago.ru/kotly-otopleniya/gazovye-kotly-otopleniya/napolnye-gazovye-kotly-atmosfernye.html/filter/kolichestvo_konturov-is-dvuhkonturniy/apply
[collapse]
Where to start the installation?
- First you need to mark the installation location on the wall or on the floor, depending on the type of boiler.
- Check whether there are enough parts and other auxiliary elements. In general, we mentally install the boiler at its future place of operation.
- View installation instructions.
IMPORTANT! Alone, you can only install a small-sized or floor-standing boiler (and even then not always). In most cases, you will need the help of one or two people.
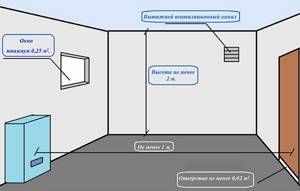
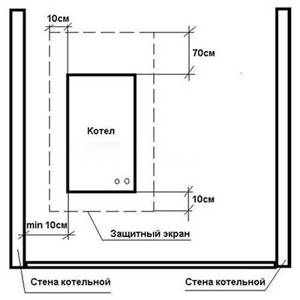
Premises requirements
The size of the installation room depends on the power of the boiler. The minimum area is 4 square meters, and the ceiling height is 2-2.5 meters.
- The doorway is at least 80 centimeters wide.
- Windows are a must. The minimum requirement for a 4 square room is a small window measuring 0.15 square meters.
- For every kilowatt of device power there should be 8 cubic centimeters of ventilation.
- Gas pipes must be metal, no other material is allowed.
- The diameter of the chimney should depend on the power. The minimum diameter is 13 cm, and it should not taper towards the top and should protrude above the roof surface by at least half a meter.
There should be gas sensors , and a gas stop valve on the boiler itself.
- The boiler must be equipped with a fuel flow sensor.
- In an apartment building, you can install the boiler everywhere except the basement, and in a single-apartment building it is recommended to install it in the basement.
- The boiler power supply (for autonomous boilers) and the electricity supply system must have thermal insulation and electrical insulation screens.
How to install equipment correctly
Strictly follow all the rules and regulations of SNiP 42-01-2002 “Gas distribution systems” without deviating from them.

Any attempt to improvise or change classical technology may be noticed by inspectors.
And if this causes an accident or losses to other residents of the house, the owner faces administrative, and, in some cases, criminal penalties.
- If the boiler is wall-mounted, the floor under it must be perfectly level , since the pump pumping water can cause vibration and displacement of the boiler. If the vibration is strong, the gas pipes or water supply system may become disconnected from the boiler, leading to a gas leak or flood.
- If it is possible to make a stand for the boiler, this will secure the structure and increase the adhesion strength to the floor.
- If you install the boiler near a stove, boiler or other heating elements, then the total power of the thermal field between them will be higher than what the sensors show, since they measure this only inside the system itself. This rule is not specified in SNiP, but is often the cause of premature wear of the mechanism or failure.
Documentation
Required documents:
- A summary of the fuel consumption of a specific device. This can be done both by the workers who install the boiler and by the owner-installer himself. The technical data sheet of the device must indicate data on the consumption of electricity, gas and water. Within 14 days, a gas service employee must issue preliminary consent to install the unit.
- Installation project , which indicates all the installation points and steps, a diagram for connecting communications and the chimney outlet.
- Technical specifications , which indicate data on the installation and conduct of communications to the boiler.
- Device certificate , reviewed and certified by gas workers. Certificate of standardization of the boiler.
Once the project has been approved, installation can begin. Professionals typically maintain an installation protocol that outlines basic steps to protect themselves in the event of equipment failure or an accident that results in damages.
The protocol is signed by the customer (boiler owner). If you are installing it yourself , the protocol should indicate the main steps specified in the instructions for the boiler. If an accident occurs during installation or the boiler does not function properly, the protocol will serve as legal protection .
ATTENTION! In the case when the installation is carried out by specialists, and the protocol is signed by the customer, it has legal force, and if the installation is performed by the customer himself, the protocol is a regular description of the actions.
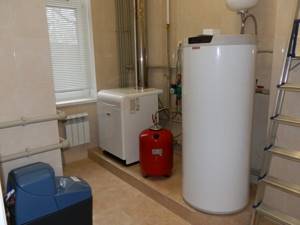
Requirements for boiler houses for installing solid and liquid fuel boilers
The requirements for volume, dimensions and materials for the boiler room are the same. However, there are several specific ones that are related to the need to organize a chimney and a place to store fuel. Here are the basic requirements (mostly they are specified in the boiler passport):
- The cross-section of the chimney should not be less than the diameter of the boiler outlet pipe. Reducing the diameter along the entire length of the chimney is not allowed.
- It is necessary to design a chimney with the smallest number of bends. Ideally it should be straight.
- There should be a supply hole (window) at the bottom of the wall for air to enter. Its area is calculated based on the boiler power: 8 sq. see per kilowatt.
- The chimney can be discharged through the roof or into the wall.
- There should be a cleaning hole below the chimney entrance for inspection and maintenance.
- The chimney material and its connections must be gas-tight.
- The boiler is installed on a non-combustible base. If the floors in the boiler room are wooden, lay a sheet of asbestos or mineral wool cardboard, with a sheet of metal on top. The second option is a podium made of bricks, plastered or tiled.
- When using a coal-fired boiler, the wiring is only hidden; installation in metal pipes is possible. Sockets must be powered from a reduced voltage of 42 V, and switches must be sealed. All these requirements are a consequence of the explosiveness of coal dust.
Please note that the passage of the chimney through the roof or wall must be made through a special non-combustible passage unit
Liquid fuel boilers are usually noisy
It is worth saying a few words about liquid fuel boilers. Their work is usually accompanied by a fairly high noise level, as well as a characteristic odor. So the idea of putting such a unit in the kitchen is not the best idea. When allocating a separate room, you should make sure that the walls provide good sound insulation and that the smell does not penetrate through the doors. Since the internal doors will still be metal, make sure there is a high-quality seal around the perimeter. Perhaps noise and smells will not interfere. The same recommendations apply to attached boiler rooms, although they are less critical.
Gas equipment installation technology
Despite the fact that all boilers have a similar design and operating principle, special rules and installation nuances are provided for floor-mounted, wall-mounted, and stand-alone boilers.
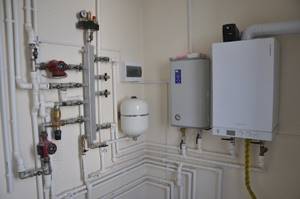
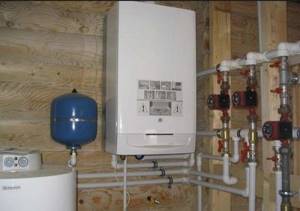
Installation of a wall-mounted boiler
Wall-mounted boilers are mounted using a special bracket, which is included with the device. The bracket material must be compatible with the wall material. If those included in the kit are not compatible with the wall (you need to clarify this in the specification for the brackets), you need to purchase others. Often a stencil is provided with the boiler for precise marking of the mounting.
- The heating system can be single-pipe or double-pipe. Regardless of the number of pipes, you first need to remove the plugs from the pipes of the device. A special filter (mesh) is installed at the return feed inlet to protect against dust or dirt.
- Next, you need to seal all contact areas (both paint and silicone sealant will do)
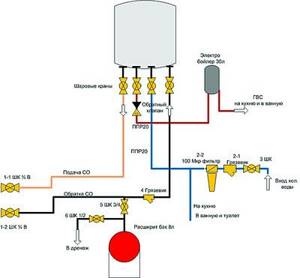
Similar to the previous point, you need to remove the plugs . Then the pipe supplying cold water must be equipped with a filter to eliminate the chance of dirt getting in. Shut-off valves must have detachable connections (popularly called “American”). It makes the installation process much easier, and replacing the tap does not cause problems. The cold water pipes are located on the left, and the hot water pipes on the right.
- The valve that cuts off the gas supply from the main line is equipped with a special filter. Many people save on this point, but in vain, because the detail is very important. Next, you need to reliably seal the joint and check the quality using water or a gas sensor. Rubber hoses are prohibited ; only corrugated ones are allowed. The boiler pipe is attached to the hose and the union nut is tightened. Sealing in this case is guaranteed by a paranitic gasket.
- The device must be connected to the network only when the design involves a closed firebox. Most devices have a three-wire connection system. For a secure connection you need to use stabilizer, which will save you from power surges and extend its service life.
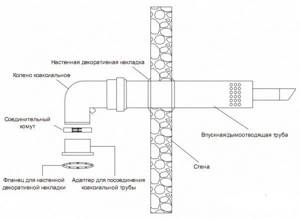
- Devices with a closed firebox are easiest to connect to the chimney. Coaxial pipes are used for this . If there are many apartments in the house, then you need to connect to a common chimney; if the house is private, the chimney is discharged through the wall. Next you need to clean the chimney of soot and debris . The chimney must be mounted at a slight angle relative to the boiler. The outlet must have a strictly vertical section of pipe; its length before turning must be more than twice the diameter of the pipe.
- Before starting for the first time, you need to wait until the liquid enters the system. The optimal pressure is 2 atmospheres. While water is being drawn, you need to check the tightness.
IMPORTANT! The first launch is carried out in the presence of a gas technician.
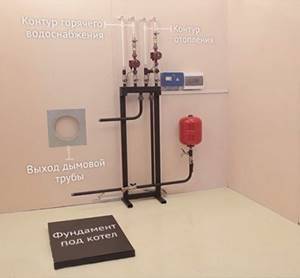
Installation of a floor-standing boiler
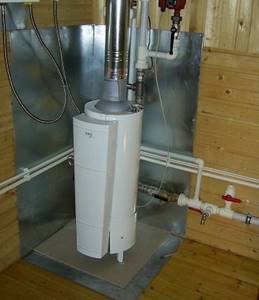
First you need to prepare a fireproof plate or similar protective screen in the place where the boiler will be located.
- Then you need to prepare a hole in which the chimney will be located. There you need to install an adapter that will be connected to the chimney. When installing a floor-standing boiler, it is prohibited to use corrugated pipes.
- Fastening of pipes and elbows is carried out . The chimney is positioned at a slight angle so that condensate can easily leave the system. The structure is clamped using clamps (in increments of 2 m) and brackets (in increments of 4 m). A cone-shaped tip is installed at the end of the chimney , which prevents water and dirt from entering.
- The boiler is connected to the drain and contact point of the heating system. If the boiler is single-circuit, then this stage is over; if it is double-circuit, then it must be connected to the water supply . The connections are sealed.
- Connection to the gas system begins with connecting the gas pipe to the boiler . The connection is sealed using tow. It is imperative to install a shut-off valve for emergency gas shut-off. It is recommended to use copper pipes with a diameter of 1.5 to 3.2 cm. Be sure to seal the connection using a paronite gasket .
- Next, the boiler is started using a stabilizer , in the presence of a gas service worker.
Kinds
Floor-mounted double-circuit gas boilers are different. Let's take a closer look at the varieties of such units.
With a closed combustion chamber
Heating boilers with a closed combustion chamber (turbocharged) have the following distinctive characteristics:
- They have a forced air intake, powered by a fan (turbine). This component removes carbon dioxide and takes in fresh air. The turbine operates all the time, so such units operate quite noisily.
- These models have a built-in burner. It is a modulated device. Automation adjusts the burner power level to the specific heat requirements of the area, as well as the performance of the gas supply/heating system.
- These types of boilers operate in two main directions - “winter” and “summer”.
- Closed-type equipment can be installed not only in private houses, but also in apartments in multi-apartment buildings. They are closed with a box and built into a furniture ensemble.
With open camera
Such units have a fairly simple design. In them, the burner is located directly under the heat exchanger. As fuel burns, fresh air is drawn from the room.
Equipment with an open burner is otherwise called atmospheric and has the following features:
- In it, air is taken in as gas is burned. The work uses air masses that come directly from the boiler room, which places greater demands on the location of the apparatus.
- These types of boilers are characterized by high efficiency (about 92%). Currently, there are quite strict standards that limit the possibility of installation and location of these units. For example, you should know that under no circumstances should you cover an atmospheric device with decorative stone or panels, and its installation is only allowed in a room with an area of at least 9 square meters. m.
- Such units have two burners - the main and pilot. Thus, the pilot burner operates continuously. The combustion intensity of the main element is regulated by turning the burner on/off.
Condensation
Such boilers are the most economical among the huge range of heating equipment powered by gas. Such units are characterized by a very high efficiency rate - 108 and 109%. Such a device works by using the heat emanating from gases.
Burnt gases leave such a device as follows:
- During fuel combustion, the dew temperature is constantly maintained. Because of this, the heating of the coolant varies from 60 to 70 degrees. Maintaining the temperature at the dew point provokes the active formation of moisture, which is contained in the flue gas.
- The smoke, which contains a lot of moisture, is sent to a condenser, which is necessary to accumulate heat stored in the heated steam.
- Condensation leads to additional heat energy (approximately 15-16%).
- After heat transfer, the smoke is sent directly into the chimney.
Gas floor-standing boilers are also divided into energy-dependent and electricity-independent.
Volatile devices have a special piezo ignition that must be started manually. The mechanical automatic system is connected to a thermal couple, which is responsible for generating low potential voltage. In this case, the power regulator is based on the principle of thermal expansion of metals. Such operation of thermal equipment is completely energy-independent - it does not need to be connected to the network.
Devices that depend on electricity most often have a closed combustion chamber. In them, the burner is equipped with electric ignition, and startup occurs thanks to a special key. The automation in such models is based on a microprocessor, which gives a signal to turn the burner on or off, as well as fire modulation. In addition, an automatic system of volatile units is responsible for controlling the intensity of fan rotation.
Chimney issue
As mentioned above, the chimney must be led outside through the wall or connected to a common one. If you do not equip it with a cap, air, water, debris, and foreign objects will get in there, which will inevitably lead to clogging of all devices connected to it. Even if the boilers connected to the system are in full working order, a clogged or dirty chimney will affect the quality of heating. What other reasons can there be for a boiler to not work? Read here.
Grounding of gas boilers
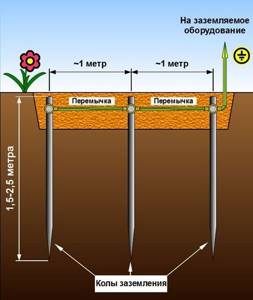
How to make grounding:
- You need to take as a basis a contour in the shape of an isosceles triangle made of 3 metal rods 3 meters long.
- The conductors need to be connected.
- Using an ohmmeter, measure the resistance inside the circuit (should be a value close to 4 ohms). If the value is higher, you can add another element to the contour.
- You need to continue until the port value is as close as possible to 4 ohms.
For grounding, rods and tubes are used, which are connected by metal strips. They are installed vertically in the ground so that the system works even in winter. It is recommended to coat metal elements with an anti-corrosion solution.