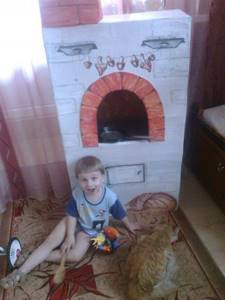
The stove is a necessary part of the mini museum of Russian culture.
What is a Russian hut without a stove? A home-made cardboard stove is suitable for creating an environment for a folk doll museum, and for introducing children to folk life. The oven turns out to be quite durable, since we reinforce most of the parts made of thin white cardboard on the reverse side with durable cardboard.
In addition to the stove itself, in our master class we will tell you how to make a stove grip and a bread shovel. These picturesque and colorful details will decorate your mini museum.
The stove will not only become an exhibit in your mini museum, but will also perfectly serve gaming purposes or become a decoration for many Russian folk tales. Of course, the first thing that comes to mind is Emelya’s self-propelled stove from the fairy tale “At the Order of the Pike.”
Master class: crafts from boxes “Russian stove”
Diana Medvedeva
Master class: crafts from boxes “Russian stove”
Master class “ Russian stove ”. The children and I decided to make pies from salt dough, and pies are baked in an oven, and to make the activity even more interesting, I made a stove .
To begin with, I found a picture on the Internet of a suitable stove , then took a TV box and cut out a hole.
box is not where the pipe should be . box (the future stove ) in two layers.
unnecessary light wallpaper using PVA glue.
And inside, where I cut out a hole, I also covered it with wallpaper and drew a flame. I drew from a children's book.
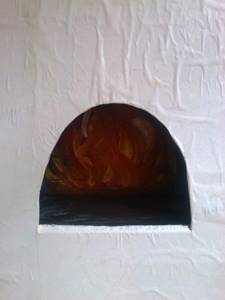
I drew bricks on a separate piece of cardboard and glued them onto PVA over the flame.

Then I started drawing individual elements.
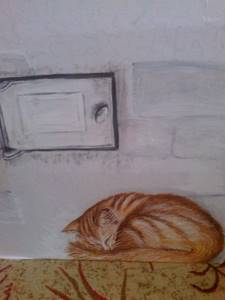
Of course, all my work is checked by my main controller.
The activity turned out to be a success; the children played with the stove .
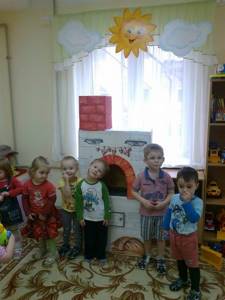
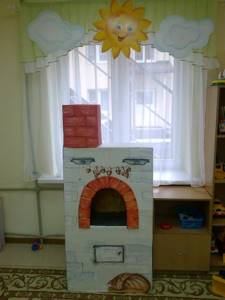
.And the sun and clouds are from the ceiling tiles.
"Miracle stove" Kindergarten decoration What is summer? This is a lot of light, This is a field, this is a forest, These are thousands of wonders. There are many miracles, and one of these miracles appeared on the territory. Christmas tree toy “Russian stove”. Master class Emelya, Baba Yaga, Ilya Muromets, Masha and Vitya... What unites these fairy-tale characters? Of course, the stove! Emelya used it as original. Summary of an integrated lesson on spiritual and moral education “Mother Stove” Goal: Introducing preschool children to spiritual and moral values based on the study of national traditions. Objectives: -Arouse children's interest.
Summary of a lesson on familiarization with the life and culture of the Kuban Cossacks “The Russian stove is the nurse for the whole house” Summary of a lesson in the preparatory group of MDOU DSKV 31, Yeisk, Yeisk district. Educator: Kovalenko T.Z. Russian stove for the whole house.
Master class “Design of the mini-museum “Russian Izba” Hello, friends and colleagues! You have already become acquainted with my events at the Russian Izba mini-museum, and now I want to introduce you to. Master class on making a model “Russian Izba” To familiarize children with Russian life, how and where Russian people lived many years ago, I decided to make a model. I took it to make it. Master class “Russian folk doll “Village Angel” MASTER CLASS “RUSSIAN FOLK DOLL “VILLAGE ANGEL” Elena Viktorovna Melnikova, e-mail ( [email protected] ) additional teacher. Master Class. Russian rag doll-amulet “Lovebirds” In our group there is a folk art corner in which kitchen utensils, napkins and towels embroidered with satin stitch are placed, wonderful. Hairdresser and stove for role-playing games on the site. Hairdresser and stove for role-playing games on the site. I took two large egg boxes and glued them together. Colored garbage bags.
Educational lesson in the preparatory school group “How the stove appeared” Topic: “How the stove appeared” Purpose: to introduce children to the origin of the Russian stove; about its use by humans; cultivate love for yours.
Source
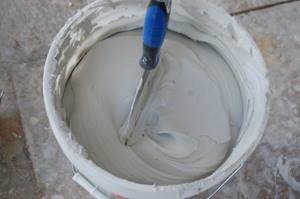
Technical characteristics and properties
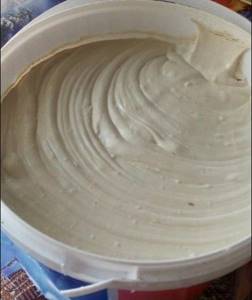
This material for coating stoves and fireplaces consists of several components that give the product strength and resistance to various factors. The main components are heat-resistant kaolin and thickeners. For strength and durability, the manufacturer has improved the formula with additional ingredients.
The appearance of the composition is a viscous beige mass that has a specific odor.
Appearance of “Emelya” coating
The main advantages of this composition over products with a similar effect:
- excellent heat resistance at temperatures up to 900 degrees;
- fire and explosion proof;
- the mixture does not shrink;
- The consistency of thick sour cream is convenient for coating. The paste does not have solid granular fractions and is easily diluted with water;
- provides good fixation of decorative elements;
- has good adhesion to the contact material;
- within a few minutes you can make adjustments to decorative elements;
- economical consumption of material when performing various works: for one square meter when gluing the material you will need approximately 1 kg of mixture, when laying bricks - 3 kg, when puttingty you need up to 1 kg of mixture;
- safe to use, does not corrode the skin of the hands, is easily washed off surfaces and washed from clothes.
Master class “Stove”
Irina Goncharova
Master class “Stove”
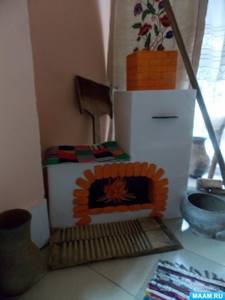
In our kindergarten there is a museum of the “Russian People's Izba”; for this museum we needed a stove . I bring to your attention a detailed master class on how to make it .
To make a stove you will need: several empty boxes, whatman paper, PVA glue, colored paper, paints, a glue gun.
Economical and energy-efficient furnaces for the waste garage
A waste oil furnace is considered the most economical, as it eliminates additional fuel costs. If you correctly calculate the materials and strictly follow the manufacturing instructions, then it will not smoke and excessively pollute the air. Such furnaces are designed to operate on transmission, machine or transformer oil. A diesel furnace for a garage operates on the same principle.
Structurally, the unit consists of two containers that are connected to each other by a perforated pipe with many holes. If a decision is made in favor of installing a waste furnace in the garage, then it is necessary that it meets the following requirements:
- maximum weight – 30 kg;
- capacity – up to 12 liters;
- standard size – 70x50x30 cm;
- average fuel consumption – 1 l/hour;
- the diameter of the exhaust pipe is 100 mm.
A wood-burning garage stove made from two gas cylinders is very economical and easy to maintain
It is quite simple to build such a structure. To create it, you don’t need nozzles or droppers, so you don’t need any special knowledge, skills or experience to make it.
Helpful advice! Before building a waste oil stove, it is advisable to first agree with the owners of neighboring garages about the collection of used oil. The container must be made of metal with a thickness of at least 3 mm.
Directly for the manufacture of the furnace you will need the following materials:
- steel pipe;
- two metal containers;
- steel corner.
The container can be the housing of an old, unusable refrigerator compressor or a gas cylinder. A furnace for a garage for mining must be made of a material with a thickness of at least 4 mm, since it is expected to heat up to 900 ° C, so thin metal will simply burn out.
The sequence of manufacturing a stove for a garage that operates during mining
A furnace for a mining garage is beneficial if there are large reserves of it.
The process of creating this type of stove for a garage with your own hands includes the following steps:
- Installing the lower container on the legs. For this purpose, parts 20 cm in size are produced from a metal corner, onto which the container is welded in a horizontal position.
- Cutting a hole in the middle of the lower part of the body, which serves as the firebox and fuel tank, welding to it a vertical pipe connecting both tanks. It is advisable that the top part is removable. This is necessary to clean the burner.
- Drilling about a dozen holes in the pipe at a height of half a meter. The first hole should be located at least 10 cm from the main body of the oven.
- Making a hole on the top of the combustion tank for pouring oil and a lid, which will help regulate the heating level of the room and the combustion process itself.
- Welding the pipe on the upper tank.
- Construction of a galvanized steel exhaust pipe at least 4 meters long and its fastening to the branch pipe.
Painting will give your garage stove a presentable look. For this purpose, a mixture of silicate glue, chalk and aluminum powder is used.
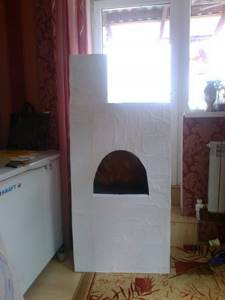
How to make a stove for crafts from cardboard with your own hands
The stove is a necessary part of the mini museum of Russian culture.
What is a Russian hut without a stove? A home-made cardboard stove is suitable for creating an environment for a folk doll museum, and for introducing children to folk life. The oven turns out to be quite durable, since we reinforce most of the parts made of thin white cardboard on the reverse side with durable cardboard.
In addition to the stove itself, in our master class we will tell you how to make a stove grip and a bread shovel. These picturesque and colorful details will decorate your mini museum.
Advantages of cardboard
- High noise insulation.
- Increased moisture resistance.
- High thermal insulation.
- Simple and quick installation.
- High fire resistance - up to 1000 degrees.
- Long service life - 50 years.
- Resistant to rodents and insects.
- Exact geometry of dimensions.
- Resistance to the formation of fungus and mold.
Foil basalt cardboard has several more advantages:
- Repels moisture.
- Does not deteriorate due to sudden temperature fluctuations.
- High vapor barrier.
- Increases sound insulation by 70% compared to cardboard without foil.
- The service life is 2 times longer than that of cardboard without foil - 100 years versus 50.
- Reflects radiation and ultraviolet rays.
Tools and materials.
We will make a stove for a mini museum of folk dolls and folk life from cardboard. Moreover, we will need three types of cardboard. More details about this are written in the chapter on cutting. Thin white cardboard, if necessary, can be replaced with thick sheets of Whatman paper.
For work, we recommend using rubber or universal glue. A glue stick will not provide sufficient strength, and PVA may warp the cardboard.
The stove parts are painted with acrylic paints. But, if there are no acrylic ones, you can also use gouache. Only after drying should a layer of varnish be applied over the gouache (for example, the cheapest colorless nail polish). Or, at worst, cover it with a thin layer of PVA glue. Otherwise, the gouache will get dirty even after drying.
Parts made of thin cardboard can be cut out with scissors. Thick cardboard needs to be cut with a paper knife. Don't forget to put plywood underneath so as not to damage the table.
How to use it correctly?
- Coating for Emelya stoves and fireplaces requires a certain temperature in the working room. It cannot be applied if the thermometer is below 5 degrees.
- Before use, open the working container and mix the mixture thoroughly.
- Next you should move on to preparing the surface of the heating device. It is necessary to thoroughly clean the surface from dust, dirt, and grease stains. If the coating has an old layer of cladding, it must be removed using a stiff brush. This way you will ensure a new layer from chipping and falling off.
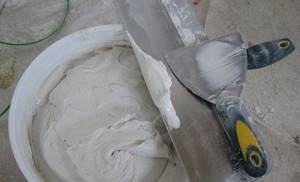
- Using various tools (spatulas), apply the composition in an even, thin layer. Its thickness should not exceed 5 mm, otherwise the material may roll and deform.
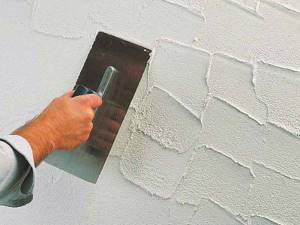
- Leave the covering for several days for the product to dry completely. The manufacturer recommends the optimal drying temperature of 20 degrees. At this temperature, complete drying will occur within 72 hours after the last manipulations with the composition.
- Only after this can you heat the device a little. This will ensure reliable adhesion of the composition to the surface.
Subject to all rules of storage and use, the manufacturer of the mixture guarantees the durability and reliability of this building material.
Schemes-drawings of a stove for a mini museum of folk dolls and folk life Russian Izba
We cut out the parts from three types of cardboard. The first four parts are made of thin white cardboard, which is included in the set of cardboard for children's creativity or is sold separately. In the diagram, fold lines are indicated in red. You need to draw something hard along these lines from the wrong side. For example, draw lines with a ballpoint pen with pressure (of course, along a ruler). Then the folds will be even and clear. The valves required to connect the parts are indicated in brown. And in green - lines for gluing parts made of thick cardboard that need to be marked.
Sheet 1 Details made of white cardboard. Schemes-drawings of the stove for the mini museum of folk dolls and folk life Russian Izba.
When you draw out the details, please note that our stove can be with a left or right pipe. If you want to get a stove like in the picture in the post, then the drawing will be the front side for you, and if you want the pipe to be on the other side, then consider it the wrong side.
Sheet 2 Details made of white cardboard. Schemes-drawings of the stove for the mini museum of folk dolls and folk life Russian Izba.
Pieces 5 to 8 need to be cut from very thick corrugated cardboard. After all, all these parts will be a kind of “shelves” on which we will lay and glue the parts. If you don’t have very thick cardboard at hand (about 0.5 cm thick), then you can glue two layers of thinner cardboard.
Sheet 3 Details of thick corrugated cardboard about 0.5 cm thick. Schemes and drawings of a stove for a mini museum of folk dolls and folk life Russian Izba.
And the last parts 9 to 15 can be made from thinner corrugated cardboard or from rigid pressed cardboard (shoe box, back hard cover from a watercolor block of paper, etc.). Most of these parts are reinforcing. The thickness of corrugated cardboard is about 0.2 cm, and pressed cardboard can be thinner. The main thing is that it is tough.
Release form and prices
This composition is produced in plastic packaging - buckets. It has different weights from 1.5 to 15 kilograms. Approximate cost is:
- 1.5 kg – from 70 rubles;
- 3 kg – from 140 rubles;
- 15 kg – from 700 rub.
When ordering in bulk, various stores offer good discounts, so by purchasing several products you will significantly save on finishing materials.
Coating for stoves and fireplaces “Emelya” is sold in specialized construction stores in any, even small, city throughout the country. You can also easily and quickly purchase the composition in online stores. Whatever purchasing method you choose, you need to ensure the quality of the material by requesting all the necessary quality certificates.
When purchasing products, pay attention to the date of manufacture, because the product cannot be stored for more than a year. You should also consider the storage temperature; if it exceeds 20 degrees, it is better to refuse the purchase.
Assembling a stove for the Russian Izba mini museum.
When all the parts are cut out, you can begin assembling the stove.
The basis of the stove for the mini museum of folk dolls and folk life Russian Izba.
We take parts 1 and 2 from white cardboard and parts 5 and 6 from thick cardboard. Glue parts 5 and 6 to the wrong side of parts 1 and 2 in pre-marked places.
Cut out a rectangle for baking on part 6.
We glue part 1 and part 2 of our stove.
We paint part 7 with white paint and glue it to the front side of part 1.
Glue on reinforcing part 11. Paint the inside of the stove with black paint, as shown in the picture. We also paint parts 9 and 10. Part 9 is on one side, and 10 is on both sides.
We glue parts 9 and 10, overlaying them like shelves on parts 5 and 6.
We glue reinforcing part 12 between the first and second part.
We fold part 4 of thin cardboard into a ladder and glue it onto the valves of parts 1 and 2, forming a pipe.
Glue together part 1 and part 3.
We glue reinforcing parts 13 and 14 onto parts 1 and 3.
We glue the pipe of part 3 onto part 12. We form the shape of the stove bench.
We glue the bed - part 15 onto the valves of parts 1 and 3.
We paint the bed with white paint.
If desired, you can decorate the mouth of the furnace with voluminous “bricks”. To do this, cut out bricks from cardboard pre-painted white and glue them at the mouth of the stove.
The stove for the Russian Izba mini museum is almost ready. You can stop at this stage.
But you can make a hedgehog and a stove bench.
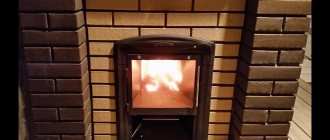
Long-burning wood-burning garage stove: types and principle of operation
Any option for garage stoves has its pros and cons, and each of them can be made with your own hands. To have an idea of the process of creating a unit and to calculate your strength and resources, it is worth getting to know each type of device in more detail.
Potbelly stove - a compact, convenient and affordable option for a garage stove
The popularity of long-burning garage stoves lies in their efficiency, since the combustion of ordinary firewood can produce the maximum amount of heat. The principle of operation is that a large amount of fuel is loaded one-time into the combustion chamber, where the process of prolonged combustion is due to poor access of oxygen. Thus, the firewood does not burn instantly, but gradually smolders, releasing flammable gas.
Long-burning garage stoves can vary in their design features; a popular variety is Bubafonya. The name of the unit comes from the name of its inventor. The high efficiency of the design lies in the fact that such a long-burning stove can operate on sawdust. If you try, you can connect Bubafonya to a water heating system. In this case, the principle of operation of the device will be to create a water jacket around the boiler.
Buleryan is also a popular model of long-burning stove; its design is very unusual. The device is widely used not only for office, but also for residential premises. This is a kind of modern hybrid of a classic potbelly stove and a long-burning stove. The unit operates by forced convection. Several curved pipes go to the firebox from below and above. Cold air enters through the lower ones, which is instantly heated in the firebox and comes out from above already hot.
Buleryan is a popular model of long-burning stove
Do-it-yourself long-burning stove for the garage
Despite the relatively complex design, you can make a long-burning stove yourself. Such a model will have one, but significant drawback: to remove the ash, you will have to turn the rather weighty body upside down. To build the unit, you will need a metal cylinder and a welding machine. You can use a square container as a basis, but only if the firewood smoldering is properly ensured. The manufacturing process itself in this case will take several hours.
Potbelly stove for a garage: operating principle and manufacturing features
An ordinary potbelly stove, popular in the 20s of the last century, is considered the most popular option for a garage stove using wood and other types of solid fuel. It can be made from a variety of available materials. Both sheet metal and a piece of pipe, an old barrel or a used gas cylinder would be appropriate here. For successful production, the material must meet the following requirements:
- metal thickness – at least 5 mm;
- a cylindrical container in cross-section must exceed 30 cm.
The classic potbelly stove includes the following elements:
- housing with grille;
- loading door;
- ash pan;
- chimney is side or vertical.
To make a chimney, use a 3 mm thick metal pipe with a cross-section of at least 12 cm. The combustion chamber is cut out from the selected blank. The fuel grate is installed at the bottom, and under it there is a box for collecting ash made of metal 3 mm thick. The chamber is closed from above and the chimney is removed. The legs for the stove are made of metal corners.
A used gas cylinder is suitable for making a potbelly stove for a garage.
Before you make a potbelly stove for your garage, you need to decide on its shape, which depends on the base material. It can be round or square. It is also important to think about safety rules. Install the stove on a flat and durable base made of fire-resistant materials. The walls also need to be protected from sunburn. There should be no foreign objects near the stove.
It is important to take into account that the metal surface of the potbelly stove will become very hot during operation, therefore, in order to avoid serious burns, it is necessary to exclude the possibility of people and animals touching it.
The procedure for making a vertical potbelly stove for a garage with your own hands
The most popular option for a do-it-yourself potbelly stove for a garage is a metal stove. In order to produce a vertical unit, the workpiece is conventionally divided into two parts. The smaller one will be located below and serve as a place for collecting ash, and the upper part (base) will be the firebox, and firewood will be stored in it.
Helpful advice! You need to be extremely careful when working with an old gas cylinder. First of all, you should make sure that there is no gas inside the container. You can completely displace it by filling the balloon with water. There are known cases when gas residues in the process of sawing a cylinder provoked an explosion.
The diagram for making a vertical potbelly stove for a garage shows all the necessary dimensions
As an illustrative example, let’s consider the procedure for making a stove for a garage from a gas cylinder:
- Cutting out doors: the top one for the firebox, the bottom one for collecting ash. They do this with the help of a grinder. The cut pieces are not thrown away; they will serve as doors.
- Welding the grates. To do this, use pieces of steel reinforcement of appropriate length, 13-15 mm thick. A distance of 20 mm is left between the grates.
- Construction of a chimney. For this purpose, a metal pipe about 10 cm high is attached to the top of the structure.
- Locks and hinges are welded to door blanks. Connect all the parts. To create a seal on the outside of the door, metal strips 20 mm wide can be welded.
- Installing legs at the bottom of the product from metal corners.
Using the same principle, a potbelly stove for a garage is made from a pipe. The difference lies in the need to weld the bottom and top cover, where a hole for the chimney is prepared in advance. You can also use a gas cylinder to build a heat-efficient rocket stove for your garage.
Advantages and disadvantages. Heating requirements. Types of heating systems: water, electric, gas and others.
Device structure
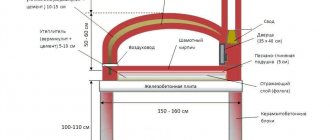
If we compare this design with other options for food ovens, it is one of the simplest. It includes:
- Foundation.
- A table that can be raised to a height that is convenient for you.
- A fire pit where wood is lit and then food is cooked.
- Semicircular vault made of refractory bricks.
- Chimney.
- Exterior finishing and thermal insulation.
Final result
Foundation and table
A wood-burning pizza oven has a fairly impressive weight of at least 600 kg. Therefore, a foundation must be poured under it. This is a slab structure with a reinforcing metal frame from the shallow category. The foundation is poured as a free-standing element.
The table, as mentioned above, rises in height to a level convenient for you. It is erected from concrete blocks. The design of the table itself is a box with a niche inside in which firewood is stored. But the upper surface is a two-layer structure.
- This is a reinforced concrete lintel with a reinforced frame made of metal reinforcement.
- This is a heat-insulating screed, which includes concrete mortar, perlite (fine river sand) and expanded clay.
Construction of the vault - initial stage
Vault and chimney
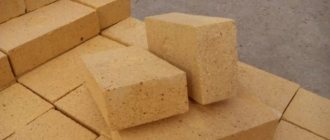
This is, in fact, a wood-fired pizza oven itself. The quality of the prepared pizza will depend on its correct construction. Previously, and today in Italy, it is made of stone or clay. But stove makers believe that the optimal, albeit expensive, option is fireclay brick. It perfectly withstands high temperatures and open flames of fire.
The chimney is located in the front part of the unit itself near the combustion opening. Since the temperature of the exhaust gases is not as high as inside the combustion chamber, the chimney pipe can be raised from ordinary building bricks.
Construction of the vault - final stage
Thermal insulation
This is one of the most important points. It is the insulation of the stove roof that determines how much fuel will be consumed to warm it up. And the better the thermal insulation, the less firewood you will use. Under the device is already insulated using expanded clay concrete, but the vault can be insulated using various materials and technologies.
- The outer side of the vault can be covered with traditional thermal insulation materials. For example, basalt wool or glass wool.
- You can cover the vault with a thick layer of cement-perlite mortar.
- You can build an additional casing around the stove from the same building brick. The gap between the two parts of the unit can be filled with expanded clay or perlite.
Why is thermal insulation so necessary? It's all about the principle of operation of the Pompeian stove. After all, the basis of everything that happens inside the firebox is the burning of wood, the release of enormous thermal energy, which rises up to the dome of the arch, is reflected from it and again enters the combustion space. That is, the result is a strong concentration of heat inside the combustion chamber. This is why a wood-burning pizza oven is economical in terms of fuel consumption.