Situations arise when a defect in the pipeline has to be repaired when supplying water. More often, fistulas occur on welded pipes; they can be eliminated by electric welding the water pipe using surfacing electrodes. Although the welding will be weak, a serious accident, water leakage will be prevented.
Before welding, the main pressure is reduced to possible limits. Experience is required to perform the work. A beginner cannot cope with such welding. It is especially difficult to weld cast iron risers. Cast iron has high fluidity; when heated, structural changes occur in the metal, worsening performance characteristics.
Welding water pipes under pressure using electric welding
Why is it necessary to weld a pipe with water?
It is necessary to boil pipes with water in the following situations:
- when, after putting the system into operation, lack of penetration of joints is detected;
- sometimes when installing welded pipes, the main line turns out to be defective;
- when it is impossible to leave a large area without water;
- there is no way to drain the water or it is not economically feasible;
- you urgently need to install a shut-off valve or metering unit;
- Due to the slope, water remains in the pipe after the system is drained.
These are not all situations in which welding of pipelines with water is necessary.
Features of welding water pipes
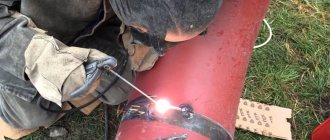
You can weld a pipe with water using electric arc, gas welding, or semi-automatic welding using surfacing wire. Electric welding of a water pipeline filled with water is associated with some features:
- The welding operating mode when sealing defects and water leaks is adjustable. If there is no risk of burns through a wall thinned by rust, the current strength when welding a cold water system filled with water is increased by 5–10%, depending on the type of alloy. By cooling the wall, the electrode will not stick to it during welding. Depending on the type of welding machine, welding is carried out using alternating or direct current. Variable is preferable; the arc during welding will be stable. The connection is formed even under a thick layer of water. If you need a high-quality seam, use direct current. Although the welding voltage will be unstable, the molten weld metal will penetrate deeper into the defect area when welding a pipeline with water.
- For operation, electrodes are selected according to the type of pipeline material. NZh-13 is suitable for welding stainless pipes, MNCh-2 or OZCH-2 is suitable for repairing cast iron risers, or you can weld gray high-carbon cast iron. When using an inverter as a current source for repair work on water pipelines, MR-3s, TsCh-4 electrodes are purchased; they melt at low currents and have a low melting point. The electrodes are pre-calcined, heated to 200°C and held for 40 minutes to an hour.
What difficulties may arise
During repair welding of water pipes using electric welding, the quality of the seam from contact with water will be low. This repair of defects is a temporary measure. It is not provided for by GOST. When water pressure increases and the system is pressurized, the seam formed during welding can crack. Not all welders undertake this type of work. Surfacing of metal in the damaged zone often leads to multiple fistulas around the welding zone, because during welding the oxidation process is activated by contact with water. Instead of one fistula, many are formed.
Welding a pipeline containing water is a technologically complex job for a number of reasons:
- Due to the steam generated from the water during welding, you have to periodically wipe the mask; the work area is difficult to see.
- Water constantly cools the welding working area and prevents the metal from penetrating to great depths. Setting occurs immediately and crystallization begins.
- When pipelines located under the ceiling leak, work clothes get wet from the water. This is fraught with breakdown of current. The hand twitches and the electrode gets stuck.
Technology
Welding pipes is a difficult and responsible task, because they almost always work under pressure. The whole matter is further complicated by the fact that welding seams can only be checked when the entire pipeline system is installed and connected. Some fistulas are so minor that they only become apparent after some time.
It is worth paying attention that factory bends and transitions have chamfered edges. It is designed to better fill the joint with metal and obtain a more reliable weld seam
If you do not have these chamfers, then it is recommended to make them “by eye” on an emery stone or using a grinder. Before welding, be sure to wipe the parts from abrasive particles, use a brush to thoroughly clean the welding area and the mass connection point.
There are the following types of steel pipe connections:
- end-to-end;
- T-bars;
- corner.
The peculiarity of pipe welding is that you have to perform all types of welding:
- horizontal (bottom);
- vertical;
- ceiling (if you have to work under a pipe).
The easiest way to weld a pipe is to turn it while applying the seam. This method is suitable for welding individual elements, but this cannot be done during the installation of the system. If the pipe is located close to the wall, and it is not possible to weld the back wall, then use a grinder to cut out a small “window” through which a hard-to-reach place is welded, and then weld the “window” into place.
In pipes, it is important that the edges are welded evenly throughout the entire thickness. To do this, not one, but several seams are placed on top of each other, gradually filling the joint with metal.
Attention: To avoid a large influx inside the pipe, the electrode is tilted at an angle of 45 degrees relative to the axis of the pipe.
The process of butt welding pipes is carried out as follows:
- the pipe is connected using 4 tacks, which are evenly spaced;
- the first seam is applied;
- at the end the final seam is applied.
Attention: During welding, the metal must have the same color. Dark areas indicate that slag or another object has entered the seam.
Most likely, a fistula will appear in this place and the pipe will have to be digested.
The first seam is applied with an electrode 2-4 mm thick according to a certain algorithm - the pipe is divided into four sectors and work is carried out alternately in each of them:
- sectors 1 and 2 are boiled;
- then sectors 3 and 4;
- if the thickness of the edges is large, sectors 1 and 2 are boiled again;
- then sectors 3 and 4;
- The final seam can be applied from any place moving in a circle.
The metal being welded quickly heats up and cools down, as a result of which the connected pipes can move from the common axis. Welding seems to pull the metal in its direction. For this purpose, tacks are installed, which are designed to hold the pipe in a given position. On pipes up to 300 mm, you can make only 4 tacks, and for larger diameters they are placed in increments of 200 - 250 mm. After welding, the slag must be removed with a hammer and a visual inspection of the seam for defects must be carried out.
T-joining pipes is somewhat different from butt welding. A “window” is cut out in the side wall of the pipe with a grinder or cutter. The end of the second pipe is rounded, giving an oval shape that follows the contour of the pipe wall. In such a connection, only two tacks are installed, located symmetrically to each other on the sides of the pipe. Then the joint is welded on both sides alternately with a double seam.
Fillet welding of pipes is used very rarely. The ends of both pipes are cut at an angle of 45 degrees and joined. Two side tacks are placed, after which a double weld is applied.
Attention: The slag from stainless steel electrodes, as it cools, begins to peel off and “shoot” on its own, so be careful and protect your eyes.
After all the pipes are welded and the system is installed, you must immediately check all joints and seams. To do this, you can use a compressor and pump air into the system. In this case, the pressure is created by a couple of kilograms more than what will later be in the system. If the pressure does not drop during the day, then the seams are welded efficiently.
If you have no experience or are not confident in your skills, watch video examples of manual arc welding on the Internet.
Related Posts
- Disadvantages of polypropylene pipes in home heating
- Instructions for inserting into a sewer pipe with your own hands
- Top 6 ways to competently make the transition from cast iron to plastic
- Rules for laying sewer pipes
- How to weld heating pipes using electric welding
- How to choose high-quality pipes for water supply in an apartment
- Which pipes are best to choose for a water well?
- Features of using PVC sewer pipes with a diameter of 50 mm
- Which pipes for heated floors to choose: characteristics and installation methods
- Pipe box
- What sizes of sandwich pipes are best to use for a chimney?
- Decorative overlay for a heating pipe: what is better to choose to make it look beautiful?
- How to insulate an outdoor water pipe
- Effective methods of thermal insulation of sewer pipes
- Do-it-yourself installation and replacement of sewer pipes in an apartment
- How to tap into a water supply system under pressure with your own hands: all the methods in one place
- Benefits of using a duct extension for radiators
- Dimensions and installation of pipes for a bath
- Sealant for sewerage
- What kind of pipes are used for the gas pipeline?
- Dismantling of heating systems
- Choosing between metal-plastic and polypropylene pipes
- How to close the pipes in the toilet
- Trenchless pipe laying options
- Connecting the toilet to the sewer without corrugation
Read with this
- Disadvantages of polypropylene pipes in home heating
- Instructions for inserting into a sewer pipe with your own hands
- Top 6 ways to competently make the transition from cast iron to plastic
- Rules for laying sewer pipes
- How to weld heating pipes using electric welding
- How to choose high-quality pipes for water supply in an apartment
- Which pipes are best to choose for a water well?
- Features of using PVC sewer pipes with a diameter of 50 mm
- Which pipes for heated floors to choose: characteristics and installation methods
- Pipe box
How to weld a pipe with water
When welding pipes under pressure and sealing fistulas, conventional inverter welding is more often used.
Fistulas and water leaks occur due to incorrect choice of mode, impacts or corrosion damage. They are eliminated in good light - the damage should be visible from all sides. When making a vertical or horizontal seam, the electrode is held perpendicular to the pipe so that water does not flow down it. The defect is melted from top to bottom:
- a few drops of melt are applied at the top point; after the arc stops, the working area is hit a couple of times with a hammer so that the metal penetrates deeper into the defect;
- the same procedure is carried out, descending to the very bottom;
- when the water stops flowing and the steam disappears, strengthen the wall around the fistula, rising from bottom to top, and apply crescents. Create additional rollers and break them with a hammer.
It is necessary to work at low current to prevent burns on the wall damaged by corrosion.
Joint repair
There are situations when you need to re-weld the entire joint. First, the lower part of the joint is welded; it is welded through a window cut out in the upper part of the pipe. It can be made in any geometry: round, square, rectangular. This does not matter; it is important to provide access to the joint. The water is blocked by clogging the passage with rags; they are inserted on both sides to dry the work area as much as possible. The seam is made in small fragments, three centimeters each, in two passes. The second is done in the opposite direction. When the scale is knocked down, the rag is removed, water will flow into the pipe again. Proceed to the side parts. The final part of the work is welding the window, it is closed with the prepared patch, the seam is drawn in a circle. Walls thicker than 6 mm are boiled twice in different directions.
Selection of electrodes
Equally important for obtaining high-quality seams is the use of proven consumables. Bad electrodes will become an insurmountable obstacle to achieving the desired result. The following brands are considered the best today:
- ANO-21, ANO-24 and MR-3 . AC power required for use. Due to its low cost, consumables are in demand in a wide variety of human activities, including household plots. Such electrodes do an excellent job of welding structures for a private farmstead: gates, greenhouses, canopies, etc. The listed consumables are not suitable for connecting pipes, and especially high-pressure lines;
- SSSI . The high quality cores have earned the praise of professionals. However, electrodes also have negative aspects. For example, they do not allow welding work to be performed at a fast pace. The weld forms slowly and it is very important to maintain a stable arc. Those who have experience with ANO and MR analogues will be able to work with such electrodes;
- LB-52U . Of all the brands under consideration, they are best suited for welding pipes using electric welding. Japanese development is preferable in the implementation of large projects. The electrodes form an even, attractive seam and hold the arc perfectly. Their only drawback is their relatively high cost.
Pipeline tapping
When it is necessary to connect plumbing fixtures, install metering devices or shut-off valves, it is not necessary to remove water from the system; this can be too expensive.
The water outlet or tap is carried out according to the following scheme:
- the embedded element is adjusted to the pipeline;
- scalded along the entire contour;
- after this, a cut-in is drilled through the pipe or a disassembled ball valve;
- then a supply line is installed to the pipe or shut-off valves are assembled. After this, the water supply is turned on.
The insertion of fittings into the pipeline using the presented technology is carried out without reducing the pressure in the pipeline. The connected element is attached to them.
There is a leak, what should I do?
The first step is to turn off the central water supply valve. In apartments it is located in the bathroom, at the connection point to the central riser. Hot and cold water supply have separate lines, respectively, two taps are installed. They are usually marked with color - blue for cold water, red for hot. If you are not sure which valve to close, close both.
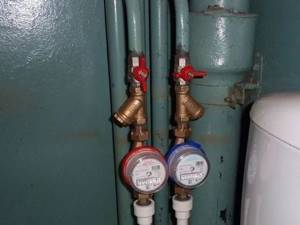
Further actions.
- Minimize the effects of water exposure. Take a large rag and place it under the leaking pipe.
- For some time after closing the central tap, water will still flow. The solution is to place a container (bucket, basin).
- After the liquid stops, wipe the floor, walls and interior items on the surface of which there is moisture.
- Fix the problem yourself or call a specialist. It is not recommended to immediately seal the pipe; it must dry. Then the causes of the defect are analyzed.
If a leak occurs in the central heating system, you must immediately call the service company. The heat supply scheme for apartment buildings in most cases does not provide for the presence of a central tap in each apartment. The solution is to place a container to collect liquid before the specialists arrive, or throw a warm blanket over the pipe. It will absorb water.
Important: a burst of heating is a dangerous situation. It is necessary to eliminate its first consequences only by protecting all parts of the body
Otherwise, the hot coolant will cause burns.
Useful tips from experts
Main water supply system filled with water, a source of high humidity. There are professional secrets that allow you to carry out quality work. You need to reduce your exposure to water. This is achieved in several ways:
- A bolt of the appropriate diameter with a large head is driven into the fistula. The stream of water decreases and only drops form. If the fistula is round, it will clog completely. It will be enough to scald the cap and melt the metal around it. This method is suitable for any spatial location of the damage.
- A large nut is placed on the fistula, the leak is partially eliminated, the water does not fall on the electrode, but flows out through the internal hole of the hook. After this, the nut is scalded along the outer edge. After this, a bolt is screwed into it using fum or screwed in, a tight connection is formed, and the defect is eliminated. The appearance of the pipe becomes worse - this is a minus, but such repairs are quite effective and do not take much time.
- The volume of metal supplied to the weld pool increases. A few drops are not enough. The size of the drop depends on the thickness of the electrode. Sometimes they additionally take an electrode with a cleaned coating. The first electrode creates an arc, and when a melt pool is formed, a second one, which has no coating, is inserted into the holder. The volume of surfacing material increases, the hole is fused faster.
Taking into account the peculiarities of working with a filled pipe, you can repair the network yourself without flushing water from the system. It is necessary to select the correct electrodes according to the type of rod, type of coating, and regulate the operating current mode.
Briefly about the main thing
Metal barrels last for many years, but they can also develop cracks and holes. This is not a reason to throw away the container - if you seal the holes correctly, it will last for many years.
When repairing holes, it is important to consider their size and location, as well as what the barrel will be used for. For example, if you plan to store water in it, you will need to use waterproof glue.
There are several ways to seal a hole in a barrel: close it with a nut or rubber, seal it or tar it, use cold welding. One of the simplest options is a plastic bag - it is inserted inside.
If the hole cannot be repaired, the barrel can be used for other purposes. They make furniture, washbasins, flower beds, barbecues, even concrete mixers.
Ratings 0
