Despite the appearance on the market of inexpensive and practical materials, copper pipes are still successfully used for assembling internal wiring of heating circuits. But copper is an expensive material, so the installation of copper heating pipes should be carried out after carefully studying the rules and regulations.
The efficiency of the finished system depends on both the quality of the equipment and the skill of making connections.
Let's look together at the features of copper heating pipelines and their installation technology.
The main advantages of using copper pipes:
Durability of course . Copper pipes are not subject to corrosion in natural environments, technical characteristics have remained unchanged for decades. The surface of the inner walls remains smooth , which prevents the formation of deposits, and the outer walls, as a rule, do not require additional protection. The copper pipeline has been in use without repair or replacement for almost as long as the house itself. Durability and heat resistance. Copper is absolutely impermeable to other substances, including oxygen, which is very important to avoid corrosion of heating system elements. High thermal conductivity . The heat transfer coefficient of copper ensures rapid heating of the room and efficient use of the coolant at the highest possible level. Thanks to this, heat transfer is maximized, the efficiency of the heating system increases, and, accordingly, energy consumption decreases. An insignificant coefficient of thermal linear elongation (expansion) is 0.1% of the length when heated from 20°C to 90°C, that is, only 5 mm for a pipe 5 meters long. The “defrosting” of the system is not scary. Due to the strength and ductility of copper, a pipe made from it can withstand several coolant freezes (up to 3 for pipes made of hard grades of copper and up to 6 for soft ones) without destructive consequences for the pipeline. Chlorine, almost always contained in the water of heating and water supply systems, contributes to the formation of a layer of patina on the inner surface of the pipe - a thin, durable protective layer that provides a significant extension of the service life of the copper pipeline.
The main disadvantages of using copper pipes:
Incompatibility with other materials. If there are aluminum elements in the system, active electrochemical reactions begin. When directly connected to products made from other metals, destruction occurs quite quickly. To improve the situation, you can use brass adapters and fittings. But it is better not to combine aluminum and copper in one system - a reaction is possible in which a large amount of gases is released and, in the absence of gas release valves, the system can simply rupture. In an acidic environment, copper begins to deteriorate. Therefore, in the heating system you need to use a coolant with a neutral PH or slightly alkaline. If there are solid particles in the coolant, abrasion occurs quickly , since it is a soft and plastic material. Therefore, a mechanical filter is needed to remove abrasive particles from the environment. Isolation from stray currents is required. Copper is an excellent conductor of electric current, therefore a grounding loop and the presence of dielectric spacers in the system are required. Difficulty of installation work. Requires special equipment and qualified personnel. Copper pipes are afraid of contact with concrete (oxidize). The rate of destruction depends on the composition of the wall, but in any case it is better to lay the pipe in a PVC sheath.
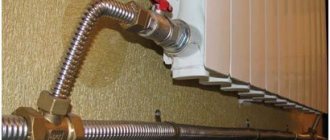
Connections of copper heating pipes are made in various ways: One-piece. By soldering, after connecting the joined parts using the socket method or using fittings, as well as through press fittings using a special tool.; Detachable. With compression fittings and with threads (thread on one end of the fitting only). Instead of copper, bronze or brass fittings can be used. To install compression fittings, no special equipment is required: the pipe is inserted into the corresponding groove until it stops, and then tightened using a nut, pressing the pipe material against the fitting body. For a tight fit, you may need two keys - tighten until completely sealed. This is all the required equipment. But the specificity of crimp connections is such that constant monitoring of tightness is required: periodically they begin to “drip”. Therefore, such connections cannot be walled into walls. Installation of press fittings using special press machines. They themselves are not cheap, and neither is their rental. But the connection turns out to be tight and reliable, but inseparable.
Labeling and cost
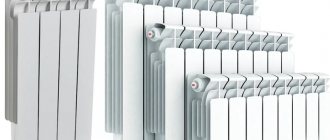
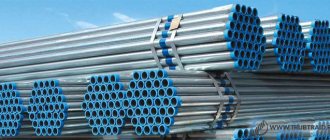
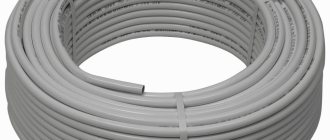
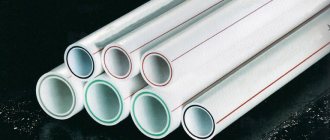
Copper pipes are available in two types: soft and hard. Solid ones are often used for heating. Release form - linear sections of 2-5 m long or coils in which sections of 5-10 m are twisted.
Dimensions . The outer diameter is indicated in millimeters (usually domestically produced or from the CIS countries) or inches (imported), and the wall thickness is indicated through a fraction or “x”: 22x1 mm (22/1mm) - outer diameter 22mm, wall thickness 1mm, which means inner diameter , according to which heating systems are designed, will be 21mm (22-1=21). For wiring a household heating system, a wall thickness of 0.8-1 mm is sufficient.
In order not to make a mistake with the choice of diameter when installing individual heating, it is easier to “dance” from the boiler outlet. This is the diameter your pipes will be before the first branch. If the system is small, the entire wiring can be done with one pipe, but if it is large enough, you need to follow the rule: after each branch, use a pipe with a diameter that is one step smaller on the dimensional grid. The branch to the heating device (radiator or heated towel rail) also has a diameter that is one step smaller. For example, 24mm comes out of the boiler, at the first branch two branches are separated, which go with 22mm pipes, and 20mm goes from it to the radiators. The “return” is assembled in the same way, but from smaller to larger sizes. If a large area of several floors will be heated, a professional thermal engineering calculation is desirable.
The fittings coming out of the boiler are usually either copper or brass, but in each case, check and remember that other materials cannot be directly connected to copper. In order to avoid a chemical reaction, you will have to use brass or bronze fittings or adapters.
annealed and unannealed pipes . Unannealed pipes have a large margin of safety: they can withstand pressure up to 450 MPa, but do not bend very well: they can only stretch by 6%. To change their characteristics, they are heated to high temperatures and then cooled. The process is called annealing, and the products that come out after it are annealed. The safety factor has become smaller - up to 22 MPa, but the elasticity has increased: the material can stretch by 50-60%. The material has also become more resistant to temperature changes, tolerates ultraviolet radiation without problems and is almost insensitive to high humidity. That’s why annealed copper is used not only in heating, but also in car engines and drives.
Normative documents
Copper pipes in the Russian Federation are manufactured in accordance with GOST 617-2006 “Copper and brass pipes of round section for general purposes. Technical conditions", the used grades of materials are specified by GOST 859-2014 "Copper. Brands" and GOST 15527-2004 "Copper-zinc (brass) alloys processed by pressure. Stamps."
Pipes are made from copper grades M1, M1r, M1f, M2r, M3r, M2, M3 and brass grade L96 according to GOST 15527. Pipes are divided into hard, semi-hard and soft.
GOST requirements and dimensions according to the standard
GOST 617-2006 defines the assortment (dimensions) and size deviations of round copper pipes. The standard applies to copper and brass (made from L96 brass containing 5% zinc) cold-formed and pressed pipes.
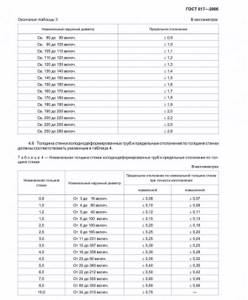
Cold-deformed copper pipes are produced with diameters from 3 to 360 mm. Wall thickness ranges from 0.8 mm for tubes with a diameter of 3 mm to 10 mm for products with a diameter of 315 mm; versions with other thicknesses are possible. Pressed products are produced with diameters from 30 to 280 mm and wall thicknesses from 5 to 30 mm.
Products with a diameter of up to 18 mm are supplied in coils, while products with a larger diameter are supplied in lengths from 1 to 6 m.
Criterias of choice
Copper models, due to their high cost, must be carefully selected.
In order not to make a mistake, you need to get acquainted with the main selection criteria:
- Compliance with terms of use. The main advantage of the products is their versatility. Suitable for both plumbing and heating systems, because they are immune to constant temperature changes and high pressure. They can withstand loads up to 40 atmospheres and temperatures up to 500 degrees Celsius. They are resistant to ultraviolet radiation and have a low expansion coefficient (7 times less than polymer ones). Also, thanks to the active bactericidal properties of copper, it is absolutely safe for humans. But it is worth paying attention to the fact that copper reacts poorly to chlorine, so interaction with it will quickly render the pipes unusable.
- Cost of material and installation. The cost of copper is several times higher than its analogues (about 4 times higher than the price of plastic). But if we take into account all the work associated with the installation and additional elements, then the final cost of the work is no higher than that of metal-plastic. A press fitting for plastic is much more expensive than a solder fitting for copper. Consequently, the final installation cost directly depends on the footage and the number of fasteners.
- Life time. The trouble-free service life of a copper pipeline is 50 years or more, which is a very good indicator.
- Ease of installation. Pipeline installation takes place in several stages: preparation of the material, its processing and installation. The process itself takes a long time, because it is necessary to cut the pipes, bend them using a pipe bender, and also carry out complete installation of all elements. In the end, everything must be connected using fittings (soldering and crimping).
You should not combine copper with galvanized steel, because due to electrolytic processes the copper will simply be destroyed.
Results
As you can see, copper pipes for heating are a good, but not ideal option. This material has many advantages, but no less disadvantages. Corrosion may occur - this may be the result of an incorrectly selected coolant composition, high pressure or water hammer. Moreover, it is worth considering that the service life of copper heating systems directly depends on proper design and installation, that is, even if high-quality components are used, but they are soldered or laid with “crooked” hands, there will be no long-term operation. And today there are very few specialists who competently work with copper, and their services (in addition to the materials) are also very expensive. Perhaps this is why they rarely install it today, especially since there is a good replacement - polypropylene (reinforced) or metal-plastic.
Finally, a few video lessons with useful information. This video has a little about the types of solders.
And this video material talks about how copper fittings are made. Interesting…
Copper is an excellent material for gas pipeline systems, heating, and so on. Copper pipes are also widely used in the installation of air conditioners. A wide range of applications is determined by such qualities of the material as resistance to high temperatures of the passing environment, resistance to corrosion, and durability. Installation of copper pipes is carried out in two main ways: soldering or crimp fittings.
Assembling a pipeline from pipes made of copper
Pipe joining methods
According to docking technology, they are considered universal. Any of several connection methods will do, which is a definite plus.
Depending on your goals, you can choose:
- welding;
- mechanical assembly (pressing, compression connection, clamping with self-locking fittings);
- soldering (hard or soft solder).
For welding, a diameter of 100 mm with a wall thickness of more than 1.5 mm is suitable. Mechanical assembly is only suitable for open areas. If the site is hidden in monoliths or in building structures, then such fittings will be expensive. Domestic heating systems typically use soft soldering. It requires special capillary fittings to operate.
Do-it-yourself copper pipe soldering technology
Before you start soldering, you need to briefly familiarize yourself with the theory so that the process is easier and clearer. In everyday life, when installing plumbing and heating systems in apartments, soft soldering is used, in which the contact points are heated to 250-300 degrees, which allows the soft solder (tin) to melt. But, despite the apparent ease, such a temperature is dangerous for copper, so everything must be done very carefully and correctly.
Preparation for capillary soldering:
- Cut the pipe to the required size.
- We chamfer the end of the workpiece (this manipulation will reduce the hydraulic resistance at the joint).
- We clean the outer surface of the pipe and the inner surface of the fitting with an abrasive sponge. This will get rid of the oxide film.
- We distribute flux paste over the entire contact area, which will provide soft solder. To make the solder hard, you do not need to use paste.
- With a slight twist, we put the fitting on the pipe until it stops.
- Remove the flux paste from the work surface with a rag.
You can start soldering.
Low temperature soldering of copper pipe:
- We heat the joint until the flux paste begins to melt. To do this, move the burner nozzle smoothly and evenly around the neck.
- After the flux has heated up, apply solder to the entire surface of the connecting seam. We do not touch the solder wire with the burner fire, since the tin needs to melt not from direct contact with the fire, but from the high temperature of the copper product.
- The melting and soldering process is complete. We are waiting for the product to cool completely. The cooling process cannot be accelerated - everything must cool naturally without improvised means.
- At the end of the work, we remove all the flux paste from the part, because it destroys the protective layer of copper products.

Third stage. Cooling the joint
When soldering of the copper pipe is completed, it is necessary to cool the joint. To do this, you can either simply leave the pipe and let it cool on its own, or use water.
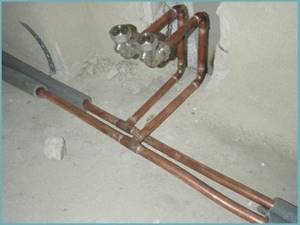
After this, all that remains is to assemble the heating system. This will not be difficult to do, since the fittings can be connected to each other without any effort.
Thus, installing a heating system made of copper pipes is not the most difficult task that can be solved on your own. Therefore, by spending money on copper pipes, you can easily save on installation work, and then, for a long time, provided that the installation is well done, you can enjoy all the benefits of the heating system.
Wiring a heating system using copper pipes is not the cheapest solution, but, with proper planning, it is durable and reliable: the shelf life of the material is 80-100 years, but how the connecting elements, soldering points and other components of the system will behave is a question.
How to paint copper pipes
After installation work, the pipeline can be painted to protect it from corrosion and give it an aesthetic appearance. Let's consider which paint is suitable to achieve the above goals.
The following paints would be a good choice:
- polyurethane;
- alkyd;
- PF-115, 156, 167, 187, 223, 519;
- GF-0119.
Prices for PF-115
PF-115
Varnishes that work well include:
- a mixture of ethylene coating with aluminum powder (ratio 9:1);
- VL-51.
It is contraindicated to use oil paints, because they darken when exposed to high temperatures!
Before painting, the surface should be cleaned and coated with lead lead primer No. 81. When painting, you should take into account that the paint is not absorbed into copper, and, therefore, it is necessary to carefully shade the applied composition. It is best to spray paint with a spray can, because with its help you can get a high-quality surface.

Features of copper solder fittings
One of the simplest and most durable connections of pipelines made of copper components is soldering.
Unlike polymer products, copper fittings, like pipes, are considered to have an eternal service life, they last for at least a century, do not deteriorate under the sun, do not melt from high temperatures and do not crack in the cold, therefore they are used where the tightness and strength of pipelines highways are subject to increased requirements.
The popularity of copper fittings is due to the special characteristics of the metal:
- copper is a known antiseptic that protects pipes from the development of bacteria and fungi;
- installation of communications consisting of copper components is simpler than connecting pipeline systems made of cast iron and steel;
- It is possible to damage copper pipes or fittings only under pressure of more than 200 atm, but such pressure simply cannot exist in communication systems.
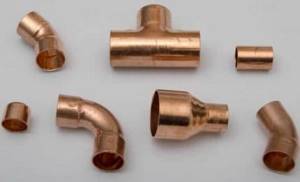
Types
In specialized stores you can find a large number of copper elements intended for the manufacture of heating systems. They are divided according to various factors:
- The material from which the pipeline elements are made. It can be pure copper, an alloy of tin, zinc.
- Seamless or welded.
- Pressed or drawn.
- Non-insulated, plastic coated.
Copper pipes with plastic coating are protected from physical impacts and damage. In addition to this, the heat loss rate is reduced and the efficiency of the system increases.
How to connect pipes using capillary soldering?
Soldering takes more time, but the connections made are durable and tight. The best option for solving everyday problems is to use soft solder. The operating temperature does not exceed 250 °C.
The use of hard solder increases strength, but the work will require expensive equipment and special conditions, since the soldering process takes place at a temperature of more than 700 ° C.
With the help of soldering, permanent connections are created, which are made either using the socket method or using fittings. With socket technology, one end of the pipe must be expanded so that when the elements are joined, a gap of 0.2-0.3 mm wide is formed between their walls.
It is filled with solder, after which a sealed connection is created. But let’s take a closer look at soldering with fittings, the most popular among installers.
Materials and tools for work
It is necessary to prepare copper pipes and fittings, but not the first type that comes across, but those specially designed for soldering.
Connectors and adapters for soldering are characterized by a smooth surface and the absence of additional grooves, nuts, rings, etc. They can have a straight, angular, cross shape - depending on the purpose
Tools for performing the work:
- gas burner – propane is sufficient;
- pipe expander (calibrator);
- pipe cutter, since metal scissors deform the shape of the pipe;
- chamfer;
- equipment for cleaning and polishing (fine sandpaper, brushes, rags).
When choosing solder, it is better to choose the option with a tin base. In addition to tin, the solder may contain bismuth or silver. This type is good because its melting point is much lower than that of copper products.
You can read more about solders for soldering copper pipes in this material.
During the soldering process, the solder will take on a liquid state and will be able to hermetically fill the connection gap, while the copper elements will not react to high temperatures.
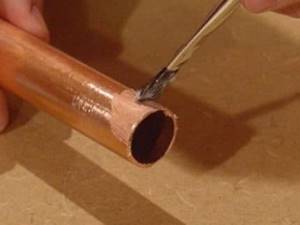
In addition to solder, flux is required. This is a kind of lubricant for parts of elements that need to be joined. Flux is carefully applied with a brush to the surface of pipes and fittings.
For ease of installation work, you can use special fittings for low-temperature soldering. They differ in that at the ends they have a narrow groove filled with solder.
Low-temperature (soft) soldering is typical for household work, while high-temperature (hard) soldering is used in production. The rigid type is also used when connecting pipes of air conditioning systems and refrigeration units.
Description of the soldering process
Copper is a malleable material, it is not difficult to work with it, but if you have no experience, it is better to first practice on unnecessary sections of pipes.
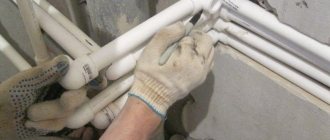
Image galleryPhoto from Using a pipe cutter, a special tool, we cut the elements. It is better to carry out operations directly during installation, in order to adjust the length if necessary. Insert the bevel cutter into the pipe and rotate it until we remove the edge that appeared during the cutting process. This is necessary so that the inside of the pipe does not narrow. First, using the same bevel remover, but its other side, and then with fine sandpaper, we process the outside of the pipe so that there are no scratches and the copper shines. To increase the efficiency of soldering, it is necessary to thoroughly clean the second part - the corner, the adapter . A suitable tool is a screwdriver with an attachment made from a regular brush. An ordinary glue stationery brush is suitable for applying flux. We take the solution in small portions and distribute it in a thin layer over the surface of the pipe. Place the prepared, cleaned corner on the end of the pipe covered with flux. To make the connection tighter, screw the pipe into the corner with light movements. Before starting soldering, you need to remove excess flux or paste. An ordinary rag will be useful for this. When the surface is completely clean, for ease of work we fix the part in a vice. We take solder in one hand, a torch in the other and begin to carefully solder. After heating the pipe, we place the solder at one point, thanks to the capillary principle it will spread over the entire area. Step 1 – cutting the copper pipe into pieces of a given size. Step 2 – removing the edge with a bevel remover. Step 3 – preparing the outer wall for soldering. Step 4 – processing the inner surface of the corner. Step 5 – applying flux or paste on the end of the pipeStep 6 - twisting the end of the pipe into the cornerStep 7 - cleaning the joint with a ragStep 8 - soldering process with soft solder
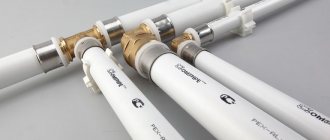
Installation instructions using fittings
There are two types of compression fittings - the so-called compression and compression. They create completely different connections, so before starting work you need to decide what kind of connections you would like to see: permanent or conditionally detachable.
Press fittings are similar to solder fittings, but have shallow recesses at the edges with sealing gaskets. Using special press pliers, which have a set of nozzles for different diameters, crimping is carried out.
As a result, it creates a sealed, permanent connection that cannot be repaired, and in the event of an accident can only be replaced.
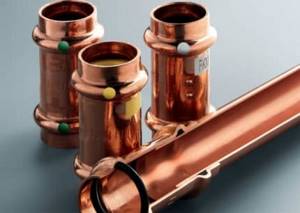
In the store you can see parts that are identical at first glance, but they differ in characteristics (composition, wall thickness, etc.). Heating fittings are marked with green markings
Pressing creates a strong, reliable connection of parts, while maintaining the geometry of the pipes and does not deform the connecting elements. There is a nuance of pressing “soft” copper products: before the operation, a support sleeve is inserted into the pipe, which resists deformation of the pliable material
The pressing process is simple and does not take much time. The tools required are a standard set for cutting and processing pipes, as well as press pliers with the required attachment.
Pressing is considered a reliable method. If you plan to thermally insulate copper pipes, you can use insulating tubes, which are easy to put on even on curved structures. After pressing, the finished heating network can be masked in grooves, covered with decorative cladding and filled with screed.
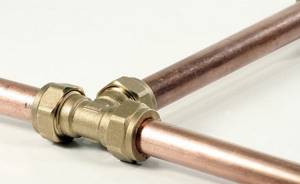
The second type of fittings is compression. They differ in design and installation process.
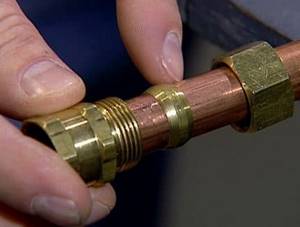
A compression fitting for copper pipes is a prefabricated device consisting of three parts: a brass or copper body, a ferrule, also called a collet, and a nut.
The crimping procedure is as follows:
- a nut is loosely placed on the prepared end of the pipe;
- then the collet is put on;
- last of all, the fitting body is put on until it stops;
- the nut is screwed manually along the thread, while simultaneously pressing the split ring;
- The connection is tightened with an adjustable or sized wrench.
During the compression crimping process, the cutting ring tightly grips the pipe, creating a strong and airtight connection. The nut may become loose over time, so pipelines with this type of installation must be regularly maintained.
The connections are conditionally detachable, since they can be disassembled, however, if necessary, the fragment with the clamped ring will have to be removed and a new fitting installed.
Reviews and operating experience
Some people consider copper pipes an excellent solution, while others do not accept them. But, in fact, this is typical for any technology and material. The only thing that people pay attention to and what is worth listening to is the fact that in an acidic environment, copper begins to deteriorate. Therefore, fill the system with either coolant with a neutral PH or slightly alkaline. It is also not recommended to use steel, aluminum or cast iron radiators. It is imperative to protect the system from stray currents (grounding and dielectric gaskets are required), otherwise chemical or electrochemical destruction begins. But in central heating systems you will not completely get rid of destruction: the coolant in them is saturated with iron, and if solid particles can be retained by a filter, then there is no escape from those dissolved in it.
Another piece of advice from an experienced installer: copper is very sensitive to contact with concrete (it oxidizes). The rate of destruction depends on the composition of the wall, but in any case it is better to lay the pipe in a PVC sheath or any insulator with similar characteristics.
Another tip from the master, but this already concerns soldering: it is important not to overdo it. Firstly, from an overabundance of diligence, you can weld the entire lumen (if a pipe of small diameter is especially important), secondly, when the soft solder overheats, the paste is overheated, which is why it cokes, which leads to the formation of fistulas, and thirdly , do not overdo it with the amount of solder. If you have no experience, practice welding on small pieces of pipe: you can check both the clearance and tightness of the connection. And after gaining at least some experience, you can begin welding the system.
Advice from experienced installers
A lot of useful information about the installation of freon pipes can be obtained from experienced installers of air conditioning systems
It is especially important to convey this information to designers, since one of the problems of the design industry is its isolation from installation. As a result, projects include solutions that are difficult to implement in practice.
As they say, paper will endure anything. Easy to draw, difficult to execute.
By the way, this is why all advanced training courses at the APIK Training and Consulting Center are conducted by teachers with experience in the field of construction and installation work. Even for management and design specialties, teachers from the field of implementation are invited to provide students with a comprehensive perception of the industry.
So, one of the basic rules is to ensure at the design level a height for laying freon routes that is convenient for installation. It is recommended to keep the distance to the ceiling and to the false ceiling at least 200 mm. When hanging pipes on studs, the most comfortable lengths of the latter are from 200 to 600 mm. Shorter length pins are difficult to work with. Longer studs are also inconvenient to install and may wobble.
When installing pipelines in a tray, do not hang the tray closer to the ceiling than 200 mm. Moreover, it is recommended to leave about 400 mm from the tray to the ceiling for comfortable soldering of pipes.
It is most convenient to lay external routes in trays. If the slope allows, then in trays with a lid. If not, the pipes are protected in a different way.
A recurring problem for many objects is the lack of markings. One of the most common comments when working in the field of architectural or technical supervision is to mark the cables and pipelines of the air conditioning system. For ease of operation and subsequent maintenance of the system, it is recommended to mark cables and pipes every 5 meters in length, as well as before and after building structures. The marking should use the system number and pipeline type.
When installing different pipelines above each other on the same plane (wall), it is necessary to install lower the one that is most likely to form condensate during operation. In the case of parallel laying of two gas lines of different systems above each other, the one in which the heavier gas flows should be installed below.