With the advent of new materials and technologies, everything has changed. Nowadays, a worthy replacement for old heating radiators has become a heated floor system, for which the heating line is installed in the floor. Today, all new buildings are equipped with such floor structures.
Having decided to lay heating pipes in the floor under a screed, you need to decide what type of pipes will work reliably for a long period. This decision at first glance seems quite simple, but practice shows that it depends on many factors.
We also suggest that you read the article - how to choose a heated floor for tiles, where we will look in detail at what types of heated floors there are, their pros and cons, and how to install them.
Pros and cons of methods for hiding heating pipes
Plasterboard and laminate structures
Many people choose this method of hiding heating pipes in a new building with laminate, making a box out of it.
In this case, the structure turns out to be designed like the floor. If, in addition to heating pipes, there are other communications in the house, it is best to hide them using a false wall made of gypsum plasterboard. The considered method has a number of disadvantages, for example:
- not suitable for metal-plastic and polypropylene pipes. which are connected by collapsible fittings;
- if the pipe is old, putting the pipe into the box is very risky: a leak that occurs can cause a lot of trouble;
- before hiding stainless, copper and steel pipes behind a decorative box, it is better to cover them with heat-insulating material;
- false wall equipment reduces the space of the room.
But the niche created as a result of the construction of a false wall can be used to advantage. For example, by laying a layer of insulation, you can improve light and sound insulation. You can use this place for a night light or place a stereo system. Using a niche to your advantage, false wall equipment will be a completely justified option for hiding heating pipes.
Hiding highways in the wall, floor
This method of hiding heating pipes in a floor screed or in a wall is not suitable for all pipelines.
Heating pipes in the wall have pros and cons that you need to know before choosing this method of masking the line. The main advantage of the method is that the design of the room will not be disrupted or overloaded with additional details. True, there are also disadvantages. For example, the complexity of installation. If the pipe leaks, the wall will have to be demolished to make repairs.
Application of decorative elements
Decorative rosettes for heating pipes are an excellent option for hiding pipes.
Thus, today there are many ways to hide heating pipes in a private house. It is advisable to close the highways at the construction stage. But even after construction you can decorate the pipes. Each method has its own advantages and disadvantages. And which one to give preference depends on the type of pipeline, operating conditions and the chosen room design.
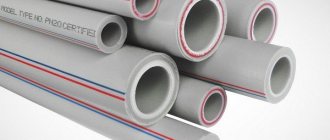
Requirements for pipes
Underfloor heating often runs on water, which is the coolant. Occasionally you can find systems where the working fluid is antifreeze or ethylene glycol. The efficiency of the circuit depends on the material from which the pipes are made:
- metal-plastic;
- cross-linked polyethylene;
- polypropylene;
- copper;
- stainless steel.
There are a number of requirements that you need to pay attention to:
- Strength indicator. The withstand pressure that the coolant creates in the pipe depends on it.
- Permissible operating temperature conditions.
- Resistant to rust.
- Material safety. It should not emit toxic fumes during operation.
- Thermal expansion coefficient. If it is high, the integrity of the pipeline may be compromised at high temperatures.
- Thermal conductivity index. The higher it is, the better the rooms will warm up.
It is necessary to draw a pipe laying diagram in advance to see where the bends will go. Their permissible radius depends on the material. Metal-plastic, copper, stainless steel can be bent at different radii. The worst performer in this regard is polypropylene.
Pros and cons of heating under floor screed
Heating rooms using floor heating circuits has a number of strengths and weaknesses. Pros:
- Heating pipes in the floor screed are economical.
- There is no need to install bulky radiators in the premises, which take up additional space.
- If the right material is selected, the active service life exceeds 50 years.
- Optimal humidity level in heated rooms.
- Uniform heating of the room.
Minuses:
- There is a possibility of damaging the pipeline when installing it, pouring concrete, or drilling holes in the flooring.
- If there is a breakdown in the heating circuit, there will be big problems with its repair.
SNIP requirements
The general SNIP regulating ventilation and heating is registered under number 41−01−2003. There are other norms, among which are:
- SNiP 2.04.05-91 (clause 3.58). Regulates the installation of decorative screens and grilles on heating radiators.
- SNiP 41-01-2003 (clause 6.5.13.). Indicates the need to install shut-off valves, except in rooms with a high probability of coolant freezing.
- SNiP 3.05.01-8 (clause 3.18). Regulates the slope of the heating circuit with a pipe length of more than 500 mm.
- SP 40-108-2004 (clause 3.2.1). Regulates the connection of a copper pipe to a boiler with aluminum terminals.
Necessary tools and materials for work
Grinder with two discs for chipping concrete
Before installing the system, you need to select the appropriate tools and materials. The craftsman will need a waterproofing film, a thermal insulator, a damper tape, a concrete mixture and a special composition for leveling the base. Depending on the type of system, the following tools are needed:
- Water heating. You need a gas torch, a cutter for metal-plastic pipes, and a pipe cutter. To lay the elements, reinforcing tape, a collector, and a mixing unit are used.
- Infrared film. You will need a hammer drill, adjustable wrenches, a building level, contact clamps, electrical tape, and pliers. You also need a thermal reflector that is placed under the film, a temperature sensor, a regulator, electrical wiring, and construction tape to glue the waterproofing joints.
- Cable. You need a thick wire, couplings for connections, tile adhesive, and a corrugated tube for cable insulation.
Budgeting
When you are at the stage of calculating the heating circuit, proceed from the fact that 1 section is selected based on 1.2 square meters of room. Do not forget to take into account the margin; if two walls in your room are adjacent to the street, you need to add a margin of up to 30%. That is, for a room of 15 square meters adjacent to the street, which will have a warm floor, it is recommended to install a radiator with at least 12 sections.
To create excess intersection pressure in the circuit, it is necessary to operate with the diameter of the supply pipe. That is, from the boiler to the main collector there must be a pipe of at least 32 millimeters in diameter. Next, a pipe of the same diameter will go to each circuit, approximately 4-5 meters for each wing. This will create excess pressure in the circuit. Next, you need to narrow it, choosing a diameter of at least 25 mm for each radiator. When water rises to the radiator, it is necessary to narrow it up to 20 mm, inclusive.
Using fittings when welding polypropylene pipes
More is not always good. It is not advisable to use pipes of larger diameter everywhere, since the permeability of water will be better, but its quantity will increase, which will lead to heating of a larger volume of liquid. This results in extra heating costs. The coolant is lifted to the floor above through a pipe of at least 32 mm.
An installation kit is included for one radiator. These are two taps, a plug, a Mayevsky tap, 2-3 hooks. Tees, transitions, couplings are considered individually, depending on the number of radiators in the house, their location, and the method of laying the pipe.
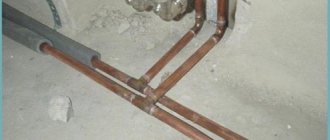
Is it possible to hide polypropylene pipes in the wall Construction and repair
Self-installation of plumbing and heating systems is no longer uncommon: with the advent of accessible and inexpensive materials on sale that do not require cutting and joining equipment, many craftsmen take on such work without fear.
Numerous master classes and video lessons are ready to clearly demonstrate all the stages from scratch to putting the system into operation.
And yet, some moments sometimes remain outside the frame: the question of whether polypropylene pipes can be hidden in the wall in order to effectively complete the decorative finish often remains open.
Hidden heating system
Modern technologies make it possible to improve the aesthetic appearance of a room in various ways. The method of placing heating pipes in the room was no exception.
It becomes possible to place them in the wall, thanks to the durability of the material used in their production.
Advantages and disadvantages
It is most convenient to place communications in the wall at the construction stage in a private house according to a previously created drawing. You can hide pipes in the wall in an apartment building if you are planning a major renovation of the premises or the entire building.
By placing the heating in the wall, the room certainly looks more prestigious, and the freed-up space can be decorated.
Pros:
- heat transfer increases, since building materials have an increased level of heat transfer, unlike air;
- the service life of the polypropylene from which the pipes are made reaches up to 50 years, ensuring the reliability of the design while observing technical standards during their installation;
- the space increases by several centimeters.
However, difficulties must be overcome in obtaining the right to permit changes in the position of communications in the premises or their so-called redevelopment.
Minuses:
- low-quality propylene increases in volume when heated;
- ordering a project to change the location of communications;
- coordination of the project with supervisory authorities. Alteration of engineering systems in an apartment building will require a special permit;
- joints may lose their sealing, which can only be determined using a device that measures water pressure;
- risks associated with preparedness for wall destruction in the event of a possible leak.
A break in the heating system pipes in the wall in the event of a leak will cause water to enter the adjacent lower apartment, since it will not be possible to quickly eliminate the leak.
How to brick up heating pipes in a wall
To disguise the pipes of the heating system in the wall, you need to find out what material the wall is made of, and select the method and sequence of work, as well as the necessary materials.
Before laying heating pipes, it is necessary to test them for strength and visually carefully check for possible damage.
Concrete
In an apartment in a panel apartment building, there are two ways to lay heating system pipes: using grooves - specially created channels for laying heating pipes in them, or creating a false wall.
How to remove heating in a wall in a panel house step by step using grooves:
- You need to start by de-energizing the common building heating riser. You should make sure that the desired riser is turned off;
- The grooves should not be located end to end. The contour should not be infringed. The recess is calculated based on the parameters of the fasteners, their quantity and the layer of prepared insulation;
- directly covering heating pipes with an insulating layer. Insulation is used to prevent condensation;
- Next, they calculate the places for fastening and mark the locations of the fasteners.
The work is carried out with a grinder. It allows you to perform high-quality actions in automatic mode and facilitates wall slitting.
When erecting a false wall, it should be taken into account that the space of the room will decrease.
Brick
Strobes are made in a brick wall in the same way as in a panel wall.
The procedure for laying part of the heating system into a brick wall:
- the depth or width of the channel is determined taking into account the amount of insulation wound on the surface of the pipe;
- after which they are placed in the marked places and secured with clamps pre-fixed with self-tapping screws.
It is necessary to test the system by running water at excess pressure for several days. After making sure that there are no leaks, the wall with communications is covered with mortar and putty.
Installation Tools
A pipe bender or spring jig. A cutter (a tool resembling pliers) helps to make a clear, strictly perpendicular cut without dents or bevels. If it is not possible to purchase a cutter, use a sharp construction knife, but in no case a hacksaw for metal (it leaves a torn cut with many burrs). Calibrator (a cross-shaped tool with ends of different sizes for different diameters). Open-end wrenches. Sandpaper. Press ticks.
Easy and quick installation with press fittings. Special pressing pliers are used to crimp them. There is also an electric press tool (a gearbox increases the pressing force to several tons), it is classified as professional equipment and is expensive.
Methods for installing heating pipes in the floor
In this block we will look at two options:
- installation for pouring;
- installation under wooden covering.
Pouring installation
The method is suitable for both apartments and houses, even with wooden floors. The screed can also be poured onto a wooden subfloor. In both cases, the algorithm of actions is the same:
- waterproofing is spread;
- insulation is installed;
- reinforcement mesh is laid;
- pipes are separated and secured;
- damper tape is glued;
- everything is filled with a layer of solution.
Now let's talk about everything in order. Waterproofing is spread on the floor to prevent moisture from entering from below, and also to avoid contact of wet mortar with the wooden subfloor. Then the working surface is insulated. The best insulation option is polystyrene foam and its derivatives, such as penoflex. A steel mesh is laid on the insulation, which will distribute the load in the layer of hardened mortar. Without reinforcement, the screed will crack.
There are special foam mats that have bumps on the surface. They are arranged in rows at regular intervals, like grid cells. Such mats are simply placed on the floor, routing is carried out along them and the whole thing is filled with mortar. Easy, fast and high quality. New technologies, however.
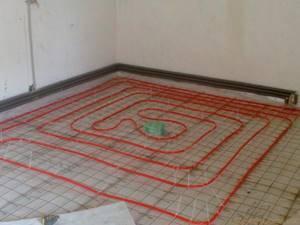
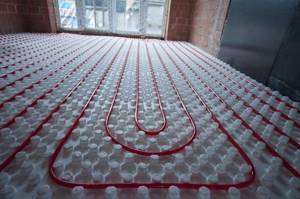
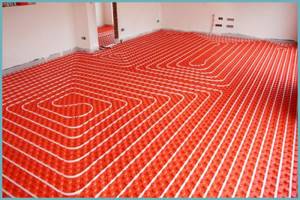
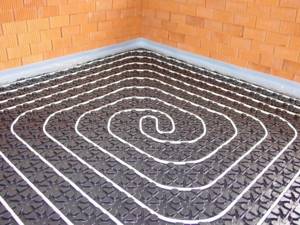
Layout diagram of heating pipes in the “snail” floor
The distribution of heating pipes in the floor is carried out according to one of two schemes:
- snail;
- snake
The snail pattern involves a circular laying of the contour from the walls to the center of the room. There are no sharp turns in the direction of circulation. The snake passes from one wall to the opposite and at each segment the direction of water movement changes by 180 degrees. Not to say that this is very bad, but the first scheme is more preferable.
The contour must be fixed to the surface, and it must be remembered that it increases in length. Therefore, the fastening should not be rigid; the line should be able to slide in it. Alternatively, you can use plastic clips that are drilled to the floor. It is easier to use ordinary clamps that secure the pipes to the mesh.
In fact, a warm floor is a layer of hardened mortar in which heating pipes are hidden. At the same time, the cement slab does not have a rigid connection either with the subfloor or with the walls. This large rectangular parallelepiped simply lies on the floor, periodically increasing and decreasing in volume.
Under no circumstances should you forget about the damper tape. This is a strip of foamed polymer that is glued along the entire perimeter of the room to the wall. The bottom edge should run along the floor. The damper tape compensates for the expansion of the screed and prevents the mortar from sticking to the walls when pouring. The thickness of the screed above the heating pipes should be at least three centimeters, and in total - about seven centimeters. If the layer thickness is insufficient, it will crack; if it is too thick, the temperature on the surface will be lower than expected.
Installation under wood flooring
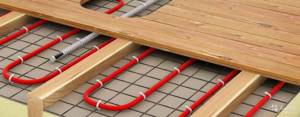
Heating pipes in a wooden floor
This method is not as effective as installing pipes in a screed, but is sometimes used. First you need to create a buffer zone for laying heating pipes in a wooden floor. To do this, logs (bars) are laid. Then pipes are laid between the lags. At the intersection of the contour and the bars, grooves are cut out in the wooden logs so that the entire highway is in the same plane. Naturally, it is necessary to provide insulation and waterproofing so that all the heat goes up. The finished floor is carefully pricked onto the joists so as not to pierce the main line.
Now let's summarize. For installation of heating pipes under screed, products made of cross-linked polyethylene reinforced with ethylene vinyl alcohol, marked PEX/EVON/PEX, are best suited. There should be no breaks in the line; everything is done from one piece. The floor must be insulated and waterproofed before pouring. The thickness of the heating pipe screed must be at least three centimeters and no more than seven. Damper tape is glued around the perimeter of the room. The temperature in the heated floor system is about 40 degrees, and on the surface of the finished floor - about 30 degrees.
Pipes for heating in the floor (in the interfloor or basement ceiling) are installed either during the hidden installation of the heating system, or during the installation of the “warm floor” structure. It is worth noting that in these cases, pipes are used in principle and various pipeline assembly technologies are used.
Therefore, in this article we will describe the installation of heating pipes in the floor, placing emphasis on all the details of the technological process. In addition, we will say a few words about the “warm floor” technology itself.
Types and layout of heating pipes
It is important to choose the correct pipe laying method. Alternatively, a distinction is made between a single-pipe and a two-pipe installation system.
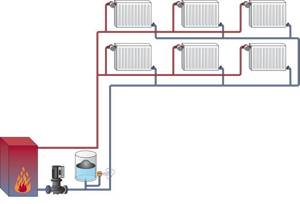
With a two-pipe installation, the system has a supply and a “return”. This increases the cost of the project, but increases the efficiency of the heating system, since the cooled water directly enters the return line, where, using a circulation pump, it is pumped back to the boiler and quickly heated. That is, the heating boiler needs to spend less energy heating water rather than heating it constantly.
Two-pipe heating system
As for the one-pipe system, here, with smaller investments, the consumer initially pays more. The fact is that cooled water from the radiator enters the supply, where it obviously dilutes the water by approximately 15-20%. Thus, water will flow to the next radiator in the system at a temperature equal to 80-85 percent of the primary values.
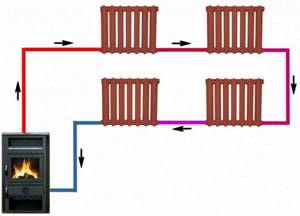
Example of a one-pipe heating system
Attention! The very last radiator in the circuit will be much cooler than the first. This should be taken into account when constructing the heating circuit. Many people think that such problems can be compensated for using a circulation pump, but this is not the case, since pumps only increase the intensity of water exchange with the boiler.
It is the two-pipe heating system that is the most efficient. Now you need to figure out how to connect the radiator. There is a bottom connection, a side connection, and a diagonal connection. Of all the above methods, it is most convenient to connect “bottom”. But such a connection is not capable of 100% converting the coolant energy into heat for your home, since the radiator is only half warm. The maximum efficiency is achieved by a diagonal connection, which involves cutting and laying supply pipes into the wall.
With a diagonal connection, the “supply” comes from above from the heating boiler, and the return flow leaves from below, from where the cooled water is again supplied to the boiler. When connecting diagonally, you should definitely choose a two-pipe system so that the coolant circulates faster in a closed circuit.
As for the installation methods, if the heating system is being changed in an already finished house, for example, in a frame house, then nothing is tapped and the pipes are laid on top of the floor or along the walls. To do this, it is necessary to install a pipe clamp every 70 cm, which is important specifically for hot heating, otherwise the PVC material will be deformed. It is precisely these pipes that people often work with, since their low cost and high durability allow them to reduce the overall costs of the project.
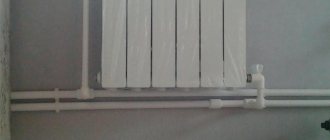
An example of laying a heating circuit over walls by installing pipes on clips and clamps
If the house is just being finished and the floors have not yet been poured, then it is most convenient to lay PVC pipes under the finishing screed. As a rule, it is never less than 7 cm, so with such a layer of concrete you can organize hidden laying of polypropylene heating pipes. If the pipe is properly soldered, you can prevent leaks. The main thing is to pressurize the system before pouring the finishing screed. For this, a system with a pressure gauge is used, designed to fill the circuit with water, thereby creating a pressure in the pipe of the order of 2-3 atmospheres. The circuit is pressurized and allowed to stand for about 5 hours. If the pressure has not dropped during this time, it means the installation was successful.
Attention! It is recommended to check the system for functionality before pouring the finishing screed. This will help prevent the plastic pipe from narrowing. The reason for this is overheating of the fitting.
As for the choice of radiator connection scheme, today the beam scheme is actively used. The radial circuit represents the connection of each radiator to the central collector, which is installed in the boiler room. A main pipe runs from the collector to the heating boiler, which is often larger in diameter than the diameter of the supply pipes. Thanks to the radial connection, it is possible to use metal-plastic pipes or cross-linked polypropylene.
Warm tiled floors
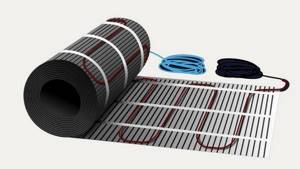
Tile floors are durable and resistant to moisture and aggressive liquids. Therefore, many homeowners opt for an electric heated floor followed by laying tiles.

Tiled floor heating
In addition, they are economical because they allow you to adjust the temperature according to the season. The installation of heated floors under tiles is made of cable, film and in the form of heating mats. Let's look at their pros and cons.
Cable underfloor heating system
Today, cable underfloor heating under tiles is rarely used. Due to the high pie of this system, which includes a concrete screed up to 4 cm thick, the height of the room increases and the load on the base increases. Therefore, it is better to use it in rooms without finishing.
Cheaper products include single-core cables. Their use is problematic in rooms with complex layouts, since there is a need for a thermostat. Easier to install are taller two-core options, the ends of which do not meet at one point. This floor is started after the screed or tile adhesive has completely hardened.
Warm floor made of electric mats
This option is suitable for rooms with a concrete base. The mats have a base of thin cables embedded in a reinforced mesh. They are produced with a thickness of no more than 3 mm and do not reduce the height of the room. The absence of screed and the minimum thickness of heating mats allow the use of such floors in rooms with low ceilings.
Appearance of mats with electric cable for heated floors
They are laid directly on concrete, covered with tile adhesive, onto which the tiles are fixed. Despite the ease of installation of this heating system, it is much more expensive than its cable counterpart.
Film floor option
Film heated floors under tiles are among the most modern and efficient electrical systems.
Film heated floor
It is easy to install and can be used on all topcoats. The coolant in the form of infrared radiation not only has high efficiency, but is also harmless to health.
Now you know how to make a heated floor with your own hands, and choosing the appropriate option will allow you to create not only a reliable heating system yourself, but also save on installation and commissioning work.
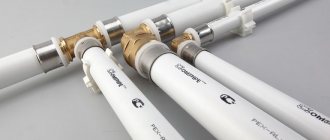
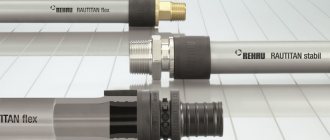
Advantages and disadvantages of metal polymers
The advantages of such products include:
- ease of installation: connections of various categories of metal-plastic pipes are carried out quickly and easily;
- high heat resistance (water heated to 100°C can be transported);
- reasonable price (metal-polymer pipes are cheaper than metal and most plastic analogues);
- high strength and ring stiffness;
- resistance to corrosion and aggressive environments;
- reluctance to form deposits and blockages;
- aesthetic appearance;
- high throughput;
- low thermal conductivity;
- sufficient plasticity;
- possibility of easy repair;
- durability.
The main disadvantage of such products lies in the fact that the metal and plastic from which the pipes are made have different expansion rates. Regular temperature changes of the agent in the pipes can lead to weakening of the fastenings, which causes leaks in the structure.
To avoid this, experts advise, when performing installation, to always provide a certain margin at pipe joints. It will also be useful because metal-plastic systems do not withstand water hammer well.
Source
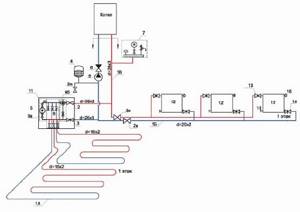
Scheme 1.
Based on the thermostatic installation kit VT.ICBOX
This scheme (see Fig. 4) is used when the coolant in the supply pipeline has a temperature of up to 60°C. At higher coolant temperatures, it is necessary to use special technical solutions (partial use of a “warm wall”; use of fine-pored screeds, thermal insulation of pipes). The advantages of this scheme include its simplicity and cost-effectiveness.
Table 2. Specification* of “warm floor” materials for “Scheme No. 1” (floor area 15 m2)
* Materials for cement-sand screed with plasticizer are not taken into account by the specification.
It is recommended to use it when laying heated floors in small rooms, given that one VT.ICBOX installation unit can serve only one heated floor loop with a length of no more than 100 m. A manifold and pumping-mixing unit are not required for such a scheme. The temperature of the coolant in the heated floor circuit is regulated by a built-in thermostat, which is part of the VT.ICBOX unit.
When the coolant temperature rises above the set value, the thermostat reduces the flow rate, thereby reducing the floor temperature. For underfloor heating installations, installation kits VT.ICBOX 1.0 and VT.ICBOX 2.0 are available. Automatic maintenance of room temperature in the VT.ICBOX-1.0 unit is carried out using a servo drive or a thermostatic head with an external temperature-sensitive element, and in the VT.ICBOX-2.0 unit. – only using a thermal head.
The disadvantage of systems with VT.ICBOX units when connecting them to a high-temperature heating system is the uneven distribution of coolant temperature along the length of the pipe, which leads to significant differences in floor temperature above adjacent pipes. Therefore, when using heated floors based on VT.ICBOX kits, it is recommended: as a finishing floor covering, use materials that are resistant to high temperatures, for example, ceramic tiles; use a screed thickness above the pipe of at least 50 mm, which will eliminate abrupt unevenness of temperatures on the surface floor. The greater the thickness of the screed, the smaller the difference in floor temperatures between adjacent pipes; lay pipes in a “snail” pattern. In this case, “hot” pipes evenly alternate with “cold” ones, which will avoid the presence of overheated areas of the floor.
Design
Installing a water heated floor in a private home is a win-win solution if you have a gas boiler, although the use of solid fuel is also acceptable. This option is efficient, inexpensive and is considered low-cost in terms of energy resources, compared to electric floors.
Impeccable operation of the device is possible with competent, professional design and installation. Therefore, work on the construction of underfloor heating in a private house begins with drawing up a project.
First you need to decide on the temperature level of the heated floor:
- for residential premises - recommended 21 - 27 degrees;
- in walk-through rooms and corridors - 30;
- in the bath and pool - from 31 to 33 degrees.
We suggest you learn how to make a heated floor in a pool yourself under the bypass paths and bowl.
When designing, it is important to take into account the length of the contours; they should all have approximately the same size. With a standard pipe diameter of 16 mm and a room area of 50 m2, the optimal loop size is from 70 to 90 meters; if the area is larger, then it should be divided into several parts. With a diameter of 17 mm, the permissible pipeline size is 90 - 105 mm, with 20 mm - 120 mm.
The pitch of laying heating elements also plays an important role in the efficiency of floor heat transfer; the recommended size is from 10 to 30 cm. At the same time, near external walls and in bathrooms - 100 - 150 mm, and in the center of the room - from 200 to 300 mm.
For your information! The “warm floor” heating system is a low-temperature device; the coolant supplied to the main line should not heat up more than 60 degrees.
If you are not sure that you are able to do the drawings and calculations yourself correctly, then it is better to entrust this work to specialists.
Installation
Installation of the heating system occurs in several stages.
Lining
To ensure effective heating, the floor must be prepared before installation.
If there is no base as such, first make a rough screed from sand-cement mortar. If concrete slabs serve as the base, they are leveled, covering all the cracks and ensuring that there is no level difference above 1 cm.
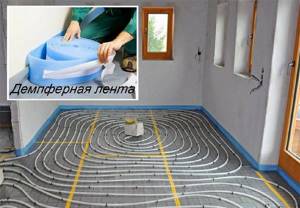
The rough screed is cleaned of dirt and dust, after which a layer of waterproofing is laid. The material for this is usually a thick film. Experts recommend placing the film on the walls at a distance of 10–20 centimeters. In rooms with high humidity, in country houses, this is mandatory. The film is overlapped by 10–20 centimeters and taped at the joints with mounting tape.
Damper tape is glued around the perimeter of the room. Its edges should be approximately 20 mm higher than the future screed. After the screed has dried, the edges of the tape are usually cut off.
Then thermal insulation is laid so that the warm floors heat the room most efficiently. There are different heat-insulating materials, both rolled and in the form of plates; the choice of coating depends on personal preferences, price, thickness. All cracks between them should be sealed with polyurethane foam to eliminate the possibility of heat leakage. The thickness of the thermal insulation when installed on a cold floor or ground should be from 5 centimeters, otherwise 3 centimeters is sufficient.
If the thermal insulation material is not foil-coated, a foil film is placed on top of it. At the joints it should be taped with aluminum tape.
We recommend that you read: How to properly bend a copper pipe with your own hands?
Once completed, the floor is ready for installation of the heating circuit.
Pipe laying
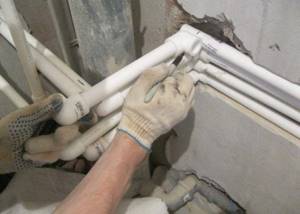
When working with polypropylene indoors, it is necessary to maintain the operating temperature above 5°C.
There are two ways to fasten the pipe: using dowels through thermal insulation and fastening to a reinforced mesh. The preferred option is to attach it to a grid as it is more reliable. Plus, the mesh allows you to strengthen the layer of screed that will cover the heating system.
The mesh for fastening is placed on a heat-insulating substrate. Then pipes for a warm water floor are laid along it according to the previously chosen scheme and secured with plastic clamps or wire. The fastening should not be over-tightened - this can lead to deformation of the pipes during operation and reduce their service life. At the junctions they are fastened together using a special welding machine. It comes in several variants and is easy to work with.
Testing
After laying and securing the pipes, they are connected to the collector and tested. To test heating equipment, water is supplied while simultaneously removing air. In this case, the water pressure should be higher than the working one, but not more than 6 bar.
After a day, the pressure is checked, and if it has dropped by no more than 2 Bar, then you can start coating. If the pressure is less, then there is an error in the gasket.
Final stage
After successful testing, they begin laying the concrete screed. If the room is small, you can additionally use another reinforcing mesh, which is placed on top.
For concrete screed, a special mixture with a plasticizer is prepared; in the absence of additional reinforcing mesh, it is also recommended to add fiber from polypropylene fibers. The screed is laid at a temperature of 5C. It is worth remembering that the screed needs 28 days to dry completely.
After the screed has dried, you can begin laying the flooring. The choice of floor covering is made among materials with special markings. Tile is considered the ideal material for heated floors.
PEX pipes or cross-linked polyethylene pipes
This type of pipe has fairly high thermal conductivity and wear resistance.
At the same time, the cost is low. And installation, with certain skills, does not take much time. However, this material is less resistant to mechanical damage than other types of pipes.
The main disadvantage of such pipes is that they have to be rigidly fixed during installation, but this disadvantage is not significant, since fixing the pipe is necessary before pouring the floor with a cement screed, which will prevent the pipe from straightening in the future.
But due to its flexibility, cross-linked polyethylene is well suited for laying on mats with bosses, which facilitates the process of installing heated floors and reduces the time for laying the “snail”
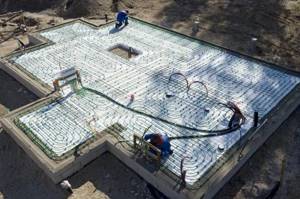
Installation of a water circuit in a concrete screed
Before laying the pipeline, the surface must be leveled so that there is no slope or holes. Self-leveling self-leveling floors are usually used for these purposes. The surface difference is allowed no more than 2 cm. When installing, follow the following sequence of actions:
- Install the collector on the wall, strictly vertically and horizontally, using a laser or water level. Installation “by eye” is fraught with malfunctions in the system in the future.
- A damper tape is laid around the perimeter of the walls. It will compensate for the expansion of the screed when heated, reduce heat loss through the walls and serve as sound insulation. The tape is laid in such a way that it protrudes above the screed - the excess is subsequently cut off.
Warm floor collector
- A layer of waterproofing is laid.
- Slab insulation is laid on the waterproofing layer. Its thickness will depend on the climate zone. You can place multifoil on top - it will reduce heat loss.
- The insulation is covered with a vapor barrier material.
- Install fasteners for pipes if they are not provided for in the insulation.
- They begin laying pipes strictly according to the scheme. Laying begins from the collector. When laying, do not allow the pipe to bend.
- After this action, check the performance of the system for at least 5 hours. Gradually increase the pressure and raise the temperature. The pressure is adjusted to the maximum permissible values. If everything went well, move on to the next stage.
Pipe laying
- After hydraulic tests, a reinforcing mesh is laid over the contour and a screed is made. The thickness of the screed must be at least 3 cm above the pipe. Insufficient thickness can cause a zebra effect, where heat is distributed unevenly across the floor area. As a solution, it is better to purchase a ready-made mixture for heated floors.
- The system is started in a gentle mode: the coolant at the entrance to the system should be 20-25 0C.
- Concrete gains strength in 3-4 weeks, after which the finished floor can be installed.
Leveling the surface
Before installing the underfloor heating system pipes, the base should be carefully prepared. It must be perfectly smooth without defects, cracks, or potholes. Along the entire perimeter of the room, a height difference of up to 10 mm is allowed. Subsequently, this is all covered with the subsequent finishing filling of the screed.

Before distributing the solution, all communications must be laid and placed in their places. There should be no debris or even dust on the surface.
We must not forget about insulating panels when the room is located above a basement or garage. Heat should be given only to the inside of the room, and not wasted on absorbing cold air from below. This will allow the heat to be distributed more efficiently.
DIY installation
Installation of a heated floor system is quite simple and can be done independently.
Required tools and materials
For installation you will need:
- A container and mixer for mixing the solution, buckets, shovels, a crowbar, usually a trowel, a long trowel.
- Drill, pliers, construction knife, glue, construction tape.
- Grinder, discs, calibrator, round file.
- Fittings, pipes, reinforcement mesh 5050 mm, pipe fastenings, pipe cutter, insulation, cement mixture, waterproofing film, press pliers.
- For wooden floors - joists, saws, pipes, pipe cutters, fittings.
Leveling the surface
It is very important to level the surface of the ceiling. There are two reasons:
- Thermal insulation boards will not adhere firmly to the ceiling and may sag during operation - this will lead to cracking of the screed and may lead to a violation of the tightness of the pipes.
- If the difference in the base is more than half the height of the pipe, then there is a high probability of air pockets in the raised parts of the pipe, interfering with the movement of warm water and reducing the efficiency of the system.
Most often, the surface of the subfloor is quite flat, but in some cases it is necessary to repair the surface with mortar or install a new leveling screed.
Preparation of the thermal insulation layer
Insulation must be installed under the heating pipelines - usually slabs of dense extruded polystyrene foam (not expanded polystyrene) of high density with a thickness of at least 35 mm (preferably 50 mm). Sometimes hard slabs of mineral wool are used, but this is not the best way. You can use a cork. It’s good if the insulation is foil. You can lay a foil waterproofing film. Do not lay penofol.
The thermal insulation is protected from above with a waterproofing film. There are films with markings, heat-insulating boards with clamps and markings.
A damper tape is fixed along the wall. Sometimes it is recommended to lay a strip of insulation along the wall.
Pipe laying and fastening
Pipes are laid on the waterproofing according to the design. The length of one circuit should not exceed 150 m - otherwise the hydraulic resistance of the pipes simply will not allow the pump to push water through the pipe. The contours should be approximately equal in length.
If pipes need to be bent, do it carefully, preferably using a template so that folds do not form on the pipes at the bending points. If there are no fasteners on the thermal insulation, then special plastic strips (mounting rails) with locks are installed to secure the pipes at the required distance from each other. You can secure pipes with U-shaped anchor brackets (clips). It is necessary to secure the pipe so that it does not “float” when pouring the screed.
After laying, the pipes are connected to the collector using fittings. Each circuit must be able to be switched off using taps at the inlet and outlet.
Then the system is tested, filled with water and heated. Test technology: pressure and temperature are gradually increased over several hours. If possible, the pressure is adjusted to 0.6 MPa (6 bar, 6 atmospheres). Test the system for at least 24 hours, bleeding the air several times.
Installing reinforcing mesh and pouring screed
The system is then filled with solution. The pipeline should be filled with water at room temperature - 20-23°C, the pressure should be 0.3 MPa. It is better to use a ready-made cement dry mixture marked “for water-heated floors.” You can add plasticizers for heated floors to ordinary cement mortar.
The screed is poured from the walls. It’s a good idea to cover it with polyethylene - this improves the maturation process of the solution and improves its quality. Drying out the surface for the solution is undesirable, and it is impossible to moisten a large area. The screed completely hardens after 20 days, but you can walk on it a couple of times after 10 days, not earlier.
All about metal-plastic pipes
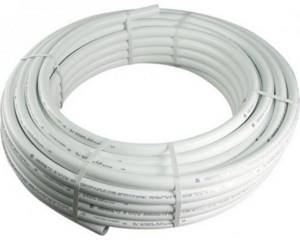
Metal-plastic pipes are lightweight and do not weigh down the supporting structure.
The structure of a metal-plastic pipe includes 5 layers:
- The inner layer is made of cross-linked polyethylene. Ensures that the working shape of the pipe is maintained when exposed to elevated pressure and temperature.
- The next layer is applied with an adhesive composition, which fixes the aluminum layer to the inner polyethylene.
- The aluminum layer is made of foil 0.2-2.5 mm thick, which is butt-welded or overlap-welded into a pipe shape. The thickness of the layer depends on the diameter of the product.
- Adhesive composition.
- Protective outer layer made of cross-linked or regular high-density polyethylene.
Warm floors made of metal-plastic are lightweight. Due to their structure, the pipes have good flexibility, which greatly simplifies their installation in a snake or spiral shape.
The durability of the pipe depends on the quality of the glue; if the adhesive composition loses its elasticity, the product delaminates and leaks begin at the joints.
To check the quality of metal-plastic, you need to heat it to a temperature of 100 degrees. If layers are visible when heated, it means the pipe is of low quality.
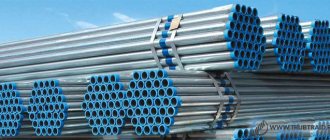
Installation of external heating pipelines
The main types of pipe laying for connection to the heating main:
- Underground installation.
- Overhead laying.
Laying pipes in the ground
This most common type of gasket is divided into:
- Channel laying, which makes it possible to protect pipes from external influences. The channels are:
- Pass-throughs designed for laying a large number of pipes and providing quick access to them for repair and inspection.
- Semi-through, which are arranged when access is rarely needed.
- Non-through, used for one type of pipeline: return or supply.
- Channelless installation, which significantly reduces the volume of excavation work, construction time and costs. Such laying of heating pipes in the ground will complicate repair work, but the use of modern reinforced casings for pipelines can guarantee their reliability.