Rating: 2,941
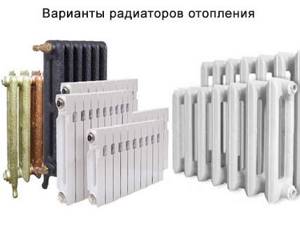
Heating appliances are in great demand, so many consumers are interested in the design of the product, manufacturer and other parameters. The heating radiator design is divided into 2 types: sectional and panel.
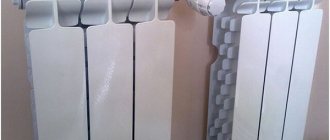
Heating radiators for apartments and houses are made of cast iron, steel and various alloys. Nowadays, they have many forms, and this is not their only difference; they also stand out due to their design features.
What does it take for batteries to work efficiently?
An efficient heating system can save money on fuel costs. Therefore, when designing it, you should make informed decisions. After all, sometimes the advice of a neighbor in the country or a friend who recommends a system like his is not at all suitable.
It happens that there is no time to deal with these issues yourself. In this case, it is better to turn to professionals who have been working in this field for at least 5 years and have grateful reviews.
Image gallery
Photo from
Marking the wall and installing brackets
Position control before fastening
Connecting the radiator to the supply pipe
Connecting the radiator to the return pipe
When deciding to install new batteries or replace heating radiators yourself, you need to take into account that their efficiency is directly affected by the following indicators:
- size and thermal power of heating devices;
- their location in the room;
- connection method.
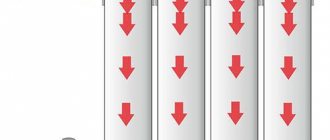
The choice of heating devices amazes the imagination of the inexperienced consumer. Among the offers are wall-mounted radiators made of various materials, floor and baseboard convectors. They all have different shapes, sizes, heat transfer levels, and connection types. These characteristics must be taken into account when installing heating devices into the system.
Among the models of heating devices on the market, it is better to choose based on the material and thermal power specified by the manufacturer
For each room, the number of radiators and their size will be different. It all depends on the area of the room, the level of insulation of the external walls of the building, the connection diagram, the thermal power indicated by the manufacturer in the product passport.
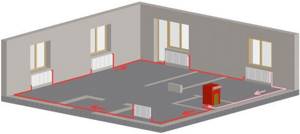
The location of the batteries is under the window, between windows located at a fairly long distance from each other, along a blank wall or in the corner of the room, in the hallway, pantry, bathroom, in the entrances of apartment buildings.
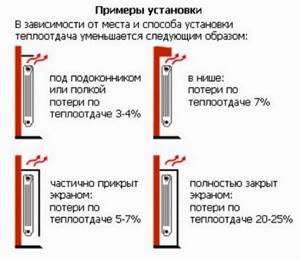
Depending on the location and method of installation of the heating device, there will be different heat losses. The worst option is a radiator completely covered with a screen
It is recommended to install a heat-reflecting screen between the wall and the heating device. You can make it yourself using one of the heat-reflecting materials - penofol, isospan or another foil analogue.
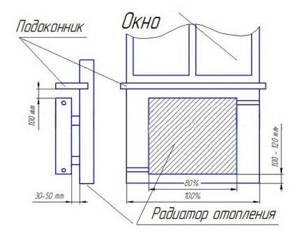
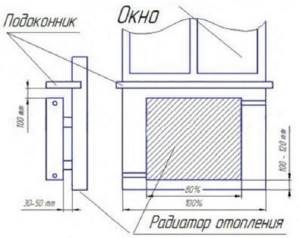
You should also adhere to the following basic rules for installing a battery under a window:
- all radiators in one room are located on the same level;
- convector fins in a vertical position;
- the center of the heating equipment coincides with the center of the window or is 2 cm to the right (to the left);
- the length of the battery is at least 75% of the length of the window itself;
- the distance to the window sill is at least 5 cm, to the floor - no less than 6 cm. The optimal distance is 10-12 cm.
The level of heat transfer from devices and heat loss depends on the correct connection of radiators to the heating system in the house.
By following the basic standards for the placement of radiators, you can maximally prevent the penetration of cold into the room through the window
It happens that the owner of a home is guided by the advice of a friend, but the result is not at all as expected. Everything is done like his, but the batteries don’t want to heat up.
This means that the selected connection diagram was not suitable specifically for this house, the area of the premises, the thermal power of the heating devices were not taken into account, or annoying mistakes were made during installation.
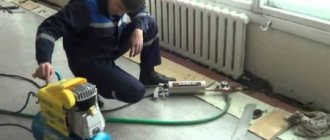
DIY installation
Bimetallic batteries do not belong to the category of complex heating equipment. However, due to the specific features of installation, it is recommended to entrust the work to specialists in this field. The cost of installing bimetallic heating batteries differs in different regions, the average price is from 3,500 rubles. If the owner of the house decides to install a bimetallic heating radiator with his own hands, then it is necessary to become familiar with the rules and features of connecting devices.
Installation recommendations
Before starting work, you must read the technical documentation for your specific radiator model. It is worth paying special attention to the features of the device, operating and installation requirements. Next, you need to decide on the list of necessary materials and tools.
Main stages of preparation for installation:
- Assemble the radiator according to the manufacturer's instructions and check its configuration for the presence of all elements.
- Turn off the heating system and make sure there is no water in the pipeline.
- Familiarize yourself with all SNiP requirements that must be complied with.
- Select connection diagram.
To carry out installation, you must have the skills to carry out plumbing work; if necessary, consult with specialists. The use of abrasive tools must be avoided.
Installation and location rules
Installation of bimetallic devices must be carried out in accordance with the instructions contained in SNiP. Each heating system must comply with certain standards and requirements. Deviations, inconsistencies or non-compliance with regulations can result in serious accidents, damage and ineffective operation of equipment.
For efficient operation of devices and air circulation, it is necessary to follow recommendations for the location of batteries and dimensional elements of the room.
Requirements:
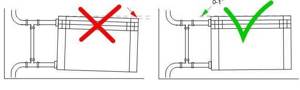
- The vertical axis passing through the center of the battery must coincide with the middle of the window. The permissible deviation from the norm is 2 cm in one direction or another. The battery should be approximately 20% narrower than the window opening.
- Excessively wide window sills are not allowed. The permissible excess should not be more than 30–50%.
- The distance from the floor to the bottom edge of the radiator should be at least 12–14 cm, and from the top of the radiator to the window sill - 10 cm.
- The distance between the rear plane of the heater and the surface of the wall on which it is installed should be within 3–5 cm. The exception is walls with heat-reflecting surfaces.
- If there is no radiator under the window, then the cold air descends along the wall and spreads along the floor. Warm air from the installed radiator prevents the penetration of cooled air masses from the window to the floor.
Required materials and tools
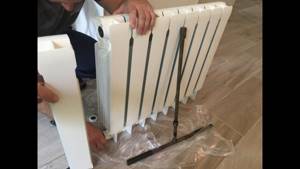
Installation of radiators requires the use of conventional and special tools. To mark the location of the brackets you need: tape measure, ruler, level, marker.
To install the brackets, you will need a drill or hammer drill, a corresponding drill of a certain diameter, and dowels. To connect to the heating network, you must have: a set of adjustable and open-end wrenches, universal clamping pliers, fum tape.

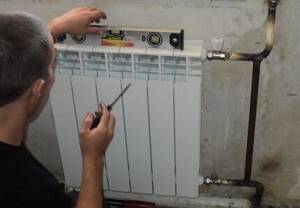
Marking places
First, you need to decide on the location of the radiator and the number of suspension points, the number of which depends on the size of the battery. SNiP recommends fixing at least 2 brackets at the top and 1 at the bottom.
Procedure:
- We measure the distance from the top point of the radiator to the mounting location of the bracket. We mark this value on the wall where the device is installed.
- We measure the distance to the second fastening point and put a mark on the wall, using a level.
- If there are more than two attachment points, then we continue measurements to the next attachment points.
- We draw a horizontal line (using a level or level) on which all attachment points should be located, and drill holes.
- We make similar measurements and markings for the bottom row brackets.
Installation
Installation of bimetallic heaters is carried out taking into account all requirements and procedures for carrying out operations.
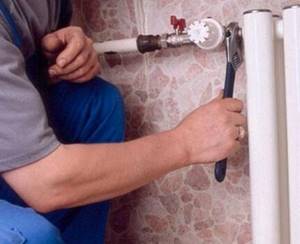
Instructions:
- Select a suitable connection diagram.
- Mark the location of the brackets in accordance with the above method.
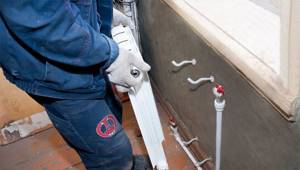
- Drill holes in the marked places and secure the brackets. If there is a plasterboard partition, it is necessary to fasten it on both sides.
- The radiator must be assembled. Do not remove the protective film. Install the radiator on the brackets, first checking their horizontal installation using a level. Reverse battery slope is unacceptable.
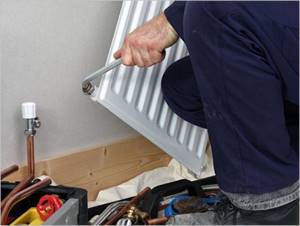
- Connect the heating system pipes to the radiator using the necessary tools. During installation, it must be taken into account that bimetallic radiators use left- and right-handed threads.
- To seal joints, you can use flax with sealant, FUM tape or other materials intended for this purpose.
- Install an automatic air vent in accordance with SNiP standards.
After installation is completed, it is necessary to remove the protective film from the devices and smoothly open the valve to allow coolant to flow in. Bleed the system. Inspect the battery for leaks at the connections.
Expansion of additional sections
To independently build up sections, it is enough to have the following tools: a regular installation kit, as well as a radiator, pipe wrench, special nipples from the section kit, and paronite gaskets for joining. Work should begin by draining the coolant from the system, as well as eliminating the possibility of its supply.
Then you need to dismantle the radiator: disconnect the heating system pipes from the battery and remove it from the brackets. The dismantled device must be carefully inspected and cleaned of dust and dirt using special means. Carefully inspect the condition of the threaded part and surfaces that ensure tightness.
If it is necessary to add a large number of sections, then there may be a need for additional fastening. For ease of work, the radiator must be laid on a flat surface, which will help to avoid various types of distortions during connections, which can subsequently affect the strength and tightness of the connections.
Next you need to assemble the battery with additional sections. To do this, move the elements and install gaskets with nipples between them. Before installation, it is necessary to check the quality of gaskets, nipples, and thread condition.
The connection begins with carefully tightening the nipple. It has two types of threads designed for screwing in different directions. When the nipple is tightened, the sections located opposite each other are connected. To carry out this type of work, you cannot do without a special radiator key.
After preliminary connection of all nipples, it is necessary to tighten them tightly, ensuring uniform screwing to avoid distortions and thread breakage. This completes the assembly of the radiator, it is ready to connect to the heating system.
Operating rules and problem solving
All necessary information on use is presented in the technical and operational documentation that comes with the device.
Rules for operating radiators:
- Before the onset of the heating season and at its end, carry out a number of preventive works related to the inspection and cleaning of batteries.
- Do not leave the system without coolant for a long time.
- The shut-off valves must be opened and tightened smoothly.
- Keep the air vent hole clean.
- Ensure unhindered flow of warm air from the battery, avoid covering the surface with any material or box.
- To protect the internal surfaces of the radiator from the effects of low-quality coolant, it is recommended to use filter elements.
Bimetallic devices are reliable in operation, provided that all requirements for use are met. But they are also prone to malfunctions.
The most common are:
- presence of battery leakage;
- complete or partial lack of heating;
- various kinds of noise in the heating system.
Compared to other types of batteries, bimetallic ones are the most resistant to the effects of low-quality coolants. However, their constant influence negatively affects the condition of the radiator walls. Deposits on internal surfaces reduce the cross-sectional dimensions of pipes and reduce the speed of fluid movement, which leads to a decrease in heating temperature.
Poor installation of gaskets and nipples leads to fluid leakage, temperature instability, and sometimes water hammer. This deficiency can be eliminated by replacing the gaskets and tightening the nipples.
The reason for insufficient heating of the battery sections and the presence of noise may be the presence of a large amount of air in the system, which should be released to solve the heating problem. You can find out how to bake a stove in your dacha yourself by following the link.
Model two
With a two-pipe system, hot water is supplied through one pipe, and cooled water is discharged through the other. In this type of circuit, heating devices are connected in parallel.
pros
The advantages of this connection scheme are the following factors:
- all heating devices heat up equally;
- It is possible to install valves in front of the radiators to regulate the amount of coolant supplied.
There are only two disadvantages of the system: a larger number of pipes are required for the installation of risers and supply lines, and, accordingly, the labor costs for installing the system are higher.
Tying heating radiators with polypropylene is simple and affordable
In recent years, polypropylene pipes have become popular among consumers because they are inexpensive and have proven themselves in operation.
Products made from polypropylene differ:
- significant resistance to aggressive environments;
- plaque does not accumulate on the walls from the inside and solid particles do not settle on them;
- soldering pipes requires special equipment;
- they have a long service life.
Thus, if heating radiators are piping with polypropylene, there will be no leakage of coolant liquid in the future. The fact is that if the fitting is installed incorrectly or is not fully tightened, leaks cannot be avoided when using conventional pipes for piping heating batteries.
Like all materials, polypropylene heating pipes have a number of features. In order not to encounter problems during their installation, you need to know about them in advance.
Number of sections of bimetallic radiators
How many sections there will be on a bimetallic radiator has a direct impact on the choice of connection method. A battery of up to 8 sections can be connected with a side, bottom saddle or diagonal connection. If there are more than 8 sections, it is better to use a diagonal connection.
When using side switching, a flow extender will be required. This refers to a tube inserted into the supply manifold. It helps out in situations where the side connection provides heating only for the first sections. Thanks to the tube inserted inside, the coolant flows further than the inlet, heating the surface of the device more evenly.
Flow extension length options:
- 2/3 batteries.
- To the center of the last section.
Different cases show the effectiveness of both the first and second options.
The main thing is that a noticeable optimization of radiator heating is achieved. Sometimes it happens that installation to the middle of the last section provokes a decrease in the heating level of the first sections. In this case, it is recommended to shorten the tube. But such situations rarely occur, which is influenced by the pressure in the riser and the cross-section of the liner. Date: September 25, 2021
Types of heating systems
The heating system in a private house can be:
- air;
- electrical;
- water.
Air system
This option operates without coolant. The air in the house is heated directly from heating devices - stoves or convectors. With this system, heating radiators are not used. Air heating is convenient for heating compact country houses. For large cottages it is used extremely rarely.
Electrical system
In such a system, heat is transferred through current conductors. Electric underfloor heating works on this principle. Heating using an electric system can be quite convenient. But its arrangement requires increased attention to safety rules, and during operation it is expensive for home owners.
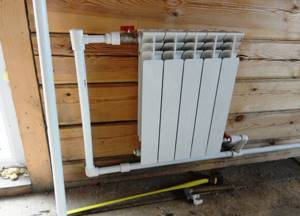
Water system
A type of heating system in which heat is transferred through water (sometimes steam) as a coolant. The coolant flows from the heating device through pipes to the heating radiators. This option is considered the most convenient and practical. Most often, in country houses, heating is installed in this way.
Water heating of a private house Source heatsun.net
Direction of coolant circulation
The lower saddle connection of the batteries using a lower vertical collector allows you to not depend on the direction of coolant supply. This cannot be said about the lateral and diagonal leash, as well as when radiators with a bottom connection point are used: here the supply must be clearly adjusted. Otherwise, the heating of the device may stop completely, or it will heat up very weakly. A lateral or diagonal connection involves the use of a top feed (the return pipe in this case comes from below).
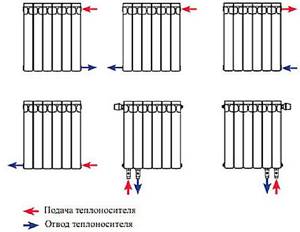
When installing a bimetallic radiator with a bottom connection, it is important to clarify in advance which of the inputs will be connected to the supply. Usually this information is indicated in the passport. It is important not to confuse the directions, because... The supply in such heating devices is equipped with a tube extending upward from the inlet assembly. With its help, the coolant is brought to the upper collector. After this, it spreads over the radiator.
The coolant collection point is the lower collector, from where it is supplied to the return pipeline. The connection point is located on the left or right side of the radiator (it is recommended to choose the point closest to the riser). This makes it possible to save on pipes for bimetallic heating radiators and achieve a more aesthetic appearance.
Basic mistakes when working
When installing heating units is carried out independently, sometimes annoying mistakes occur:

- The reverse scheme, when the supply is replaced by the return of water. The problem can be identified and fixed through testing.
- Installation of decorative screens that block access to the thermostat. As a result, the valve turns off the heating when the radiators are not heated enough. This leads to an overall decrease in the efficiency of the device by up to 20%. In this case, it is advisable to replace the blank panel with a lattice product.
- The absence of air valves leads to uneven heating of the battery, as well as to the formation of corrosion.
- The vertical position of the thermostat head is fraught with unstable operation of this device. In this case, it is necessary to change the orientation of the thermoelement.
In conclusion, it should be said that experts consider the optimal circuit for connecting radiators in a private house to be diagonal.
Only in rare situations can several sections remain cold. This indicates that there is not enough throughput or pressure.

A one-way side connection is the most ineffective, since the hot coolant in this case penetrates the battery at the top point and does not move through all sections. Consequently, sections located far from the connection point will not be able to warm up.
The saddle and bottom connections are becoming increasingly popular, as they ensure uniform heating of the sections. In addition, home owners like that such schemes make it possible to hide pipes in the wall, which looks aesthetically pleasing.
It should be mentioned that before installing a heating radiator in a private house according to the chosen scheme, you need to take into account the material from which the device is made. For products made of steel and cast iron, a bottom connection is more suitable, and for bimetallic and aluminum products, a diagonal or bottom connection is more suitable.
In principle, you can easily handle the choice of connection diagram and installation of batteries yourself if you follow the recommendations given above. And then the house will always be warm, even in the most severe frost.
Things to consider
When choosing an installation diagram for a radiator, it is important to consider several factors:
- type of system - one-pipe or two-pipe;
- where does the coolant supply come from above or below;
- number of sections in the battery.
A little more detail about how all these factors can affect.
System type
A single-pipe system can be with vertical or horizontal wiring. Horizontal is used in small houses - one or two floors, rarely in three-story houses. Vertical wiring is common in high-rise buildings. This is when a pipe comes out of the flow, goes to the radiator, and then goes from the radiator to the floor. And this picture is observed in every, or almost every room (there are options, two radiators are powered from one riser, and they can be in different rooms, or they can be in the same one).

Options for connecting two radiators from one riser. In the photo the wiring is single-pipe, supply from above
What's good about this system? It requires less installation costs, is more stable - it is more difficult to unbalance it. However, with massive changes in the parameters of radiators and pipes, the hydraulic resistance can change significantly. And instead of the expected “warming”, you can get barely warm first two sections, and a corresponding decrease in temperature.
What is the disadvantage of single-pipe wiring? As the coolant moves, it gradually cools. And the more efficiently the radiator of the upstairs neighbor heats up (with top supply), the colder it will be on the lower floor. That is why they adopted the Decree that the heating system is common property, and the replacement of pipes or heating devices must be approved by the operating organization.
This is what a vertical two-pipe system looks like, with a lateral connection (supply riser to the right)
Two-pipe distribution in multi-story buildings is rarely used: it carries many more pipes, and with larger sizes it is more difficult to balance. This is what a two-pipe system looks like in a multi-story building: two pipes enter the room. One (hotter) coolant is supplied to the radiator, and the second one discharges slightly cooled coolant. With this scheme, coolant of approximately the same temperature is supplied to all heating devices through the riser. This is its advantage. But by changing the hydraulic resistance in just one radiator, you can completely unbalance the system. If the resistance is very small, then all the coolant (or almost all) will flow through this section. The rest will remain cold. Therefore, if you have such a wiring, it is mandatory to install control valves (manual control valves or thermostats).
Coolant supply direction
Now let’s talk about how the direction of coolant supply influences. With a lower saddle connection of radiators (the code uses a lower vertical collector, and not a special input unit), there is not much difference. But with a lateral and diagonal drive, as well as when installing radiators with a bottom connection point, you cannot make mistakes with the supply. This threatens that it will either not warm up at all, or very weakly.
With a lateral or diagonal connection, the supply starts from above, and the return pipe goes from below. How this looks in real examples, look at the photo.

Lateral connection with one-pipe system, vertical distribution, supply from above
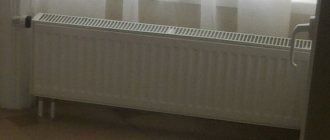
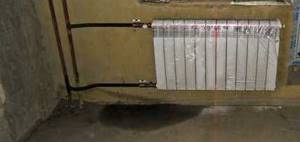
When installing a bimetallic radiator with a bottom connection, you need to know exactly which input the supply is connected to. This data is in the passport. Why can't it be mixed up? Because at the supply level in such heating devices, a tube runs upward from the inlet assembly, which brings the coolant to the upper collector. And then it spreads over the radiator. The coolant is collected in the lower collector, and from there it is discharged into the return pipeline. Please note that the connection node can be located on the right or left of the radiator. Choose the one that is closer to the riser - fewer pipes, neater appearance. Read more about radiator connection diagrams here.
This is what a radiator with a hidden bottom connection looks like. It is important not to confuse the supply and return pipelines.
Number of sections
The number of sections of a bimetallic radiator affects the choice of connection type. If the battery has up to 8 sections, you can use a side, bottom saddle or diagonal connection. For larger quantities, the most effective is diagonal. Lateral flow is also possible, but with the use of a flow extender.
The flow extender is a tube that is inserted into the supply manifold. It helps in the case when, with a lateral connection, only the first few sections turn out to be hot, the rest heat up very weakly. A tube inserted inside brings the coolant not to the inlet, but further, and therefore the entire surface is heated more evenly.
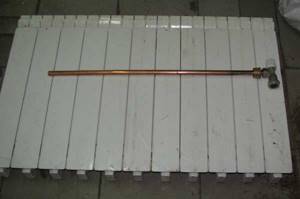
This is what a flow extender looks like. A simple device, but the effect is great
What length should I install the flow extension? There are two options: for 2/3 of the battery or until the middle of the last section. Different options are effective in different situations. In any case, the radiator begins to warm up better. It’s just that sometimes, when installed to the middle of the last section, the former heat up noticeably less than the latter. Then the solution is to shorten the tube. But this situation does not always arise. This depends on the riser pressure and the diameter of the liner. Based on experience, we can advise installing a long tube, then, if necessary, it can be shortened (it won’t be possible to lengthen it).
Sometimes, to more evenly distribute the coolant, holes are made in the flow extension tube through which it flows into nearby vertical collectors. But the thicket and the one-piece tube prove to be very effective.
Single-pipe forced circuit
The simplest heating radiator connection scheme that is used in practice is a single-pipe system. The good thing about it is that it is simple and requires fewer pipes on the routes. It is because of this that it was often used back in Soviet times, precisely to save material.
However, this advantage of the “single-tube” looks dubious against the background of its disadvantages. The main one is parallel threads. The coolant enters the radiator, gives off heat to the surrounding air, and then returns to its own flow. But, since the coolant in the radiator has cooled a little, the flow temperature decreases slightly. That is, the coolant enters the second radiator cooler than the one that entered the first. The second radiator gives off heat again, the coolant has cooled again and is again mixed with the coolant that comes from the boiler and from the first radiator. It comes to the third radiator even colder than to the second. If the system is long enough, then temperature changes on the last radiator will be quite noticeable.
How can you correct the situation when different radiators heat differently? The only solution is to increase the size of the latest radiators. And the easiest way is not to use a single-pipe scheme, but to choose some other one. Which one? We will look at this further.
Required fittings
To install any sectional bimetallic radiator, you need a standard connection kit. It consists:
- plugs,
- a manual air vent valve (Maevsky tap) and a key for it,
- two adapters (one with a right-hand thread, the other with a left-hand thread).
Adapters are installed on the right and left of the radiator. Fittings or pipes will be connected to them. The diameter of the fittings and liner will depend on their diameter - ½ or ¾ inch.
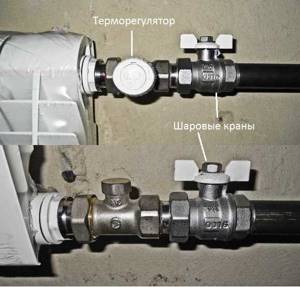
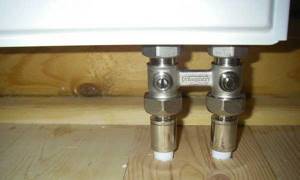
These are fittings for radiators. Ball valves are required, and thermostats in one-pipe systems are optional, in two-pipe systems are required
What kind of pipes and what diameter?
If you are replacing radiators in a high-rise building, you must use the same pipes and the same diameters. This is not just a whim, but reasonable demands. Systems in multi-storey buildings are designed for certain parameters, the key of which are hydraulic resistance and operating pressure. Under them, a test (pressure) pressure is created when starting the system, which is much higher than the working one.
Related materials and tools
You will also need hooks or brackets for hanging on walls. Their number depends on the size of the batteries:
- if there are no more than 8 sections or the length of the radiator is no more than 1.2 m, two fastening points on top and one on the bottom are sufficient; for every next 50 cm or 5-6 sections, add one fastener on top and bottom.
You also need fum tape or linen winding, and plumbing paste to seal the joints.
You will also need a drill with drills, a level (preferably a level, but a regular bubble one will do), and a certain number of dowels. You will also need equipment for connecting pipes and fittings, but it depends on the type of pipes. That's all.
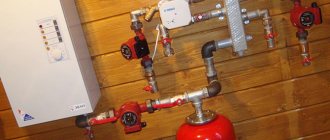
Two-pipe radiator connection diagram
It is very simple: all devices in this heating radiator connection diagram are connected in parallel to each other. Like everything that moves, liquid, of course, chooses the path that is easiest for it. With a two-pipe design, it is easier for the coolant to flow through the first radiator. Further on, on the second radiator, the pressure will be weaker, so there will be less flow through it. On the third radiator there will be even less pressure, and so on throughout the network. If there are a lot of radiators, then there is a high probability that with such a scheme nothing will flow through the last radiator at all.
It turns out that the first radiator heats the best, the second heats worse, the third even worse, the fourth heats very poorly, and the last does not heat at all. The problem is similar to what we observed in the single-pipe circuit; it can be partially solved by increasing the area of the last radiator.
Both systems are bad because they are very poorly balanced. We can struggle for a long time with the fact that one radiator heats us, but the other does not. If we close one, the first one starts to heat up. We close the first one, the second one starts heating, but the first one stops heating. This kind of nonsense happens in two-pipe connection diagrams for heating radiators. It happens that there are two radiators next to each other, there is a flow through one, but there is no flow through the other. That's all. No matter how you fight, no matter how you adjust, either one or the other warms, but never together. Therefore, if you use such a system, then use it in very small spaces.
Purpose and selection of bypass
When installing a bimetallic radiator in a single-pipe system, it is imperative to use a bypass. This is the name given to the jumper between the supply and return pipes. It allows excess coolant to bypass the battery. This scheme allows you to avoid blocking the drain and subsequent troubles with the management campaign. Most often, the bypass is made offset: its optimal location is between the radiator and the riser. If you insert a tap into the jumper, this will make it possible to adjust the temperature of the radiator. However, in this case there is a possibility of blocking the riser.
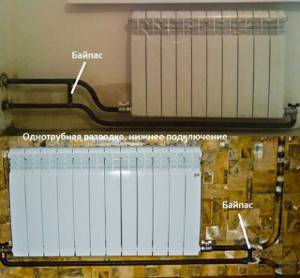
A more effective solution is to use an unregulated bypass, equipping the radiator directly with control valves. This is mainly done in cases where the room is very hot. If there is no such problem, then it is better not to reduce the efficiency of radiators, which inevitably happens when installing regulators.
The automatic fittings are designed for a pressure of 10 atm. Therefore, when the testing pressure drops below 15 atmospheres, operation does not encounter any difficulties. Exceeding this limit will most likely lead to device failure. If it is absolutely impossible to do without a thermostat, and the test pressure is very high, it is better to dismantle the device before starting the circuit and replace it with a drain. Upon completion of the pressure testing, the device is mounted back, which makes it possible to clean the valve at the same time.
Norms and restrictions
Warm water floor is a low-temperature heating system. According to existing standards, the maximum temperature level of the coolant should be +55 degrees. During operation, standard heating usually ranges from +35 to +45, with the floor heating up to +26 - +31. The standards for different premises differ:
- for bedroom, kitchen, living room - +26;
- for bath, toilet, hallway—+31.
Liquid circulates through the floor lines using a pump. In addition, it allows you to regulate the heating level in the room. You need to select it based on the speed of water movement. The maximum permissible for hydrofloors is 0.6 m/s.
The difference between the heating of water at the supply and outlet should not be within 10 degrees.
Calculation of the number of sections
To make an accurate calculation, it is better to entrust such work to the masters. If this is not possible, then you can do it yourself. This does not require any special knowledge or skills.
You just need to know two indicators:
- radiator model power;
- area of the room where it will be installed.
The first indicator can be found in the product passport. It is installed by the manufacturer. Next, you will need to calculate the dimensions of the room along the perimeter and divide this value by 10.
The obtained indicators are divided by the power of the radiator. The result is a number that will tell the user how many sections all batteries in the room should have. If the installation is carried out taking into account these parameters, then an ideal heating system can be created for the apartment.
Rules for connecting heating radiators
Regardless of the type of radiators chosen and the connection diagram suitable for them, it is important to calculate and install everything correctly.
Each specific case will have its own optimal system. For expensive houses with a large area, it is advisable to contact specialists who can offer the optimal design. This is not an issue on which you need to skimp.
In order to properly install and connect heating devices in complex design schemes, it is better to use the services of professionals
For small residential houses, you can independently choose a suitable scheme and install heating devices. It is imperative to take into account the features of your home, the rules for installing batteries and the feasibility of using one or another scheme.
When installing radiators, do not forget that the type of material for the battery itself and the pipes must be the same. Plastic pipes connected to cast iron heating devices will cause many problems, ruining the heating system.
When installing heating radiators yourself, you should not forget to install ball valves for bleeding air and a regulator at the inlet
Calculation of the number of sections
To calculate the required number of sections, it is necessary to take into account a number of factors. First of all, you need to know the battery power and the area of the room
There are also more complex calculation methods that take into account additional parameters (for example, non-standard ceiling heights, the number of windows and doors, the number of external walls, etc.).
Before installing the radiator, you need to calculate the number of sections
The simplest formula for calculating the number of sections looks like this:
number of sections = room area x 100/battery power.
The standard ceiling height is 2 meters 70 centimeters.
If there is a 12 meter room and radiators with 180 watt sections, then the formula will look like this:
12 x 100/180 = 6.66.
We round the resulting value up and as a result we find out that 7 sections are needed to heat the room.
System technology
The characteristic features of single-pipe systems arise from their ring design and the sequential passage of coolant through the radiators. First of all, it is an inevitable fact that the temperature of the last heater and return will always be much lower than in the first radiator.
Other features are most clearly manifested in gravity-flow structures.
- The expansion tank should not be installed on the return line, but at the highest point of the vertical column after the boiler. In this case, the tank can be of an open type.
- The boiler inlet should be located as low as possible. Ideally, below floor level.
- The entire line after the vertical column must have a continuous slope. An elevated section of pipeline can stop the system from working due to the accumulation of air and disruption of water flow due to gravity.
Therefore, even at the planning stage, all these features should be taken into account.
Is it possible to connect heating batteries in series in a house?
Despite the advantages of beam and parallel circuits, simple wiring is no less in demand. Subject to proper calculation and proper organization, it can be no less effective. It is used in apartments connected to a centralized network, as well as in small heating systems for country houses and private houses. It can be implemented both in horizontal piping in a one-story building, and in vertical piping, when risers connect the upper and lower levels. In this case, it is possible to install devices of any type: sectional, panel, tubular.
Radial diagram for connecting heating radiators
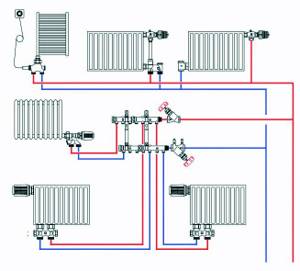
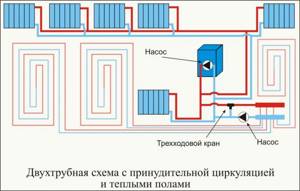
Let's consider a scheme in which a collector is used. The coolant from the boiler approaches the collector, and from the collector to each of the radiators there is its own pair of pipes: direct and return. If these pipes are hidden in the floor, for example, in the insulation of a heated floor screed, or even placed between the “subfloor” and the finished floor, then a room without pipes will look very aesthetically pleasing. Pipes to another floor can be routed along the ceiling. With this scheme, each of the radiators can also be turned off, but the others will continue to work.
Step-by-step installation
- First make all the necessary markings for mounting the brackets;
- Attach these devices to the walls.
- Install Mayevsky taps on the batteries.
- Install plugs and heat supply regulators, faucets and valves.
- Align the battery placed on the brackets horizontally.
- Connect the battery to the common pipeline using adapter fittings.
- Perform pressure testing of the heating system and pre-start the liquid.
Thus, correct installation of heating radiators is a simple matter: you should not have any problems during the self-installation process.