Plumbing is an essential component of housing, without which concepts such as comfort and modernity disappear. Over time, the existing water supply system in a house or apartment requires not only repair, but also replacement. Replacing water supply pipes with new ones is done in order to eliminate leaks, increase pressure in the system, and also get rid of the unpleasant hum and color of the water. Replacing a water pipeline does not require knowledge of hydraulics, but it will not be superfluous if you are going to carry out similar types of work. To change pipes, you need to know the instructions, as well as stock up on the necessary materials and tools.
Replacement of pipes: why such work is carried out
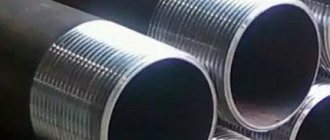
Replacement of water pipes in apartments is a mandatory phenomenon that must be carried out without fail in order to improve the quality of water. Steel pipes that were installed during the construction of multi-story buildings become obsolete over time. Plaque and blockages form in their internal cavity, which contribute to the deterioration of water quality. Blockages and plaque reduce the diameter of water pipes, so over time, a phenomenon such as a decrease in water pressure can be observed.
Steel pipes have long faded into the background, as they were replaced by plastic products. Installing plastic pipes to replace steel ones is the best solution, which will provide a number of the following advantages:
- ease of installation of water supply in a house or apartment;
- absence of blockages in the internal cavity of the plastic, since this material does not come into contact with water;
- durability, since after the construction of a plastic water supply system, you can forget about problems with water for the next 50-70 years.
Organizational issue when replacing a riser
Installation of new equipment is impossible without dismantling the old one. In this case, the difficulty arises in replacing the riser in the bathroom, since it affects the neighbors above and below.
It is not enough to change a piece of pipe in one apartment; it is also important to carry out work in the ceilings, where there are also structural elements. They pose a considerable threat: cement damages pipes over time, which can lead to leaks, which are quite difficult to identify and eliminate.
To resolve the issue with your neighbors, you can do the following:
- Get written confirmation from the neighbors below that in the event of a leak in the old riser, they will not make claims. For residents living above, try having them sign a document guaranteeing payment for possible damage caused by a break in old communications. Very often this approach brings results, and neighbors agree to joint repair work.
- You can contact the Housing Office with an offer to make full payment for replacing the riser. In this case, the mission of persuading uncooperative neighbors is assigned to representatives of the management company.
It should be remembered that even in a privatized apartment, all central communications located in it belong to public utilities.
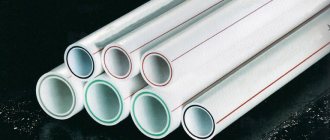
Which plastic pipes to choose to replace the water supply
You can replace the pipeline in an apartment or house with plastic pipes made from the following materials: polypropylene, metal-plastic, and polyethylene. When choosing a material, it is important to consider not only their characteristics, but also their cost. The most expensive option is to use a metal-plastic pipeline, since the cost of one meter of a product with a diameter of 100 mm is about 1.5 thousand rubles. This cost is due to the design of the product. Polypropylene and polyethylene pipes are 2 times cheaper, so in most cases, owners decide on polypropylene.
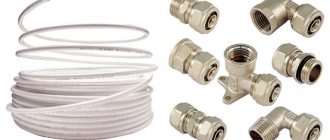
When calculating the cost of a pipe, you must also take into account the price of connecting elements. These are elements such as fittings, fasteners, adapters.
Replacement of plumbing and heating systems
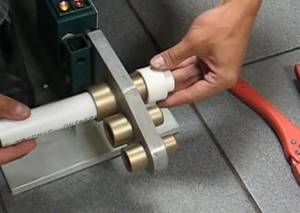
Replacing metal pipes with polypropylene pipes is carried out in several stages. First you need to draw a drawing of the layout of the future pipeline. After drawing up the drawing, you need to prepare the tools:
- special soldering iron for plastic tubes;
- a set of keys;
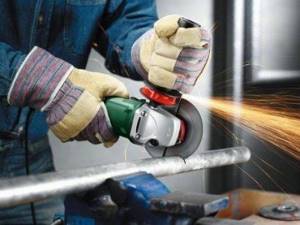
- grinder with disc;
- scissors for cutting tubes.
After preparing the tools and materials, you can begin work.
Dismantling
Step-by-step instructions for dismantling water supply or heating pipes:
- Drain the system.
- Shut off the water supply.
- Cut off old pipes.
It is necessary to leave pipe cuttings 5 cm from the ceiling and floor. Attach special adapters to the cut areas.
Preparation for installation
Before replacing steel pipes in an apartment, you need to calculate the required number of polypropylene elements and cut them using special scissors. The cuts must be straight to ensure strong connections. We must not forget about the coefficient of thermal expansion. When calculating the length of the tubes, you need to add about 2 cm to it.
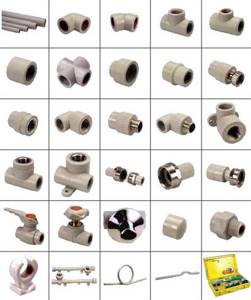
Fitting
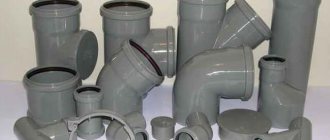
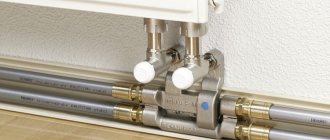
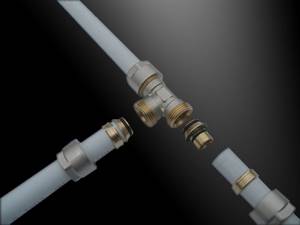
When installing polypropylene pipelines, you need to use special fittings to connect the pipes. There are several types of such parts:
- Tees - used to connect individual branches to the main line. They are convenient for installing various equipment.
- Angled - products for bending heating circuits to get around any obstacles.
- Couplings - suitable for fastening tubes of different diameters, creating a straight contour.
To secure individual pipeline elements to the wall, you need to use special brackets.
Polypropylene fittings for installation
Selection of pipes and method of their installation
Before installing a pipeline in an apartment with your own hands, you need to decide on the material. This is necessary in order to select the necessary connecting elements, as well as choose the installation method.
From the analysis it is clear that the best option for water supply is polypropylene pipes.
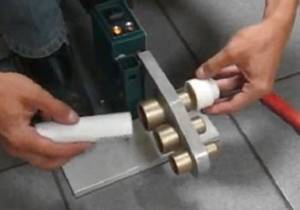
When the optimal material option for installing the water supply system has been selected, you need to understand the method of connecting the pipes. For polypropylene, the soldering connection method is used. To carry out work with a soldering iron, it is not necessary to buy one, since you can borrow money from familiar craftsmen.
The soldering method is based on connecting two polypropylene products using special plastic fittings or couplings. The principle of joining or soldering is based on heating the outer and inner parts of the products, after which they are joined.
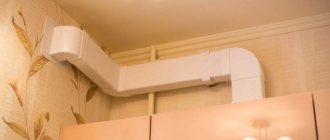
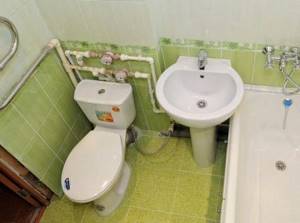
Installation of communications in the bathroom
After dismantling and gating the walls, you can proceed to laying new pipes. However, before this process, you should once again make sure that everything is taken into account in the prepared drawing, and whether additional materials will be required.
Pipe replacement work consists of several steps:
- installation of riser and water distribution;
- installation of sewer networks;
- testing.
By following the technological instructions, all manipulations can be performed quite quickly.
Installation of riser and installation of wiring
Before starting work, you should make sure that the internal diameter of the new pipes for the riser and distribution corresponds to the old one. After this, you can start the process.
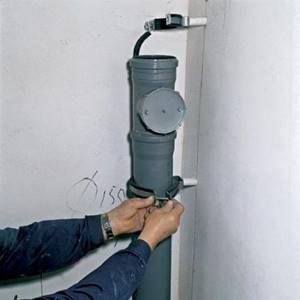
How to properly replace the riser?
Initially, the riser itself should be replaced, taking into account the subsequent pipe routing. To do this, it is necessary to determine at what distance from the riser the internal wiring elements will extend, and then cut the pipe prepared for the riser into parts corresponding to the calculation made.
On old parts of risers located in adjacent apartments, threads are cut with a die. After this, adapter flanges are installed on the risers, then these elements are assembled from polypropylene pipes using soldering. Threaded connections are sealed with Fum tape. This procedure is suitable for metal/plastic joints.
A small section of pipe with a diameter of 0.5 inches is soldered to the outlet flange, at the end of which there is a ball valve set to the “closed” position.
When installing a shut-off valve, be sure to install a cleaning gasket, since a large number of impurities present in tap water are retained on the filter
After this, you can open the valve in the basement to restore the water supply, and then check the tightness of the connections made.
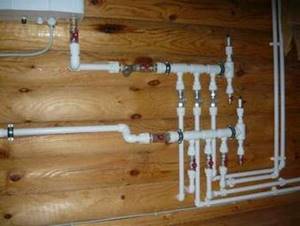
Installation of pipes and connection of devices
Pipes are laid from the riser. Their installation takes place in parallel, fastening is carried out at several points so that there is no sagging. The elements are connected using both fasteners (fittings of various types) and soldering, which requires a soldering iron.
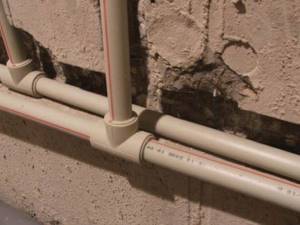
Polypropylene pipes should be laid exactly according to the marked marks, avoiding kinks. If it is necessary to change direction, it is advisable to use special corner elements
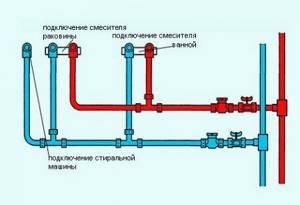
In the area where the sink, shower, bathtub, and washing machine are located, branches are made that are cut off by ball valves. Cold water is supplied to the toilet, cold and hot water is supplied to all other appliances. Valves are installed at the ends of the pipes, which must be closed.
If you plan to disguise cold water pipes behind a false wall, they need to be insulated with polyethylene foam to get rid of condensation.
To install a faucet over a bathtub, you need to knock out the wall to bury a piece of pipe into it. A special film and flanges fixed at a certain distance are placed at the ends, which must be fixed flush with the wall surface, with a small tolerance on the thickness of the finishing material.
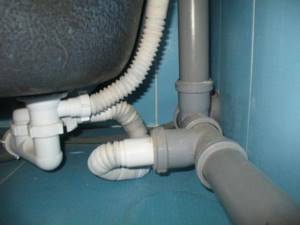
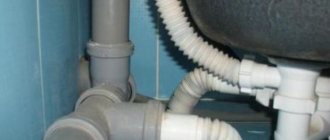
To connect pipes to plumbing fixtures located in the bathroom, you can use flexible corrugations or special connections that fit the size
Due to the elasticity of the material, polypropylene pipes can be slightly bent, thus reducing the number of fittings used when laying the system. This is important not only for saving money: a smoothly laid water supply reduces the likelihood of blockages caused by sediment.
To prevent rupture of communications from water hammer, a compensation loop must be provided in the system.
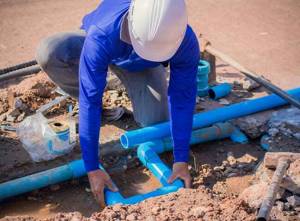
Replacement of sewer pipes
An important and responsible step is the replacement of old sewer pipes, which are often in poor condition due to corrosion and rotten seals. A new plumbing system will improve drainage and eliminate unpleasant odors and leaks.
Instead of outdated cast iron elements, which are very difficult to work with, it is better to install modern sewer lines made of light and durable polymer pipes and other parts. You can do this yourself, since such a system is mounted like a constructor
To replace sewer pipes, the following algorithm is used:
- The places where plumbing fixtures will be installed are indicated.
- Taking into account the dimensions of the plumbing products, precise measurements are taken to determine the drain points.
- A sketch is drawn up with an approximate diagram of the sewer system, which indicates the branches of communications, the location of installation of revisions, and the parameters of the elements.
- According to the drawing, calculations are made, based on the results of which materials are purchased.
- Using a grinder, old elements are dismantled.
- If you plan to replace the riser, it is necessary to connect its parts using special adapters. This work will have to be carried out in the apartments of residents located above and below after prior approval.
- Having dismantled the old communications, you can begin installing a system of new pipes, making fastenings so that the elements are located at an angle of approximately 5o. It is advisable to reduce the number of unnecessary bends, in which deposits often accumulate, and, if necessary, make them as smooth as possible.
Finally, the communications carried out through the wall are diverted from the kitchen to the bathroom. After this, you need to connect all the pipelines by connecting them to each other. Upon completion of the tests, open sections of pipelines are closed by any of the popular methods.
Checking your work results
The installation of new water and sewer pipes must be completed by inspection. To do this, turn on cold and hot water alternately, and carefully inspect the connections.
To check the correct operation of the system, you need to leave cold and hot water flowing for 10 minutes. If no leaks are noticed during this time, the pipes have been replaced correctly.
Large leaks can be detected by eye; small ones can be detected using a paper napkin, which is used to wipe the questionable section of the pipe.
All faults should be eliminated by disassembling the structure and reassembling it or replacing the defective fragment.
How to change pipes in an apartment: step-by-step instructions
Initially, work begins by shutting off the water supply valve to the apartment or house. Only after closing the inlet valve can the process of dismantling the steel pipeline be carried out. Usually, a grinder is used for this, which is used to saw the pipeline into pieces.
When sawing a pipeline with a grinder, you need to drain the remaining water in the system to avoid it getting on the tool.
After completing the dismantling of the old pipeline, you can begin replacing it with a new one:
All the difficulties that may arise when installing a water supply system in a plastic apartment are connecting the correct fittings at the forks. To do this, it is recommended to initially sketch out a wiring diagram and then carry out work on it.
As you can see, replacing water pipes in an apartment or house is not very difficult. If you need to replace the sewer system in your apartment, then everything is even simpler here. Polypropylene pipes with socket joints are used for sewerage. You don't need a soldering iron to connect them, just your hands and fittings. If you have been putting off the process of replacing the water supply or sewer system in your apartment for a long time, then it’s time to do the work yourself.
People often hesitate to replace old steel water pipes, believing that this repair will be difficult, and inviting plumbers will greatly lighten the wallet. Indeed, hiring specialists is never cheap. But water pipes are not difficult to replace yourself. No extra expenses. And the replacement process itself may then seem quite simple.
If you are doing major renovations in an apartment or house, then replace the old pipeline at the same time. Old steel water pipes can leak at any time. Then you will have to repair and change the pipeline in a room that has already been put in order.
What should I replace old pipes with?
You can choose pipes from the following materials: - copper; - steel; - metal-plastic; - polypropylene.
More details about polypropylene pipes
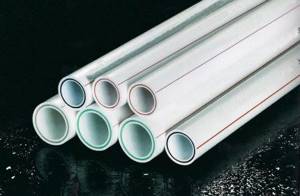
In stores you can choose polypropylene pipelines for cold and hot water. They differ in wall thickness and the presence of reinforcement.
Please note that PN-20 pipes can be used if the water temperature is up to 60 degrees. If boiling water is possible, then reinforced pipes PN-25 are needed.
There are a variety of fittings and fasteners for pipes, with which you can assemble a pipeline of any complexity.
You can buy a soldering iron for installing a pipeline; it is not expensive. But, later it will turn out to be unnecessary on the farm, because repairs to the polypropylene pipeline are unlikely to be needed. Now you can find construction companies and sellers who rent out such soldering irons. And you can install a simple household plumbing system in a day. Therefore, renting a tool in this case is the best option.
Selection of pipes by diameter
Choosing a pipe diameter is a very complex and controversial issue. And to make a decision, it is better to use experience than to try to make your own selection using tables or using hydraulic calculations.
It is necessary to select the diameter of the pipes so that the pipeline does not create too much hydraulic resistance, which would noticeably affect the amount of water supplied.
The resistance of the pipeline to the movement of water will depend on its length, the number of turns and branches, the amount of water supplied, and the material (roughness). The selection of diameter is also influenced by the pressure in the system; the lower it is, the larger the diameter of the pipes is needed.
When replacing short pipelines in ordinary small-sized apartments, polypropylene pipes with an outer diameter of only 20 mm are more often used, without any complex calculations and conclusions. The same diameter is used to connect most household plumbing fixtures. This simplifies installation and circuitry. In addition, the main contribution to capacity limitation is not made by pipes, but by bottlenecks in mixers, taps...
Please note that “hot” pipes will have a smaller internal diameter due to increased wall thickness. It's different for different manufacturers.
You can also take the following into account.
The diameter of metal pipes is often determined in inches: 3/8 inch - 10 mm. 1/2 inch - 13 mm. 3/4 inch - 20 mm 1 inch - 25 mm 1.5 inch - 38 mm, etc. In general, one inch is equal to 25.4 millimeters.
And polypropylene and metal-plastic ones are mainly characterized by their outer diameter. But then you need to take into account that 20 mm polypropylene and 16 mm metal-plastic, taking into account the wall thickness, and 1/2-inch metal are almost the same in terms of throughput.
For short polypropylene pipelines (up to 5 meters), the following rules are used. By analogy, you can select pipes from other materials.
- To connect one consumer (faucet, plumbing fixture), pipes with a diameter (external) of 20 mm are suitable;
- Long risers, main pipelines, and collectors are usually made from 25 mm pipe.
- Long water pipes into the house are often made from 32 mm pipes.
You can also take into account that a 20 mm pipe passes up to 20 liters of water per minute without much increase in hydraulic resistance, if its length does not exceed 10 meters. Pipe 25 mm - 30 l/min, 32 mm - 50 l/min, 38 mm - 75 l/min (length less than 10 meters). An ordinary tap at standard pressure consumes 5 - 7 liters of water per minute. For calculations, 4 simultaneously operating consumers are accepted.
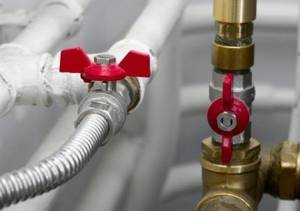
Taps, mixers
Ball valves are now used to shut off individual pipelines. They are comfortable and durable. Taps can be in a metal or plastic case.
The metal tap on the threaded connection can be dismantled, but inserting it into the plastic pipeline will require two American women.
Plastic taps are soldered in like other fittings.
If the valve is used frequently, then it is preferable to install a ball valve in a metal case with a threaded connection (socket valve). If the valve is intended only for emergency shutdown of a branch, then it is better to install a soldered valve in a plastic case.
Single-lever mixers have gained the most popularity. The water flow is controlled in a ceramic cartridge. Such faucets are very reliable, and their repair is simple, and mainly consists of replacing the cartridge with a new one. Cartridge wear directly depends on the presence of abrasive particles in the water.
Therefore, for reliable operation of all plumbing fixtures, a cleaning filter must be located on the inlet pipeline. It must be provided and installed.
How to do it, what to pay attention to
As you can see, assembling a plastic pipeline is very simple, and replacing old pipes with new ones is not that expensive. As a result of the repair, we obtain normal water consumption, reliability, and aesthetics.
Plumbing is one of the most important parts of your home, but did you know that it needs to be replaced over time? It’s easy to change the water supply in an apartment or private house yourself, if you have instructions, a set of plumbing tools and a clear head on hand.
In recent years, there has been a great demand in the country for European-quality renovations - covering apartments with plasterboard, massive use of plastic and many other miracles of progress. But at the same time, they are increasingly forgetting about the water supply system, and yet in old houses there are often still Soviet pipes lying around (overgrown with rust and plaque).
Choosing pipes for the bathroom
Before carrying out work to replace communications in the bathroom, it is important to decide which structural elements to give preference to when installing a new system.
For wiring, as a rule, the following types of pipes are used:
- plastic;
- steel;
- cast iron;
- metal-plastic;
- ceramic;
- copper;
- asbestos-cement.
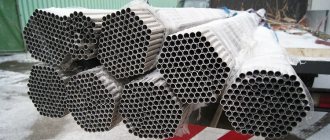
Pipes made of steel alloys (they contain various additives, aluminum, honey, nickel) are usually used in multi-story buildings where it is necessary to create efficient and durable wiring.
Such communications are resistant to hot/cold water and can withstand high pressure. Among the disadvantages are possible blockages from mineral deposits, which often accumulate on the walls.
Fragility and the formation of plugs are the negative aspects of ceramic pipelines, from which main communications are usually installed. Due to the complexity of the work, replacement of such systems is carried out by specialized organizations
Copper pipes are high-quality, durable products that are resistant to corrosion and aggressive chemicals. It is worth considering that such elements are expensive and poorly compatible with steel and other metals. Because of these disadvantages, they are most often used in private homes.
Older buildings built in the 1960s and 1970s typically used cast iron pipes. Such systems have important advantages, since this metal has good heat capacity and resistance to temperature changes.
A significant disadvantage of such structures is their heaviness (installation and disassembly requires special equipment), as well as intolerance to shock loads and a tendency to clog - accumulations of mineral deposits and debris easily form on their surface.
Currently, polypropylene pipes are widely used, which are distinguished by their affordable price, lightness, elasticity, resistance to corrosion and aggressive substances, and do not tend to form blockages.
Polypropylene pipes are suitable for laying both closed and open systems, as they are durable, aesthetically pleasing, and do not require painting or other finishing.
However, their use is justified only for laying internal communications, since plastic does not tolerate temperature changes well. In addition, polypropylene pipes are deformed when exposed to high temperatures, so they should be used with caution for hot water supply.
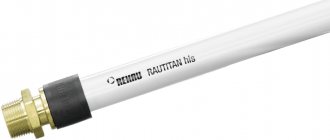
Another popular material today is metal-plastic, combining polymer and metal layers. This material weighs slightly more than its plastic counterparts, but is durable, resistant to mineral deposits, and most importantly, has an extremely low deformation rate.
As a rule, to carry out the work yourself, the last two options are used, since polymer and metal-plastic pipes are easy to process and install. Moreover, all work with them can be done with a minimum of special equipment.
When selecting material for replacing communications, it is also necessary to determine the dimensional parameters of the elements:
- for internal risers, pipes with a diameter of 40 mm are suitable;
- for sewer drain – 50 mm;
- for laying hot/cold water supply systems - 15, 25 and 32 mm.
The process of replacing pipes in a bathroom consists of dismantling the existing water supply and sewer systems and installing new structural elements.
An article entirely devoted to assessing the positive and negative aspects of popular positions on the market will help you compare the characteristics of PP and metal-plastic pipes.
Why do you need to replace old water pipes?
In addition to pure H2O, a huge amount of impurities pass through the water supply every second, which tend to settle on the inner surface of the pipes. Over time, the lines become clogged with particles of oxidized metal, which leads to corrosion. In addition, the appearance of old Soviet metal pipes is not at all in harmony with the modern interior of the apartment. Sooner or later, almost all owners of old apartments come to mind one simple thought - the pipes need to be changed.
Cost of replacing water pipes with plastic ones
At the moment, the most popular pipes are made of polypropylene, metal-plastic (so-called “reinforced pipes”), or polyethylene. The price for them differs not only depending on the material, but also depending on the region of residence.
So, the price per meter of a propylene pipe with a diameter of 100 mm will be 500-600 rubles, a reinforced pipe with the same characteristics will cost 1300-1600, and the cost of a polyethylene pipe will be around 300-500 rubles.
To determine the price of a new water supply system, take a diagram, calculate the total length of the pipes, add 15% - just in case, add the cost of fittings and fasteners and... voila - you will have the cost of all elements and installation of the main in your hands.
Advantages of plastic water pipes
Firstly, plastic does not rust, which makes it much more durable and safer than Soviet-era metal water pipes.
Secondly, it does not have a fragile internal coating, which again extends its service life and maintains the purity of the water even after a couple of decades of operation.
Thirdly, it is more reliable, as it can be easily soldered and is resistant to temperature changes. So, if you don’t know what to choose – metal or plastic – feel free to buy polymer.
Frequency of replacement of water supply pipes
There is no clear answer to this question, but using a statistical survey, the result was obtained “once every 30-40 years if it is plastic and once every 20 years if it is metal.” Due to the high wear rate of the latter, the water supply system becomes unusable faster. On the other hand, if the pipes are outwardly in good condition, and the pressure and purity of the water in them correspond to your understanding of the norm, you can postpone replacement.
As the saying goes, “don’t break what still works.” But if troubles appear ahead of schedule, they need to be replaced, and quite urgently, since problems with pipes can have catastrophic consequences. In addition, it is recommended to immediately change the entire system - simply because the method of joining plastic with metal is still not as reliable as joining two identical materials that can be securely fastened in many different ways.
Metal-plastic plumbing pipes
Metal-plastic pipes are composite plumbing products - a polymer tube reinforced with a metal mesh. Installation of metal-plastic pipes is worth recommending to those who are looking for:
- Strength.
- Durability.
- Simple and fast execution of work.
- Resistance to aggressive environments.
Installation of metal-plastic pipes is often ordered when installing heated floors; they are often used in systems operating with compressed air or chemically aggressive liquids. These pipes are perfect for laying electrical communications .
Metal-plastic pipes are also very popular. This fact is understandable, because they are an economical option. The pipes are very flexible, which makes installation easier and there are very few joints when installing plastic pipes. Like previous pipes, they do not corrode and there is no accumulation of rust or stones on the pipe walls. But the service life of these pipes is less than 35 years, as stated by the manufacturer; there is also a minus - this is instability to temperature changes.
| Pipe installation, pipe replacement, pipe repair | Price, rub) |
| Installation of metal-plastic pipes for hot and cold water, without installing sanitaryware, faucets, point (up to 3 running meters) | 1,400 rub. |
| Replacement of pipesLayout of metal-plastic pipes, l.m. | 450 rub. |
| Pipe laying, l.m. | 100 rub. |
| Pipe cutting and stripping (pcs.) | 80 rub. |
| Pipe connection (1 connection) | 250 rub. |
| Installation of comb (complete with pipes), pcs. | 600 rub. |
Deciding on the choice of material
Before you dive into work, decide on some questions. And the first of them is what kind of material to use in the apartment. The three most popular options have already been presented, so now let's look at their pros and cons.
Polypropylene water supply
Until recently, polypropylene pipes were the absolute champion when it comes to choosing materials for plumbing. They are almost not subject to wear, are relatively easy to install, do not conduct electricity, are heat-resistant, and reliable. But there are also disadvantages - for example, the connections cannot be separated, since the only truly reliable method of connecting one pipe to another is welding, and the only way to correct poor soldering is a pipe cutter.
Metal-plastic and reinforced pipes
An older version, originally from the 90s. It was then that the country was hit by a plastic boom and reinforced polymer was found almost everywhere, including water pipes. On the other hand, since polypropylene simply did not exist at that time, metal-plastic was indeed the best option, especially in comparison with galvanized (or even non-galvanized) Soviet steel pipes. Metal-plastic withstands physical impacts well, wears out slightly and looks great, but it also has disadvantages - it is much more expensive than its competitors and has an extremely negative attitude towards temperature changes, which is why it begins to leak after 2-3 seasons. On the other hand, it is even easier to install than polypropylene, so if you are making plumbing in a country house or other place where there is no electricity for welding yet, metal-plastic will be the best choice.
HDPE pipes (polyethylene)
A relative newcomer to the market, so it will be difficult to say exactly how good they are, but in theory everything looks just great - polyethylene pipes are not only durable, but also flexible, which allows them to be used even where a polypropylene or metal-plastic structure would be too bulky. In addition, they can freely change geometry, which provides a high level of protection against physical impact. On the other hand, heat resistance raises some doubts, but for water pipes this is still not so important, especially considering that the price of these pipes is lower than their polypropylene counterparts. Alas, they share a minus with polypropylene - the only truly durable connection method is welding.
Features of work on replacing pipes, risers and heating radiators
Dismantling heating risers

Replacing risers
Since heating modernization may affect the systems of other apartments, it is necessary to inform the housing office about the upcoming work. Their employee must shut off the riser in case there is water in the system. When pipe replacement is not an emergency, it must be carried out during the non-heating season.
Before changing heating pipes,
you need to come to an agreement with the neighbors below and above, because if sections of old pipes remain in the ceilings, there will still be a possibility of leakage.
Stages of dismantling work:
- The housing office employee must shut off the risers and drain the water from them.
- The riser is cut off from the upper and lower floors using a grinder.
- Since the new riser pipes are plastic, a thread is made on the riser pipe, it is lubricated, and sealed with fum tape. Then a coupling is screwed on, connecting the plastic and steel pipes.
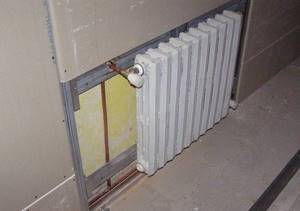
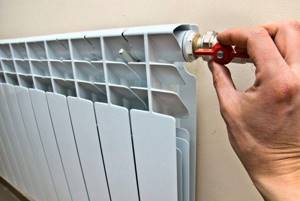
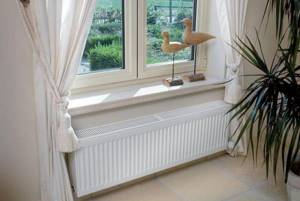
Installation of heating radiators
The best for central heating are bimetallic or modern cast iron radiators - they have a large enough flow for water, so they rarely become clogged.
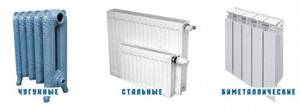
Types of radiators
Battery installation features:
- First, the radiator installation locations are marked.
- Brackets must be used to install radiators.
- Installation of the battery must be carried out exclusively according to the level, since if it is skewed, air may collect in it and it will not work well.
- As a rule, radiators are installed under a window to prevent cold air from entering the room.
- The distance between the radiator and the wall should be about 5 cm, the gap to the floor - a maximum of 12 cm, to the window sill - 10 cm.
When replacing pipes and heating radiators, they must be equipped with shut-off valves. This is necessary so that in the event of a radiator leak, this section can be closed, and this will not affect the functioning of the entire heating system.
Connecting pipes to radiators
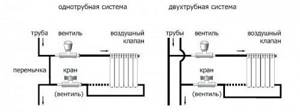
Heating system diagrams
- A single-pipe system where only hot water flows through the risers. For risers with this system, pipes with a diameter of 32 or 25 mm are used. For pipes supplying coolant to radiators, a diameter of 20 mm can be used.
- A two-pipe system, where hot water is supplied through one pipe (“direct”) and discharged through the second (“reverse”). With this system, the diameter of the pipes is selected depending on the number of radiators: when there are 8 or more batteries, pipes with a diameter of 32 mm are used, when there are fewer batteries, 20 mm. For the riser system, a pipe diameter of 32 mm is also used.
When it is necessary to replace heating pipes, it is important that the diameter of the pipes going to the radiators is not smaller than those that were previously installed. Installation of pipes to radiators:
Installation of pipes to radiators:
- With a single-pipe system, a Mayevsky valve is located in the upper part of the radiator, which is necessary for venting air. The bottom hole is closed with a plug. The surface must be cleared of paint before installing the plugs. Then they install the heating taps using a special wrench - preferably with union nuts. When changing heating pipes ,
the pipeline leading to the radiator is installed after its installation. - With a two-pipe system, grooves are made for the pipes in the floor, the pipes are sheathed with insulation and laid in the grooves. The pipes that go to the radiators are similarly hidden in the walls.
Heating pipes built into the walls
Final stage:
- connecting pipes to risers;
- when replacing heating risers, it is necessary to install a jumper (if the taps on the battery are closed, in the absence of a jumper, the entire heating riser will not work);
- the assembled system must be checked for leaks by testing it under pressure 1.5 times higher than normal.
If the heating system in an apartment is correctly replaced, the problem of heat and leaks will be solved for at least 20 years.
Choosing the installation method
There are two methods of normal installation of plastic pipes - welding and press fitting. Welding is divided into two types - cold (using epoxy glue) and hot (using a welding machine).
Cold method
Cold welding is not only a method, but also the name of the main consumable when using it. Nowadays, almost every hardware store sells fast-hardening, reliable glue that allows you to firmly connect plastic pipes together. This method is more resource-intensive than hot welding, but does not require an expensive welding machine. It will also require a little more time - the glue needs to harden, and money, since the material, although inexpensive, requires a lot of it.
On the other hand, it prevents the appearance of sagging inside the pipes, which increases their normal service life. We recommend using this method, since durability and reliability are more important than immediate savings in time and money.
Welding
The classic method of joining pipes, not only plastic, but also metal. Requires a powerful power source, as well as a set of equipment - a welding machine, a protective mask, etc. This method is faster than cold welding and is traditionally considered more reliable. But, as studies have shown, cold welding is not inferior to hot welding in terms of speed and reliability. On the other hand, improper use of hot welding can lead to the formation of beads on the pipes, which is guaranteed to lead to pipe clogging in the next few years.
Press fittings
Another option for connecting pipes, this time purely mechanical. This method is characterized by the use of fittings made of plastic material, which, after installing pipes in them, are pressed with force by a special press machine. This leads to their deformation and fixation of the joints. The result is a strong connection.
Scope and advantages of polypropylene pipes
Hollow round products made of polypropylene are very popular due to the fact that they have a much longer service life than their metal counterparts. Manufacturers guarantee the safety of a properly installed water supply network for 30-50 years. In addition, polypropylene is free from one of the main disadvantages that cast iron and steel products suffer from: it is not susceptible to corrosion.
Polypropylene water supply is strong, durable and cheap
The main areas of application for polypropylene carriers are the installation of plumbing and water supply systems. The maximum temperature at which systems made using polypropylene can be operated is 140°C. This is quite enough for installation in a home water supply, since the temperature of the water in the heating system is significantly lower than the boiling point.
The main design advantages of polypropylene coolants:
- strength and elasticity of the material.
- reliability.
- high thermal energy savings.
- good sound insulation.
- significantly less weight of the installed water supply system compared to metal.
The main design disadvantage of polypropylene products is the limitation on the water temperature in the pipes. It cannot be raised above 140 degrees. In addition, it is necessary to very carefully protect polypropylene from exposure to aggressive environments - alkalis and acids.
Polypropylene costs an order of magnitude less than metal and metal-plastic. It is environmentally friendly, since the chemical composition of the transported liquid is the same on any section of the pipeline. The only condition for all these advantages to be converted into money savings is compliance with the rules for installing a water supply or plumbing system.
Do-it-yourself installation of water supply in an apartment
Preparing to install a water supply system
It’s easy to dismantle old pipes and install new ones, so you can do it all yourself. It is better to do the work with at least one assistant. What to do first:
- Find the inlet valve and close it. Make sure to wrap it completely - even if the remaining stream is as thick as a match, a lot of water can leak out. Be careful not to break the valve.
- Disconnect all plumbing fixtures. Don't forget about the heating boiler, if you have one, as well as the washing machine and dishwasher.
- Remove old pipes. If they are steel or cast iron, wear safety glasses and a respirator. Cast iron tends to crumble, making it easy to break, but small particles can get into your eyes or windpipe. Cover your ears and wear thick gloves.
- Cut the pipes according to the diagram. This is done with a pipe cutter, regardless of the type and material of the pipes. You can try with an ordinary grinder, but the cut must be perfectly even. When cutting, consider the depth - that is, add half the depth of the fitting to each end of the pipe that will go into it.
- Align the pipes with a gauge. This will eliminate the ovality and make them round.
- Clean the pipes from any contaminants, and also remove any unevenness at the ends, if any remain after using the pipe cutter.
Then everything depends on the chosen fastening method. If it’s hot welding, warm up the welding machine; if it’s a press fitting, prepare the press machine and the fittings themselves; if it’s cold welding, no preparation is required, unless you forgot to buy glue.
How to glue pipes using cold welding
The simplest option, requiring only high precision execution of instructions:
- Bevel the end of the pipe. Angle – 15 degrees. The tool is a chamfer, bought at any hardware store. The procedure is quite complicated, since you need to avoid hangnails as much as possible. In general, we advise you to practice first and start installing pipes only after you are completely confident in your abilities.
- Clean the fitting flares of dirt, dust and moisture by hand or using a special CPVC cleaner. Better last - it’s more reliable.
- Apply the glue with a brush, by hand, carefully. As tightly as possible both on the surface of the pipe and on the inner surface of the socket. In this case, it is better to use more glue than necessary rather than worry about how to patch the current connection.
- Insert the pipe into the socket. Do it as quickly as possible, ideally immediately after applying the glue.
- Rotate the pipe relative to the fitting 90 degrees. Or vice versa - rotate the fitting relative to the pipe. This is done in order to distribute the glue as evenly as possible.
- Hold the pipe and fitting together for 20-30 seconds. Absolute fixation is required, scrolling or changing the depth of the pipe entering the fitting is not recommended.
- Check that there is an even layer of glue around the circumference. After the fixing period has ended, inspect the pipe from all sides to ensure that excess adhesive has come out of the fitting. If there is too much of it, remove it with a soft cloth.
- Continue installing other pipes, but remember that it will still take a lot of time before the glue completely hardens.
We connect pipes by hot welding
Hot welding can be different - polyethylene pipes can be welded using the butt method, but polypropylene will have to be processed using the socket method. And there is also electrofusion, which will also have to be taken into account. So first decide on the method you will use and then proceed with the corresponding procedures.
Yulia Petrichenko, expert
Butt method
Due to the high flexibility and ductility of polyethylene pipes, they are welded directly, without the use of fittings. To do this you need:
- Center the pipes.
- Make sure they fit together as tightly as possible. This is important because reflow cannot correct really large defects (more than 1/5 of the pipe wall thickness).
- Separate them again and insert a heated heating element between them. Then press them against him again.
- Wait until the ends melt - you will know this by the amount of burt squeezed out under mechanical pressure. The flash height must be indicated in the welding chart that came with the pipe or welding machine.
- When the ends have melted, release the clamping force and wait for the ends to warm up deeply. This takes the time indicated in the welding table.
- Now remove the heating element and press the ends of the pipes tightly against each other for a while, gradually increasing the pressure. This needs to be done as quickly as possible. The phase is relatively short and in no case should it be exceeded, so it would be better to interrupt the “seam settling” procedure a little earlier than to ruin the whole job from excess zeal.
- Maintain the compression force on the pipes for some more time, but do not increase it! This will help the pipes not to “play” back while cooling.
Socket welding
This process requires the use of fittings. Ideal for polypropylene pipes. It is carried out with a welding machine according to the appropriate instructions, but since we are working “with our own hands”, we will show the installation using an ordinary blowtorch with a special nozzle consisting of a mandrel and a sleeve.
- Warm up the welding machine to the desired temperature.
- Place the fitting onto the mandrel (this will take some effort) and insert the pipe into the coupling. This needs to be done as quickly as possible.
- During the heating process, increase the force of pressing the pipes against the mandrel and coupling. This must be done until they are completely inserted into the welding nozzle. After this, stop the pressure.
- When the parts are hot enough, quickly remove them from the attachment and press them together. After this, you will get a one-piece structure of two parts.
- Weld a plug or the next pipe into the other end of the fitting.
Electrofusion welding
This type of welding is used when installing gas pipelines, as it is expensive, but reliable. If you want “only the best,” you can also use it when installing plumbing. It will require a special electrical fitting - a polyethylene fitting with a built-in heating element. The method is only suitable for round polypropylene pipes.
- Prepare your welding machine.
- Degrease and clean the contact surfaces of the pipe and fitting.
- Place a mark on the pipe indicating the boundary of its entry into the fitting.
- Securely secure the pipe and fitting. The fitting can push it out due to thermal expansion and your task is to prevent this.
- Connect the welding machine to the fitting and press the “Start” button on it. It will turn off automatically.
- Leave the parts and fitting alone for at least an hour. Before this time has expired, the connection cannot be used!
Press fittings
A press fitting is used in cases where the pipe does not tolerate welding well and is the main method of fastening metal-plastic pipes, although polypropylene can also be fastened this way. This is the simplest method of all listed, but the least reliable.
- Place the ferrule on the pipe.
- Insert the O-ring fitting into the pipe.
- Crimp the coupling with special press pliers. It is advisable to use electric pliers, as they provide greater force and high reliability.
Using the chosen technology, replace all water pipes with new ones. The sewerage system is installed in approximately the same way (this is shown in more detail in the video below), and preferably at the same time as the water supply system, so as not to stop the riser later again. It is very important to do everything according to the plan, but even after the process is completed, do not rush to turn on the water. First you need to test the system with a pressure test pump.
Video tutorial: Replacing water pipes with plastic ones
Dismantling the old pipeline
The initial stage of work is the removal of all communications located in the room. To carry it out, it is necessary to turn off the water supply at the risers, and when replacing it, the water supply in the basement.
In this case, the following rules must be observed:
- Coordinate the planned work with an organization that maintains in-house water supply systems.
- Be sure to inform residents living in the apartments above and below about the upcoming replacement of communications, informing them of the exact date and time of work.
- Take all measures to promptly complete repairs to ensure that water is turned on in a timely manner.
After turning off the water, you can begin dismantling, which is carried out in several stages.
Stage 1: cutting structures and removing pipes
Having received the consent of the neighbors, you need to turn off the water in the riser, and then drain the remaining liquid in them. Then you can proceed to trimming the old pipes with a grinder. In this case, you should step back 0.5 m from the floor/ceiling of adjacent apartments to facilitate the process of connecting pipes.
When making a cut, it is important to monitor its perpendicularity, which in the future will simplify the carving on it with a die or other device.
The pipe section located in the slab is loosened with transverse blows with a hammer, after which it is knocked out (you can also use a chisel or hammer drill). To recycle old metal pipes, they can be cut into small pieces that are taken out or sold for scrap.
Stage 2: replacing shut-off valves and water drains
To replace shut-off valves at the inlet, old models are screwed together or cut off from the inlet pipe with a grinder, after which the threads are cut with a screw or other device, then the new equipment is screwed on. The screwed inlet taps are closed, after which you can turn on the water in the riser.
Water is drained from old pipes so that it does not interfere with further dismantling. The washing machine, faucets, and other water consuming appliances are disconnected from communications. All plumbing fixtures connected to the sewer are disconnected in the same way.
Stage 3: removing dowels and laying grooves
Previously, when installing pipes in the bathroom, dowels driven into the concrete with a gun were widely used for fastening to the walls.
Since such elements are extremely difficult to remove, you can remove their heads using a grinder. In this case, a smooth surface of the walls is created, thanks to which you can safely lay tiles or other finishing materials.

If the old pipes were laid in the bathroom at a great distance from the floor, it is advisable to move them to a lower height, which will allow them to be masked without resorting to gating. To do this, you will have to expand or re-punch new holes in the walls.
If it is necessary to lay channels in the walls (grooving), it is advisable to replace the metal disk inserted into the grinder with a similar part designed for working on concrete, brick and stone. If there is reinforcement in the wall, it is again replaced with a disk for metal.
Pipe crimping
Pressure testing of pipes is an increase in pressure in one of the sections of the network in order to identify leaks or structural weaknesses in it. This is done using a special pressure test pump.
- Hermetically separate the pipe section from the rest of the network. This is done either with elevator valves or pneumatic plugs.
- Connect a pipe pressure testing pump to the area and pump cold water into the area.
- Apply pressure to the pipe that is 10-20% higher than normal. For heating, water supply and sewerage it is 6-8 kgf/m2.
If the area passes the test, move on to the next one. If not, think about how to replace it or at least strengthen it.
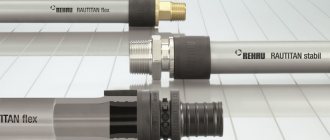
Uponor pipes
When choosing pipes from this company, you should take into account that uponor pipes are installed in several ways. The most popular of them is using staples. In rooms that have a large area, pipes are fixed with harpoon clamps on special heat and sound insulating mats, pre-folded. This material, in addition, has a reliable waterproof film on it.
Advantages of stopper pipes when installing plumbing fixtures:
- These pipes are highly resistant to chemically aggressive environments and are not afraid of cracks, stretching, or any mechanical defects, high temperatures and high pressure.
- The pipes have excellent hydrodynamic properties.
- They have a memory effect on changing shape.
- Installation of uponor pipes is much faster than installation of plumbing using materials from other manufacturers.
TOP 5 mistakes when installing plastic water pipes
In this section we have collected the most offensive and popular mistakes when installing plastic pipes.
- Incorrectly marked boundary of the pipe entrance to the electrical fitting. It will force you to lose one fitting and two pipes, but overall nothing fatal.
- Too much force when butt welding. Again, there are two pipes on the list of losses, but you lost them not because of inattention, but because of your own zeal.
- Loosely fitting bevels during cold welding. The result will be a weak connection that will only be held in place by glue.
- Pipes not cleared of dust and grease during welding. The result will be a weak connection that will simply fall apart after a few years.
- Incorrectly measured fitting size before cutting pipes. Will force you to ruin all the material. There is no solution, and the process itself is characterized by large financial and time losses, for which this error receives first place. As the saying goes: “Measure twice, cut once.”
Expertise – sewerage, water supply
Ask an expert
Do-it-yourself replacement of water pipes in an apartment with plastic ones: cost, video instructions - printable version
Replacing iron pipes with plastic ones is one of the most popular services among homeowners today. Plastic pipes themselves have an optimal price-quality ratio and are rapidly replacing steel and cast iron pipes. It is more convenient to find a specialist for replacing water supply pipes in Moscow and St. Petersburg through the Youdo.com mobile platform.
Rules for soldering pipes
To reliably fasten the welded edges of the pipe together, you must:
- measure the pipe sections being welded;
- Make a chamfer -
— with a slope of 15° and a depth of 2-3 mm (standard DVS-2207-1, Germany).
— with a slope of 45° and a depth of 2/3 of the outer diameter (standard of the Russian Federation).
The soldering iron should be installed on a special stand. The optimal heating temperature for the working surface is 260 degrees.
The fitting is installed on a mandrel - a special attachment for welding. The heated pipe is inserted into the sleeve. At the same time and very quickly, the parts removed from the heater are connected to each other. The holding time of the connection depends on the size of the outer and inner diameters. When overexposed, there is a danger of deformation of the joint and loss of elasticity. Having brought the sleeve all the way to the joint, you should stop moving, since if there are unwanted sagging inside the pipe, its conductivity will be impaired.
Connection using a soldering machine
Holding time of the connected pipes on the machine depending on the diameter, seconds:
- 20 mm – 5;
- 25 mm – 7;
- 32 mm – 8;
- 40 mm – 12;
- 50 mm – 18;
- 63 mm – 24.
The easiest way to avoid mistakes is to measure the depth of the sleeve. By measuring exactly the same distance on the pipe, you can visually check the moment of the joint. The connection speed of the heated pipe and coupling should be maximum. To avoid reducing the quality of the welded joint, it is strictly not recommended to rotate the parts being connected around their axis.
Advantages of plastic pipes
- high anti-corrosion performance
- safe use at home
- quietness of the pipeline
- low thermal conductivity coefficient
To ensure that the replacement of pipes with plastic ones is carried out exactly according to the instructions, our performers weld the pipes with special tools. The main thing is to clearly maintain the heating temperature, which is different for each pipe diameter. At the customer's request, plastic pipes can be hidden in the walls. This gives an aesthetic appearance to the room.
Selection of pipe laying system
The pipeline can be installed in different ways. The system can be open when the networks are laid directly along the walls. In this case, access to the pipes is easier, but the appearance spoils the interior of the bathroom.
Before replacing pipes in the bathroom, it is necessary to draw up a diagram of the planned placement of communications, indicating connections to all plumbing fixtures
The option with closed communications looks more aesthetically pleasing. In this case, grooves are made in the walls - special grooves where structural elements are hidden, which are then sealed with plaster and finishing materials.
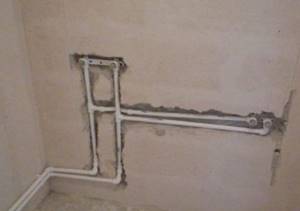
The closed method is quite expensive, in addition, it can only be recommended for the most reliable pipes and carefully made connections, since access to the pipes is very difficult
Nowadays, for laying pipes, a masking method is often used, which does not require much trouble. In this case, when laying structures, they are hidden under plumbing fixtures, interior items, or hidden in boxes specially constructed to protect and decorate communications.
Replacement technology
It's time to move on to practice. Let's look at how metal-plastic pipes are replaced.
Work order
Planning everything correctly is half the battle. The preparatory stage is no less important than repair work. If you have decided on the material, then proceed according to this scenario:
- Draw a plan or drawing of what exactly you are changing and how you are going to do it.
- Calculate how much material is required for the work.
- Purchase pipes and connecting elements.
- Find tools and devices for joining products.
- Turn off the water.
- Dismantle the old network fragment.
- Install the plastic parts.
- Check the system's functionality.
- Get rid of trash.
- Enjoy the results.
Dismantling old elements
Do-it-yourself replacement of pipes with metal-plastic ones begins with destruction. Dismantling can differ only in technology and the number of tools used. Breaking is not building, so you can figure out how to remove failed network fragments yourself. In some places you can actually unscrew it, but in other places you will have to use a grinder to cut it off.
For work, get the following tools:
- a hammer with a wooden or rubber head;
- Bulgarian;
- perforator;
- chisel;
- scrap;
- grinding discs;
- screwdrivers;
- knife;
- adjustable wrenches.
Worth paying attention! Try to combine pipe replacement and repair, then you can hide the new network in the walls.
Installation of plastic
When the old elements are dismantled, you have two options:
- install new plastic fragments in their place;
- lay the network differently - according to a new plan.
The connection of plastic products depends on their complete composition. Welding technology can be applied with a construction soldering iron/welding machine or chemical composition, either using fittings or gaskets and bolts. Focus on the type of plastic pipes you prefer.
Why change heating pipes?
Traditional heating systems made of steel pipes and cast iron radiators are becoming obsolete not only morally.
The main disadvantages of such systems are:
- steel and cast iron are prone to corrosion - after many years of operation, pipelines may leak;
- “overgrowth” with calcium salts and a significant decrease in efficiency, clogging of radiators with rust;
- inability to shut off the radiator or heating system in one room - it is necessary to turn off the entire riser in an apartment building or a completely private house;
- inability to bleed air from the radiators in the apartment.
Old wiring is often not done according to the design, or the design was not well thought out - and as a result, the room is cold. The presence of air in the coolant also creates inconvenience in the form of cold radiators and noisy risers.
Operation and repair of polypropylene pipes
Like any other material, polypropylene, in addition to its advantages, has a number of disadvantages. Its performance may be affected by:
- high shock loads;
- excessively high water temperature;
- exceeding the nominal pressure;
- interaction of pipes with chemically aggressive substances;
- errors made during the installation process.
Before starting repair work, you should carefully inspect the water supply system and identify the causes of technical problems.
Repair of polypropylene pipes using fittings
If depressurization is diagnosed in the area of the joints (places for installing measuring equipment, connecting fittings and transitions to other types of media), it means that there is a misalignment of the sealing ring installed at the joint, or the fitting is faulty. To carry out renovations in an apartment you need:
- shut off the water supply;
- dismantle the failed joint;
- restore the tightness of the system section at the leak site using a welding machine;
- install a new fitting.
In addition to the soldering machine, rubber clamps and special glue can be used to create sealed joints of polypropylene products. A piece of thin rubber, carefully treated and degreased with alcohol, is used as a patch. You can secure the clamp using wire.
This repair method is temporary. A new fitting must be installed at the failed joint as soon as possible.
To ensure smooth operation of the heating system, it is necessary to install a sufficient amount of measuring equipment to monitor water pressure and temperature. Automation should warn about all problems in a timely manner. In the event of a breakdown, repairing the system yourself will be technically simple. It will also not cause financial difficulties. If you follow the operating rules of the plumbing system, it will last a long time and will not cause problems associated with repair or replacement of equipment.
Do-it-yourself replacement of plumbing and water pipes
When planning to change communications yourself, pay attention to a number of important nuances:
- First of all, decide on the preferred material for pipe structures.
- Do not forget that, among other things, you will have to purchase and install new water intake meters.
- Determine whether it is necessary to replace the shut-off valves where the water supply enters the premises.
- Find out exactly what set of tools you will need to carry out repair work.
- If water purification filters have not been installed previously, make sure they are available in advance. This is the only way to protect plumbing, household appliances and communications from premature failure.
When purchasing liquid purification devices, be sure to consider the products offered by ours. The products in our range are of high quality and have a long service life.
- During the installation of pipe elements, it may be necessary to install valves. To do this, you will have to shut off the common riser, which should also be thought about in advance in order to avoid unforeseen situations.
Only when all of the above issues have been resolved can you proceed directly to action.
Copper pipes
Copper pipes were previously considered elite when there were no plastic pipelines.
Copper has a number of positive properties for which it continues to be praised to this day:
- The antibacterial effect of copper is well known, which is the main reason for its use.
- Thermal conductivity. Copper is an excellent heat transfer agent, allowing it to operate over a very wide temperature range, especially in the refrigeration industry. Copper does not become brittle at low temperatures.
- Reliability and aesthetics. Copper withstands high pressure, its linear expansion is minimal, i.e. it does not “play” when temperatures change.
- Copper is a natural, environmentally friendly material.
When is the best time to change the system?
The ideal time to replace your heating is summer. There is no coolant in the system and neighbors in an apartment building will not complain. There is time to think, purchase materials and complete the work carefully and without haste.
But if a leak occurs and repairing the heating pipes in the apartment is impossible or ineffective (it is impossible to close multiple rusted places with clamps), then there is nowhere to go - we replace them at any time of the year.
What to replace it with?
The choice of types of heating pipes is quite large. Below are their characteristics:
- steel (regular carbon). Inexpensive, but prone to corrosion and overgrowing with calcium salts; pipes are connected by welding - a welding unit and a welder are required. Splashes of metal during welding can spoil any repair - and it is not always possible to completely cover the floor and walls in the place where metal is welded;
- galvanization. Galvanization does not rust for many years, then behaves like a pipe made of ordinary steel. The disadvantages are the same;
- stainless steel. Does not rust or overgrow. Quite difficult to weld. It has proven itself well in private houses, but is not very appropriate in apartment buildings;
- copper. Durable, expensive, very difficult to assemble - not every specialist can do tin soldering;
- stainless corrugated pipe. Does not rust or overgrow. Very flexible, which reduces the number of joints. Easy to cut and install. It is assembled onto fittings that require periodic inspection and maintenance (replacement of seals). It tolerates temperature changes and pressure surges well. Does not withstand significant mechanical loads. Not the cheapest material.
- polypropylene pipes (PPR). Polypropylene is easy to install and solder, bends well, does not rust, deforms little when heated, and easily connects to metal through adapters. Inexpensive material;
- polyvinyl chloride (PVC) pipes. They do not rust, are slightly deformed when heated, are easily soldered and assembled into fittings. Inexpensive material;
- metal-plastic. It has reinforcement made of aluminum tape, plastic - PVC or cross-linked polyethylene. Inexpensive and popular material. They are mounted on special fittings, bend well, and do not rust. They have a small thickness and low mechanical strength - there is a risk of damage. Withstands temperatures up to 95°C;
- pipes with a modified molecular system - pipes made of cross-linked polyethylene PEX. They can withstand temperatures from −110 to +110 °C, operating temperatures up to 95 °C, and are used for pipelines when operating at subzero temperatures. Very durable, bend well, do not rust, mounted using fittings.
In general, for replacing heating risers in apartments, the best option is plastic and metal-plastic, since there is no point in installing an expensive metal pipe in a separate apartment, and no one guarantees that the building has grounding for utility networks. In a country house, the choice of material is determined by personal preferences and financial capabilities.