Do-it-yourself Dutch oven: device, diagrams
Its main function has always been heating.
But years have passed, and this simple scheme has received a lot of improvements and changes corresponding to the 21st century. It was not in vain that we started with a historical fact, because many do not know where the name came from and mistakenly call this stove Galanka.
Of course, this spelling is easier to write, but things should be called by their proper names.
Advice for beginners from professionals
To better understand how to install a Dutch oven and make as few mistakes as possible, you should listen to the following advice from experienced craftsmen:
- If the area of the room in which the Dutch oven will be installed is 40 m2, then it is possible to determine the optimal dimensions of the oven. For a stove whose height is 210 mm, dimensions of 780x580 mm are considered acceptable.
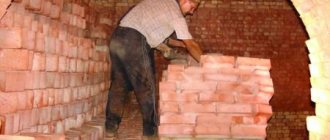
- In order for the masonry to be of the highest quality possible, before laying the bricks, experts recommend immersing each of them in water for a few minutes - during this time, excess air bubbles will be removed from them. This will ensure that during laying the brick will not absorb too much moisture, as a result of which it will turn out to be of better quality.
- Due to the fact that door frames installed during masonry are sensitive to high temperatures, before installing them in the oven they are either varnished or wrapped in asbestos cord. These materials are known to have fire-resistant properties.
- Most often, during the repair of a stove that was in operation, bricks break off at the ends and corners, which will then have to be restored. To prevent such a problem from arising, during brick laying it is advisable to finish it with special plates of various shapes.
- There is another fairly important quality indicator that guarantees long-term operation of a Dutch oven. Experts recommend maintaining the distance between the chimney and the roofing. We must strive to ensure that it is more than 150 mm.
conclusions
Don’t think that building a Dutch oven is completely simple and can be easily done without skills and experience. Rather, on the contrary, it is a process that will require from the master not only technical knowledge, but also attention to detail, accuracy and diligence. In our article, we tried to provide as many practical recommendations as possible from experienced stove makers to make it easier for you to learn this process. We hope that it will help you avoid common mistakes and make a high-quality and functional stove with your own hands. It is worth noting that all recommendations are dictated not only by experience, but also by safety precautions. Therefore, you should not experiment with building a stove, otherwise you cannot avoid serious risks not only to health, but also to life.
Operating principle
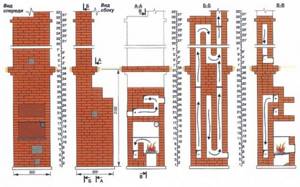
In order for the gases heated by the combustion of fuel to transfer their heat to the bricks as much as possible, their path is deliberately lengthened. Hot gases from the firebox rise through the upward channel, warming up the walls, and cool down. Then they descend to the firebox, warm up and rise up again. The smoke goes into the chimney from the last channel. The Dutch can be “stretched” upward by 2–3 floors, which the Dutch successfully did, saving space, materials, fuel and, minimizing the number of pipes.
Bottom line
Now you know how many bricks are needed for the stove. It is not difficult to calculate the amount of stone needed to build a stove on your own. Errors can only occur in numbers that need to be double-checked several times. Construction work on the construction of a furnace requires not so much an exact amount of material as its good quality. There are a large number of seemingly similar materials on sale, but they all have different quality.
The described calculation methods are used only in cases where the work is planned to be carried out independently. Hired workers will perform all calculations using their own methods. Don’t be afraid to pick up a calculator and then go to the store and purchase the necessary materials in the required volume.
pluskirpich.ru
Prepare the necessary materials
Let's figure out what materials are needed to build a Dutch oven with a stove for your home.
- Standard fire-resistant brick of standard sizes. The answer to the question of how many bricks are needed will depend on the design of the furnace. On average, it will take 200 pieces to fold a Dutch oven.
- Approximately 0.4 cubic meters of clay .
- Sifted river sand without lumps and foreign inclusions, especially organic matter.
- Free access to water.
- A door for the firebox, better than a factory-made one.
- If you are building a heating and cooking stove with a stove, then you will need a ready-made cast iron stove.
The tool is prepared as for any masonry work. After everything is prepared, including the space has been cleared, the material is stored within reach without interrupting the work process, you can begin to build a stove with a stove.
How to calculate how much solution is needed?
It all depends on the amount of building stone. For every 100 bricks you will need at least 30 kg of clay and 70 kg of sand, plus 10-20 kg of cement for the pipe. That is, for the furnace option from Method 1 you will need 260 kilograms of the first component and 607 kilograms of the second. For a 4-meter pipe it is better to take the maximum amount of cement. Also, to increase the strength of the solution, it is recommended to add 150 g of salt for every 10 kg of clay. Only 390 grams.
Video - Dutch oven
Design features
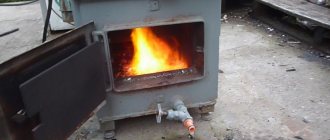
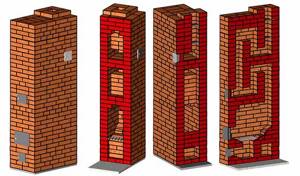
The Dutch oven consists of a very capacious firebox (a niche where firewood and coal are placed), located almost near the floor, six smoke channels - three lifting and three outlet (thanks to which the flue gases gradually heat the stove) and a chimney. Masonry begins after the construction of the reinforced foundation.
The shape of the furnace can be rectangular or round.
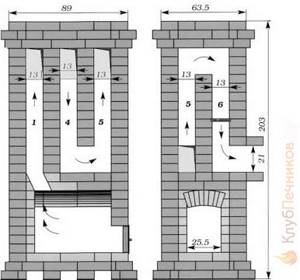
The principle of flue gas movement in a Dutch oven
Flue gases generated during fuel combustion from the furnace enter the first lifting smoke channel. Here they give up their heat and, through the pass, gradually drop to the firebox level along the release channel, where, due to the high temperature, they heat up again and the process repeats. And from the last channel the smoke comes out into the chimney.
This smoke circulation system allows you to effectively warm up the room.
The draft in the classic, outdated model is regulated by the height of the pipe, the valve and the firebox door.
Scheme of the furnace operation
Positive aspects of the Dutch oven
- ability to heat a large space;
- lightness of design (compared to a Russian stove);
- after burning the fuel, the stove heats the room for a long time due to heated bricks that accumulate heat;
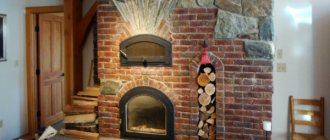
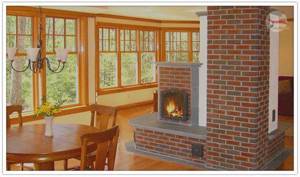
- aesthetic appearance;
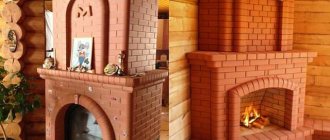
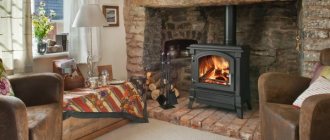
- in modern models it is possible to transform the combustion hole, stylizing it as a fireplace;
- due to the thickness of the masonry of one brick, the structure quickly warms up, while less fuel is consumed than in a Russian stove;
- the ability to combine the stove with boilers and connect it to the water circuit and even to gas burners;
- possibility of using any solid fuel.
Disadvantages of the classical design
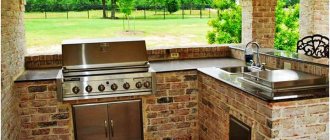
- the absence of a hob does not allow the stove to be used for cooking;
- the absence of a blower in the classic Dutch model does not allow for optimal traction control;
- due to the same design feature, in bad weather with poor draft, smoke may enter the room;
- The absence of a grate and a box for collecting ash complicates the process of cleaning the furnace from combustion products.
- Modern designs are free of these shortcomings. In addition, Dutch ovens can be modified to allow you to bake bread or cook food in ovens, and the blower allows you to regulate the draft and eliminate the possibility of oven gases entering the room.
What will be needed to lay a stove?
The furnace itself will require the following materials:
, How:
- solid stove bricks and refractory bricks (approximate quantity - about two hundred pieces, depending on the volume of masonry);
- roofing felt, waterproofing or special film;
- oven clay;
- river sand;
- cement (concrete);
- plastic wire;
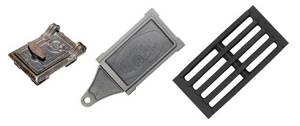
- cast iron doors;
- grate;
- asbestos cord;
- water;
- valve;
- reinforcement for the foundation.
Tools
:
- shovels:
- containers for mixing oven clay;
- fine mesh for sifting sand;
- tape measure and building level.
Important! In order to check the correctness of the drawing, the oven is laid out of bricks on a flat surface without the use of binding materials (clay and cement). This allows you to avoid construction errors.
Preparing clay mortar
This is done in advance, two to three days before the furnace is erected.
Decorative finishing
Any stove, be it Russian, Dutch, Swedish or a sauna structure, consists of several main sections. For each of them, the material should be selected separately, since certain characteristics required specifically for a specific part of the hearth are important.
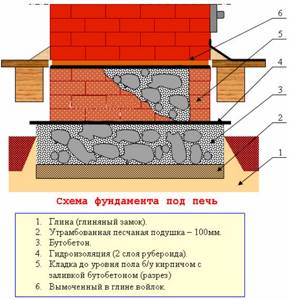
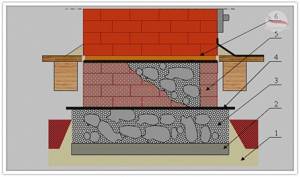
Foundation
The first step is to build the foundation. Since the structure is usually located on the ground floor, the proximity of the ground must be taken into account. Therefore, a concrete slab is usually laid as the first layer, below the floor level, and a layer of waterproofing is applied to it.
Thus, we get a layer that will withstand the mass of our future structure, and also will not allow moisture and cold that come from the soil to affect it. Solid brick rows are usually laid on top of the waterproofing layer; there can be from two to four.
This is the second part of our foundation. As a rule, clinker material is used for it. This is due to the fact that it has very high strength, it is not afraid of loads, so such a base will easily support the weight of the entire stove.
Another section of the design that raises the most questions about the selection of material is the firebox. This is the very place where firewood is laid and where the fire is made. The bricks in the firebox are directly exposed to the flame for a long time, and this happens over many years. Therefore, appropriate requirements are imposed on them.
We suggest you familiarize yourself with How to properly build a brick chimney
As a rule, fireclay blocks are used to lay out the firebox. They have the highest fire resistance of all possible options, so they quietly perform their functions throughout the entire life of the fireplace.
In principle, the entire structure can be assembled from fireclay. But this is very expensive. In addition, the firebox lined with cream-colored fireclay blocks looks very advantageous when surrounded by red brick blocks, so this solution is optimal from the point of view of not only functionality, but also design.
Chimney and pipe
The chimney does not come into direct contact with the fire and does not carry a particularly high load. However, it also has certain requirements.
Firstly, it is exposed from the inside to aggressive chemicals released during combustion. They have a detrimental effect on the condition of the building material from which the inside of the chimney is lined, so special attention should be paid to the resistance of these bricks to various destructive factors.
Secondly, the part of the chimney that is located above the surface of the roof of the house - that is, the pipe - is also subject to attacks from the external environment. Rain and snow, frost, wind, sudden changes in air temperature - all this significantly undermines brick blocks.
Experienced craftsmen recommend using two different materials for this section of the oven. Clinker, as the most resistant to aggressive chemicals, is used for laying out the inner layer. And on the outside, ordinary ceramic bricks are perfect, as they withstand the effects of the external environment very well. It’s not for nothing that many different structures are erected from it, including residential buildings.
The appearance of the fireplace is also important, especially in modern private homes. In principle, if we are talking about an old hut, then usually the structure is simply covered with whitewash, as in the old days.
But still, as a rule, recently preference has been given to finishing with facing bricks. This option is suitable for the Russian oven, and for the Dutch oven, and for other varieties.
When choosing a cladding, you need to consider two factors:
- heat capacity. She must be tall. The brick is required to accumulate as much heat as possible;
- thermal conductivity. This ability is important so that the stove not only stores heat, but also releases it into the room.
As a rule, both of these indicators are present in second-grade ceramic facing bricks. This is the material that experts recommend using for the exterior finishing of the stove structure.
Any stove, be it Russian, Dutch, Swedish or a sauna structure, consists of several main sections. For each of them, the material should be selected separately, since certain characteristics required specifically for a specific part of the hearth are important.
Foundation
The first step is to build the foundation. Since the structure is usually located on the ground floor, the proximity of the ground must be taken into account. Therefore, a concrete slab is usually laid as the first layer, below the floor level, and a layer of waterproofing is applied to it.
Chimney and pipe
Features of the Dutch oven
- capacious firebox without blower;
- the firebox should always be rectangular;
- 3 ascending and 3 descending smoke circulations, thanks to these designs, gases pass sequentially, heating all the walls of the furnace, and exit through the chimney;
- absence of grates.
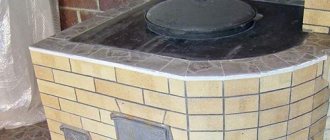
A Dutch oven is mainly used only for heating. You can install a hob on it like on a gas boiler if the surface is covered with asbestos or other non-flammable material. You can also install a water heating system inside it.
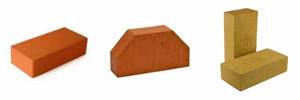
Recommendations for choosing bricks
In order to purchase high-quality material that will not let you down even after several years of use, you should carefully approach the selection procedure. Simple tips will help you do this:
- The counterfeit contains foreign inclusions, such as individual pebbles or pieces of limestone.
- It is advisable to buy the entire amount of material at once from one manufacturer and one batch.
- Brick that was not fired has a pale appearance and deviations from standard dimensions.
- The listed recommendations will help you correctly select and calculate the material for laying the stove. The process itself will require not only high-quality materials, but also solid experience.
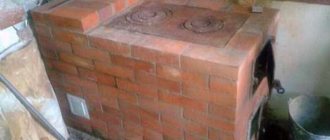
Lay out the Dutch oven
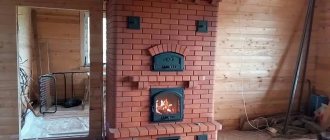
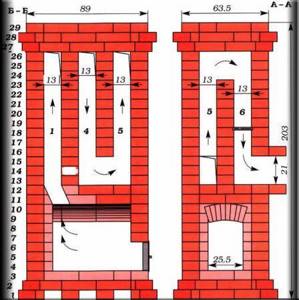
We previously described how to build the simplest version of a stove with three vertical channels with your own hands in a separate step-by-step instruction. This publication presents a variant of a heat-intensive Dutch oven with a horizontal channel system shown in the drawing.
Heater specifications:
- thermal power – 2.5 kW;
- average heated area – 20 m²;
- dimensions in plan – 51 x 89 cm;
- planned height - 35 rows of bricks or 2.45 m (increased if necessary);
- To save heat, an internal cavity is provided, filled with sand.
A traditional Dutch stove is suitable for heating a small private house, cottage or bathhouse. Placed in a convenient location in a heated room with a distance of 10 cm from the foundation of the building and away from the external walls. Since the design does not provide for a hob, the stove is built in a living room - living room or bedroom.
Procurement of building materials
A favorable feature of the Dutch house in terms of economy is the possibility of using second-rate materials, including used bricks. To prepare the solution, you will use ordinary gully clay and carefully sifted quartz sand.
To build the model shown in the drawing, building materials and furnace casting will be required in the following quantities:
- solid ceramic brick of standard size 25 x 12 x 6.5 cm – 400 pcs.;
- main combustion door 250 x 205 mm;
- ash chamber door 13 x 14 cm;
- inspection door for cleaning measuring 130 x 140 mm – 2 products;
- finished grate (grids) 25 x 25 cm;
- chimney damper 130 x 130 cm – 2 products;
- pre-furnace steel sheet 0.5 x 0.7 m;
- roofing felt;
- felt or asbestos cardboard.
Recommendation. Since the combustion chamber is built without the use of refractory stones, high-quality, well-burnt red brick should be selected for its laying.
We arrange a rubble foundation
Since the weight of the structure is about 1.5 tons, it is necessary to construct a foundation that is not connected to the foundation of the existing building. In order to save materials, it is made of rubble - from broken stone, brick and large construction waste. The upper plane of the foundation is brought to the level of the finished floor of the room.
The foundation is laid according to step-by-step instructions:
- Stepping back at least 100 mm from the foundation of the building, dig a pit measuring 61 x 100 cm, which is 100 mm larger than the dimensions of the stove. The depth depends on the location of the dense soil layer and is at least half a meter.
- Place a cushion of sand and compact it. Layer thickness – 10 cm.
- Fill the hole with rubble, compact it thoroughly and pour liquid cement mortar into the gaps between the stones (a budget option is clay with water).
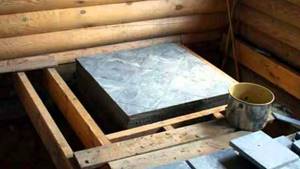
- When the solution has hardened, waterproof the underground part by covering the upper surface with roofing felt folded in half, as prescribed in the diagram.
- Lay retaining walls from any brick to the level of the finished floor, using cement-sand mortar. Fill the internal cavity with rubble stone, as described in the previous paragraphs.
Level the surface of the foundation with cement mortar, wait until it hardens and place a sheet of basalt cardboard or clay-soaked felt on top. The oven base is ready.
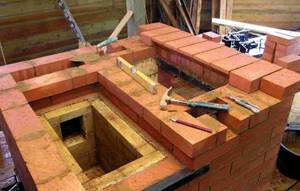
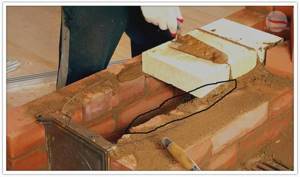
Laying order
For the reliability of construction, it is important to make the masonry mortar correctly. Soak the clay in water for 24 hours, pass through a fine sieve and mix with sand in a 1:1 ratio, then adjust the consistency. A solution that is too fatty subsequently threatens to crack, and a thin solution will not gain the required strength. In the first case, sand is added, in the second - clay.
Calculation of the number of bricks
Regardless of the type of brick block, they all have the same standard dimensions. This makes it possible to use several varieties at once in one masonry, without having to rack your brains trying to align the rows.
Bricks have the following dimensions:
- single (standard) - 250x120x65 millimeters;
- one and a half - 250x120x88 millimeters;
- double - 250x120x138 millimeters.
There are also other options, but these are, as a rule, European standards that are not applied in our country.
For kiln construction, as a rule, single bricks are used, sometimes one-and-a-half bricks. Double is not suitable in this case. The fact is that it is usually hollow, that is, it has a large number of holes in the structure. This is done in order to reduce its weight.
We only need solid blocks. Hollow ones accumulate heat much worse and are destroyed more quickly under the influence of various aggressive factors.
Let's move on directly to the calculations. For them, we need only two indicators: the number of bricks from which the lowest continuous row is laid, that is, the base, and also the number of rows. All this is easy to calculate if you know the dimensions of the blocks you are going to use.
Having calculated the amount of material in the base, multiply it by the number of rows of which the oven will consist. In this case, only those departments that go up to the chimney are taken into account. Subtract a third from the resulting product, and you will have the required number of bricks.
We carry out calculations for the chimney separately. There you take the number of bricks in one row, multiply by the number of rows and do not subtract anything.
That's all. All that remains is to add up the results. Now you know how many bricks you will need to build a fireplace. Don't forget to add about 5% in case of replacing blocks broken during construction. Good luck and warmth in your home!
seberemont.ru
Foundation? Foundation!
A Dutch oven, despite its light weight, needs a foundation. You can equip the foundation in two ways - from cement mortar or from bricks. Both options have their own characteristics.
If free sand and gravel are available, then pouring a cement mixture foundation will be cheaper than a brick foundation. However, this is a labor-intensive process, even with the use of a concrete mixer.
In turn, a Dutch brick foundation will be noticeably more expensive , but at the same time it is much easier to make.
Formation of a cement foundation
Let's consider a method for forming a cement foundation for a Dutch oven.
You need to do the following:
- Prepare a pit, the depth of which is at least 50 cm. The area of the formed base must be larger than the size of the planned furnace.
- Make a cushion of gravel 10-1 cm thick and carefully compact it.
- Install the formwork and place a reinforcing frame made of metal rods, the thickness of which is 1 cm.
- Prepare the cement mixture and gradually pour the reinforcing structure.
- Cover the foundation with cement powder.
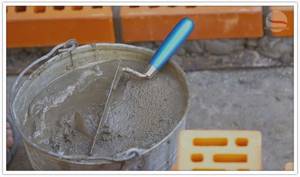
And now the solution.
High-quality masonry of a Dutch oven with a stove requires the preparation of a clay mortar. The strength and heat resistance of the Dutch oven and its tightness during operation depend on the quality of the solution.
If the proportions of the elements that make up the solution are violated, cracking of the furnace and even carbon monoxide leakage are possible.
The ratio of binding elements in the clay mortar depends on its purpose:
- for masonry work or
- for finishing a stove with a stove.
The frozen mixture must have a high level of rigidity. Masonry mortar of the correct consistency will be plastic and viscous, it will not crumble and will not be liquid.
Methods for calculating the amount of bricks
The required amount of brick must be calculated with maximum accuracy and avoid errors in calculations, since if you take too much brick, then the unused material may disappear over time, and if you take too little, then at the end of construction the shortage of brick material will make itself felt and you will not be able to finish the job you started.
There are also universal methods by which you can absolutely accurately calculate how much building material you need. But, before that you will need:
- Tape measure for measurements;
- Plumb lines;
- Trowels;
- Rule.
So let's get started. Counting method number one.
Professional builders put it into a simple and universal formula, thanks to which you can easily find out how much building material is needed.
Well, the formula itself is as follows : you need to take the required number of bricks that will be used when laying the first brick row. The quantity that we received must be multiplied by the number of brick rows (basically, the height of one row is exactly eight centimeters). From the result obtained, you need to subtract one third of the total amount.
For example, the base of a brick stove consists of bricks measuring three by four, then in the bottom row there will be exactly twenty-four bricks.
It is important to know: this formula is conditional and minor errors can be made when calculating.
Next, after we have carried out preliminary calculations, it is necessary to measure the height of the structure. For example, if the height from the floor to the end of the brick structure is exactly two and four millimeters, then from the resulting size you need to subtract thirty centimeters (the height of the cutting itself) and ultimately you get two and nine millimeters. Also, we must not forget about the height of this brick row (seven centimeters) and in this way we get exactly thirty centimeters. Of these thirty centimeters you need to subtract one third (approximately ten pieces of building bricks).