Furnace designs
Brick kilns have not lost their relevance in the private sector for many years. This is due to their economy and efficiency. The thick walls of the structure can retain heat for a long time.
Stoves are distinguished by purpose and are heating, cooking, combined and multifunctional. We will describe each variety below.
For heating
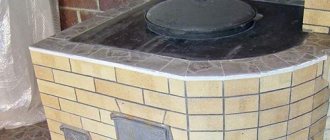
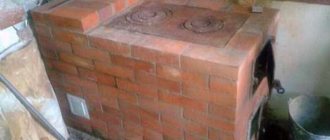
The most common and simplest. Used for heating only. It is mainly used in houses remote from gas pipelines. It is also often installed as a fireplace stove. These include fireplaces that can have a closed or open firebox, which can effectively heat up to 20 m² of space. Includes a combustion chamber (can be laid out or purchased separately), an ash pan and a chimney.
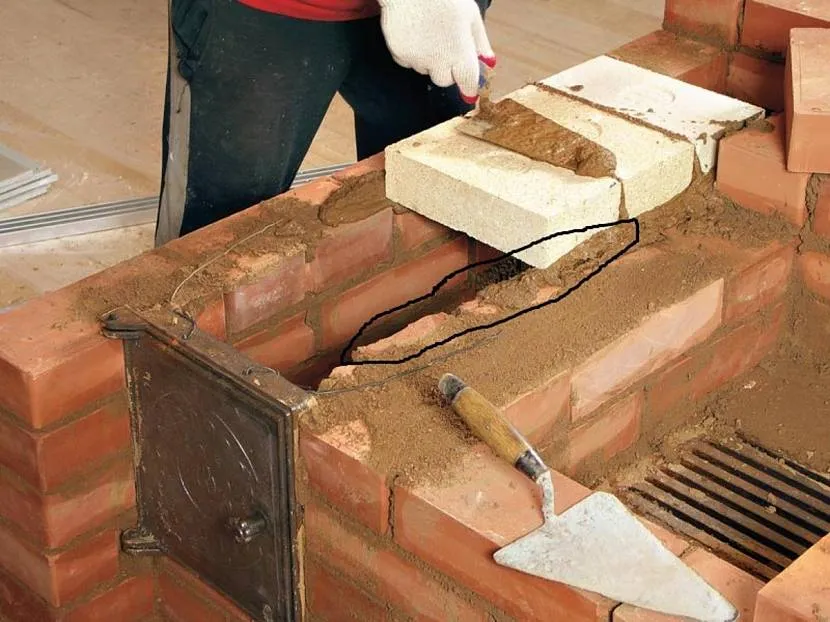
Stove-fireplace in the country Source pechnoy.guru
Heat transfer depends on the type of masonry, the size of the walls and the materials used. The most popular masonry option is one brick. The walls warm up to 600 degrees. The shape can be elongated, wide, round, triangular. The choice of shape depends on the desires of the home owner, the interior and the area of the room itself. Stone, plaster and tiles are used for decoration.
The easiest way is to make a rectangular or square oven. All other options should be entrusted to a good specialist, since there are many nuances and features of masonry that should always be remembered. To increase the tightness, the stove can be equipped with sheet metal on the outside, which makes it possible to heat large houses.
With hob
A good choice for a summer house that is used in warm weather. The emphasis is not on heating, but on the convenience of cooking. Additionally, a tank for heating water can be installed, which ensures comfortable living. Widely used in homes with heating by electricity or natural gas. The building is made of brick, inside the structure there is a chimney, an ash pit and a firebox. Place a stove on top, you can make an oven.
Option with hob and built-in oven Source gost-kamin.ru
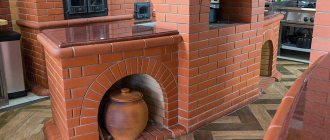
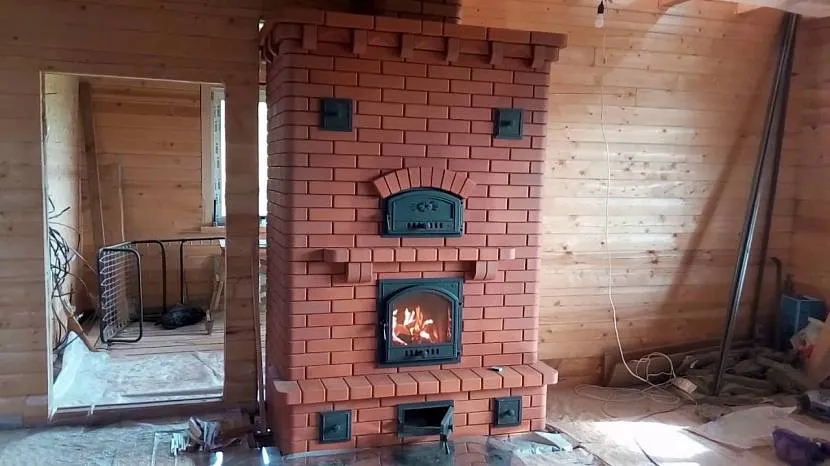
Combined models
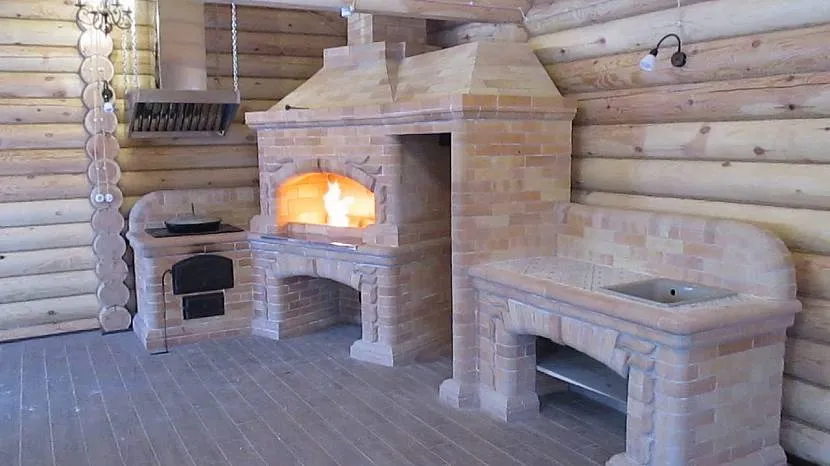
Used for cooking and heating at the same time. The project is much more complicated than the previous ones, since it is necessary to make an ash pit, a fuel combustion chamber, a chimney, install a cabinet and a hob. This option is quite heavy and massive, so it is used for spacious houses that require a solid foundation. Used if there is no other heating method. Sometimes they are equipped with drying chambers for preparing various preparations, clothes, and firewood. They are also often equipped with water tanks, beds, and ovens.
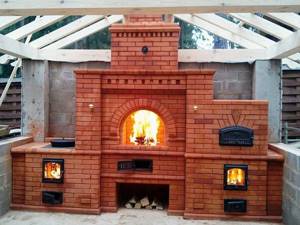
Combined stove in the gazebo Source avatars.mds.yandex.net
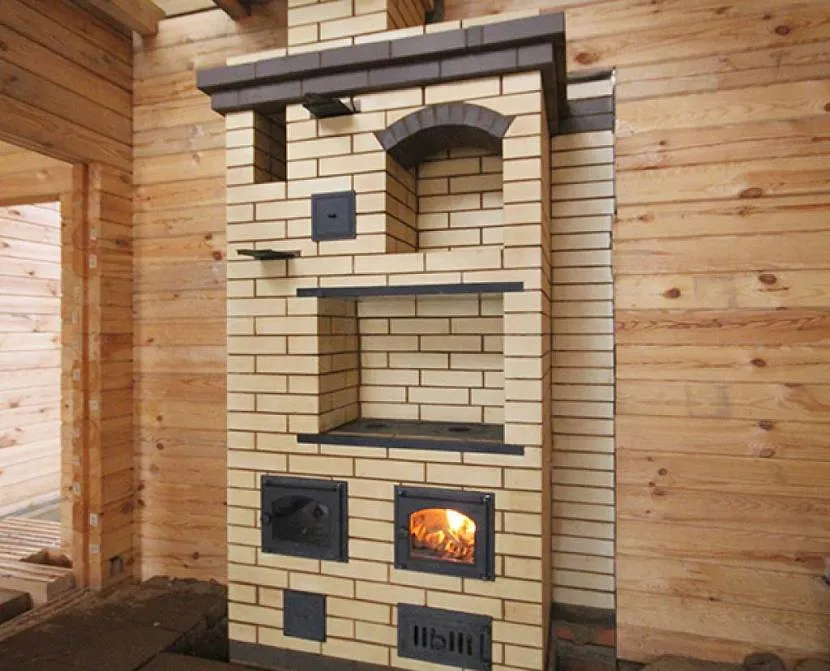
Multifunction ovens
They are mostly done only in large gazebos. They simultaneously heat the structure and allow you to cook food. As in the previous case, they can have an oven and dryer. The main difference between these ovens is that they can additionally have several more sections for frying food over coals or smoking. Naturally, it is simply impossible to make such a stove yourself without the appropriate skills and knowledge. Therefore, trust the work to qualified craftsmen with extensive experience. This is the only way you will get a good result that will always please you.
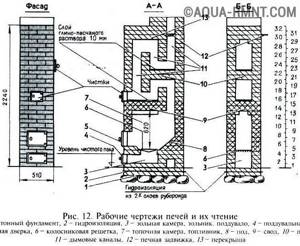
Construction, material base
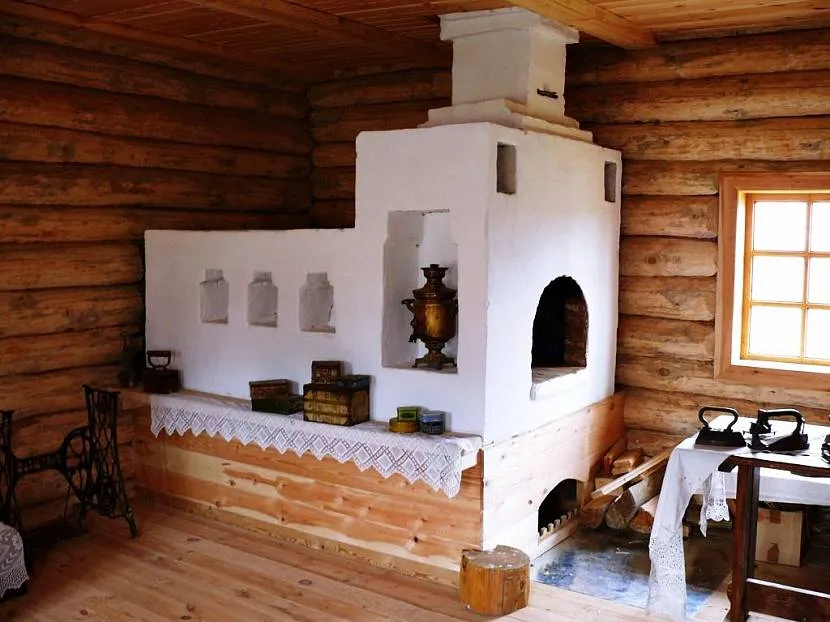
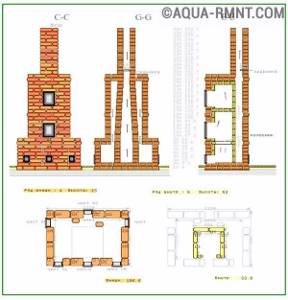
A traditional Russian stove is a massive stone structure of intermittent operation, heating and cooking type, equipped with a stove bench.
Thanks to its high heat capacity, the stove accumulates heat and releases it into the room for a long time after heating. Therefore, the room does not get cold, even if it is not possible to continuously maintain the fire. The standard dimensions of a Russian stove were tied to arshins, but when converted to the usual centimeters they are usually rounded.
- Length – 3 arshins (about 213 cm, now 210 cm).
- Width – 2 arshins (about 142 cm, now 140 cm).
- The height to the bed is 2.5 arshins (about 178 cm, now 180 cm).
A Russian stove of this size could heat a room of about 40 m². With the use of modern energy saving technologies, this area can be significantly increased. What then, what now, the shape can be whatever you want, but the design of the classic Russian stove is unchanged.
- Ward - a foundation (stone, brick, concrete, wood); if the guard was wooden, it was combined with an under-furnace.
- Podpechek (podpechok) - a cavity under the stove intended for storing and drying fuel.
- The hearth (vault) is the base of the furnace, insulated with backfill (sand, brick chips, expanded clay), which ensures optimal temperature in the cooking/oven zone.
- A stove is a small cavity for storing dishes, if located in the front part, it is called a subrack.
- The shelf is a platform in front of the furnace, where cooked food is left after being removed from the oven.
- Under – the base of the cooking zone, is made with a slight slope forward (so that the gases collect under the arch, and it is more convenient to move the dishes).
- The crucible (cooking zone, firebox) - fuel combustion and food preparation take place in it.
- The vault (sky) is the upper part of the furnace, rectangular, arched or barrel-shaped, with a backfill on top to prevent direct heating of the stove bed.
- A bed (floor, roof) is a platform above the furnace, intended for resting or sleeping, one of the main elements of the classical design.
- Overpipe - the top, a chamber above the pole, ending with a tapering nozzle (hail), in which smoke collects, giving off heat to the house before being discharged into the chimney.
- View - a valve with a hole above the hilum, located behind the door, through which the flow of cold air from the pipe is regulated.
- Pipe (chimney).
- The valve is located in the pipe, above the view, and allows you to completely close the chimney.
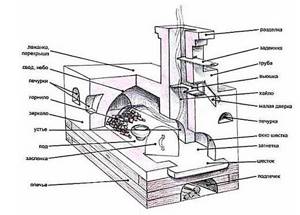
And an example of a stove with a stone base.
In the classic version, Russian stoves are bell-type structures with a channelless convective system. Since the heat source is located almost a meter high from the floor, and in the oven there are not only no channels, but it is also insulated, the temperature difference in the room can be more than ten degrees. In modern stoves used for cooking and heating, this problem is solved by installing chimneys instead of ovens, ensuring uniform heating of the room at all levels. And there can be several fireboxes, depending on the required functionality.
Increasingly, outdoor complexes are being built on the basis of Russian stoves, the main task of which is to prepare dishes in various modes. These stoves no longer have a bench, they are much smaller in size, and to maintain the temperature in the cooking zone as efficiently as possible during construction, thermal insulation materials are used.
Another modification is to make a small firebox under the hearth so that you can cook in the warm season without having to heat the entire oven and room. Often in such ovens, the firebox above the firebox is equipped with grates to create a barbecue, or a metal hob is installed.
As for the masonry material, the best option is a special oven brick designed for high heat. But structures made of red solid brick, in combination with fireclay in the area of the firebox and mouths, are also quite viable.
The main condition is that the brick must be of high quality, not burnt, with a smooth surface and good geometry, since the seams are thin and it will not be possible to play with mortar.
There are decorative bricks with chamfers and arched ones on sale, but many process ordinary bricks - both economically and manually.
Today there are no problems with various specialized masonry mortars, although our predecessors got by just fine with mixtures based on fatty clay and river sand. Before use, the clay was thoroughly crushed and sifted, and the sifted sand was calcined. The proportions varied - either sand and clay in equal parts, and water one part of the volume, or more sand (up to five parts). Since difficulties usually arise with the right clay, there are not only ready-made mixtures on sale, but also oven clay separately. A brick oven without further finishing also looks aesthetically pleasing, but if desired, it can be lined. Stoves plastered with clay and whitewashed will look organic only in an appropriately decorated room.
Simple and economical furnace laying
There are several options for how to build a brick oven with your own hands for a house with a stove, step by step and correctly. First of all, you must first determine what the main purpose of the structure is - heating or for cooking. You may choose an option with the additional elements listed above or a direct-flow design. The main thing in resolving this issue is the purpose of the future design.
Design of a small stove Source avatars.mds.yandex.net
Designs with weak gas revolutions do not provide high heat transfer. They are mainly used for small areas - up to 16 m² and garages.
With hob
How to make a stove of this type is described below. The simplest model is small in size - 78x53 cm (WxD) and allows you to place one burner. You can use red brick, but it must be selected very carefully - only smooth and without cracks. This will save on the purchase of fireproof stones.
For the solution, take clay/water/sand (4/1/8 hours). The amount of mortar is determined in accordance with the amount of brick. If the seam is 3-5 mm, then it will be enough for 50 pieces. stones.
The process of laying a slightly smaller stove is as follows:
- A base is prepared that is approximately 10 cm wider than the future structure; the first brick on the base is placed at floor level. With an underground of 0.5 m or more, a hole is not needed.
- Formwork is made 74x61 cm, roofing material is placed on top (in two layers) and concrete is poured. Construction of the structure begins in 7 days and not earlier. It is necessary that the foundation dries well, otherwise the structure will simply sag, may tilt and crack.
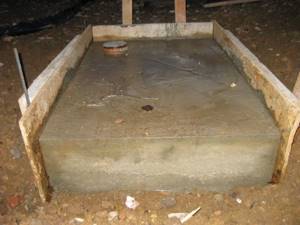
Foundation for a stove Source bricks.su
- The depth of the structure is 3 stones, the width is half as much - 1.5 (76x39 cm). The stones are adjusted first without mortar. The layer of mortar for the bottom row is no more than 5 mm.
- On the next tier a hole is left for the blower door. Fastening occurs with wire, its ends are laid in the seams. They leave a gap between the metal and the stone.
- 4 tiers of stones are laid on edge, a firebox is created, and a smoke circulation is created at the back. One stone is placed at the back without using mortar; it must be removed to clean the chamber. Two stands are made in the chimney; they hold the partitions.
- The 5th row is laid flat, leaving a hole for the door, there will be channels at the back.
- From the 8th the door is closed. A brick with a beveled end is placed in the back of the firebox.
- After the 9th tier, a cord (asbestos) is laid, it is used as a sealing material for joints.
- On the 10th, the firebox is covered with a stove.
- Row 11, a valve is placed in the pipe, the pipe is sealed with a cord.
On the next 2 tiers the walls of the pipe are made. How to build a brick oven with your own hands for a house with a small stove - stick to this design and everything will work out. But we must remember that there are a number of nuances and emerging difficulties that need to be resolved immediately. If you make mistakes, you will not get the desired result. Therefore, it is better to contact a specialist.
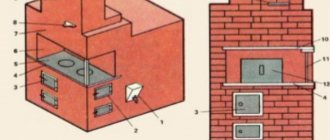
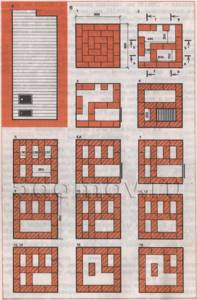
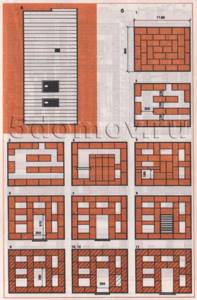
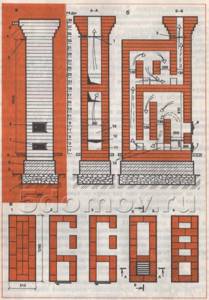
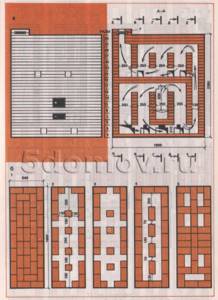
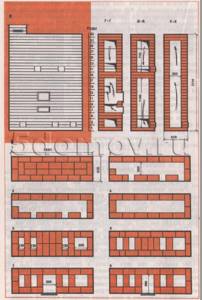
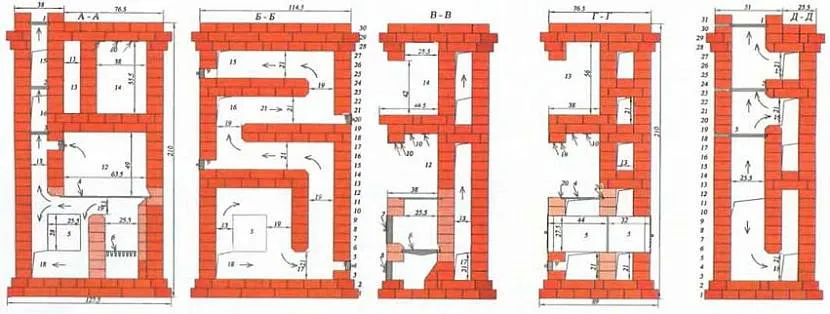
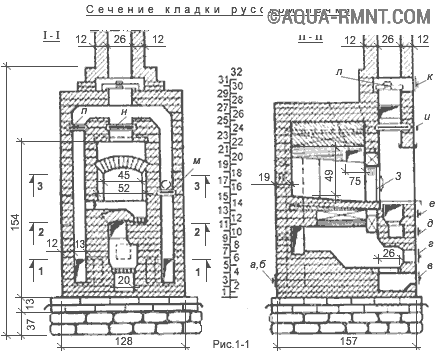
Heating stove with bottom heating size 770×770 mm
The heating stove has dimensions, mm: 770x770x2310 (see Fig. 2).
Rice. 2. Heating stove with bottom heating, size 770×770 mm a - facade; b - sections A-A, B-B; c - masonry 1-13 rows; d - sections B-C, D-G; d - masonry 14-35 rows; 1 - smoke valve; 2 — holes for cleaning; 3 - combustion door; 4 — blower door; 5 - firebox; 6 — grate; 7 - ash chamber
Rice. 2. Heating stove with bottom heating, size 770×770 mm g - sections B-C, D-G; d - masonry 14-35 rows; 1 - smoke valve; 2 — holes for cleaning; 3 - combustion door; 4 — blower door; 5 - firebox; 6 — grate; 7 - ash chamber
Material consumption (excluding foundation and pipes) is as follows:
- red brick – 230 pcs.,
- fire-resistant brick - 210 pcs.,
- red clay - 12 buckets,
- fireproof clay - 6 buckets,
- sand - 7 buckets,
- fire door - 250×210 mm,
- blower door - 250×140 mm,
- smoke valve - 130×250 mm,
- grate - 300×252 mm,
- cleaning doors size 130×140 mm - 6 pcs.,
- pre-furnace sheet - 500×700 mm.
The stove can be built by one stove within 18-20 hours; in addition, it takes about 5 hours to carry the material and prepare the clay-sand solution.
The stove is designed to heat a room up to 20 m². The heat output of the furnace with a one-time firebox (with anthracite consumption of up to 12.2 kg) is about 3 kW (2600 kcal/h). The heat output of the lower part of the furnace is 2.3 kW (2000 kcal/h). The heat output of the stove with double firing increases to 3.7 kW (3200 kcal/h).
It is advisable to use anthracite and coal as fuel, but in their absence, you can use firewood, coal briquettes and peat briquettes.
The laying of the furnace in rows does not differ from the previous heating furnace with dimensions of 770x640 mm.
Video description
How to lay a small stove, watch the video:
Direct flow type
There is nothing particularly difficult about how to make a direct-flow furnace. But it is very important to strictly adhere to all requirements and be sure to choose a quality stone.
Used for heating small rooms. A strong foundation is needed. Design dimensions 51x64 cm (WxD).
The arrangement of the furnace is as follows:
- For the foundation, crushed stone is poured into a layer of up to 20 cm and filled with mortar. Each stage must be carefully aligned. You can lay the stone only after a few days.
- The depth of the structure is 2.5 stones, the width is 2. There is no blower chamber; instead, holes are drilled in the door.
- Only the 6th row will cover the door. The general procedure is very simple, you just need to observe the dressing.
- From the 8th row, the structure is narrowed using halves of ¾ pieces of stone. Firebox outlet 12.5x25 cm.
- The 9th row is laid with a whole brick, similar to the 7th.
Laying a direct-flow furnace Source blog-potolok.ru
- The next row is placed edge flush with the inner edge.
- Then again, flat (4 pcs. ¾ and 2 pcs. whole), narrowing the smoke channel.
- Next, the stones are edge-on, there is a brick in the middle of the channel, the structure rises 5 tiers.
All other channels are laid flat. On the last 2, the channel is narrowed in halves to dimensions of 12x12 cm. The valve and pipe are installed last.
See also: Catalog of companies that specialize in the installation of stoves and fireplaces, grill houses and gazebos.
For heating
Let's look at how to build a brick stove for heating. For example, let's take a stove 51cm x 90cm x 2m 38cm (WxDxH).
The following materials will be required:
- sand/clay/brick (18/9 buckets/390 pieces, red, solid);
- doors (cleaning and blowing doors);
- roll of waterproofing roofing felt (60cm x 1m);
- one valve and grid 40x25 cm;
- one pre-furnace steel sheet 70x50 cm.
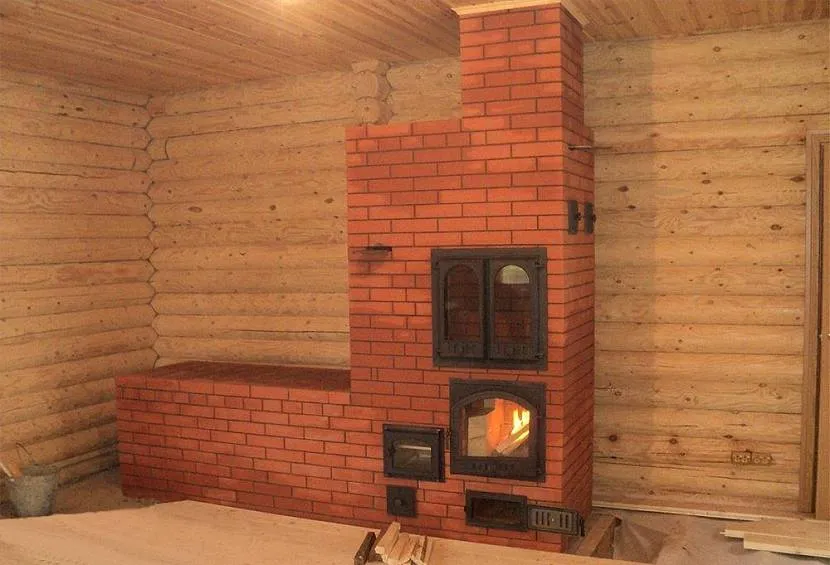
Brick stove-fireplace for heating Source svoimirukami.lesstroy.net
The masonry process is as follows:
- The base protruding in the first row is laid. Be sure to check the horizontal level with a level. The hardest thing to work with is the corners. It is recommended to install template posts at the corners from bottom to top.
- Two stones with beveled edges are placed at the end.
- The air vent door is installed and secured.
- On the next 2 tiers an ash chamber is made.
- The fire chamber is laid out and a grate is installed.
- The firebox door is placed from the 7th to 8th tiers, beveled bricks are placed at the back (they improve the draft inside the stove).
- At 9 the firebox door is closed.
- The smoke exhaust and fuel chamber are placed from rows 10 to 16.
- The cleaning door is installed on the 17th row.
- Smoke circulation channels are made on 18-30 rows. The walls must be smooth; the inside of the walls must be rubbed with a wet rag.
- On the next two tiers, the roof of the furnace is made.
- The last 2 tiers are laid out for the chimney.
Laying a heating stove Source eurolain.ru
How to make a brick stove for your home with your own hands, if the room is small, is described above. The main thing is to adhere to all requirements and rules. Upon completion of the masonry, the structure must be left to dry. After seven days, a test fire is required.
Economical option
If your budget is limited and the room itself is small, then such a design will be a real salvation. There are many fairly simple designs for economical stoves. You can try making them yourself or order installation. But in any case, you need to understand how to lay a brick stove with your own hands. Even if you don’t do the masonry yourself, knowing how to build a stove will allow you to control all the work.

Heating stove Source i.ytimg.com
Heating stove with bottom heating size 890×890 mm
The heating stove has dimensions, mm: 890x890x2310.
Material consumption (excluding foundation and pipes) is as follows:
- red brick - 340 pcs.,
- fire-resistant brick - 270 pcs.,
- red clay - 16 buckets,
- fireproof clay - 7 buckets,
- sand - 10 buckets,
- fire door - 250×210 mm,
- blower door - 250×140 mm,
- smoke valve - 130×250 mm,
- grate - 380-252 mm,
- cleaning doors measuring 130×140 mm - 10 pcs.,
- pre-furnace sheet - 500×700 mm.
The stove can be built by one stove within 24 hours; in addition, it takes about 6 hours to carry the material and prepare the clay-sand solution.
The stove is designed to heat a room up to 25-30 m2. The heat output of the furnace with a one-time firebox is about 3.7 kW (3200 kcal/h), and with a two-time firebox - 4.7 kW (4000 kcal/h). Drawings of sections of the furnace and the order of masonry are shown in Fig. 3.
Rice. 3. Heating stove with bottom heating, size 890×890 mm a - facade; b - masonry 1-16 rows;
Rice. 3. Continuation in - sections A-A, B-B, C-C, D-G; g - 17 - 27 rows
Rice. 3. Continuation d - laying 28-35 rows
Laying a stove in rows is almost no different from laying a heating stove measuring 770x640 mm. Anthracite, hard coal, coal briquettes, peat briquettes and firewood can be used as fuel. In this furnace, the grate is designed for the use of firewood, coal briquettes and peat briquettes. When using anthracite and hard coal, the grate is laid flat at the back with three rows of refractory bricks.
Video description
For a clear overview of laying and applying mortar, watch the video:
- Duplicate row, but the stones are laid flat.
- The brick is on edge, the walls are wiped with a wet rag.
- The brick is laid flat, and on the back side - on the edge.
- Next, the firebox is closed, 2 bricks should hang over the chamber (if the structure is planned to be used as a fireplace and the firebox is not covered), the flame will be directed to the middle of the structure.
- The stones are moved a little to the back side, they will support the door. Before laying the brick, wet strips of asbestos are laid to seal it. The panel cannot be placed on the mortar - cracks will appear due to the difference in thermal expansion.
- A pipe is formed to remove smoke. A smooth expansion is made towards the back. Stone is used for the base; light metal is used for everything else.
- A valve is installed, it is necessarily sealed with asbestos, first coated with a solution. This completes the construction of the structure.
Decorated stove for cooking and heating Source mainavi.ru
At the end, several tiers of the chimney are made, and a pipe is inserted into it. The brick (installed without mortar) and all debris are removed. The joint of the structure near the floor is closed for decoration with metal. The structure will dry completely after 1-2 weeks.
How to build a simpler type of oven if you don’t have the time, necessary materials or skills? Take advantage of the following structure, which can be erected in just a few hours. It has the simplest operating principle.
Fuel is placed below, which burns there, and where it settles. The draft is created by temperature changes. This design is characterized by a minimal amount of smoke and almost complete combustion of fuel. For this option, two half stones and 20 whole bricks are enough. There are five rows in the stove, the stones are tied together with mortar, but you can lay out the stove without using it - it will be a temporary structure.
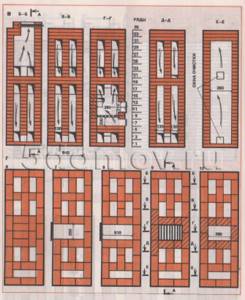
Heating stove with bottom heating size 1160×890 mm
The heating stove has dimensions, mm: 1160x890x2240.
Material consumption is as follows:
- red brick - 580 pcs.,
- fire-resistant brick - 140 pcs.,
- red clay - 22 buckets,
- fireproof clay - 5 buckets,
- sand - 13 buckets,
- fire door - 250×210 mm,
- blower door - 250×140 mm,
- smoke valve - 130×250 mm,
- grate - 380×252 mm,
- cleaning doors measuring 130×140 mm - 9 pcs.,
- pre-furnace sheet - 500×700 mm.
The stove can be built by one stove within 26 hours; in addition, it will take about 6 hours to prepare the clay-sand mortar and carry the material.
The stove is designed to heat a room up to 45 m2. The heat output of the furnace with a one-time firebox is 4.3 kW (3700 kcal/h), and with a two-time firebox - 5.4 kW (4600 kcal/h).
In this furnace, the grate is designed to use firewood, coal briquettes and peat briquettes as fuel. When using anthracite and hard coal, the grate is laid at the back with refractory bricks on the edge.
Drawings of sections and order of masonry are shown in Fig. 5.
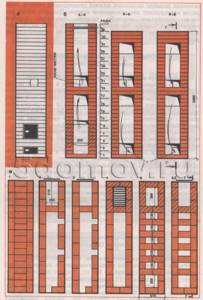
Rice. 5. Heating stove with bottom heating, size 1160×890 mm a - facade; b - masonry 1-12 rows
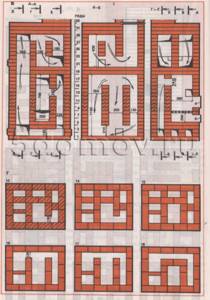
Rice. 5. Continuation in - sections A-A, B-B, D-G; g - masonry 13-18 rows
Rice. 5. Continuation d - sections B-C, D-D, E-E; e - masonry 19-28 rows; 1 - firebox; 2 - ash chamber; 3 - grate; 4 - combustion door; 5 — blower door; 6 — cleaning holes; 7 - smoke valve
Rice. 5. Continuation - masonry 29-32 rows
When laying the second row, it is necessary to strictly adhere to the order, since this row forms a system of chimneys for the lower heating chamber. The bottom of the ash chamber is laid with masonry of the fourth and fifth rows. When laying the sixth row, a blower door is attached to the masonry.
Otherwise, the laying of the stove is not difficult and is similar to the laying of previous stoves, but you must strictly adhere to the procedures: you should not make unjustified narrowing of the chimneys. The pipe is placed in five bricks with an internal size of 130x250 mm.
Advantages of a simple stove
All simple type ovens have many unique advantages. For example, a minimum of time is spent on their construction. Some models can be erected in just an hour, while others take 1-2 days to install. Small structures are lightweight, which means they do not require a foundation, which saves time, money and effort. You can choose any place to install the structure; if mobile versions are made without using a binder solution, then it can be disassembled at any time, moved and installed in a new location. Any materials can be used for fuel - pine cones, logs, stems of large plants, and so on.

Option for decorating a fireplace stove Source o-remonte.com
It is also important that such designs have lower fuel cell consumption. For example, compared to potbelly stoves, you will need several times less firewood. If you use the simplest stove without binding stones with clay, you can increase the heat transfer, which will be greater than from an open fire. This is a great option for hiking, but not very convenient if you travel without transport. Since the brick is heavy and capacious, it is inconvenient and difficult to carry.
An additional big advantage is the minimal level of smoke, and the fuel itself practically burns without waste. After good heating, the temperature of the stones can reach 1 thousand degrees, which guarantees not only good and fast heating, but also quick cooking of various dishes.
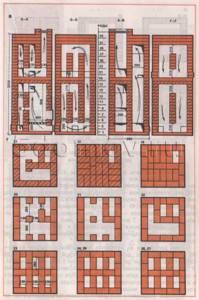
Heating stove with bottom heating size 1290×510 mm
The heating stove has dimensions, mm: 1290x510x2310 (see Fig. 6).
Rice. 6. Heating stove size 510×1290 mm a - facade; b - sections A-A; c - masonry 1-5 rows; 1 - foundation in the ground; 2 - soil; 3 - smoke valve; 4 - cutting; 5 - ceiling; 6 - combustion door; 7 — blower door; 8 - waterproofing; 9 - external foundation; 10 - firebox; 11 - ash chamber; 12 — grate; 13 - holes for cleaning
Rice. 6. Continuation of d - masonry 6-30, 33 rows
Rice. 6. Continuation d - masonry 31,32, 34-40 rows
Material consumption (without foundation and pipe) is as follows:
- red brick - 400 pcs.
- fire-resistant brick - 220 pcs.,
- red clay - 16 buckets,
- fireproof clay - 10 buckets,
- sand - 11 buckets,
- fire door - 250×210 mm.,
- blower door - 250×140 mm,
- smoke valve 130×250 mm,
- grate - 300×250 mm,
- cleaning doors measuring 130×140 mm - 4 pcs.,
- pre-furnace sheet - 550×700 mm.
The stove can be folded by one stove within 24 hours; in addition, it will take about 6 hours to prepare the solution and carry the material.
The heat output of the stove with a one-time firebox is about 3.8 kW (3300 kcal/h), with a two-time firebox - 5.1 kW 14,400 kcal/h)^ The stove is designed for heating a room up to 35 m2. It is advisable to lay the furnace from the fourth to the eighteenth row using refractory bricks. With proper operation, the efficiency of this furnace can be up to 80%, and when using hermetic (furnace and blower) doors it reaches 85%.
The laying of the stove is simple, it is carried out according to the procedures, while observing the correct alternation of seams.
Do you need a drawing?
Drawings “how to build a stove with your own hands correctly” are not required in this case, especially if a specialist is working. A clear and detailed description allows you to do without them. It is the simplicity of the designs and minimal costs that make it possible to save yourself from complex and lengthy work.
A high-quality and detailed drawing is only necessary if you are building a large stationary stove for heating your home and cooking food. But even in this case, an experienced specialist can do without it.
Multifunctional large oven Source i.ytimg.com
Where is the best place to install?
The grub can be installed almost anywhere. If your furnace only serves to heat the house, it is better to build it in a utility room to free up space in the main part of the house and prevent smoke from entering the living rooms.
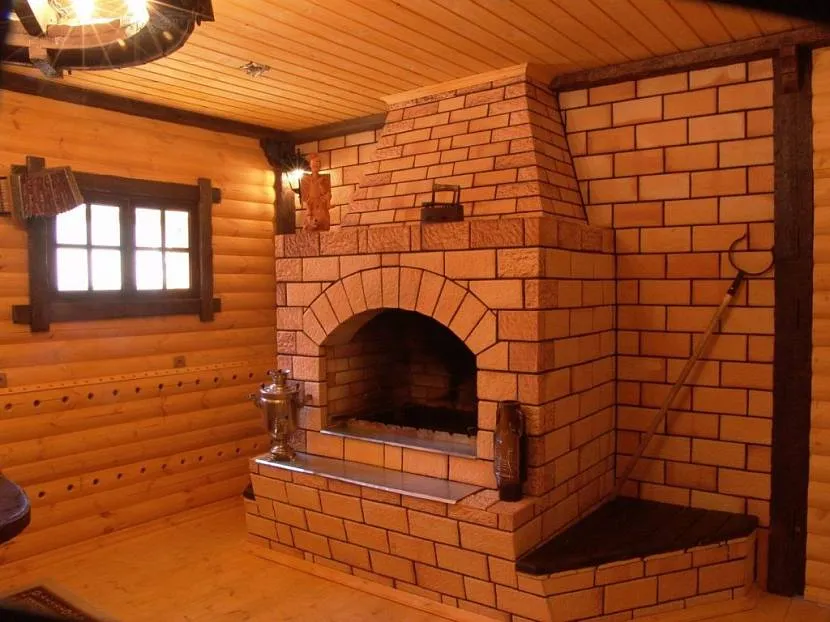
If the user of the stove wants to build a simplified, beautiful fireplace for himself, it is better to install it in a room that is a gathering place for family and guests. Everyone will appreciate an unusual and attractive element of the interior if the stove is built carefully, additionally covering it with a special facing material.
When building a stove with a built-in panel, the best place for installation will be the kitchen. In this case, the grinder functions as a hob; cooking food on it will not only give the food a special taste, but will also significantly save electricity or gas.
It is important that the area where the stove is installed has a sufficiently strong floor. The roof where the chimney passes must not be altered.
Choosing a wood stove for home heating
There are a huge number of options and modifications of modern heating stoves. As the number of options increases, the problem of choice always arises. Usually guided by the following principles:
- The size of the stove should be selected based on the dimensions of the room and the number of heated rooms;
- functional purpose: cooking, heating, combined;
- correct selection of furnace power.
Everyone's taste preferences are different. It is difficult to give advice on this matter. You must always proceed from the functional purpose of the stove. If the stove just needs to heat, then you can take it to a separate room. If you like an open fire, next to which you can sit on a cold winter evening, then you should choose a design that allows installation inside the house. Such a stove will perfectly complement the interior of the room.
Construction Materials:
building materials for laying a stove
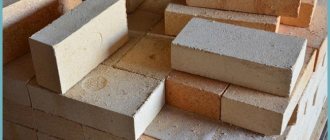
- Kiln brick (fireclay), grade Sh8, can withstand high temperatures (up to + 1600 C), it is usually used to build a firebox, it retains heat well and is durable when compared to other types of bricks.
- Red refractory brick can withstand temperatures up to + 800 C, it is used to install the entire structure of the furnace, it is quite brittle and therefore you need to be extremely careful when transporting and working with it. Read more about firing bricks at home.
- A mastic designed for gluing brickwork that can withstand high temperatures (up to + 1500 C), you can use the ready-made mixture “Garant+”. For better bonding of the stove masonry, we recommend preparing the following solution: take mastic, fireclay powder and fireclay clay in proportions of 1:1:1.
How stove and water heating are combined
Water heating from a stove helps to significantly increase the efficiency of the stove. Although small in size, a stove with a water circuit is capable of heating large areas.
To organize water heating, a heat exchanger is built into the body of the stove, and sometimes it is built into the chimney. Next, pipes are supplied to the heat exchanger, which are subsequently connected to radiators. An expansion tank and pump are installed on the return line. A pump is not necessary, but it helps circulate water in the pipes. Thanks to good circulation, the rooms begin to be heated as soon as the stove is fired. A drainage system is also required to be installed. If the stove will not be used for a long time, for example, in winter, then the water from the system must be drained so that it does not freeze in the pipes and damage them.
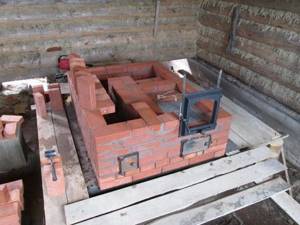
Making a stove with your own hands
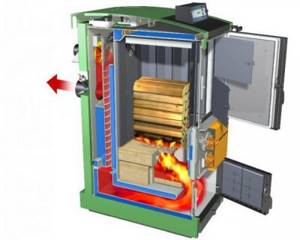
A big advantage will be the purchase of a pyrolysis unit - it is distinguished by long-term burning of wood and increased efficiency.
Stove heating with a water circuit can heat large buildings - it all depends on the power of the stove used. If it is possible to purchase a factory-made wood-burning stove, then this is a plus. Factory units are more accurate and efficient, but they require funds to purchase them.
If there is a shortage of funds, stove heating with a water circuit is implemented on the basis of self-assembled wood-burning stoves. They are assembled from sheet metal and brick. Metal stoves are simple - you need a welding machine to assemble them. They are also extremely compact and do not take up much space. Their brick versions are more voluminous, but they retain heat longer and have a more aesthetic appearance.
Assembling a simple stove with a water circuit for heating a house with your own hands is not difficult for those who know how to handle tools. In this review we will look at two schemes - one of them will help you assemble a stove from metal, and the second from brick. But first, we need to talk about the manufacture of the coil, which is the heart of any heating unit that runs on wood.
Some tips
When planning to build a wood-burning brick stove with your own hands, think about how it will stand in your home. Leave an air gap between the back wall of the house and the wall of the stove and install a sheet of iron there to reflect the heat inward. If you build a brick stove close to the wall, then the wood will heat not only the premises, but also the street.
If you want to heat two rooms at once, mount a brick stove in an adjacent wall, choosing a suitable design - then the convection part will heat both rooms. Remember that each drawing is individual, and different ceiling heights in houses can affect the design of the stove.
When operating a brick stove, do not ignite wood with flammable liquids. Firstly, it is unsafe - detonation of vapors causes the most unexpected consequences. And secondly, constant ignition with odorous liquids can lead to a persistent odor throughout all rooms. Light wood in brick ovens using plain paper or dry kindling. We also recommend not filling the firebox with wood to the very top.
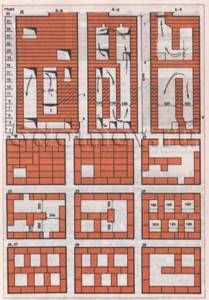
Heating stove with bottom heating size 1880×640 mm
The heating stove has dimensions, mm: 1880x640x2380.
Material consumption (excluding foundation and chimney) is as follows:
- red brick - 950 pcs.,
- fire-resistant brick - 40 pcs.,
- red clay - 29 buckets,
- fireproof clay - 1 bucket,
- sand - 17 buckets,
- fire door - 250×210 mm,
- blower door - 140×250 mm,
- smoke valve - 130×250 mm,
- grate - 380×250 mm,
- doors for cleaning holes measuring 130×140 mm - 12 pcs.,
- pre-furnace sheet - 500×700 mm.
The stove can be folded by one stove maker within 36 hours; In addition, it will take about 10 hours to prepare the solution and carry the material.
The heat output of the stove with a single firebox per day is about 5.5 kW (4700 kcal/h), with two fireboxes - 6.6 kW (5700 kcal/h).^The stove is designed for heating a room up to 55 m2. All types of solid fuel can be used in this stove. The grate is designed for use as fuel with firewood, coal briquettes and peat briquettes. When using anthracite or hard coal as fuel in this furnace, the grate is laid on the edge with refractory bricks.
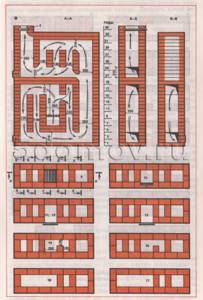
Drawings of the furnace sections and arrangement are shown in Fig. 9. The arrows indicate the movement of flue gases in the furnace chimneys.
Rice. 9. Heating stove with bottom heating, size 1880×640 mm a - facade and section A-A; b - masonry 1-5 rows
Rice. 9. Heating stove with bottom heating, size 1880×640 mm (c) sections B-B, B-C, D-G, D-D, E-E; g - smooth 6-10 rows
Rice. 9. Heating stove with bottom heating, size 1880×640 mm d - masonry 11-28 rows
Rice. 9. Heating stove with bottom heating size 1880×640 mm e - masonry 29-36 rows
Laying a stove is not particularly difficult, but first you need to carefully study the drawings of sections and the order of brick laying.
From the horizontal section (according to A-A Fig. 9, b) it can be seen that there is a horizontal chimney under the ash chamber. The firebox is made of refractory brick.
When laying the second row, you must strictly adhere to the order. The masonry of the fifth row determines the main dimensions of the chimneys of the lower heating chamber. The laying of the twenty-first row must also be carried out strictly in order; a chimney with a width of 130 mm is left here near the vertical channel. The masonry of the twenty-fourth row also determines the main dimensions of the chimneys of the upper heating chamber. The remaining rows of the furnace masonry are similar to the masonry of previous furnaces.
Heating stove with bottom heating, size 1650×510 mm
The heating stove has dimensions, mm: 1650x510x2310.
Material consumption (excluding foundation and chimney) is as follows:
- red brick - 640 pcs.,
- red clay - 22 buckets,
- sand - 12 buckets,
- fire door - 250×210 mm,
- blower door - 140×250 mm,
- smoke valve - 130×250 mm,
- grate - 300×250 mm,
- cleaning doors measuring 130×140 mm - 7 pcs.,
- pre-furnace sheet - 500×700 mm.
The stove can be built by one stove within 26 hours; in addition, it will take about 6 hours to prepare the clay-sand mortar and carry the material. 2
The stove is designed to heat a room up to 50 m2. The heat output of the furnace with a single firebox is 5 kW (4300 kcal/h), with two fireboxes per day - about 6.2 kW (5300 kcal/h). All types of solid fuel can be used in this stove, but when using anthracite and coal, it is advisable to line the stove from the ninth row until the firebox is covered with refractory bricks, and in its absence, the firebox should be laid out using selected red bricks in these rows.
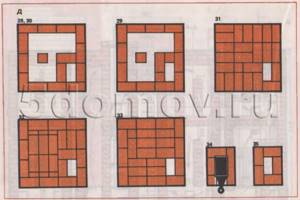
Drawings of sections and ordering are shown in Fig. 7.
Rice. 7. Heating stove with bottom heating, size 1650×510 mm a - facade and sections G-G, D-D, E-E; b - masonry 1-8 rows
Rice. 7. Continuation in - sections A-A, B-B, B-C; g - masonry 9-17 rows
Rice. 7. Continuation d - masonry 18-35 rows
Laying the stove is not particularly difficult. The fifth row determines the main dimensions of the chimneys of the lower heating chamber; this row covers the bottom of the ash chamber. The twenty-fifth row also determines the main dimensions of the chimneys of the upper heating chamber. In a cross-section of the furnace, the inside is visible, as in an x-ray (see horizontal section of the furnace).
More detailed information on working with brick laying
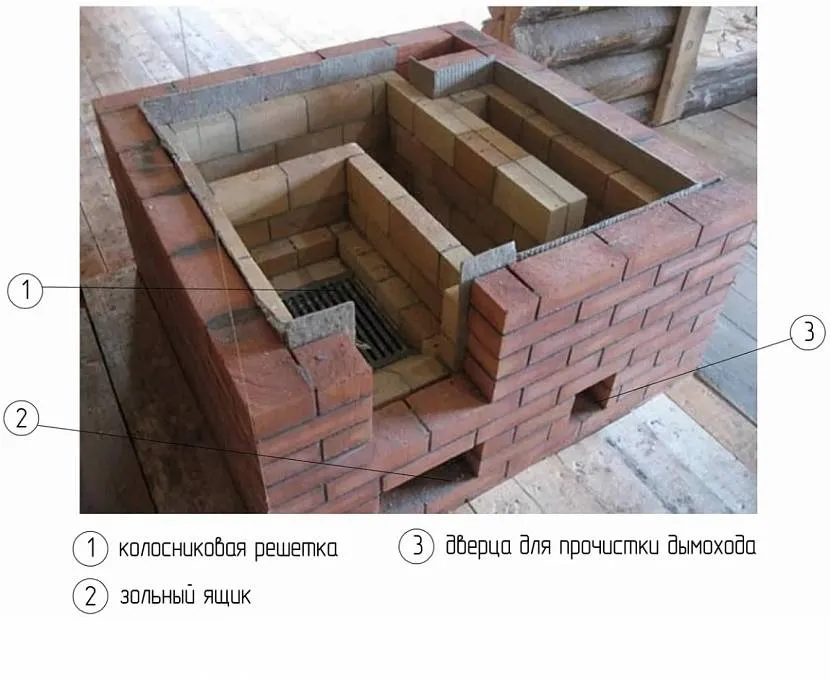
- work on laying out the stove must begin from the corner;
- the brick of the new row must always overlap the joint of the bricks of the previous row;
- the ash door, firebox and grate are installed and secured to the structure using steel wire;
- the mortar used for laying bricks is poured into the space formed behind the grate;
- it is important to remember that the firebox must be laid out with bricks specially designed for this purpose;
- the hob, if it is used during installation, is best placed on a metal corner welded into a single frame, this will allow the structure to be more durable;
- the chimney and chimney of the stove being constructed must have the same opening size.
Read more information about the construction of a large Russian stove at the link.
Schemes and designs of stove heating in the house
Stove heating of a private house is divided into several types according to the design of the firebox:
- Straight-through . Basically, such stoves are made of brick. The principle of their operation is to pass a flow of air through the ash pan, then through the grate, maintaining the combustion of fuel, and then exits through the pipe, already in the form of smoke. The big drawback of this design is its very low efficiency: a significant part of the heat, in the literal sense, simply flies out into the chimney. Once-through furnaces are equipped with special valves that close when the fuel burns out and stops producing carbon monoxide. This allows you to maintain the heat for a long time. Also, to increase the efficiency, during assembly of the furnace, broken glass can be placed in it, which holds the temperature for a very long time.
- Channel . The main feature of such stoves is a system of channels through which smoke moves and uniformly heats the entire stove. Thanks to this solution, the entire structure heats up faster and retains heat well. The heating rate depends directly on the length of the channels and their number.
Channel-type brick oven Source yandex.ru
- Kolpakovaya . The operating principle is based on the movement of flow gases in a natural way. First, they fill the cap, where they cool and then come out on their own through a special cover. This allows the stove to heat evenly and quickly, which then retains heat for a long time, heating the room. Unlike the first two options, this design is easy to maintain. Soot can be easily removed from the hood through a special hole, whereas in the first two cases you will have to clean the chimneys and pipe, which is not very convenient.
- Water circuit . This is not a firebox design, but a fairly common element of the heating circuit that can be installed on any stove. You just need to add a heating tank to the firebox or a coil on the pipe.
Diagrams of various designs of brick kilns Source domvpavlino.ru
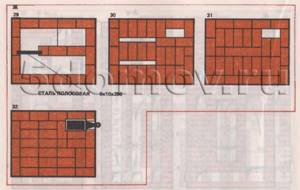
Features of the order of brick stoves
Stoves often serve as interior decoration, so they are lined with clinker, tiles, and tiles. The diagonals in the first row are carefully measured, and a plumb line is hung in the center of the chimney, which is removed on the last rows of the pipe. Also, the diagonals are controlled every 4 rows, and on each row a cord is pulled during installation, which is checked by the rule. Instead of cement-sand mortar, it is recommended to use clay, regardless of the type of furnace being built. Ready-made dry solutions significantly save time spent on clay preparation. To prevent the composition from drying out quickly, the brick must be moistened with water before laying.
Operating costs will be lower if there are no rectangular ledges inside the structure. For this purpose, when creating an overlap (ledge), the stone is tried on without mortar, the overlap line is outlined, and the excess material is cut off with a grinder. Internal seams during laying are regularly checked, and excess mortar is removed from time to time. The pipe is cleaned after completion of the work.
Brick kilns are made of several materials:
- external cladding;
- masonry bricks (main structure);
- fireclay – fireproof material is used to lay out areas exposed to strong heat (furnace, under);
- bricks with high-density edges are located inside the oven.
Clay bricks should not be mixed with fireclay, and ovens, hobs, rods and grates, and water tanks should not be embedded in the masonry - this is due to different expansion coefficients when heated. If metal elements are rigidly embedded in the masonry, the structure will soon collapse.
Heating stove with bottom heating size 2250×510 mm
The heating stove has dimensions, mm: 2250x510x2480.
Material consumption (excluding foundation and chimney) is as follows:
- red brick - 740 pcs.,
- fire-resistant brick - 40 pcs.,
- red clay - 25 buckets,
- fireproof clay - 1 bucket,
- sand - 15 buckets,
- fire door - 250×210 mm,
- blower door - 250×140 mm,
- smoke valve - 130×250 mm,
- grate - 380×252 mm,
- cleaning doors measuring 130×140 mm - 7 pcs.,
- pre-furnace sheet - 500×700 mm.
The stove can be built by one stove within 30 hours; in addition, it will take about 8 hours to prepare the clay-sand mortar and carry the materials.
The heat output of the furnace with a one-time firebox per day is 6 kW (5100 kcal/h), with a two-time firebox - about 7.1 kW (6100 kcal/h). The stove is designed for heating a room up to 60 m². Drawings of sections and ordering are shown in Fig. 8.
Rice. 8. Heating stove with bottom heating, size 2250×510 mm a - facade; b - sections A-A, B-B, B-C; c - masonry 1-6, 8 rows
Rice. 8. Heating stove with bottom heating, size 2250×510 mm g - section G-G; d - masonry 7 - 18 rows
Rice. 8. Heating stove with bottom heating size 2250×510 mm e - masonry 19-36 rows
When laying the fifth row, it is necessary to strictly adhere to the order, since this row determines the main dimensions of the chimneys of the lower heating chamber. The twenty-third row also determines the main dimensions of the chimneys of the upper heating chamber. It is not recommended to reduce or increase the size of chimneys when laying subsequent rows.
Brick or metal?
- It is impossible to get burned on heated ceramics.
- A properly oriented stove can heat several rooms without installing a water heating heat exchanger.
We should not forget that the high heat capacity of brick allows the stove to be fired less often, which makes it economical. A properly built brick stove can effectively heat a small country house during the day.
Metal boiler systems have a lot of significant disadvantages over ceramic ones, namely:
Lack of "breathing". Ceramics have an amazing property: when it cools, it absorbs moisture from the air, and when it heats up, it releases it. As a result, a house with a brick oven always has a comfortable level of humidity.
Tip: By lining a metal heating boiler with slate, you can partially achieve the “breathing” effect.
Short heat dissipation. The heat capacity of metal is significantly less than ceramics. The heat transfer of a metal model usually does not exceed 2 hours after heating.
Advice: a cast iron fireplace stove for long-term combustion partially solves this problem. After facing with stone or ceramics, such a model will not be inferior to a brick model in terms of softness of heat transfer.
Advice: Cladding significantly increases safety when using metal wood-burning stoves, although it deprives them of their main advantage - mobility.
To summarize the above: manufacturers of modern steel and cast iron stoves (in the struggle for this market segment) were able to neutralize almost all the main advantages of brick heating devices. As for the cost part, the cost of a fairly efficient metal pyrolysis furnace is about 30-40 thousand rubles. Laying stoves and fireplaces: the owner will have to pay about 100 thousand rubles for the material alone. plus the cost of a qualified stove-maker with an apprentice – another 100-120 thousand rubles.
Calculation of basic parameters
Before choosing a working design for a heating device, it is necessary to make a preliminary calculation according to the parameters of a particular room. The most accurate method is to determine the dimensions based on the heat output of the furnace. In order not to go into complex calculations, for well-insulated houses they use a simplified calculation scheme proposed by I.V. Kuznetsov. This method uses the average thermal power removed from one square meter of the surface of the unit (TMEP). For a conventional firebox, take the value 0.5 kW/sq. m, and if intensive heating is necessary, which occurs during severe cold weather - up to 0.76 kW/sq. m.
When determining the thermal power of a furnace, only those surfaces that participate in heat exchange processes are taken into account. For example, in “Dutch” systems, sections of walls located near the floor, below the horizontal sections of the gas duct, are not excluded from the calculations.
In principle, these values are enough to select a suitable project from those that can be found in the public domain. If the available options are not suitable for any reason, then you will need to calculate the parameters of the main elements of the furnace and design your own design.
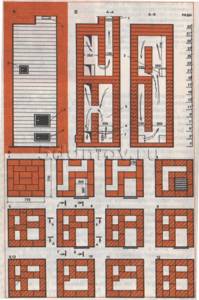
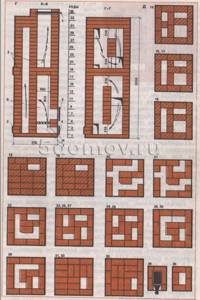
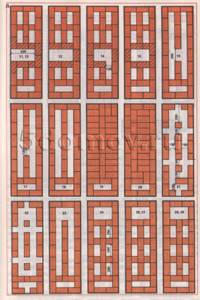
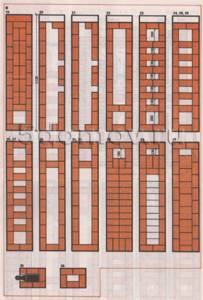
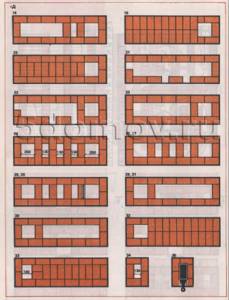
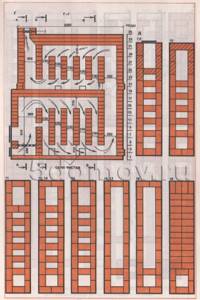
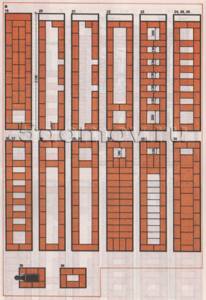
Drawings and diagrams of brick kilns
Bath stove
Russian stove
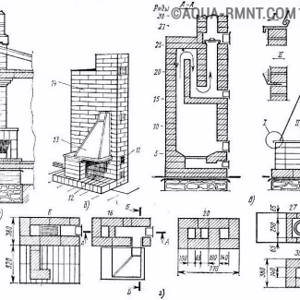
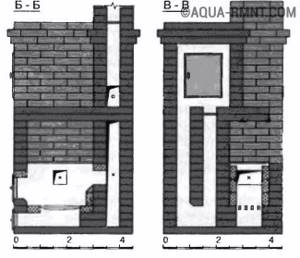
Stove-fireplace
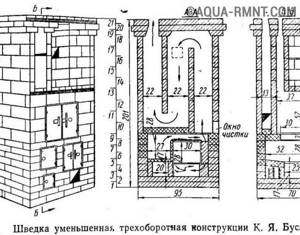
Swedish oven
Classic "Dutch"
Bell furnace
Firebox
The dimensions of the firebox are determined based on the maximum volume of the fuel fill. In this case, the amount of combustible materials is calculated using their calorific value and specific gravity, focusing on the required power. The volume of the firebox should be 2–3 times larger than the obtained value, which will allow the stove to be reheated at extremely low temperatures. When calculating the size of the combustion chamber, it is necessary to take into account that the maximum filling should not exceed 2/3 of the volume of the combustion chamber. In addition, the dimensions of the firebox and all its components must be adjusted to the size of the bricks used for laying the stove. In your calculations, you can use special tables designed taking into account the need to heat rooms of various sizes.
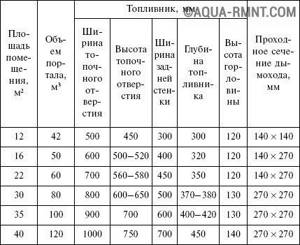
Calculation table for the main elements of a brick kiln
Ash pan
The height of the ash pan depends on the type of fuel used. For low-ash combustible materials such as coal or peat briquettes, this value is taken equal to 1/3 of the height of the firebox. If the stove is heated with wood or pellets, then the height of the ash chamber must be reduced to 1/5.
Chimney
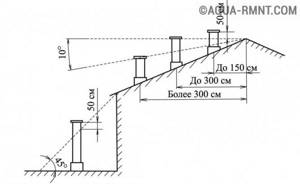
When calculating the chimney, it should be taken into account that the place of its installation must comply with SNiP
Unlike gas heating equipment, wood stoves do not require much draft, so the best shape for the smoke channel would be a rectangle. When calculating the chimney, it is taken into account that the cross-section of the blower should not exceed the area of its flue, and all values are adjusted to the dimensions of a standard brick. Since accurate design requires operating with a lot of data and parameters, it is best to use one of the special programs. However, for the most common cases (no kinks in the smoke channel, vertical stroke, rectangular cross-section, height from 4 to 12 m), you can use average values for furnaces with a power of up to 14 kW:
- Less than 3.5 kW - 140x140 mm.
- 5 – 5.2 kW – 140x200 mm.
- From 5.2 to 7.2 kW - 140x270 mm.
- From 7.2 to 10.5 kW - 200x200 kW.
- 5 – 14 kW – 200x270 mm.
Recommended sizes are minimum. And yet there is no need to excessively increase the cross-section of the smoke channel, since cold air will descend into the stove through a chimney that is too wide. Counterflow, or “swish” in the language of professional stove-makers, threatens not only a deterioration in performance, but also more serious problems.
To calculate the amount of material required, it is best to use special tables. Below is one of them.
Calculation of the number of bricks
You should not worry if the chimney calculated “offhand” occasionally starts to smoke. If necessary, it can be extended with a piece of asbestos-cement pipe 0.5–1 m long, or several more rows of bricks can be laid. Often such events are carried out when the aerodynamics of the terrain have changed. For example, after trees grow or taller buildings are erected in the neighborhood.