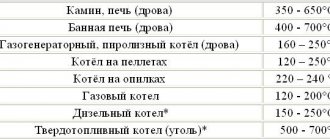
To make brick chimney or ventilation ducts, solid ceramic bricks of grade M75 or M50 or special concrete blocks with rectangular or round ducts are used.
The minimum cross-section of channels made of brick is 14 x 14 cm (14 cm is the size of 1/2 brick with seams), and if they are built from circular elements, their diameter should not be less than 15 cm.
The dimensions of the channels in chimneys less than 5 m high for the removal of smoke or combustion products must be increased to 14 x 20 cm or to a diameter of 18 cm.
Chimney ducts must be laid in the walls between heated rooms.
This will protect them from cooling, which can lead to a weakening of the chimney draft. You should try to group the ducts in such a way that there are as many of them as possible in the common chimney leading above the roof. This will reduce the cost of construction and improve the operating conditions of the chimney, because adjacent channels for removing smoke or combustion products, as well as ventilation ducts, heat each other.
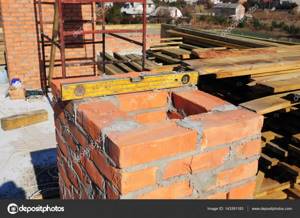
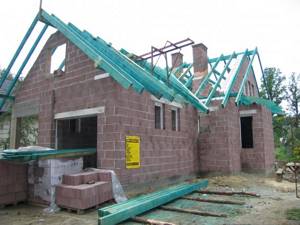
A brick chimney is built simultaneously with the construction of the walls of the house. It is constructed according to the same principle, regardless of whether the channels in it will be used as smoke ducts, ventilation ducts, or both.
Under the chimney it is necessary to build a foundation of solid brick or reinforced concrete, and in any case it is necessary to prepare a foundation design. It must be taken into account that the height of the foundation must be no less than 30 cm, and its length and width must be such that on all sides the foundation protrudes beyond the contour of the chimney by at least 15 cm. If the construction of the chimney is planned as a fragment of the outer wall, the bottom its foundation should be at the level of the bottom of the wall foundation so that it is also below the soil freezing zone.
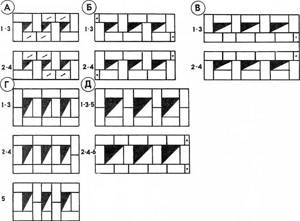
When constructing chimneys, special attention must be paid to their tightness. To build a good chimney, you must adhere to several rules. First of all, the bricks must be laid with dressing, that is, they must be laid in such a way that the vertical seams overlap with the bricks of the previous and next row.
For masonry, you need to use the same mortar as for the load-bearing walls of the house (that is, cement or cement-lime). It is very important that the inner surface of the chimney (chimney channel) is smooth. Therefore, during construction it is worth using special templates.
The vertical seams of each layer of bricks must overlap with the bricks of the previous and next layers. Bricks in the walls, which are partitions between the channels, must be placed at least at one end into the outer walls perpendicular to them.
The thickness of the partitions between the channels for removing combustion products must be at least half a brick, that is, 12 cm.
Between the ventilation ducts they can be twice as narrow. Often the outer walls of the chimney are also made half a brick thick (12 cm). To prevent the combustion products in the chimney from cooling too quickly, it is good to cover the outside of the chimney with a layer of thermal insulation, for example, mineral wool.
- Date: 06-01-2015 Comments: Rating: 34
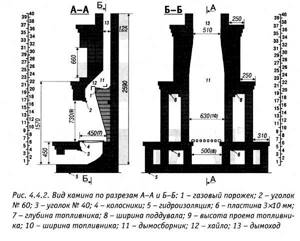
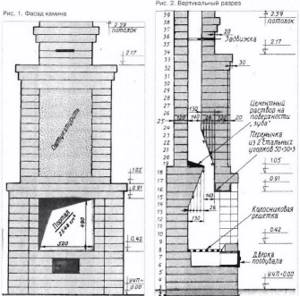
The chimney for the fireplace must be built in accordance with all rules and regulations.
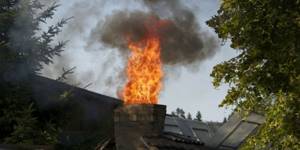
No mistakes should be made at any stage of its design and construction. For example, incorrect calculation of the height of the chimney pipe will lead to the fact that the fireplace will begin to smoke and fill everything around it with soot and soot. Therefore, if you want your heating system to work without problems and complaints, you need to know the rules for building a chimney for a brick fireplace and do everything in strict accordance with the instructions.
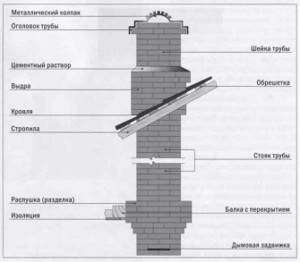
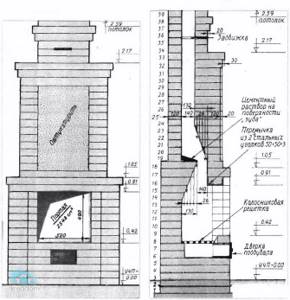
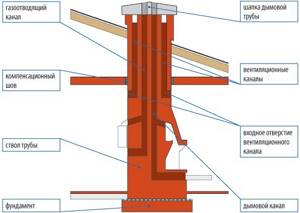
Diagram of a brick chimney.
Determining the size and shape of a brick chimney
The optimal shape for a smoke exhaust pipe is a cylinder.
Corners create additional barriers for smoke, making it difficult to remove. As a result, more soot will accumulate on the walls of the structure. The cylindrical shape is devoid of angles and the mentioned disadvantages.
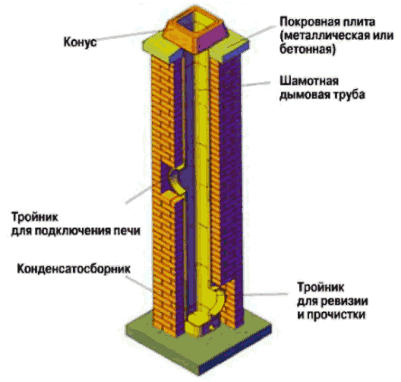
Chimney structure.
The dimensions of a brick chimney - diameter and height - must be calculated taking into account the power of the equipment, existing obstacles in the path of exhaust smoke, their size, and the width of the inlet. In the process of calculating the height, it is necessary to take into account the height of the house itself, the type of roof, the size of neighboring buildings and construction requirements.
In the process of drawing up the project, it must be taken into account that the length of any horizontal section of the smoke exhaust structure should be no more than 1 m. This is due to the fact that heated air moves in a vertical rather than horizontal direction. And if this requirement is neglected, the draft will decrease significantly, as a result of which soot will be intensively deposited in this area.
Return to contents
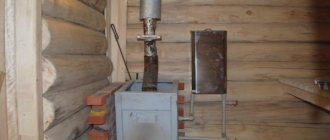
Heating scheme using a fireplace.
Quite often, at the stage of connecting the fireplace to the chimney system, an obstacle arises due to different hole diameters. In such situations, you have to use a special reduction adapter.
In this case, the junction of the fireplace with the brick chimney must be treated with sealant. Next, the structure should be assembled so that it expands upward. Thanks to this technique, condensate will not escape onto the outer walls of the chimney.
The assembly of a brick chimney should be carried out in accordance with a previously prepared project. The masonry is laid out in layers. During the construction process, you need to strive to ensure that there are no roughnesses on the inside of the walls of the structure, and be sure to monitor the tightness of the structure.
If your house already has a ready-made old brick chimney that is suitable for your equipment, then a liner must be made before using it. A steel pipe is installed in the old smoke exhaust structure. During installation, you need to ensure that there is a technical gap between the new chimney and the existing brickwork.
Choosing the chimney height.
In the process of building a brick chimney, in most cases it is necessary to use tees. In the design of such tees, it is necessary to provide special inspection doors for more convenient further maintenance and, of course, take into account the outlet angles.
A brick chimney requires mandatory insulation. It will ensure the safety of not only the smoke exhaust system, but also the entire building as a whole.
Properly organized thermal insulation allows you to speed up the heating of the pipe and reduce the accumulation of condensate. In addition, the insulation will protect combustible materials from the effects of a heated brick pipe. In the process of installing a chimney for a fireplace through the ceilings, it is necessary to carry out work in compliance with fire regulations, taking into account the temperature of the ceiling material and the smoke exhaust pipe itself.
For finishing walls and ceilings located in close proximity to the smoke exhaust duct, it is highly recommended to use only non-combustible materials. Otherwise, you will have to additionally install protective metal sheets.
That part of the brick chimney that faces the street must be additionally fixed and protected from the wind. Protection from various debris and precipitation is provided with the help of nets, deflectors and weather vanes.
Return to contents
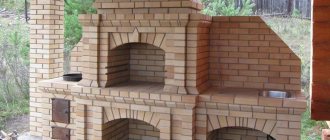
Fireplace diagram.
When building a brick chimney, no mistakes should be made. Any shortcomings lead to serious consequences - from expensive modifications to the structure to smoke poisoning or fire.
Errors that can lead to extremely adverse consequences include:
- Insufficient thermal insulation of the structure. Because of this, nearby materials may char or catch fire. The use of unifying protection of more than one channel with one fungus. Because of this, the ventilation system is destroyed, as a result of which smoke begins to enter the house. Unauthorized modification or repair of a brick chimney without preliminary recalculations.
It is quite difficult to build a technically safe and maximally correct brick chimney in all respects on your own. Every fireplace, house, etc.
d. has individual characteristics. Therefore, at least at the stage of drafting a smoke exhaust system, it is recommended to consult with specialists.
Return to contents
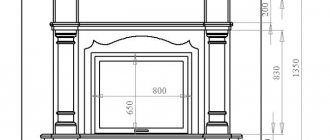
Drawing of a brick fireplace.
During the design and construction of a brick chimney, at each stage it is necessary to strictly comply with all the requirements for such systems. Violation of technology can provoke extremely unfavorable consequences.
First of all, it is impossible to organize an exhaust ventilation system without arranging compensating supply ventilation. You cannot organize smoke removal through channels that have ventilation grilles. Any obstacles on the path of smoke will delay its removal, and this, as already noted, cannot be allowed.
The fireplace itself must be built next to a partition made of non-combustible material, and it must be internal. The smoke exhaust duct must be installed in an external wall, also necessarily made of non-combustible material.
If necessary, external insulation is performed. It will prevent the formation of condensation from gases discharged by the chimney. If there are no walls suitable for placing smoke exhaust ducts, it will be necessary to use mounted or root pipes.
One fireplace can only be connected to one separate chimney or separate smoke channels.
But there is an exception. Two fireplaces can be connected to one chimney only if they are located on the same floor of the building. The connection of pipes requires a cut with a height of 1 m from the bottom connection and a thickness of 120 mm.

If the fireplace is planned to be used for large-scale heating, you can connect a so-called radiator pipe to it, which allows you to increase the heat transfer area. In the future, the combustion intensity will be controlled by regulating air exchange. Or, as an alternative, you can use a damper.
Tools necessary for work: hammer, trowel, building level, square, jointing.
Smoke removal should be organized in the simplest possible way.
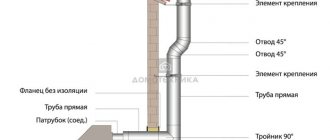
Therefore, the best option is to install a vertical smoke exhaust system with a height of 7 m or more or create a structure with a more complex configuration, having bends with an angle of 45°. If an elbow will be used, then a tee must be installed. Thanks to it, subsequent cleanings will be less difficult.
It is important to consider the location and thermal protection of a brick chimney. The smoke is hot, it will transfer heat to the structure and heat it up, so it is extremely important to provide fire protection for the walls and ceilings. If there is a plastic or wooden structure near the chimney installation site, it must be insulated.
As a rule, basalt wool is used for this. The chimney passage requires additional protection from the cold. A fungus or weather vane is installed at the end of the pipe.
To build a brick chimney yourself, you will need the following materials and tools:
- Container for preparing mortar. Cement mortar (sand and dry cement). A set of chimney pipes with all the required elements. Brick. Sticky aluminum tapes. Square. Lead sheet. Construction level. Trowel. Shovel for mortar. Joining. Stairs. Hammer. Mop.
Return to contents
Brick chimney laying diagram.
When building a chimney yourself, you need to be extremely careful at every stage of the work.
First of all, you need to pay attention to the solution. An ordinary solution consisting of a portion of cement, 3 times more sand and water to a thick sour cream will do. Make sure that no stones or debris get into the solution; check it with your hands.
Each row of masonry must be checked against the order. The structure is erected so that the frame for it does not come into contact with the external walls. As a rule, fireplaces operate in conjunction with an attached pipe that connects to their exhaust vent.
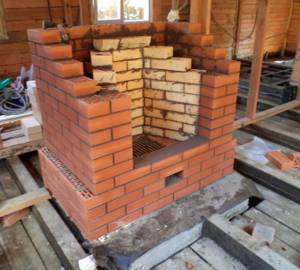
The internal part of the brick chimney structure is laid out on a clay-sand mortar. First, the base of the pipe is laid - at least 3-4 rows. The internal cross-section of the chimney is selected in accordance with the power of the fireplace.
Characteristics of brick.
Make a fluff along the entire length of the ceiling.
It will provide fire protection. The pipe should expand. To do this, you need to shift the brick by 25% of the width to the outer edge.
The base of the extension must coincide with the surface of the ceiling in the room. The thickness of the fluff should be half a meter. If the thickness is insufficient, it will need to be expanded using sheet asbestos or other non-combustible material, laying it around the entire perimeter.
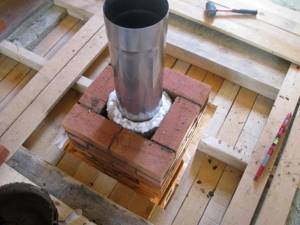
Having completed the preparation of the floor, place the main riser in the gap between the attic floor and the roof sheathing. The dimensions of this element must correspond to the dimensions of the base neck.
Subsequently, the chimney is laid out so that there is another extension on the street side - the so-called otter. Thanks to this expansion, precipitation will not enter the attic. External masonry is carried out using standard cement-sand mortar, the proportions of which were given above.
Return to contents
Stages of laying a chimney.
The chimney pipe must be installed in a strictly vertical position.
Make sure that its inner surface does not have any protrusions and is perfectly flat. The outlet - if it is created - can go to the side no more than 100 cm. There should be no obstacles along the entire path of the smoke exhaust pipe.
A fireplace consumes more air than a stove, so its chimney should be much higher than the stove chimney. It is important to maintain the correct thickness of the chimney walls.
So, the outer cold wall is laid out in brick. In the middle of the room it can be made in half a brick. If the room has walls and partitions made of wood and the pipe has to be laid through them, this can only be done through a sheet of asbestos-cement or metal.
It is better if the pipe has a round cross-section. Square and rectangular shapes are less preferable, i.e.
because soot collects at the corners and interferes with the normal movement of gas. The optimal sections are 1/15, 1/12 or 1/10 of the size of the internal opening of the firebox.

As for pipes, asbestos-cement or ceramic are the most preferable. You can purchase a ready-made kit.
Such kits include standard blocks, collar facing plates, protection for the top of pipes and other important elements. The installation of such systems begins with the installation of the first block on top of the structure. Cement mortar is applied where the smoke collector connects to the pipes.
Make sure that the grooves of this block are facing up. The first block of lining is inserted inside. It is installed with the extended side on top.
The brick cladding is secured using metal anchors. They must be inserted between the external blocks of the chimney pipe.
The brickwork must be brought to the top of the pipe blocks. The solution is placed on the edge of the uppermost block, pressed into it, and then the cuff is inserted into the pipe. Another layer of mortar is applied to the cuff and the bricks are laid.
After this, everything is covered with a protective plate. It should be placed on a layer of solution. Where the pipes intersect with the roof, a gap is formed.
Precipitation can penetrate into the house through it. To prevent this from happening, the gap is sealed with a solution. You can also make the casing out of metal.
The metal sheathing is installed using adhesive aluminum tapes and lead sheeting.
The sheathing consists not only of strips, but also of an apron attached to each side. This solution forms a collar design. It will be necessary to seal one edge of such a collar into the masonry seams, and leave the other on the roof surface.
The walls of the head should be one brick thick.
However, if the walls of the smoke exhaust pipe are insulated with asbestos-cement slabs and plastered, then the lining can be half a brick thick.
If you wish, you can buy ready-made pipe heads.
To prevent the draft from tipping over at the mouth of the pipe, it is necessary to install a multi-tiered deflector. A ridge canopy is installed above the head. To ensure that the end part of the head does not collapse under the influence of precipitation, it is necessary to install metal caps and make a edging of roofing steel.

Windproof nozzles are installed on the pipe heads. The head itself must be positioned above the point of exposure to wind pressure. And finally, spark arresters and wire mesh with cells up to 3 mm are installed on the tips.
Thus, you can handle the construction of a brick chimney for a fireplace with your own hands. Happy work!
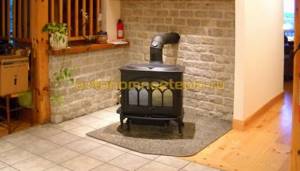
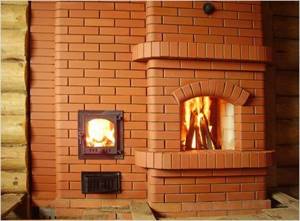
A fireplace is an installation that has many responsibilities. It should not only warm the room, but also bring coziness, joy, and comfort.
However, in order for the logs to burn and no acrid smoke to enter the room, it is necessary to correctly build a chimney for the fireplace with your own hands - one of the fundamental parts of the entire structure. It must be durable, reliable and safe.
Content:
Calculator for calculating the cross-section of a fireplace chimney
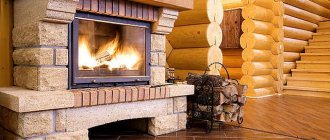
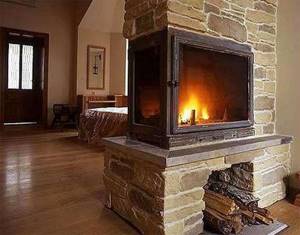
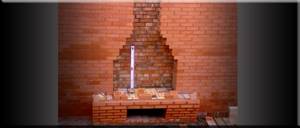
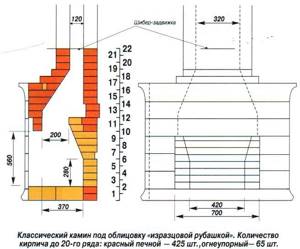
Many owners of private houses dream of a fireplace - this personification of special comfort, conducive to a quiet, comfortable holiday in the winter cold. Such a dream can be brought to life - by purchasing a ready-made factory-made fireplace, or by building a “classic” brick structure.
Calculator for calculating the cross-section of a fireplace chimney
If you purchase a finished product, then no special problems are foreseen - the manufacturer has already provided to the smallest detail the dimensions of the device itself and the diameter of the chimney pipe required for it. With a brick fireplace, everything is somewhat more complicated, especially if the owner himself decided to take on its design. Many dimensional nuances must be taken into account, and one of them is the optimal cross-section of the smoke exhaust duct, on which both the efficiency of the fireplace and ensuring the safety of its operation depend. The calculator for calculating the cross-section of a fireplace chimney, located below, can help with this question.
The second subsection of the publication will provide several necessary explanations for the calculations.
Calculator for calculating the cross-section of a fireplace chimney
What is the calculation based on and how is it carried out?
The chimney is one of the main elements of the fireplace, and its dimensions must strictly correspond to the characteristics of the heating device (structure). Moreover, this dependence is quite multifaceted.
A chimney built “by eye”, or for the sake of only the external decorative qualities of the fireplace, without taking into account its parameters, can lead to a number of negative consequences. There are special standards that regulate the cross-sectional area of the chimney depending on the total area of the fuel window. It is believed that the approximate area ratio should be 1:10. However, pipes of different cross-sectional configurations (round, square or rectangular) have their own specific aerodynamic features, so the indicated ratio may change in one direction or another.
In addition, the height of the chimney pipe, measured from the grate (bottom of the combustion chamber) to the upper end (mouth), also makes its “mite” here. As the height increases (up to certain limits), the draft also increases, and this also affects the calculated value of the ratio of the areas of the chimney channel and the fuel window.
In this case, there is no point in providing a table, since all the necessary values from it are already included in the calculator program.
- The width and height of the fireplace window are entered in millimeters.
- The height of the chimney pipe is presented in the range from 5 to 11 meters. Less than 5 meters is unacceptable according to safety rules (SNiP directly prohibits this), and with a pipe height of more than 10-11 meters, the fireplace begins to work ineffectively - it becomes too “gluttonous”, but without the necessary heat transfer. It is necessary to take additional measures to artificially reduce traction.
- In a separate calculator window you will be asked to specify the shape of the channel - circle or rectangle (square).
- In accordance with this choice, the value is taken after the calculation.
— A is the diameter of the round chimney (in millimeters);
— B – length of the side of the square channel (in millimeters)
- B - the value for a rectangular channel is given in units of area (in square centimeters), since options are possible here - lengthening one side by shortening the other.
It should be correctly understood that the calculator gives minimum indicative values. Of course, in practice they are reduced either to brick fractions (when laying a brick pipe), or to standard pipe diameters (for metal or ceramic chimneys).
Is it difficult to assemble a fireplace yourself?
Don’t be fooled by the fact that laying a small fireplace looks simple - there are a lot of nuances in this matter, and it’s worth weighing everything very well before starting to work on your own. Read more about building a brick fireplace with your own hands in the corresponding article on our portal.
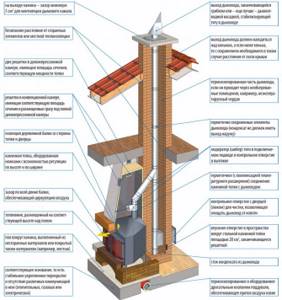
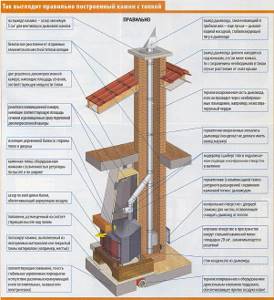
How is a brick chimney constructed?
Before you start building a brick chimney, you need to understand what main parts such a structure consists of:
- Mounting pipe - a part laid out immediately behind the combustion chamber and into which a draft-regulating valve is installed. Fluff - it follows immediately after the mounting pipe, representing an expansion of the outer part of the chimney up to 25-30 cm. Designed for safer passage through the ceiling Riser - part located in the attic and rising to the roof. It needs high-quality insulation. Otter - is a four-sided extension of up to 15 cm, protecting against precipitation from entering the attic. Neck - part of the chimney located directly above the roof and turning into the final cap
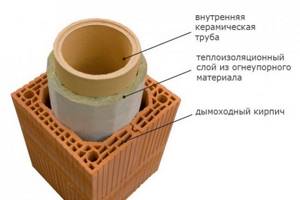
For those who find it difficult to install a brick chimney for a fireplace, there are always simpler, but high-quality options. You can build a structure using ceramic blocks, various pipes, etc.
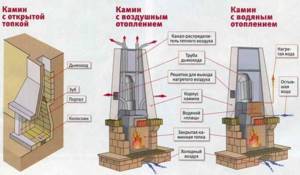
Calculation of a chimney for a fireplace with an open firebox
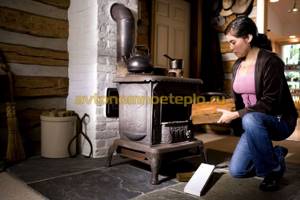
One of the highlights of the interior of any room is undoubtedly the fireplace. Modern fireplaces can operate not only on classic fuel, but also on electricity and natural gas, which allows the use of this type of heating equipment even in apartments of multi-storey buildings. And if you are the happy owner of a private home, then you can install a classic fireplace, the open firebox of which allows you to admire the fire and burning, regularly crackling logs. But for this it is also necessary to build a chimney.
Preparing for work
The fundamental stage is preparation for the work. It is necessary to familiarize yourself with the various drawings and choose the most suitable one. It would be a good idea to indicate on the diagram all the characteristics of the pipe being constructed and save it.
Watch the video preparing the solution:
Chimneys for brick fireplaces have their own characteristics, depending on the type of stove being installed:
- For wood-burning models, it is enough to make brickwork. For gas models, you need to place a metal pipe inside the masonry.
Before laying the chimney, a rectangular foundation is erected. It is made 30-40 cm high and 15-20 cm wide in one of two options:
- Formwork is installed and concrete is poured. Lay out of refractory solid bricks
To build a brick chimney for a fireplace, you need to prepare the following tools and materials:
- Fireproof brick (grade M200 and higher) Mortar consisting of cement, fine sand, water and clay Hand tools (trowel, level, plumb line, etc.) Thermal insulation materials Steel sheets Electric tools (grinder, drill)
Laying of the mounted pipe
It is necessary to decide what the cross-section of the chimney will be for a fireplace built from brick.
The smoke, rising upward, moves in a spiral. Therefore, it is customary to give preference to a round-shaped channel, but it is extremely difficult to lay it out of stone. You have to make a section in the form of a square, the size of which depends on the fireplace portal:
- Closed portal - approximately 15x25 cm Open portal - approximately 25x25 cm
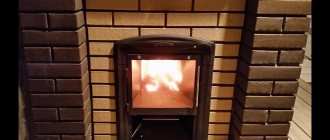
It is necessary to start laying from the top, arranging the nozzle pipe.
It is very important to monitor the ligation of seams between rows, vertically and horizontally. The thickness of the seams should be 1-1.5 cm. One value should be maintained throughout the entire construction.
We make a fireplace from start to finish: stages of work in order:
It is necessary to continue laying the mounted pipe until 5-6 rows remain from the ceiling. To ensure that the smoke does not have any obstacles, it is recommended to plaster the inner surface with the mortar used for joints. It is better to lay the layer not thick, so as not to greatly reduce the diameter of the chimney for a brick fireplace.
If the mounted pipe is laid directly against the wall, it must be secured. To do this, pins are installed every 25-30 cm, one end of which is driven into the masonry, the other into the wall.
Having laid the last row of the chimney pipe, it is necessary to check the vertical and horizontal, it is time to begin the most important and difficult stage of construction - the construction of the fluff, the otter and the riser located between them.
Collective chimney: correct connection
The dimensions of a chimney used simultaneously for several heating devices is a separate topic for discussion.
If smoke removal from a number of heating devices is necessary, then the chimney calculation is made taking into account all heating devices used in the system, their type, power, and fuel consumption.
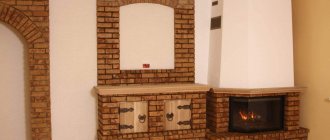
- For example, in a house with a single chimney, several heating devices, a boiler for a common heating system and a fireplace are installed.
- It immediately becomes clear that we are facing completely different systems. The diameter of the fireplace chimney does not correspond at all to the diameter of the boiler chimney.
- As a rule, fireplaces run on wood fuel, and home heating boilers run on natural gas.
Is it possible to combine these 2 completely different systems? Can. Moreover, with the correct placement of heating devices, they will not only not create problems, but will also complement each other.
How does this happen?
- One chimney includes a boiler and fireplace. During operation, the boiler periodically turns off and goes into standby mode. At this time our fireplace is on. Therefore, the chimney maintains a normal temperature and the gases do not cool down.
- Hence the absence of condensation and good draft when the boiler is subsequently started.
- But the size of the chimney for a fireplace must be significantly larger than for a boiler. And if we only use the boiler without starting the fireplace, we may have problems with excess draft, leading to improper operation of the boiler.
- As we know, the diameter of the chimney for a fireplace is calculated in a ratio of 1:10 to its firebox. It becomes clear that this chimney diameter is very large for the boiler. People use the fireplace infrequently, and the heating boiler runs constantly in the winter.
- So, you need to make a chimney of a smaller diameter, suitable for the boiler? No, that would be a big mistake. When the boiler works independently, everything will be fine. When the fireplace starts, increased aerodynamic resistance will be created in the chimney.
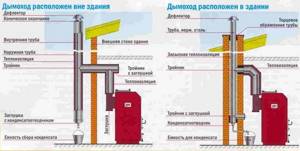
Two-way chimney. Rice. 1
- improper operation of heating devices;
- ingress of carbon monoxide into the room.
This is already life-threatening. Carbon monoxide poisoning is often fatal.
Two-way chimney - solution to the problem
How to solve this issue?
Our advice is to use a two-pass chimney.
Advantages of a two-pass chimney:
Two-way chimney. Fig.2
- the ability to use various heating appliances simultaneously and separately in one chimney;
- stable operation of each device;
- savings during construction and installation;
- space saving.
When installing such a chimney, all conditions must be met for the correct operation of each device. If the fireplace can function perfectly with a brick chimney, then the boiler needs to be lined. This will protect the brick from the alkaline effects of condensation.
Before you undertake the installation and installation of a chimney for several systems, familiarize yourself with the operating parameters of each heating device. The best solution would be to purchase a special industrial-made two-way chimney. This way you will protect yourself from possible design errors. Even for an experienced specialist, connecting different types of heating devices into one chimney is a difficult task.
Fireplace through attic and roof
In order to pass a chimney for a fireplace built by yourself through the ceiling as safely as possible, you need to lay out the fluff. The thickness of its walls should be equal to at least one brick placed in length. In this case, the expansion is done in stages, moving by ¼ with each row.
Sometimes, instead of the classic tub of the thickened part, a concrete box is used, filled with pebbles, sand or expanded clay and installed around the chimney pipe. This option is easier to implement:
- First, the wooden formwork is arranged so that it rises 7-10 cm above the ceiling; it must be secured more securely and make sure there are no cracks. The inside of the boards is covered with a solution of sand and clay so that the formwork can be easily dismantled after the concrete mixture has hardened. Next, reinforcement is done by rigidly connecting the rods and brick masonry with each other A solution consisting of a high grade of cement, sand and the selected filler is prepared, thoroughly mixed and poured, completely hiding the reinforcing rods. After drying, the formwork is dismantled. The surfaces must be smooth so that it is possible to cover the fluff with masonry without any problems.
In order to maximally protect the structure of the ceiling, which should not touch the chimneys for stoves and fireplaces, it is necessary to make a steel edging around the perimeter of the hole, and put glass wool impregnated with clay mortar into the resulting gap. It is also recommended to lay the insulation to the sides, removing up to 20-30 cm.
Watch the video, the chimney through the roof slab:
After the formation of the fluff, the installation of the riser continues.
In this part, the size of the chimney for the fireplace is made similar to the mounted pipe, only plastering with clay mortar is carried out simultaneously from the inside and outside. During the heating season, the attic temperature is set to low. To eliminate the big difference inside and outside the chimney, it is recommended to wrap the riser with non-flammable insulation.
The most difficult stage of the instructions on how to build a chimney for a fireplace has been completed.
Having reached the roof, it is necessary to proceed to the next stage - arranging the otter. The pipe is expanded, as when laying fluff, but only slightly. In this case, it is necessary to install a galvanized metal casing around the perimeter with a small protrusion on the roof, which is covered with soft waterproofing and roofing.
Finishing the fireplace
Having finished building the otter, you need to start arranging the final part - the neck of the chimney for the fireplace with your own hands.
Let's watch the video, the first firebox:
It is made similarly to a riser and rises to the selected height, which depends on the distance from the ridge:
- Up to 1.5 m - 0.5 m above the highest point Up to 3 m - at the level of the top point More than 3 m - a straight line drawn between the top point and the pipe being erected should deviate from the horizontal no more than 10 degrees
All that remains is to complete the head for the future chimney. Its construction is carried out similarly to fluff. Upon completion of the work, it is recommended to install the cap and weather vane.
Popular mistakes and tips
The most common mistake is made at the calculation stage. If the fireplace is placed incorrectly, the chimney pipe may rest against one of the beams. The problem can be eliminated by installing additional elements of the rafter system.
Watch the video, installation of connections to the pipe:
Many people, in order to save money and time, combine more than one channel with one fungus. This is one of the biggest mistakes. The ventilation system ceases to fully perform its functions, as a result of which mold and condensation appear.
There is nothing difficult about how to make a brick fireplace for a chimney with your own hands. However, you cannot begin repairs or make any structural changes without permission. It is necessary to contact a specialist and carry out additional preliminary calculations.
Watch the video and recommendations from experts:
Each fireplace or duct must exit into one chimney. If this is necessary, the common part is expanded and a cut is made in the center with a thickness of 12-15 cm to a height of one meter.
There should not be many changes in the direction of the chimney, since smoke removal should be carried out in the simplest and fastest way. The construction of complex structures with slopes of no more than 45 degrees is permitted only with a minimum chimney length of 6-7 m.
Main nuances
Note that the chimney of a fireplace and stove is practically no different structurally. The only difference is that the fireplace has an open firebox, while the stove has a closed firebox. Incorrect design of the fireplace chimney can lead to smoke in the room. Therefore, it is important to correctly calculate the dimensions of the firebox, determine what diameter the channel will have and what height the structure will have.
In this case, the chimney should be as simple as possible; the best option is straight and vertical. If a more complex configuration is used, it is necessary to provide bends with an angle of more than 45 degrees.
To regulate air exchange, do not forget to use a damper, and to clean the fireplace, you must provide a tee to make cleaning the heating equipment easier.
An important condition for the effective and safe operation of heating equipment of this type is reliable thermal insulation. The chimney heats up, so it is necessary to reliably protect the ceiling and walls from fire (mineral basalt wool is used for this). It is also necessary to think about protection from the cold if the channel is located in an external wall or on the street, which is highly undesirable. From above, the chimney is protected from precipitation by a weather vane or fungus.
We also note that a modern fireplace can have different configurations; structures made of refractory brick or stone with an open firebox are used less and less; they have been replaced by fireplaces with a cast-iron closed firebox (the front panel is made of special fire-resistant glass).
The calculation for a fireplace with a closed firebox is almost the same as the calculation for a stove chimney. But we’ll talk below about how the calculation is performed if the fireplace has an open firebox.