Hello dear friends!
Today we will talk about the dangers of ice on roofs. Few people know, but every year in Moscow alone more than 300 people die from icicles and more than a thousand are injured. The main risk group, as always, is young children. But there is an engineering solution, the widespread use of which would solve this problem once and for all. And its name is heating cable for drainpipes. In today’s article I propose to get to know him in more detail.
What is it and why is it needed
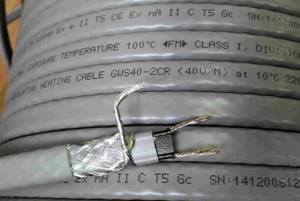
A heating cable is a wire through which electric current passes. The energy of the electric current is converted into heat, the amount of which directly depends on the resistance of the cable material and the strength of the current.
Designed to prevent the formation of ice on drainage systems.
When is heating needed?
Heating of the drain must be carried out in the off-season - when the first snow falls and in the spring, at the beginning of melting. The temperature outside at this time ranges from -5 to 3˚С. It is at this time that ice and icicles form.
In addition, in country estates there is often a need to warm up external water and sewer pipes.
Why does ice accumulate?
Ice accumulates on the roof and in gutters for several reasons:
- Temperature jumps. The snow lying on the roof first melts and then freezes in the form of icicles;
- Incorrectly calculated roof slope angle;
- Uncleaned gutters. Leaves and dirt clog the drain holes, which prevents the normal outflow of water;
- Warm attic roof. The difference in temperature inside and outside the room leads to the formation of condensation, which freezes and forms ice.
Installing a roof and gutter heating system will help prevent the formation of icicles. With its help the following tasks are solved:
- Ice removal;
- Preventing roof damage due to water accumulation;
- Preventing sudden temperature changes;
- Reducing snow load;
- Roof cleaning;
- Extending the service life of the entire roofing pie.
Resistive cable
There is a high resistance core inside the wire. When current flows, the inner cable heats up and releases heat to the insulation and then to the roof. This is a very simple system that does not require much investment.
Advantages of this cable:
- no starting current;
- stable power;
- low cost.
There is only one downside to resistive cables for roofing, and that is that due to the constant power, a thermostat is needed to lower or increase the temperature.

Advantages and disadvantages
Like any engineering solution, a heating cable has a number of pros and cons.
Advantages:
- Fast, uniform heating;
- Long service life - at least 10 years;
- Safety and environmental friendliness;
- The system configuration can be easily changed;
- Quite low power consumption.
- Resistance to external influences.
Flaws:
- The need for accurate, competent calculations;
- The cost of a good cable is quite high.
Operation of anti-icing systems: expert advice
In order for roof heating to function for a long time and without failure, you must comply with the requirements for arranging the system. The rules for operating the system are as follows:
- Before the start of the season, you need to clean the drainpipes and other elements on which the heating cables are located. To do this, use soft brushes. Cleaning is carried out as carefully as possible, since strong mechanical impact can damage the cable.
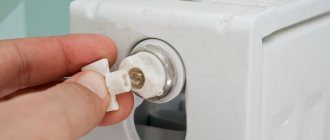
- It is necessary to periodically inspect the system equipment. For example, connections need to be tightened.
- Automatic switching on/off of the system is determined taking into account the climatic conditions in the region. The manufacturer's recommendations are also taken into account.
Types of heating cables
There are 2 types of heating cable.
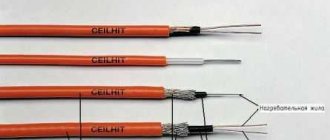
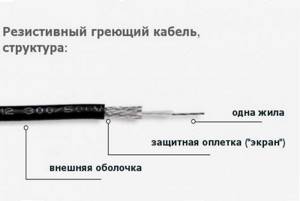
Resistive
Traditional, simple and inexpensive. It is a high resistance copper wire covered with an insulating layer. The entire length of the product is heated evenly. Ideally, protect the wire with a layer of thermal insulation.
The resistive cable is available in two versions - serial and zonal. Zonal is an improved version of sequential. Its design contains 2 cores, connected at equal intervals with a special wire. These gaps form independent zones, and if one burns out, the others continue to operate normally. If the serial cable burns out, it cannot be restored.
The main advantages of resistive cables are low resistance, ease of installation and operation, and fast heating.
An important nuance is that the heating of the cable is distributed evenly over its entire length, but its temperature in different areas of the roof is different. For example, in severe frost, the part of the wire located in the open air will be colder, and the part located inside the pipe will be warmer.
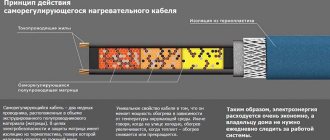
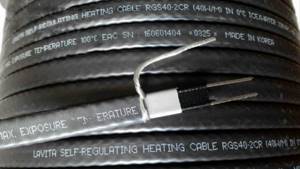
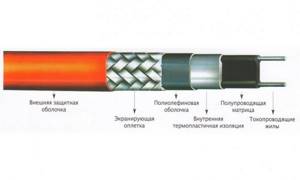
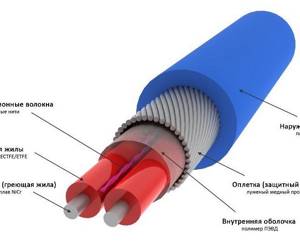
Self-regulating
It has a more complex device. Inside there are 2 wires placed in a special matrix.
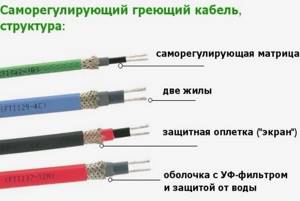
The matrix regulates the resistance of the cores depending on the air temperature. The entire structure is wrapped in several layers of insulation and covered with a shell that protects from external influences. The warmer it is outside, the less the wire heats up, and vice versa.
This option, although more expensive, is more reliable than the resistive one, it does not burn out, does not overheat, and can be divided into sections of the required length.
Classification
Depending on the heat release pattern, heating cables are divided into 3 groups:
- resistive;
- self-regulating;
- with mineral insulation.
Resistive heating cable can be:
- linear (single, two or multi-core);
- zonal.
The operating principle of a resistive type heating cable is based on the voltage drop in the core when an electric current passes through it. If there is only one core, there is no protection against electromagnetic radiation. If there are two or more wires, one of them carries the current. The length of the linear electrical cable can be different; cutting during installation is not allowed.
Resistive cable
Zone electrical cables are sets of resistor sections that are connected to the cores in parallel. During installation, cutting into sections 1.5-2 meters long is allowed.
A self-regulating heating cable is similar in design to a linear zonal one.
Self-regulating heating cable
The main difference is the replacement of the insulating material with a polymer matrix, which increases resistance when current passes.
The self-regulating cable changes temperature depending on environmental conditions: if it gets warmer, the matrix reduces the heating level.
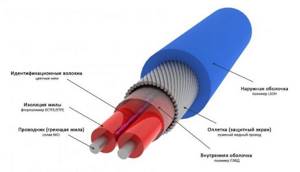
Mineral insulated cable consists of a copper core encased in powdered magnesium oxide insulation, encased in a sheath of stainless steel, copper or cupro-nickel alloy. Magnesium oxide ensures the stability of the system due to tightness, minimal linear expansion, resistance to mechanical damage, electromagnetic waves, and ultraviolet radiation. The service life reaches 60-80 years.
Shielding
The screen is a protective shell made of aluminum or copper foil. It serves as an additional source of heat distribution, but its main function is to prevent electric shock to a person carrying out repair work.
The design of a shielded conductor is more complex, and therefore the price is higher.
Most often there is a cheap unshielded option on the market. For its safe operation, a residual current device (RCD) is required.
Power and duration
The power of the cable depends on its temperature class.
- Low temperature. Heating up to 65C, power up to 15 W/m;
- Medium temperature conductor. Heats up to 120C, power 10-33W/m;
- High temperature. The most powerful is up to 95W/m, heats up to 190C without problems. Designed for industrial plants and large diameter pipes.
It is rational to select a wire of suitable power for different communications; underestimating it will lead to poor heating, and overestimating it will lead to increased energy consumption.
Selecting cable power depending on the diameter of the drain pipes:
- Pipe outer diameter (D) from 15 to 25 mm – power 10 W/m:
- D25-40mm - 16W/m;
- D40-60mm - 24W/m;
- D60-80mm -30W/m;
- D 80-300mm - 40W/m;
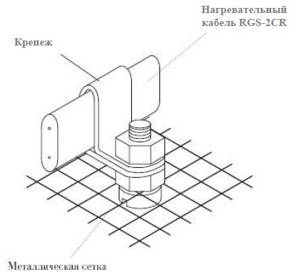
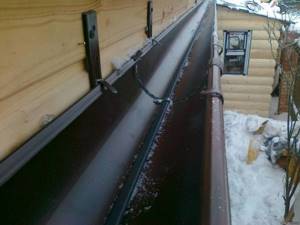
Fastenings for mounting a heating cable on the roof
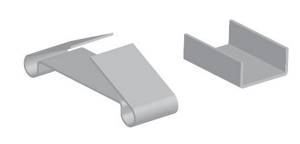
Fastening clamp BRN.2-50 Ts
- Purpose: roofing
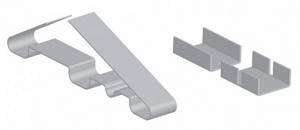
Fastening clamp SR/T.3-50 Ts
- Purpose: roofing
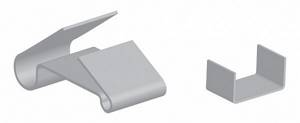
Fastening element BRN/T.1-25 Ts
- Purpose: roofing
To section
Life time
The service life of the cable depends on the operating conditions and the materials from which it is made.
You can bring the service life of products from different manufacturers to a common denominator:
- Resistive - in a screed it lasts up to 50 years, in other conditions - on average 15;
- Self-regulating - “lives” up to 20 years.
Particular attention should be paid to the choice of manufacturer.
Why does ice form on the roof?
There are two main reasons:
- If the day is warm, the snow begins to melt. The resulting water flows down the gutters. At night, when the temperature drops, the remaining water turns into ice. Such a difference in temperature in winter and spring is observed within the city. When a large number of houses are clustered, the air is always warmer. Metal gutters are sometimes covered with a thick crust of ice, which is very difficult to remove from the gutter without breaking it.
- The reason for the formation of ice is the roofs themselves, especially if the roof is of the attic type. The snow melts from the heat emanating from the house. Water flowing onto the cornice cools and freezes again. Unreliable or poorly designed thermal insulation can trigger snow melting. Through cracks and unreliable joints in the thermal insulation material, internal heat comes out, warming up the snow. It turns into water and then into ice.
To get rid of this problem once and for all and protect the drainage system, it is necessary to install heating for the drainpipes. There are a number of anti-icing systems.
Causes of ice formation
Those that restrain snow from falling off the roofing and heat cables that serve to heat gutters. Their main function is to free the roof from the ice crust and prevent dangerous icicles from forming.
Modern storm drainage systems must be equipped with an anti-icing system for the roof surface. What is she like?
Make it yourself or buy it
The range of heating cables in stores is very large. But there are several ways to make a wire with your own hands. Let me give you an example of a home-made cable:
- We take a two-core copper wire in double insulation and a 300W power supply (a computer one will do), in addition, to measure the parameters you will need a temperature sensor.
- We connect the wire to the 5V output of the power supply.
- After 10 minutes, the temperature of the cable will reach approximately 50 C-, this is quite enough to heat the drain.
Features of choosing control automation
Electrical installation has several types.
The choice of connection scheme through an automatic humidity and temperature controller is most justified. The system is fully automated thanks to humidity sensors installed in those areas of the roof where snow and melted ice most often accumulate. The automatic control unit and self-regulating cables lead to high system efficiency and energy savings. It is possible to connect via an air sensor or thermostat. Such a system uses only one parameter in its operation - air temperature. And the probability of ice formation is no longer taken into account. Manual connection is the cheapest method, but requires constant attention and monitoring of weather conditions. Heating the roof and gutters is a relatively inexpensive and high-quality option for protecting a building in difficult climatic conditions and during seasonal weather changes.
Tips for choosing
The advantage of a homemade system is the low cost of the components (all equipment on average costs no more than 1000 rubles), and besides, the cable is easy to repair, it will not burn out or melt. The power supply is very easy to replace if necessary.
Disadvantages: the process is not automated; it is necessary to adjust the temperature manually and periodically check the power supply.

Therefore, the industrial option is still simpler. Professionals recommend installing a combined heating system. In it, the resistive cable is located in areas with the same temperature (roof slope, etc.), and the self-regulating cable is located in gutters, valleys, and pipes.
You can manually turn on the resistive part of the system for convenience.
Selection of heating elements
The gutter heating cable is the basis of the anti-icing system. The efficiency of the installed system largely depends on the correctness of its choice.
During installation, a heating cable is used for this type of drain:
When arranging houses, it is recommended to use both types of wire. This way you can achieve high-quality results without significant overpayments. Inexpensive resistive heating cable is used to cover large areas under the roof. As for self-regulating elements, they are attached to the most difficult sections of drains.
Do-it-yourself cable making and installation
Drawing and diagrams
Regardless of whether the heating wire was made by yourself or purchased in a store, it is quite possible to install it yourself.
As an example, I will give several ready-made diagrams for different sections of the roof (a little lower in the text: Fig. 1, Fig. 2, Fig. 3).
Size calculation
Initially, we measure the diameter of the pipes and select the power of the wire. It should be noted that if the roof is reliably thermally insulated, a cable with a power of 25-40 W/m will be sufficient. If the roof is cold, choose a product with at least 40-50 W.
There is another formula for an accurate calculation, in which the length of the cable is added to the length of the heated space and multiplied by 2. The resulting number is the required power.
The resulting power value should be compared with the value recommended based on the physical and technical characteristics of the material used:
- for plastic gutters - minimum 20 W per linear meter;
- for metal gutters - minimum 25 W;
- for wooden gutters – minimum 18 W.
If the cable in the anti-icing system is laid using the spiral piping method, its length must be calculated using the following formula:
Overall Length = Pipe Length x Spiral Factor.
The spiral pitch is determined depending on the pipe diameter using special tables.
Next, you should draw an exact diagram of all elements of the system. All stages of work will be carried out according to this drawing.
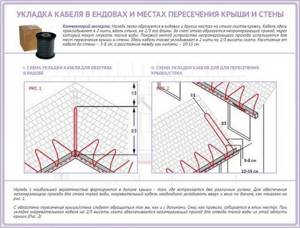
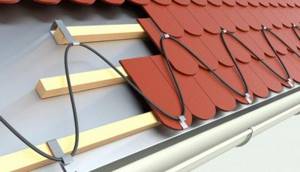
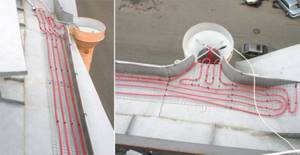
Fig.1. Laying cables along the edge of the roof:
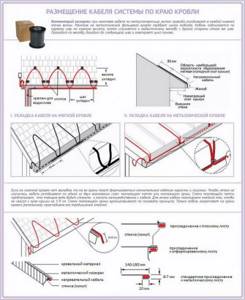
Fig.2. Installation in gutters and pipes:
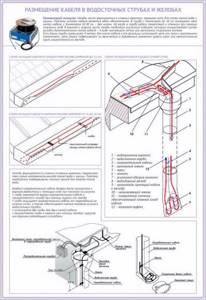
Fig.3. Placement in valleys:
Calculation of the required amount of cable.
The total length for anti-icing systems is determined by the total number of roof components that need to be heated. Table 1 below will help determine the required cable length for roof heating. Table 1
| Design element | Required quantity of cable m per m structure | Note |
| Overhanging roof edge | See Table. 2 | In table 2 Based on weight and length, calculate the required number of cables. |
| Gutter | 1 | One strand of cable for every 10 cm of width |
| Drainpipe up to 100 mm. | 2 | |
| Drainpipe more than 100 mm. | 4 | |
| Endova | 2 | * Laying on the bottom is allowed 2/3 length. For large quantities precipitation may increase to 6 cable threads. |
| Dormer window | 1 | 1 meter of cable per meter of window perimeter. |
We advise you to study Non-polar capacitor
* For complex roof structures or large areas, it is possible to use a more powerful cable.
Attention! These recommendations are not absolute. The amount of cable may vary depending on the roof structure. Table
2
| Visor (see) | Heating cable loop height | Meters of cable per meter of soft roof * | Meters of cable per meter of metal roofing** |
| 30 | 45 | 1,9 | 2,5 |
| 60 | 75 | 2,7 | 3,5 |
| 90 | 105 | 3,6 | 4,5 |
| 120 | 135 | 4,6 | 5,5 |
* Standard soft roof design. ** Metal roof with laying pitch of 60 cm.
Installation procedure
- The cable should be warmed to room temperature before installation.
- Clear all gutters and gutters of debris.
- Remove sharp edges that could damage the heating cable.
- Mount a moisture-resistant junction box in a protected area.
- Start cable installation from the junction box. Leave a small loop where the cable exits the junction box.
- After installation, test the cable with a megger for a resistance of 10 MΩ.
- A thermostat can be used to turn the cable on/off. An automatic ice and snow detector can be additionally used to switch cable modes.
ATTENTION!
- To minimize the risk of fire if the cable is damaged or improperly installed, use a safety circuit breaker (fuse) to ground the circuit. On circuits longer than 30 meters, it is recommended to use a 30mA switch to prevent abnormal shutdown. The braid must be connected to ground, providing protection through the circuit switches. All electrical connections must be made by a qualified electrician.
- Do not twist the wires relative to each other. This may cause a short circuit and damage the cable.
- Live electrical elements must be protected from moisture, otherwise an accident may occur.
- A damaged cable must be replaced.
- Avoid installing ladders on top of heating cables.
Flat roof
Installation features
Installation of a heating system for roof communications should be carried out taking into account the following rules and in the following sequence:
- It is necessary to take care of the presence of a temperature change controller, a power supply with a temperature sensor, and a precipitation control sensor;
- A wire of the required length is prepared according to measurements and diagrams. Ideally, install the cable before installing the top layer of the roof and finishing;
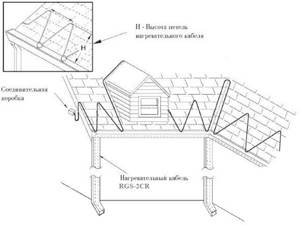
- The cable is tied into bundles using special clamps and then laid in trays and pipes. The cable at the edge of the roof is mounted in a zigzag, secured using special clamps;
- The heating cable is secured in gutters and pipes using mounting tape, in stripes across. If the heated drain or sewer pipe is longer than 6 m, the wire is first attached to a sheathed metal cable, and then the entire structure is lowered into the pipe;
- To heat drainpipes, lay 2 pieces of the required power at the same time. Installation is carried out from above and below.
- The place where the wire is attached must be inspected for sharp edges and unnecessary objects;
- Thermostat sensors are fixed;
- The control panel is installed;
- Commissioning work is being carried out.
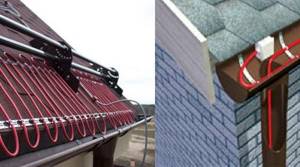
How does a gutter heating system work?
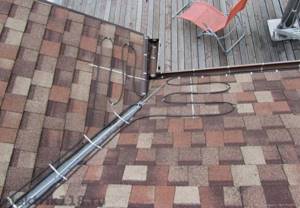
The operating principle of the gutter heating system is based on the use of thermal energy, which is generated when electricity passes through a flexible cable that has a certain resistance. Heating is installed in places where there is the slightest possibility of ice formation. As a rule, heating elements are laid on the roof, along gutters and risers. Heat helps melt snow and prevents water in the drainage system from freezing when the temperature drops below 0°C.
Heating cable for roofing and gutters is used to perform the following tasks:
Electric heating of gutters using modern control equipment allows you to completely eliminate human participation in the operation of the systems. The correct choice of device, its proper installation and configuration ensure that the heating of gutters and gutters, roofing and drainage will be carried out efficiently and economically. Considering the cost of electricity, this factor should be taken into account.
Frequent errors and problems during installation
Installing a heating system is not difficult, but common errors occur during assembly:
- The cable cannot be secured using self-tapping screws, steel strips, wire, vinyl tape, or tape. Sealant and mounting tape are always required;
- Incorrectly selected power is fraught with either high costs or ineffectiveness of the system;
- The wires must not be twisted, otherwise a short circuit will occur;
- Any connection should be carefully insulated from moisture;
Common problems:
- Circuit breaker malfunction;
- Malfunction of the residual current device;
- Poor quality braided cable termination;
- Low voltage, hence the reduction in heating power;
- Mechanical damage;
- Overheating (resistive version);
Heating system design
Heating drainpipes is a rather complex technical process. As a rule, installation of the system is carried out by specialists with the necessary knowledge and experience. But if you show patience, accuracy and a thoughtful approach, then you can arrange the heat supply to the gutters and roof on your own. To do this, you need to familiarize yourself with the general structure of the heating system and the rules for its installation.
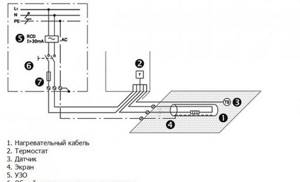
A standard drain heating system consists of the following devices and mechanisms:
- Heating part. It is an electrical cable for gutters, which is used to heat trays, pipes and roofing. Its installation is carried out on the outside and inside of these structures so as to initially exclude the very possibility of any mechanical damage and rupture. The wire has sufficient strength and a reliable coating that provides protection from solar radiation, water, heat and cold. When installing heating systems, 2 types of heating elements are used: resistive and self-regulating cable. As a rule, both are used for high-quality and economical heating.
The equipment for heating gutters may vary. Its volume and characteristics of the devices depend on the area to be covered and the required power. In addition, the amount of automation may vary due to the choice of type of heating elements.
Service
Maintenance of the system comes down to monitoring its operation, periodically checking all sensors and visually inspecting its integrity.
Modern gutter heaters are equipped with special thermostats with LED bulbs. If the light is on, it means heating is in progress; if it turns off, the required temperature has been reached. If heating does not occur, look for the cause of the malfunction. The main reasons are listed in the previous paragraph.
System health check
First of all, the cable must meet fire and electrical safety requirements. Products must be accompanied by certificates and recommendations from manufacturers. Electrical safety is guaranteed with a leakage current of no more than 10 mA. For this purpose, the system is equipped with an RCD.
For complex roof structures, multiple zones of an anti-icing system are installed. For each of them, the leakage current is declared.
System tests are as follows:
- Acceptance tests - determination of insulation resistance, testing of RCDs, determination of the quality and speed of the system.
- Periodic – autumn inspection of technical condition. The insulation resistance is checked and weak points are found. Then a test run is carried out and the functioning of the equipment is checked. Afterwards, the thermostats are adjusted, and the system turns on in standby mode.
Expert advice
Some useful tips:
- The cable can be laid both inside and outside the pipe. Typically, pipes with a diameter greater than 40 mm are tied with a self-regulating cable from the outside. If the pipe diameter is smaller, using an internal resistive one is suitable;
- It would be a good idea to ask the manufacturer for a hygiene certificate (especially important when heating pipes with drinking water);
- A new cable with food-grade braid may emit a pungent odor at the beginning of use - this is not scary;
- Before purchasing, check your energy consumption level
- If an open installation is planned, it is desirable to have UV/protection. For internal installation, a waterproof shell is required.
Installation Basics
The roof heating system consists of the following main components:
- Heating part – electric cable . It is laid on the outside of the roof and the most dangerous areas.
- Distribution and information part . It includes power, control and signal cables, mounting elements and distribution boxes. The task performed is supplying power to the heating cable, transmitting signals from sensors to monitor and control the process.
- Control system . It consists of temperature controllers, sensors, control panel, control devices, starting and protection devices. The configuration depends on the type of cable, its power, and the purpose of the system.
When installing, the following rules must be taken into account:
- Installation is carried out in accordance with a previously developed project, in compliance with the requirements of PES and fire safety.
- The heating cable forms heating sections. To do this, it is cut into sections of a certain length, laid out on the surface, secured and connected using couplings.
- The cable is fastened to the surface using strips of mounting tape using additional elements depending on the heating zone.
- All connections of supply wires are made in junction boxes, and after installation the insulation resistance is measured.
- Control sensors are placed in accessible places, flush with the heated surface, but within sight.
- The heating system is installed at an air temperature of at least 5 degrees.
- The installation site is cleared of debris and dust, and thoroughly dried.
- Distribution and power cables are covered in cable ducts or corrugated pipes.
Important ! Installation of the heating system should be carried out as carefully as possible to avoid damage to the roofing. Only materials and components specified in the instructions are used.
On the edge of the roof

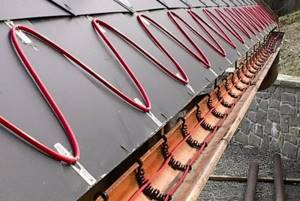
The cable is laid on the roofing in parallel rows or in a snake pattern, with a given pitch depending on the area of the heating zone and the power of the cable. The distance between the rows is 15–20 cm. The cable is secured to the surface using mounting tape and sealant. The mounting pitch is 30–40 cm. As a rule, cables with a power of 22–25 W/m are used. For a soft roof, a cable with a power of no more than 20 W/m is selected.
On a steep slope, the cable is laid between the edge of the roof and the snow guard . With a slope of up to 30 degrees, the heating element occupies the entire width of the cornice, and the installation ends 25–30 cm above the load-bearing wall. If the slope of the slope is less than 13 degrees, then the cable is laid in a loop only in the area where the drain funnel is located.
In valleys and junctions
Special zones in the form of valleys and junctions are covered with a heating cable for 1/3 of its length. It is laid in a loop to form two branches. The distance between the sides of the loop is 12–15 cm. If two-core cables are used, then it is 40–42 cm.
In gutters
In the gutter, the cable is mounted in two rows, parallel to each other. Fastening is done with strips of mounting tape in the transverse direction. The fastening spacing for a resistive cable is 25–30 cm, for a self-regulating cable – 45–50 cm. The tape itself can be strengthened with rivets using sealant.
In drainpipes
In a drainpipe, the cable is fixed to the walls and located inside the pipe in the form of a loop. Fastening is provided by mounting tape or heat-shrinkable tube . If the length of the pipe exceeds 5 m, the cable is lowered on a cable, which ensures its mechanical strength and prevents the core from being pulled out.
The drain funnel is heated separately. To do this, the cable is laid around the hole and covers an area 50–60 cm wide on all sides.