The procedure for implementing the heating system
It doesn’t matter whether you install the heating yourself or invite specialists, you will have to go through the same steps. Under certain conditions (for example, if the heating system is assembled “from scratch” during construction, or the system is upgraded during renovation, if it is a private cottage or apartment), the sequence of operations may change, some of them are performed in parallel
Selecting the heating type
First of all, the developer needs to decide on the type of heating for the house. Water with a gas boiler, an air system with a solid fuel heat generator, electric heated floors, a good old wood stove - there are a lot of options. The most important criteria here will be:
- technical characteristics of the building (cubic capacity, configuration, quality of thermal insulation);
- climatic conditions;
- operating conditions (for permanent residence or temporary stay);
- availability of certain energy resources.
Heat distribution in air heating systems
Engineering calculations
- Thermotechnical. Possible heat losses through the enclosing structures are determined, which will have to be replenished using a heating system of a given power.
- Hydraulic. Allows you to design the optimal system configuration, select pipeline cross-sections, and equipment characteristics.
Based on these calculations, a working design is created, which includes the diagrams and drawings necessary for installation, as well as a complete list and specification of components. At this stage, an estimate for heating installation is drawn up.
Selection and acquisition of equipment
- Heat source (type, power, type of fuel).
- Air ducts or pipes (material, cross-section for different sections).
- Heating appliances (radiators of a certain type, registers, air heaters, pipes/cables for underfloor heating).
- Auxiliary elements (pumps, manifolds, shut-off valves, control devices, expansion tank, heat storage boiler).
Installation and debugging of the system
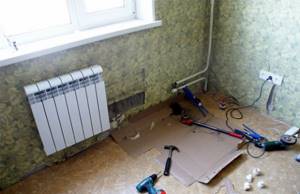
Direct installation of heating in an apartment or house is carried out - a chimney is organized, pipelines are laid, heating devices and a heat generator are tied up.
To control the quality of the system’s assembly, it is pressure tested. Air or water is pumped into the pipeline and kept there for 6-8 hours under pressure slightly higher than the nominal one.
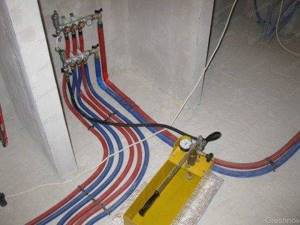
The crimping is done before the screeds are poured and the frames are sewn. The test is considered passed if the pressure gauge readings have not changed
After starting the heating, the system is balanced using taps or automatic thermostats.
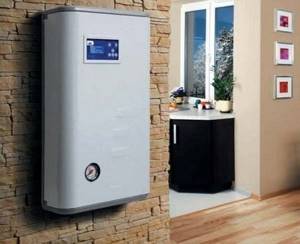
Criteria for choosing a heat generator
There is simply a huge selection on the market - domestic and foreign manufacturers offer a wide variety of models. From such an assortment, a buyer with any income level will be able to choose something for himself.
In order not to make a mistake when buying a boiler, you need to check what type of fuel is most available in the region. It is also important to correctly calculate the power of the equipment.
Advantages of gas units
The vast majority of owners of wooden houses opt for gas equipment.
The popularity of wall-mounted and floor-standing gas boilers is due to the fact that such fuel is one of the cheapest in many countries. In addition, with its help you can organize a completely autonomous and maintenance-free heating system.
The list of advantages of gas boilers needs to be supplemented:
- High efficiency . Even a low-power device generates more heat than its counterparts running on other types of fuel.
- Ease of operation . No need to worry about where the fuel will be stored. At the same time, using such equipment is easy - you only need to set it up once.
- Durability . A high-quality gas unit will last at least 15 years.
The main disadvantage is the need to obtain special permission to install it. All other disadvantages are completely offset by advantages.
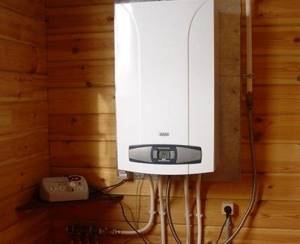
If you need to heat a large house with an area of more than 100 m2, then it is better to refuse a gas boiler. In this case, it will be an economically unprofitable solution
Diesel component in the system
Diesel-powered equipment has become increasingly popular over the past few years. First of all, liquid fuel boilers are cheap to maintain and easy to install.
At the same time, there is no need to organize a complex chimney design - many models run on light heating oil. The only thing required is to organize the pipe outlet in the form of a sandwich. It has a special turbine that pushes out air.
If you have decided to install a diesel boiler, you need to understand that this heating method will be expensive. After all, the efficiency of this equipment varies from 75 to 85%, which is a rather low figure.
Also, a diesel-powered unit requires constant monitoring. If it is left for at least a week, it will lead to problems. Indeed, due to the low quality of fuel, the equipment may stop. As a result, the water in the pipes will freeze and burst.
Even despite all the advantages of a diesel device, it should only be installed if this is the only available way to organize a heating system
Solid fuel boiler
This type of equipment is as popular as gas equipment. Great demand is due to the efficiency and environmental friendliness of solid fuel boilers. After all, such a device is the cheapest device to operate. At the same time, it burns renewable fuel and is highly energy efficient.
The market offers an impressive selection of solid fuel boilers. Savings in this matter are not always justified - if you decide to buy the cheapest model, you need to be prepared for the appearance of soot, soot and come to terms with the need for frequent cleaning.
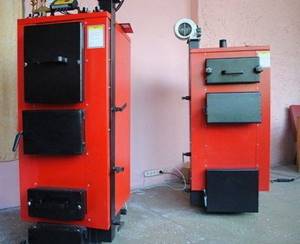
The only disadvantage of solid fuel boilers is the need to allocate space for storing fuel, which requires quite a lot for its operation
Electric heat generator
Equipment that uses current in its operation is the only solution for those regions where centralized communication systems are not installed. Most often it is used as an additional option.
Today, manufacturers offer a wide range of electric boilers. Models with power from 6 to 30 kW are available on the market. Such a wide range of performance allows you to order the device for a wooden house of any size.
Advantages of the equipment:
- small dimensions;
- operational safety;
- complete autonomy;
- cheapness;
- Efficiency approaching 100%.
But keep in mind that electricity is the most expensive energy carrier. Therefore, even despite the low cost of the unit, operating such a system will be expensive.
Electric boilers are completely safe for a wooden house. But to avoid problems, you need to install a meter and select a cable with a calculation of 8 amperes per 1 mm2 of its cross-section
Power calculation rules
To determine the optimal performance of the boiler, it is not at all necessary to seek help from a specialist. To do this, you only need to determine the amount of heat loss. Knowing this value, it must be multiplied by the area of the house and the resulting number will be the required power.
If the building is not insulated in any way, then heating one square meter will require from 130 to 200 W. For buildings with old windows and a facade that is covered with material that does not allow cold to pass through, the optimal value will be 90-120 W/m2.
As for houses with good thermal insulation of attic and basement floors, plastic double-glazed windows, insulated doorways, properly arranged air exchange, then 50-80 W/m2 will be enough to heat them.
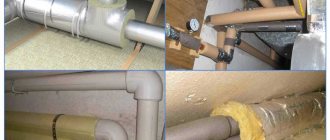
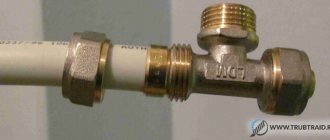
Classification of polypropylene hoses
Depending on the conditions of use, in accordance with GOST (ISO 10508), polypropylene pipes for heating a private house or other facility have 5 classes. The third group of long elements is practically not used in the construction of thermal circuits of buildings.
Fragment of heating made of PP pipes
Polymer hoses are classified depending on the operating temperature and coolant pressure:
- Class 1 - used when installing water supply networks with water heated to 60 °C and a pressure of 0.4 MPa;
- Class 2 - used for the installation of water supply systems that can withstand 0.6 MPa and are capable of moving coolant up to 70 °C;
- Class 4 - used when installing low-temperature radiators and underfloor heating up to 70 °C and 0.8 MPa;
- Class 5 - used during the installation of high-temperature radiators with heat resistance up to 90 °C and 1.0 MPa.
Rarely used, class 3 is produced by manufacturers for the installation of low-temperature radiators and underfloor heating systems up to 50 °C.
The maximum temperature for the first and second groups can be 95 °C, for the third category - 65 °C, and for types 4 and 5 - 100 °C. With these values, communications are allowed to operate for a maximum of 100 hours over the entire period of operation.
Possible errors and problems
The most common mistakes when replacing heating:
- using heating pipes that are not intended for this purpose;
- the diameter of the heating pipes does not match that described in the project;
- heating structure made of pipes made of different materials;
- heating wiring is done incorrectly;
- installation of a room thermostat, which controls the operation of the boiler, in the wrong place;
- lack of required headroom when installing heated floors;
- did not check the underfloor heating system for leaks before covering it with the finishing floor covering;
- they made a screed on a system of plastic pipes, but did not fill it with water;
- dilatation gaps are not made or made incorrectly;
- We turned on the heated floors for heating when the screed had not yet dried. Study the long-burning solid fuel boiler at the link.
What material are hives made of?
Nowadays, beehives for bees are made from a variety of modern materials, but more comfortable and environmentally friendly houses are made from natural material - wood. It is also advisable to use wood to make hives because beekeeping products made from natural materials are more natural and effective.
The boards should not have cracks or rotten places; they must first be thoroughly dried. Loose knots that sometimes come across are drilled out, and the resulting holes are sealed with plugs, which must be made of the same wood, using waterproof glue.

Selecting materials for building a hive.
Knots that have grown tightly together with the tree and are strong are left, but only if they are at least 15 mm from the longitudinal edge and 45 mm from the end edge. If the parts are less than 65 mm wide, the frame should not have any knots. Making a hive for bees is a complex matter that requires beekeepers to be meticulous and serious.
It is best to build a hive from soft wood: linden, poplar, willow, spruce, cedar, fir. Choose smooth boards, not warped, with a width that should be 5 mm greater than the width of the hive wall. The supply is necessary because the blanks must be cleaned before use.
The wooden parts are fastened together with nails, which must have such a diameter as not to split the boards. Don’t forget that hives need to be painted periodically every 2-3 years in order for them to look beautiful and dignified, as well as to protect the wood from pests and precipitation.
When painting hives, it is best to choose light colors of paint - white, blue or yellow are ideal.
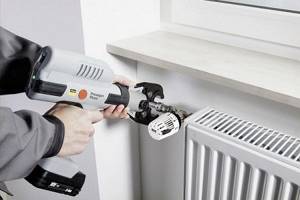
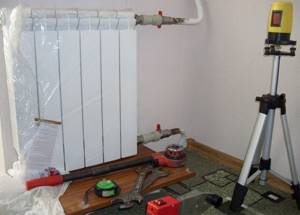
How to assemble radiator sections?
There are several types of radiators. There are solid ones, and there are those that need to be assembled into a single whole. This procedure is not time-consuming or labor-intensive. However, it requires the right approach. Such sections are connected to each other with special nipples, which in turn are tightened with keys with a long handle. To prevent leakage, there is a special rubber gasket between the sections, which at the same time helps to tighten the threads more reliably and maintain a strong pressure of hot water. After all sections are connected, it is necessary to check them for leaks. To do this, you can use either simple running water or compressed air. There is no point in experimenting with hot water.
How to install heating correctly
In order for a finished heating system with a natural circulation type to function correctly and efficiently, it is important to adhere to certain rules when installing it. In general, the installation diagram looks like this: In general, the installation diagram looks like this:
In general, the installation diagram looks like this:
- Heating radiators must be installed under the windows, preferably at the same level and maintaining the required indentations.
- Next, install the heat generator, that is, the selected boiler.
- Install the expansion tank.
- The pipes are laid out and the previously fixed elements are joined into a single system.
- The heating circuit is filled with water and a preliminary check for the tightness of the connections is performed.
- The final stage is to start the heating boiler. If everything works correctly, then the house will be warm.
Please pay attention to some nuances:
- The boiler should be located at the lowest point of the system.
- The pipes must be installed with a slope towards the return flow.
- There should be as few turns in the pipeline as possible.
- To increase heating efficiency, pipes with a larger diameter are required.
We hope this article will be useful to you, and you will be able to independently install a heating system without a circulation pump in your country house.
A heating system with natural circulation of liquid is a closed device of the gravitational (gravity) type, which allows you to heat rooms in a private house regardless of the power supply.
This advantage of the design makes it possible to use it in regions with problems or complete absence of a central electrical network. The system is economical, but for its proper functioning you will need to make accurate calculations.
Replacing batteries via UC
At the time of an accident (for example, a radiator has leaked), replacing the heating battery lies entirely within the responsibility of the organization, to whose account residents transfer money for maintaining common property and carrying out major repairs. It cannot be said that such a replacement occurs free of charge. Cases of coercion to purchase new devices are not uncommon. It happens that receipts are issued for the cost of work performed.
IMPORTANT! Residents of apartment buildings, regardless of the type of property, do not have to pay anything additional for emergency work.
The most unpleasant thing is if the battery replacement process is needed in emergency mode during the heating season. And representatives of the management company will begin to evade their obligations, citing the fact that they have neither time, nor workers, or even the radiators themselves. They will remove the old one, install plugs and politely ask you to wait. Moreover, there is no statutory deadline for replacing faulty radiators. In such a situation, it is important to eliminate the cause of the accident. Therefore, in order not to wait for anything, you need to act.
Actions are recorded in writing. All complaints, statements, acts, any other documents accompanying the process must be in 2 copies. First, a contractor is called to draw up a report. Further, the claim, together with the act, is referred to the Criminal Code. The claim must refer to 491 Decree of the Government of the Russian Federation. The 2nd copy must contain the date and signature of the management company employee who accepted the application. This may also take some time. In case of refusal, the Housing Inspectorate, when contacting them, will take control of the situation and the issue will be resolved. We previously wrote about who to complain to about the management company.
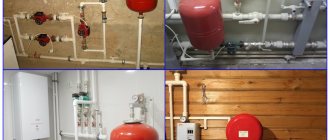
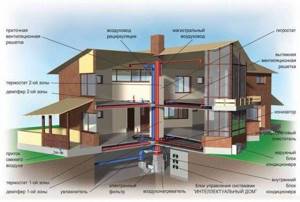
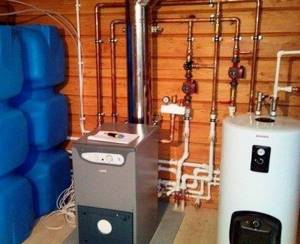
Overview of the necessary equipment for an autonomous heating system
Gas or electricity. What's better
DIY starts with studying the project. All work must be carried out in strict accordance with technical documentation. Changing the method of heating an apartment on the fly, installing a boiler with a higher power than specified in the project and increasing the number of radiators is fraught with troubles.
Therefore, you need to decide in advance what is best for you - gas heating or electric heating, and which heating devices to install. The following requirements must be taken into account:
- coordination of project documentation with the energy company supplying gas or electricity;
- when installing gas heating, it will be necessary to install a coaxial chimney on the street;
- in the case of electric heating, it will be necessary to re-equip the home electrical wiring, install a three-phase meter and electrical circuit breakers;
- apartments equipped with gas boilers require installation of supply and exhaust ventilation;
- Direct connection of the boiler to the pipeline and start-up work is carried out by an authorized person, a representative of the gas distribution organization.
How to properly connect heating equipment, how to install a boiler and start the entire heating system in accordance with established standards, it is better to contact specialists on these and other issues.
It would be appropriate to remind you that choosing electric heating will not give you advantages and real savings. Heating an apartment directly with electricity is an expensive proposition. Only by installing a multi-tariff meter will you be able to achieve a tangible economic effect. Often restrictions on the operation of electric heating are imposed by an established consumption limit. Excessive consumption of electricity will lead to unexpected costs for light and worsening temperature conditions.
Types of materials for making radiators
replace the heating system in the apartment, select heating radiators for the apartment
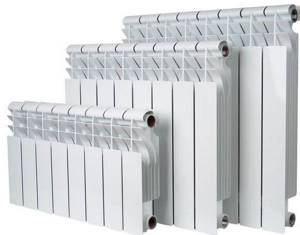
- Radiators made of cast iron
. The biggest advantage of cast iron is its low cost; moreover, it is highly durable, which will increase its service life for many decades. The features of this design are designed for the purchase of radiators with a large number of sections in order to heat the room quickly and efficiently. - Batteries made of steel
. Such structures are characterized by a high level of heat transfer, and are also able to withstand high loads and corrosion; moreover, they are easy to install indoors and ensure the most efficient operation. - Bimetal batteries
. This type is considered the most innovative and modern, in addition, they are light in weight and have a pleasant appearance. Such a heating system can be installed independently and without the help of specialists, and the combination of two types of metals increases resistance to external and internal influences and ensures maximum heat transfer (read: “The best heating radiators for an apartment: classification”).
Diagrams by type of coolant supply
The radiator will work effectively if the coolant is evenly distributed across all sections.
Warm and cold water have different densities. The heated coolant always tends upward. In the system it is replaced by cold, denser water. This feature is taken into account when supplying coolant to the batteries.
Coolant supply diagram
Upper eyeliner
Each radiator has vertical channels connecting the horizontal upper and lower manifold. The presence of these elements allows the coolant to circulate in the device.
With the top connection, mainly only the top of the battery heats up. To prevent such an effect, a jumper is installed after the first rib in the direction of flow of the coolant. Therefore, the heated water first falls into the lower collector.
Then it passes through all sections of the radiator and enters the return pipeline. As a result, the top connection turns into a diagonal way to connect the battery.
If there is no jumper in the radiator, the supply pipe is connected at the top, and the return pipe at the bottom from the opposite end of the battery. This option is called diagonal strapping.
Bottom eyeliner
This is the easiest way to tie. The scheme involves installing the boiler in the basement or on the ground floor. From the heat generating unit, the main pipeline is led to the attic, where the expansion tank is installed. A starting line is laid from the tank, but not lower than 1.5 m to the first radiator.
The supply and return are connected to the batteries at the lowest points on opposite sides. All radiators in the system are connected to pipelines in the same way and installed in series.
When installing a heating circuit with natural circulation, the pipes are laid at an angle. The last battery must be located above the boiler. The height difference between the final radiator and the heat generating unit should not exceed 3 m.
Connection in progress:
- circulation pump;
- bypasses;
- shut-off valves;
- Mayevsky cranes.
Pumping equipment runs on electricity. When it is turned off, circulation of the coolant is possible only in a natural way. Therefore, it is better to lay pipelines at a slope.
DIY water heating of a private house, design diagrams
When independently building a country house, everyone wondered how to make water heating at home with their own hands, and looked everywhere for diagrams of possible designs. Today there are many different options for installing water heating home systems. They can be easily divided into just three main types. The equipment and materials used for all of them are the same, but the design is different. What are the main differences and what are the advantages of each system?

A properly installed heating system is the key to comfort in your home during cold weather.
Selecting a heating system
First, choose the heating system you intend to use in your home.
The most common in homes is a water heating system, which we will consider. Draw up a project that includes a heating boiler, radiators, communications, temperature control devices and control of the entire system. Calculate the required system power based on the area and volume of the house.
In addition, make a list of necessary materials, equipment and tools. Purchase everything according to the list. Some tools can be rented rather than purchased.
You should also consider the features of choosing a heating system before proceeding with installation.
Whose property are heating radiators in apartments?
Heating devices - an intra-house heating system, including risers, heating elements, control and shut-off valves, collective heat energy metering devices and other equipment located on these networks - are common house property. Based on this, it is prohibited to independently replace radiators.
An appointed construction and technical examination can determine whether heating appliances belong to the common or personal property of the apartment owner. The expert considers the following questions:
- How are more than one room in the house served by heating elements located in the apartment?
- The heating elements of the intra-house heating system located in the apartment are intended to serve more than one room in a given house.
About the heating system of a multi-storey building
Home heating system. as a rule, it is single-pipe; the spill is either upper or lower. As for the return and supply, they can be located in the basement, but it is possible that the return is in the basement and the supply is located in the attic. The movement of water in the risers can be parallel and go from top to bottom, or counter-movement and go from bottom to top (in this regard, what matters is what heating scheme was used in the house).
There are risers that are used with a counter coolant; they can also be a passing one. If the heating scheme of the house is exactly like this, then in any system there is a functioning heated towel rail riser (in this case, the system can have either an open water intake or a closed one).
The number of sections and size of heating radiators are very important. Such parameters must be determined through calculations as the water in the coolant cools
In this regard, there is one good piece of advice: if you want to replace the radiators with newer and more modern ones, then you should not use the services of friends, since you need to take into account the progress and cooling of the coolant. In this case, it is recommended to use the services of a house maintenance company, and you should not throw away the jumpers, since the company is interested in restoring them. Thus, it becomes clear that a multi-storey building is heated using a rather simple but very effective system
However, if any failures occur, you should not carry out repairs yourself (especially if you do not have the appropriate training). In any case, you must definitely call the technicians from the service company, who, as a rule, fix all problems in the shortest possible time. Masters use the following tools:
Thus, it becomes clear that a multi-storey building is heated using a rather simple, but very effective system. However, if any failures occur, you should not carry out repairs yourself (especially if you do not have the appropriate training). In any case, you must definitely call the technicians from the service company, who, as a rule, fix all problems in the shortest possible time. Masters use the following tools:
- pipe (gas) wrench;
- adjustable wrench;
- pipe bender;
- crimping pliers.
With such tools, all problems are quickly eliminated.
Replacing heating radiators in an apartment
Art. 25 Housing Code of the Russian Federation, Russian Federation No. 37 dated 08/04/1998, Central heating radiators
Consequently, moving or replacing heating devices, as well as changing their configuration, does not require changes in the technical passport, and also cannot be considered as a refurbishment of the premises, and, as a result, is a violation of the procedure for using common property.
Coordination
The apartment owner first needs to agree on:
- replacing the original radiators with similar radiators;
- replacing batteries with radiators of a different type, with possible configuration changes;
- transfer of batteries.
In the first case of replacing batteries with similar radiators, it will only be enough to notify the management organization about the upcoming installation.
Subsequently, you need to seek the help of a specialist who will determine the possibility of installing new devices. The examination is paid for by the owner of the apartment.
To select and replace heating devices in your apartment, you need to understand the main stages of work, as well as possible problems that you may encounter during the work process.
Material selection
Bimetallic batteries with a steel core and aluminum fins have 4 important properties:
- high mechanical strength, thanks to the high level - 16 atmospheres - operating pressure and test pressure - up to 30 atmospheres;
- the chemical stability of the core has the ability to form a galvanic couple with copper pipelines;
- high efficiency;
- the modern look is quite presentable.
Cast iron radiators are corrosion resistant
Steel radiators can be sectional or panel. Sectional radiators in appearance resemble cast iron batteries. Steel radiators are able to withstand a working pressure of 16 atmospheres and also have a long service life. The main disadvantage is the risk of damage due to water hammer or external mechanical impact, due to the relatively thin steel - 1.5 mm.
Aluminum radiators are lightweight, so battery installation can be done by one person. The positive qualities of radiators lie in the large number of product options that differ in functionality and form, as well as an immediate response to changes in water temperature. Disadvantages include the need for air removal and unacceptable contact of the coolant with other metals. If this rule is not followed, the radiator may be destroyed by chemical attack.
Calculating the number of sections
To calculate the required number of sections, you can use a simple algorithm: 2 sq. m. area = 1 section
In addition to the throttle or thermostatic head, it is advisable to install the following near each radiator:
- an additional valve on the second line of the supply line, which will completely cut off the radiator and allow, if necessary, to completely disconnect and dismantle the radiator;
- a valve on the jumper, which in the closed position will direct the entire flow of water in the riser through the radiator, otherwise through the bypass.
Do you want to have your own heating? Algorithm of actions
Obtaining permission to disconnect
The desire of residents to improve the heating of their own apartment during the cold period is natural, if we take into account how centralized heating works in our houses and what utility costs they have to bear. At first glance everything is simple
If you have money, take it and install a boiler in your home and heat it as you please. But there is one significant “but”. In our country, the independence of citizens, even in terms of managing their property, has its limitations. We are forced to heat our own homes using the services of public utilities. Any attempt to change the life support order of a city apartment encounters obstacles from the state.
Energy companies are monopolists in the heat supply market, and the state helps them in this by artificially limiting the ability of citizens to switch to autonomous sources of energy supply. A homemade heating system in an apartment is most often the result of a grueling struggle between residents and regulatory authorities. The whole problem is how to get permission to disconnect from the central heating supply. Existing technical standards do not allow you to independently obtain the right to autonomous heating of a city apartment without permission, even despite the fact that the Civil Code of the Russian Federation does not directly prohibit such actions for homeowners and the apartment owner has the right to refuse the services of a centralized heating system at any time. heat supply.
Important! Unauthorized shutdown of elements of the intra-house heating system is punishable by law and is an administrative offense. Article 7.21 of the Code of the Russian Federation on Administrative Violations gives a clear idea of the responsibility of residents in this regard
Organizing independent heating of your apartment with your own hands means only one thing at the initial stage. You will have to independently seek official permission to disconnect from the central heating. Already at this stage you need to decide which type of home heating is optimal in your case.
in high-rise buildings (more than 9 floors) there is no centralized gas supply in order to increase the safety of operation of residential buildings. Therefore, gas heating is acceptable mainly for residents of old apartment buildings, where there is a centralized supply of household gas.
What heating to use, gas or electricity, is up to you. The main thing is that the project meets the necessary building codes and safety standards.
The project must indicate all the necessary technical parameters of heating devices, a plan and diagram for their connection, as well as detailed hydraulic calculations. Only after all bureaucratic issues have been resolved can we directly address the technical side of the issue.
Dismantling old heating
Having dealt with the energy company and received permission to disconnect, you can move on to the next stage - dismantling the piping system and radiators of the in-house system in the apartment. In this situation, you cannot do without the help of the management company or the housing office. It is necessary to agree with these services on the procedure for disconnecting the apartment from the intra-house heating communications. Only after this can dismantling begin.
In the process of work, it is necessary to strictly adhere to the sequence, cutting out exactly those nodes and elements of the system that correspond to the diagram. Otherwise, if the heat supply to other apartments is disrupted, you will have to answer not only according to the law for sabotage, but also bear the financial costs associated with paying a fine. You will have to restore damaged house communications at your own expense.
Work should begin by dismantling the main wiring elements. To give integrity to the central heating circuit, which is now useless to you, it is better to replace the riser by cutting in a new steel pipe of the same diameter instead of the old pipe. Having isolated yourself from the central heating supply, proceed to dismantling old pipelines and turning off heating appliances. Having isolated yourself from the central heating supply, proceed to dismantling and disconnecting.
For reference! There is a mandatory rule. It is strictly not recommended to use old wiring and radiators for new heating systems. Inconsistency of technical parameters, large contamination can lead to technological violations during the operation of autonomous heating.
Installation and replacement stages
Required tools and materials
In addition to a large piece of pipe, it is desirable to have a welding machine and the appropriate skills in your hands.
Skills in welding sealed seams together with the mirror are required. Gas welding makes it easier to work in difficult conditions.
If there is welding, you need welds - short and long threads, shut-off valves and radiators will fit them.
In addition, you need:
- 3 locknuts, one per radiator;
- 3 drives - one each for the jumper and liner;
- 3 valves DN20.
The valves will, in various positions, block the flow of water through the jumper or direct all the water to the heating device. Or limit the passage of the battery when the jumper is open.
The valves are exclusively ball valves. It’s better to forget about screw valves.
As an option, you can install a thermal head or throttle on one of the connections. Very reliable, hassle-free and convenient design. When assembling by hand, you will have to purchase a die with a lock and turbine and a steel cutting circle. All straight sections with threads will be completed on site. You will need all the listed parts: 2 tees (brass or cast iron) and 2 couplings. The threads must be cut in a vice.
Replacement of pipes requires certain tools
Reset risers
In houses with bottom filling, the risers are connected in pairs. You will have to find out exactly how the riser of interest is connected. An easy way to find out is to go to a top floor apartment and look at the lintels. Top pouring means that you will have to turn off one valve in the attic and in the basement.
How to find valves: follow the entrances - in the basement the stairs are always visible. If the required entrance is found, finding out the position of the valve is a simple matter. All valves are closed, then the vents are opened or the plugs are unscrewed.
Wait for the water to drain to ensure that the fittings are fully functional. If there are relief valves instead of plugs, starting and resetting will be easier.
Turning off the riser during the heating season is only possible if there is a passage to the upper apartment.
If no one lives in it, then you will not be able to start the heating by bleeding the air.
A simple way to disassemble heating devices is to cut off their connections with a turbine. Then the locknuts and a piece of liner are unscrewed from the radiator cap. Two factors depend on cutting the riser: relations with neighbors below and above. It makes sense to replace risers through the ceilings. Corrosion most quickly destroys the pipe inside the ceiling. You need to cut the pipe in the place where you can weld the finished one or trim the thread on it. Preferably not close to the wall or floor. A grinder is convenient for chamfering and cutting off the riser before trimming the threads.
The first step is to reset the risers
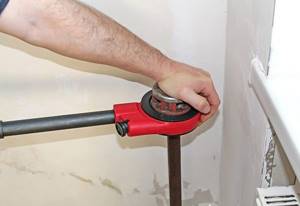
Thread cutting
But cutting threads for the first time can be quite difficult.
What to take into account:
- The chamfer is removed from the pipe using a turbine or file and an entrance is made for the die.
- The holder with the die is installed on the pipe with the long side. This is necessary so that the die is strictly perpendicular to its axis.
- Short threads are cut on the riser - no more than 5 threads.
- When the die finds the pipe, you need to squeeze the holder with the maximum available force.
- The riser itself must be held with a key after the first cut thread. The force is directed in such a direction as to compensate for the rotation of the die at the moment. The situation of tearing off threads from the radiator lower or higher up the riser is quite possible.
- Threads are cut clockwise. The force directed towards the key goes in the opposite direction.
The exception is a convector installed for welding. You will not tear off a pipe welded to the convector. There is no need to hold the riser when cutting threads.
Long threads are cut off on the connections to the radiator (you will have to fit locknuts and radiator plugs onto them) and on the outlet in the jumper. When cutting, the pipe is clamped in a vice so as not to crush or damage the already cut threads.
The next stage is threading the heating pipes
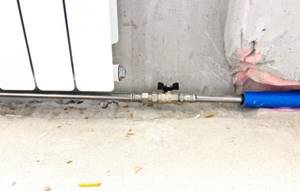
Assembling risers and connecting radiators
Cut pipes with threads cut on both sides are passed through the ceilings and connected with couplings to the threads on the riser.
Winding - linen with silicone sealant or red thread. Good results from polymer thread too. The price of winding is much higher, but for one-time work you can buy it.
Linen ensures tightness. Silicone protects against fading and rotting. Then tees are screwed onto the threads. The gap between the threads directed towards the heating device is exactly half a meter along their axes.
The next valves to be screwed into the tees are the valves with female-female threads with small pipes or male-female threads. Long pipes are screwed into the radiator shut-off valves - pipes with a long thread at one end and a short length at the other. You immediately need to push the stop of the radiator cap and locknut onto them.
The jumper is mounted in the same way as any drive.
Then the radiator is connected. It is hung on brackets so that the axes of the threads coincide with the axes of the eyeliners. Next, pre-wound plugs are driven into it. Same with locknuts.
If welding is available, you can get by with a small number of threads.
After cutting the threads, you should connect the pipes to the radiator
Pressure testing and first launch
There is only a little work left: we need to start the riser and test the structure under pressure, resuming movement in it.
We start with tests. At this stage, it is desirable to have an assistant who, if there is a leak, will inform you about it in the simplest way - by tapping on the riser or by calling the phone.
Open the valve on the jumper and close all the valves leading to the radiator. This way we limit the number of threads that are under pressure during the first start-up. We close the vents at the bottom or tighten the plugs. Open the valve on the new riser a little.
As soon as the water in the open valve subsides, the bottling pressure in the risers can be considered equal. The valves on the risers (in the case of top filling - in the attic) open at full strength. Then - a visual inspection: upon arriving at the apartment, we open the valves on the supply lines (slowly, allowing the radiator to fill with water without consequences) and carefully inspect all the threads for leaks.
If there are screw valves on the risers, open the valve where the arrow from the filling to the apartments is installed. By opening another standing valve, you can tear the valve away from the stem.
Now all that remains is to bleed the air and begin moving.
How to do it:
- In houses with bottom filling, in an apartment on the top floor, open the Mayevsky tap on the jumper between the risers. When water flows from the tap, do not leave: air bubbles may remain in the radiators and be delayed near the vent. Only a heated riser indicates that the movement has definitely begun.
- Top filling does not require active action: the air lock will go into the expansion tank in the attic. If its volume is small, it is better not to be lazy and open the air vent on the top of the tank.
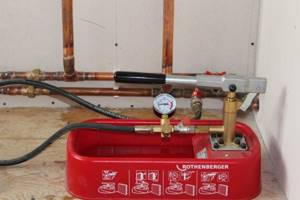
Pressure testing of the heating system
Prices for crimping machine
crimper
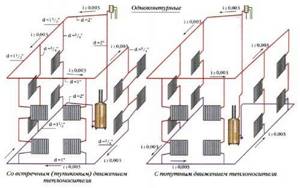
Features of the horizontal pipe laying scheme
Scheme of horizontal heating in a two-story house
In the overwhelming majority, a horizontal two-pipe heating system with bottom wiring is installed in one or two-story private houses. But, in addition, it can be used to connect to centralized heating. A feature of such a system is the horizontal arrangement of the main and return (for two-pipe) lines.
When choosing this piping system, it is necessary to take into account the nuances of connecting to various types of heating.
Central horizontal heating
To draw up an engineering diagram, you should be guided by SNiP 41–01–2003. It states that the horizontal distribution of the heating system must ensure not only proper circulation of the coolant, but also ensure its metering. For this purpose, two risers are installed in apartment buildings - with hot water and for receiving cooled liquid. A calculation of a horizontal two-pipe heating system, which includes the installation of a heat meter, is required. It is installed on the inlet pipe immediately after connecting the pipe to the riser.
In addition, hydraulic resistance in certain sections of the highway is taken into account
This is important, since the horizontal distribution of the heating system will only work effectively if the appropriate coolant pressure is maintained
In most cases, for multi-apartment buildings, a single-pipe horizontal heating system with bottom wiring is installed. Therefore, when choosing the number of sections in radiators, you need to take into account their distance from the central distribution riser. The farther the battery is located, the larger its area should be.
Autonomous horizontal heating
Heating with natural circulation
In a private house or apartment without a connection to the central heating supply, a horizontal heating system with bottom wiring is most often chosen. However, it is necessary to take into account the operating mode - with natural circulation or forced under pressure. In the first case, a vertical riser is installed immediately from the boiler to which the horizontal sections are connected.
The advantages of this arrangement for maintaining a comfortable temperature level include the following:
- Minimum costs for purchasing consumables. In particular, a horizontal single-pipe heating system with natural circulation does not include a circulation pump, a membrane expansion tank and protective fittings - air vents;
- Reliability of operation. Since the pressure in the pipes is equal to atmospheric pressure, the excess temperature is compensated using an expansion tank.
But there are also disadvantages to be noted. The main one is the inertia of the system. Even a well-designed horizontal single-pipe heating system for a two-story house with natural circulation will not be able to quickly heat the premises. This is explained by the fact that the heating network begins to move only after reaching a certain temperature. For houses with a large area (from 150 sq. m.) and with two floors or more, a horizontal heating system with bottom wiring and forced circulation of liquid is recommended.
Heating with forced circulation and horizontal pipes
Unlike the scheme described above, there is no need to make a riser for forced circulation. The coolant pressure in a horizontal two-pipe heating system with bottom wiring is created using a circulation pump. This is reflected in improved performance:
- Quick distribution of hot water throughout the entire line;
- Possibility of adjusting the volume of coolant for each radiator (only for a two-pipe system);
- A smaller area is required for installation since there is no distribution riser.
In turn, horizontal wiring of the heating system can be combined with a collector one. This is relevant for long-distance pipelines. This way you can achieve even distribution of hot water throughout all rooms of the house.
When calculating a horizontal two-pipe heating system, it is necessary to take into account the rotary units; it is in these places that the hydraulic pressure losses are greatest.
When do you need to change pipes?
The most common reason for replacing pipes is the low resistance of cast iron and steel types to corrosion. Over time, they wear out, which leads to leaks. Over the years of operation, a layer of deposits accumulates on the inner surface of the pipes, which reduces the efficiency of the entire system, since less coolant flows into it. When radiators are clogged with rust, they stop heating, although the riser remains hot.
Replacement is made when, due to an error in the design, the heating of the room is connected through the “return”, so it is cold there. The inability to bleed air from the pipes leads to cooling of the radiators and noise in the riser. Old heating systems did not provide for the installation of taps to shut off the pipes in each room. Therefore, in emergency cases, it is necessary to turn off the heating riser of the entire entrance.