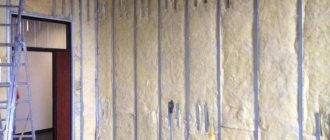
Here is a question from one of the construction forums: I am planning a roof made of corrugated sheets, the attic space will be cold. Is it necessary to lay a layer of waterproofing between the sheathing and the metal sheet of corrugated sheets, if so, why?
In this article I will try to answer this question.
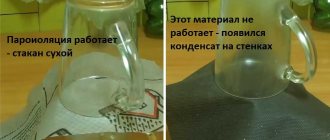
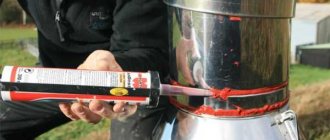
In fact, everything is simple: if the attic is cold and well-ventilated (well, really!), then you can lay a metal roof directly on the sheathing, which it is advisable to treat with an antiseptic, but if the attic space is closed, then vapor-waterproofing is required! Although I am a supporter of installing waterproofing in all cases, since houses, as a rule, are built to last for many years, and the roof is one of the most expensive elements in the construction of a house and lasts a very long time. And, perhaps, 10-15 years after some new decorative finishing of the house, ventilation will not be so effective and then problems with fogging of the roof may arise.
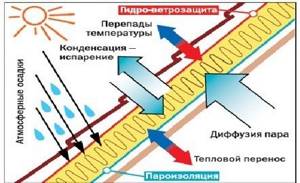
And the roof sweats due to temperature changes; the iron on the outside is cold; condensation forms on the inside, which is warmer; this is a law of nature; it cannot be defeated. The main source of heat loss is, as you know, the ceiling. And heat (to varying degrees) is transmitted by any thermal insulation coating, so no matter how well the ceiling is insulated, it will always be warmer in the attic than outside, therefore, in order to equalize the temperature with the environment, good ventilation of the attic is needed. Plus, when installing the roof, careless or inexperienced builders can screw in a self-tapping screw (and more than one) and not get into the sheathing, turn it out and screw it next to it (this happens quite often), and this is an extra hole in the roof through which moisture can get in from the outside.
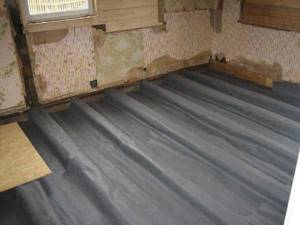
Here is one example.
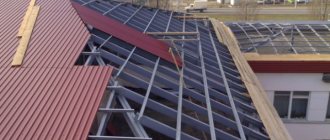
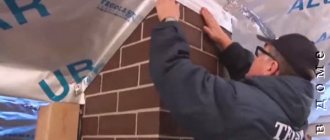
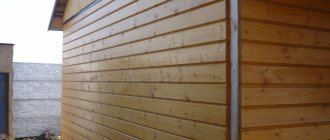
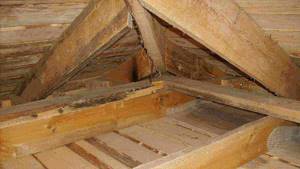
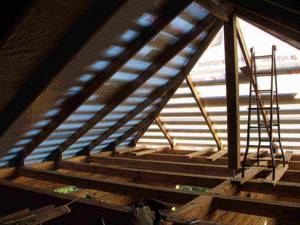
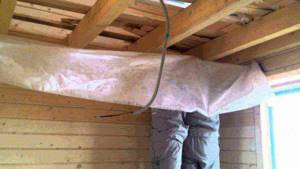
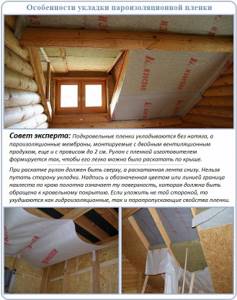
People bought an old house, removed the old iron, which was laid directly on the sheathing, while a dormer window was installed in the attic, and on the other side there was an open hem to the yard, in other words, there was continuous ventilation. Following the example of their ancestors, the new owners laid a new roof directly on the sheathing, but at the same time removed the dormer window and covered the entire house with plastic siding. As a result, we got what is shown in the pictures. Within 2-3 years, the entire sheathing along with the rafters became unusable. As a result, the meager savings led to an expensive, complete reconstruction of the entire roof.
The conclusion is obvious: in most cases, it’s not worth skimping on? Despite the design of the attic space, steam-waterproofing is worth doing in a heated residential building. You can read about the types of waterproofing and methods of its installation here .
Cold roof design in a residential building
Many developers who want to save some money on construction strive to purchase the cheapest materials, but at the same time, so that the quality of the entire building does not suffer much from this.
This is possible if you use primitive two slopes as a rafter system, corrugated sheets as a covering, and make the roof cold.
The design features of such a roof can be listed on one’s fingers, since there is no need to lay thermal insulation material, a vapor barrier layer and other components often found on insulated roofs. If you still doubt the savings, then we can say with confidence that the cold version will cost 50-60% less than the insulated structure. In addition, the work can be carried out independently, therefore, the savings will increase even more.
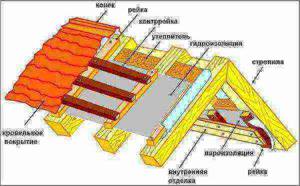
The cold roof pie, in most cases, includes the following products:
- Rafter legs
- Waterproofing material
- Counter-lattice
- Lathing
- Profiled metal sheet
Is waterproofing necessary for metal tiles on a cold roof?
It is worth noting that all metal surfaces have one similar feature: they collect condensation. The waterproofing included in the roofing pie with a cold roof will correct this problem and protect the room from incoming moisture both from the outside and from the inside. Many developers, when constructing an insulated roof, advise their friends not to lay a vapor barrier layer if they build a building with a cold type of roof. They think that the cold will remove the condensation that is visible on metal products, but they are very mistaken.
Condensation appears due to the temperature difference between the roof space and the external environment.
Naturally, when the attic is not heated and is not insulated in any way, the difference will be small, but still it is sufficient to provoke the release of moisture from the air. As you can see, condensation will form regardless of the type of roof, therefore, the question posed at the beginning of the paragraph can be answered unequivocally: yes, it is necessary.
An example is outbuildings whose owners do not care much about their service life. In such buildings, the roofing pie is the most primitive and even violates building codes. Most often, a roofing pie consists of rafters, sheathing and roofing. All layers of vapor barrier and waterproofing were simply thrown away. Despite this fact, this building can stand for a significantly long period, or, conversely, it can collapse in just a couple of years. It depends on your luck, but why take risks if you can do everything in a high-quality manner?
You cannot afford to take risks on residential buildings, as someone’s life may depend on it. I am not exaggerating, because if condensation affects the rafter system and other roofing elements for a long time, it will simply destroy them, which can lead to the fall of the entire roofing pie.
IMPORTANT: If at the beginning of construction you decide to build a cold roof, but later after a certain period you will insulate it, then it is most advisable to lay micro-perforated film as a waterproofing product. Its properties are practically no different, but the price tag is much lower than membranes.
Variety of materials
To protect surfaces and insulation from moisture use:
- reinforced polyethylene film;
- aluminum coated film;
- film made of propylene fibers;
- membrane vapor barrier.
What where When?
The main role of a vapor barrier material is to protect wooden structures and insulating material from moisture, rotting and, as a result, premature destruction.
It is extremely important to use it on lower floors, above basements and basements, and especially above bathrooms and kitchens. It is also necessary to remember that the insulation protection must be double-sided, since wet mineral or glass wool almost completely loses its thermal insulation qualities. That is, the film is placed between the finished floor and the insulation material, as well as between the insulation and the subfloor
However, often the bottom layer is replaced with waterproofing
That is, the film is placed between the finished floor and the insulation material, as well as between the insulation and the subfloor. However, often the bottom layer is replaced with waterproofing.
Which side should I lay?
You need to know which side to lay the vapor barrier on the floor. An extremely important nuance, since the wrong technology for installing the material will negate all its properties.
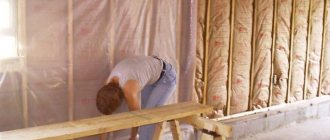
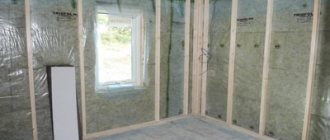
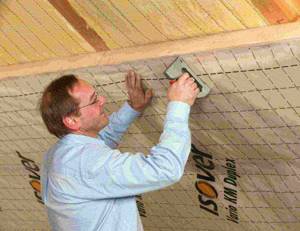
A man lays vapor barrier material on the floor
Here are the instructions:
- The double-sided film is placed with the smooth side facing the insulation and the corrugated side on top. The rough surface acts as a filter for steam and even the smallest drops of water.
- It is customary to lay polypropylene with the wicker side away from the insulation, and the smooth side inside.
- Installation of foil vapor barrier is carried out with the aluminum side facing the room, as it tends to reflect infrared radiation.
- Individual installation technology is possible for individual brands and types of vapor barrier materials.
- Before use, be sure to read which side to place the vapor barrier on the subfloor and insulation.
Laying algorithm
It's not complicated:
- First, the old flooring is dismantled down to the subfloor. Then the base is prepared: debris is removed, cleaned, leveled, treated with antiseptic and primer. Old floor beams or joists that have begun to collapse must be replaced with new ones.
- Hydro and vapor barrier of the subfloor is carried out, preventing moisture from entering the insulation from the ground or lower rooms. The film strips are laid with the correct side (see above) overlapping by 15-20 cm. The edges must be glued with reinforced or double-sided tape. Also, the vapor barrier should extend 10-15 cm onto the walls and joists. It can be attached to beams and joists with metal brackets.
- A layer of insulation is laid on top of the film with the seams staggered and a thickness of at least 20-30 cm.
- A second layer of vapor barrier is laid on top of the insulation, also with an overlap and gluing the joints. If installation is carried out on wooden floor joists, it is necessary to lay the film so that it sag slightly: this way a ventilation gap is created between it and the finished floor. However, it is also recommended to put counter-battens on the logs on top of the vapor barrier, which will prevent the film from coming into contact with the finished floor.
- The finished floor is filled and then finished with the finishing floor covering.
Now you know how to install a vapor barrier on the floor and will not make the mistake of doing your own repairs.
We recommend looking at what happens if the vapor barrier is not installed correctly. Condensation fills the ceiling with water, the insulation gets wet and mold spreads. Don't make these mistakes.
In winter, when it’s frosty outside but the inside of the house is cozy and warm, unnoticeable steam forms in the rooms. And this steam must leave the room freely. To accomplish this task, a vapor barrier is installed. You need to know which side to lay the vapor barrier on the floor, walls or ceiling.
Waterproofing and ventilation of cold roofs
If you are laying a micro-perforated product, then such a layer will block the access of moisture from the outside, but at the same time water vapor can pass through this area without problems. We can say that laying vapor barrier products on roof slopes is not necessary in this case. After steam penetrates inside, it ends up between the waterproofing material and the metal coating, from where it is removed by natural ventilation.
IMPORTANT: When a dense waterproofing film that retains water vapor is used, this leads to a significant increase in air humidity and, as a rule, dampness in the room.
With increased air humidity, condensation processes begin, so moisture accumulates on the back side of the film and penetrates all roofing materials. Due to this fact, for the construction of a cold roof it is not recommended to use materials such as polyethylene and polypropylene, roofing felt, and glassine.
The ventilation system for cold roofs is quite simple. To create it, gaps are left, which, as a rule, are located along the eaves overhang. Air masses pass through them, collect all the humidified air and remove it through the cold triangle located in the ridge part of the roof.
The counter grille is a design to provide additional ventilation.
Most often it can be found on complex roofing systems, where products with a high degree of waterproofing are used as a coating, for example, metal, bitumen shingles and others. The gap that is created by installing counter-battens allows fresh air to dry the roofing pie on both sides, so structures with such a pie last much longer than others.
Role and functions of the roof
To keep the house warm, dry and easy to breathe, a competent combination of different design solutions is necessary.
When choosing the design and shape of the roof, it is necessary to take into account not only its functional, but also its decorative and artistic qualities.
The roof experiences the greatest temperature, atmospheric, and mechanical loads from the outside, as well as exposure to air and moisture from inside the room, so the technology of constructing it with your own hands does not tolerate negligence.
Factors of environmental influence on roof structure.
Roof functions:
- Be warm (thermal insulation).
- Be waterproof (waterproofing).
- Be resistant to mechanical stress.
The first and third functions can be achieved with your own hands by simply using durable roofing (tiles, metal, slate...) and reliable thermal insulation (damask, mineral wool, expanded clay...) materials, but to achieve one hundred percent waterproofness, a rather complex prefabricated filling is required.
In this case, it is necessary to provide both external roof waterproofing and internal vapor barrier.
Cold roof. Is waterproofing necessary on outbuildings?
First of all, it is worth noting that outbuildings differ significantly from residential buildings in both their structure and volume.
The vast majority of developers are trying to save money on the construction of secondary structures, so the issue of waterproofing is more relevant than ever. Before answering the question, let's look at the coating. Today, corrugated sheeting is one of the cheapest materials, so I will talk about buildings covered with it.
Manufacturers from different countries are striving to produce such products so that the whole world can use them. If you are a fan of corrugated sheets, then today such material is a sheet of metal with an anti-condensation coating.
In appearance, it is practically no different from its analogues. A synthetic composition is applied on the inside; it resembles felt. Due to the large number of pores, this material is capable of retaining up to 1 liter of water per square meter. After the surface has been saturated with moisture, ventilation comes into play and if it is carried out according to all the rules and regulations, the drying process will not take much time.
Thanks to the installation of such a “tricky” coating, the need to lay a vapor barrier and waterproofing layer is eliminated, but it should be understood that the weight of such a coating will vary depending on weather conditions. When making the necessary calculations, it is very important to take these parameters into account and use them in the calculations. It is worth noting that a finished roof will be much cheaper, because it will not contain almost half the roofing pie.
Installation Tips
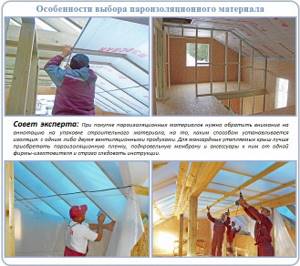
The design of the vapor barrier film depends on the direction of use of the room, the type of surface of the fences and the type of material used. There are quite a lot of vapor barrier and vapor-permeable films; in addition, their names are tricky; sometimes it is difficult to understand for what purpose this or that film was created. However, a vapor barrier film differs from a vapor-permeable film in terms of vapor permeability. So, carefully look at the symbols on the packaging and read the instructions. The package with vapor barrier material usually indicates how and which side to mount it on.
Key rules to follow when installing a vapor barrier:
- the film must be laid on the warm side of the room;
- It is forbidden to cover the thermal protection with a vapor barrier on both sides, since it is necessary to create conditions for the volatilization of steam penetrating into the heat insulator from the inside;
- the steam barrier is mounted tightly, without slack;
- the mating points are overlapped by approximately 10 centimeters and glued with 2-sided tape;
- A small gap should be left between the film and the lining.
When insulating a heated room, when the heat insulator is located deep in structures lined with thin sheets, this layer is mandatory:
- for the roof of used attics and attics;
- to protect the attic floors of the “cold” roof from the passage of water vapor;
- to protect the roof with slopes and walls of a frame structure from the passage of water vapor;
- to protect indoor pools, baths, steam rooms from the passage of water vapor;
- to protect against the passage of water vapor of a heated loggia while thermally insulating all surfaces of the fences - external cladding, floor and ceiling;
- for steam and anti-filtration waterproofing of floors of the lower floor in a house made of brick and wood.
When installing protection against steam penetration using a polyethylene film, it does not matter which side it is laid on; steam does not pass through equally in any direction.
Films with an anti-condensation surface have a rough inner layer, which is capable of retaining excess moisture until conditions for its weathering arise. Films with a reflective surface can return some of the heat, which makes it possible to save on heating costs. On a note! In order to correctly install such materials, it is necessary to leave an interval of 40-60 millimeters between them and the final cladding. If this is not done, the vapor barrier will remain, but specific functions will not be performed.
The film is fixed from the inside in a vertical, horizontal or inclined position to the wooden parts of the wall frame, to the floor beams and floor joists, to the rafters or additional roof sheathing. The width of the canvas is overlapped by at least 150 millimeters. In the case of increasing the length, the overlap is similar, and the seam must be fixed on the load-bearing component of the frame.
All seams and joints must be taped with construction tape. The use of sealants and adhesives for vapor barrier films based on silicone, polyurethane or acrylic resins is prohibited. The protection of all surfaces of the fences must be a continuous layer. Installation to structural elements made of wood is carried out using zinc-coated nails with a large head or staples. A block is stuffed on top of the fixation points - it “covers” the holes, forms the required interval for the correct functioning of the specialized surface and serves as a lathing for fixing the final cladding.
On a note! Specific conditions for a water vapor barrier for timber beam ceilings. The film should be installed at the bottom of the beams in order to completely protect all structural components from getting wet. All diagrams and technical solutions that film manufacturers indicate in their instructions are advisory in nature.
To find out whether polyethylene can be used as a vapor barrier, see the following video.
Installation of waterproofing for cold roofs
So, based on the information obtained above, you understand that waterproofing material is installed regardless of the type of roof and the functional purpose of the building. However, if you want to save money, you can use roofing coverings with an anti-condensation layer, but not all people like metal coverings, so I will now tell you the general principle of installing waterproofing.
- First of all, an inexperienced roofer must repeat safety precautions and the principle of working at height. After this, he dresses in special uniform, which should include the following: personal protective equipment, good shoes with non-slip soles and a mounting belt.
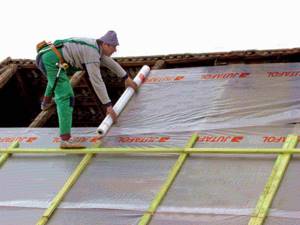
- After the rafter legs have been secured in place, you can begin laying the vapor barrier layer. It is attached to the rafters using a construction stapler and pressed against the sheathing. With a small slope, strips of material are placed across the slope, and along highly inclined slopes. To improve the quality of laying this layer, the joints are coated with bitumen or taped with double tape.
IMPORTANT: Before installing the sheathing, it is very important to treat its elements with special protective solutions, which will increase the degree of ignition of the wood and protect it from rotting.
- Next, the counter-lattice is laid. It creates the necessary air gap, thanks to which moisture will be removed from the roofing pie.
- Waterproofing material is laid on top of the conro-lattice.
- After this, they begin to install the corrugated sheets.
Most developers strive to cover as much length as possible with one strip of corrugated sheet. This is justified by the fact that in this way fewer joints are obtained, therefore, the waterproofing qualities of the entire roof are significantly increased. You can do all the work yourself, but to increase efficiency it is better to invite 1-2 partners.
Roof construction is a critical stage of construction work that needs to be given special attention. As soon as it comes to it, the following questions immediately arise: what kind of roof to make, what is its design, what to use as a flooring, insulate it or make it cold? You decide these questions yourself. We would like to draw your attention to the fact that there are plenty of materials for roof cladding. They all have their pros and cons. One of these popular materials is corrugated sheeting. It has many advantages, which is why it is so valued by builders. What can we say about vapor barrier? Is it necessary if you use corrugated sheeting? What materials are best suited for this purpose?
Let's look at the answers to these and other questions in detail.
Features of vapor barrier installation
In order not to get confused in the recommendations, you should reduce the rules for attaching a vapor barrier to a wall, ceiling, or roofing to two main positions:
- Which side to attach?
- Is there a need for a gap between the vapor barrier and thermal protection?
The vapor barrier is laid on the insulation with the smooth side, with the exception of the last under-roof layer.
A gap for ventilation between the film and the insulation of 2 to 5 cm is left when working with Izospan.
Preparatory work
Preparatory work inside the premises is of a general construction nature. It is necessary to reliably insulate exposed electrical wires, prepare the necessary tools and a workbench. Once again, you should make sure that you know how to properly attach the vapor barrier. Then unwind the roll with the desired side up.
Technology for laying vapor barrier on the ceiling
When installing the vapor barrier on the ceiling, to the inside of the wooden paneling, the vapor barrier is placed with the rough side facing the room. Using a stapler, the strips are secured with an overlap of 10 cm. An overlap of up to 5 cm is left on the walls around the perimeter. The joints are glued with special tape. The film must be stretched, sagging must not be allowed, so it is fixed in the right places with intermediate slats. The rules for laying vapor barrier for the ceiling allow the use of both conventional PVC film and Izospan.
Technology for laying vapor barrier on the floor
Vapor barriers for floors are used to prevent laminate, parquet, and natural boards from absorbing excess moisture.
On the prepared, cleaned and primed base coating (concrete floor), thermal insulation is laid between profile 5-centimeter slats, followed by vapor barrier material (rough side up), the strips are overlapped using tape. It is necessary to release a reserve of up to 5 cm around the entire perimeter of the room, and glue the film with tape with an overlap of 10 cm. Next, heat-insulating foil is laid and secured with tape. Next, the flooring is installed.
Rules for installing a vapor barrier layer on walls
In frame buildings with external insulation, the vapor barrier material Izospan A is used. The material is laid on the outside of the insulation under the outer skin of the building with the smooth side facing out. Laying is done from the bottom up in horizontal stripes, fixed with a stapler, the strips are overlapped by 10–15 cm. Wooden counter-battens are attached on top of the insulation, which are used for installing the sheathing. Be sure to make a ventilation gap equal to the thickness of the slats.
The vapor barrier for the walls of a wooden house is attached directly to the insulation from the inside, with the smooth side facing it. The vapor barrier film should be laid from bottom to top in horizontal stripes overlapping to a width of 10–15 cm.
A little about the cold roof
It is known that when installing a roof, work is carried out to insulate it. This is done to ensure that heat does not leave the building and cold does not get inside. It is especially important to do insulation when the roof is an attic. But there is another concept, the so-called “cold roof”. In this case, no insulation work is carried out; it is enough to make a sheathing and lay down the material. Using this type may be advisable if the roof does not need to be insulated. The advantage of a cold roof is its high efficiency, ease of operation and high speed of construction.
In what cases is it advisable to install a cold roof? For example, in a country house or in your own private house there is an attic that you will not use as an attic. Or, you need to block off a building that is not intended for permanent residence. In this case, it is rational to make the roof cold. At the same time, it is important to insulate the ceiling inside the building itself, and cover everything using corrugated sheeting. But the question arises: what can we say about vapor barrier, is it needed under the corrugated sheeting of a cold roof? Let's first figure out why a vapor barrier is needed in general.
It plays a vital role - it protects the insulating material from moisture penetration. After all, warm and humid air will accumulate in the upper part and on the roof. If the vapor barrier is not performed correctly, this will lead to early roof repairs and a decrease in the life of the building. And wooden structures will rot when exposed to moisture. But there is one nuance here. All this is rational when the attic or attic is insulated; as for a cold roof, everything is not so simple. Is a vapor barrier necessary in this case? After all, we learned that its main purpose is to protect the insulation layer. It is necessary, and there are reasons for that.
Although the room will be well ventilated, it will still suffer from precipitation. Corrugated sheeting cannot 100% prevent moisture from penetrating under the roof. Snowfall, heavy rain along with wind can take their toll and liquid will get inside. This is fraught with the fact that the metal elements inside will become rusty and fail. The same applies to wooden products (built, sheathing, etc.), which will rot and deform.
So, we learned that a vapor barrier under corrugated sheeting is still needed, even when installing a cold roof. But how to do this? Let's look at the main vapor barrier materials that can be used under corrugated sheeting.
Installation of a vapor barrier
Installation of vapor barrier material is an important stage of work when insulating building structures, determining their ability to retain heat and provide protection against moisture penetration into the insulation.
A vapor barrier is installed during the construction of a building (structure) before finishing the premises or installing the roofing, as well as when performing repair work on these structural elements.
Performing this work requires knowledge of the installation features of a vapor barrier.
They can be divided into several stages: preparatory, execution of work and final.
Preparatory stage
During this period of work, the material that will be used as a vapor barrier is selected and purchased, and the selection criteria will be:
- place of use, installation (facade of the building, interior, etc.);
- requirements for technical characteristics (ability to pass evaporation);
- operational indicators;
- the possibility (features) of installation on a particular building structure.
Initially, prepare the surface on which the vapor barrier will be mounted. These works depend on the material from which the base is made and the location where they are carried out.
Wooden structures are treated with antiseptic solutions and fire-fighting substances, and brick and concrete are treated with deep penetration primers to prevent the appearance of microorganisms (fungus, mold, etc.).
Execution of work
At this stage, the installation of a vapor barrier is carried out on a selected area of building structures, while the installation is carried out on different elements of the building (ceiling, wall, rafters, etc.) made of different materials (metal, wood, concrete, etc.) differently.
Ceiling mount
The installation of a vapor barrier layer on the ceiling is required when performing work on insulating rooms on the upper floors of a building that have a cold attic, when insulating the roof of buildings that do not have an attic, when insulating basements, as well as the ceiling in a bathhouse.
For these purposes, films of various types, as well as pseudo-diffusion membranes, are used.
The film (membrane) must be solid to cover the entire required area. If this is not possible, installation is carried out with an overlap of 10.0 - 20.0 cm.
Attaching the vapor barrier membrane to the ceiling
The joints are taped on both sides with construction tape or special tape to prevent the possibility of moisture penetration.
When using foil film, the strips are laid end-to-end, without overlapping. The joints are taped with aluminum tape.
When installing on a wooden surface, use a construction stapler or nails with a large head.

Vapor barrier can be attached to wooden surfaces with a stapler
The vapor barrier layer should extend onto the walls and there should be no gaps in the corners. If possible, the joints of the strips of the material used (film, membrane) should be located on the rafters or elements of the ceiling frame, which will allow the vapor barrier to be securely fastened and prevent the connecting tape (adhesive tape) from peeling off. The canvas should not sag, but be taut.
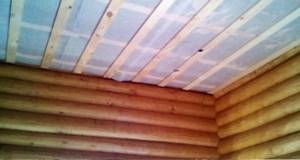
Ceiling covered with vapor barrier film
Floor fixing
When performing floor insulation work, the vapor barrier is laid after the waterproofing is done and the insulation is laid.
The film (membrane) must be solid or overlapped to prevent water vapor from penetrating into the insulation layer.
The vapor barrier should lie on the walls, and between it and the insulation layer there should be an air gap of 45.0 - 50.0 mm.
Wall mount
When installing a vapor barrier to a wall indoors, galvanized nails with large heads or staples are used to secure it.
Fastening is carried out directly to the surface of the wall, if it is a wooden structure, or to a wooden sheathing mounted on a wall made of concrete or brick.
When performing facade work, the vapor barrier layer is mounted on the frame for fastening the facade finishing elements.
During this period, excess film (membrane) that interferes with the finishing of the insulated room (corners, excessive overlap on the wall, etc.) is removed. The fastening of the installed vapor barrier is checked.
Glassine as a vapor barrier
All vapor barrier materials are manufactured in the form of films. The material consists of several layers that perform their role or task. One such material is glassine. This, one might say, is a classic for both warm and cold roofs. This material has been used for decades. It is quite reliable and does its main task well. In addition, this vapor barrier will cost you the least. However, it is better not to use the material for residential buildings.
If there is a living space immediately under the roof, then it will suffer from the properties of glassine. The point is that when the material heats up, it emits a not entirely pleasant aroma. It is not dangerous to life, just like vapors of roofing felt, but for permanent residence it is not entirely an ideal option. Moreover, corrugated sheeting is used as a roofing material, which, like all metals, will become very hot when exposed to the sun, especially in summer.
Another disadvantage of glassine is its heavy weight and narrow rolls, so installation will be quite problematic and inconvenient. To summarize, we can note all the pros and cons of the material.
Pros:
- strength;
- reliability;
- flexibility;
- durability;
- low cost.
Minuses:
- when heated, an unpleasant aroma appears;
- has a lot of weight;
- complexity of installation.
We can conclude: the material is not the best option for residential premises, but it may be suitable for a summer house with a non-residential attic or a bathhouse.
Vapor barrier and why it is needed
When installing a warm roof made of corrugated sheets, vapor barrier is necessary due to the fact that the insulation should be protected from water vapor rising from the heated room, and the internal structure of the roof made of corrugated sheets should be protected from condensation that accumulates on the insulation. In a word, the vapor barrier layer provides double protection - from internal and external influences.
How to choose material?
The following materials are used for vapor barrier:
- glassine;
- polyethylene;
- polypropylene;
- reinforced film;
- foil vapor barrier;
- membrane on a non-woven basis.
Glassine has been used for these purposes for a long time and has proven itself quite well. However, it has significant drawbacks: it is quite heavy and, what is much worse, when heated, it emits unpleasant-smelling fumes.
Although their health hazard has not been proven, it is already becoming difficult to stay indoors, so it would be wiser not to use glassine for residential buildings.
Polyethylene is cheap, but short-lived. In addition, it promotes the formation of condensation and does not interfere with the free flow of moisture, so a house with such a vapor barrier will be damp all the time.
Polypropylene and reinforced film are the best materials in the budget segment. However, they are not without their negative sides - reinforced polyethylene, like regular polyethylene, does not prevent moisture condensation, and polypropylene without a special coating spoils the thermal insulation layer.
Vapor barriers with foil are perhaps the best option among film vapor barriers, although they are relatively inexpensive. This film is durable, reliable and allows you to save heat.
Finally, the best choice is a vapor barrier membrane . What sets it apart from film materials is that it perfectly absorbs moisture and at the same time allows the ceiling to “breathe.” In addition, it weighs significantly less, is easier to install and can be laid close to the thermal insulation layer.
Installation of vapor barrier
A vapor barrier is installed on the ceiling slats under the insulation layer. Calculation of vapor barrier material for installation, just as in the case of waterproofing, implies an overlap of sheets of 10 to 15 cm and sagging between the slats of up to 2 cm . It would be better to fasten the joints with mounting tape.
Do you need a vapor barrier under the corrugated roof of a cold roof?
If you decide to install an insulated cold attic in your home, you will not need a vapor barrier for the roof , since such a device does not involve strong temperature changes. Therefore, there is no need to protect roofing materials from water vapor rising from the inside.
Polyethylene film
Ordinary household polyethylene is also suitable for vapor barrier of a corrugated roof. It is quite famous and has been used for many years. Polyethylene is able to perfectly retain moisture and water vapor, protecting and insulating the structural elements of the roof from the inside. One of its main advantages is that it is cheap, so you will need less money to install a roof. Polyethylene is able to provide good vapor barrier, no worse than specialized films and various membranes.
But, these are all the advantages of this material. Cheapness is fraught with complexity and impracticality. As you know, polyethylene is not the strongest material, so it can easily be damaged during installation. To avoid this, experts recommend using a thicker whip. This makes it difficult to fix it without outside help. And yet, such weight becomes an obstacle in that it will be difficult to attach it to the corrugated sheet using standard methods.
When you are limited in funds, then polyethylene is quite suitable for a vapor barrier layer. It is attached using a construction stapler to the sheathing inside. The film fastening step depends on its thickness. Usually it is about 1–1.5 m. To prevent condensation from getting inside, it is important to seal all places with punctures and joints with construction tape.
Note! In order for the vapor barrier layer to be reliable and fully perform its functions, it is better to attach it in two layers.
Now let’s summarize and understand the advantages and disadvantages of polyethylene.
Pros:
- low cost;
- very low permeability.
Minuses:
- insufficient strength;
- short service life;
- heavy weight;
- complexity of installation;
- A lot of condensation forms, it drains and does not linger on the surface.
Polyethylene is not the best option, but if you lack funds, you can resort to it.
Laying of roll materials
Vapor barriers based on glassine, foil, films and membranes are mounted identically. Therefore, the methodology outlined in this section is applicable to all roll materials. She explains how to install a vapor barrier on the ceiling correctly. When laying rolled materials, the general requirement must be observed: the vapor barrier must create a closed loop around the heat insulator on all sides without gaps or gaps. Therefore, when insulating the ceiling, proceed as follows:
- A 25 mm thick edged board is sewn onto the underside of the floor beams. The distance between the beams should be taken based on the width of the insulation used. Typically this value is 600mm.
- Insulation is placed in the resulting “boxes” in several layers. When the thickness of the insulation slab is 50mm, there can be from two to four or more such layers, depending on the climatic conditions of the area. In this case, the joints of the layers should not coincide with each other.
- It should be taken into account that for proper operation, the vapor barrier layer and the insulation must have a gap of 50mm between each other. The boards according to claim 1 have a thickness of 25mm. Therefore, it is necessary to move the bottom layer of rolled material away from the insulation by another 25mm. Perpendicular to the boards and, accordingly, parallel to the beams with the same interval of 600 mm, we sew a 25 mm thick batten. We fasten the boards and slats to the beams with nails or self-tapping screws of suitable length.
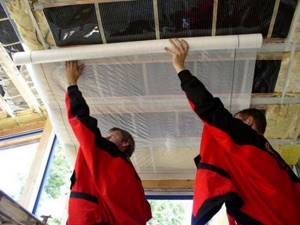
- It is more convenient to install a vapor barrier on the ceiling with two people, if possible three. This way the work is done faster and more correctly. One worker holds the edge of the rolled material, the second unrolls the roll, and the third attaches the material to the slats using a construction stapler.
- The material is laid with an overlap of panels of 150-200mm. The joints are taped with special tape. It is usually offered to be purchased along with film or foil.
When laying, special attention should be paid to which side to lay the material towards the insulation. Typically this point is indicated on the accompanying label of each roll.
If such a hint could not be found, then you can follow the general rules: • glassine is laid with cardboard to the insulation; • foil vapor barrier - foil into the room; • films, as a rule, have one smooth surface - it should be towards the insulation, the other - fleecy - this one - into the room.
After filing the ceiling from below, we move on to the upper part of the ceiling, which faces the cold attic. The vapor barrier is installed here in the manner described earlier. It is also necessary to maintain a distance of 50mm from the insulation to the insulation. If the height of the beams is not enough, it is increased with a lath and rolled material is laid on top of the lath.
If the attic space is intended to be used for storing something, although fire safety standards do not encourage such use, it is necessary to lay a solid floor made of 35mm thick edged boards on top of the vapor barrier. To prevent the floorboard from coming into contact with the vapor barrier, it should be laid through a counter-batten sewn onto the beams on top of the insulating material. If the size of the attic does not imply economic use, it is not necessary to lay a solid floor. You can use a 35-50mm thick board to lay a passage along the roof ridge.
Vapor barrier reinforced polyethylene film
Roof vapor barrier films, as already mentioned, consist of several layers. The base is polyethylene, which is reinforced with auxiliary materials. The most budget-friendly of them is reinforced film. It consists of several layers of polyethylene film, and is also necessarily supplemented with an additional reinforcing mesh made of polypropylene or fabric. Thanks to this structure, the material is strong and it will be difficult to tear it with your own hands. In addition, an accidentally dropped tool will not damage it either, which is quite practical.
In addition to everything, this film has greater rigidity than conventional polyethylene. But, despite the large number of layers, its weight is not that great. Therefore, it will be easy for you to install the material on a corrugated roof. And the film can be secured and joined with special self-adhesive tapes.
Pros:
- high strength;
- light weight;
- multiple layers ensure reliability and durability;
- relatively low price;
- ease of installation;
- has low vapor permeability.
Minuses:
- as in the case of ordinary polyethylene, a lot of condensation forms, it flows off and does not linger on the surface.
If you need to make a good vapor barrier, but you do not have huge funds, then reinforced film is the optimal solution. This is an ideal price-quality ratio option for your residential building.
Features of fastening vapor barrier materials
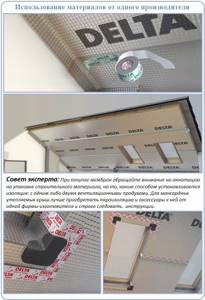
To construct a vapor barrier, a wide range of polymer films are now produced that fundamentally perform the same function, but differ in the degree of effectiveness. Well-founded recommendations for choosing products from a manufacturer with an impressive reputation are worth following, because... In addition to production experience, he also has the need to maintain decent quality of the brand.
Good advice, which all manufacturers certainly give, is to purchase a set of basic and consumable materials from one company. This rule must also be adhered to for the sake of ideal compatibility of films and adhesive tapes, their reliable adhesion and normal subsequent operation.
When laying and fastening vapor barriers, the following rules should be observed:
- The vapor barrier film panels are laid from top to bottom. Each subsequent strip must overlap the previous strip on the side of the room. This is so that the vapors that penetrate into the roofing pie during condensation can simply flow towards the eaves.
- The vapor barrier is rolled out according to the factory winding. There is no need to turn anything over; the manufacturer has thoroughly thought out everything for ease of work on the roof. The roll of material should be on top, the rolled out sheet on the bottom.
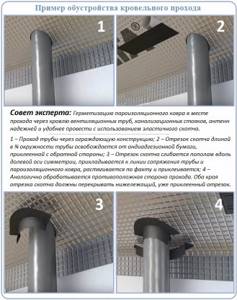
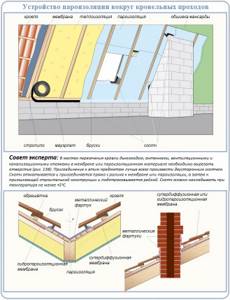
- The vapor barrier is joined into a single carpet using single- or double-sided tape. In areas of roof penetrations, the fastening of the vapor barrier film is complemented by the installation of slats around ventilation and sewer risers and chimneys. The panels are laid with an overlap of 10–20 cm.
Dormer windows are equipped with a vapor barrier, similar to roof penetrations. The insulating carpet in the area where they are located is cut according to the envelope principle. The cut corners are turned outward along the window slopes and cut again after the fact so that the material can be used to cover the insulation and its edges can be fixed.
Steam protection does not require connecting the panels with tape if the ceiling on the attic side is insulated with backfill insulation. In such schemes, a film made of polypropylene or polyethylene is loosely laid on concrete slabs with an overlap of 20 cm. In this case, there is no special need to attach the panels to the structure, because the film will be pressed down by the insulating layer.
In such systems, waterproofing is not used for insulation at all; it is installed along the slopes, but high demands are placed on the ventilation device. In addition to standard under-roof ventilation ducts, dormer windows must be constructed and it is advisable to install roof aerators.
A vapor barrier for equipped heated attics is constructed along the rafters from the inside. Panels of material are installed only perpendicular to the rafters, in contrast to waterproofing, which on steep roofs can be laid along the rafters.
Vapor barriers in attics are laid either over the entire area of the roof structure, including the gable areas, or only along the pitched planes. In the first case, to remove warm air masses, usually saturated with moisture, a combined mechanical ventilation system is constructed, which includes both supply and exhaust devices.
If the vapor barrier is installed only along pitched planes, vapor diffusion will occur through the gable walls if they are made without insulation. For ventilation, it is not necessary to build an artificial system; natural devices can handle the removal of steam and exhaust air: ventilation windows, under-roof vents, ordinary aerators.
Another significant difference from the process of laying waterproofing is that the vapor barrier is constructed without breaks in the areas of the hip and ridge joints. Before attaching vapor barrier panels to each other, they are fixed to the rafters with metal brackets.
Polymer films are laid on wooden rafter frames without tension. This is necessary so that during the linear movements characteristic of wood, the lumber does not tear the insulating carpet. The adhesive tape for connecting the panels is unrolled directly from the factory roller and glued as it is unwinded. The double-sided side is attached first with the back side, then the turned side to the master.
On the inside, a sheathing is installed on top of the vapor barrier carpet, which serves as an additional element for fastening the material and as a basis for installing the attic cladding. This technological gap will also eliminate the formation of condensation that occurs from direct contact of the casing and the polymer film.
The installation of a vapor barrier along the slopes can be done both before laying the insulation and after the specified work has been carried out. However, the priority is the period after installation, so that if the roofing cake gets wet in the rain, it can be dried naturally.
Another compelling argument for constructing a vapor barrier after installing the pie and laying the roof is that it becomes possible to postpone this stage of work for a while before installing the sheathing. As a result, finishing work can be carried out in winter, and the rainy season will not interfere with their implementation.
Polypropylene film
It is made in exactly the same way as multilayer reinforced polyethylene. Polypropylene is used to increase the strength of the film. Its installation is also simple. A feature of polypropylene films is the presence of an additional relief layer. What is it for? A lot of condensation forms on the foam, which negatively affects the structural elements.
To prevent moisture from harming the insulation (if any) or structural elements, an additional anti-condensation layer is applied to the polypropylene film, which consists of a mixture of cellulose and viscose. The layer absorbs condensation without problems, preventing the formation of condensation drops. This layer is rough, and during installation it should be placed towards the room, with the smooth side facing out.
Advice! Before starting work, read the instructions from the manufacturer.
Pros:
- light weight;
- high strength;
- reliability and practicality;
- ease of installation;
- low vapor permeability.
Minuses:
- material without anti-condensation coating spoils the insulation and structural elements.
Video description
This video explains in detail which side to lay the film on. General tips for installing it are also given:
As mentioned above, the overlap should in any case be at least 15 cm. Sealants and glue should never be used: diffusion film, as well as alternative materials, contains acrylic components. They are destroyed when using glue.
However, tape is acceptable for use. It not only glues parts of the film, but also eliminates defects that appeared during its installation.
There has long been a debate among repairmen about whether it is worth installing a vapor barrier. Some argue that this should never be done - if it does not sag, the degree of steam evaporation will drop many times. For others, on the contrary, it seems that tensioning the vapor barrier is a necessity. As they say, sagging film deteriorates very quickly.
General advice on how to properly install a vapor barrier ends here. During operation, some other nuances may arise, but their number is small.
As well as their degree of importance
Vapor barrier film with foil
This is one of the types of previous films. But, the material not only has an additional reinforcing layer, but is also equipped with an aluminum layer that reflects heat. What does this give? This layer reflects infrared rays, preventing them from leaving the house. Thanks to this, a certain “thermos effect” is created. Foil film is intended for baths and greenhouses, but it has begun to be used as a vapor barrier for roofs made of corrugated sheets and other materials. It is highly efficient, reducing heat loss through the roof by 10–15%. This allows you to significantly save energy that goes into heating. For example, using Izospan under corrugated sheeting increases the room temperature by only 2˚, while the costs are still the same.
Note! The reflective effect is possible only in air, so when mounting the film with foil it is important to leave a gap of 4–5 cm.
Pros:
- light weight;
- high strength and reliability;
- durability;
- low vapor permeability;
- not harmful to humans;
- reflects infrared radiation, retaining heat.
Minuses:
- high price.
Foil film is one of the best, but, as they say, you have to pay for quality. If you have enough funds, then it is better to use it to make a vapor barrier under the corrugated sheeting on the roof. Still, what choice to make is up to you.
- Types of roofs of private houses
- How to properly cover a roof with slate
- How to cover a roof with corrugated sheets with your own hands
- Installation of a roofing pie under corrugated sheeting
The roof plays a key role in protecting the house from precipitation and other adverse influences. A number of materials are used to preserve heat and maintain a comfortable microclimate. All together they make up a roofing pie. To prevent heated air from escaping from the room during the cold season, heat-insulating materials are used under the corrugated sheeting. A vapor barrier will help maintain a low degree of thermal conductivity.
Rules for installing a vapor barrier layer
Depending on the quality of the film, it can be laid before installing the roofing pie or after performing the specified work. Naturally, the choice of the optimal time for installation depends not only on the preferences of the roofers, but also on the ability of the material to resist weather influences, as well as on its strength qualities.
The main rule that should be remembered and strictly followed by those who are going to lay a vapor barrier on the roof with their own hands is: the roll must be rolled out the way it was wound by the manufacturer. It is necessary to strictly follow all installation instructions and follow the directions indicated on the material.
There is no need to rewind the roll, trying to turn over the side whose function the manufacturer has included direct contact with steam. If the film is laid on the opposite side, it will not retain evaporation and will allow more water into the insulation than is allowed according to the technical parameters of the thermal insulation.
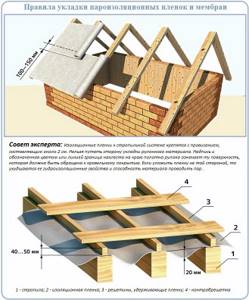
The second mandatory postulate of installing a vapor barrier is that the film cannot be attached “with tension.” The material should be fixed so that it sag slightly between adjacent rafters. The recommended sag amount is approximately 2 cm. A system made of wood will always “play” slightly: swell and expand during the rainy season, shrink and contract in hot weather. To prevent the vapor barrier from breaking through when the wood moves, this reserve is created.
Most manufacturers of vapor barrier materials allow both horizontal and vertical spreading patterns. But you should not unconditionally rely on the opinion of the majority; you must carefully study the instructions attached to the material, which necessarily indicate possible layout options and the nuances of their application.
Usually on the vapor barrier film along the edge there is also a distance for overlap. The instructions for use indicate the width of the overlap depending on the steepness of the roof being installed.
In addition to the width of the overlap, the slope of the slopes also affects the direction of the stripes. On flat structures, roll insulation is most often rolled out perpendicular to the rafters. To attach steep structures to frame systems, membranes are often spread along the rafters. A longitudinal arrangement is preferable, especially if it is possible to cover the slope with one sheet without forming transverse seams - the most common cause of leaks.
According to roofers with extensive experience in arranging roofs, vapor flows move upward and sideways. This direction must be taken into account when arranging the film panels. When the strips are located across the rafters, laying the vapor barrier begins from the ridge and moves towards the edge of the slopes.
To prevent condensation, when it is likely to form, from flowing into the roofing pie of the attic roof and from soaking the insulation, the vapor barrier strips are glued together with tape. The material is laid so that each lower strip overlaps the already secured upper strip by the amount of overlap specified by the manufacturer. This is the main difference between the installation technology and the waterproofing device, the upper strips of which overlap the underlying ones.
When using slats to fix a vapor barrier layer, they must first be antiseptic, because the wood will have to come into contact with the material of other heating equipment, which is fraught with the formation of condensation. Note that attaching the film using a block has a significant advantage - it can simultaneously serve as the basis for installing the inner lining, as well as for forming ventilation ducts.
Why do you need a vapor barrier under corrugated sheets?
Vapor barrier (as well as waterproofing) is installed under corrugated sheeting to achieve two goals:
- Protect the thermal insulation layer from moisture. When wet, its thermal conductivity increases. Also, the penetration of liquid leads to the gradual destruction of the insulation.
- Prevent the accumulation of moisture in the thermal insulation layer and direct water vapor outward.
There is always water vapor in the air of a residential building. Partially they escape through the ventilation system, while a certain proportion remains in the room. Warm air, saturated with vapor, rises upward towards the ceiling. There it cools, and moisture is transferred to the roofing materials.
Due to its porous structure, insulation absorbs moisture. As it gets wet, its thermal conductivity increases, and it retains heat in the room less well. To prevent moisture from penetrating into the pores of the insulation, use a vapor barrier film under the corrugated sheeting. It is laid from the side of the room and is needed to protect the insulation and other structural elements from the ingress of water vapor.
Which side to lay the vapor barrier towards the insulation - Roofing and Roofing
When insulating a roof or room with a heat insulator (mineral wool, glass wool, loose polystyrene) capable of transmitting and accumulating moisture, it is necessary to install a vapor barrier layer. Moisture that gets into the thermal insulation significantly worsens its performance properties, increasing thermal conductivity.
In addition, due to the humid environment, wooden structures with which the insulation comes into contact quickly begin to rot and collapse.
At the stage of preparation for insulating a roof or house, it is important to figure out which side to lay the vapor barrier against the insulation - a violation of the technology will lead to steam from the room penetrating into the thermal insulation layer.
What kind of vapor protection is needed?
Types of vapor barrier materials
The primary issue is the choice of material that will protect the insulation from moisture. Classic roofing felt and glassine, which were used for water vapor barrier, have given way to modern polymer films with different performance parameters. Membranes used in construction are divided according to vapor permeability into completely impermeable films and partially permeable (diffusion) films.
Manufacturers offer the following types of vapor barrier membranes:
:
- polyethylene film (can be used to insulate a roof or floor, the barrier is vapor and waterproof);
- reinforced polyethylene film (higher strength);
- aluminum foil film (used for internal insulation, mounted with the reflective side facing the room - additionally helps to retain heat, primarily designed for use in saunas and baths);
- film with anti-condensation coating (prevents moisture condensation, intended for installation in structures with metal elements prone to corrosion - corrugated sheets, metal tiles, etc., the film is mounted with the treated side facing the heat insulator).
Reinforced polyethylene film If, when insulating rooms in a house, a completely impermeable film is used to create a vapor barrier, it is necessary to provide effective ventilation of the rooms that can remove excess moisture outside.
What to consider when choosing a vapor barrier
There are many types of vapor barrier films available in construction stores for roofs, both cold and attic. To make the right choice, you need to be aware of the following factors:
- price;
- efficiency;
- expediency.
Before purchasing materials for corrugated sheeting, you need to decide on the amount allocated for construction. If the price of the material is decisive, you need to choose from economical materials.
The second point is efficiency. Vapor barrier films have different performance characteristics, which are important to familiarize yourself with before purchasing.
It is worth choosing a material that suits the characteristics of the room. For a heated residential house, the best option would be foil film, while for a cold roof of a country house, inexpensive glassine is quite sufficient. If you are installing the roof of a rarely visited mansion that has not been heated for a long time, you need a simple vapor barrier made of polyethylene or polypropylene.
What materials are used for vapor barrier
The vapor barrier layer under corrugated sheeting or any other roofing material is made in the form of a film. The following are the most common types of it, which are presented in construction stores.
Polyethylene film. Household polyethylene has long been used as a vapor barrier material. It does not allow steam rising from the living space to pass through. Polyethylene is a cheap material compared to reinforced films or membranes. Its significant disadvantage is its lack of strength. It is easy to damage the film during installation. For reliable vapor barrier, it is laid in two layers and fixed to the internal sheathing with a construction stapler. The fastening step is from one to one and a half meters. If the film is still damaged, a patch is needed. The puncture site should be covered with construction tape. The joints also need to be secured with tape. Considering the above, polyethylene film is quite acceptable and cheap, but at the same time not the best option for vapor barrier.
Reinforced polyethylene film. Also an inexpensive but high-quality material for vapor barrier under corrugated sheeting. It is made of several layers of polyethylene and reinforced with polypropylene mesh. Such a film is light in weight and has sufficient strength; it is more difficult to damage during installation. Due to the reinforcing mesh, the material has greater rigidity. The film can be secured with a special tape. This is the optimal combination of low price and good quality material, suitable for vapor barrier of residential buildings.
Glassine. This material has long been used for vapor barrier. It reliably retains moisture, is durable and has a long service life, but is quite heavy. Although glassine is a cheap material, it is not recommended for residential premises. When heated, it emits an unpleasant odor, and under the corrugated sheet its temperature will often rise, especially in the warm season. Therefore, glassine should be used only for a bathhouse or a cold roof of a non-residential attic. It is more convenient to use it as waterproofing - then it will need to be laid on top of the sheathing.
Polypropylene film. Durable material for vapor barrier under corrugated sheeting. It is produced similarly to multilayer polyethylene film. The two main differences are the use of polypropylene and the presence of a relief layer. The fact is that condensation accumulates on smooth polyethylene films, which collects in drops and periodically drips onto the floor. The rough anti-condensation coating is made from viscose and cellulose. It absorbs moisture and prevents it from beading. Subsequently, when the air humidity decreases, the collected condensate evaporates. As a rule, polypropylene film is placed with the anti-condensation surface down, towards the room. To clarify the installation procedure, you need to refer to the manufacturer's instructions. This type of vapor barrier film is one of the best options for arranging a roof under corrugated sheeting.
Foil film. In fact, it is a type of polyethylene or polypropylene film. In addition to the reinforcing mesh, it has a thin aluminum layer. It reflects infrared rays and helps maintain heat in the house. Although at first this material was used in the construction of bathhouses, it began to be used for vapor barriers in residential buildings. After laying foil film, heat loss is reduced by 10 percent or more. Its price is higher than other types of vapor barrier films, but it justifies itself by allowing you to save on heating costs. The foil film is laid with an aluminum layer towards the room. Be sure to leave a gap between the material and the wall finish: a gap of about 5 cm is needed. A small distance should be left to the insulation. The film is fixed with self-adhesive tape, all joints are covered with aluminum tape. Then the vapor barrier layer will be airtight.
Materials used and their installation
To resolve the issue of which vapor barrier to choose for roofing, the industry produces the following materials:
- Vapor-proof films. Used for all types of roofs and roofing coverings. They are laid directly on the insulation with an overlap of 10 cm; the seams are sealed with tape to seal. The sheathing is installed while maintaining a ventilation gap of about 5 cm. It is recommended that fastening to the rafters be done with thin slats. Popular: Russian “Izospan”, German “Delta” and “Tyvek” (manufactured by Luxembourg). The latter is the most expensive, but higher quality and durable.
- Films made of antioxidant materials. The inner side, facing the inside of the attic, consists of fleecy fabrics on which condensation collects and then evaporates without penetrating the insulation. Installation is similar to vapor-tight ones. The most commonly used film is SVITAPFOL AC.
- Diffuse membranes. Available single- and double-sided. The first carry pairs in only one direction, so they are laid on a certain side. Based on the number of layers, they are distinguished between single- and multi-layer. In multilayer ones, condensate accumulates with its gradual release. Membranes are thin, strong and durable, but are expensive. They are laid close to the heat insulators and do not require a gap.
Installing a roof vapor barrier with membranes is an effective modern method.
The seams are sealed using a stream of hot air. On flat roofs with a concrete base, bitumen membranes fused to the concrete work well. The entire surface is completely enveloped in bitumen, creating a completely impenetrable coating, including fastening elements. Vapor barrier materials from the companies TechnoNIKOL, Bikroelast, and Linokrom are of high quality. The only disadvantage of bituminous materials is their significant weight.
Laminated membranes, consisting of reinforced films laminated on both sides and a foil screen (food-grade aluminum), are fixed directly to the thermal insulators on the room side with a mandatory ventilation gap.
The characteristics of vapor barrier and roofing materials must match in quality and durability, because the need to replace the vapor barrier layer will lead to a rework of the entire roofing pie.
The installation of a roof vapor barrier is extremely important for the durability of the entire building and the conditions for comfortable living in it. Improperly performed vapor barrier or its absence leads to moistening of the elements of the rafter system with the appearance of fungus and mold, loss of thermal properties by the insulator (with an increase in the humidity of the insulation by 5%, its characteristics deteriorate 2 times)
Features of a cold roof
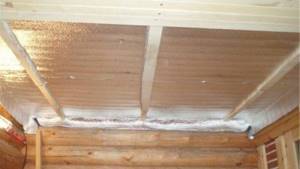
Although the space directly under a cold roof is not heated, the temperature inside will still be different from the temperature outside. Therefore, condensation will begin to appear on the underside of the corrugated sheet. In view of this, a waterproofing layer is necessary to prevent moisture from entering the wooden rafters and other structural elements of a cold roof.
Important! The waterproofing layer is laid on top of the rafters. Then the material is fixed with a counter-lattice, followed by the lathing and the corrugated sheet itself.
If the waterproofing layer does not prevent steam from escaping to the outside, a vapor barrier for cold roof slopes is not required. Water vapor, having risen, will penetrate through the film under the corrugated sheet, and there it will be dried under the influence of air currents.
It is important to choose a material for waterproofing a cold roof that will not trap steam. In this case, polyethylene, polypropylene, roofing felt or glassine are not suitable. For a cold roof, a non-woven vapor-permeable membrane is recommended.
Recommendations for vapor barrier installation
As you can see, a vapor barrier is installed only for a warm roof, in order to protect the insulation from the ingress of water vapor. There are several recommendations that will help you do this job efficiently.
- It is better to place panels of vapor barrier material with an overlap of about 15 cm.
- You need to select the appropriate connecting tape for the selected film or membrane.
- Vapor barrier strips can be made of either wood or metal. They should be small in size.
When installing a warm roof, vapor barrier is an important component of the roofing pie. The material is selected based on financial and practical considerations, and also based on its feasibility.
What else to read on the topic?
Author of the article:
Sergey Novozhilov is an expert on roofing materials with 9 years of practical experience in the field of engineering solutions in construction.
Waterproofing is a necessary element of the roofing pie, regardless of how the corrugated roof is constructed: according to the principle of a warm or cold roof.
No matter how well a roof is made from corrugated sheets, moisture can penetrate into the under-roof space through the joints of the roofing sheets and at the points of their attachment to the sheathing, causing damage to the load-bearing structures and ceiling finishes.
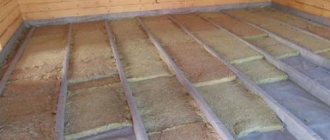
Laying a film vapor barrier on insulated floors
Moisture-proof film on floors under insulation
In order to protect the floor surface from moisture and condensation, a film can be laid. Before work begins, insulation is carried out along the joists - mineral or basalt wool is placed in the cavity. Simultaneously with the vapor barrier, waterproofing of the first floor of the house is organized.
In the room area, roll insulation film is used. It is placed with an overlap of 12-15 cm, and then the joints are carefully glued. The material is placed on the wall by 10 cm.
Vapor barrier of concrete floors is performed at the last stage. First, waterproofing is laid, then insulation, and finally film.
Reasons why waterproofing is installed under a cold roof made of corrugated sheets
Precipitation
Corrugated sheeting cannot 100% eliminate the possibility of moisture getting into the under-roof space of the house. Heavy rain or snow combined with intense winds can cause moisture to seep into the roof, which in turn can lead to corrosion.
Wear of fasteners and roofing modules
The peculiarity of corrugated sheeting is that its sheets are subject to temperature deformation, as a result of which the roof can allow moisture to pass through the junction line of the roofing modules. Often water penetrates under the roof and at the points where the corrugated sheeting is attached to the rafter system, since over time the tightening of the screws weakens and the rubber sealing washers are destroyed. The ingress of water into the under-roof space is fraught with wetting of the rafter system with its subsequent rotting, and as a result - destruction of the roof frame.
Condensation Formation
With high-quality installation of a corrugated roof, when the roofing reliably protects the house from atmospheric moisture and leaks, theoretically, you can do without waterproofing.
But sources of moisture are not only precipitation from outside. This is also condensation that forms on the inner surface of the roof due to the difference in temperatures inside and outside the house.
The likelihood of condensation becoming even higher when utilities pass through the attic: heating and hot water pipes, ventilation ducts or a fireplace chimney. Liquid and gaseous media circulating through such pipelines usually have an elevated temperature and heat up the air in the under-roof space, contributing to more intense condensation.
Why is ventilation necessary?
Warm air rising from a heated room contributes to the accumulation of condensation in the under-roof space, as a result of which the house begins to become damp. The consequences of this may be:
- the appearance of mold and mildew;
- rust on metal parts;
- damage to the thermal insulation layer;
- rapid wear of supporting structures;
- overheating of the roof from the inside , which in winter contributes to the melting of snow and the formation of icicles on the eaves.
The arrangement of the cornice can be carried out using plastic air-conducting grilles , which are mounted in the lower cornice boards or a special “breathing” material placed between the beginning of the roof and the walls. You can also simply leave an air gap between the cornice and the walls of the house, but it should be borne in mind that this method reduces the thermal insulation characteristics of the building.
Read about installing other elements here.
Roof plane
The simplest option for this element of the ventilation system is to install ordinary dormer windows, i.e. small through grilles protected on top by canopies from rain and snow.
It is also possible to install full-fledged ventilation shafts, but this will cost much more, and, in addition, requires compliance with a number of safety standards and regulations. So, for example, you should take into account the height of the shaft relative to the ridge, etc.
A roof made of corrugated sheets allows you to use any standard ridge and install it extremely simply, without any additional elements. The fact is that the profile of such a coating implies a wave whose height is at least 30 mm , which provides sufficient clearance for the free passage of air flows.
What is a roofing pie in practice:
What is suitable for waterproofing a cold roof under corrugated sheeting?
The main conditions that a water barrier for a cold roof made of corrugated sheets must meet are moisture resistance, mechanical strength, and resistance to temperature influences.
The most budget-friendly, but short-lived option for waterproofing is polyethylene film. Reinforced polyethylene membranes have slightly better strength characteristics. But against their background, polypropylene films and anti-condensation membranes equipped with a non-woven viscose-cellulose layer that actively absorbs excess moisture are significantly superior.
The Ondutis D (RV) waterproofing membrane is optimally suited as an under-roof waterproofing for non-insulated metal roofs made of corrugated sheets or metal tiles.