When carrying out cosmetic repairs, specific situations often arise. For example, such as covering the pipes in the bathroom with plasterboard with your own hands. The risers of the sewer network in the corners of the bathroom, heating pipes and water supply in the kitchen, by their presence, do not have the best effect on the aesthetics of the interior. Therefore, it makes sense to hide them. The easiest way is to cover the pipes with plasterboard, since processing with plasterboard does not cause problems even for an inexperienced craftsman. Knowing how to cover pipes with drywall, you can proceed accordingly when sealing any types of pipes (for example, gas).
Next, it is proposed to master an elementary option for resolving the situation - making your own pipe box from plasterboard.
Preparation of tools and materials
To proceed to the work process, devices and materials are prepared according to the list.
To create a box you will need:
- a pair of gypsum fiberboard panels (cuts saved from wall cladding, at least 50 by 50 cm, are suitable);
- metal profile - its quantity is determined according to the length of the box (within 5-25 m);
- set of dowels with d 6 mm;
- metal screws;
- mesh for HA reinforcement;
- putty.
Before you sew up pipes with plasterboard, you need to have the following devices ready:
- level to control the evenness of surfaces;
- tape measure - it is used to measure the necessary parameters, with its participation the GC panels and profile are cut;
- a pencil for making marks on the material for cutting it or installing fasteners;
- a hammer drill or drill with attachments and a drill (d - 6 mm) for making holes in the wall for dowels;
- Phillips screwdriver;
- hammer;
- hacksaw;
- metal scissors;
- a grater with teeth for smoothing the cement composition;
- spatula for spreading the putty on the surface.
For those who have no idea how to cover pipes with plasterboard, the following guide will help you understand the key points of this process.
But first you should clearly understand why GC panels are considered excellent for masking pipes in a toilet, bathroom, or in any room of the home. This choice is due to a number of important advantages when working with gypsum board. In particular these:
- affordability;
- simplicity and speed of assembly of the structure;
- neutrality of plasterboard for health, its environmental safety;
- no release of toxins from heating the sheets.
Knowing all the subtleties, you just need to choose the right type of material. For rooms with high heat and humidity conditions, a moisture-resistant type of panels is recommended - KGVL.
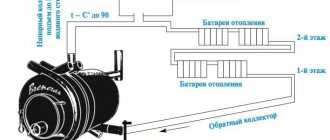
How to effectively hide heating pipes in an apartment or private house
The simplest case is new construction, when it is possible to think in advance about how to hide the heating pipes. If it is necessary to close the pipeline in the kitchen, in a private house, apartment or room, the list of options comes down to the following:
- counters;
- valves to shut off the flow;
- flange and threaded connections;
- pumps;
- expansion tanks and other equipment.
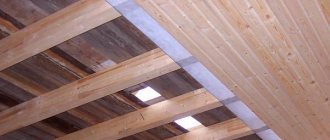
Private buildings are often made of wood, which makes it possible to easily hide heating pipes in private houses. Alternatively, you can stretch the pipeline through the joists by drilling holes for the pipes. It is important to have a safety margin for the lags to ensure the reliability of the entire structure. Before closing heating pipes into the wall or floor in a room, it is necessary to put on special covers to reduce heat losses and test the system. You will also need to draw up a diagram for laying heating pipes so that possible repair work in the future does not lead to destruction of the integrity of the hidden main.
Important! In a private house, before hiding the heating pipes, you need to make sure that the box has a supporting surface, i.e. it is forbidden to hang it.
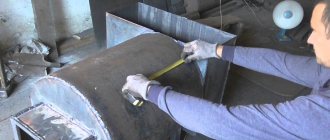
- It is necessary to remove traces of previous finishing from the surface of the pipe.
- The surface must be cleaned with a wire brush.
- It is also necessary to perform priming.
Heating pipes running along the wall near the floor can be covered with plastic or wooden baseboards specially designed for this purpose. They are available in different widths and will help hide several pipes at once.
Preparatory stage work
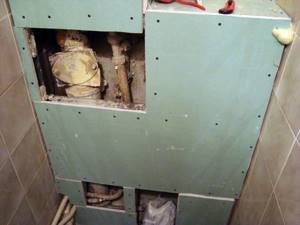
Before actually covering the riser pipes, it is recommended to prepare them properly. That is, the previous coatings are removed from them and a fresh coat of paint is applied. This will extend the life of the pipes by protecting them from the corrosion process with paint. After all, after covering the pipes with a box, access to them becomes difficult. Even when a hatch is made on the front wall of the box.
The drying of the paint on the pipes signals that the next stage has arrived - arranging a frame structure for the box.
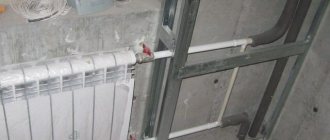
Installation of plasterboard box
- Sheets of plasterboard are prepared for assembling the sheathing, after which they are cut into fragments of the required size.
- The blanks are inserted between the profiles and placed for subsequent fixation.
- The plasterboard blanks are attached to the frame using self-tapping screws. The heads of the screws should sink into the drywall no more than 1 millimeter. Drywall sheets are screwed to the frame on both sides.
- Using a hacksaw, the ends and edges of the used sheets protruding beyond the structure are sawed off. The edges in the places of cuts are leveled using a diamond mesh No. 100.
At this point, the assembly of the box itself can also be considered complete, and the next stage is the transition to its lining and additional work.
Construction of frame support
Usually, when making a frame, metal profiles are used, made from special galvanized sheet with a decent shelf life and resistant to rust. Sometimes a frame is made for a box made of wood beams.
To hide the risers behind the drywall, a profile support is erected, focusing on a sequential alternation of procedures.
- Marks are placed on the ceiling, walls and floor for the future frame, and they are armed with a pencil, a plumb line, and a level.
- The guides are placed according to the markings, fixing them to the wall surface using dowels.
- The work on arranging the supporting structure is completed by installing rack-mount elements along guide profile beams. The connection of profiles joining each other is carried out with a special fastening device - the so-called bugs.
How to cover heating radiators and pipes with plasterboard: 12 pressing questions during repairs
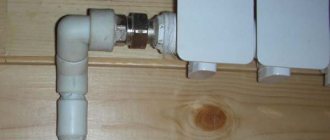
Well, every thread is a place of potential leakage: flax burns out over time, and synthetic windings often leak at the slightest reverse movement of the thread (for example, if a neighbor, when replacing a battery, slightly turns the riser or begins to cut a thread on it). Reference: melting point steel - 1300 - 1400C. The boiling point of zinc is about 900C. By welding galvanization, you get a pipeline in which the only thing left from galvanized steel is the price: the seams will rust in the same way as a black steel pipe. Where there are no threaded connections on them, of course.
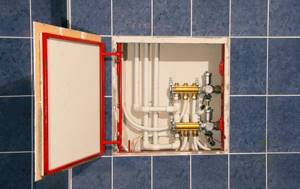
Steel pipes running on gas, provided the paint on their surface is intact, do not rust or wear out, their service life is almost unlimited. However, it is much easier to clean grease plugs not with a cable, but simply by disassembling the pipes and shaking out the grease in the trash. Of course, this can only be done with an open sewer line. No. All threads, taps in front of gas appliances and the meter itself must be accessible for dismantling and maintenance.
If there is a leak at any connection, the accumulation of gas in the box is simply dangerous, and it will also interfere with identifying the leak and carrying out repair work. Don’t forget about the need to check the meter: after a few years it will have to be removed. First of all, you need to assemble the frame. To make the box, either a metal profile or a wooden beam can be used. The advantages of a metal profile made of galvanized steel are that, unlike wooden beams, it has increased resistance to moisture and is not exposed to rust for a long time.
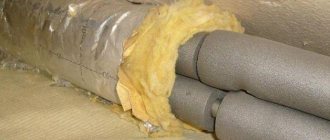
You will need materials such as polyurethane foam, shock-absorbing tape, putty to level the surface of the box. Tools that will be useful are a drill, a hammer, a screwdriver, a tape measure, a level, a plumb line, and a pencil. If the floor is concrete, then it is grooved. The dimensions of the niche are calculated taking into account the diameter of the pipe and the volume of thermal insulation.
The pipeline is hidden in the made niches. If it is wooden, then it is mounted on joists. When laying a heating pipeline under the floor, two installation options are possible: with and without thermal insulation of the pipes.
The option of laying heating communications in the floor with thermal insulation differs little from embedding it in the walls.
Sheathing the frame with HA sheets
The next step is to sew up the constructed base with gypsum fiber blanks. Close attention is paid here to the following nuances:
- use exclusively moisture-resistant GC products;
- panels are chosen with a thickness that can give greater rigidity to the box (that is, 12 mm);
- When joining plasterboard blanks, they use either edge alignment (if there is a factory edge) or the method of making a chamfer with an angle of 45 degrees.
- there is a gap in the casing for air ventilation;
- check the position of the screw heads - they should be recessed, and not exposed or dangling over the wall.
The first step is to take measurements. Calculate the ceiling/floor gap using a tape measure. Measure the required distance on the profiles and cut them to make 3 pieces. Three racks are placed around the pipes (2 near the wall and 1 in the center between the first two) maintaining a right angle between them. If the risers are located not at an angle, but along the wall, 4 profile sections are prepared. They frame pipes in the shape of a square. Or they also use three posts, beveling the corner and constructing a triangular support. The choice of frame geometry is mainly guided by design considerations.
After measuring the gaps between the posts, support crossbars are made. They are fixed using metal screws.
An important point: in order to prevent deformation of the frame installation during seismic shifts, a special shock-absorbing tape is used. It is applied to the areas where the working surfaces come into contact with the racks. The use of such a tape will help level out vibrations, preventing them from reaching the profile. This creates protection against destruction of the frame structure.
Sheathing with HA sheets is done in one of two ways: either with HA sections prepared according to measurements, or with a solid piece of material with the extra centimeters cut off after fastening it with self-tapping screws. In a situation where some part of the sheet is missing, the joints are laid in place of the crossbar, after which the edges of both parts of the sheets are secured.
The voids between the sheathing and the wall are filled with polyurethane foam.
Treating the plasterboard closure for pipes with putty is considered the final stage of all procedures. But first, the places where the HA connects to each other are taped with sickle tape. To make the surface perfectly even, the caps of the fasteners are carefully puttied.
To make the corners even, use a slope corner. Putty is applied to the back side of it in small portions and, pressing, it is applied to the corner. Then, using a wide spatula, the effect of a leveled base is achieved. After the putty has dried, sand the surfaces and prime them. And then they move on to finishing - wallpapering, painting, tiling, etc.
Pipe lining using other methods
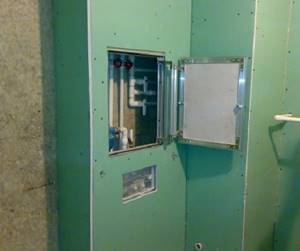
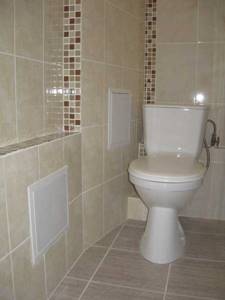
Anyone who finds that covering the pipes with a box is difficult or is not possible for one reason or another will continue to figure out how to cover the pipes in the toilet with plasterboard. Construction of a protective wall is one of the alternative ways.
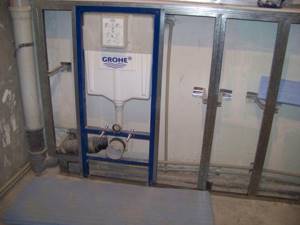
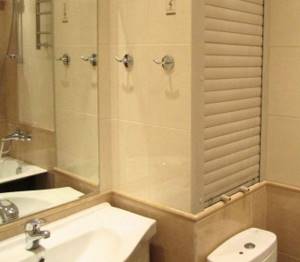
When making such a wall, it must be equipped with an inspection hatch or a door with hinged doors. The wall surface is lined with materials that predominate in the design of the entire sanitary facility. Often the frame for a wall-hung toilet is hidden behind such a wall. The installation of such a device is done in accordance with the technical instructions attached to the product.
In terms of design, doors and hatches can be built completely differently. They can be finished with tiles. Special fastening loops called frogs facilitate their better opening. You can build shutter doors or install roller shutters here.
Drywall finds beneficial use in such matters as the installation of various structures that hide utility networks. It is only important not to forget that in this case they acquire a special type of HA and be sure to adhere to a clear sequence.
How to provide access: 3 most convenient ways
To ensure easy and fast access, it is most convenient to use one of the options below:
- Roller shutters or blinds. An excellent solution when creating a false wall at the back wall of the toilet. Attached to the frame, they provide the widest access to the pipeline. In this case, the finishing area is reduced, and there is no need to think through mounting methods for the hatch. In addition, behind them you can organize shelves for storing household chemicals.
- Plumbing hatch. You can make it yourself, but it’s easier to buy it in a store. Can be metal or plastic, used independently or under tiles.
- Removable tiles with magnets. An interesting solution that can be used when decorating a toilet with large tiles. A hole is made to fit the size of the element, magnets are inserted between the drywall and the tile on its surface, and 4 metal plates are glued to the sides of the removable tile.
USEFUL INFORMATION: Suspended ceilings: how to make it yourself?
As you can see, the process of high-quality masking of water pipes and sewer risers with plasterboard is not so complicated. With due care, attentiveness and a little skill, it is quite possible to do it yourself, significantly saving your own money.