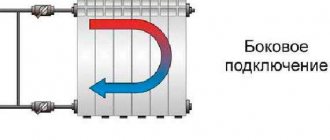
How to sheathe pipes with plasterboard - do-it-yourself finishing options
Many apartment owners, after completing the installation of pipes or heating systems in the house, are wondering how to cover them with an outer box and what kind of cladding to use for this. Everyone has their own preferences in this matter, but the material that is most often used for this purpose is drywall. True, it is necessary to provide for possible breakdowns: for example, buy reliable fittings on the website https://alfastars.msk.ru/.
Preparatory stage work
Before actually covering the riser pipes, it is recommended to prepare them properly. That is, the previous coatings are removed from them and a fresh coat of paint is applied. This will extend the life of the pipes by protecting them from the corrosion process with paint. After all, after covering the pipes with a box, access to them becomes difficult. Even when a hatch is made on the front wall of the box.
The drying of the paint on the pipes signals that the next stage has arrived - arranging a frame structure for the box.
Advantages of plasterboard boxes
In general, the construction of an outer box can serve various purposes, for example:
- Give structures an aesthetic appearance.
- Provide protection from accidental mechanical and other damage.
- Achieve a soundproofing effect (especially in the case of sewer pipes).
Plasterboard sheets meet all these requirements well, and although other materials can be used to construct the box, they are preferable for a number of reasons:
- Low price.
- Easy to assemble structure.
- Excellent environmental performance.
- High sound absorption rates.
Working with this material is not difficult, and therefore the involvement of professionals is optional, and if you have some skills, you can cover the pipes with plasterboard yourself.
Can I use drywall in the bathroom?
Every home craftsman who has ever worked with drywall will confirm that this material is very convenient. With its help, you can easily assemble any structures, including curved ones.
But this material consists of cardboard and a gypsum layer, and these materials very poorly tolerate not only direct contact with moisture, but also being in a damp room. Therefore, it is irrational to use it to perform any repair work in the bathroom.
However, the above applies only to ordinary material, and now manufacturers are producing a moisture-resistant version, which is designated by the abbreviation GKLV. The structure of this material is similar - a layer of gypsum and two layers of cardboard covering the gypsum on both sides. The difference is that all three layers have an additional coating that protects against moisture.
Specifications
GKLV has the following properties:

- sheets are produced in different sizes, sheet width is in the range of 600-2000 mm, length - 1200-4000 mm. The thickness can also be different - from 6.5 to 24 mm;
- GKLV's resistance to moisture is 95% higher than that of conventional drywall;
- GKLV structures can even be washed, but you should not use too much water;
- the material is fireproof, it does not support combustion, and in the event of a fire it does not release substances harmful to health.
Advice! It is easy to distinguish gypsum boards from ordinary drywall. To do this, you don’t even have to look at the markings, since the materials are painted in different colors. If the usual version is gray, then for use in the bathroom it is green.
Preparation for covering pipes with plasterboard box
Before sheathing the pipes with plasterboard, you should do some preliminary work, which is as follows:
- Preparation of the necessary materials, including metal profiles (guides, racks), screws, dowels and the plasterboard sheets themselves.
- Preparation of the necessary tools (knife, screwdriver, hacksaw, plumb line, level, pencil).
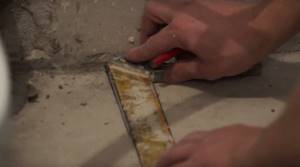
- In the case of metal pipe products, it is advisable, before covering the pipes with plasterboard, to clean their surfaces of old paint and repaint. After covering the pipes with plasterboard, access to them becomes very difficult or impossible.
Upon completion of the above work, before covering the pipes in the room or bathroom with plasterboard, you must first prepare a reliable frame for its fastening.
Step-by-step instruction
Let's consider step by step how to cover pipes with plasterboard with your own hands:
- The first thing to do is take measurements and other preparatory work described above.
Measurements of required distances
- Three rack-mount vertical profiles are installed.
Vertical rack profiles
- Measure the distance between the profiles.
Measuring the distance between installed profiles
- The resulting distance is measured on another profile.
Measuring the distance on the profile
- Several blanks are cut out.
Cutting blanks
- The blanks are inserted between the profiles.
Inserting blanks
- The workpieces are secured using self-tapping screws or a cutter.
Fastening workpieces
- Drywall sheets are screwed with self-tapping screws to the profiles on both sides of the frame.
Screwing drywall
- Saw off the protruding edges of the drywall sheets using a hacksaw.
Sawing
- Using a No. 100 diamond mesh, level the edges of the drywall.
Aligning edges
- The gaps between the drywall and the wall are filled with polyurethane foam.
Foaming cracks
- Insert a flange under the hood into the resulting box.
Flange
This completes the installation of the plasterboard box. Using these instructions, the process of covering pipes with plasterboard is quite simple and quick. A video on hiding pipes using drywall will help you solve any questions you may have about installing the box.
Did you like the article? Subscribe to our Yandex.Zen channel
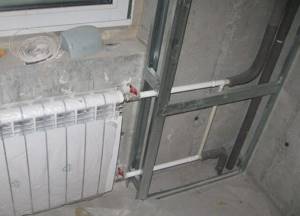
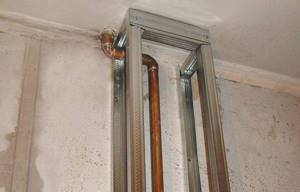
DIY frame installation
The material for constructing the frame structure to which the plasterboard sheathing will be attached is usually metal profiles (racks and guides) made of galvanized sheet.
These products are resistant to corrosion and rust, and therefore their use ensures a long service life and the absence of serious problems during operation.
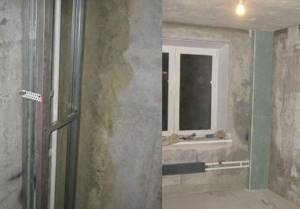
Work on the manufacture of a frame structure consists of the following stages:
- Marking the lines and contours of the frame on the floor, walls and ceilings, made with a simple pencil using a level and plumb line.
- Installation of guide profiles in accordance with the marks and their fastening to the wall using dowels.
- Installing three vertical rack profiles and measuring the distance between them.
- Inserting rack profiles into the guides and attaching them to each other using small special screws called “bugs”.
After the specified work is completed, the frame for the planned cladding can be considered ready, and it is possible to begin the construction of the box itself from plasterboard sheets.
Carrying out work
Preparatory work
Before you start covering the riser pipes in the bathroom, you should prepare the room properly, in particular the pipes. To begin with, you should remove the old coating and apply fresh paint. This is required so that the service life of the pipes is extended by protecting the paint from the corrosion process. The fact is that after closing the pipes with a box, access to them will be difficult, even if a hatch is made on the front wall of the box. When the paint on the pipes dries, it will mean that it is time for the next stage - creating a frame structure for the box.
Construction of a support from a frame
As a rule, in the manufacture of the frame, metal profiles are used, which are made from galvanized sheet metal with a long shelf life and resistance to rust. Sometimes the frame for the box is made of wooden beams. To ensure that the risers are hidden behind the drywall, a profile support is erected based on the sequence of procedures.
- Marks are made on the walls, ceiling and floor for the future frame, and you will need a pencil, a building level and a plumb line.
- Next, following the markings, you can begin to set the guides and fix them to the wall surface using dowels.
- The completion of the frame construction consists of installing the rack elements along the guide profile beams. The connection of profiles that are joined together is carried out using special fastening devices, which are popularly called bugs.
So, let's move on to the most important thing.
Covering the frame with HA sheets
The next step is to sew up the fabricated gypsum fiber base. Here you should pay close attention to the following nuances:
- Use only moisture-resistant drywall panels.
- Panels should be selected with a thickness that can give the box greater rigidity (i.e. 1.2 cm).
- When joining plasterboard blanks, you should use either edge alignments (if there is a factory-type edge) or by laying a chamfer at an angle of 45 degrees.
- A gap is created in the sheathing so that everything is ventilated naturally.
- Check the position of the screw heads - they should be sealed, not exposed and not dangling above the wall.
So, first, take measurements. After this, calculate the size of the gap between the floor and ceiling using a tape measure. Measure the required distance on the profiles and cut so that you get 3 blanks at once. Three racks should be placed around the pipes (2 of them should be against the wall and 1 in the center between the first two), while a right angle should be maintained between them. If the risers are located not in the corners, but along the wall, you will need to prepare 4 pieces of metal profile. They will need to frame the pipes in the shape of a square, or use three posts, bevel the corner and create a triangular-shaped support. When choosing frame geometry for covering pipes with plasterboard, be guided by considerations of what is best suited for the design.
After the gaps between the posts have been measured, crossbar supports should be made, which are secured using metal screws. It should be noted that to prevent deformation of the frame installation during seismic shifts, a special shock-absorbing tape should be used. It should be applied to the areas where the working surface touches the racks. The use of such a tape also makes it possible to level out vibrations, and this will prevent them from reaching the profile. Due to this, you will have protection from the destruction of the frame structure.
Sheathing with sheets of plasterboard is carried out according to one of two scenarios - either with pieces of material that was prepared according to measurements, or with a solid piece of material with the extra centimeters removed after attaching it using self-tapping screws. If a certain part of the sheets is missing, the joints can be laid in place of the crossbars, and after the edges of the two parts of the sheets should be secured. The resulting voids between the wall and the sheathing should be filled with polyurethane foam.
Treating the plasterboard box for pipes with putty is considered the final work. But before this, the joints of the drywall with each other should be taped with sickle tape. In order to give ideal evenness to the surface, the caps of the fasteners should be thoroughly puttied.
In order to get even corners, use sloped corners. Apply a little putty mixture to its back side and apply pressure to the corner. After this, using a wide spatula, you can achieve the effect of a leveled wall. When the putty has dried, you can go over the surface with sandpaper and prime it. After this, you can begin finishing work - gluing wallpaper, painting or laying tiles.
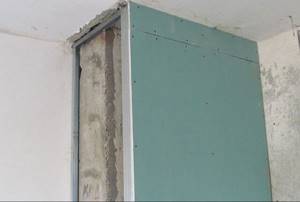
Installation of plasterboard box
- Sheets of plasterboard are prepared for assembling the sheathing, after which they are cut into fragments of the required size.
- The blanks are inserted between the profiles and placed for subsequent fixation.
- The plasterboard blanks are attached to the frame using self-tapping screws. The heads of the screws should sink into the drywall no more than 1 millimeter. Drywall sheets are screwed to the frame on both sides.
- Using a hacksaw, the ends and edges of the used sheets protruding beyond the structure are sawed off. The edges in the places of cuts are leveled using a diamond mesh No. 100.
At this point, the assembly of the box itself can also be considered complete, and the next stage is the transition to its lining and additional work.
How to hide heating pipes: we analyze the types of boxes and decorative trims
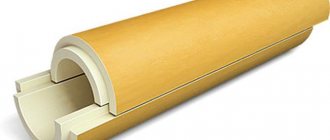
To create closed systems, all pipes passing through the apartment are removed into specially made channels in the walls, after which the contours are sealed with plaster. An unaesthetic appearance can be avoided by decorating the junction with decorative overlays specially designed for heating pipes.
- screwdriver;
- scissors (cutter, hacksaw) and drywall plane;
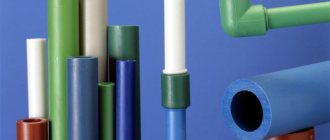
- sheets of plasterboard (for the bathroom and kitchen it is better to take moisture resistant, for other rooms - standard);
- wooden beams (metal profile);
- dowels, self-tapping screws for fastening the structure;
- building materials for filling, priming, finishing;
- skirting boards.
Depending on the design, decorative products may have a corrugated, smooth, or polished surface; be plain, with patterns or imitation of various materials (stone, mother-of-pearl, cork). First of all, a sheathing made of wooden beams with a cross-section of approximately 40x40 millimeters is attached to the ceiling and walls. These elements are fastened to the walls and ceiling using dowels equipped with a polymer sleeve.
After attaching the beams, they are aligned in the horizontal and vertical directions.
Processing and finishing of plasterboard sheathing
If we are talking about how to cover heating pipes with plasterboard, or you need to enclose the heating system as a whole with a duct, then it becomes important to have holes in the casing for heat to escape into the room. It is desirable that such thermal holes have a diameter of five centimeters or more, but they can be replaced by a large number of small holes.
During the summer period, the thermal openings are not used, and in order to prevent dust and other particles from becoming clogged in them, it is recommended to close them until the next winter. A convenient option is commercially available rotary lids that can be left open in cold weather and closed during the spring and summer seasons.
If it is necessary to enclose ordinary household pipes in a box in the kitchen or toilet, or the question is how to cover the pipes in the bathroom with plasterboard, then the presence of such holes is not required.
In addition, the lining and additional arrangement of the plasterboard box involves several types of work:
- Sealing fastening points, slots and seams. As a rule, ordinary polyurethane foam is used for this purpose.
- Strengthening the external and internal corners of the box with steel corner profiles, which not only helps align the corners, but also provides additional protection from accidental mechanical damage.
- Inserting a flange for the hood into the upper part of the mounted box.
- Putty work followed by sanding with a trowel mesh or sandpaper.
- Decorative finishing of the erected cladding structure. There are quite a lot of options to choose from here. For example, the box can be covered with wallpaper, painted in the desired color with paint or emulsion, covered with self-adhesive furniture tape, the use of liquid wallpaper, decorative plaster, etc. Which option or style to choose depends on the imagination, taste and preferences of the home owners .
As you can see, covering pipes with plasterboard does not present any particular difficulties and does not require high professionalism or sophisticated equipment. This explains the popularity of plasterboard boxes for enclosing pipes and other structures. Any self-taught home craftsman can make them if he carefully reads the instructions and observes accuracy and thoroughness in his work.
Tools and accessories
To begin the work process, you must first prepare the materials and devices according to the list.
To make a box you will need:
Two panels of moisture-resistant plasterboard (the scraps left after covering the walls are also suitable, dimensions no less than 0.5 * 0.5 meters).- Metal profile - the quantity is determined by the length of the box (from 5 to 25 meters).
- Self-tapping screws for metal.
- Set of dowels 0.6 cm.
- Mesh for plasterboard reinforcement.
- Putty.
Before you start sewing pipes using drywall sheets, you should prepare the following tools:
- Building level to control the evenness of surfaces.
- Tape measure - you will need it to take measurements, and also use it to cut plasterboard panels and metal profiles.
- A pencil that is needed for marking material to cut it or install fasteners.
- Hammer/drill with a 6mm drill bit and bit to make holes in the wall for the dowels.
- Hammer.
- Phillips screwdriver.
- Hacksaw.
- Metal scissors.
- A grater with teeth for smoothing cement mortar.
- A spatula is used to distribute the putty solution onto the surface of the HA.
Those who don’t know how to make a box for closing pipes from plasterboard can see the step-by-step process below. But first, you should clearly define and understand why plasterboard panels are considered the ideal material for masking pipes in a bathroom, toilet or any other room. This choice is due to a number of advantages when working with this material.
These include:
- Affordability.
- Speed and ease of assembly.
- Neutrality of the material for human health, its safety at the environmental level.
- No release of toxic substances when sheets are heated.
When you know all the intricacies, all that remains is to make the right choice in favor of the type of material. For rooms where there is high humidity, it is recommended to use moisture-resistant drywall, which differs from other types in green color.
How to cover pipes with plasterboard
Major home renovations often involve replacing pipes. After the installation of pipes or radiators is completed, it becomes necessary to hide communications to create a favorable appearance for the walls in the bathroom, toilet or any other room. A lot of work done during the renovation period using expensive tiles, heated floors and attractive plumbing fixtures, and a lot of effort put into creating a pleasant interior can be in vain if you do not think through the camouflage of communications.
For such work, various materials are used, but the most acceptable is the use of plasterboard, from which the box is made. Why does the choice fall on drywall?
The advantages of a plasterboard box for covering pipes are due to the following:
- affordability of drywall;
- ease of production of plasterboard structures.
- environmental safety of drywall, characterized by the absence of harmful substances in its composition. This is especially true in the manufacture of boxes for batteries and heating pipes that generate heat when heating rooms.
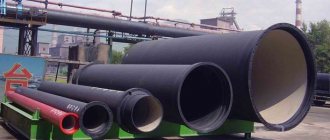
A little information about drywall. This popular building material is characterized by a multilayer structure with alternating gypsum and paper layers. Drywall sheets are available for sale in sizes of 2.5 by 1.2 meters. One sheet of drywall will be enough to make a box for the fan riser.
Note!
To construct a box in rooms with high humidity, such as a bathroom and toilet, you should use a moisture-resistant type of plasterboard.
Little tricks
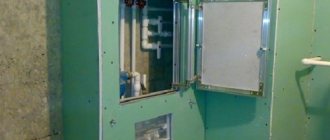
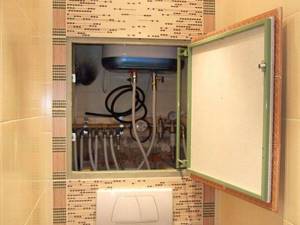
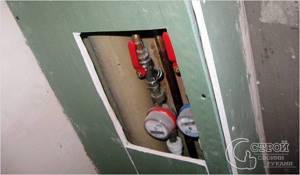
A box based on a frame made of metal profiles covered with moisture-resistant plasterboard sheets reliably hides pipes and pipeline fittings. However, during operation, utility lines may fail and require replacement or repair. To ensure easy access to heating, sewerage and water supply networks, when constructing a decorative plasterboard box, a technical hatch is provided. To do this you need:
- Outline the dimensions of the inspection hole at the stage of installing the guide elements of the structure. For strength, the opening is strengthened with additional sections of the profile.
- Attach a metal frame to the outside of the profile.
- Cut out a piece for the inspection hatch cover that will cover the opening. For this you can use OSB sheets or similar materials.
The choice of fasteners for the technical hatch cover depends on its size. For small inspection holes, you can use magnets, and if there are large openings, it is advisable to fix the door with hinges.
The construction of a large inspection hatch includes the following steps:
- Making a frame, which must have stiffening ribs, and a frame for the door. To do this, use profiles reinforced horizontally or vertically with embedded elements. The planes of the frame and profiles must match. The base for the lid can be made from wooden blocks, pre-treated with a protective compound.
- Sheathing the structure with plasterboard sheets, which are secured overlapping with the frame.
- Installation of fittings on the frame and door.
The hatch cover is hung after finishing the structure, adjusting the ease of opening and closing it. To prevent the door from sagging, it is made heavier.
When making a box to mask heating networks, there is a possibility of overheating of the casing. How to cover pipes in a bathroom with plasterboard to avoid damage to the material from high temperatures?
To do this, thermal holes are made in the sheathing walls using a drill, the diameter of which must be at least 5 cm. Perforation is also necessary when masking heating radiators. The holes ensure unhindered penetration of thermal energy into the room and reduce heat loss, allowing you to maintain a comfortable temperature in the room with minimal heating costs.
Materials and tools
Before you start making a box, you should consider a set of tools and materials.
Materials and tools:
- sheet plasterboard;
- metal profile (guide and rack);
- dowel-nails, self-tapping screws for fastening parts of the box;
- special knife for cutting drywall.
You will need materials such as polyurethane foam, shock-absorbing tape, putty to level the surface of the box. Tools that will be useful are a drill, a hammer, a screwdriver, a tape measure, a level, a plumb line, and a pencil.
Stretch ceiling - bypassing the pipe near the wall for white and colored ceilings, bypassing the detachable ventilation duct
The specifics of pricing for suspended ceilings and their installation have led to the fact that increasingly the ceiling is made to the size of the apartment owner. It is much cheaper to install it yourself. Today we will touch on one of the typical problems of novice installers: how to bypass a pipe with a stretch ceiling (read also about PVC stretch ceilings).
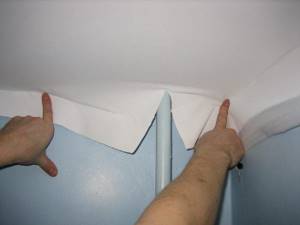
Looks like we have a problem.
Preliminary work
Preparatory work includes processing steel heating pipes and radiators (heating radiators), from which old paint is removed and, if necessary, new paint is applied. Paint as an insulating material will protect metal pipes from premature damage by rust. These works must be completed before installing the box, which will subsequently block access to the pipes.
The above work will not be required if the box being manufactured will be used for sheathing plastic water pipes.
Note!
You can continue installing the box only after the paint on the pipes or batteries has completely dried.
How to sew up a riser with plasterboard
When carrying out cosmetic repairs, specific situations often arise.
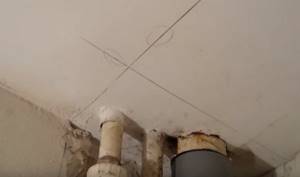
For example, such as covering the pipes in the bathroom with plasterboard with your own hands. The risers of the sewer network in the corners of the bathroom, heating pipes and water supply in the kitchen, by their presence, do not have the best effect on the aesthetics of the interior. Therefore, it makes sense to hide them. The easiest way is to cover the pipes with plasterboard, since processing with plasterboard does not cause problems even for an inexperienced craftsman. Knowing how to cover pipes with drywall, you can proceed accordingly when sealing any types of pipes (for example, gas). Next, it is proposed to master an elementary option for resolving the situation - making your own pipe box from plasterboard.
What is this article about?
Installation of the frame and its covering
The plasterboard box is fixed to a strong metal frame with vertical and horizontal elements made of profiles.
Note!
When alternating horizontal elements, a step of 60 cm must be observed.
The finished frame is sheathed with sheets and strips of plasterboard, pre-cut to fit the dimensions of the frame. Plasterboard parts are fixed to the profiles using self-tapping screws. They are screwed into the drywall with a small recess so that they can be hidden under a layer of plaster.
There are several methods for covering pipes with plasterboard:
1. Carry out “preservation of the vent riser pipeline: remove rust from the pipes, replace damaged sections of the pipeline, prime or paint the pipes, seal the joints between sections of pipes.
2. Work on installing the casing box should begin from the bottom. This means that the dimensions of the box, taking into account its contours, should be marked by drawing straight lines using a corner, starting directly from the floor surface - to the left and right of the pipe. Sections of profiles of the required length are fixed horizontally using dowels along the lines drawn on the floor. Horizontal profiles are installed in the same way on the ceiling (or in another place at the top of the future box). Vertical profiles are attached to installed horizontal ones. Next, the remaining horizontal profile elements are added in increments of 60 cm.
Note!
The vertical profile elements are attached to the horizontal guides using special self-tapping screws.
3. Cutting plasterboard blanks is carried out after the final installation of the profile frame. Drywall is cut with a special knife, often used for cutting wallpaper. On the front side of the plasterboard sheet, lines of the external dimensions of the individual sides of the box of profiles are drawn. Furrows are applied along these lines with a knife, one at a time for each workpiece. The cut plasterboard blank is simply broken and then cut on the back side of the plasterboard sheet.
Note!
Plasterboard blanks are secured to the box frame using ordinary metal screws.
4. Arrangement of a window (ventilation hole) in a plasterboard box opposite the fitting (taps and connecting devices on pipelines). The need for such a window is obvious - during operation, regular inspection and repair of the sewer system is necessary.
Only after you have learned how to cover pipes with plasterboard and have completed all the work on installing the box, can you begin finishing work. They may include applying plaster to the surface of the box and then painting it, or lining the box with ceramic tiles.
The common property includes an in-house engineering drainage system, consisting of sewer outlets, fittings (including bends, transitions, pipes, revisions, crosses, tees), risers, plugs, exhaust pipes, drainage funnels, clearings, branches from risers to the first butt connections, as well as other equipment located in this system. Many apartment owners, after completing the installation of pipes or heating systems in the house, are wondering how to cover them with an outer box and what kind of cladding to use for this. Everyone has their own preferences in this matter, but the material that is most often used for this purpose is drywall.
Box surface finishing
The finishing of the box is usually done in the same way as the rest of the room. The most common option is laying tiles. Sometimes they use plastic wall panels, which is somewhat worse, but cheaper, simpler and much faster. Both options do not require preparation of the surface of the box - puttying the heads of the screws, grinding the angular line of connecting planes. Considering the specifics and purpose of the box, these two options can be considered the most successful.
Box with inspection hatches, finished to match the walls of the room
Sometimes the box is built in an already finished room. Then you have to look for a material that is the same or as close as possible to what was used previously. It is recommended to choose moisture-resistant and durable types - tiles or mosaics, plastic panels. It is not recommended to paint the box, since you will have to first putty the bolt heads, grind the edge, or install a perforated corner on it and then putty.
All these procedures require the use of gypsum or acrylic putty, which will gradually absorb water vapor and swell. This will cause the painted surface to become uneven and lose its original appearance. In addition, it is difficult to produce high-quality painting at home.
Also, pay attention to such an option as – Decorating the toilet with PVC panels, where we examined in detail, using examples, an additional option for decorating the toilet and bathroom.
Self-assembly of the box is not difficult, but it requires accuracy and thoroughness. It is necessary to use personal eye and respiratory protection and prepare the workplace to prevent damage to the material. Before starting work, you should acquire tools, purchase components and fasteners, and purchase the required amount of drywall. It is useful to make a diagram of the upcoming work, which will help determine the order of actions and draw up a specification for materials. Careful preparation will ensure maximum success of the entire event.
Prices for popular models of screwdrivers
Screwdrivers
How to sheathe pipes with plasterboard - do-it-yourself finishing options
The material for the construction of the frame structure to which the plasterboard sheathing will be attached is usually metal profiles (racks and guides) made of galvanized sheet. Plasterboard sheets meet all the specified requirements well, and although other materials can be used to construct the box, they are preferred in a number of ways reasons: Working with this material is not difficult, and therefore the involvement of professionals is optional, and if you have some skills, you can cover the pipes with plasterboard with your own hands. Many apartment owners, after completing the installation of pipes or heating systems in the house, are wondering how to cover them with an outer box and what kind of cladding to use for this. Everyone has their own preferences in this matter, but the material that is most often used for this purpose is drywall.
Upon completion of the above work, before covering the pipes in the room or bathroom with plasterboard, you must first prepare a reliable frame for its fastening.
Plumbing pipe box
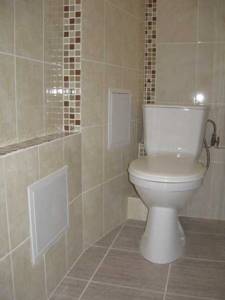
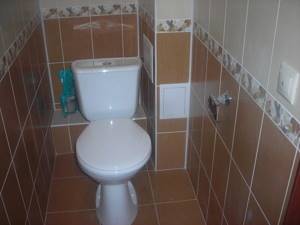
In the toilet
The question arises, how to cover the pipes in the toilet with plasterboard, because there are usually all sorts of taps and filters that require access.
This option for standard houses is the simplest; it is easiest to do it yourself.
In order to cover the pipes, you just need to make a protective wall.
The peculiarity of this wall is that it is necessary to provide a sufficiently large hatch for inspection, it can even be in the form of opening doors. And the wall itself is finished in the same way as the entire toilet.
Often, behind such walls they hide a special frame for a wall-hung toilet. The instructions that come with this device detail how it can be installed.
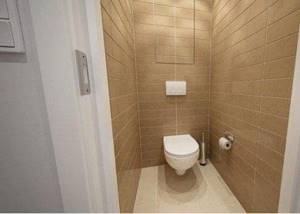
A false wall made of plasterboard, behind which the plumbing connections and the mounting system for a wall-hung toilet are hidden.
Doors and hatches are completely different. You can trim the doors with tiles; it is convenient to open such a door using the so-called frogs.
These are special hinges for attaching the door. You can make louvered doors or even use roller shutters.
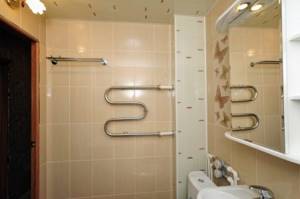
In the bathroom
If the bathroom is shared with a toilet, then the principle of closing the pipes there is the same as in the toilet, only the box has to be made with one or two side walls, for example, as in the photo.

A gypsum fiber board box in a combined bathroom with tiles and roller shutters.
If the bathroom is separate, then all communications are usually located in the toilet, and in the bathroom there are only water supply and sewerage pipes.
We will consider a typical solution to the question of how to cover pipes in a bathroom with plasterboard.
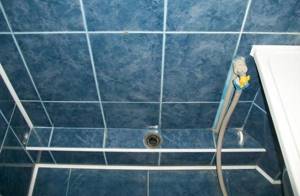
This is what the box in the bathroom should look like.
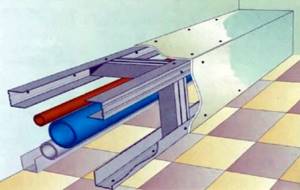
The box in the bathroom is built horizontally, and in all other respects it repeats the principle of building a box for hiding heating pipes, which is described above.
The guides are installed along the box on the floor and wall. After strengthening the frame, the box is sheathed with moisture-resistant plasterboard and finished with tiles.
Is it possible to cover heating pipes with plasterboard?
Use a galvanized metal profile that is not susceptible to corrosion due to high humidity. It is better not to use wood for the frame. Before hiding the heating radiator, it must be prepared. It is very convenient when modern batteries are used, but with cast iron ones you will have to tinker. Usually, through the holes in the structure covering the battery, it is still partially visible, so you cannot ignore the finish of the device itself
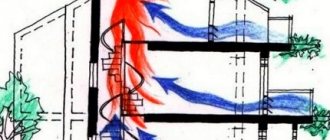
- Streams of warm air should not encounter obstacles on their path. This ensures uniform heating of the entire room.
- All threaded connections and air and water relief valves must be easily accessible.
- When the box is joined to the flooring, three main lines are immediately measured and marked - two side and the front.
- If it hangs, then remove the distance from the floor. Mark a line on the wall and check it for level.
Let's start with a question regarding the heating riser. Not everything is so categorical here; if you really want to, you can cover it with drywall. But at the same time, a number of certain factors must be observed. When carrying out repair work, remember that heating pipes and radiators should never be covered with plasterboard boxes and partitions.
But with a riser it’s a little easier, the main thing is to follow the recommendations described above.
- clearing the site for future work;
- wall primer. If you need to close the gas pipe, prime it with an anti-mold and fungal agent;
- We apply markings on the walls corresponding to the drawing.
Note! The drawing needs to include the dimensions of the frame and the thickness of the plasterboard sheets. The drawing will help you accurately calculate the amount of materials needed for the job.
Frame
The principle of constructing the frame with prepared markings: a profile is attached to each line, plus the connection of the corresponding corners. That is, in addition to the main ones, you will need 2 more profiles for connecting the corners between the ceiling and the floor.
When installing any standing box made of plasterboard (vertically, to the height of the entire room), profiles 3-6 cm wide are used. The shape is a channel or a corner.
In the center
Pipe in the center of the room
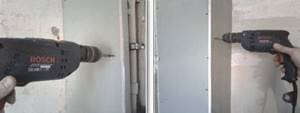
Let's take a closer look at how to make a frame for a box in the corner of a room:
- Cut metal profiles into pieces of the required length.
- Place one of the parts to the marking line and make several holes, step 15-20 cm.
- Remove the metal and make holes for drywall dowels in the designated areas. Hammer in the dowels.
- Place the metal on the line and fasten it with screws.
Then the remaining parts are attached in the same sequence.
To install parts that are not adjacent to the walls, you need:
- cut through the upper and lower edges of the profile (if using a channel);
- fold the center and trim the sides a little.
The central part will be mounted to a part that is already attached to the ceiling and floor. The side parts will extend beyond the frame; to be sure, they can be fastened with small screws.
Advice! Between the main parts you can install stiffening ribs from ordinary tex (2-3 pieces - for the entire height), the structure will be more stable.
In the corner
This type of frame can be installed for pipes located in the corner of the room. Residents often want to hide heating pipes, and a plasterboard heating pipe box helps to do this in a matter of minutes.
Boxes located in the corner differ from those located in the center of the room only in the absence of a second metal guide connecting the floor and ceiling. When the box is shaped like a parallelepiped, two such guides are used, but when placed at an angle, one side disappears.
In terms of assembling the frame, the system is similar, only using fewer prefabricated parts. It is also more convenient to use a corner-shaped profile as a corner guide, with a shelf wider than that of the main metal used. It is used not to cut the channel, but to place the corner on top of other parts.
How to cover walls with plasterboard if heating pipes are in the way
A good alternative to corrugated stainless steel would be copper on soldered joints, but the problem is that it forms a galvanic couple with aluminum, which leads to electrochemical reaction of one of the metals, and aluminum radiators are often used in heating systems. The structure of rack profiles is fastened with transverse inserts for strength. Sometimes a shock-absorbing tape is laid. It is believed that it absorbs vibration, due to which the frame will last longer. First you need to install rack profiles. Their number and length will depend on the room where the renovation is being carried out. For example, to insulate pipes in a toilet (where the riser is usually located in the corner), three profiles are required; if the pipes are located vertically or horizontally in the middle of the wall, then four rack strips need to be fixed. That is, the pipes are placed either in a square or in a triangle - it depends on the wishes of the owners and the characteristics of the room.
If necessary, then upon completion of the installation of the metal structure, we attach soundproofing materials. It is best if you carry out these actions simultaneously with covering the walls with plasterboard. Once the installation of the frame is complete, you can begin to cover it with plasterboard. Sheathing
happens as follows: To obtain clear and even corners, use a metal corner. A putty solution is placed inside it and, pressing the corner tightly to the edge of the box, stretch it over the entire surface. Then the wall is leveled with a thick spatula, cleaned and primed.
The resulting surface becomes suitable for subsequent finishing with paint, wallpaper, tiles, and tiles.
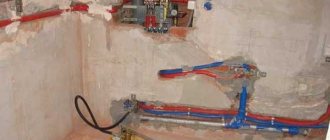
Laying pipes in grooves
The option of laying in grooves is used if the bathroom is being renovated. That is, the old finish has been knocked off, communications are being carried out anew. In order to lay pipes, it will be necessary to cut grooves (grooves) in the wall or floor. A very important point is that the width of the grooves should be greater than the diameter of the pipes being laid.
But there are a few points here:
- If hot and cold water lines, as well as sewerage, are laid separately, then the grooves are made to match the diameter of the pipeline. In this case, the sewerage system must be laid with an inclination towards the riser. And this will have to be taken into account when cutting grooves.
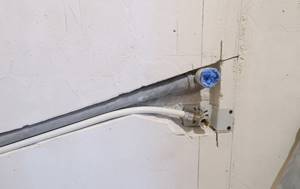
- If hot and cold water pipes are laid together, then there are two options for their location. The first is on top of each other. In this case, the top one should always be hot. The second is in the horizontal plane. In this case, the plumbing system should always be to the right of the hot water supply line.
- It is rare when all utility networks are located in one large groove.
The pipes inside the grooves are secured with clamps and sealed with plaster mortar.
Back to contents↑
How to cover heating radiators and pipes with plasterboard: 12 pressing questions during repairs
Steel pipes are known to be susceptible to corrosion. The first through fistulas appear where the metal is thinner - on the threads of the connections and on the welds.
- The connections between the radiator and the hoses are detachable and leak from time to time. Carrying out repairs inside a box that does not allow you to turn the union nut or radiator cap with a wrench is not an option;
- On the upper floors, radiators are equipped with air vents. The box deprives the owner of free access to the Mayevsky crane;
Use a removable decorative screen. It should be dismantled as simply as possible, without tools if possible, and be mesh or lattice on all sides, including the top. However, it is much easier to clean grease plugs not with a cable, but simply by disassembling the pipes and shaking out the grease in the trash. Of course, this can only be done with an open sewer line.
If you cover steel pipes or any material with serviceable connections (for example, metal-plastic on compression fittings), you will create problems for yourself. The box will have to be disassembled at the first leak.
Preliminary marking
Marking stages:
- As soon as the drawing is completed, it needs to be transferred to the space around the communications;
- With a pencil you need to make a mark on the wall in the place where the pipes protrude from the corner the furthest, while retreating 5 cm;
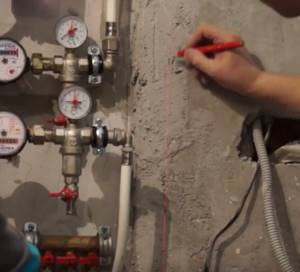
- Once marks are made on both sides, you need to draw an even perpendicular line on the wall, passing exactly along this mark;
- To make the line straight, you can use a plumb line or laser level;
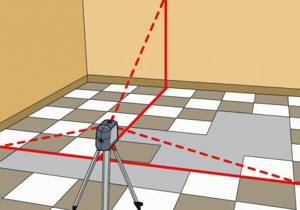
- Next, you need to mark on the floor and ceiling the location of the guide profile; for this you need a construction corner. Place the corner with the short edge to the corner at the intersection of the floor and the wall, and draw a straight line on the floor. The angle between the strip on the wall and the strip on the floor should be 90 degrees;
- The same should be done on the ceiling.
The marking is ready, you can proceed to the next stage.