Methods for connecting heating radiators
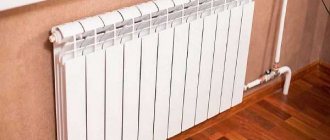
Heating radiators are mounted on the wall, or, occasionally, on the floor.
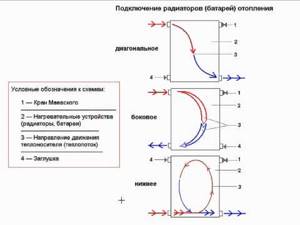
There are several ways to connect them. The methods themselves are divided according to the side of the pipe connection (side, bottom) and according to the scheme for connecting several radiators at the same time (parallel, serial, cross).
The choice of a specific option is made based on several conditions:
- design number of radiators in the room;
- outlet side of connecting pipes: top, bottom, side;
- type of heating system: two-pipe or one-pipe;
- type of pipe laying: open or under plaster.
Let's look at connection methods in more detail.
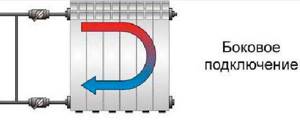
Lateral
This option is the simplest and most common, since most radiator models have side pipe outlets. This is how it is calculated by the manufacturer.
The side connection is also convenient because unscrewing the nuts from the side is much more convenient than from below under the device body.
In addition to the bottom connection, there are wall-mounted radiators with top connection. The top side is usually clearly visible, so the connection will be visible and such a scheme is rarely used by manufacturers. The technological connection with it does not differ from the options with a bottom or side arrangement.
Lower
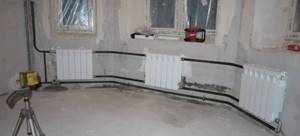
Bottom pipe connections are most often used when they are laid hidden under plaster. It must be taken into account that pipes with coolant, when laid even in non-combustible walls, require good thermal insulation.

Coolant temperatures up to 90 C do not pose a fire hazard. Thermal insulation is constructed so that only the radiator is heated, and not the wall from the inside. With properly designed thermal insulation, the efficiency of the heating system does not decrease.
Parallel
Powerful sections are connected in parallel. The advantage of this method is that the radiators are well separated from each other.
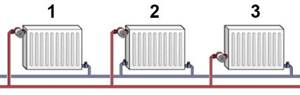
They can be replaced, repaired, turned off, and the operation of the entire heating network is not disrupted. The option is often used in private homes and autonomous heating systems.
Sequential
The sequential scheme is beneficial when low-power radiators are installed and there are a large number of them in one common heating system.
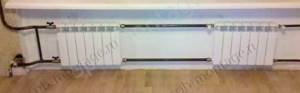
In a sequential circuit, maximum savings in connecting pipelines are achieved. That is why it can often be seen in centralized networks, while the two-pipe parallel circuit is practically never found there.
Cross
By cross we mean a combined connection scheme with parallel and serial connections.
This option is suitable when you need to use radiator models of different power. Many centralized heating systems are assembled using a cross pattern.
Connection features
Methods for connecting radiators
When installing heating systems in private homes, the following connection methods are used:
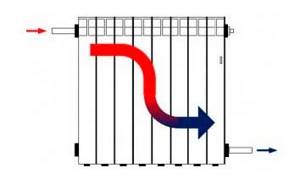
In this case, the supply pipe is connected from above, and the return pipe is connected from below to the same section. This connection diagram for the heating battery allows the radiator to heat up evenly. However, if the accordion has a large number of sections, then significant heat loss will occur, so it is better to use other connection options.
Saddle and bottom
This method is an excellent option for cases where pipes run through the floor. The connection is made to the pipes located at the bottom of the structure, in opposite sections. The only disadvantage of this method is its low efficiency, since heat loss can reach 15 percent.
Used when connecting devices with a large number of sections. As you might guess, the inlet pipe in this case is connected from above, and the outlet pipe from below, in the opposite section. This scheme for connecting heating radiators in a private house promotes uniform distribution of coolant and maximum heat transfer from appliances.
Note! When using a thermostat for heating parallel to the radiator, a bypass must be installed. This will allow you to regulate the degree of heating of the device.
Radiator connection diagram
As we can see, the methods for connecting heating radiators depend on a number of factors, such as the method of laying pipes, the power of the equipment, etc. In particular, the type of system is of great importance. We will talk in more detail about the types of heating systems below.
Single-pipe system diagram
Types of system
When installing heating systems, two schemes are used:
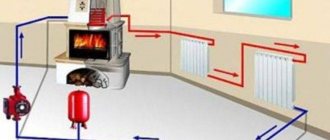
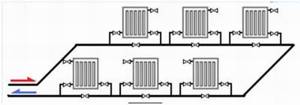
- Single-pipe - is the simplest, since the coolant circulates through one pipe, to which heating devices are connected in series. Its disadvantage is that it does not allow you to regulate the heat supply. Therefore, heat transfer corresponds to the design norm laid down during the design. This scheme is used in small systems, since with a long pipeline and a large number of radiators, the devices will heat up unevenly.
- Double-pipe - its meaning is that hot water flows through one pipe, and cooled water returns to the boiler through the other. In this case, heating batteries are connected in a private house, respectively, in parallel. The advantage of such a device is the uniform heating of the sections, as well as the ability to adjust the heat transfer. The only drawbacks that can be identified are the need for more pipes; accordingly, the cost of the structure increases.
Diagram of a two-pipe system
It should be noted that, regardless of the type of system, connecting heating batteries with your own hands can be done in two ways:
- According to the vertical scheme, the heating device is connected to a vertical riser, from which wiring is carried out to the radiators.
- According to the horizontal scheme, the coolant circulates through horizontal pipelines.
The choice of heating battery connection diagram depends on the characteristics of the house. For example, if the housing contains several floors, then the connection is realized according to a vertical scheme.
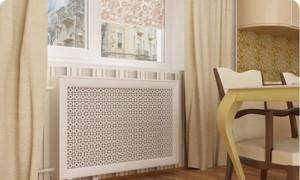
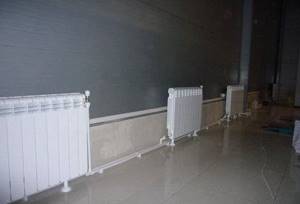
In the photo there is a radiator located under the window
Types of heating systems
One heating circuit is usually used for several rooms. The radiators in it can be connected either in series or in parallel.
In this case, a parallel connection requires the supply of two pipes to each radiator: with hot coolant and return with cold.
Parallel connection is justified for devices with high heat transfer. Consistent - ensures pipe savings.
Connection to a one-pipe system
In a single-pipe system, several radiators are placed sequentially one after another in a pipe section. The circuit is convenient for lateral connection. Then you will need a minimum number of pipes.
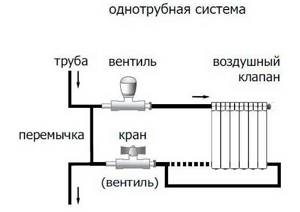
It must be remembered that one closed tap will disrupt the operation of the entire group that is connected in series behind it. A single-pipe scheme is usually used on the scale of one room.
Connection to a two-pipe system
A two-pipe system requires twice as many pipes. This disadvantage is largely eliminated if cheap heat-resistant polymer pipelines are used.
When is a two-pipe system beneficial:
- the purchased radiators have too much power and massive design for serial connection;
- There is only one radiator installed in the room; in any case, two pipes must be drawn to it;
- Only one room needs to be heated (for example, a studio apartment).
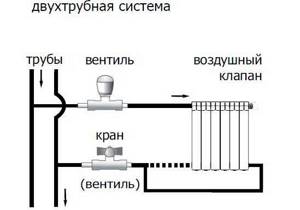
A two-pipe design will provide a higher level of reliability than a single-pipe design. It will also be possible to install taps on radiators and each individual tap will in no way affect the operation of the others.
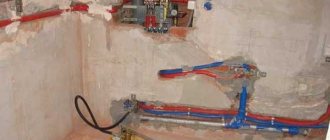
Connection steps
The operating technology depends on the selected set of fittings and pipe material. If pipes are laid along the surface of the walls in a room, then the best option is classic metal pipes.
If heating lines are laid in advance under the plaster, or in specially designed channels, then a more modern option can be used. For example, polypropylene heat-resistant pipes.
Work with steel pipes is carried out with a standard plumbing tool kit. Plastic pipes and fittings require specialized crimping tools. They are not needed for all fittings. Many systems have a threaded crimp system.
How to properly connect a radiator in an apartment?
In an apartment with a gas boiler (such options are especially common in older buildings where it is possible to install a chimney), radiators are installed in the same way as in a private house.

However, much more often you have to deal with the option when the apartment is connected to a common centralized heating network. In this case, the choice of the required radiator model must be consistent with it in terms of power and type of connections available.
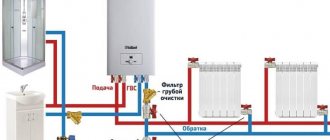
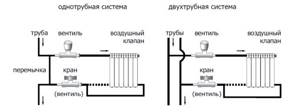
Radiator connection diagrams
The figure below shows connection diagrams for a one-pipe and two-pipe system:
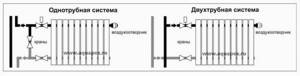
Let's take a closer look at the correct location of the valve, faucet, jumper and air valve:
What taps should be installed on heating radiators?
Various designs of taps are placed in front of heating radiators. They serve to solve several problems:
- Mayevsky valve - to remove air;
- a regular tap - to adjust the amount of circulating coolant;
- The tap can be used to completely shut off the water during repairs.
The use of plastic pipe allows the installation of simple rotary taps. In an autonomous heating system made of metal pipes, it is better to use threaded valves that do not cause water hammer when closing.
In private autonomous heating systems, taps are placed at the entrances to the premises, in front of vertical sections and in other places. Their presence turns out to be very convenient when carrying out repairs of individual sections of the network.
Assembling a heating radiator with your own hands: connecting sections and fastening
The need to assemble and disassemble a heating structure arises when one of the sections leaks, even if you want to save on assembling the entire complex, and if necessary, expand sections, since you initially “missed” in counting them. As you can see, there are many reasons, they are less important than the process to which our instructions are dedicated.
The ultimate goal is warm batteries.
There are many batteries, but one assembly method
We would like to remind you that batteries can be of several types based on materials:
- Cast iron;
- Bimetallic;
- Aluminum;
- Steel.
And several types of designs:
For your information! The secret is simple: the method of assembling different radiators is the same + the method of tying the radiators is also the same.
Therefore, today's material is universal for all types of batteries.
Let's start with sections
Let's carry out the assembly using sectional batteries as an example. In order to somehow supplement the information, we will analyze the points of piping radiators, especially since they are of the same type for both sectional and panel heaters.
Let's put everything in its place.
The binding begins with the distribution of roles:
- Each radiator, regardless of type, has four threaded inlets. Our task is to determine the coolant input-output circuit for the correct placement of plugs and proper connection of the element to the network;
Assembly diagram.
Advice! If you are doing a regular radiator replacement, then you don’t need to come up with anything. You do everything in the same way as the previous radiator. Top entrance, bottom exit. The opposite upper threaded hole is a pass-through plug with a Mayevsky tap.
The opposite lower threaded outlet is a blind plug.
- The roles are distributed. We assemble:
- The beginning is the connection of the Mayevsky tap and the blind plug. For these purposes, flax fiber and a special paste for sealing threaded connections are suitable;
- The fiber is wound in even strands without lumps or ridges in the direction opposite to the direction of the thread of the plugs;
For additional sealing of parts we use fiber.
- The paste then fixes this fiber in place;
- Using a wrench, the plugs are installed in place.
An adjustable wrench is a great helper.
Advice! Special keys with shaped recesses for the main parameters of the installation kit are available for sale. An adjustable wrench is quite enough for tying the radiator, although its capabilities will not be enough for plugs for cast iron radiators.
Then you will still need a gas wrench.
- It’s a little more complicated with water inlet and drainage. Today, taps called American valves are installed in batteries; these connections with a union nut provide the most reliable connection. Their installation proceeds as follows:
- The threaded part entering the radiator is made in the same way as already described - with fiber and paste;
Recommendations! Flax and paste can be replaced with FUM tape, as many advise. It is indeed possible, but it must be done correctly. Such a replacement is possible in houses and apartments where there is an autonomous heating system, where the coolant pressure in the network is quite low - the circuit is closed. FUM tape feels very comfortable in such conditions. During pressure surges, which are frequent guests of the general heat supply system, the tape can be destroyed.
The result is clear - leak.
- The American one is tightened not with an ordinary gas wrench, but with a hexagon.
Is replacement possible?
Advice! In many video materials you can see how an American woman is twisted with a chisel, a square pin, and even one grip from a plier.
We won’t judge how justified this is, but the native key is still better.
Connecting sections
To do this, we will need nipples - special section connectors with a rubber sealing ring, as well as keys for tightening the nipples.
Our help! Nipple is a type of connection represented by a piece of pipe with a central transverse groove for a rubber seal. Combs with carvings for the right and left sides extend from the furrow.
This design allows you to screw the connector into threaded sockets while simultaneously bringing the radiator fins closer to each other.
How to assemble sections of a heating radiator?
The assembly algorithm is simple:
- Assembling sections of aluminum radiators, as well as assembling bimetallic heating radiators with your own hands, begins with “making” nipples in threaded holes;
Photo of a nipple with a seal.
Advice! If you are connecting two sections, then the connecting windows should have: one - right-hand thread, the other - left-hand thread.
- The assembly of aluminum heating radiators, as well as the assembly of cast iron heating radiators with your own hands, occurs by uniformly tightening the threaded connections of the nipple and sections using special keys;
Keys for assembling ribs.
Observation! It is better to carry out battery installation work together.
This is both easier and the connection is easier to control.
- After joining the required number of sections, the assembly of the aluminum radiator, like any other, is carried out according to the wiring diagram, which has already been described.
A few words about fastening
We have already described how to assemble bimetallic radiators and how to assemble an aluminum radiator. The type of constructor does not matter; the ribs are assembled according to a similar principle with your own hands. And here it is also better to work together.
Advice! If you are replacing, for example, a cast iron radiator with a steel panel one, then the types of fastenings for cast iron structures will not suit you. They need to be removed and new ones installed. Fortunately, panel heater kits have them.
And while one person will carry out the rough joining, the second can mark the locations of future fastenings.
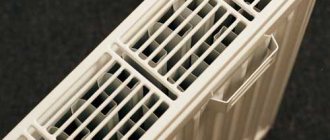
Everything that is good for sections is not suitable for panels.
To the piggy bank. If you do not connect the batteries to the riser, but connect them to the autonomous system, then the experts advise making a slight tilt of the battery about 5 degrees so that the Mayevsky tap is slightly higher than the input connection with the coolant supply. The result of this connection is that if air accumulates in the system, it will be at the tap, and not located above the water flow along the entire perimeter of the pipe.
Finally
Installing and assembling the heater is a simple process, especially since the price of all the work is quite reasonable, because our material and video in this article will help you assemble it.
hydroguru.com
When is the best time to change heating radiators in an apartment?
It is best to replace it outside the heating season. These are all the summer months and part of the spring and autumn (determined by the climate in your region).
Before replacing, we check the condition of the taps. In older networks they usually do not provide complete coverage.
Is it possible to replace heating radiators in winter?
It is not advisable to carry out replacement while the heating system is on, but it is possible. The main requirement for this is reliable shutoff of the coolant outlet. You can use a standard faucet and additional accessories.
If the radiator is removed for a long time, then the pipe outlets can be short-circuited with a segment so as not to disrupt the operation of the overall system.
The efficiency of the heating system of an apartment or private house depends not only on the power of the heat sources. Correct installation of heating radiators will reduce the cost of heating the room, make it more productive and improve the microclimate.
Regardless of what system you use, single-pipe or two-pipe, autonomous or centralized, where the radiator will be located - in an apartment or house, the rules for installing heating radiators are the same. There are three options for radiator placement:
- In a niche;
- Under the window;
- On the wall.
Each option has its own placement rules. Everything we will tell you below applies to aluminum, cast iron and metal radiators. These recommendations do not apply to quartz heaters. You can read more about them in the article “Quartz heating batteries: 14 pros and cons.”
Types of heating systems
There are three options for radiator connection systems - serial, single-pipe, two-pipe and collector (parallel). They differ in the wiring diagram. Depending on what system is installed, it is necessary to select the type of batteries. It is important to remember that incorrect connection of heating radiators leads to a decrease in the actual thermal power of the batteries.
Serial connection
This is the simplest option for connecting radiators. From the heating device the pipe passes to the first radiator, from it to the second, etc. This connection option has become obsolete, since the water cools quickly and the heating level drops sharply with distance. There is no option to turn off an individual battery - you have to shut off the entire system.
A clear example of serial connection of radiators.
Single pipe system
A single-pipe system uses one main pipe through which heated water or other coolant flows from a heating device (heat pump, boiler, boiler, etc.). Each battery is connected in such a way that the liquid passing through it returns to the main line.
The radiator can be turned off using a valve or shut-off valve without shutting off the main pipe. The water temperature in each subsequent radiator drops, but not as significantly as with a series connection.
Two-pipe system
The supply of heated water and the discharge of cooled water in the system occurs through different mains. Each radiator is connected to both pipes. In such a system, the temperature of the liquid at the inlet of each radiator is almost the same; it decreases slightly due to heat loss in the pipes.
Collector (parallel) system
In this system, all batteries are connected in parallel. One line comes out of the heating device, which is connected to the collector (popularly called a comb). In the collector, water is distributed through several pipes, each of which leads to a separate radiator. The shut-off valves are located on the manifold.
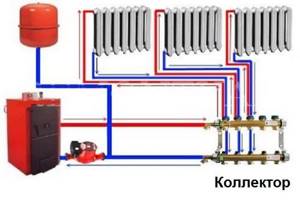
Collector or parallel heating system
The collector system can work in conjunction with any other. For example, several radiators connected to each other in parallel using a single-pipe or two-pipe system can be connected to the main line with warm water leaving the collector. The number of heating radiator sections depends on the selected system and type of connection. You can calculate them using an online calculator.
Installation nuances
There are two types of bimetallic radiators: partially or completely bimetallic.
In the first case, aluminum is used for the manufacture of vertical collectors, which requires special care during installation. There are the following requirements for how to correctly connect a bimetallic battery:
There are the following requirements for how to properly connect a bimetallic battery:
When connecting fittings and manifolds, be careful not to use excessive force. As a rule, the accompanying documentation contains detailed installation instructions
A torque wrench is very convenient in this regard, allowing you to control the applied force. When using linen winding, it is important not to overdo it with its quantity. Otherwise, some of the effort will go into it, which will ultimately lead to the appearance of microcracks.
After the coolant gets into them, the process of peeling off the paint will begin. As a result, sooner or later a leak will appear. It is best to apply sealant and a little flax. It is better to avoid using paint in systems where antifreeze acts as a coolant. This will lead to rapid corrosion of the seal and the appearance of a leak.
- The battery must be mounted in a strictly horizontal position. An exception is when an air vent is used, when, for greater efficiency in releasing gases, a slight forward angle deviation along the circulation path is allowed. It is prohibited to make a slope in the opposite direction, because this disrupts circulation.
- When hanging the radiator, you must use three brackets: two on top and one on the bottom. The upper elements take on the entire load. Due to the lower fasteners, the desired direction is set.
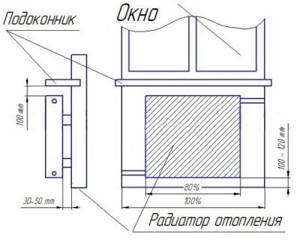
- To ensure effective air exchange, the following parameters should be adhered to: distance to the floor - from 60 mm, to the window sill - from 100 mm.
In some cases, the manufacturer may recommend other distances, depending on the design features (the differences are usually a few centimeters). However, the gap between the rear surface of the battery and the wall remains unchanged - 30-50 mm.
How to properly install a battery under a window
The greatest heat loss occurs through windows. Therefore, correct installation of the battery under the window is especially important.
- The radiator should be located exactly in the middle of the window - this way it will cut off the cold air and prevent it from spreading throughout the apartment.
- The installation height of the radiator from the floor should be 5-10 cm. If the gap is larger, a layer of cold air will form. If less, it will be difficult to clean under the battery.
- The distance from the wall should be at least 5 cm so as not to impede air convection. Otherwise, the battery will heat the wall of the building and not the room.
For radiators without an air cutter, the minimum distance to the window sill is 10 cm plus 3 cm for every 1 cm of protrusion. Installing heating radiators under the window close to the window sill will interfere with air convection. And this will lead to a decrease in heat transfer.
If the distance between the window and the floor is too small and it is not possible to comply with the standards described above, it is better to install a low radiator with a large number of sections. This way you can avoid excessive heat loss and heat the room more efficiently.
You can read more about the issue of arranging a niche in the article “How to properly recess batteries into the wall without heat loss”
Installation of a heating device
Once we have figured out at what height to hang heating radiators, we can take a closer look at the process of installing them. During the installation process, do not forget to maintain the standardized distances. It is important to take this into account at the stage of installing fasteners in the case of using an attachment.
Installation of floor-mounted radiators
Floor heating devices are usually quite heavy and therefore cannot be hung on walls. Most often, such units are made of cast iron, because this material has good heat capacity. The device has removable or stationary legs that are fixed to the floor. When attaching the legs to the floor covering, take into account what material it is made of. You also need to consider the material of the subfloor. For fixing, depending on the material, wood screws, dowel-nails or fasteners with plastic dowels are used.
To prevent such a heating device from accidentally overturning, it is additionally secured with a wall bracket at the required height. To correctly calculate the installation location of the holder, measure the distance from the floor to the place where it is fixed to the heating structure. After this, the installation locations of fasteners are marked on the wall surface, holes are drilled, fasteners are driven in and the holder is secured.
An expert answers your questions
What is the best way to install batteries in a niche or on a wall?
If you want to hide the radiator, it is better to install it in a niche. But keep in mind that it must be made according to the rules; it is best to install a heat-reflecting screen in it.
When you make a niche in an exterior wall, you will reduce its thickness. If a house or apartment is poorly insulated from the outside, this will lead to heat loss. In addition, a thin wall will not support a heavy battery.
Do you need a niche for heating radiators? Do you need a niche for the battery?
There is no need for a niche as such. With its help you can hide the radiator and put a decorative grille on top.
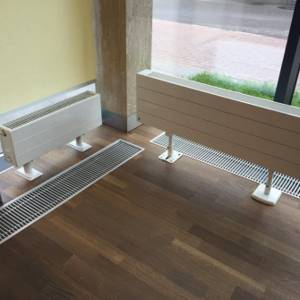
Where to put the batteries if the house has large windows?
If you mean windows that start from the floor, then you need to place it directly in front of the window (see photo). If the windows are of normal height, but wide, panoramic, you need to install radiators under them. There will simply be more of them. Calculate so that there is one radiator for every 2 linear meters of window.
How to properly position heating radiators in a private house?
The installation rules are the same for both a private house and an apartment. The only difference is the large number of external walls. Try to make the wiring so that all the batteries stand along them.
Most heat loss occurs in the corners where two exterior walls meet. You should definitely install a radiator there. It may be small, 3-4 sections, but it is necessary.
Why do they put batteries in the corner?
This is done only in those corners where two outer walls meet. It turns out that in a small area there is a large area of walls through which heat escapes. And these losses need to be compensated somehow.
How to properly install batteries under plastic windows?
It makes no difference whether you place them under plastic or wooden windows. You just need to correctly calculate the number of sections. The smaller the window area and the greater the number of chambers, the less heat escapes through it.
Do heating radiators need to be placed flush with the edge of the window sill?
If your window sill does not extend beyond the edge of the wall, this can be done. But imagine how ugly such an arrangement will look? In addition, the lower the radiator is located, the more evenly the room warms up.
If you want to ask your question, do so in the comments.
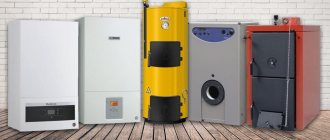
Types of heating radiators for an apartment or private house
The first thing you should decide on before installing a heating radiator in an apartment is the choice of the type of this device.
The following types of heating batteries and radiators are widely represented on the modern market:
- cast iron;
- aluminum;
- bimetallic;
- steel;
- copper;
- plastic.
Each of these varieties has its own advantages and disadvantages that you need to know in order to make the right choice. For example, cast iron batteries, which were widely used back in Soviet times, are characterized by a long service life and undemanding quality of coolant - the water in them can even be rusty or contain a large number of impurities. At the same time, due to the low thermal conductivity of cast iron, the fuel costs for heating such devices are quite high. Another disadvantage is the unaesthetic appearance of cast iron batteries, so nowadays they are not used so often.

Aluminum, steel, bimetallic and copper radiators have excellent thermal conductivity and an impressive appearance. At the same time, they also have disadvantages. For example, the disadvantage of aluminum batteries is their high sensitivity to water purity and instability to high coolant pressure. Bimetallic devices are somewhat more durable in this regard. Copper radiators are the most durable and most efficient in terms of heating, but at the same time they are also the most expensive.
As for plastic radiators, this is the most economical option, they are light in weight and easy to install, but they cannot be heated above 80 °C.
Having studied the features of various types of batteries before installing a heating radiator with your own hands, you can make a choice in favor of one type or another. A lot here may also depend on the interior of the room, the budgetary capabilities of the homeowners and other factors.
Possible radiator connection diagrams
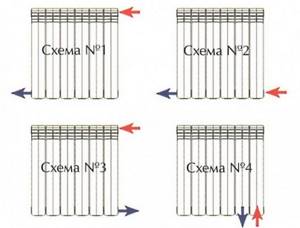
Before you begin the process of installing heating radiators, it is extremely important to determine the connection diagram. There are several options for how to do this; this is also indicated in the snip. Each of them has both certain advantages and disadvantages. Connection methods:
- side connection. This method is perhaps the most common, since it is this method that allows for maximum heat transfer from radiators. The installation principle is quite simple - the inlet pipe is connected to the upper radiator pipe, and the outlet pipe is connected to the lower one. Thus, both the inlet and outlet pipes are located at one end of the battery.
- diagonal connection. This method is used primarily for long radiators, since it allows for maximum heating of the battery along its entire length. In this case, the inlet pipe should be connected to the upper pipe, and the outlet pipe to the lower one, which is located on the other side of the battery.
- bottom connection. The least efficient connection method (compared to the side method, efficiency is 5-15% lower), used primarily for heating systems located under the floor.
Instructions for installing heating radiators
So, how to hang radiators correctly? You have purchased radiators and even decided exactly how they will be installed. Now you need to familiarize yourself with all the requirements of SNIP - and you can begin installation. It's actually quite simple.
Most radiator manufacturers, trying to make life as easy as possible for users, include detailed instructions and rules for installing heating radiators with each battery.
And they really need to be followed - after all, if the radiator is installed incorrectly, if it breaks, repairs under warranty will be denied.
If you want to protect the device from scratches, dust and other damage that may occur during installation, then during the installation process you can not remove the protective film - this is allowed by the rules for installing radiators. The single most important requirement that must be strictly followed is strict adherence to the indentations necessary for normal circulation of heated air. Here are the rules for installing heating radiators to indentations put forward by SNIP:
- According to current standards, the distance from the window sill or the bottom of the niche should be at least 10 cm. It should be taken into account that if the gap between the radiator and the wall is less than ¾ of the depth of the radiator, the flow of warm air into the room will be much worse.
- Equally strict requirements are imposed on the installation height of radiators. How to properly place heating batteries? So, if the distance between the bottom point of the radiator and the floor level is less than 10 cm, then the outflow of warm air will be difficult - and this will negatively affect the degree of heating of the room. The ideal distance is 12 cm between the floor and the radiator. And if this gap is more than 15 cm, then there will be too large a temperature difference between the upper and lower parts of the room.
- if the radiator is installed not in a niche under the window, but near the wall, then the distance between the surfaces should be at least 20 cm. If it is smaller, air circulation will be difficult, and in addition, dust will accumulate on the back wall of the radiator.
In order to get maximum useful information regarding the installation of radiators, you can use our resource. You can find many valuable tips and recommendations on how to properly install a heating radiator.
Installation of aluminum radiators
Aluminum radiators are lightweight, affordable, and can withstand fairly high coolant temperatures.
Connection diagram for aluminum radiators.
In addition, such products have an attractive appearance, unlike cast iron batteries. The service life of the product is more than 10 years. Due to the special properties of aluminum, the devices are not subject to corrosion. Bimetallic and aluminum structures are similar in their characteristics.
There are currently two main types of aluminum batteries:
- standard (or European type) - capable of withstanding operating coolant pressure of up to 6 atmospheres. Such products are intended for heating private low-rise buildings;
- reinforced - withstand pressure up to 16 atmospheres. This type is used in the heating system of multi-storey buildings.
Diagram of an aluminum radiator.
Aluminum batteries are of the sectional type, and their installation is carried out according to the general principle for installing batteries of this type. The equipment is installed under windows or on racks on the wall. Installation of cast iron batteries is also carried out at these locations. The pipeline to the battery can be connected from one or both sides. Depending on heat loss, aluminum radiators may have a different number of sections.
When choosing a battery, the technical characteristics of the heating system are taken into account: this is the operating pressure of the coolant, the maximum temperature, and the pressure of the system.
The following parts are usually included with aluminum radiators:
- racks and brackets;
- plugs;
- Mayevsky valve or automatic air release valve;
- sealing gaskets;
- shut-off or thermostatic valves.
Return to contents
Before installing the radiator, you must first assemble it. It is worth noting that it is better to entrust all assembly and installation work to specialists. However, you can assemble and then install the structure yourself. You just need to strictly follow the instructions, and also check the reliability of the fastenings and all connections.
Assembly diagram of an aluminum radiator.
The aluminum radiator is assembled immediately before its installation. To do this, plugs and plugs are screwed in, shut-off and temperature control valves are installed. Cleaning the structure at this stage is strictly prohibited, as this can lead to damage and leaks. The assembly of cast iron radiators is similar to this technology, however, such batteries have a one-piece design. And if in the future aluminum radiators can be enlarged or reduced by installing/dismantling sections, then in cast iron devices such operations are excluded. A new device will need to be installed.
The next step is to install the air valve, which is necessary to release air. The valve is attached with the outlet head facing up. The tightening force should not exceed 12 kg. If the automatic valve is installed correctly, it closes immediately after bleeding the air, and the radiator is filled with coolant. To put the valve into working condition, you should slightly loosen its cover without unscrewing it completely. If air often forms in the battery during operation, this indicates that the system is not operating properly. In this case, you should contact a specialist. Assembling a cast iron battery is easier.
Return to contents
The next operation is marking the mounting points and installing the brackets. Marks should be made according to obtaining the most effective heat transfer: 10 cm from the window sill, 11-12 cm from the floor, 3-5 cm from the wall. Other parameters also influence heat loss: installation in a niche, the presence of a decorative screen, and the method of supplying coolant. To insert the bracket, dowels are first installed in the wall or fasteners are fixed with cement mortar in pre-prepared holes.
Installation diagram of an aluminum radiator.
Next, the aluminum radiator itself is hung. The hooks of the brackets should be located between the sections, the lower parts of the collectors should be located on the hooks. The accuracy of the position of the radiator in the horizontal plane must be checked using a building level. If necessary, adjustments are made using brackets.
The final stage is connecting the aluminum radiator to the heating system. To do this, using a pipe wrench, the structure is connected to the heat supply pipes equipped with a valve, thermostat or tap on the supply line. When installing aluminum batteries, you can install shut-off valves only on the lower supply, since if water is drained from the riser, it remains in the radiator when the shut-off valves are closed. When filling new radiators and the entire heating system with coolant, the shut-off and control valves must be opened smoothly, which will help avoid water hammer.
When installing new aluminum radiators, remember that the original packaging (plastic film) should be removed only after completion of work. This will protect the structure from damage.
Return to contents
The pipeline to the radiator can be connected from one or both sides. In the first case, there is no need to install long radiators. When supplied from different sides in systems with artificial circulation, the length of the radiator should be no more than 24 sections, in gravity systems - no more than 12 sections.
It is recommended to use shut-off and control valves at the outlet and inlet of the radiator, since its use has a number of positive aspects:
- allows you to adjust the temperature in the room manually or automatically;
- allows you to disconnect the radiator from the heating system for replacement, flushing, repairs, and also in case of an emergency.
When operating an aluminum radiator, the following actions are prohibited:
- completely disconnect the radiator from the heating system, except in emergency situations and during maintenance and repairs;
- cover the surface with “metallic” paints such as silver;
- use abrasive materials and cleaning agents to clean the structure;
- empty the heating system with aluminum radiators more than 15 days a year.
During operation, it is necessary to clean the battery at the beginning of the heating season and 1-2 times during the heating season.
In general, aluminum radiators are the best option for heating both multi-storey and private houses. They are better than many other batteries, especially cast iron, which are becoming increasingly rare on the market today.
1poteply.ru
Heating radiator installation procedure
It should be noted that SNIP also prescribes the procedure for installing the radiator. Using it, you can do everything correctly:
- First of all, you need to determine the location for the fasteners. Their number depends on the size of the battery, but even if the smallest radiator is installed, there must be at least three brackets;
- The brackets are being attached. For reliability, it is necessary to use dowels or cement mortar;
- The necessary adapters, Mayevsky tap, plugs are installed;
- Now you can begin installing the radiator itself;
- The next step is to connect the radiator to the inlet and outlet pipes of the system;
- Next you need to install the air vent. According to modern SNIP, it must be automatic;
- After the correct installation of the heating radiators is completely completed, you can remove the protective film from the radiators.
If during the installation of heating radiators you adhere to all the rules and requirements described above, then you will enjoy the warmth that your correct installation of radiators and a well-made heating system provides for a long time.
Installation of bimetallic batteries: step-by-step instructions
Consider an installation with a side connection. Before starting work, drain the water from the pipe, dismantle the old heating device and prepare the radiator:
Screw 2 paired nuts from the ready-made kit - left and right - into the holes for connecting the pipes.
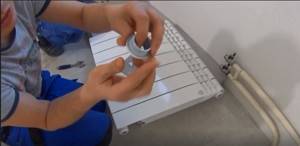
On the opposite side of the radiator, install a plug from below, and a Mayevsky tap from above.
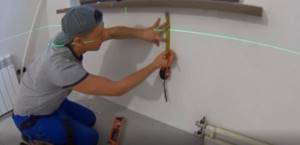
Place the battery against the wall and mark the top connection line of the device with a pencil. Then measure the distance from the top of the radiator to the mounting point of the bracket and place it on the wall. It is convenient to mark using a laser level. For aesthetics, the radiator is oriented exactly in the middle of the window; to drain into the system, do not forget to give a slight slope.
Drill holes, insert dowels and screw in brackets.

To connect to the pipe, screw an American piece of suitable diameter onto its outlet hole.
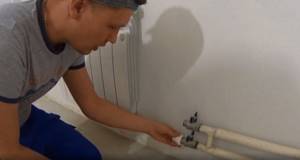
Install the American one on the battery hole.
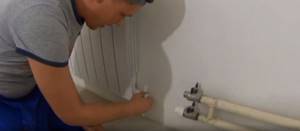
Measure the distance between the nuts.
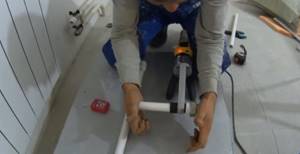
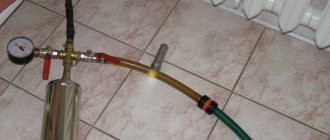
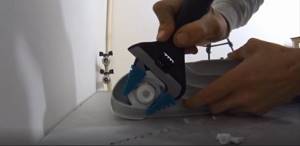
Cut a piece of polypropylene pipe and use a plastic welding machine to weld it into the gap. The photo shows the heating of the pipe and coupling.
Connect the second radiator hole to the pipe in the same way. After installation is completed, fill the battery with water, connecting the supply and return, and bleed the air using the Mayevsky tap.