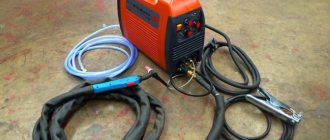
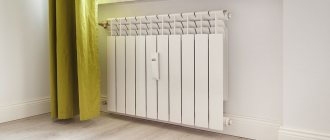
We work officially, we provide all the documents for approval of the replacement of heating radiators (batteries) for welding in the housing office and department of health departments. Plumbing work of any complexity. We install radiators (batteries) on gas welding, electric welding, and threaded connections. All pipe components are manufactured in our production using machines from the German company ROTHENBERGER. Our warehouse in Moscow has a large selection of heating radiators. Call by phone +7(495)-773-70-54
or leave a request on the website, our managers will calculate the cost of work and components. The price quoted over the phone will not change.
Our prices.
| № | Name | price, rub. |
| 1 | Assembly, installation and connection of a new radiator by welding with dismantling of the old radiator | 3900 |
| 2 | Assembling, installing and connecting a new threaded radiator with dismantling the old radiator | 3500 |
| 2 | Connecting the heating riser directly with dismantling the old radiator | 3000 |
| 3 | Chiselling a brick wall for a pipe | 650 |
| 4 | Grooving a concrete wall for a pipe | 800 |
| 5 | Grilling a wall or floor under a die | 500 |
| 6 | Drilling a through hole in the wall for a pipe | 500 |
| 7 | Laying pipes behind the p/m | 800 |
| 8 | Dismantling and installation of a heating riser | 3000 |
| 9 | Relocating the heating riser | 5000 |
| № | Heating radiators | Price of one section, rub. |
| 1 | Bimetal radiator Rifar-Monolit 500 (Russia) | 810 |
| 2 | Bimetal radiator Rifar-Monolit 350 (Russia) | 800 |
| 3 | Set of fasteners and adapters | 350 |
| 4 | Bimetal radiator Rifar-Base 500 (Russia) | 700 |
| 5 | Bimetal radiator Rifar-Base 350 (Russia) | 690 |
| 6 | Set of fasteners and adapters | 500 |
| № | Replacing a heated towel rail | price, rub. |
| 1 | Removing the old heated towel rail | 800 |
| 2 | Assembly and installation of heated towel rail lintel d up to 25mm/32mm | 3000/3500 |
| 3 | Heated towel rail jumper kit d up to 25mm/32mm | 4000/4500 |
| 4 | Assembly and installation of a new heated towel rail | 2500 |
| 5 | Installation of an additional tap | 500 |
| № | Radiator mounting kits | price, rub. |
| 1 | Minimum set | 2700 |
| 2 | Standard set | 3500 |
| 3 | Medium complexity set | 4500 |
| 4 | Diagonal connection kit | 6000 |
| 5 | Direct riser connection installation kit | 1000 |
| 6 | Duct extension | 1000 |
Of course, many residents of our country have no idea how to replace a heating radiator using welding. Of course, it is possible to carry out the entire procedure without the intervention of third parties. However, it is worth considering that this process is very complicated and incorrectly replacing heating radiators during welding can lead to disastrous consequences, so it should only be carried out by professionals.
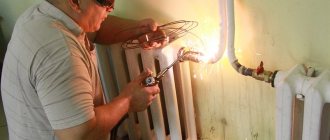
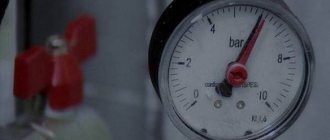
The process of replacing and installing heating radiators using welding is carried out as follows. First you need to understand what the pressure is in the pipes, and if it exceeds 8 atmospheres, then you need to think about installing bimetallic heating radiators. First of all, the water is drained from the system, after which you can begin to dismantle the old heating radiator: in order to carry out the dismantling, specialists cut off the old pipes with a grinder. After removing the old battery, they move on to packaging the new radiator. The complete set of tools necessary for packing a battery consists of: investment paste, an adjustable wrench, a set of special nuts for the battery and flax. Tool sets exist for various pipe diameters, so specialists determine their size in advance so that the packaging is done efficiently and quickly.
After this, the nuts are screwed in, but there is a slight subtlety here. On one side, two nuts are screwed in using a normal thread, and on the other, a nut is screwed in with a left-hand thread. On the right thread, at its very tip, flax is wound (clockwise) and, accordingly, on the left - counterclockwise. After this, the structure is lubricated with investment paste and screwed in until it stops. On the side that is intended for the passage of the pipe, an American screw is screwed in, and on the other side, from above, a Mayevsky tap is screwed in. This tap is necessary to vent the battery. A plug is screwed in at the very bottom.
After carrying out this work, specialists can proceed directly to attaching the radiator. To do this, they take all the necessary measurements and drill holes in the marked places where the fasteners will be screwed. A new heating radiator is installed on the finished fasteners, measured according to the level. If necessary, fasteners are trimmed by bending them to the sides or height. After installation, specialists proceed to welding work, having inserted a jumper in advance (possibly with a crane). The tap is inserted into the jumper in cases where the goal is to ensure that the coolant moves only through the pipe.
This is the method used to replace heating radiators using welding. If you want the work to be carried out efficiently and quickly, and for the radiator to serve for many years to come, contact the experienced specialists of our company. We will be able to carry out all complex work on replacing heating radiators at the highest level. Professionally installed equipment will work without interruptions and problems for a long time, giving the home warmth and comfort.
Connecting heating radiators
It is worth highlighting the stage of direct connection of heating radiators and its features.
There are 3 main options for connecting heating radiators to the system:
- one-sided;
- diagonal;
- saddle
With the bottom connection of the batteries, the consumer has no choice of how to connect the heating radiator. Manufacturers clearly indicate in the instructions how the flow and return are connected. These recommendations are strictly followed, because otherwise the coolant will not circulate normally and the battery will not heat the room.
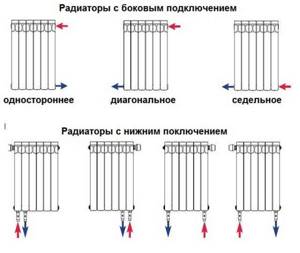
Options for connecting heating radiators
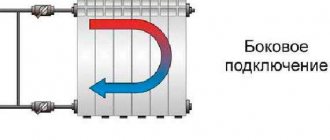
One way connection
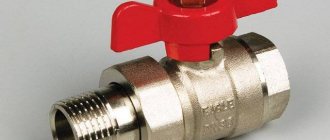
This connection method is most common in apartments. It can be either one- or two-pipe. Most often, metal pipes that can withstand elevated temperatures and pressure are used for connections. In addition to the pipes for connecting the battery, you will need 2 ball valves, 2 pipes, 2 tees.
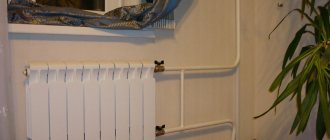
The pipes are connected as shown in the photo. A bypass (or bypass) in a single-pipe system is provided so that it is possible to stop the flow of coolant to the radiator without turning off the system and draining the water. There are no taps installed on the bypass so that there is no possibility of accidentally stopping the movement of the coolant along the riser.
To seal threaded connections, either linen winding or fluoroplastic sealing tape is used. Plumber's packaging paste is applied to these materials to seal them. Please note that screwing the faucet into the manifold does not require a large amount of winding. Otherwise, cracks may appear.
Differences from other installation methods
An alternative for connecting pipes when replacing batteries is the threaded method. It is especially popular among home craftsmen who do not have in their arsenal such expensive equipment as a gas welding machine and the skills to work with it.
In this case, the assembly of the system and installation of the batteries selected for replacement is carried out using threaded threads and special connecting elements - tees, fittings, nuts and other adapters.
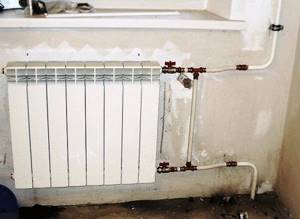
Installation using threaded technology is impossible without differences and visible fasteners - when replacing one radiator, more than 12 seams are left, whereas with gas welding - only 5-6
The main (and perhaps the only) advantage of the threaded method over the gas welding method is the ability to assemble the system quietly and without fire hazards with your own hands, without resorting to the expensive services of professional craftsmen. And such a structure can be disassembled in the future if there is a need to clean or replace any element.
But the assembly process requires detailed study, precise fitting and correct selection of all connecting elements. And even if you manage to do everything correctly and start the system, over time it will still fail.
As a result, water will quickly find “weak spots”, undermine the sealing gaskets and break through. Therefore, in high-pressure lines, threaded connections quickly “give in” under the pressure of water hammer.
Another popular alternative to gas welding is electric heating. Both technologies work on a similar principle - heating to the melting point and joining metals. At the same time, electric welding is a little cheaper, and the scale of “destruction” after such work is small, since the heated area of the electric device is much smaller.
But despite these advantages, gas welding has an important feature - the ability to regulate the melting rate by changing the flame angle. Unlike almost instantaneous heating by electric welding, gas technology works gradually, without disturbing the structure and strength properties of the metal.
That is why gas welding is by far the leader when choosing a method for replacing batteries among those who like to make repairs efficiently and reliably.
What are the pros and cons of electric welding?
Welded joints have the following advantages:
- large connections can be obtained;
- For welding, you can use a material that is similar to the pipe material. Thanks to this, all the properties of the pipeline are preserved;
- thanks to the connecting seam, the external and internal dimensions of the structure remain unchanged;
- simple and cheap way.
The disadvantages of welded joints are usually due to the low qualifications of the worker. Due to non-compliance with technology, rules, or inexperience, welding may be incomplete. This means that cracks and displacements may form. Therefore, welding of heating batteries must be carried out skillfully, carefully and carefully.
When is it necessary?
Sooner or later, apartment owners need to replace heating appliances. This can be caused by various reasons, for example, during renovation of the premises (unsatisfactory appearance of the radiators) or the heating device has exhausted its service life (not sealed, poor heat transfer). And if replacement is inevitable, then you need to find out what you need to know and need to do for this.
Which heating radiator to choose
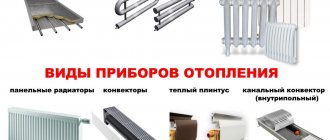
First, you need to choose a new heating device that will be installed in place of the old radiator. Today there is a huge selection of heating radiators - cast iron, steel, copper, aluminum, bimetallic. The appearance of heating devices is also varied.
Why installation should be carried out by a specialist
Secondly, after you have decided on the choice of radiator, you need to install it correctly. Installation, of course, must be carried out by qualified specialists, since the quality of the work performed determines how long and how well the new radiator will serve. And any defect when performing this type of work can lead to depressurization of the heating system and, as a result, flooding. Eliminating the consequences of such incidents is associated with material costs. You may also have to replace the heating riser if it is heavily rusted.
Don't forget about the control valves
It should be noted that for comfortable operation of the heating device, it is necessary to provide for the installation of control valves (control valve, thermostats); it is also possible to install shut-off valves, which allows you to completely shut off the radiator and, if necessary, dismantle it without stopping the heating system. But in this case, in order not to disrupt the operation of the heating system, a jumper (bypass) must be installed in front of the device; the bypass cross-section is calculated by the same qualified specialists.
Requirements for the process of replacing radiators
Modernizing home heating is impossible without preliminary calculations and selection of batteries suitable for the design. Moreover, it is not at all necessary to replace old radiators with identical ones.
It makes sense to consider models made from other materials and add/reduce the number of sections. But here it is important to follow the rule of the “golden mean” and calculate the power of the heating system in order to obtain maximum efficiency at a minimum cost.
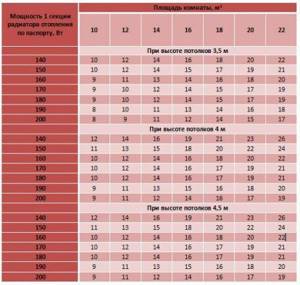
General recommendations for determining the number of sections for radiators with different capacities, intended for rooms with different areas and ceiling heights
You can independently find out the required size, operating power and number of batteries for a room in several ways. The simplest option is applicable for rooms with a ceiling height of 2.4-2.65 m. To calculate the sections, you should find out the area of the room and multiply by 100 W (calculated power for heating 1 m2 according to building codes).
The resulting figure must be divided by the heat transfer of 1 radiator section, which can be found from the product data sheet (standard value - 170 W) and rounded up to the nearest whole number.
For rooms with high ceilings it will be better to use volume calculations. To do this, you need to multiply the area of the room by its height, and then by the recommended thermal power indicator for your home (in a panel building it is 41 W, for a brick building - 34 W).
It remains to divide the resulting value by the same efficiency of one section, then round the figure. Of course, such calculations can only be averaged.
For more accurate indicators, a number of individual factors should be additionally taken into account:
- climate typical for your area;
- number of floors and location of the heated room;
- the number of windows and the quality of their glazing (plain glass or energy-saving packages);
- the presence of a balcony or loggia adjacent to the room;
- internal or external insulation of the apartment.
It is also important to determine whether it is planned to install decorative screens, which many people use to cover radiators when decorating the interior.
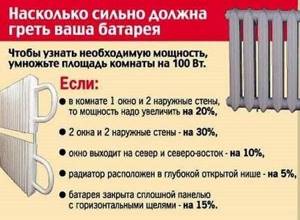
To accurately determine the thermal power of the system, you need to take into account all heat losses possible in the room where you plan to replace the batteries
As for the materials from which radiators are made, the most popular options today are steel, aluminum, copper, bimetallic (an alloy of several metals) and time-tested cast iron devices. Each of them has its own nuances and advantages, but the main thing is that they are all available for installation using gas welding.
